Your final blog post should be an online link to you BLURB book with an evaluation. If you have already written an evaluation as part of another blog post on your book design then add the online link to that blog post and change the date to make sure it sits at the top.
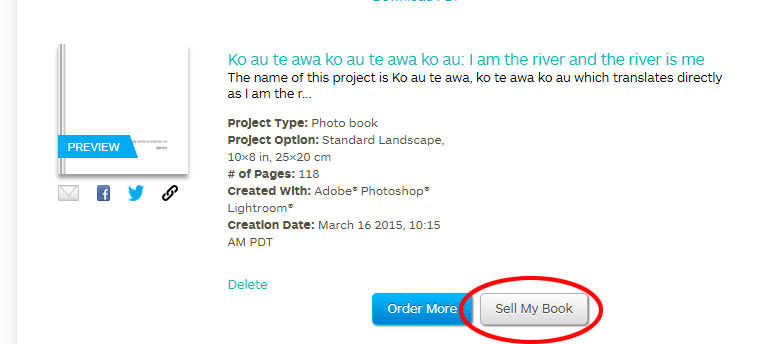
Log into your blurb account and click on Sell my book
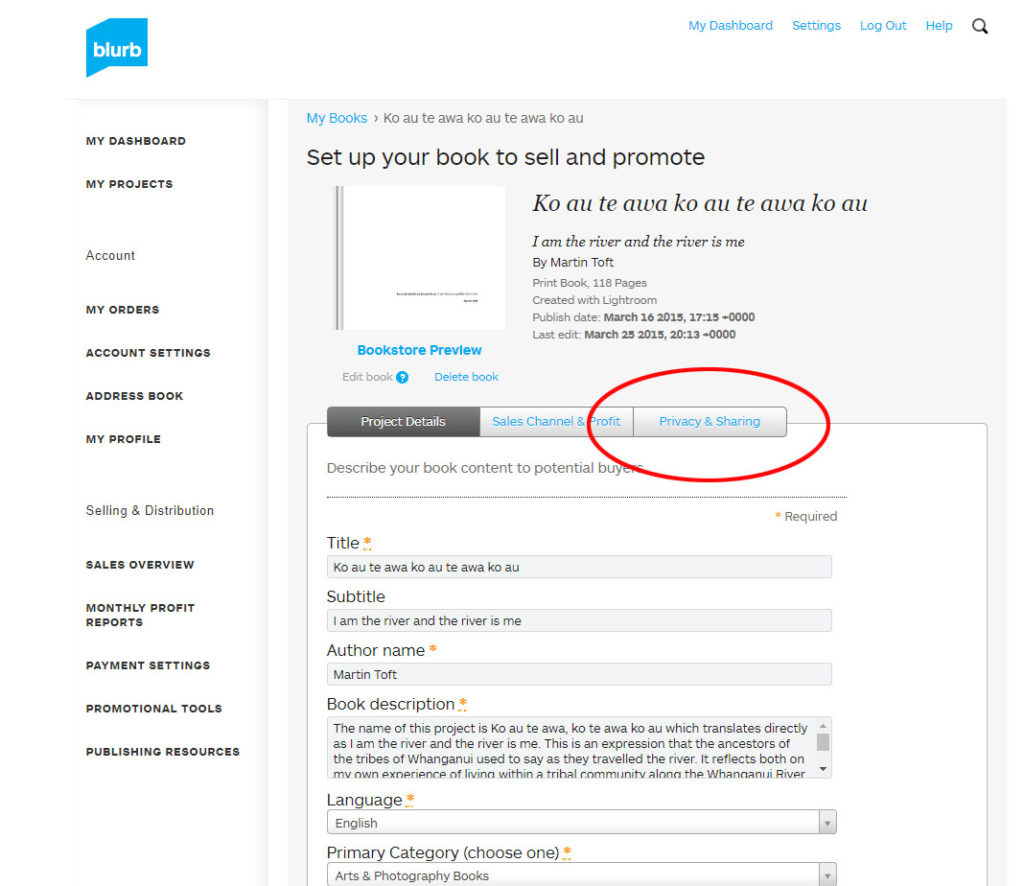
Click on Privacy & Sharing
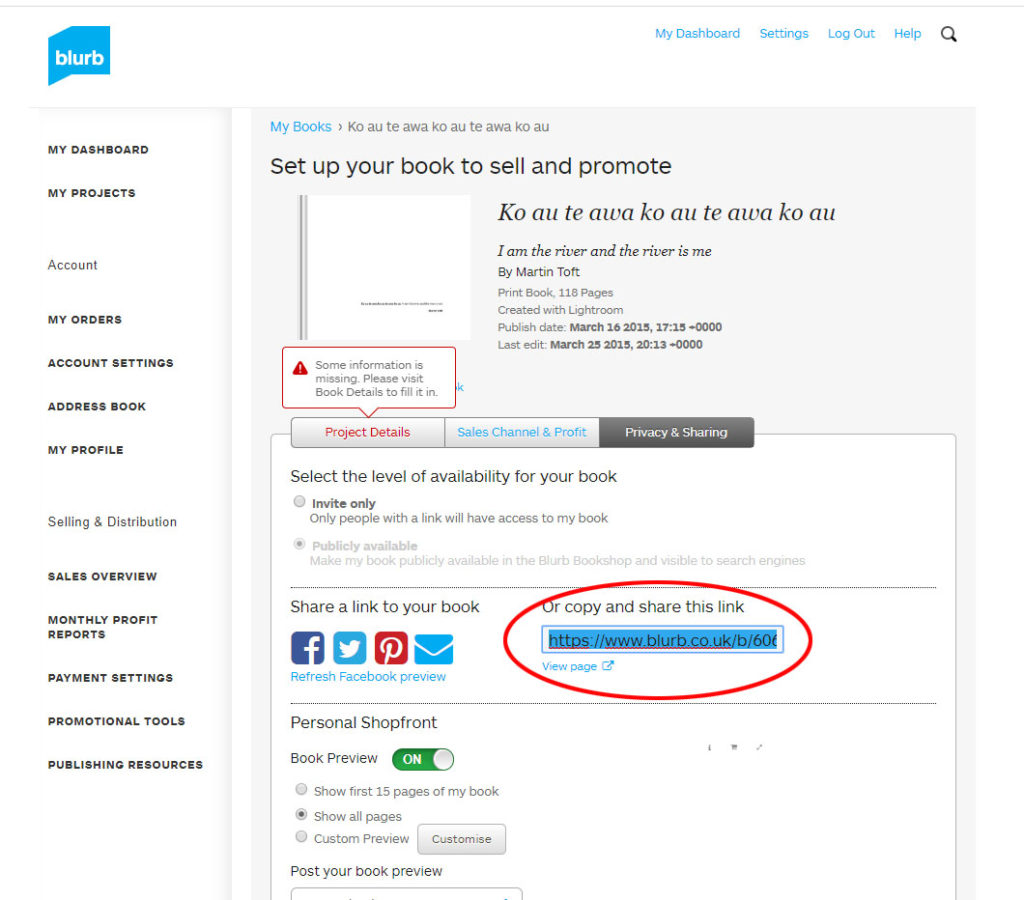
Copy link circled in red above.
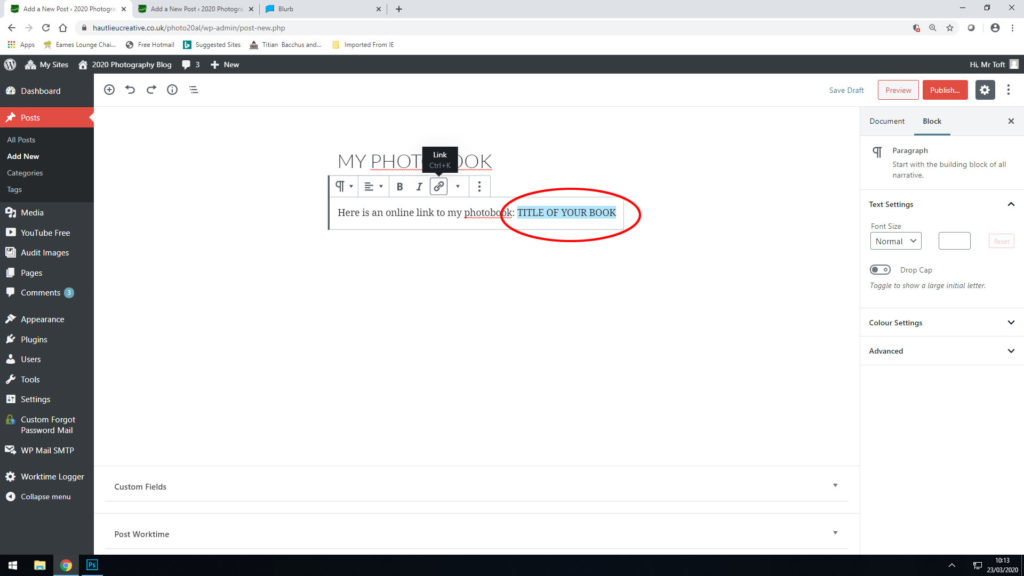
In your Photobook blog post with your final layout and design, at the very top, type title of your Photobook and copy in link from Blurb using Link button above.
Mon 3 – Thurs 6 Feb: 2 days = 10 hours controlled test Photography classroom + Photography studio Groups: 13C and 13A: MON 3 – TUE 4 FEB 13D: WED 5 – THURS 6 FEB
DEADLINE: LAST DAY OF YOUR MOCK EXAM ESSAY > PHOTOBOOKS / FILM > BLOG POSTS
IN PREPARATION FOR MOCK EXAM MAKE SURE THE FOLLOWING IS READY BY THE END OF THIS WEEK:
Complete and proof read essay by Friday 31 Jan and publish on blog (so there is enough time to present it into book design in Mock exam.)
Upload new photoshoots and complete final edit in Lightroom – make sure to produce blog posts showing selection process and experimentation of images.
A draft layout of your photobook/ rough cut of film edit before your Mock Exam begin (that time is used to fine tune design with teacher’s approval)
Review Checklist on blog for overview of work that must be completed.
Go through Go4School Tracking Sheet (sent in email on 17 Jan) and improve, complete and publish missing blogposts.
Structure your 2 day Mock Exam as follows:
DAY 1: Essay: If needed, complete any final adjustments to essay, incl illustrations, referencing and bibliography + publish on blog.
Photoshoots/ recordings: Complete editing images or recordings for your photobook / film + produce blog posts showing selection process and experimentation of images. Use a combination of print screens + annotation. Write an evaluation about what went well and what you need to do next to develop your shoots and project.
DAY 2 Photobook/ film: Complete photobook design/ edit film + produce blogpost showing design process and evaluate. Produce a blog post showing layout and design process using a combination of print screens + annotation. Add essay and present at the end of your book.
Prints: Select final prints and produce blog post showing presentation ideas and create mock-up in Photoshop and create a virtual gallery. Make sure you save final images in print folder here by end of the day:
Blogposts: Finish and publish any missing blog posts as per Checklist and your Go4School Tracking sheet.
ESSAY Publish final essay as a separate blog post with illustrations of key works by artists and your own images analysed in your text, as well as a bibliography listing all literary sources used. Also incorporate essay in the back of your book using layout in text columns and include illustrations and bibliography.
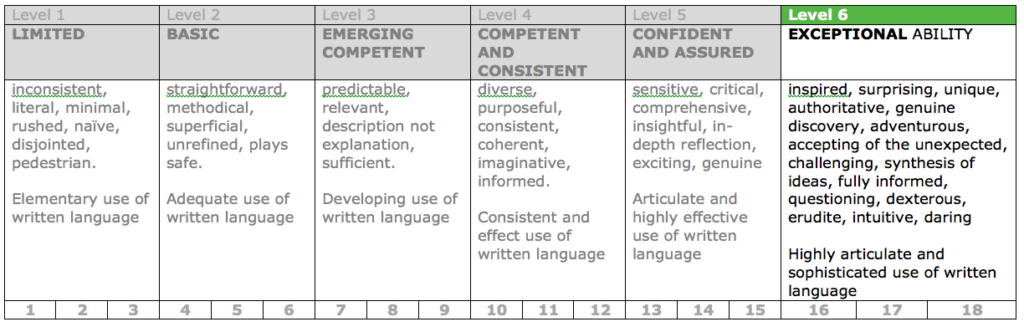
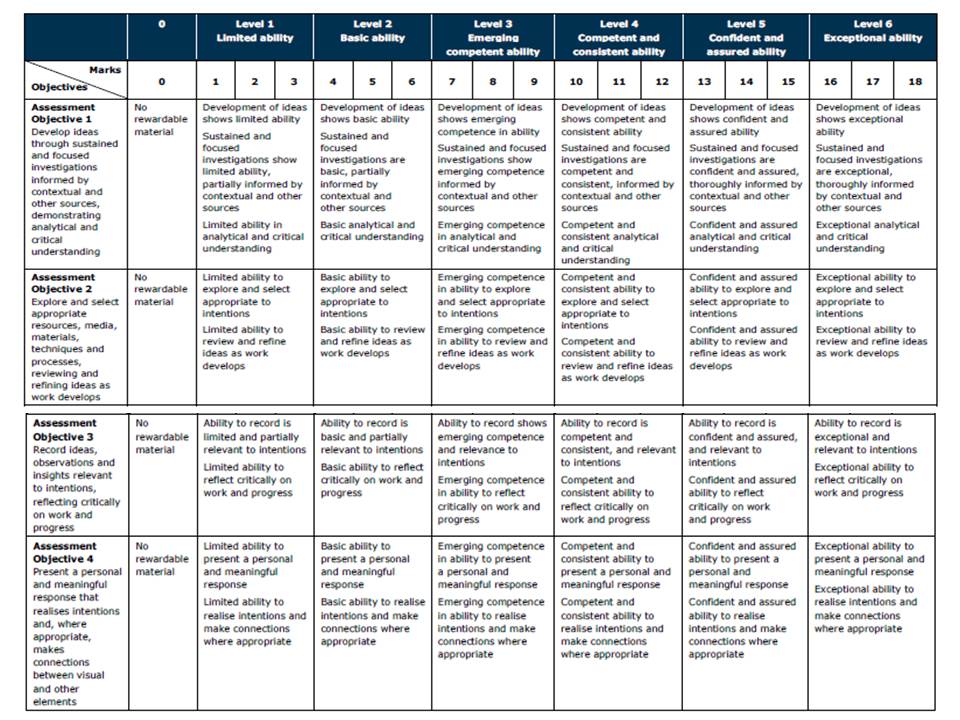
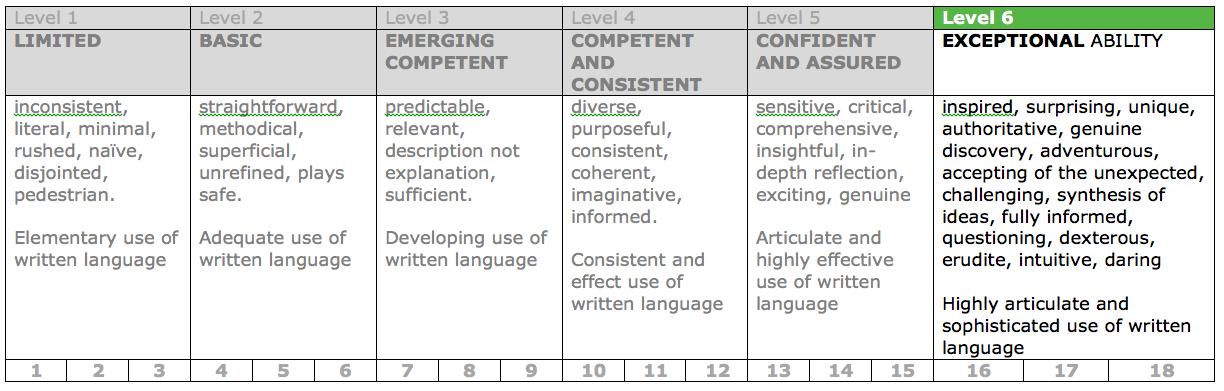
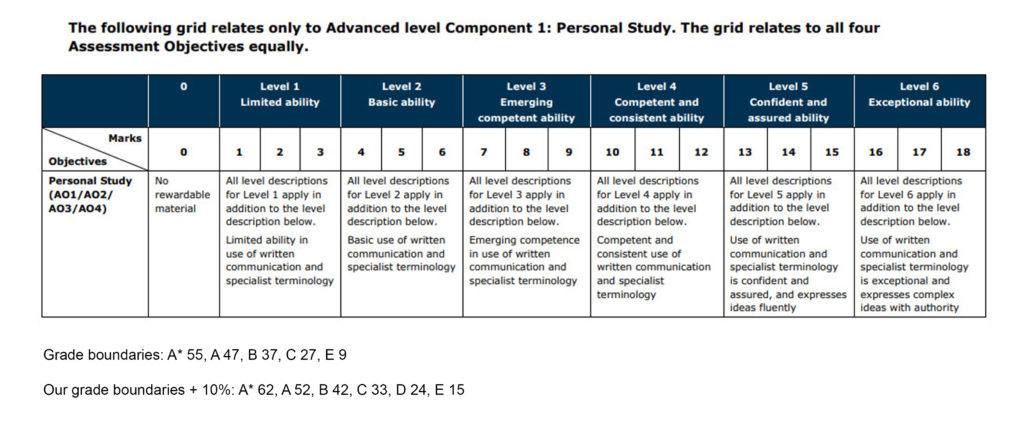
Marking Criteria
PHOTOBOOK Make sure you have a made a blog post that charts your design decisions, including prints screens of layout with annotation and write an ongoing evaluation. If you complete it; final book design must be checked and signed off by teacher.
For more help and guidance editing, process and evaluation go to blog post below.
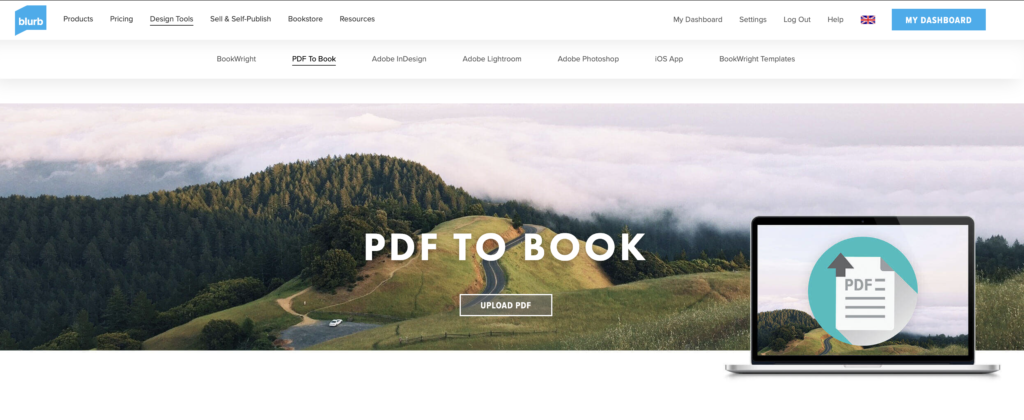
BLURB – Upload pdf to Book Once your final design has been signed off by the teacher follow these steps to upload book as a PDF to Blurb.
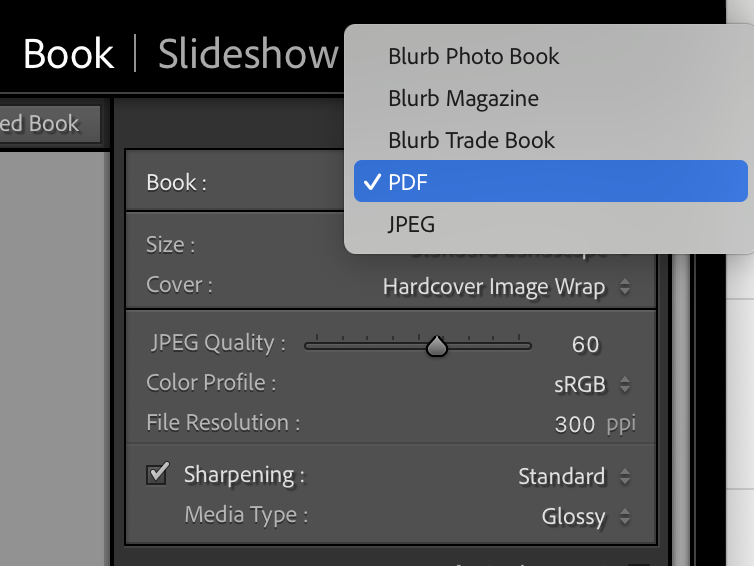
1. In Lightroom top right corner click drop-down menu in Blurb Photo Book and choose PDF. Make sure you increase JPEG Quality to 100 %.
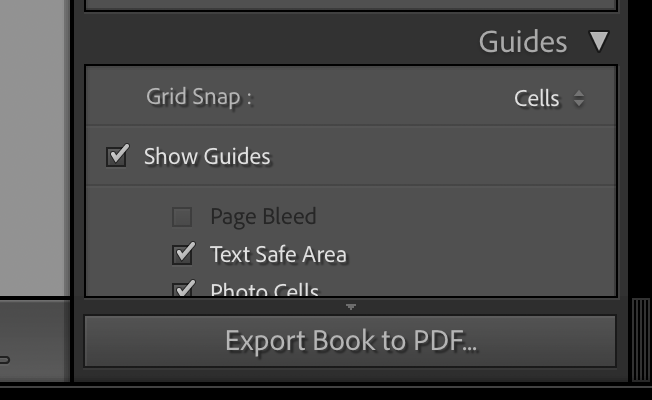
2. In bottom right corner click button: EXPORT BOOK to PDF
3. Save PDF as filename: PHOTOBOOK in folder in your student folder on M:drive.
4. Move PDF file: PHOTOBOOK toOne Drive in Office 365.
5. At home download above file from One Drive and save on your personal computer.
6. Log into your BLURB account (www.blurb.co.uk)
7. In top menu bar click on Design Tools and choose PDF to Book in drop down menu.
8. Click on button: Upload PDF
9. Upload your PDF files. Cover PDF: Click to choose a file or drag and drop one here Pages PDF: Click to choose a file or drag and drop one here
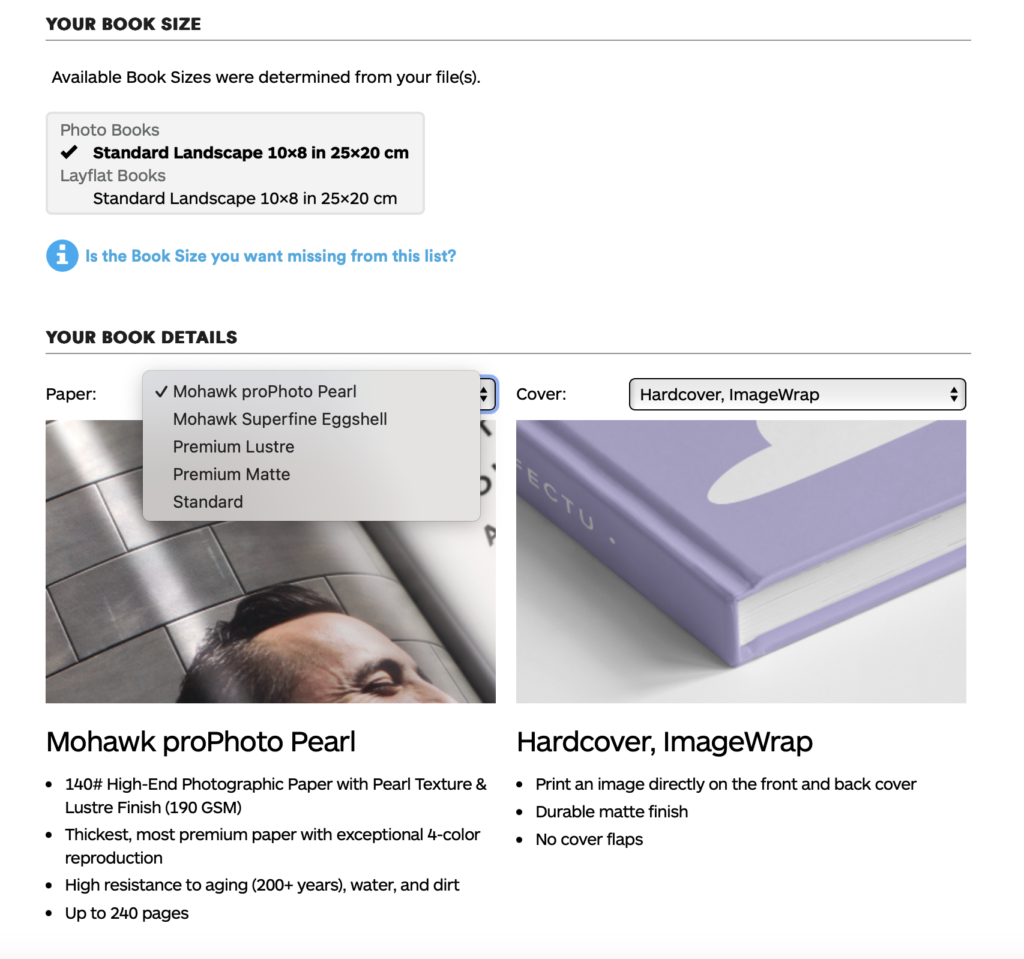
10. Once uploaded, choose paper, either Premium Lustre or Premium Matte and choose cover, either Hardcover, Image wrap or Soft cover.
11. Select either Logo on white page or Logo on black page. IT cost you more if you choose no logo.
12. Type Title of your book and Author’s name (your name)
13. Click button: Upload to Blurb and go to check-out and order your photobook (you need either debit or credit card)
BLURB – ORDER BOOK Inside Lightroom upload book design to BLURB, log onto your account on their website, pay and order the book.
Consider spending a few extra pounds on choosing better paper, such as Premium Lustre in check-out, change colour on end paper or choose different cloth/ linen if needed.
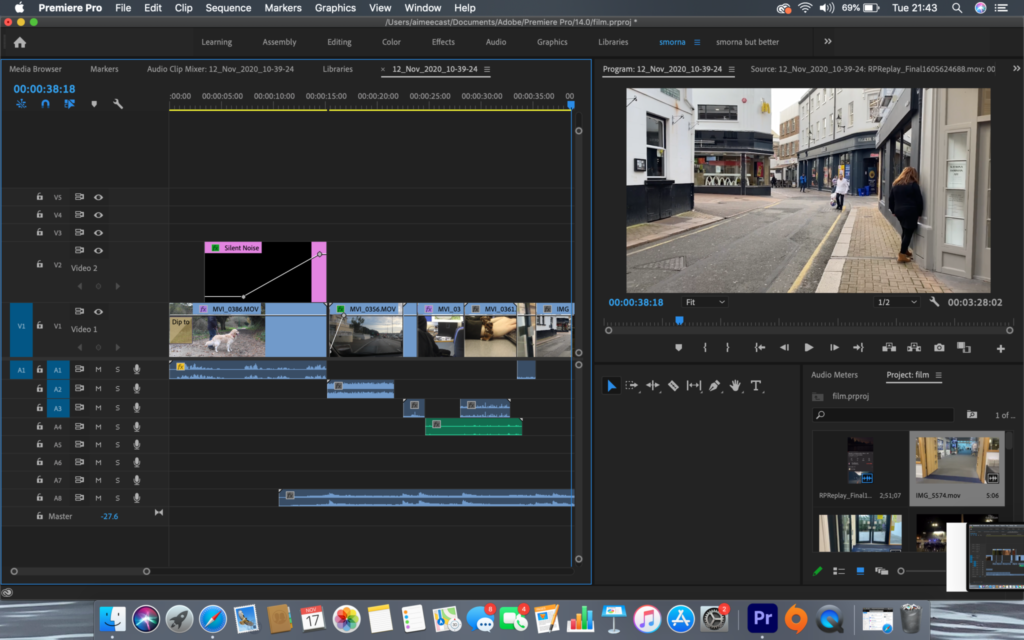
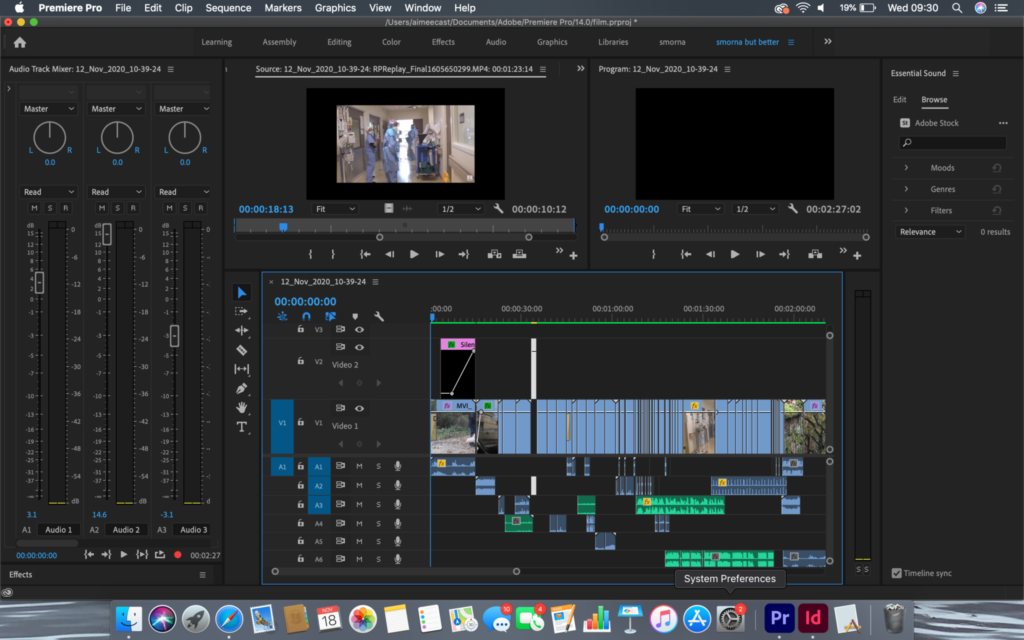
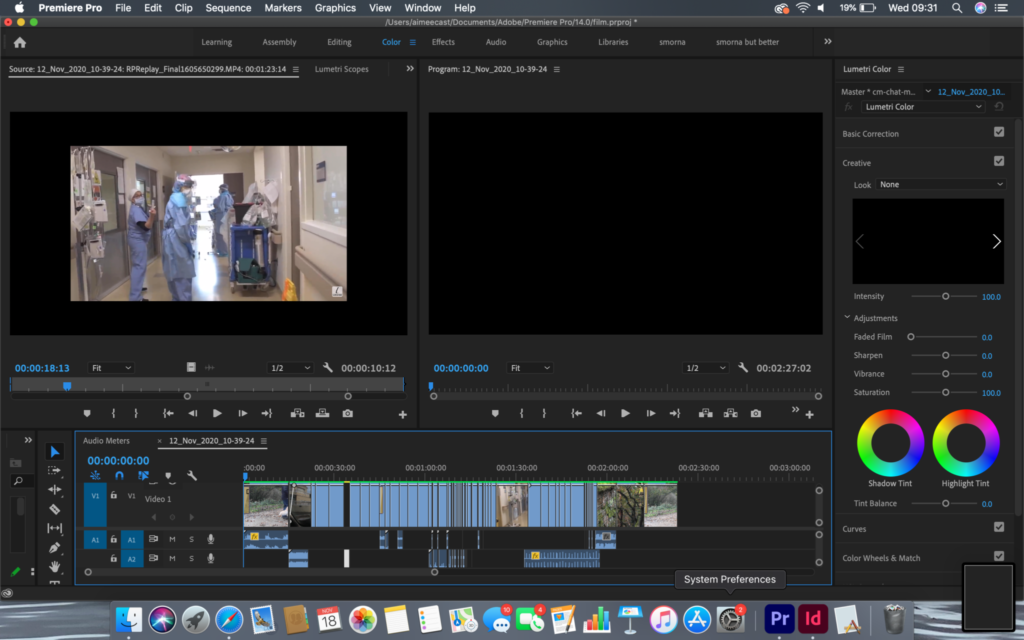
FILM Make sure you have a made a blog post that charts your editing process, including prints screens with annotation and write an evaluation. If you complete it; final film must be checked and signed off by teacher.
For more help and guidance on editing, process and evaluation go to blog post below.
Export final film as mp4 file and upload to Youtube / Microsoft Streams and embed on Blog. Follow these steps:
In Premier: Click on Sequence > Render IN/OUT
File > Export > Media
Export Settings: Format H.264
Output Name: use title of your film and save to V:Data drive
Click Export at bottom
Using Microsoft Stream: Open up Office 365
Go to All Apps and select Stream
Create > Upload Video
Browse to upload your exported film from V:Data drive
Write a short description, choose thumbnail and publish
My Content > Videos > embed film into Blog post with evaluation.
In Youtube: Set up an account at home (www.youtube.com)
Click Create (top right corner) > Upload video
Select file > your exported film from V:Data drive
Write a short description and choose thumbnail
Once uploaded, embed film into Blog post with evaluation.
BLOGPOSTS All blog posts in relation to the above must be published, including any other supporting posts missing from previous work modules since the beginning of Yr 13 academic year, including zines which must be printed & bound, Hockney ‘joiners’, 3D photo-sculpture and final prints.
See previous student, Stanley Lucas as a guide on blogposts that needs to be done and published before you the end of your Mock Exam.
EVALUATION: Upon completion of photobook/ film and presentation of prints make sure you evaluate and reflect on your learning and final outcomes. Comment on the following:
How successful was your final outcomes (book, film, prints etc)?
Did you realise your intentions?
What references did you make to artists references? comment on technical, visual, contextual, conceptual?
FINAL PRINTS Select your final prints (5-7) from photobook/ film and make a blog post showing ideas about how to present them.
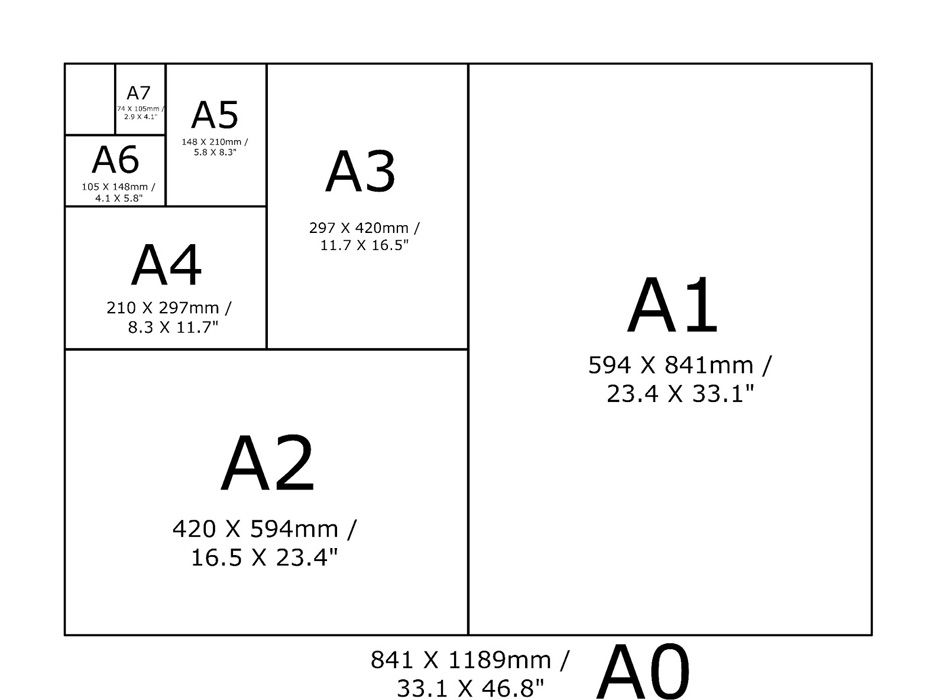
In photoshop produce a mock display (create new document size A1: 594 x 841mm) using different image sizes, for example: A3 x 2, A4 x 2, A5 x 3
PREPARE AND SAVE IMAGES FOR PRINTING:
Add your images to the print folder here…M:\Radio\Departments\Photography\Students\Image Transfer\Yr 13 NEA 2025
Complete any unfinished work from last term if you have time, For example: select images for print form Zine/ St Helier and/or St Malo project.
File Handling and printing...
Remember when EXPORTING from Lightroom you must adjust the file size to 1000 pixels on the Short edge for “blog-friendly” images (JPEGS)
BUT…for editing and printing when EXPORTING from Lightroom you must adjust the file size to Short edge for “high resolution” images (JPEGS) like this…
A5 Short Edge = 14.8 cm
A4 Short Edge = 21.0 cm
A3 Short Edge =29.7 cm
This will ensure you have the correct ASPECT RATIO
Ensure you label and save your file in you M :Drive and then copy across to the PRINT FOLDER:
For a combination of images, or square format images you use the ADOBE PHOTOSHOP > NEW DOCUMENT + PRINT PRESETS on to help arrange images on the correct size page (A3, A4, A5)
You can do this using Photoshop, Set up the page sizes as templates and import images into each template, then you can see for themselves how well they fit… but remember to add an extra 6mm for bleed (3mm on each side of the page) to the original templates. i.e. A4 = 297mm x 210 but the template size for this would be 303mm x 216mm.
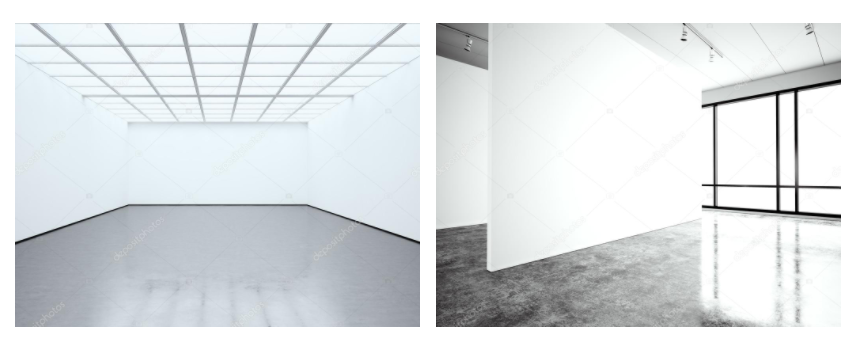
Making a Virtual Gallery in Photoshop
Download an empty gallery file…then insert your images and place them on the walls. Adjust the perspective, size and shape using CTRL T (free transform) You can also add things like a drop shadow to make the image look more realistic…
PRACTICAL WORK: This term you have 4 weeks to complete all coursework, including essay and photobook or film. This include all relevant blog posts demonstrating your knowledge and understanding of: RESEARCH > ANALYSIS > PLANNING > RECORDING, EXPERIMENTATION > PRESENTATION > EVALUATION.
DEADLINE: MUST complete final photo-shoots/ moving image recordings by FRI 24 JAN 2025
ESSAY: We will continue to spend at least 1 lesson a week on CONTEXTUAL STUDIES where you will be learning about critical theory, photo history and contemporary practice as well as developing academic study skills to help you writing your essay. However, it is essential that you are organising your time effectively and setting aside time outside of lessons to read, study and write.
DEADLINE: Final essay MUST be handed in FRI 31 JAN 2025
PHOTOBOOK / FILM: Returning after Christmas we will be spending the whole month of January developing, designing and printing the photobook which will include your essay and somewhere between 30-50 images sequenced to tell a story. For those making a film you will spend January editing moving images and sound in Premiere.
MOCK EXAM: 3 – 6 Feb 2025. 2 days controlled test (10 hours) Groups: 13C and 13A: MON 3 – TUE 4 FEB 13D: WED 5 – THURS 6 FEB
DEADLINE: Completion of photobook or film LAST DAY OF YOUR MOCK EXAM.
Week 16: 6 – 12 Jan PHOTOBOOK: Editing photoshoots FILM: Editing footage and sound ESSAY: Introduction
PHOTO-SHOOTS:Lessons Mon 6 – Fri 12 Jan Upload new images from to M:drive and begin to edit in Lightroom. Follow these instructions:
EDITING:
Save shoots in folder and import into Lightroom
Organisation: Create a new Collection from each new shoot inside Collection Set: PHOTOBOOK
Editing: select 8-12 images from each shoot.
Experimenting: Adjust images in Develop, both as Colour and B&W images appropriate to your intentions
Export images as JPGS (1000 pixels) and save in a folder: BLOG
Create a Blogpost with edited images and an evaluation; explaining what you focused on in each shoot and how you intend to develop your next photoshoot.
Make references to artists references, previous work, experiments, inspiration etc.
Prep for photobook design: Make a rough selection of your 40-50 best pictures from all shoots. Make sure you have adjusted and standardised all the pictures in terms of exposure, colour balance.
EVALUATING: Upon completion of photoshoot and experimentation, make sure you evaluate and reflect on your next step of development. Comment on the following:
How successful was your photoshoot and experimentation?
What references did you make to artists references? – comment on technical, visual, contextual, conceptual?
How are you going to develop your project from here? – comment on research, planning, recording, experimenting.
What are you going to do next? – what, why, how, when, where?
ESSAY Follow these instructions:
Essayintroduction: convert draft introduction to final version.
Think about an opening that will draw your reader in e.g. you can use an opening quote that sets the scene. Or think more philosophically about the nature of photography and its feeble relationship with reality.
You should include in your introduction an outline of your intention of your study, e.g.
What are you going to investigate?
How does this area/ work interest you?
What are you trying to prove/challenge, argument/ counter-argument?
Whose work (artists/photographers) are you analysing and why?
What historical or theoretical context is the work situated within?
What links are there with your previous studies?
What have you explored or experimented with so far in your photography project?
How will your work develop.
What camera skills, techniques or digital processes have you used, or going to experiment with?
Below is link to a blog post which will provide you with helpful guidelines if you are struggling to structure your essay or writing paragraphs.
PHOTOBOOK: Lessons Mon-Wed Produce a number of blogposts that show evidence of the following:
1. Research a photo-book and describe the story it is communicating with reference to subject-matter, genre and approach to image-making.
2. Who is the photographer? Why did he/she make it? (intentions/ reasons) Who is it for? (audience) How was it received? (any press, reviews, awards, legacy etc.)
3. Deconstruct the narrative, concept and design of the book and apply theory above when considering:
Book in hand: how does it feel? Smell, sniff the paper.
Paper and ink: use of different paper/ textures/ colour or B&W or both.
Format, size and orientation: portraiture/ landscape/ square/ A5, A4, A3 / number of pages.
Title: literal or poetic / relevant or intriguing.
Narrative: what is the story/ subject-matter. How is it told?
Structure and architecture: how design/ repeating motifs/ or specific features develops a concept or construct a narrative.
Design and layout: image size on pages/ single page, double-spread/ images/ grid, fold- outs/ inserts.
Editing and sequencing: selection of images/ juxtaposition of photographs/ editing process.
Images and text: are they linked? Introduction/ essay/ statement by artists or others. Use of captions (if any.)
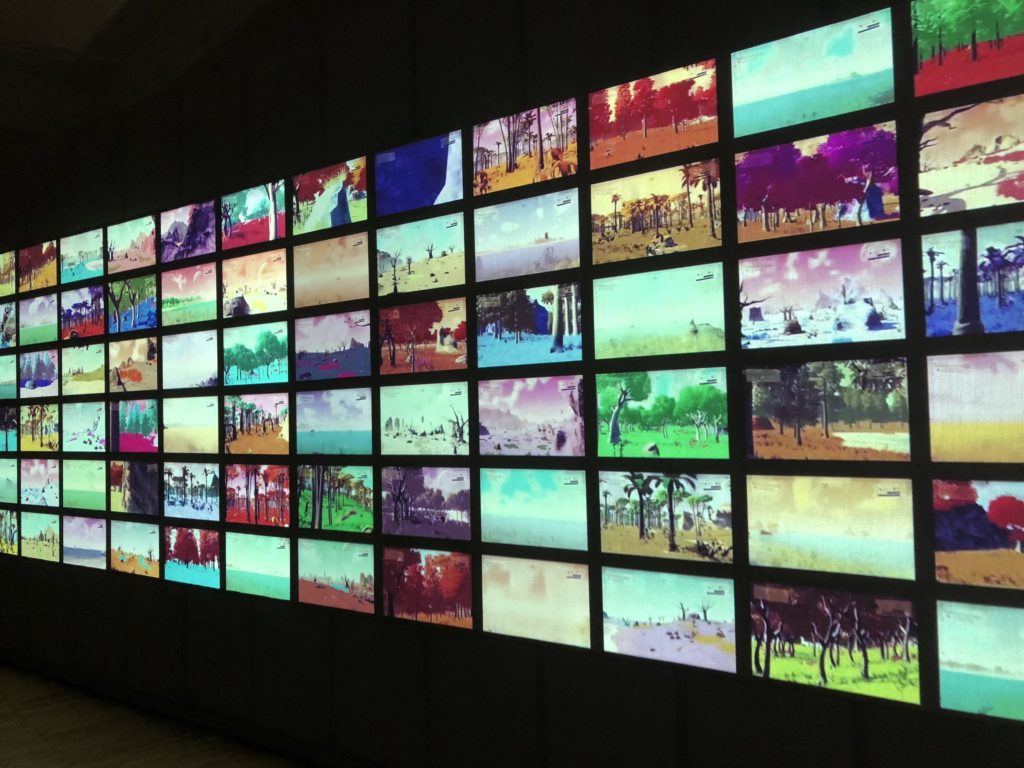
UNDERSTANDING PHOTOBOOKS: NARRATIVE, EDITING, SEQUENCING, DESIGN, FORM, FUNCTION
Earlier in the academic year we looked at narrative in photography. Let’s refresh our memory and revisit some of the theories around visual storytelling.
Narrative is essentially the way a story is told. For example you can tell different narratives of the same story. It is a very subjective process and there is no right or wrong. Whether or not your photographic story is any good is another matter.
Narrative is constructed when you begin to create relationships between images (and/or text) and present more than two images together. Your selection of images (editing) and the order of how these images appear on the pages (sequencing) contributes significantly to the construction of the narrative. So too, does the structure and design of the photo-zine or photobook.
However, it is essential that you identity what your story is first before considering how you wish to tell it. Planning and research are also essential to understanding your subject and there are steps you can take in order to make it successful. Once you have considered the points made between the differences in narrative and story complete the following:
CASE-STUDIES: Let’s explore some examples of images used in photo-essays and photobooks and see if we can identify the story as well as examine how narrative is constructed through careful editing, sequencing and design.
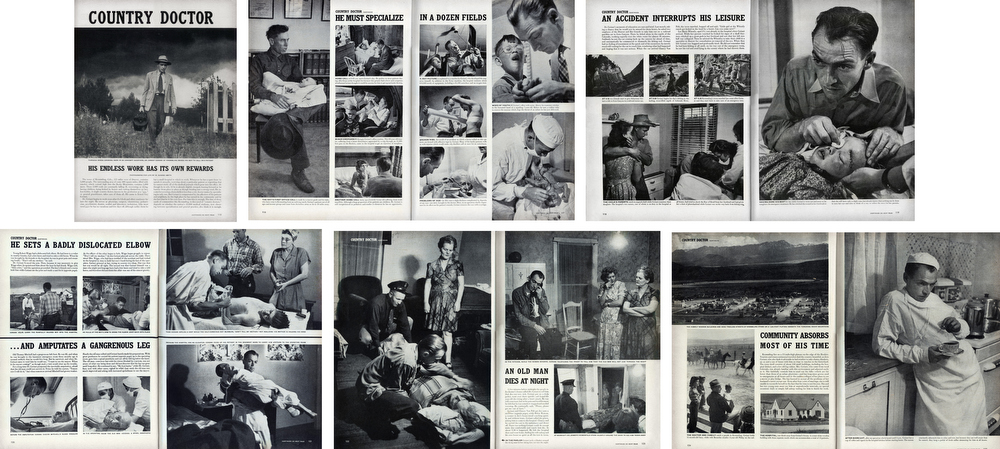
PHOTO-ESSAY: The life of a country doctor in Colorado’s Rocky Mountains
“A photo is a small voice, at best, but sometimes – just sometimes – one photograph or a group of them can lure our senses into awareness. Much depends upon the viewer; in some, photographs can summon enough emotion to be a catalyst to thought”W. Eugne Smith
W. Eugene Smith compared his mode of working to that of a playwright; the powerful narrative structures of his photo essays set a new benchmark for the genre. His series, The Country Doctor, shot on assignment for Life Magazine in 1948, documents the everyday life of Dr Ernest Guy Ceriani, a GP tasked with providing 24-hour medical care to over 2,000 people in the small town of Kremmling, in the Rocky Mountains. The story was important at the time for drawing attention to the national shortage of country doctors and the impact of this on remote communities. Today the photoessay is widely regarded as representing a definitive moment in the history of photojournalism.
Here is a Powerpoint with more information about how to construct a Traditional Picture Story that includes individual images such as:
Person at Work
Relationship Shot
Establishing Shot
Detail shot
Environmental Portrait
Formal Portrait
Observed Portrait
Here is a link to an entry for Percival Dunham considered Jersey first photojournalist for a very brief period in 1913 and 1914, when he worked for Jersey Illustrated Weekly and then the Morning News, the main competitor for many years for the Evening Post (now the Jersey Evening Post and the island’s only daily newspaper for over half a century). Try and identity individual images as above from a selection of prints from the Societe Jersiaise Photographic Archive that holds over 1000 images by Percival Dunham in their collection.
Select somewhere between 12-15 images from the set and edit and sequence them to construct a specific narrative.
Record an image of your sequence and produce a blogpost where you describe the above process.
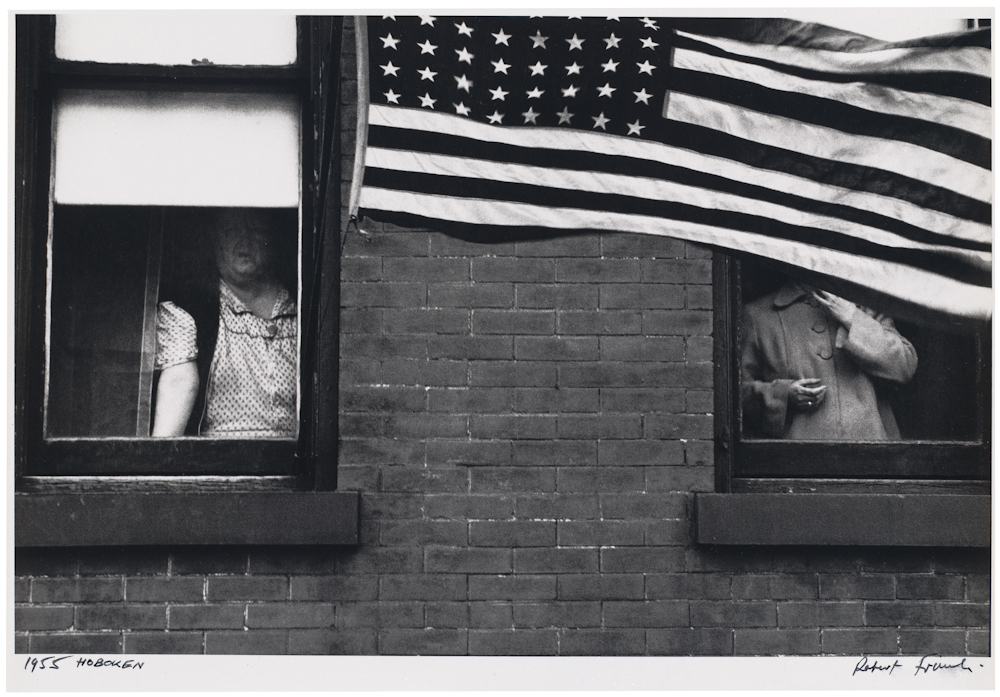
PHOTOBOOKS: In October of 1958, French publisher Robert Delpire released Les Américains in Paris. The following year Grove Press published The Americans in New York with an introduction by American writer, Jack Kerouac (the book was released in January 1960).
Like Frank’s earlier books, the sequence of 83 pictures in The Americans is non-narrative and nonlinear; instead it uses thematic, formal, conceptual and linguistic devices to link the photographs. The Americans displays a deliberate structure, an emphatic narrator, and what Frank called a ‘distinct and intense order’ that amplified and tempered the individual pictures.
Although not immediately evident, The Americans is constructed in four sections. Each begins with a picture of an American flag and proceeds with a rhythm based on the interplay between motion and stasis, the presence and absence of people, observers and those being observed. The book as a whole explores the American people—black and white, military and civilian, urban and rural, poor and middle class—as they gather in drugstores and diners, meet on city streets, mourn at funerals, and congregate in and around cars. With piercing vision, poetic insight, and distinct photographic style, Frank reveals the politics, alienation, power, and injustice at play just beneath the surface of his adopted country.
Since its original publication, The Americans has appeared in numerous editions and has been translated into several languages. The cropping of images has varied slightly over the years, but their order has remained intact, as have the titles and Kerouac’s introductory text. The book, fiercely debated in the first years following its release, has made an indelible mark on American culture and changed the course of 20th-century photography. Read article by Sean O’Hagan in The Guardian
MORE PHOTOBOOKS: A few photobooks dealing with memory, loss and love
I went back to Russia to visit the places containing scattered vestiges of my father’s memory.
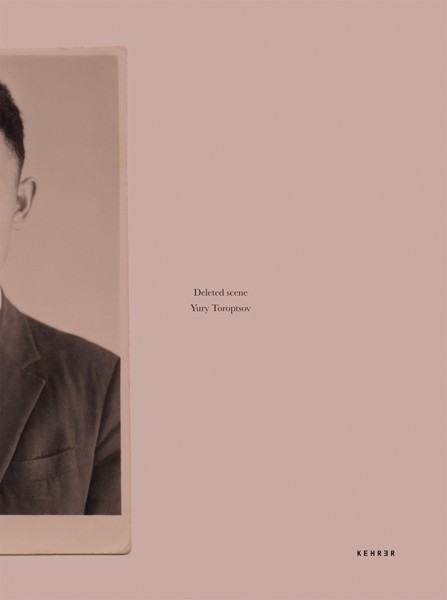
On a mission to photograph the invisible, with Deleted Scene photographer Yury Toroptsov takes us to Eastern Siberia in a unique story of pursuit along intermingling lines that form a complex labyrinth. His introspective journey in search of a father gone too soon crosses that of Akira Kurosawa who, in 1974, came to visit and film that same place where lived the hunter Dersu Uzala.
Yury Toroptsov is not indifferent to the parallels between hunting and photography, which the common vocabulary makes clear. Archival documents, old photographs, views of the timeless taiga or of contemporary Siberia, fragments or deleted scenes are arranged here as elements of a narrative. They come as clues or pebbles dropped on the edge of an invisible path where the viewer is invited to lose himself and the hunter is encouraged to continue his relentless pursuit.
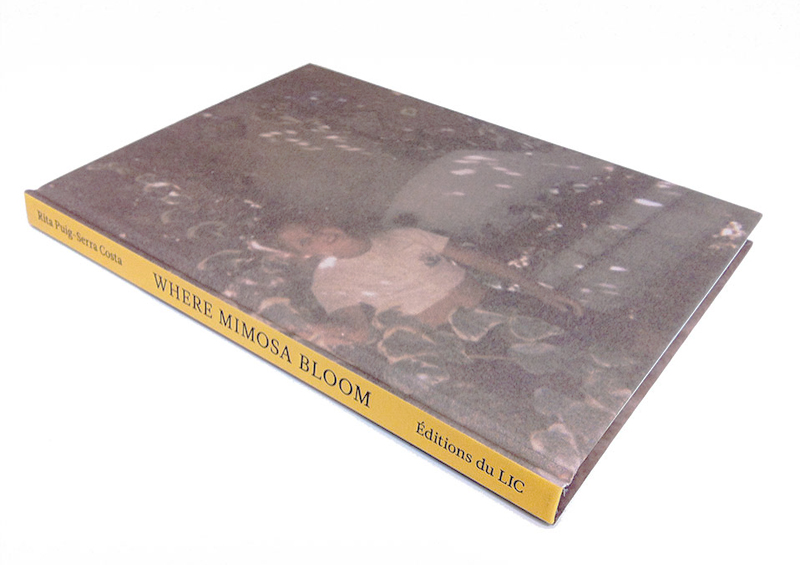
Dealing with the grief that the photographer suffered following the death of her mother, Where Mimosa Bloom by Rita Puig Serra Costatakes the form of an extended farewell letter; with photography skillfully used to present a visual eulogy or panegyric. This grief memoir about the loss of her mother is part meditative photo essay, part family biography and part personal message to her mother. These elements combine to form a fascinating and intriguing discourse on love, loss and sorrow.
“Where Mimosa Bloom” is the result of over two years work spent collecting and curating materials and taking photographs of places, objects and people that played a significant role in her relationship to her mother. Rita Puig Serra Costa skillfully avoids the dangerous lure of grief’s self-pity, isolationism, world-scorn and vanity. The resonance of “Where Mimosa Bloom” comes from all it doesn’t say, as well as all that it does; from the depth of love we infer from the desert of grief. Despite E.M.Forster’s words – “One death may explain itself, but it throws no light upon another” – Rita Puig Serra Costa proves that some aspects of grief are universal, or can be made so through the honesty and precision with which they are articulated.
I received a text message. “Today, our divorce was finalized.” The message from my mother was written simply, even though she usually sends me messages with many pictures and symbols. I remember that I didn’t feel any particular emotion, except that the time had come. Because my parents continued to live apart in the same house for a long time, their relationship gently came to an end over the years. It was no wonder that a draft blowing between the two could completely break the family at any time.
In Japan, legend has it that a man and woman who are predestined to meet have been tied at the little finger by an invisible red string since the time they were born. Unfortunately, the red string tying my parents undone, broke, or perhaps was never even tied to begin with. But if the two had never met, I would never have been born into this world. If anything, you might say that there is an unbreakable red string of fate between parent and child.
Before long, I found myself thinking about the relationship between my parents and . How many days could I see my parents living far away? What if I couldn’t see them anymore? Since I couldn’t help feeling extremely anxious about it, I was driven to visit my parents’ house many times. Every day I engage in awkward conversation with my parents, as if in a scene in their daily lives. I adapt myself to them, and they shift their attitude toward me. We do not give way entirely to the other side, but rather meet halfway. Indeed family problems remain unresolved, although sometimes we tell allegorical stories and share feelings. It means a lot to us that our perspectives have changed with communication.
My family will probably never be all together again. But I feel without a doubt that there is proof inside of each of us that we once lived together. To ensure that the red string that ties my family together does not come undone, I want to reel it in and tie it tight.
‘The Epilogue’ is the book about the story of the Robinson family – and the aftermath suffered in losing their 26 year old daughter to bulimia. Working closely with the family Laia Abril reconstructs Cammy’s life telling her story through flashbacks – memories, testimonies, objects, letters, places and images. The Epilogue gives voice to the suffering of the family, the indirect victims of ‘eating disorders’, the unwilling eyewitnesses of a very painful degeneration. Laia Abril shows us the dilemmas and struggles confronted by many young girls; the problems families face in dealing with guilt and the grieving process; the frustration of close friends and the dark ghosts of this deadliest of illnesses; all blended together in the bittersweet act of remembering a loved one. Read more here on Laia Abril’s website
Thurs-Fri: EssayParagraph 1 In this lesson you will write a 45 mins draft essay paragraph 1 following these steps:
Use information gathered in previous blog posts, or use hyperlinks below, in relation to Art Movement and Isms relevant to your artists references and their work.
Select at least two quotes from your literary sources that you can incorporate into your paragraph.
Your paragraph must include visual examples of artists work within that art movement that is relevant to your Personal Study.
Consider content and instructions below
Complete Paragraph 1 and upload to the blog at the end of lesson
Paragraph 1 Structure (500 words): Use subheading. This paragraph covers the first thing you said in your introduction that you would address.The first sentence introduces the main idea of the paragraph. Other sentences develop the subject of the paragraph.
Content: you could look at the following…exemplify your hypothesis within a historical and theoretical context. Write about how your area of study and own work is linked to a specific art movement/ ism. Research and read key text and articles from critics, historians and artists associated with the movement/ism. Use quotes from sources to make a point, back it up with evidence or an example (a photograph), explain how the image supports the point made or how your interpretation of the work may disapprove. How does the photograph compare or contrast with others made by the same photographer, or to other images made in the same period or of the same genre by other artists. How does the photograph relate to visual representation in general, and in particularly to the history and theory of photography, arts and culture.
Include relevant examples, illustrations, details, quotations, and references showing evidence of reading, knowledge and understanding of history, theory and context!
Week: 18: 20 – 26 Jan (Yr 12 Mock exam 20-22 Jan) ESSAY: Complete paragraph 2 & 3 (artists case studies) PHOTOBOOK: Editing & designing Photobook FILM: Editing Film
Mon – Wed: Essay Paragraph 2 & 3 You are working independently and unsupervised due to Yr 12 Mock Exams. First, go to your blog posts that you produced about your artists references and copy your research and analysis into your new essay paragraphs. You may need to re-structure or re-write some of the sentences using linking words so that they flow better in a coherent manner. You may also need to do some more research and interpret their work in relation to your essay question. Follow these steps:
Paragraph 2 Structure (500 words): Use subheading. In the first sentence or opening sentences, link the paragraph to the previous paragraph, then introduce the main idea of the new paragraph. Other sentences develop the paragraphs subject (use relevant examples, quotations, visuals to illustrate your analysis, thoughts etc)
Content: you could look at the following...Introduce your first photographer. Select key images, ideas or concepts and analyse in-depth using specific model of analysis (describe, interpret and evaluate) – refer to your hypothesis. Contextualise…what was going on in the world at the time; artistically, politically, socially, culturally. Other influences…artists, teachers, mentors etc. Personal situations or circumstances…describe key events in the artist’s life that may have influenced the work. Include examples of your own photographs, experiments or early responses and analyse, relate and link to the above. Set the scene for next paragraph.
Include relevant examples, illustrations, details, quotations, and references showing evidence of reading, knowledge and understanding of history, theory and context!
Paragraph 3 Structure (500 words): Use subheading. In the first sentence or opening sentences, link the paragraph to the previous paragraph, then introduce the main idea of the new paragraph. Other sentences develop the paragraphs subject (use relevant examples, quotations, visuals to illustrate your analysis, thoughts etc)
Content: you could look at the following…Introduce key works, ideas or concepts from your second photographer and analyse in-depth – refer to your hypothesis…Use questions in Pg 2 or add…What information has been selected by the photographer and what do you find interesting in the photograph? What do we know about the photograph’s subject? Does the photograph have an emotional or physical impact? What did the photographer intend? How has the image been used? What are the links or connections to the other photographer in Pg 2? Include examples of your own photographs and experiments as your work develop in response to the above and analyse, compare, contrast etc. Set the scene for next paragraph.
Include relevant examples, illustrations, details, quotations, and references showing evidence of reading, knowledge and understanding of history, theory and context!
PHOTO-SHOOTS:Lessons Thurs-Fri Upload new images from to M:drive and begin to edit in Lightroom. Follow these instructions:
EDITING:
Save shoots in folder and import into Lightroom
Organisation: Create a new Collection from each new shoot inside Collection Set: PHOTOBOOK
Editing: select 8-12 images from each shoot.
Experimenting: Adjust images in Develop, both as Colour and B&W images appropriate to your intentions
Export images as JPGS (1000 pixels) and save in a folder: BLOG
Create a Blogpost with edited images and an evaluation; explaining what you focused on in each shoot and how you intend to develop your next photoshoot.
Make references to artists references, previous work, experiments, inspiration etc.
Prep for photobook design: Make a rough selection of your 40-50 best pictures from all shoots. Make sure you have adjusted and standardised all the pictures in terms of exposure, colour balance.
EXPERIMENTING:
Export same set of images from Lightroom as TIFF (4000 pixels)
Experimentation: demonstrate further creativity using Photoshop to make composite/ montage/ typology/ grids/ diptych/triptych, text/ typology etc appropriate to your intentions
Design: Begin to explore different layout options using InDesign and make some page spreads for our newspaper (format: 280.5 (h) x 420 mm (w)
Alternatively design a photo-zine. Set up new document as A5 page sizes. This is trying out ideas before you begin designing photobook.
Make sure you annotate process and techniques used and evaluate each experiment
EVALUATING: Upon completion of photoshoot and experimentation, make sure you evaluate and reflect on your next step of development. Comment on the following:
How successful was your photoshoot and experimentation?
What references did you make to artists references? – comment on technical, visual, contextual, conceptual?
How are you going to develop your project from here? – comment on research, planning, recording, experimenting.
What are you going to do next? – what, why, how, when, where?
FILM:Lessons Thurs-Fri Bring footage from video/ audio recordings to lessons: Follow these instructions:
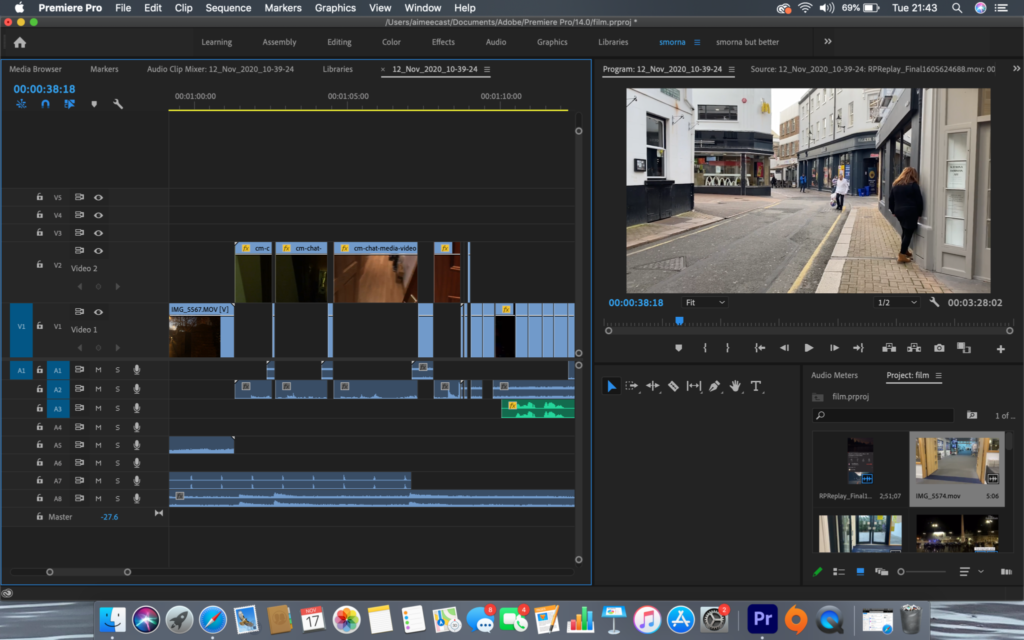
EDITING: • Save media in folder on local V:Data Drive • Organisation: Create a new project in Premiere • Editing: begin editing video/ audio clips on the timeline • Adjusting: recordings in Colour / B&W appropriate to your intentions.
EXPERIMENTING: • Video: experimenting with sequencing using relevant transitions and effects • Sound: consider how audio can add depth to your film, such as ambient sound, sound fx, voice-over, interview, musical score etc. • Title and credits: Consider typography/ graphics/ styles etc. For more creative possibilities make title page in Photoshop (format: 1280 x 720 pixels) and import as a Psd file into your project folder on the V-Data drive.
EVALUATING: Write an evaluation on the blog that reflects on your artistic intentions, film-editing process and collaboration. Include screen-prints from Premiere and a few ‘behind the scenes’ images of the shooting/ production for further annotation. Comment on the following:
How successful was your photoshoot and experimentation?
What references did you make to artists references? – comment on technical, visual, contextual, conceptual?
How are you going to develop your project from here? – comment on research, planning, recording, experimenting.
What are you going to do next? – what, why, how, when, where?
Week: 19-20: 27 Jan – 6 Feb ESSAY: complete Essay PHOTOBOOK: complete layout and design FILM: complete final edit and export film MOCK EXAM: 2 days (10 hrs) Mon 3 – Thurs 6 Feb
In the next two weeks focus on beginning to edit and collect all your images, archival material and texts, including finishing writing your essay needed to complete your photobook.
ESSAY: Thurs-Fri Complete conclusion, bibliography, proof read and hand in final draft no later than Fri 31 Jan. Follow these steps:
Conclusion (500 words): Write a conclusion of your essay that also includes an evaluation of your final photographic responses and experiments.
List the key points from your investigation and analysis of the photographer(s) work – refer to your hypothesis. Can you prove or Disprove your theory – include final quote(s). Has anything been left unanswered? Do not make it a tribute! Do not introduce new material! Summarise what you have learned. How have you been influenced? Show how you have selected your final outcomes including an evaluation and how your work changed and developed alongside your investigation.
Bibliography: List all the sources that you used and only those that you have cited in your text. Where there are two or more works by one author in the same year distinguish them as 1988a, 1988b etc. Arrange literature in alphabetical order by author, or where no author is named, by the name of the museum or other organisation which produced the text. Apart from listing literature you must also list all other sources in alphabetical order e.g. websites, exhibitions, Youtube/TV/ Videos / DVD/ Music etc.
PHOTOBOOK: Mon-Wed + MOCK EXAM Follow these steps:
You want to aim for a draft layout before the Mock Exam begins, then use the two days allocated to fine tune final layout and design.
1. Write a book specification and describe in detail what your book will be about in terms of narrative, concept and design with reference to the same elements of bookmaking as above.
Narrative:What is your story? Describe in:
3 words
A sentence
A paragraph
Design: Consider the following
How you want your book to look and feel
Paper and ink
Format, size and orientation
Binding and cover
Title
Structure and architecture
Design and layout
Editing and sequencing
Images and text
2. Produce a mood-board of design ideas for inspiration. Look atBLURB online book making website, photo books from photographers or see previous books produced by Hautlieu students on the table in class.
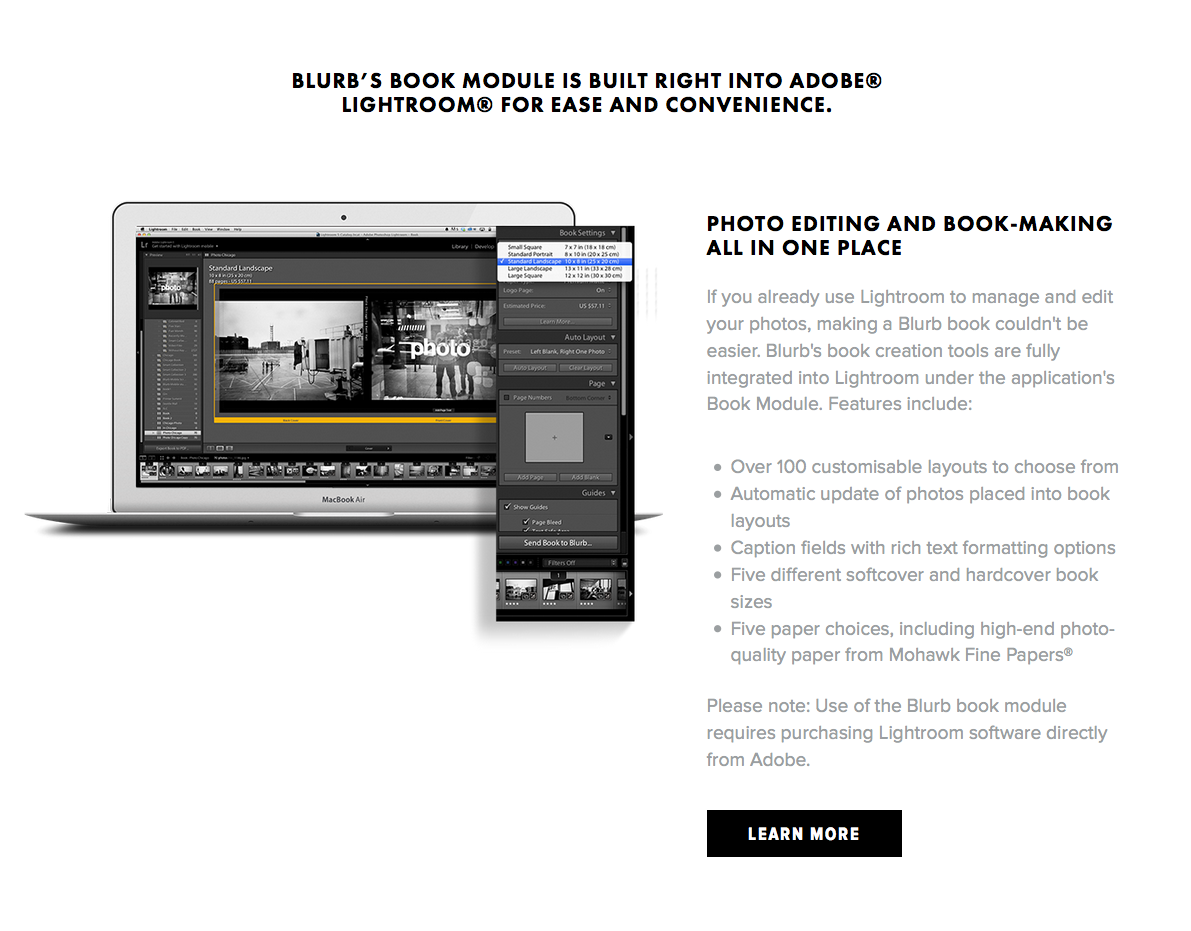
3. Create a BLURB account using your school email address. With Blurb you have different options on how you design your book:
a) Using Lightroom to design your book which is integrated with BLURB. Only for use on school computers, unless you have LR at home on your own laptop.
b) Download Bookwright via Blurb onto your own laptop and work offline at home and you can work indecently of school. Here you have full control of layout/ design features. Once completed, you upload photo book design to Blurb
c) Choose online option if you want to work directly online. Very limited layout/design options (not recommended!)
For those who wish to make their own hand-made photobook using Indesign follow the same steps as below in terms of documenting and annotating your design process. or if you want to customize your Blurb book see me for more details on how to do it.
4. Using Lightroom make a rough selection of your 30-50 best pictures from all shoots. Make sure you have adjusted and standardised all the pictures in terms of exposure, colour balance/ B&W, contrast/brightness etc. Produce blogpost from each shoot with selection of edited images following instructions below.
EDITING:
Save shoots in folder and import into Lightroom
Organisation: Create a new Collection from each new shoot inside Collection Set: PHOTOBOOK
Editing: select 8-12 images from each shoot.
Experimenting: Adjust images in Develop, both as Colour and B&W images appropriate to your intentions
Export images as JPGS (1000 pixels) and save in a folder: BLOG
Create a Blogpost with edited images and an evaluation; explaining what you focused on in each shoot and how you intend to develop your next photoshoot.
Make references to artists references, previous work, experiments, inspiration etc.
EXPERIMENTING:
Export same set of images from Lightroom as TIFF (4000 pixels)
Experimentation: demonstrate further creativity using Photoshop to make composite/ montage/ typology/ grids/ diptych/triptych, text/ typology etc appropriate to your intentions
Make sure you annotate process and techniques used and evaluate each experiment
5. Print a set of small work prints (4 to one A4 page) on the Laserjet, cut them up in guillotine and lay them out on the big white table for editing.
6. Decide on format (landscape, portrait) size and style of your photo-book. Begin to design your photo book, considering carefully, narrative, editing, sequencing, page spreads, juxtaposition, image size, text pages, empty pages, use of archival material etc.
7. Add your illustrated essay at the end of your photo book, including title, any captions (if needed), bibliography, illustrations of artists work (incl data) and images of your own responses. Think carefully about font type, size and weighting.
8. Produce screen prints of layout ideas as you progress and add to Blog for further annotation, commenting on page layout/ narrative/ sequencing/ juxtaposition of pictures.
9. EVALUATION: Upon completion of photobook/ film and presentation of prints make sure you evaluate and reflect on your learning and final outcomes. Comment on the following:
How successful was your final outcomes (book, film, prints etc)?
Did you realise your intentions?
What references did you make to artists references? comment on technical, visual, contextual, conceptual?
10. FINAL PRINTS: Select a set of 5-6 photographs as final outcomes and evaluate – explaining in some detail how well you realised your intentions and reflect on what you have learned in OBSERVE, SEEK, CHALLENGE project.
11. Save final prints in our shared PRINT folder (no later than 15:00 end of your Mock exam day) in a high-resolution (4000 pixels on the long edge.) Save each images in your name i.e. first name_surname_title_1, and 2, 3 and so on.
M:\Radio\Departments\Photography\Students\Image Transfer\YR13 PRINT FOLDER PERSONAL STUDY 2025
12. Virtual Gallery: Produce gallery mock-ups in Photoshop or create online gallery space using Artsteps.com
Now that you are beginning to write your Personal Study essay it seems appropriate to clarify the use AI. These principles is relevant for any for of writing that an A-level photography students is required to do, ie. essays, artists case studies, contextual studies, image analysis etc.
We (teachers) are assessing an individual students ‘knowledge’ and ‘understanding’ so if it seems as if a piece of written work is inconsistent with the evidence you already have published on the blog, then some sort of viva voce (oral examination) would be good to ascertain if that work does represent that students’ ‘knowledge’ and ‘understanding’ of a topic. If not, then the usual guidelines around plagiarism need to apply – ie disqualification.
Ofqual, the Office of Qualifications and Examinations Regulation that regulates qualifications, examinations and assessments in England are really clear about the use of ChatGTP to construct coursework. It’s basically a hard NO. Coupled with the fact that they use AI detection on work which appears to be plagiarised or fabricated by AI and can disqualify it. Synthesising arguments from research is an essential skill which is being tested in assessment objectives so to get an AI to do it is essentially cheating.
For those interested here is a document from JCQ (Joint Council for Qualifications outlining the current rules that govern student’s use of AI. Also, here in the following link to the Ofqual Guide for Schools and Colleges 2025 there is a paragraph about teachers using AI as the means to mark student work. It is under the subheading ‘During Assessments and Marking’.
How to use AI responsibly: If using AI is essential for your learning, follow these set of principles:
Reference if AI/ ChatGPT has been used like any other literary or academic source. For essay, this means adding in-text reference and list it in the Bibliography.
Reference what text prompt has been used and when, including date you generated content.
Demonstrate how you have used AI to inform your own knowledge and understanding.
Save screenshot of the questions you asked and the answers you got. For essay, this means adding a screen grab from AI/ChatGP tool and list it in Appendices at the end of essay (after Bibliography)
DEADLINE: Essay introduction MUST be published on blog Friday 10 January 2025
DEADLINE: Final Essay MUST be handed in Fri 31 Jan 2025
ESSAY: In the Spring term will be spending 1 lesson a week, normally Wednesdays on writing and developing your essay. However, you will need to be working on it independently outside of lesson time.
Objective:Criteria from the Syllabus
Be aware of some of the methods employed by critics and historians within the history of art and photography.
Demonstrate a sound understanding of your chosen area of study with appropriate use of critical vocabulary. – use for image analysis
Investigate a wide range of work and sources
Develop a personal and critical inquiry.
How to start: Copy this essay plan into your own blog post, titled: Essay Draft:
Literary sources: Go to this blog post here: Theory: Literary Sources and copy relevant key texts relating to the subject of your essay and list in alphabetical order in your bibliography. In addition, find your own key texts in relation to artists selected for in-depth analysis in your essay and list these too. These texts could be interviews with the artist, or reviews/ critique’s written by others. See useful online sites/ sources here .
Research and identify 3-5 literary sources from a variety of media such as books, journal/magazines, internet, Youtube/video that relates to your personal study and artists references .
Begin to read essay, texts and interviews with your chosen artists as well as commentary from critics, historians and others.
It’s important that you show evidence of reading and draw upon different pints of view – not only your own.
Take notes when you’re reading…key words, concepts, passages, page number to be used for in-text referencing etc.
Bibliography
List all the sources that you have identified above as literary sources. Where there are two or more works by one author in the same year distinguish them as 1988a, 1988b etc. Arrange literature in alphabetical order by author, or where no author is named, by the name of the museum or other organisation which produced the text. Apart from listing literature you must also list all other sources in alphabetical order e.g. websites/online sources, Youtube/ DVD/TV.
Quotation and Referencing:
Why should you reference?
To add academic support for your work
To support or disprove your argument
To show evidence of reading
To help readers locate your sources
To show respect for other people’s work
To avoid plagiarism
To achieve higher marks
What should you reference?
Anything that is based on a piece of information or idea that is not entirely your own.
That includes, direct quotes, paraphrasing or summarising of an idea, theory or concept, definitions, images, tables, graphs, maps or anything else obtained from a source
How should you reference?
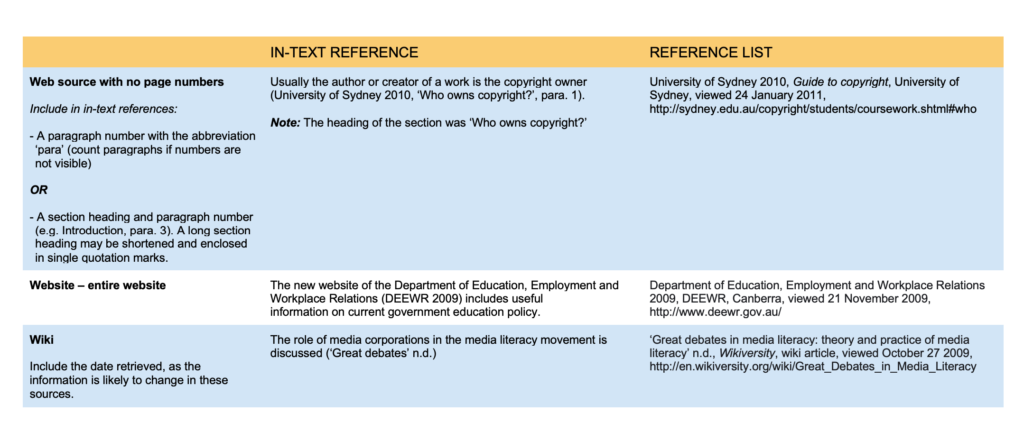
Use Harvard System of Referencing…see Powerpoint: harvard system of referencing for further details on how to use it.
https://vimeo.com/223710862
Here is an full guide on how to use Harvard System of Referencing including online sources, such as websites etc.
Essay Question
Think of a hypothesis and list possible essay questions
Below is a list of possible essay questions that may help you to formulate your own.
Some examples of Personal Study essays from previous students:
Essay Plan Make a plan that lists what you are going to write about in each paragraph. Further help can be found here essay structure or see link here The Royal Literay Fund
Essay question:
Opening quote:
‘To photograph is to appropriate the thing photographed.’ (Sontag 1977:4)
Introduction (250-500 words): What is your area study? Which artists will you be analysing and why? How will you be responding to their work and essay question?
Pg 1 (500 words): Historical/ theoretical context within art, photography and visual culture relevant to your area of study. Make links to art movements/ isms and some of the methods employed by critics and historian.
Pg 2 (500 words): Analyse first artist/photographer in relation to your essay question. Present and evaluate your own images and responses.
Pg 3 (500 words): Analyse second artist/photographer in relation to your essay question. Present and evaluate your own images and responses.
Conclusion (250-500 words): Draw parallels, explore differences/ similarities between artists/photographers and that of your own work that you have produced
Bibliography: List all relevant sources used
Sontag, S. (1977). ‘In Plato’s Cave’ in On Photography. London: Penguin Books.
Use of AI / ChatGPT – go to this blog post here for guidelines.
Key Terminology: Here is a link to a glossary of key words, glossary of photographic processes, glossary of art movements and genres, and linking words and phrases.
Essay writing: Here is a link to another blog post which will provide you with guideline and more details about how to structure each paragraph in your essay.
Begin to write a paragraph (250-500 words) answering the following questions below.
You got 45 mins to write and upload to the blog!
Draft Introduction (250-500 words). Think about an opening that will draw your reader in e.g. you can re-formulate the essay question. You should include in your introduction an outline of your intention of your study, e.g. what area of photography, or subject-matter are you exploring? Which artists/ photographers are you going to investigate/ analyse/ interpret? Why does this subject/ work interest you? What are you trying to prove/challenge, argument/ counter-argument? What historical or theoretical context is the work situated within? Include at least 1 or 2 quotes for or against. What links are there with your previous studies, if any? How has this subject and chosen artists/ photographers inspired your own images/ responses? How will your work develop? What camera skills, photographic techniques or processes have you experimented with, or are you going to experiment with?
A well rehearsed phrase that we are all familiar with, invoking childhood memories of fairytales, grandparents recounting old days or stories around the campfire. American novelist Kurt Vonnegut argued that the quality that defined good storytellers was simply that they themselves loved stories.
In this module we will study how different narrative structures can be used to tell stories in pictures from looking at photography, cinema and literature in photo-essays, film and books. We will consider narrative within a documentary approach where observation is key in representing reality, albeit we will look at both visual styles within traditional photojournalism as well as contemporary photography which employs a more poetic visual language that straddles the borders between objectivity and subjectivity, fact and fiction.
In order to understand how photography as a medium can be applied to tell a story we need to understand the differences between narrative and story and how editing, sequencing and design is intrinsic to this process.
THEORY
Often people tend to think of narrative and story as the same thing. In photography that is no exception. Jörg M. Colberg, a photographer, teacher and editor of Conscientious Photo Magazine (online blog dedicated to contemporary fine-art photography) has written extensively about narrative in photography. For you to gain a better understanding of the differences between narrative and story when we think about it in relation to making a photobook (which is your main outcome in your Personal Study later in the academic year) or in your current task of making a photo-zine you NEED TO READ his two blog posts; Photography and Narrative (part 1) and Photography and Narrative (part 2).
a story or account of events, experiences, or the like, whether true or fictitious
a book, literary work, etc., containing such a story, or
the art, technique, or process of narrating, or of telling a story.”
In Colberg’s view;
‘Those three options really aren’t the same at all. A photobook’s story is not the same as the book itself…. What I tend to find is that many photographers use the term narrative in the sense of it being the same as story (option 1), but what they mean is that it is the way the story is told (Option 3).’
He continues:
‘This is because it will contain a set of photographs that are being presented in a very specific way: there is an edit, a sequence, and very specific decisions about design and production were (hopefully) being made. As I’m trying to explain in the following, the edit and sequence (and to a lesser extent design and production) form a specific narrative that, in turn, might or might not produce or allude to a story. How to approach this then?’
When Colin Pantall made his book, All Quiet on the Homefront about his daughter growing up and becoming a father he wrote about the process of making it on his Blog here: Identifying the Story: Sequencing isn’t narrative
In Pantall’s experience narrative isn’t just sequencing a set images that flows together nicely. He says:
‘In photobooks there are so many elements used in editing, sequencing and creating a narrative. It’s really difficult. For All Quiet on the Home Front, we went through the lot of them. Sequencing by chronology, geography, family, resemblance, art history, season, colour, form, tone, flora, expression, dress, climate, mood, symbolism, material, and so on. The sequencing was a gradual process that was embedded into the editing with voice, mode, person, text, the basic best picture edit and much more besides.’
In his view identifying the story first and being able to communicate it in three words is essential.
‘You can sequence in a multitude of ways in other words. But none of that made a narrative. What made the narrative was actually identifying what the story was about. Do that and then you can create all the structures through which the story can flow – and that, structures plus story, creates the narrative.’
For photographer, writer and lecturer, Lewis Bush;‘narrative are things that exists within stories.’ In his article, Storytelling: A Poverty of Theory, Bush gives different reasons why photography as a medium does not have an established theory on narrative like cinema or literature. He also wonders why photographers often refer to themselves as storytellers but have little understanding of the differences between story and narrative when applied to photography.
‘One story can spawn many narratives, a fact that, in contrast to photography, is well understood in literature and cinema….when I say ‘I’m going to tell you a story’ I actually tell you a narrative of that story.’
Bush cites an example in cinema, Akira Kurosawa’sRashomon where multiple narratives are presented on screen of a murder, that may or may not have happened.
In photography today Bush reminds us;
‘it is well understand that single images are not reality, they are a representation of it.’ Similarly, a series of images put together in a fragmentary and incomplete order is ‘a record of something [that] are always a narrative of a story or event, never a full reflection of the thing itself’.
In a follow article: ‘Photographic Narrative: Between Cinema and Novel‘ Lewis Bush cites different examples from both cinema, literature and photography and identity each mediums different strengths and weaknesses.
In Bush’s view, photography’s narrative strength is;
‘It’s sheer power of description.’ A single photograph can depict a scene with a verisimilitude which pages of written account would still fail to capture. It is this quality which led photography to be first employed for practices like crime scene photography, in place of the unreliable memory and incomplete notes that had previously been relied upon.
Conversely photography also has many weaknesses, such as explaining things. Bush cites German theatre parctitioner and playwright Bertol Brecht who wrote, a photograph of a factory tells us what a factory looks like, but it tells us very little about the relationships that underlie it.
Bush also references Roland Barthes , whose seminal book, Camera Lucida,(1980) is a bedrock of photographic theory, especially, the relationship between photography and memory, photograph and death. He describes reading a sentences where Barthes, ‘characterised photographs as things which were somewhere “between cinema and novel”.
Bush then outlines traits and similarities for storytelling between photography and cinema, photography and literature and provides a number of examples which we will have a closer look at below.
CINEMA
Chris Marker: La Jétte
Chris Marker, La Jettee, (1962)
Chris Marker, (1921-2012) was a French filmmaker, poet, novelist, photographer, editor and multi-media artist who has been challenging moviegoers, philosophers, and himself for years with his complex queries about time, memory, and the rapid advancement of life on this planet. Marker’s La Jetée is one of the most influential, radical science-fiction films ever made, a tale of time travel. What makes the film interesting for the purposes of this discussion, is that while in editing terms it uses the language of cinema to construct its narrative effect, it is composed entirely of still images showing imagesfrom the featureless dark of the underground caverns of future Paris, to the intensely detailed views across the ruined city, and the juxtaposition of destroyed buildings with the spire of the Eiffel Tower. You can read more here about the meaning of the film and it is available on Vimeo here in its entirety (29 mins)
Mark Cousins:Atomic, Living in Dread and Promise
A narrative can also be made constructed entirely of archive footage as in Atomic, Living in Dread and Promise, a film that shows impressionistic kaleidoscope of our nuclear times – protest marches, Cold War sabre-rattling, Chernobyl and Fukishima – but also the sublime beauty of the atomic world, and how x-rays and MRI scans have improved human lives. The nuclear age has been a nightmare, but dreamlike too. Made by director and film critic, Mark Cousins and featuring original music score by Mogwai, it was first broadcast on BBC4 as part of Storyville documentary. Your can read a Q&A with Cousins’ here where he discusses the making of the film.
Christopher Nolan: Memento
Memento is a 2000 American neo-noirpsychological thriller film written and directed by Christopher Nolan. Guy Pearce stars as a man who, as a result of an injury, has anterograde amnesia (the inability to form new memories) and has short-term memory loss approximately every fifteen minutes. He is searching for the people who attacked him and killed his wife, using an intricate system of Polaroid photographs and tattoos to track information he cannot remember.
The film is presented as two different sequences of scenes interspersed during the film: a series in black-and-white that is shown chronologically, and a series of color sequences shown in reverse order (simulating for the audience the mental state of the protagonist). The two sequences meet at the end of the film, producing one complete and cohesive narrative
Telling a story in reverse can be an interesting way to construct a narrative. Both cinema and literature are good at jumping between different time modes, past, present and future. Moving image and sound can enhance these different temporal shifts and written language is good and transporting your imagination from one time zone to another. Photography is mute but different strategies can be employed such as changing from colour to monochrome suggesting a different time or a different set of images. Using old photographs from archives, or found imagery can add complexity too, and including words can support a sequence of images, or add tension between the visual and the textual adding other elements to a photographic narrative.
Memento: Narrative and Postmodernism is also being looked at in Media Studies and if you are studying this subject make sure you include knowledge and understanding learned. Adopting a inter-disciplinary approach to your work is advantageous and being able to use theory and/ or context from other subjects will add value to your overall quality of your work and potentially achieve higher marks.
Theorists like Sergei Eisenstein, D.W Griffiths, Lev Kuleshov, Jean Epstein, John Grierson (also the coiner of the term ‘documentary’), Dziga Vertov, Andre Bazin, and Siegfried Kracauer went into sometimes painful detail to articulate theories about how various film and editing combinations created different forms of meaning. Many of these ideas remain surprisingly robust and useful a century later, and remain the bedrock of much of the theory taught to film students. Let’s look at some narrative structures and film editing techniques that are used in cinema.
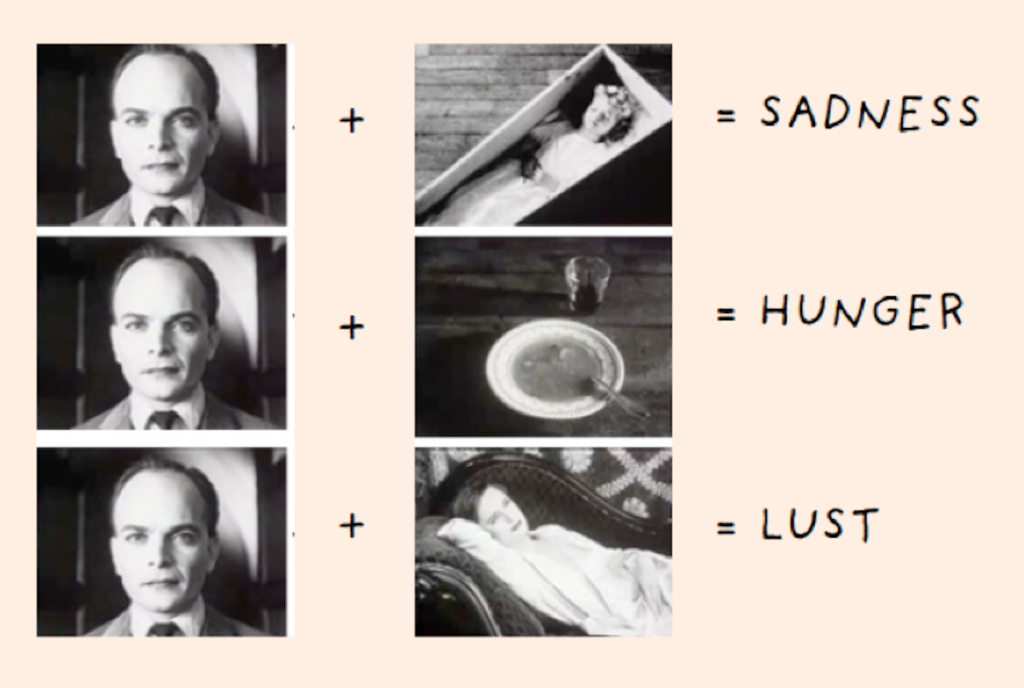
The Kuleshov effect is a film editing (montage) effect demonstrated by Soviet filmmaker Lev Kuleshov in the 1910s and 1920s. It is a mental phenomenon by which viewers derive more meaning from the interaction of two sequential shots than from a single shot in isolation. Through this phenomenon we can suggest meaning and manipulate space, as well as time.
The Kuleshov Effect
Kuleshov edited a short film in which a shot of the expressionless face of Tsarist matinee idol Ivan Mosjoukine was alternated with various other shots (a bowl of soup, a girl in a coffin, a woman on a divan). The film was shown to an audience who believed that the expression on Mosjoukine’s face was different each time he appeared, depending on whether he was “looking at” the bowl of soup, the girl in the coffin, or the woman on the divan, showing an expression of hunger, grief, or desire, respectively. The footage of Mosjoukine was actually the same shot each time.
Kuleshov used the experiment to indicate the usefulness and effectiveness of film editing. The implication is that viewers brought their own emotional reactions to this sequence of images, and then moreover attributed those reactions to the actor, investing his impassive face with their own feelings. Kuleshov believed this, along with montage, had to be the basis of cinema as an independent art form.
For more details see Dr McKinlay’s blog on Narrative in Cinema and The Language of Moving Image which look more specifically at some of the conventions and key terminology associated with moving image (film, TV, adverts, animations, installations and other moving image products.)
PHOTOGRAPHY
Let’s explore some examples of images used in photo-essays and photobooks and see if we can identify the story as well as examine how narrative is constructed through careful editing, sequencing and design.
PHOTO-ESSAY: The life of a country doctor in Colorado’s Rocky Mountains
“A photo is a small voice, at best, but sometimes – just sometimes – one photograph or a group of them can lure our senses into awareness. Much depends upon the viewer; in some, photographs can summon enough emotion to be a catalyst to thought”
W. Eugne Smith
W. Eugene Smith compared his mode of working to that of a playwright; the powerful narrative structures of his photo essays set a new benchmark for the genre. His series, The Country Doctor, shot on assignment for Life Magazine in 1948, documents the everyday life of Dr Ernest Guy Ceriani, a GP tasked with providing 24-hour medical care to over 2,000 people in the small town of Kremmling, in the Rocky Mountains. The story was important at the time for drawing attention to the national shortage of country doctors and the impact of this on remote communities. Today the photoessay is widely regarded as representing a definitive moment in the history of photojournalism.
In October of 1958, French publisher Robert Delpire released Les Américains in Paris. The following year Grove Press published The Americans in New York with an introduction by American writer, Jack Kerouac (the book was released in January 1960).
Like Frank’s earlier books, the sequence of 83 pictures in The Americans is non-narrative and nonlinear; instead it uses thematic, formal, conceptual and linguistic devices to link the photographs. The Americans displays a deliberate structure, an emphatic narrator, and what Frank called a ‘distinct and intense order’ that amplified and tempered the individual pictures.
Although not immediately evident, The Americans is constructed in four sections. Each begins with a picture of an American flag and proceeds with a rhythm based on the interplay between motion and stasis, the presence and absence of people, observers and those being observed. The book as a whole explores the American people—black and white, military and civilian, urban and rural, poor and middle class—as they gather in drugstores and diners, meet on city streets, mourn at funerals, and congregate in and around cars. With piercing vision, poetic insight, and distinct photographic style, Frank reveals the politics, alienation, power, and injustice at play just beneath the surface of his adopted country.
Since its original publication, The Americans has appeared in numerous editions and has been translated into several languages. The cropping of images has varied slightly over the years, but their order has remained intact, as have the titles and Kerouac’s introductory text. The book, fiercely debated in the first years following its release, has made an indelible mark on American culture and changed the course of 20th-century photography. Read article by Sean O’Hagan in The Guardian
Rita Puig Serra Costa: Where Mimosa Bloom
https://vimeo.com/124694405
Dealing with the grief that the photographer suffered following the death of her mother, Where Mimosa Bloom by Rita Puig Serra Costatakes the form of an extended farewell letter; with photography skillfully used to present a visual eulogy or panegyric. This grief memoir about the loss of her mother is part meditative photo essay, part family biography and part personal message to her mother. These elements combine to form a fascinating and intriguing discourse on love, loss and sorrow.
“Where Mimosa Bloom” is the result of over two years work spent collecting and curating materials and taking photographs of places, objects and people that played a significant role in her relationship to her mother. Rita Puig Serra Costa skillfully avoids the dangerous lure of grief’s self-pity, isolationism, world-scorn and vanity. The resonance of “Where Mimosa Bloom” comes from all it doesn’t say, as well as all that it does; from the depth of love we infer from the desert of grief. Despite E.M.Forster’s words – “One death may explain itself, but it throws no light upon another” – Rita Puig Serra Costa proves that some aspects of grief are universal, or can be made so through the honesty and precision with which they are articulated.
Yoshikatsu Fujii:Red Strings
https://vimeo.com/102344549
I received a text message. “Today, our divorce was finalized.” The message from my mother was written simply, even though she usually sends me messages with many pictures and symbols. I remember that I didn’t feel any particular emotion, except that the time had come. Because my parents continued to live apart in the same house for a long time, their relationship gently came to an end over the years. It was no wonder that a draft blowing between the two could completely break the family at any time.
In Japan, legend has it that a man and woman who are predestined to meet have been tied at the little finger by an invisible red string since the time they were born. Unfortunately, the red string tying my parents undone, broke, or perhaps was never even tied to begin with. But if the two had never met, I would never have been born into this world. If anything, you might say that there is an unbreakable red string of fate between parent and child.
Before long, I found myself thinking about the relationship between my parents and . How many days could I see my parents living far away? What if I couldn’t see them anymore? Since I couldn’t help feeling extremely anxious about it, I was driven to visit my parents’ house many times. Every day I engage in awkward conversation with my parents, as if in a scene in their daily lives. I adapt myself to them, and they shift their attitude toward me. We do not give way entirely to the other side, but rather meet halfway. Indeed family problems remain unresolved, although sometimes we tell allegorical stories and share feelings. It means a lot to us that our perspectives have changed with communication.
My family will probably never be all together again. But I feel without a doubt that there is proof inside of each of us that we once lived together. To ensure that the red string that ties my family together does not come undone, I want to reel it in and tie it tight.
NARRATIVE – a summary
Narrative is essentially the way a story is told. For example you can tell different narratives of the same story. It is a very subjective process and there is no right or wrong. Whether or not your photographic story is any good is another matter.
An analogy: if you witnessed a road accident and the police arrived to take statements from witnesses. Your version of events would be different to that of other witnesses or bystanders. They are both ‘true’ to what you saw and they both tell a different narrative depending on where you were in relation to the event, your point of view and how you remembered the event as it happened.
Narrative is constructed when you begin to create relationships between images (and/or text) and present more than two images together. Your selection of images (editing) and the order of how these images appear on the pages (sequencing) contributes significantly to the construction of the narrative. So too, does the structure and design of the photo-zine or photobook.
However, it is essential that you identity what your story is first before considering how you wish to tell it. Planning and research are also essential to understanding your subject and there are steps you can take in order to make it successful. Once you have considered the points made between the differences in narrative and story, write the following:
PLANNING: Write a specification that provide an interpretation and plan of how you intend to explore A Love Story. This must include at least 3 photoshoots you will be doing in the next 2-3 weeks (these could include photo-assignments). How do you want your images to look and feel like? Include visual references to artists/photographers in terms of style, approach, intentions, aesthetics concept and outcome. Remember the final outcome is a 16 page photo-zine so you will need to edit a final series of 12-16 images that sequenced together as a set forms a narrative that visualises your love story.
STORY: What is your love story? Describe in:
3 words
A sentence
A paragraph
NARRATIVE: How will you tell your story?
Images > new photographic responses, photo-shoots
Archives > old photos from family albums, iPhone
Texts > letters, documents, poems, text messages
AUDIENCE: Who is it for?
Most image makers tend to overlook the experience of the viewer. Considering who your audience is and how they may engage with your photo-zine is important factor when you are designing/ making it.
Reflect and comment on this in your specification (age group, demographic, social/ cultural background etc.)
PHOTOBOOKS
A few photo book dealing with memory, loss and love
Yury Toroptsov:Deleted Scene
On a mission to photograph the invisible, with Deleted Scene photographer Yury Toroptsov takes us to Eastern Siberia in a unique story of pursuit along intermingling lines that form a complex labyrinth. His introspective journey in search of a father gone too soon crosses that of Akira Kurosawa who, in 1974, came to visit and film that same place where lived the hunter Dersu Uzala.
Yury Toroptsov is not indifferent to the parallels between hunting and photography, which the common vocabulary makes clear. Archival documents, old photographs, views of the timeless taiga or of contemporary Siberia, fragments or deleted scenes are arranged here as elements of a narrative. They come as clues or pebbles dropped on the edge of an invisible path where the viewer is invited to lose himself and the hunter is encouraged to continue his relentless pursuit.
Mayumi Suzuki:The Restoration Will
My parents, who a owned photo studio, went missing after the 2011 tsunami. Our house was destroyed. It was a place for working, but also for living. I grew up there. After the disaster, I found my father’s lens, portfolio, and our family album buried in the mud and the rubble.
One day, I tried to take a landscape photo with my father’s muddy lens. The image came out dark and blurry, like a view of the deceased. Through taking it, I felt I could connect this world with that world. I felt like I could have a conversation with my parents, though in fact that is impossible.
The family snapshots I found were washed white, the images disappearing. The portraits taken by my father were stained, discolored. These scars are similar to the damage seen in my town, similar to my memories which I am slowly losing.
I hope to retain my memory and my family history through this book. By arranging these photos, I have attempted to reproduce it.
Dragana Jurisic’s YU:The Lost Country
Yugoslavia fell apart in 1991. With the disappearance of the country, at least one million five hundred thousand Yugoslavs vanished, like the citizens of Atlantis, into the realm of imaginary places and people. Today, in the countries that came into being after Yugoslavia’s disintegration, there is a total denial of the Yugoslav identity.
“There proceeds steadily from that place a stream of events which are a source of danger to me,” wrote the Anglo-Irish writer, Rebecca West in 1937. “That place” was Yugoslavia, the country in which I was born. Realizing that to know nothing of an area “which threatened her safety” was “a calamity”, she embarked on a journey through Yugoslavia. The result was Black Lamb and Grey Falcon. Initially intended as “a snap book” it spiraled into half a million words, a portrait not just of Yugoslavia, but also of Europe on the brink of the Second World War, and widely regarded as one of the masterpieces of the 20th century.
At Easter 2011, I started retracing Westʼs journey and re-interpreting her masterpiece by using photography and text, in attempt to re-live my experience of Yugoslavia and to re-examine the conflicting emotions and memories of the country that was.
In 1999, Jacob Aue Sobol went to live in the settlement of Tiniteqilaaq, Greenland, where he lived the life of a fisherman and hunter with his Greenlandic girlfriend Sabine and her family. Taken over three years Sobol’s book records, in photographs and narratives, his encounter with Sabine and their life on the east coast.
https://vimeo.com/103609319
Photographer Jacob Aue Sobol reflects on the three years he spent in Greenland and the traveling he did there. While his first trip was focused on documenting the culture, his second trip revolved around his girlfriend Sabine, who later became the subject of a series of photographs.
Laia Abril: The Epilogue’
‘The Epilogue’ is the book about the story of the Robinson family – and the aftermath suffered in losing their 26 year old daughter to bulimia. Working closely with the family Laia Abril reconstructs Cammy’s life telling her story through flashbacks – memories, testimonies, objects, letters, places and images. The Epilogue gives voice to the suffering of the family, the indirect victims of ‘eating disorders’, the unwilling eyewitnesses of a very painful degeneration. Laia Abril shows us the dilemmas and struggles confronted by many young girls; the problems families face in dealing with guilt and the grieving process; the frustration of close friends and the dark ghosts of this deadliest of illnesses; all blended together in the bittersweet act of remembering a loved one. Read more here on Laia Abril’s website
AUDIENCE: Most image makers tend to overlook the experience of the viewer. Considering who your audience is and how they may engage with your photo-zine is important factor when you are designing/ making it.
Students past responses to the theme of love, friendship, family etc.
Niah Da Costa: Espera For my photo book, the main theme was intimacy and young love. I wanted to explore my relationship with my boyfriend and show a series of different styles of images. I called this photo book “Espera” which means to wait in Portuguese, as this word (besides love) is a word that both Jack and I use frequently. Read more on her BLOG here.
Amy Low:Nothing can get between us A photo-book which is based on specific people in my life and what makes them an individual, I want this to also center around the theme of youth culture. Each picture/section of my book is about one person and their features/interests and things that make them who they are. I also plan to have pictures which break theme in the book to act as a barrier between each portrait. Read more on her BLOG here.
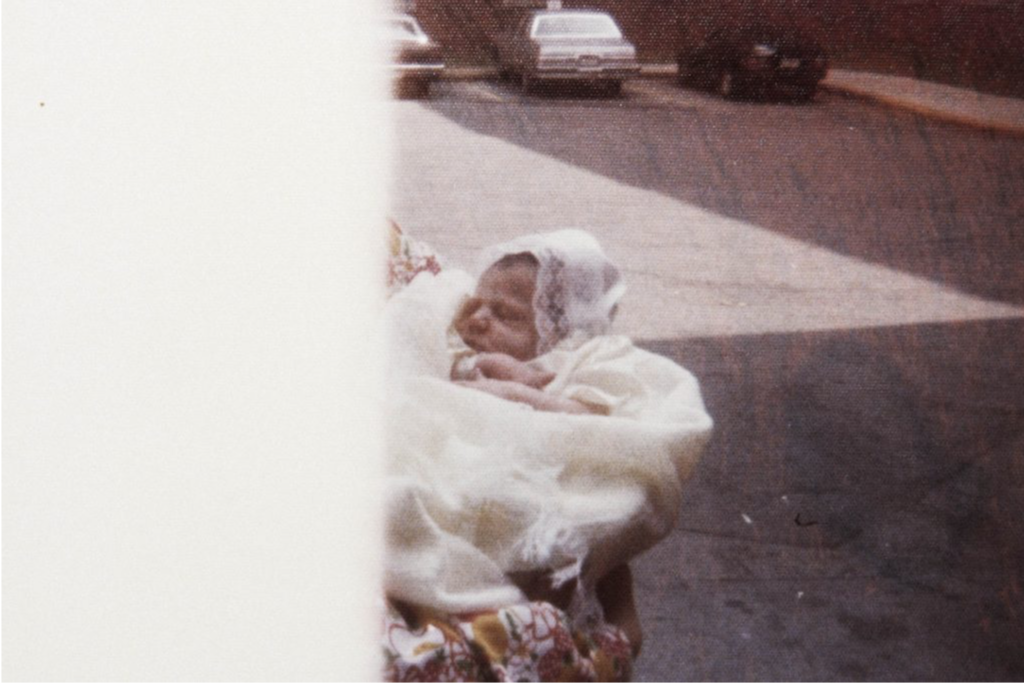
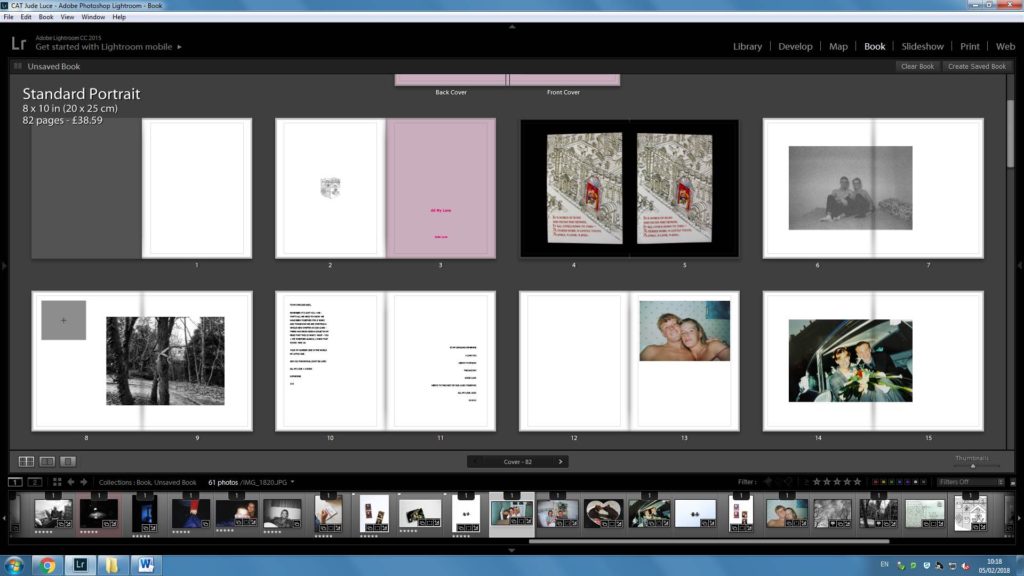
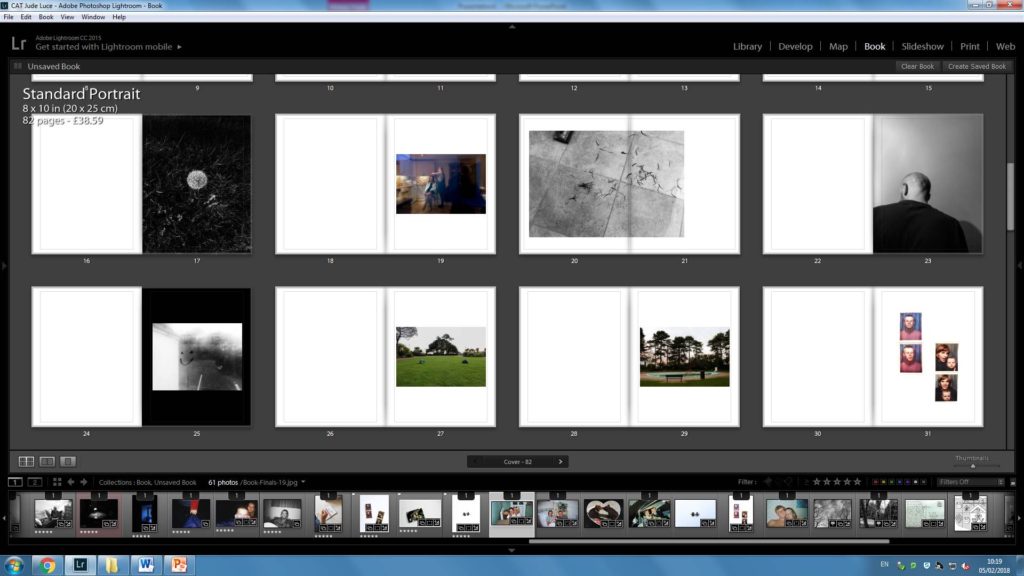
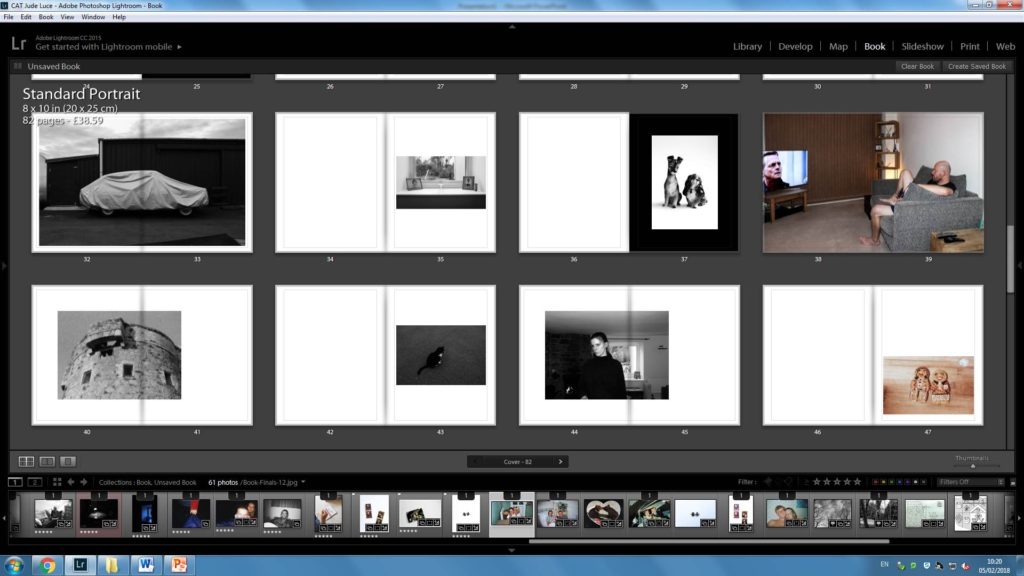
Jude Luce: All My Love My plan for my photo book is to produce a detailed and insightful exploration into my family life, with me centered within the middle. This is the running theme throughout and I hope to show it through poetic, still images of landscapes or objects which may have no direct meaning at its face value but has a deeper meaning once inferred. As well, the portraits in my project are intended to be collaborative and intimate to show the relationships I hold with the people in my life but the portraits are intended to show the emotion of each being as well. I have contrasted yet shown the similarities of my mum and dad’s relationship when they were together to that of my relationship with Lucy now and the overall look I hope to achieve is that of a fun, vibrant, light-hearted but quite solemn and sombre image-based diary about how I am still developing through the events if life and the attachments I have built from the event which shaped my life – my mum and dad’s divorce. I want their to be an obvious existence of the theme of attachment but also an underlying theme of detachment. Although these themes are the main focus for my book, they are underlying themes which are subtly hinted at every now and then by a sequence which develops upon the understanding of love. Memory is fragile and I use this notion as a driving force for my project made up of diaristic photographs, which, when come together, create an album of moments in time which in-turn lend themselves to never be forgotten. I have attempted not to avoid the subject of my mum and dad’s divorce but felt it easier to express this and my feelings towards it through other subject matter, being my relationship with my girlfriend and the other people in my life, such as my individual relationships with my mum and dad and how I view them in solitary opposition to one another.
Use this simplified list to check that you are on task. Every item on the list represents one piece of work = one blog post. It is your responsibility as an A-level student to make sure that you complete and publish appropriate blog posts each week.
AUTUMN TERM
WEEK 1: 4 – 8 Sept 1. Research & Context: Jersey’s maritime history and cod-trade 2. Research & Context: St Helier Harbour history and mood-board
WEEK 2: 9 – 15 Sept 1. Planning & Recording: Visit to SJ Photo-archive and St Helier Harbour 2. Editing & Developing: St Helier Harbour photoshoots
WEEK 3: 16 – 22 Sept 1. Essay: Origin of Photography > Deadline: 30 Sept 2. Planning & Recording: Visit to Maritime Museum and St Helier Harbour 3. Editing & Developing: St Helier Harbour photoshoots
WEEK 5: 30 Sept – 6 Oct 1. Zine: Research & Mood-board 2. Zine: Design & Layout
WEEK 6: 7-13 Oct 1. Zine: Final design & Evaluate 2. Zine: Print & Bind
DEADLINE: Zine > Fri 11 Oct
WEEK 7: 14-20 Oct 1. Talk: Steve Carter, Art Director – Mon 14 Pd 3 in the Hall 2. Windows & Mirrors: Written assignment 3. Windows & Mirrors: Photo assignment
WEEK 8: 21-27 Oct 1. Personal Study: Review & Reflect
Half-term: 28 Oct – 3 Nov Windows & Mirrors: Assignments Complete work and improve blogposts, or begin tasks below
WEEKS 9: 4-10 Nov 1. Personal Study: Mind-maps & Mood-boards
WEEK 10: 11-17 Nov 1. Personal Study: Artists Case-studies x 2
WEEK 11: 18-24 Nov 1. Personal Study: Statement of Intent
WEEK 12: 25 -30 Nov 1. Photo-shoots: Planning & Recording x 3-4
WEEK 13: 1 – 8 Dec 1. Photo-shoots: Editing and Developing
WEEK 14: 9 – 15 Dec 1. Photo-shoots: Editing and Developing
WEEK 15: 16 – 18 Dec 1. Essay: Hypothesis, Essay plan and Introduction (draft)
DEADLINE: Essay draft introduction > Thurs 18 Dec
XMAS BREAK 19 Dec – 6 Jan Photo-shoots: Produce at least 2-3 photoshoots Essay:Read key texts for essay and write an essay draft
SPRING TERM: 4 Weeks left until MOCK EXAM
WEEK 16: 6 – 12 Jan 1. Photo-shoots: Editing and Developing 2. Essay: Complete essay introduction > Fri 10 Jan
WEEK 17: 13 – 19 Jan 1. Photobook/ Film: Deconstruct photobook/ film > narrative, concept and design 2. Essay: Paragraph 1 > historical context
WEEK 18: 20 – 26 Jan > Yr 12 Mock Mon 20 – Tue 21 Jan 1. Essay: Paragraph 2 & 3 > artists case studies 2. Photo-shoots: Editing and Developing
WEEK 19: 27 Jan – 2 Feb 1. Photobook/ Film: Book/ film specification > narrative, concept, design, moodboard 2a. Photobook: Create BLURB book account and begin layout in Adobe Lightroom 2b. Film: Create film project and begin editing in Adobe Premiere 3. Essay: Conclusion, bibliography, referencing, proof-read DEADLINE: Hand in essay Fri 31 Jan
Week 20: 3 – 6 Feb MOCK EXAM 2 days = 10 hours controlled test Photography classroom + Photography studio Groups: 13C and 13A: MON 3 – TUE 4 FEB 13D: WED 5 – THURS 6 FEB
1. Essay: Publish final essay with illustrations and a bibliography 2a. Photobook: Complete design and include essay in book layout 2b. Film: Complete editing film, export and embed on blog 3. Prints: Select a set of 5-6 final prints and export into print folder 4. Blog: Review and complete all supporting blogposts
The gaze, as a visual act, generates modes of power, domination, and control. It has the ability to categorize people, generate feelings of shame, and assert one’s superiority. The gaze of the superior and privileged person, specifically directed toward oppressed and less privileged groups of people, is one type of the manifestation of power and control. The camera lens is another demonstration of a powerful gaze, referred to as the photographic gaze, simulating the gaze of the naked eye. Indeed, the former could even be more powerful than the gaze of the naked eye due to photographic permanence. Janina Struk defines a photograph as: “a two-dimensional object, a fraction of a second framed and frozen in time” (4). Susan Sontag in On Photography notes that “photographs are a neat slice of time, not a flow” (17). It is the stillness of a photograph that gives it power and makes it more effective than television broadcasting or film. Photography, then, has the ability to capture in “still time” the expression of oppressed subjects as the camera gazes at them.
To understand what is meant by the photographic gaze, explore Daniel Chandler; Notes on ‘The Gaze’: ‘The gaze’ (sometimes called ‘the look’) is a technical term which was originally used in film theory in the 1970s but which is now more broadly used by media theorists to refer both to the ways in which viewers look at images of people in any visual medium and to the gaze of those depicted in visual texts. The term ‘the male gaze’ has become something of a feminist cliché for referring to the voyeuristic way in which men look at women (Evans & Gamman 1995, 13). My aim here is to alert students to existing material and frameworks which may assist them in their own investigations of the issue of the gaze in relation to media texts.
Forms of gaze
In the case of recorded texts such as photographs and films (as opposed to those involving interpersonal communication such as video-conferences), a key feature of the gaze is that the object of the gaze is not aware of the current viewer (though they may originally have been aware of being filmed, photographed, painted etc. and may sometimes have been aware that strangers could subsequently gaze at their image). Viewing such recorded images gives the viewer’s gaze a voyeuristic dimension. As Jonathan Schroeder notes, ‘to gaze implies more than to look at – it signifies a psychological relationship of power, in which the gazer is superior to the object of the gaze’ (Schroeder 1998, 208).
Several key forms of gaze can be identified in photographic, filmic or televisual texts, or in figurative graphic art. The most obvious typology is based on who is doing the looking, of which the following are the most commonly cited:
the spectator’s gaze: the gaze of the viewer at an image of a person (or animal, or object) in the text;
the intra-diegetic gaze: a gaze of one depicted person at another (or at an animal or an object) within the world of the text (typically depicted in filmic and televisual media by a subjective ‘point-of-view shot’);
the direct [or extra-diegetic] address to the viewer: the gaze of a person (or quasi-human being) depicted in the text looking ‘out of the frame’ as if at the viewer, with associated gestures and postures (in some genres, direct address is studiously avoided);
the look of the camera – the way that the camera itself appears to look at the people (or animals or objects) depicted; less metaphorically, the gaze of the film-maker or photographer.
In addition to the major forms of gaze listed above, we should also note several other types of gaze which are less often mentioned:
the gaze of a bystander – outside the world of the text, the gaze of another individual in the viewer’s social world catching the latter in the act of viewing – this can be highly charged, e.g. where the text is erotic (Willemen 1992);
the averted gaze – a depicted person’s noticeable avoidance of the gaze of another, or of the camera lens or artist (and thus of the viewer) – this may involve looking up, looking down or looking away (Dyer 1982);
the gaze of an audience within the text – certain kinds of popular televisual texts (such as game shows) often include shots of an audience watching those performing in the ‘text within a text’;
the editorial gaze – ‘the whole institutional process by which some portion of the photographer’s gaze is chosen for use and emphasis’ (Lutz & Collins 1994, 368)
James Elkins offers ten different ways of looking at a figurative painting in a gallery (Elkins 1996, 38-9):
You, looking at the painting,
figures in the painting who look out at you,
figures in the painting who look at one another, and
figures in the painting who look at objects or stare off into space or have their eyes closed.
In addition there is often the museum guard, who may be looking at the back of your head, and
the other people in the gallery, who may be looking at you or at the painting. There are imaginary observers, too:
the artist, who was once looking at this painting,
the models for the figures in the painting, who may once have seen themselves there, and
all the other people who have seen the painting – the buyers, the museum officials, and so forth. And finally, there are also
people who have never seen the painting: they may know it only from reproductions… or from descriptions.
Looking at someone using a camera (or looking at images thus produced) is clearly different from looking at the same person directly. Indeed, the camera frequently enables us to look at people whom we would never otherwise see at all. In a very literal sense, the camera turns the depicted person into an object, distancing viewer and viewed.
We are all familiar with anecdotes about the fears of primal tribes that ‘taking’ a photograph of them may also take away their souls, but most of us have probably felt on some occasions that we don’t want ‘our picture’ taken. In controlling the image, the photographer (albeit temporarily) has power over those in front of the lens, a power which may also be lent to viewers of the image. In this sense, the camera can represent a ‘controlling gaze’.
In her classic book, On Photography Susan Sontag referred to several aspects of ‘photographic seeing’ which are relevant in the current context (Sontag 1979, 89):
‘To photograph is to appropriate the thing photographed’ (ibid., 4);
‘Photographing is essentially an act of non-intervention… The act of photographing is more than passive observing. Like sexual voyeurism, it is a way of at least tacitly, often explicitly, encouraging what is going on to keep on happening’ (ibid., 11-12);
‘The camera doesn’t rape, or even possess, though it may presume, intrude, trespass, distort, exploit, and, at the farthest reach of metaphor, assassinate – all activities that, unlike the sexual push and shove, can be conducted from a distance, and with some detachment’ (ibid., 13).
The functions of photography can be seen in the context of Michel Foucault‘s analysis of the rise of surveillance in modern society. Photography promotes ‘the normalizing gaze, a surveillance that makes it possible to qualify, to classify and to punish. It establishes over individuals a visibility through which one differentiates and judges them’ (Foucault 1977, 25). Photography was used in the second half of the nineteenth century to identify prisoners, mental patients and racial types (Tagg 1988). However, looking need not necessarily be equated with controlling (Lutz & Collins 1994, 365).
Looking is not indifferent. There can never be any question of ‘just looking’. John Berger, Ways of seeing, 1972
John Berger, Ways if Seeing, BBC episode 1, 1972John Berger, Ways if Seeing, BBC episode 1, 1972
In Ways of Seeing, a highly influential book based on a BBC television series, John Berger observed that ‘according to usage and conventions which are at last being questioned but have by no means been overcome – men act and women appear. Men look at women. Women watch themselves being looked at’ (Berger 1972, 45, 47). Berger argues that in European art from the Renaissance onwards women were depicted as being ‘aware of being seen by a [male] spectator’ (ibid., 49).
Berger adds that at least from the seventeenth century, paintings of female nudes reflected the woman’s submission to ‘the owner of both woman and painting’ (ibid., 52). He noted that ‘almost all post-Renaissance European sexual imagery is frontal – either literally or metaphorically – because the sexual protagonist is the spectator-owner looking at it’ (ibid., 56). He advanced the idea that the realistic, ‘highly tactile’ depiction of things in oil paintings and later in colour photography (in particular where they were portrayed as ‘within touching distance’), represented a desire to possess the things (or the lifestyle) depicted (ibid., 83ff). This also applied to women depicted in this way (ibid., 92).
Writing in 1972, Berger insisted that women were still ‘depicted in a different way to men – because the “ideal” spectator is always assumed to be male and the image of the woman is designed to flatter him’ (ibid., 64). In 1996 Jib Fowles still felt able to insist that ‘in advertising males gaze, and females are gazed at’ (Fowles 1996, 204). And Paul Messaris notes that female models in ads addressed to women ‘treat the lens as a substitute for the eye of an imaginary male onlooker,’ adding that ‘it could be argued that when women look at these ads, they are actually seeing themselves as a man might see them’ (Messaris 1997, 41). Such ads ‘appear to imply a male point of view, even though the intended viewer is often a woman. So the women who look at these ads are being invited to identify both with the person being viewed and with an implicit, opposite-sex viewer’ (ibid., 44).
We may note that within this dominant representational tradition the spectator is typically assumed not simply to be male but also to be heterosexual, over the age of puberty and often also white.
As Jonathan Schroeder notes, ‘Film has been called an instrument of the male gaze, producing representations of women, the good life, and sexual fantasy from a male point of view’ (Schroeder 1998, 208). The concept derives from a seminal article called ‘Visual Pleasure and Narrative Cinema’ by Laura Mulvey, a feminist film theorist. It was published in 1975 and is one of the most widely cited and anthologized (though certainly not one of the most accessible) articles in the whole of contemporary film theory.
Laura Mulvey did not undertake empirical studies of actual filmgoers, but declared her intention to make ‘political use’ of Freudian psychoanalytic theory (in a version influenced by Jacques Lacan) in a study of cinematic spectatorship. Such psychoanalytically-inspired studies of ‘spectatorship’ focus on how ‘subject positions’ are constructed by media texts rather than investigating the viewing practices of individuals in specific social contexts. Mulvey notes that Freud had referred to (infantile) scopophilia – the pleasure involved in looking at other people’s bodies as (particularly, erotic) objects. In the darkness of the cinema auditorium it is notable that one may look without being seen either by those on screen by other members of the audience. Mulvey argues that various features of cinema viewing conditions facilitate for the viewer both the voyeuristic process of objectification of female characters and also the narcissistic process of identification with an ‘ideal ego’ seen on the screen. She declares that in patriarchal society ‘pleasure in looking has been split between active/male and passive/female’ (Mulvey 1992, 27). This is reflected in the dominant forms of cinema. Conventional narrative films in the ‘classical’ Hollywood tradition not only typically focus on a male protagonist in the narrative but also assume a male spectator. ‘As the spectator identifies with the main male protagonist, he projects his look onto that of his like, his screen surrogate, so that the power of the male protagonist as he controls events coincides with the active power of the erotic look, both giving a satisfying sense of omnipotence’ (ibid., 28). Traditional films present men as active, controlling subjects and treat women as passive objects of desire for men in both the story and in the audience, and do not allow women to be desiring sexual subjects in their own right. Such films objectify women in relation to ‘the controlling male gaze’ (ibid., 33), presenting ‘woman as image’ (or ‘spectacle’) and man as ‘bearer of the look’ (ibid., 27). Men do the looking; women are there to be looked at. The cinematic codes of popular films ‘are obsessively subordinated to the neurotic needs of the male ego’ (ibid., 33). It was Mulvey who coined the term ‘the male gaze’.
References: Berger, John (1972): Ways of Seeing. London: BBC/Harmondsworth: Penguin Burgin, Victor (Ed.) (1982a): Thinking Photography. London: Methuen Caughie, John, Annette Kuhn & Mandy Merck (Eds.) (1992): The Sexual Subject: A Screen Reader in Sexuality. London: Routledge Evans, Caroline & Lorraine Gamman (1995): ‘The Gaze Revisited, Or Reviewing Queer Viewing’. In Burston & Richardson (Eds.), op. cit., pp. 13-5 Dyer, Richard ([1982] 1992a): ‘Don’t Look Now: The Male Pin-Up’. In Caughie et al. (Eds.) op. cit., pp. 265-76; also in Dyer (1992b), op. cit., pp. 103-119 Elkins, James (1996): The Object Stares Back: On the Nature of Seeing. New York: Simon & Schuster Foucault, Michel (1977): Discipline and Punish: The Birth of the Prison. New York: Pantheon Fowles, Jib (1996): Advertising and Popular Culture. Thousand Oaks, CA: Sage Lutz, Catherine & Jane Collins (1994): ‘The Photograph as an Intersection of Gazes: The Example of National Geographic‘. In Taylor (Ed.), op. cit., 363-84 Messaris, Paul (1997): Visual Persuasion: The Role of Images in Advertising. London: Sage Mulvey, Laura ([1975] 1992): ‘Visual Pleasure and Narrative Cinema’. In Caughie et al. (Eds.), op. cit., pp. 22-34. Also published in: Mulvey 1989; Mast et al. (Eds.) (1992), op. cit., pp.746-57; abridged version in Bennett et al. (Eds.) (1981), op. cit., pp. 206-15; originally published in Screen16(3): 6-18 Schroeder, Jonathan E (1998): ‘Consuming Representation: A Visual Approach to Consumer Research’. In Barbara B Stern (Ed.): Representing Consumers: Voices, Views and Visions. London: Routledge, pp. 193-230 Sontag, Susan (1979): On Photography. Harmondsworth: Penguin Tagg, John (1988): The Burden of Representation. Amherst: University of Massachusetts Press Willemen, Paul ([1980] 1992): ‘Letter to John’. In Caughie et al. (Eds.) op. cit., pp. 171-83; originally published in Screen 21(2): 53-65
Tasks/ Assignments/ Activities – see photopedagogy
How does the gaze function active vs passive within social media, popular/ celebrity culture at large, such as our desire for gossip, tabloid journalism, post-truths, AI generative content? Who controls what we are looking at? How can we manage/ curate our own information and what we are looking at, or directed towards Images = knowledge = power =control = consumerism = money = power.
The A-level coursework consist of two modules, Personal Investigation (practical work worth 72 marks) and Personal Study (written work worth 18 marks) which are interlinked and informed by each other. All the work that you produced (both coursework and mock exam) in Yr 12 also contributes towards A-Level coursework and overall equates to 60% of the total marks and the remainder 40% accounts for the External Set Assignment (Exam) in 2024. The Personal Investigation accounts for 48% and the Personal Study accounts for 12% of the total coursework marks. Final DEADLINE is Mock Exam 3-5 Feb.
What is a Personal Study?
The aim of this unit is to critically investigate, question and challenge a particular style, area or work by artists/ photographer(s) which will inform and develop your own emerging practice as a student of photography. The unit is designed to be an extension of your practical work in your Personal Investigation module where the practical informs and develops the theoretical elements and vice versa of your ongoing project.
Your Personal Study is a written and illustrated dissertation, including a written essay (1000-3000 words) and a lens-based body of work (either stills photography or moving image) with a number of final outcomes produced from your Personal Investigation unit.
PRESENTATION: The choice is between making a photobook; exploring a subject and theme in depth using photography as a tool for visual storytelling, either through observation (documentary) or staging (tableaux) a series of photoshoots. Making a film might be more in line with your creative skills set and offer other elements to storytelling, such as combining moving image and sound. Either option offers its own unique set of challenges and opportunities for you to express yourself creatively as A-Level Photography student.
Explore Shannon’s blog posts to learn more about her Personal Study into patriarchy and women’s traditional role
What it says in the syllabus (Edexcel)
BLOG: In addition, you are expecting to produce an appropriate amount of blogposts that demonstrates your ability to research, analysis, plan, record, experiment, present and evaluate. DEADLINE: BLOG >
PRINTS: You are also encouraged to print and present a number of images from your practical work as final outcomes. DEADLINE: PRINTS >
The personal study will consist of a critical and analytical written piece of a minimum of 1000 words and maximum of 3000 words of continuous prose, making links to the student’s own practical investigations, supported by contextual research. Through the personal study, students will demonstrate understanding of relevant social, cultural or historical contexts. Students will also express personal interpretations or conclusions, and use technical and specialist vocabulary. The focus of the personal study can be any concept, movement, person, people, artefact(s), or other source of reference. However, it must be related to their own ideas, investigations and practical work. The personal study can take any form but must: ● be presented as a separate piece in writing ● be a minimum 1000 words on the chosen subject ● be written in continuous prose ● be in a presentable format for assessment ● include a full bibliography, citing all references.
Students will need to consider: ● critical and analytical content ● expression of personal interpretations and conclusions ● contextual research and understanding ● links between research, analysis and own investigations ● use of specialist terminology and vocabulary ● clarity of expression and language ● appropriate structure and presentation.
The personal study must be the student’s own work, forming an essential part of their independent investigations. Development of the personal study may be supported through presentations to the class, discussions and individual tutorials. Teachers can also help students to focus their ideas for the personal study by asking them to produce a proposal or an outline of their intentions. Students may support their progress in writing the minimum 1000 words with visual examples of their own work and the work of others, sketchbook annotation, notes from visits, exploration of materials and the development of their own ideas. Any references to others’ writing should be acknowledged through a bibliography. Internet sources should be cited with a brief description of the source material.
To summarise: ● supporting studies will help to prepare for both practical work and personal study ● the practical work(film, photobook, prints and supporting studies) and personal study(essay) may be approached in any order, or progress simultaneously ● the outcome for the personal study must form a separate presentation ● work must not be added to or altered once submitted for assessment ● the practical work will be marked against all four Assessment Objectives, equal to 48% of all coursework marks. ● The personal study comprises 12% of the final qualification and is marked out of 18.
How to get started
How to get started: Link your chosen area of study to your previous work, knowledge and understanding based upon your chosen themes of ‘OBSERVE, SEEK, CHALLENGE‘.
Up until now you have explored the theme of ‘OBSERVE, SEEK, CHALLENGE‘ focusing on visiting tourism, heritage and industrial sites, such as St Malo, Societe Jersiaise, Maritime Museum and St Helier Harbour producing three different outcomes; A3 page-spreads, photo-zines and final prints. All these outcomes are exploring a sense of place and cultural identity through storytelling. It’s up to you to decide how you want to explore the theme of ‘OBSERVE, SEEK, CHALLENGE‘ further and choose a medium that you enjoy most and feel will give you the best chance at producing a quality final outcome. This project will be the final chance you have to improve your coursework marks and grades!
For example, some of the subjects or issues you wish to explore within the theme of ‘OBSERVE, SEEK, CHALLENGE‘, you may have explored previously in Yr 12 projects based around the theme of ‘NOSTALGIA’, that included PORTRAITURE and FEMINITY vs MASCULINITY and LANDSCAPE and ANTHROPOCENE and STILL-LIFE and FORMALISM Or, you may wish to develop new ideas around COMMUNITY and FAMILY. It may be useful for you to revisit some of the projects you have already covered in your coursework, so far (see below).
PRACTICAL WORK: You have 4 weeks in lesson time in the remainder of the Autumn term, and at Christmas another 2 weeks to complete principal shoots and make new images. This include all relevant blog posts demonstrating your knowledge and understanding of: RESEARCH > ANALYSIS > PLANNING > RECORDING, EXPERIMENTATION > PRESENTATION > EVALUATION.
PHOTOBOOK: Returning after Christmas we will be spending the whole month of January developing and designing your photobook, which will also include your essay and somewhere between 30-50 images sequenced to tell a story.
FILM: If you are making a film, then you will be spending January editing your footage, including both visual (moving image/ still-images) and sound (ambient sound, voice-over, sound effects and music scores). Your essay will be published as a separate blog post.
DEADLINE: MUST complete 4-5 new photo-shoots/ moving image/ sound recordings this AUTUMN and SPRING TERM that must be published on the blog by WED 22 January.
ESSAY: We will be spending minimum 1 lesson a week on CONTEXTUAL STUDIES where you will be learning about art/photo history, critical theory and contemporary practice as well as developing academic study skills to help you writing your essay. However, it is essential that you are organising your time effectively and setting aside time outside of lessons to read, study and write.
DEADLINE: Final Essay MUST be published on blog: Fri 31 Jan 2025
MOCK EXAM: 3 – 5 Feb 2025. 3 days controlled test (15 hours) ALLGroups: 13A. 13C & 13D.
DEADLINE: Completion of photobook or film LAST DAY OF YOUR MOCK EXAM.
Week 8: 21 – 27 Oct Introduction to Personal Study Review and Reflect
Lesson task Mon: Choose one Personal Study project from past students and evaluate against assessment criteria using official mark sheet
For photobooks, look through sequence of images carefully and study their supporting blog posts.
For films, watch film saved in shared folder here and study their supporting blog posts.
M:\Departments\Photography\Students\Image Transfer\LOVE & REBELLION\FILM\Personal Study
Present their project in class and comment on the book, or film’s quality, with reference to: Concept > ideas and meaning behind project Narrative > a sense of a story or subject being explored Editing > consistency and quality of imagery Sequencing > the order of which images appear on the page or in the film to tell a story Design > layout of images and choices of format, size, front-cover, title and other design elements Aesthetic > how something looks and overall beauty (or lack of) of final product.
Make an assessment using the mark sheet below and calculate a grade.
Lesson task Tue:Personal Study Read the essay and comment on its overall written and interpretative quality as well as its use of critical, contextual and historical references, eg.
Does the essay address its hypothesis?
Does it provide new knowledge and understanding?
Is the essay well structured with a sense of an introduction, paragraphs and a conclusion?
Use and flow of language, prose, punctuation, spelling.
Use of specialist vocabulary relating to art and photography.
Analysis of artist’s oeuvre (body of work) and key work(s).
Evidence of wider reading with reference to art history/ theory, political discourse and/or socio-economical context.
Use of direct quotes, summary or commentary from others to make an informed and critical argument.
Use of referencing system (eg. Harvard) and a bibliography.
Use of illustrations with captions listing name of artist, title of work and year of production.
Make an assessment using the mark sheet and calculate a grade.
Lesson Task Wed-Fri: Review and Reflect complete the following blogpost
Objective:Criteria from the Syllabus
Essential that students build on their prior knowledge and experience developed during the course.
Develop your written dissertation in the light of your chosen focus from the practical part of previous coursework and projects.
From all the coursework (Personal Investigation) that you have produced write an overview of what you learned so far (both as Yr 12 and Yr 13 student) and publish on the blog.
1. Describe which themes (Observe, Seek, Challenge, Anthropocene, Home, Feminity/ Masculinity/ Identity etc,) medium (photography, film), approaches (documentary, tableaux, conceptual), artists (incl contextual references to art history, movements and isms) and photographic skills, processes, techniques and methods (incl learning new software) inspired you the most and why.
2. Include examples of both previous and current experiments and imagery to illustrate your thinking.
HALF-TERM 28 Oct – 3 Nov: Read mock exam paper: ‘OBSERVE, SEEK, CHALLENGE’ and make notes. Begin to research and explore themes > gathering images, writing initial ideas, record images with your camera that can be used to produce mindmap and moodboard.
Week 9: 4 – 10 Nov Explore themes of ‘OBSERVE, SEEK, CHALLENGE’ and produce MINDMAP and MOODBOARD complete the following blogposts
Assessment Objectives
Definition in dictionary:
You should provide evidence that fulfils the four Assessment Objectives: AO1 Develop ideas through sustained and focused investigations informed by contextual and other sources, demonstrating analytical and critical understanding AO2 Explore and select appropriate resources, media, materials, techniques and processes, reviewing and refining ideas as work develops AO3 Record ideas, observations and insights relevant to intentions, reflecting critically on work and progress AO4 Present a personal and meaningful response that realises intentions and, where appropriate, makes connections between visual and other elements.
a person who watches or notices something.”to a casual observer, he was at peace.
a person who follows events closely and comments publicly on them.”some observers expect interest rates to rise”
a person posted in an official capacity to an area to monitor political or military events.”elections scrutinized by international observers”
SYNONYMS: spectator, onlooker, watcher, voyeur, looker-on, fly on the wall, viewer, witness, eyewitness, bystander, sightseer, commentator, onlooker, reporter, blogger, monitor.
SEEK
VERB
attempt to find (something):“they came here to seek shelter from biting winter winds” SIMILAR: look for, be on the lookout for, search for, try to find, look about for.
ask for (something) from someone:“he sought help from the police” SIMILAR: ask for, request solicit, call on, invite, entre, beg for
(SEEK SOMEONE/SOMETHING OUT)search for and find someone or something:“it’s his job to seek out new customers” SIMILAR: discover, detect find (out), unearth, uncover, disinte
CHALLENGE
NOUN
a call to someone to participate in a competitive situation or fight to decide who is superior in terms of ability or strength:“he accepted the challenge” SIMILAR: dare, provocation, summons
a call to prove or justify something:“a challenge to the legality of the banning order” SIMILAR: opposition, defiance, ultimatum, confrontation with.
VERB
invite (someone) to engage in a contest:“he challenged one of my men to a duel” · “organizations challenged the government in by-elections” SIMILAR: dare, summon, invite,bid, throw down the gauntlet, to defy someone to do something
definition: Binary opposition: a pair of related terms or concepts that are opposite in meaning.
Theory of binaries. According to French philosopher, Jacques Derrida, meaning is often defined in terms of binary oppositions, where “one of the two terms governs the other.”. An example would be the white/ black binary opposition in the United States, the African American is defined as a devalued other. An example of a binary opposition is the male-female dichotomy, where male is the dominant gender and women are subservient (patriarchy).
Patriarchy: a system of society or government in which men hold the power and women are largely excluded from it, both within family, workplace and government.
Synonym: a synonym is a word that means the same or nearly the same thing as another word
Antonym: a word of opposite meaning. The usual antonym of good is bad.
Binary opposition & narrative: Claude Levi-Strauss was a French anthropologist and ethnologist who developed the theory of structuralism and structural anthropology. Levi Strauss theory on binary opposition talks about how narrative can be split into opposites, such as Good and Evil, Man and Woman, Rich and Poor, etc. Due to having these opposites, when together it creates the conflict in the narrative story and this becomes the central climax. Read more here.
How to start
Read the Exam Paper thoroughly, especially pages pages 4-5 and page 25-28 which details specific starting points and approaches to the exam theme – make notes! Look up the word in the dictionary, synonyms and etymology (the study of the origin of words and the way in which their meanings have changed throughout history.)
Brainstorm your idea and research artists listed – look also at starting points in other disciplines e.g. Fine Art and Graphic Communication etc.
Begin to gather information, collect images, produce a mind-map and mood-board
Write a Statement of Intent that explains how you interpret the themes and wish to develop your project.
Make plans for at least 3 photoshoots – you MUST produce ONE PHOTO-SHOOT over H-Term as an initial response to themes/ ideas etc.
Each week you are required to make a photographic response (still-images and/or moving image) that relates to the research and work that you explored in that week. Sustained investigations means taking a lot of time and effort to produce the best you can possibly do – reviewing, modifying and refining your idea and taking more pictures to build up a strong body of work with a clear sense of purpose and direction
Prior to the timed MOCK examination you must produce and submit preparatory supporting studies which show why and how the supervised and timed work takes the form it does. You must produce a number of blog posts 15-30 that charts the development of your final piece from conception to completion and must show evidence of:
Development of your thoughts, decisions, research and ideas based on the theme
Record your experiences and observations
Analysis and interpretation of things seen, imagined or remembered
Investigations showing engagement with appropriate primary and secondary sources
Experimentation with materials, processes and techniques
Select, evaluate and develop images/ media further through sustained investigation
Show connections between your work and that of other artists/ photographers
Critical review and reflection
Controlled conditions 5/15 hrs over one/three days: (Final Outcome)
This time is for you to fine tune and adjust your final images for print using creative tools in Lightroom/Photoshop and/or complete a final edit of your photobook, film or video in Premiere. Your final outcome(s) must be presented in a thoughtful, careful and professional manner demonstrating skills in presenting work in either window mounts, picture frames, foam-board, and/ or submit pdf of photobook, or embed (from Youtube upload) moving image and video based production to the blog.
IDEAS > INTERPRETATIONS > ARTIST EXAMPLES from pages 4 & 5 in exam booklet
Caves of Altamira
After having visited the caves of Altamira, Picasso famously said:
In 15,000 years we have invented nothing.
Pablo Picasso and his African masksPablo Picasso and CollagesBanksy, Cave Painting Removal
The Russian avant-garde reached its creative and popular height in the period between the Russian Revolution of 1917 and 1932, at which point the ideas of the avant-garde clashed with the newly emerged state-sponsored direction of Socialist Realism.
Exhibition at The Museum of Modern Art (MOMA) Covering the period of artistic innovation between 1912 and 1935, A Revolutionary Impulse: The Rise of the Russian Avant-Garde traces the arc of the pioneering avant-garde forms after Socialist Realism was decreed the sole sanctioned style of art. The exhibition examines key developments and new modes of abstraction, including Suprematism and Constructivism, as well as avant-garde poetry, film, and photomontage.
Varvara Stepanova, The Results of the First Five-Year Plan, 1932 (State Museum of Contemporary Russian History, Moscow)
Ai Weiwei
Ai Weiwei’s colored vases: Clever artwork or vandalism? read article here
51 ancient Chinese vases covered with brightly colored paint
Exhibition visitors have expressed feelings of uneasiness or even pain and nostalgia when seeing Colored Vases by Ai Weiwei1. The 51 vases that make up the artwork are originally treasures from the Neolithic Age (5000–3000 BCE) and the artist has dunked them in common industrial paint.
Why did Ai Weiwei do it?
By doing this, he commented on the devastation caused by the Chinese Cultural Revolution2 and the disregard for centuries-old craftsmanship3. By covering the surfaces, the history of the vases is no longer visible but still there, beneath the dried layer of industrial color. Some viewers have felt provoked by this audacious act, in their eyes destroying something rare and precious instead of safeguarding and worshipping it.
Conclusion
Like many other works by Ai Weiwei, he uses irony to challenge viewers’ assumptions and perspectives. As China’s most notorious artist, he finds himself in constant confrontation with the Chinese authorities, and Colored Vases is an essential piece in his rebellious oeuvre.
Ai Weiwei, Study of Perspective
Study of Perspective is a photographic series produced by Ai Weiwei between 1995 and 2017. Throughout the series, viewers see Ai’s left arm extended forward with the middle finger raised to significant institutions, landmarks and monuments from around the world. These pictures mimic tourists’ photos and encourage people to question their adherence and acceptance towards governments, institutions and establishments. This series speaks out about Ai’s beliefs regarding freedom of speech, empowerment of the people, and democratic values and showcases his activist side in true colors.
Sunflower Seeds 2010 consists of millions of individually handcrafted porcelain sunflower seeds. The work has a volume of nearly ten cubic metres, weighing approximately ten tonnes. The artist has stipulated two different configurations for the work. In the first, the seeds are arranged in a continuous rectangular or square field to a depth of ten centimetres. This ‘bed’ of seeds conforms to the dimensions of the display space, with walls confining the work on three sides. Alternatively, the work is presented as a conical sculptural form, approximately five metres in diameter. In this second configuration, there is no containing structure or support for the conical form, which is installed by carefully pouring the seeds from above to form the shape. Any uneven edges can be adjusted by hand at the time of installation.
This work is derived from the Eleventh Unilever Series commission for Tate Modern’s Turbine Hall for which Ai created 1-125,000,000 2010, a bed of ceramic sunflower seeds installed across the floor of the space. The Unilever Series commission was the first time Ai Weiwei presented this multitude of sunflower seeds as a continuous rectangular field to create a ‘unique surface’, and the first time he proposed an interactive element, in which the public was invited to walk on the seeds. In the event, after the initial days of the exhibition, it was not possible for viewers to interact with the work by walking on it due to the health risks posed by the resulting dust.
The fabrication of the seeds was carried out in the city of Jingdezhen in northern Jiangxi, a region of China south of Beijing. Historically famous for its kilns and for the production of imperial porcelain, this region is still known for its high quality porcelain production. The sunflower seeds were made by individual craftspeople in a ‘cottage-industry’ setting, rather than in a large-scale factory, using a special kind of stone from a particular mountain in Jingdezhen.
The symbol of the sunflower was ubiquitous during the Cultural Revolution in China in the 1960s and 1970s, and was often used as a visual metaphor for the country’s Communist leader Chairman Mao (1893–1976) and, more importantly perhaps, the whole population. In Sunflower Seeds Ai examines the complex exchanges between the one and the many, the individual and the masses, self and society. Far from being industrially produced, the sunflower seeds are intricately and individually handcrafted, prompting a closer look at the ‘Made in China’ phenomenon commonly associated with cheap mass-produced goods. The myriad sunflower seeds – each unique yet apparently the same – can be seen toevoke the quest for individuality in a rapidly transforming society.
In his proposal for the Unilever Series Commission, Ai commented on the significance of the sunflower seeds:
[In] the times I grew up, it was a common place symbol for The People, the sunflower faces the trajectory of the red sun, so must the masses feel towards their leadership. Handfuls were carried in pockets, to be consumed on all occasions both casual and formal. So much more than a snack, it was the minimal ingredient that constituted the most essential needs and desires. Their empty shells were the ephemeral traces of social activity. The least common denominator for human satisfaction. I wonder what would have happened without them? (Ai Weiwei, unpublished proposal for Tate Modern Unilever Series, March 2010.)
Ai’s practice is increasingly driven by issues facing contemporary China, such as the exercise of autocratic power, the disappearance of Chinese cultural and material history, and concerns about human rights, hard labour and poverty. Sunflower Seeds explores the complexity of the Chinese individual’s relationship with society, the authorities and tradition.
MIND-MAP and MOODBOARD
RESEARCH > It it is paramount that you explore the themes of ‘OBSERVE, SEEK, CHALLENGE’ in a personal and unique manner. Having studied exam paper thoroughly, especially pages 4 & 5 and, produce a mind-map and mood-board of ideas/ interpretations/ starting points working in small groups of 2-3 students and feedback to the class.
Some of you may wish to continue to explore ‘stories’ within Jersey’s maritime heritage or your own connection with the sea. For example, Doug Ford mentioned several female historical figures, such as diver … whose story is not represented in the island maritime history. Or, those mothers, wives, sisters who stayed behind and looked after the family home, farm and businesses when men engaged in the cod-fisheries left for Newfoundland or Gaspe in the spring every year. Equally, some of you or members of your family or friendship groups may use the leisure or sport, such as surfing, swimming, sailing, or simply enjoying Jersey beaches and coastlines. Fortifications and German bunkers are scattered all around the island and as architectural features in they landscape they would make for a thorough photographic study. Individual bunkers and sites also has specific occupation stories that may be linked to grandparents or great grandparents who fought in WW II.
Week 10: 11 – 17 Nov INSPIRATIONS: Artists References complete the following blogposts
THEORY > ANALYSIS ARTISTS REFERENCES:
Objective:Criteria from the Syllabus
Select artists work, methods, theories and art movements appropriate to your previous coursework work as a suitable basis for your Personal Study.
Investigate a wide range of work and sources
ARTISTS REFERENCES: Read pages 25-28 in the Exam paper with specific starting points relating to photography. You can choose artists references listed here or select work from artists/ photographers, filmmakers that have inspired your work in the past, and that you would like to research in depth as a basis for your Personal Study. It’s essential that you choose 2-3 artists as a basis for case studies. Compare and contrast their practice and work following these steps:
Produce a mood board with a selection of images and write an overview of their work, including methods, style, approach and subject matter.
Select at least one image from each photographer and analyse in depth using methodology of TECHNICAL > VISUAL > CONTEXTUAL > CONCEPTUAL.
MEANING & METHODS: Identify meaning and methods behind selected artists/photographers work and research at least 3 different literary sources (online articles, books, YouTube clips) that will provide you with different critical perspective and views other than your own.
The literary sources will also provide you with something to read for further contextual understanding and critical thinking in preparation for writing your essay. Make sure you save hyperlinks photocopies etc in a new folder: Academic References.
Incorporate quotes and comments from artist themselves or others (art critics, art historians, curators, writers, journalists etc) using a variety of sources such as YouTube, online articles, reviews, books
Make sure you reference sources and embed links to the above sources in your blog post.
For more help and guidance see blog post here which suggest different artists in response to themes of ‘OBSERVE, SEEK, CHALLENGE.’
EXTENSION: CONTEXTUAL STUDIES1 Conversations on Photography: As a case study read one interview, identity 3 quotes and apply theory to a analysis of one image.
Week 11: 18 – 24 Nov > Statement of Intent complete the following blogposts
STATEMENT OF INTENT
Write a Statement of Intent of 250-500 words that clearly contextualise;
What you want to explore?
Why it matters to you?
How you wish to develop your project?
Which form you wish to present your study (photobook, film, prints etc)
When and where you intend to begin your study?
Make sure you describe how you interpret the themes of ‘OBSERVE, SEEK, CHALLENGE’ and any specific subject-matter, topic or issue that you wish to explore, including references to artists, art movement and any other inspiration. Revisit your mind-map and mood-board and hone in one or two ideas. For example, you may wish to consider:
How you wish to photograph places, people, objects – carefully selecting your point of view (framing), composition and lighting.
Will you be making images outside or inside, shooting on locations or use the studio.
Will your images be documentary (windows, observational), or tableaux (mirrors, staged) in your approach, style and aesthetic look?
What will you include?
What will you leave out?
How will you present these images to the viewer?
In a book, a film, or prints on the wall?
With or without accompanying text?
In a grid, typology study or a linear sequence?
Will you be manipulating images using montage/ collage techniques or apply AI technology?
Will you be using any specific photographic techniques, processes of software (Photoshop, Premiere, Audition, Blurb online book making)
What difference do these decisions make to the meaning of your project and the images you will be making?
Week 12: 25 – 30 Nov PHOTO-SHOOTS: Planning & Recording complete the following blogposts
PRACTICE > RESPONSES PHOTO-SHOOTS
PLANNING: Produce a blog post with a detailed plan of at least 3-4 photoshoots that you intend on doing in response to analysis and interpretation of your Artists References above. Make sure photo-shoots relates to the ideas on how you intend to develop your project as set out in your Statement of Intent. Follow these instructions: what, why, how, when, where?
There are three photographic genres that you could consider when developing ideas and planning photoshoots, they are:
LANDSCAPE > PLACE > GEOGRAPHY > ENVIRONMENT > GEOLOGY – familiar vs unfamiliar – ordinary vs extra-ordinary – vernacular vs spectacular PORTRAIT > PEOPLE > IDENTITY > CULTURE > COMMUNITY – individual vs collective – explore the photographic gaze STILL-LIFE > OBJECT > HISTORY > MEMORY > FAMILY – private vs public
RECORDING: Complete planned photo-shoot and bring images with you into class. Begin to edit and show experimentation with images using Lightroom / Photoshops/ Premiere as appropriate to your intentions. Make sure you annotate processes and techniques used.
Produce a blog post from each shoot with careful selection, adjustments and editing of images in Lightroom. Review and evaluate shoot for further development and experimentation. Your first photo-shoot MUST be published on the blog by Fri 13 Dec.
EVALUATION: Upon completion of photoshoot and experimentation, make sure you evaluate and reflect on your next step of development. Comment on the following:
How successful was your photoshoot and experimentation?
What references did you make to artists references? – comment on technical, visual, contextual, conceptual?
How are you going to develop your project from here? – comment on research, planning, recording, experimenting.
What are you going to do next? – what, why, how, when, where?
Week 13: 1 – 8 Dec ESSAY: Hypothesis, essay plan and introduction (draft) complete the following blogposts
MON: Literary Sources
Research and identify 3-5 literary sources from a variety of media such as books, journal/magazines, internet, Youtube/video that relates to your personal study and artists references .
Begin to read essay, texts and interviews with your chosen artists as well as commentary from critics, historians and others.
It’s important that you show evidence of reading and draw upon different pints of view – not only your own.
Take notes when you’re reading…key words, concepts, passages
Write down page number, author, year, title, publisher, place of publication so you can list source in a bibliography
Bibliography
List all the sources that you have identified above as literary sources. Where there are two or more works by one author in the same year distinguish them as 1988a, 1988b etc. Arrange literature in alphabetical order by author, or where no author is named, by the name of the museum or other organisation which produced the text. Apart from listing literature you must also list all other sources in alphabetical order e.g. websites/online sources, Youtube/ DVD/TV.
Quotation and Referencing:
Why should you reference?
To add academic support for your work
To support or disprove your argument
To show evidence of reading
To help readers locate your sources
To show respect for other people’s work
To avoid plagiarism
To achieve higher marks
What should you reference?
Anything that is based on a piece of information or idea that is not entirely your own.
That includes, direct quotes, paraphrasing or summarising of an idea, theory or concept, definitions, images, tables, graphs, maps or anything else obtained from a source
How should you reference?
Use Harvard System of Referencing…see Powerpoint: harvard system of referencing for further details on how to use it.
https://vimeo.com/223710862
Here is an full guide on how to use Harvard System of Referencing including online sources, such as websites etc.
TUE: Essay Question
Think of a hypothesis and list possible essay questions
Below is a list of possible essay questions that may help you to formulate your own.
Essay Plan Make a plan that lists what you are going to write about in each paragraph – essay structure
Essay question:
Opening quote
Introduction (250-500 words): What is your area study? Which artists will you be analysing and why? How will you be responding to their work and essay question?
Pg 1 (500 words): Historical/ theoretical context within art, photography and visual culture relevant to your area of study. Make links to art movements/ isms and some of the methods employed by critics and historian.
Pg 2 (500 words): Analyse first artist/photographer in relation to your essay question. Present and evaluate your own images and responses.
Pg 3 (500 words): Analyse second artist/photographer in relation to your essay question. Present and evaluate your own images and responses.
Conclusion (250-500 words): Draw parallels, explore differences/ similarities between artists/photographers and that of your own work that you have produced
Bibliography: List all relevant sources used
Wed-Fri: Essayintroduction In this lesson you will write a 45 mins draft essay introduction following these steps:
Open a new Word document > SAVE AS: Essay draft
Copy essay question into Essay title: Hypothesis > if you don’t have one yet, make one!
Copy your Statement of Intent from previous blogpost.
Identify 2 quotes from your literary sources using Harvard System of Referencing.
Use one quote as an opening quote:Choose a quote from either one of your photographers or critics. It has to be something that relates to your investigation.
Begin to write a paragraph (250-500 words) answering the following questions below.
You got 45 mins to write and upload to the blog!
Think about an opening that will draw your reader in e.g. you can use an opening quote that sets the scene. Or think more philosophically about the nature of photography and its feeble relationship with reality.
You should include in your introduction an outline of your intention of your study, e.g.
What are you going to investigate?
How does this area/ work interest you?
What are you trying to prove/challenge, argument/ counter-argument?
Whose work (artists/photographers) are you analysing and why?
What historical or theoretical context is the work situated within?
What links are there with your previous studies?
What have you explored or experimented with so far in your photography project?
How will your work develop.
What camera skills, techniques or digital processes have you used, or going to experiment with?
Below is link to a blog post which will provide you with helpful guidelines if you are struggling to structure your essay or writing paragraphs.
Week 14: 9 – 15 Dec PHOTO-SHOOTS: Editing and Developing complete the following blogposts
EDITING:
Upload new images from camera card and save to folder on the M:drive
Import images from M:drive into Lightroom
Organisation: Create a new Collection from each new shoot inside Collection Set: PHOTOBOOK
Editing: select 8-12 images from each shoot.
Experimenting: Adjust images in Develop, both as Colour and B&W images appropriate to your intentions
Export images as JPGS (1000 pixels) and save in a folder: BLOG
Create a Blogpost with edited images and an evaluation; explaining what you focused on in each shoot and how you intend to develop your next photoshoot.
Make references to artists references, previous work, experiments, inspiration etc.
EXPERIMENTING:
Export same set of images from Lightroom as TIFF (4000 pixels)
Experimentation: demonstrate further creativity using Photoshop to make composite/ montage/ typology/ grids/ diptych/triptych, text/ typology etc appropriate to your intentions.
Make sure you annotate process and techniques used and evaluate each experiment
EXTENSION: Design a photo-zine. Set up new document as A5 page sizes. This is trying out ideas before you begin designing photobook.
EVALUATING: Upon completion of photoshoot and experimentation, make sure you evaluate and reflect on your next step of development. Comment on the following:
How successful was your photoshoot and experimentation?
What references did you make to artists references? – comment on technical, visual, contextual, conceptual?
How are you going to develop your project from here? – comment on research, planning, recording, experimenting.
What are you going to do next? – what, why, how, when, where?
Week 15: 16 – 18 Dec GROUP CRIT: Work in progress complete the following blogposts
Mon 16 & Tue 17 Dec > Work-in-Progress
Prepare a 2-3 mins presentation on something that you are working on right now in your project. For example:
An idea An image A photo-shoot An experiment An inspiration New research New development
Use blog posts to present in class or print images or any photographic experiments as visual reference material. As a class we will give constructive feedback on how each student can develop their work and project.
XMAS BREAK 19 Dec – 6 Jan PHOTO-SHOOTS: Produce at least 2/3 photo-shoots ESSAY: Read key texts for essay and begin to write an essay draft
PLAN > RECORD > As a creative response to initial ideas set out in your Statement of Intent plan a relevant photoshoot during the Christmas break that provides you with some visual material to develop your project further in the New Year. There are three photographic genres that you could consider when developing ideas and planning photoshoots, they are:
LANDSCAPE > PLACE > GEOGRAPHY > ENVIRONMENT > GEOLOGY – familiar vs unfamiliar – ordinary vs extra-ordinary – vernacular vs spectacular PORTRAIT > PEOPLE > IDENTITY > CULTURE > COMMUNITY – individual vs collective STILL-LIFE > OBJECT > HISTORY > MEMORY > FAMILY – private vs public
Produce a blog post from each shoot with careful selection, adjustments and editing of images in Lightroom. Review and evaluate shoot for further development and experimentation. Your photo-shoots MUST be published on the blog by Fri 10 JAN 2025.
USEFUL RESOURCES
DOCUMENTARY vs TABLEAUX PHOTOGRAPHY
CONTEXTUAL STUDIES > 1 blog post. Describe the genres of documentary photography and tableaux photography and highlight the differences and similarities in the style and approach of the image-making process. For example: What do we mean by a photograph that is ‘documentary’ in style. How does a staged tableaux image construct a narrative different from documentary photography? Which of the two genres are best at representing truth? Or, is photography now unreliable as ‘evidence’ or ‘bearing witness’ and be a ‘window’ onto the world due to new technology, such as AI and other digital image manipulation software. In order to answer these questions fully, you may want to refer to your earlier essay; Photography and Truth: Can a photograph lie? See more here:
Aim to write 500-1000 words and include images to illustrate both genres of photography and show evidence of reading by including direct quotes from sources and referencing using Harvard system.
RESOURCES > First, Look through both these PPTs to get a basic understanding documentary photography and tableaux photography.
Photographer Rob Hornstra on documentary, storytelling and slow journalism
Rob Hornstra and writer Arnold van Bruggen spend five years working in the Sochi Region where the 2014 Winter Olympics where held. Here is a link to The Sochi Project
British documentary photographer Chloe Dewe-Matthews
Jeff Wall, Insomnia, 1994, Transparency in lightbox, 172,2 x 213,5 cm
Stranger than Fiction: Should documentary photographers add fiction to reality? Documentary photography belongs to the realm of truth, yet some photographers are testing the boundaries between reality and fiction in a bid to reach a public that is accustomed to these narrative forms in the literary and cinematic worlds. In contemporary photography today your have what some people call Fictional Documentary (similar to TV genre such as doc-drama) where you interpret real or historical events through fiction. This is often expressed through a personal and artistic vision which are operating somewhere between fiction and fantasy with some elements of truth or historical data that has been re-imagined.
See the work of: Cristina de Middel (Afronauts, Sharkification, This is What Hatred Did), Max Pinckers (Will They Sing Like Raindrops or Leave Me Thirsty), Vasantha Yogananthan (A Myth of Two Souls), Ron Jude (Lick Creek Line), Eamonn Doyle ( i ) Paul Graham (Does Yellow Run Forever), Yury Toroptsov (Fairyland, House of Baba Yaga, Divine Retribution), Gareth McConnell (Close Your Eyes), Joan Fontcuberta
EXTRA READING: For a contemporary perspective on documentary practice read photographer, Max Pincher’s Interview: On Speculative Documentary To read this interview you must access it online from home as it is blocked from internet filter in school.