Welcome back!
SPRING TERM – DEADLINES
PRACTICAL WORK: This term you have 6 weeks to complete all work, including essay and photobook or film. This include all relevant blog posts demonstrating your knowledge and understanding of: RESEARCH > ANALYSIS > PLANNING > RECORDING, EXPERIMENTATION > PRESENTATION > EVALUATION.
DEADLINE: MUST complete final photo-shoots/ moving image recordings by end of January 2022
ESSAY: We will continue to spend 1 lesson a week every Wednesdays on CONTEXTUAL STUDIES where you will be learning about critical theory, photo history and contemporary practice as well as developing academic study skills to help you writing your essay. However, it is essential that you are organising your time effectively and setting aside time outside of lessons to read, study and write.
DEADLINE: Essay MUST be handed in Mon 31 Jan 2022
PHOTOBOOK / FILM: For the whole month of January you will be developing and designing your photobook which will include your essay and somewhere between 40-60 images sequenced to tell a story. For those making a film you will spend January editing moving images and sound in Premiere.
MOCK EXAM: 7 – 11 Feb 2022
3 days controlled test (15 hours)
Groups: 13B: MON 7 – WED 9 FEB
13C: WED 7 – FRI 11 FEB
DEADLINE: Completion of photobook or film
LAST DAY OF YOUR MOCK EXAM.
PLANNER – Download and save in your folder. Make sure you monitor and track your progress.
Week 15: 5 – 9 Jan
Essay writing: Academic study skills
Contextual Study: Decoding Photography
Wed: Academic Sources
- Research and identify 3-5 literary sources from a variety of media such as books, journal/magazines, internet, Youtube/video that relates to your personal study and artists references .
- Begin to read essay, texts and interviews with your chosen artists as well as commentary from critics, historians and others.
- It’s important that you show evidence of reading and draw upon different pints of view – not only your own.
- Take notes when you’re reading…key words, concepts, passages
- Write down page number, author, year, title, publisher, place of publication so you can list source in a bibliography
Bibliography
List all the sources that you have identified above as literary sources. Where there are two or more works by one author in the same year distinguish them as 1988a, 1988b etc. Arrange literature in alphabetical order by author, or where no author is named, by the name of the museum or other organisation which produced the text. Apart from listing literature you must also list all other sources in alphabetical order e.g. websites/online sources, Youtube/ DVD/TV.
Quotation and Referencing:
Why should you reference?
- To add academic support for your work
- To support or disprove your argument
- To show evidence of reading
- To help readers locate your sources
- To show respect for other people’s work
- To avoid plagiarism
- To achieve higher marks
What should you reference?
- Anything that is based on a piece of information or idea that is not entirely your own.
- That includes, direct quotes, paraphrasing or summarising of an idea, theory or concept, definitions, images, tables, graphs, maps or anything else obtained from a source
How should you reference?
Use Harvard System of Referencing…see Powerpoint: harvard system of referencing for further details on how to use it.
Here is an full guide on how to use Harvard System of Referencing including online sources, such as websites etc.
Thurs: Essay Question
- Think of a hypothesis and list possible essay questions
- Below is a list of possible essay questions that may help you to formulate your own.
Some examples of Personal Study essays from previous students
In what way have Jim Goldberg and Ryan McGinley represented youth in their work?
What Constitutes a ‘Real’ Image?
To what extent can we trust documentary photography to tell the truth about reality?
How does Jeff Wal’s Tableaux approach depict a seemingly photojournalistic approach?
How can photography bear witness to reality?
Compare how Cindy Sherman and Phoebe Jane Barrett challenge gender stereotypes.
How can something that doesn’t physically exist be represented through photography?
How does the work of Darren Harvey-Regan explore abstraction as an intention and process?
THUR: Essay Plan
Make a plan that lists what you are going to write about in each paragraph – essay structure
- Essay question:
- Opening quote
- Introduction (250-500 words): What is your area study? Which artists will you be analysing and why? How will you be responding to their work and essay question?
- Pg 1 (500 words): Historical/ theoretical context within art, photography and visual culture relevant to your area of study. Make links to art movements/ isms and some of the methods employed by critics and historian.
- Pg 2 (500 words): Analyse first artist/photographer in relation to your essay question. Present and evaluate your own images and responses.
- Pg 3 (500 words): Analyse second artist/photographer in relation to your essay question. Present and evaluate your own images and responses.
- Conclusion (250-500 words): Draw parallels, explore differences/ similarities between artists/photographers and that of your own work that you have produced
- Bibliography: List all relevant sources used
Week 16: 10 – 16 Jan
Essay: write Introduction & paragraph 1
Photobook/ Film: Editing images/ footage
ESSAY: Lesson time (Mon-Wed)
Essay Introduction
In this lesson you will write a 45 mins draft essay introduction following these steps:
- Open a new Word document > SAVE AS: Essay draft
- Copy essay question into Essay title: Hypothesis > if you don’t have one yet, make one!
- Copy your essay introduction (from Essay Plan) which will give you a framework to build upon and also copy your Statement of Intent.
- Identify 2 quotes from sources identified in an earlier task using Harvard System of Referencing.
- Use one quote as an opening quote: Choose a quote from either one of your photographers or critics. It has to be something that relates to your investigation.
- Add sources to Bibliograpphy > if by now you don’t have any sources, use S. Sontag. On Photography Ch1
- Begin to write a paragraph (250-500 words) answering the following questions below.
- You got 45 mins to write and upload to the blog!
- Think about an opening that will draw your reader in e.g. you can use an opening quote that sets the scene. Or think more philosophically about the nature of photography and and feeble relationship with reality.
- You should include in your introduction an outline of your intention of your study e.g.
- What are you going to investigate.
- How does this area/ work interest you?
- What are you trying to prove/challenge, argument/ counter-argument?
- Whose work (artists/photographers) are you analysing and why?
- What historical or theoretical context is the work situated within. Include 1 or 2 quotes for or against.
- What links are there with your previous studies?
- What have you explored so far in your Coursework or what are you going to photograph?
- How did or will your work develop.
- What camera skills, techniques or digital processes in Photoshop have or are you going to experiment with?
- Use information you gathered in Art Movements & Isms sheet as a starting point for your paragraphs
- Use 500 words blog post you produced before Christmas in relation to Art Movement and Isms as a basis for this paragraph
- Select at least two qoutes from your literary sources (see list below) that you can incorporate into your paragraph.
- Your paragraph must include visual examples of artists making work within that art movement that is relevant to your Personal Study.
- Complete Paragraph 1 and upload to the blog at the end of lesson
Paragraph 1 Structure (500 words) : Use subheading. This paragraph covers the first thing you said in your introduction that you would address. The first sentence introduces the main idea of the paragraph. Other sentences develop the subject of the paragraph.
Content: you could look at the following…exemplify your hypothesis within a historical and theoretical context. Write about how your area of study and own work is linked to a specific art movement/ ism. Research and read key text and articles from critics, historians and artists associated with the movement/ism. Use quotes from sources to make a point, back it up with evidence or an example (a photograph), explain how the image supports the point made or how your interpretation of the work may disapprove. How does the photograph compare or contrast with others made by the same photographer, or to other images made in the same period or of the same genre by other artists. How does the photograph relate to visual representation in general, and in particularly to the history and theory of photography, arts and culture.
Include relevant examples, illustrations, details, quotations, and references showing evidence of reading, knowledge and understanding of history, theory and context!
How Did Pictorialism Shape Photography and Photographers ?
Realism vs Pictorialism: A Civil War in Photography History
Movements: Straight Photography
Modernism and Postmodernism History
For more help and guidance with writing your essay go to blog post below.
WED 12 JAN: CONTEXTUAL STUDIES
Decoding Photography
• Select one of the questions listed
• Read text in detail, make notes and identify 3 quotes
• Select one image from examples mentioned in text and apply your own interpretation of the photograph by applying theory and critical thinking
• Incorporate the 3 quotes above into your interpretation of the image and make sure you comment on the quotes.
Go to Blogpost here for more details
FILM: (Lesson time (Thurs & Fri)
RECORDING: Produce a number of photographic response to your Personal Study and bring footage from video/ audio recordings to lessons:
EDITING:
• Save media in folder on local V:Data Drive
• Organisation: Create a new project in Premiere
• Editing: begin editing video/ audio clips on the timeline
• Adjusting: recordings in Colour / B&W appropriate to your intentions.
EXPERIMENTING:
• Video: experimenting with sequencing using relevant transitions and effects
• Sound: consider how audio can add depth to your film, such as ambient sound, sound fx, voice-over, interview, musical score etc. • Title and credits: Consider typography/ graphics/ styles etc. For more creative possibilities make title page in Photoshop (format: 1280 x 720 pixels) and import as a Psd file into your project folder on the V-Data drive.
EVALUATING: Write an evaluation on the blog that reflects on your artistic intentions, film-editing process and collaboration. Include screen-prints from Premiere and a few ‘behind the scenes’ images of the shooting/ production for further annotation. Comment on the following:
- How successful was your photoshoot and experimentation?
- What references did you make to artists references? – comment on technical, visual, contextual, conceptual?
- How are you going to develop your project from here? – comment on research, planning, recording, experimenting.
- What are you going to do next? – what, why, how, when, where?
THURS/FRI: 13 – 14 Jan
PRESENTATION – Work-in-Progress
PRESENTING: Prepare a 3-5 mins presentation on something that you are working on right now in your project. For example:
An idea
An image
A photo-shoot
An experiment
An inspiration
New research
New development
Use blog posts to present in class. As a class we will give constructive feedback on how each student can develop their work and project.
Week 17: 17 – 23 Jan:
Essay: Paragraph 2 + 3
Film: Deconstruct narrative, editing & sound
ESSAY: Lesson time (Fri)
• Complete Paragraph 2 & 3 and upload to the blog no later than Mon 24 Jan.
UNDERSTANDING FILM EDITING:
NARRATIVE, CINEMATOGRAPHY, SOUND, MISE-EN-SCENE, EDITING
Earlier in the academic year we looked at narrative in photography, literature and cinema. Let’s refresh our memory and revisit some of the theories around visual storytelling.
Blog: Produce a number of posts that show evidence of the following:
1. Research a film and describe its story – including subject-matter, genre and style etc.
2. Who is the film director? Why did he/she make it? (intentions/ reasons) Who is it for? (audience) How was it received? (any press, awards, legacy etc.)
3. Deconstruct the film’s narrative, editing and sound, such as; scenes, action, shot sizes, camera angles and mise-en-scene (the arrangement of the scenery in front of the camera) from location, props, people, lighting, sound etc.
CASE-STUDIES: Look below for examples of films and theory on editing and sound used in understanding cinema and language of moving images.
THEORY
For more details see Dr McKinlay’s blog on Narrative in Cinema and The Language of Moving Image which look more specifically at some of the recognised conventions and key terminology associated with moving image (film, TV, adverts, animations, installations and other moving image products) which will help to create your own moving image product. Remember the key is to know what the rules are before trying to break them.
The following recognised conventions should help students to deconstruct key moving image media texts and will also help students to create their own moving image products, working within or against these conventions. Remember the key is to know what the rules are before trying to break them.
As alluded to, when looking at moving image products, it is useful to make a link to NARRATIVE THEORY as most often the key ideas, codes and conventions that are put to use for moving image products, are usually put together to serve ideas around NARRATIVE. For example, character, theme, motivation, empathy, ideology and so on.
Here are a few things to consider when working with Moving Image. (These are extracts from Dr McKinlay’s blog posts above)
THE CAMERA: Here are some of the key features of the camera in terms of creating a moving image product.
Focus and Depth of Field: The focus is used to direct and prioritise elements in a shot and therefore prioritise certain information. For example, it will determine who the audience should look at (even if we are not listening to them). It may switch our focus (known technically as a pull focus / rack focus / follow focus) between one element and another. Remember that the elements may not be people, but could be objects, spaces, shapes or colours, which may represent an idea, theme, belief etc (see the post on Semiotics)
Shot sizes, angles and movements
- High angle / Low angle / bulls-eye / birds eye / canted angle
- Tracking / Panning / Craning / Tilting / Hand held / Steadicam
- Establishing Shot / Long Shot / Medium Shot / Close-up / Big Close-Up / Extreme Close Up (students often struggle with the first and the last again issues with SCALE, SIZE & SPACE, so practice is really important)
- Insert Shot
THE EDIT: Moving image products (like other media products: print, radio, on-line) are clearly constructed around the concept of putting one thing next to another. This is editing.
Editing is the process of manipulating separate images into a continuous piece of moving image which develops characters, themes, spaces and ideas through a series of events, interactions and occurrences. As such, it is (usually) LINEAR and SEQUENTIAL, although, it must be remembered that moving image products often parachute the audience into a particular moment and usually leave them at an equally unresolved moment. As such BACK STORY, FORESHADOWING, REPETITION, ELLIPSIS, DEVELOPMENT, ENIGMA, DRAMATIC IRONY and other concepts are really important to always bear in mind. Again NARRATIVE THEORY is really important to an understanding of moving image products.
Moving from Camera to Edit, would be to look at the way camera can frame and position characters and thereby the audience by creating ‘subjectivity‘ and empathy in the way they are constructed. This can be used to deliberately ‘stitch‘ the audience into the text in a deliberate and particular way.
This idea of sewing / stitching the audience into the text was developed by theoreticians of the “Screen theory” approach — Colin MacCabe, Stephen Heath and Laura Mulvey, so follow this link to find out a little bit more.
SHOT SEQUENCING 1: Shot / Reverse Shot
The Shot / Reverse Shot a really good starting point for students to both think about and produce moving image products. The basic sequence runs from a wide angle master shot that is at a 90′ angle to (usually) two characters. This sets up the visual space and allows the film-maker to to then shoot separate close-ups, that if connected through an eye-line match are able to give the impression that they are opposite each other talking. The shots are usually over the shoulder. Firstly, they include both characters – which are called EXTERNAL REVERSES. As the drama increases, the framing of each shot then excludes the back of the head of the other character and moves in to a much closer over the shoulder shot – which are called INTERNAL REVERSES. Remember that these shots are not creating a direct look to camera. To look directly at the camera creates a very different relationship between the characters and the audience and is a technique that is only used for specific techniques / genres / film-makers.
The basic edit: cut/fade/dissolve
SHOT SEQUENCING 2: Shot progression
Shot progression usually involves the following shots (although not always in the same order). The use of these shots allow the audience to understand SPATIAL RELATIONSHIPS between locations, people, movements etc. The length of shot will determine the drama, empathy, theme etc. The choice of how to sequence each shot will determine the AESTHETIC QUALITY of the product. The next sequence will then follow a similar pattern, which again allows the audience to understand concepts such as SPACE, TIME, DISTANCE, MOVEMENT, MOTIVATION, PLOT, THEME etc.
- establishing shot / ES, moving to
- wide shot / WS,
- to medium shot / MS,
- to close up / CU,
- to big close up / BCU;
- and then back out again
The use of sequential editing (editing one clip to another) allows for a number of key concepts to be produced:
- parallel editing: two events editing together – so that they may be happening at the same time, or not?
- flashback / flash-forward – allowing time to shift
- montage – a series of independent and perhaps unconnected shots to be edited together
CONTINUITY EDITING
Continuity editing can be seen as the opposite of montage editing as the main aim is to create a sense of realism or ‘believability’ known as verisimilitude and has it’s own structure of rules where shots are edited together at particular times or on particular shots. For example:
- match on action
- eye-line match
- graphic match
- sound bridge
- 30′ rule
- 180′ rule
Editing is the process of putting one element / idea next to another. It is known as the Kuleshov effect, in that adding one element / idea to another actually produces a third idea / element, which if constructed well can produce in the audience an idea that isn’t actually present! If this sounds confusing, the basic rule in editing is you don’t show everything literally, you need to use just enough information to provide ideas and suggestions for your audience to develop EMPATHY and INVOLVEMENT with characters, themes, setting, plot. As such, what you leave out known as ELLIPSIS is just as important as what you put in. Again the ideas of SPACE, SIZE & SCALE are really important, because you need to frame your shots with appropriate SIZE AND SCALE and trim your shots so that they are not too long ie creating the appropriate SPACE for ideas, characters, themes, the plot etc to develop.
The Kuleshov effect is a film editing (montage) effect demonstrated by Soviet filmmaker Lev Kuleshov in the 1910s and 1920s. It is a mental phenomenon by which viewers derive more meaning from the interaction of two sequential shots than from a single shot in isolation. Through this phenomenon we can suggest meaning and manipulate space, as well as time.
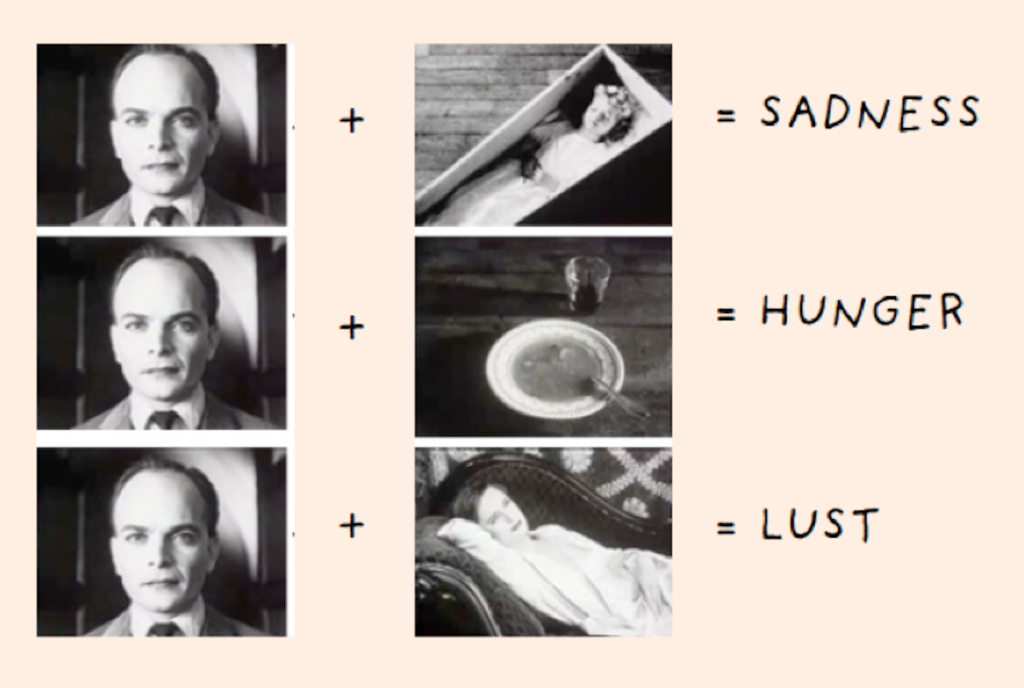
Kuleshov edited a short film in which a shot of the expressionless face of Tsarist matinee idol Ivan Mosjoukine was alternated with various other shots (a bowl of soup, a girl in a coffin, a woman on a divan). The film was shown to an audience who believed that the expression on Mosjoukine’s face was different each time he appeared, depending on whether he was “looking at” the bowl of soup, the girl in the coffin, or the woman on the divan, showing an expression of hunger, grief, or desire, respectively. The footage of Mosjoukine was actually the same shot each time.
Kuleshov used the experiment to indicate the usefulness and effectiveness of film editing. The implication is that viewers brought their own emotional reactions to this sequence of images, and then moreover attributed those reactions to the actor, investing his impassive face with their own feelings. Kuleshov believed this, along with montage, had to be the basis of cinema as an independent art form.
Chris Marker: La Jétte
Chris Marker, (1921-2012) was a French filmmaker, poet, novelist, photographer, editor and multi-media artist who has been challenging moviegoers, philosophers, and himself for years with his complex queries about time, memory, and the rapid advancement of life on this planet. Marker’s La Jetée is one of the most influential, radical science-fiction films ever made, a tale of time travel. What makes the film interesting for the purposes of this discussion, is that while in editing terms it uses the language of cinema to construct its narrative effect, it is composed entirely of still images showing images from the featureless dark of the underground caverns of future Paris, to the intensely detailed views across the ruined city, and the juxtaposition of destroyed buildings with the spire of the Eiffel Tower. You can read more here about the meaning of the film and it is available on Vimeo here in its entirety (29 mins)
Mark Cousins: Atomic, Living in Dread and Promise
A narrative can also be made constructed entirely of archive footage as in Atomic, Living in Dread and Promise, a film that shows impressionistic kaleidoscope of our nuclear times – protest marches, Cold War sabre-rattling, Chernobyl and Fukishima – but also the sublime beauty of the atomic world, and how x-rays and MRI scans have improved human lives. The nuclear age has been a nightmare, but dreamlike too. Made by director and film critic, Mark Cousins and featuring original music score by Mogwai, it was first broadcast on BBC4 as part of Storyville documentary. Your can read a Q&A with Cousins’ here where he discusses the making of the film.
Christopher Nolan: Memento
Memento is a 2000 American neo-noir psychological thriller film written and directed by Christopher Nolan. Guy Pearce stars as a man who, as a result of an injury, has anterograde amnesia (the inability to form new memories) and has short-term memory loss approximately every fifteen minutes. He is searching for the people who attacked him and killed his wife, using an intricate system of Polaroid photographs and tattoos to track information he cannot remember.
The film is presented as two different sequences of scenes interspersed during the film: a series in black-and-white that is shown chronologically, and a series of color sequences shown in reverse order (simulating for the audience the mental state of the protagonist). The two sequences meet at the end of the film, producing one complete and cohesive narrative
Telling a story in reverse can be an interesting way to construct a narrative. Both cinema and literature are good at jumping between different time modes, past, present and future. Moving image and sound can enhance these different temporal shifts and written language is good and transporting your imagination from one time zone to another. Photography is mute but different strategies can be employed such as changing from colour to monochrome suggesting a different time or a different set of images. Using old photographs from archives, or found imagery can add complexity too, and including words can support a sequence of images, or add tension between the visual and the textual adding other elements to a photographic narrative.
Memento: Narrative and Postmodernism is also being looked at in Media Studies and if you are studying this subject make sure you include knowledge and understanding learned. Adopting a inter-disciplinary approach to your work is advantageous and being able to use theory and/ or context from other subjects will add value to your overall quality of your work and potentially achieve higher marks.
Theorists like Sergei Eisenstein, D.W Griffiths, Lev Kuleshov, Jean Epstein, John Grierson (also the coiner of the term ‘documentary’), Dziga Vertov, Andre Bazin, and Siegfried Kracauer went into sometimes painful detail to articulate theories about how various film and editing combinations created different forms of meaning. Many of these ideas remain surprisingly robust and useful a century later, and remain the bedrock of much of the theory taught to film students.
MISE EN SCENE
Mise en scene plays a huge role in communicating the tone of a story — but what is mise en scene? In classical terms, mise en scene is the arrangement of scenery and stage properties in a play or film. Today, mise en scene is regarded as all of the elements that go into any single shot of a production. Click below to learn more about mise-en-scene
https://www.studiobinder.com/blog/mise-en-scene-elements-color-in-film/
Four of the most important aspects of mise en scene are: sets, props, costume/hair/makeup, and lighting. Here are examples from filmmakers Stanley Kubrick and Wes Anderson on how to apply color to these four aspects.
VIDEO ART are not following moving image conventions as described above. Instead they are more fragmented in structure and often don’t follow a narrative in a linear sense. Often they are concerned with other elements, such as repetition, parody, chance, play or staging something for the camera. For more help and guidance – see my a previous blog posts here from 2017
Tom Pope, Art and Protests, Jersey Live film stuff
You may explore different approaches to image-making across different genres such as performance, photography, video, multi-media, installation, land/ environmental art, experimental film-making and avant-garde cinema.
See more examples here of video art and experimental films in the blog post from our 90 sec film project on ART & ACTIVISM.
Sound
Moving image depends on sound for much of its’ meaning. It is impossible to overstate how important a role audio plays in the film viewing experience. While it’s perfectly natural to be drawn to the visual side of film making, those striking visuals don’t hold the same weight without strong cinematic sound design to back them up. Whereas a painting is purely visual and a song can be purely aural, cinema combines sight and sound for a unified experience where one bolsters and elevates the other. Click on link below and learn about the role of the sound designer and other sound design jobs, the fundamentals of sound design, and to check out some examples from the movies with the best sound design.
https://www.studiobinder.com/blog/what-is-sound-design-for-film/
What is sound design?
Sound design is how filmmakers flesh out the aural world of a film to enhance the mood, atmosphere, and/or tone. Sound design components include sound effects or SFX sound design, mixing, Foley sound design, dialogue, and music. Sound design is the final and most important element needed to create an immersive experience for the audience.
Examples of sound design in practice:
A sound designer working in the sci-fi, horror, or fantasy genres will likely be tasked with conceiving original sounds for unique sources. What does an alien ship sound like? How do you approach horror creature sound design? All of these are questions a sound designer will devise answers for.
Let’s take a look at District 9‘ssound design as an example. In this scene, the sounds of the mech suit, alien weapons, computerized UI, the spaceship, and the creature vocalizations all required immense creativity in District 9’s sound design.
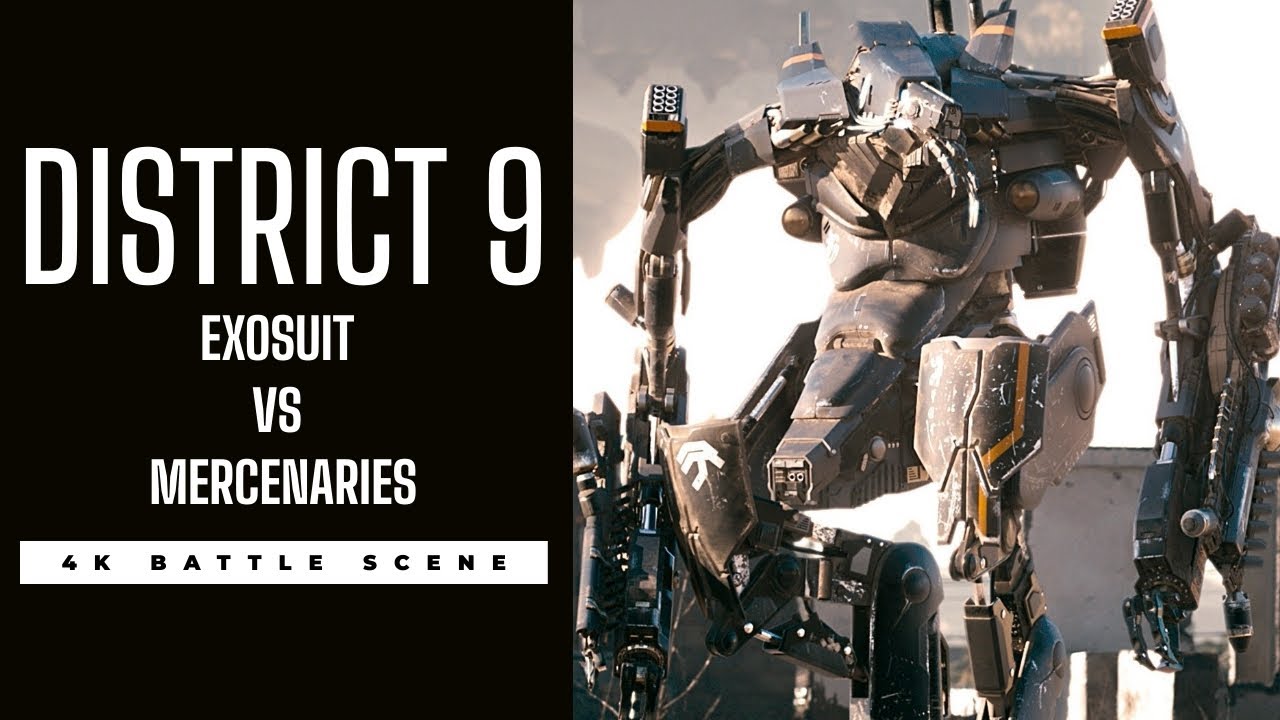
This is sound design from Neill Blomkamp’s District 9
The Coen Brothers have a keen ear for cinematic sound design. Their filmography is jam-packed with excellent examples of sound design, including some of the best sound design in films. Their work showcases the variety of different directions a sound designer can take the material.
This can range from stylized near-cartoon sound design in something like Raising Arizona to something more psychologically-driven like Barton Fink’ssound design. John Goodman’s ferocious roars, hysterical dialogue, the rush of fire, and the long decay of his shotgun blast, are all sound design examples culminating in one cohesive moment.
Barton Fink sound design in action
In addition to individual sound effects, sound designers also create what are known as soundscapes. You can think of a soundscape as a bed of audio that music, SFX, and dialogue rest on top of. Creative soundscapes are a great way to enhance a film’s sense of atmosphere or style.
Many of the most memorable soundscapes find themselves at home in the horror genre. An eerie soundscape can be a great way to double down on the creepiness of on-screen visuals. The films of David Lynch almost always feature incredibly inventive soundscapes that he often crafts himself.
In this example from Eraserhead, notice how much atmosphere and dread are generated through the powerful and oppressive soundscape. The droning, surreal tones are layered with industrial noises that magnify the bleak nature of the environment surrounding our protagonist and the end effect is staggeringly effective.
Sound editing vs sound mixing
To continue familiarizing yourself with audio post-production and to get a good handle on the distinction between sound editing and sound mixing, read article on the nuances that distinguish them here.
What you hear on a movie’s soundtrack is multilayered. Dialogue, ADR, sound effects, Foley, music — it’s all part of the overall sound design. Putting it all together is a massive job and it’s handled by multiple teams with different taks. So, that brings us to the question of the hour: what is the difference between sound editing vs sound mixing?
Catch a few scenes from iconic movies that delineate between editing and mixing, below.
https://www.studiobinder.com/blog/sound-editing-vs-sound-mixing/
What is sound editing?
Sound editing is the creation, recording, or re-recording of sounds.
When you’re on set, capturing quality sound is critical. But the majority of the sounds you hear in the movies are rarely ever captured this way. Often, the main focus on set, is the blocking and staging of the actors, and perfecting the execution of their lines.
Many of the sounds are added in later. The collection and creation of these sounds is sound editing. We’ll get more into the ways artists collect these sounds soon. Once these sounds are added in, then sound mixing can begin. The main goal in mixing is to make sure that all of the sounds, including recorded dialogue, are as seamless as possible.
Let’s dive a little deeper into both sound editing and mixing.
Week: 18-19 -20: 24 Jan– 11 Feb
MOCK EXAM 3 days (15 hrs) Mon 7 – Fri 11 Feb
Finish Editing Film & Complete Essay
In the next three week focus on beginning to edit and collect all your images, archival material and texts, including finishing writing your essay needed to complete your photobook.
ESSAY: Lesson time (Fri):
Complete conclusion, bibliography, proof read and hand in draft essay no later than Mon 31 Jan.
You want to aim for a draft layout and hand in draft version of your essay before your Mock Exam day, then use that day to fine tune design and complete essay.
INTERIM DEADLINE: FRI 4 FEB
DRAFT FILM EDIT
FILM: Lesson time (Mon, Tue, Thurs & Fri)
Produce a number of blogposts that show evidence of the following:
- STORYBOARDING: Re-evaluate your own film’s narrative and storyboard including details of individual scenes, action, shot sizes, camera angles and mise-en-scene (the arrangement of the scenery in front of the camera) from location, props, people, lighting, sound etc.
Narrative: What is your story?
Describe in:
- 3 words
- A sentence
- A paragraph
2. RECORDING: Produce a number of photographic response to your Personal Study and bring footage from video/ audio recordings to lessons:
• Save footage in folder on local V:Data Drive
• Organisation: Create a new project in Premiere
3. EDITING:
• Begin editing video/ audio clips on the timeline
• Adjust recordings in Colour / B&W appropriate to your intentions.
• Video: experimenting with editing and sequencing using relevant transitions and effects
• Sound: consider how audio can add depth to your film, such as ambient sound, sound fx, voice-over, interview, musical score etc. • Title and credits: Consider typography/ graphics/ styles etc. For more creative possibilities make title page in Photoshop (format: 1280 x 720 pixels) and import as a Psd file into your project folder on the V-Data drive.
Produce screen prints of layout ideas as you progress and add to Blog for further annotation, commenting on editing and sequencing video and sound etc.
4. EVALUATION: Write an evaluation on the blog that reflects on your artistic intentions, film-editing process and collaboration. Include screen-prints from Premiere and a few ‘behind the scenes’ images of the shooting/ production for further annotation. Comment on the following:
- How successful was your photoshoot and experimentation?
- What references did you make to artists references? – comment on technical, visual, contextual, conceptual?
- How are you going to develop your project from here? – comment on research, planning, recording, experimenting.
- What are you going to do next? – what, why, how, when, where?
5. BLOG POSTS: Make sure all blog posts are finished including, research, analysis, experimentation, annotation and an evaluation of final outcomes.
6. FINAL PRINTS: Select a set of 5-6 photographs as final outcomes and evaluate – explaining in some detail how well you realised your intentions and reflect on what you have learned in LOVE & REBELLION project.
Save final prints in our shared PRINT folder (no later than 15:00 end of your Mock exam day) in a high-resolution (4000 pixels on the long edge.) Save each images in your name i.e. first name_surname_title_1, and 2, 3 and so on.
M:DepartmentsPhotographyStudentsImage TransferPRINTINGA2 Coursework Prints Spring 2022