Write an evaluation, reflecting on the experience of being part of making a newspaper and working on Occupation vs Liberation project and put it here at the top of the blog post, titled: Liberation Newspaper.
Copy and past all the below and publish as your own blog post.
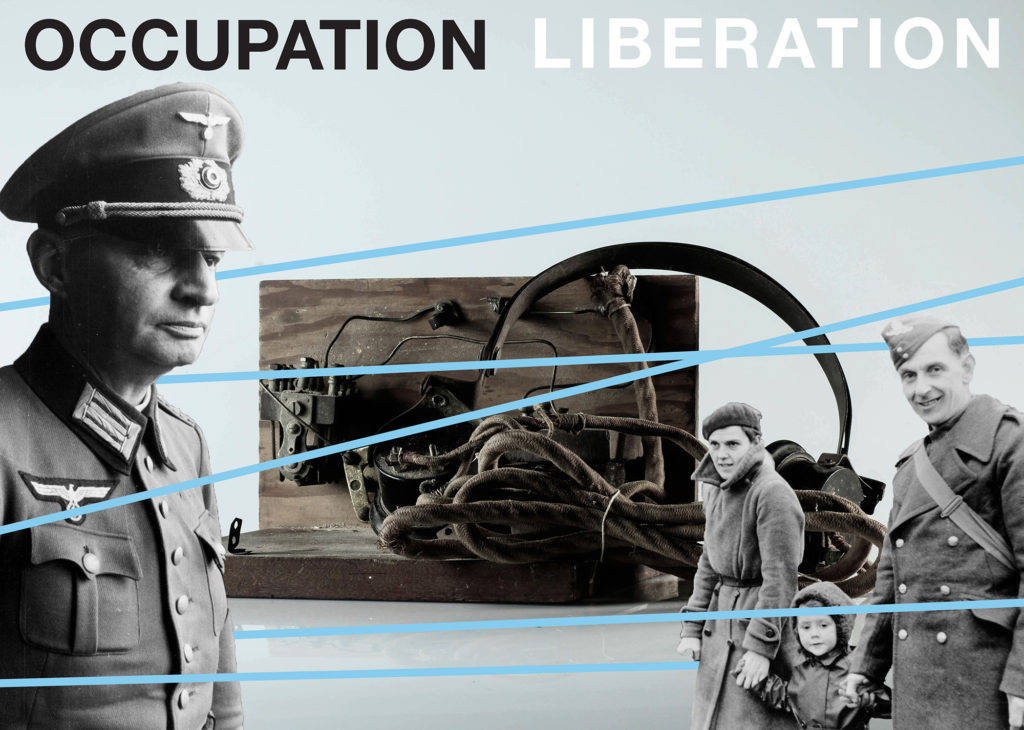
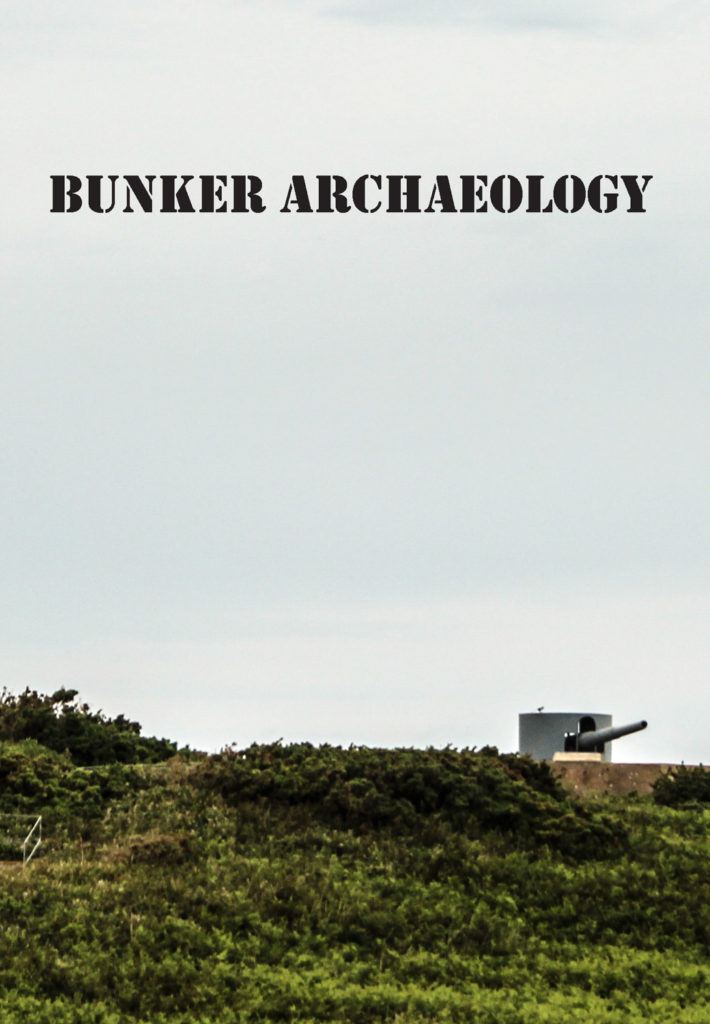
Liberation Newspaper
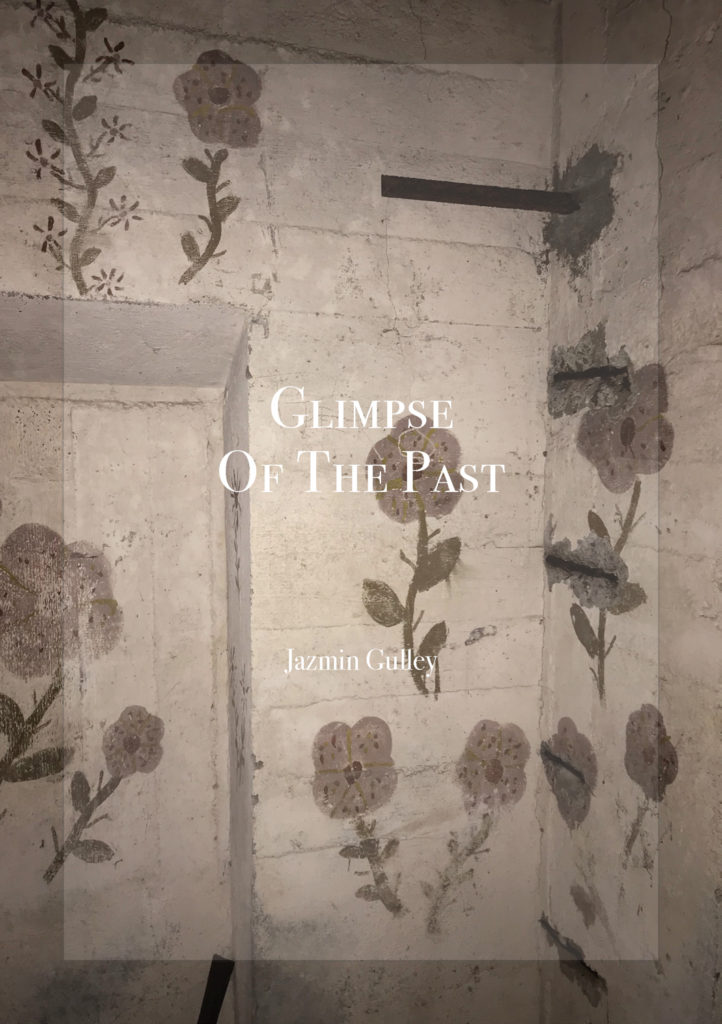
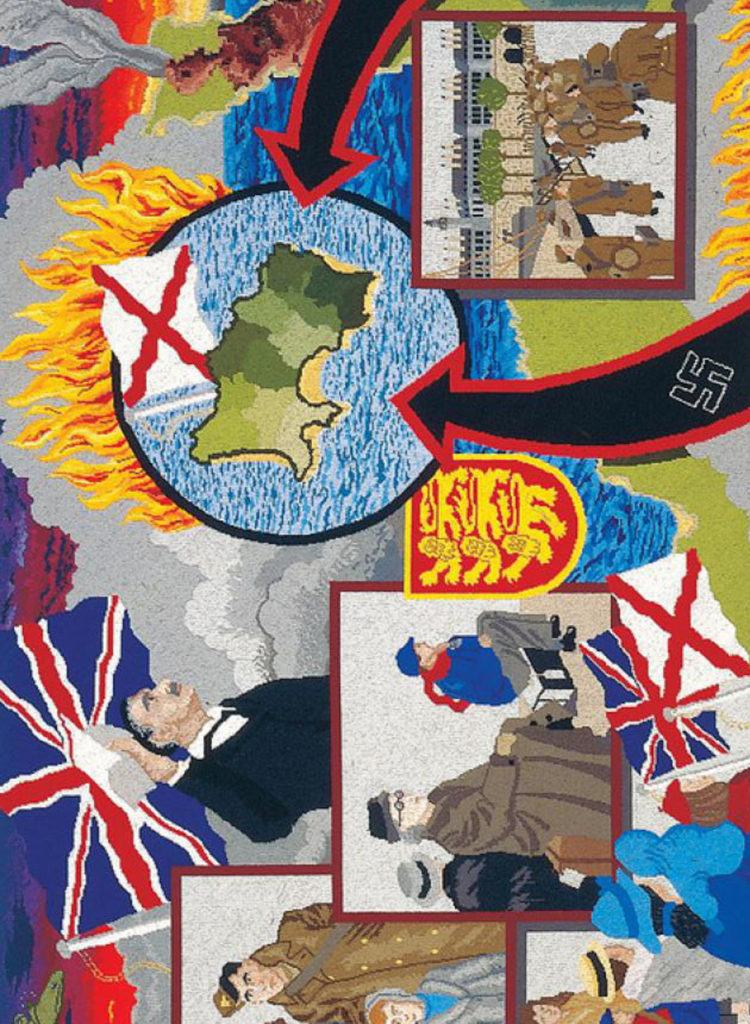
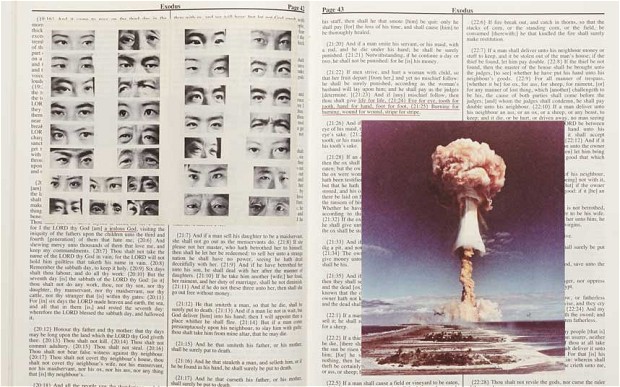
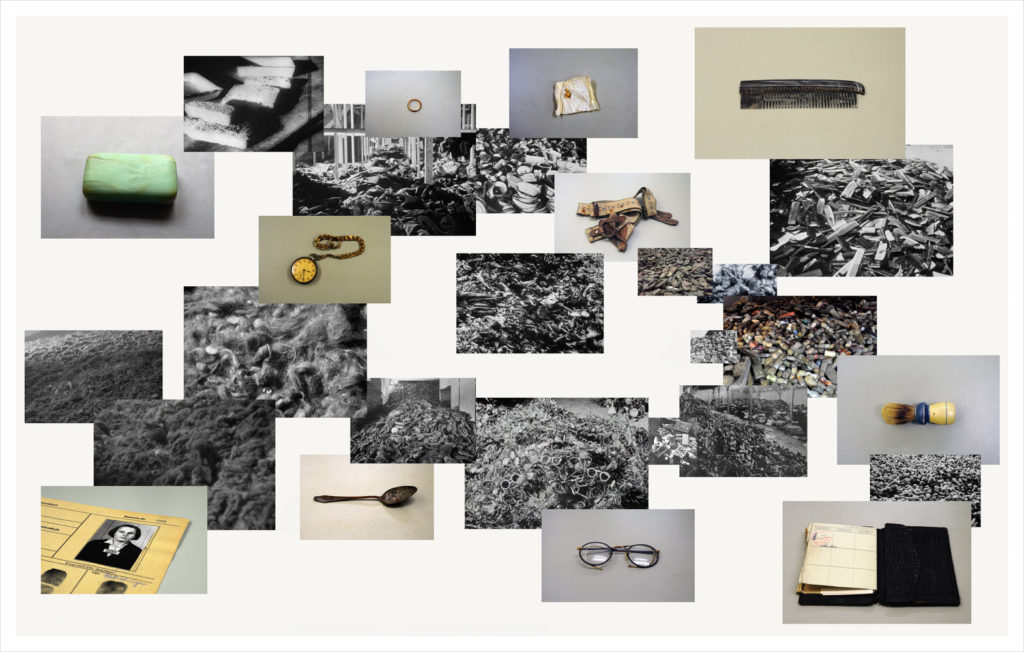
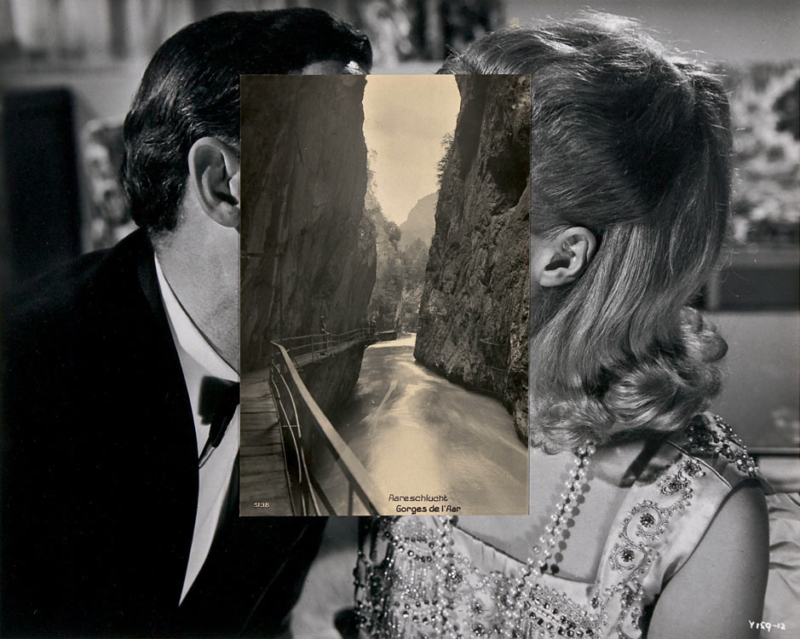
Since the summer of 2019 A-Level Photography Students at Hautlieu School have been working on an extensive programme of study in their final year exploring Jersey’s Liberation and Occupation history in collaboration with Société Jersiaise, Jersey Heritage, Channel Island Occupation Society, Jersey War Tunnels, Bureau des Îles Anglo-Normandes and post-graduate students from École Européenne Supérieure d’art de Bretagne in Rennes with funding from Liberation 75. Students were challenged with responding to personal stories told by islanders experiencing the German Occupation first-hand and finding inspiration by looking through images, documents and objects held in various collections in Jersey’s public archives, producing a series of individual creative outcomes such as montages, photo-zines and collectively construct a visual narrative presented as a newspaper supplement printed and distributed by Jersey Evening Post on Friday 24 April 2020.
The Liberation vs Occupation project began partly as a response to 75 years of celebrating freedom in Jersey from the German Occupation in 1940-45. Sadly, islanders will not be able to commemorate this landmark event as initially planned and it is hoped that this newspaper and joint exhibition between Jersey and French students will in some small way act as catalyst for remembering those years of hardship and subsequent joy when Churchill’s now famous speech was broadcast on the 8 May 1945 with the endearing words ‘our dear Channel Islands are also to be freed today’.
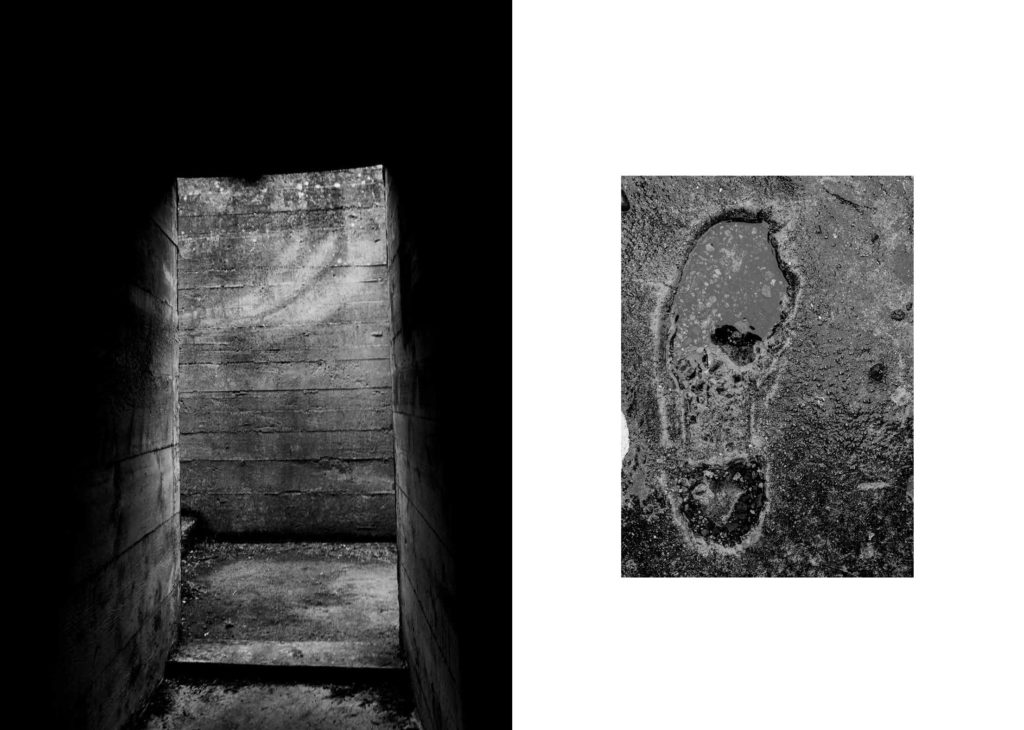
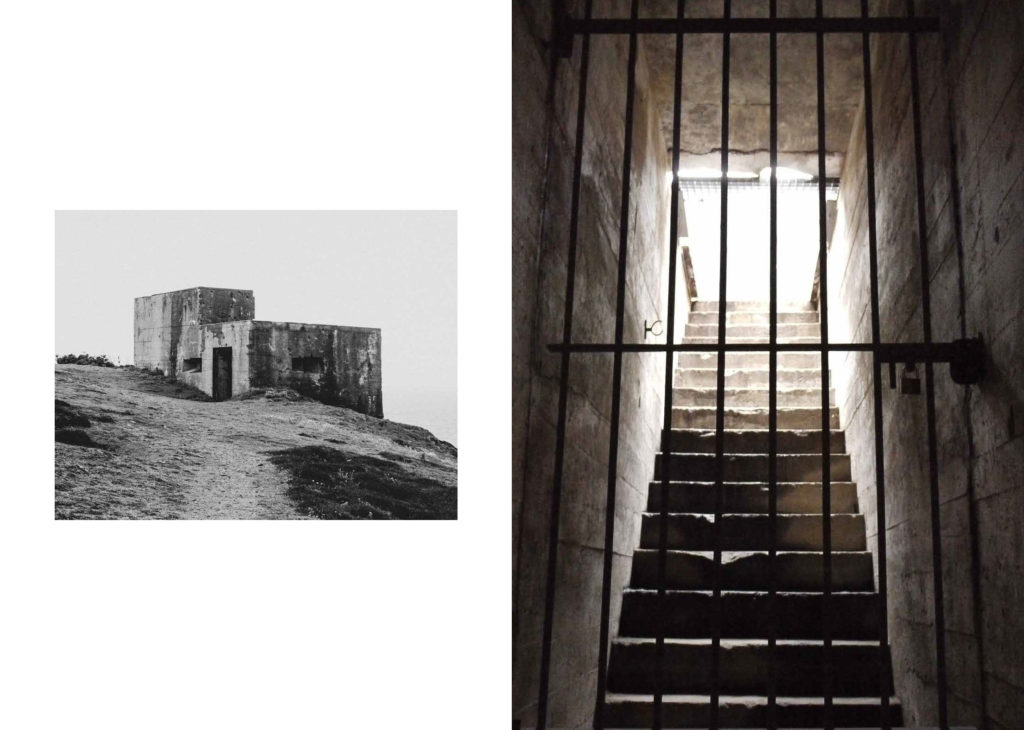
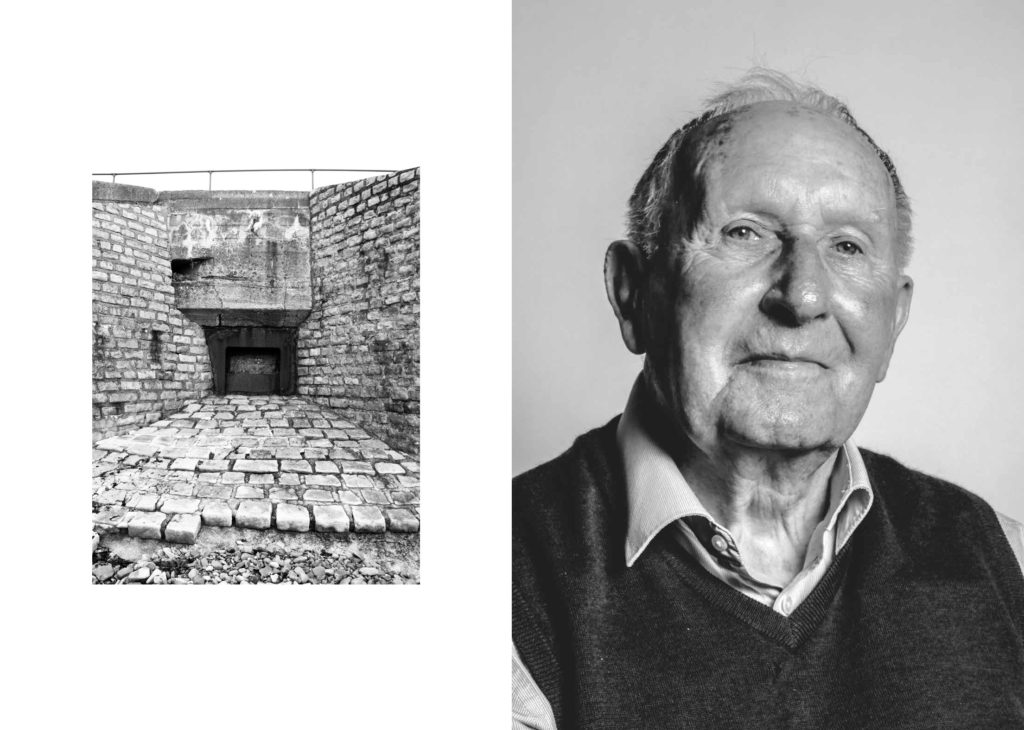
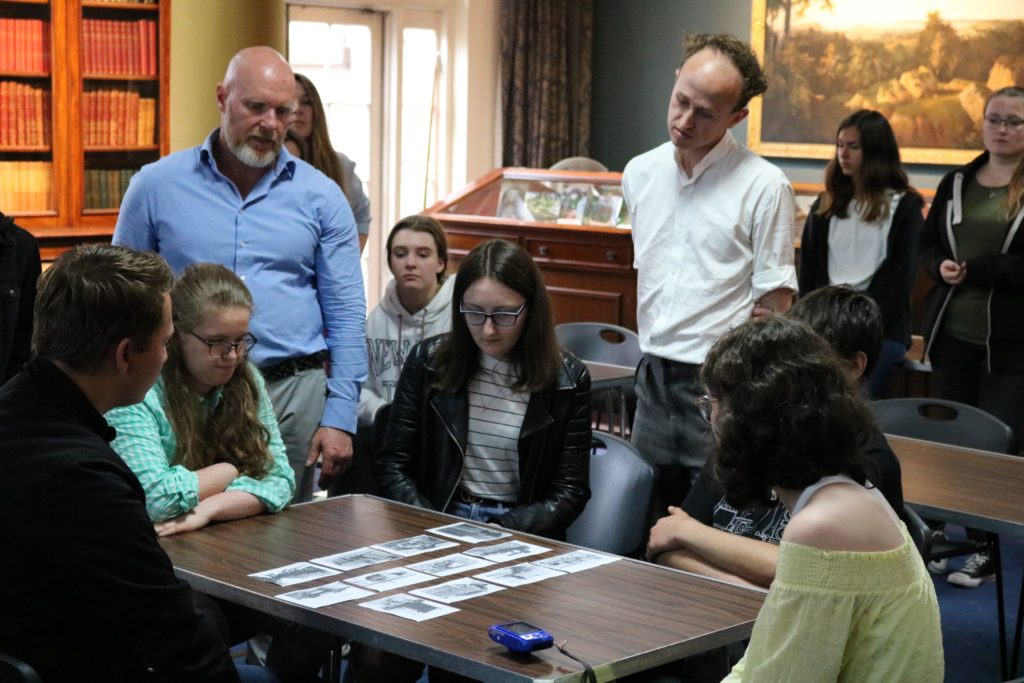
The programme of study began on the 4 June at the Société Jersiaise Photographic Archive where students took inspiration from a presentation by Patrick Cahill, Photo-Archivist and looked through some of the historical collections held in the photo-archive pertaining to the German Occupation of Jersey in 1940-45. In September students explored the landscape of German fortifications around the coastline of Jersey with specific visits to bunkers, such as Battery Moltke at Les Landes and Battery Lothringen at Noirmoint Point. Further visits followed to Jersey War Tunnels and Jersey Archive to research public records and learn more about life in the island during the Occupation.
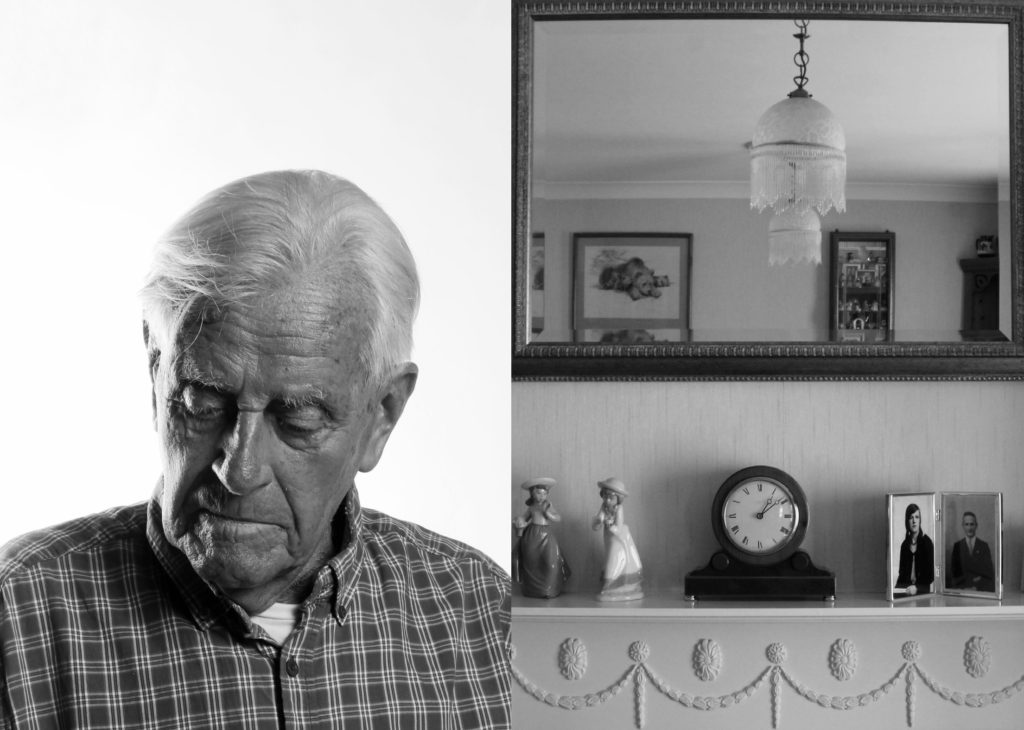
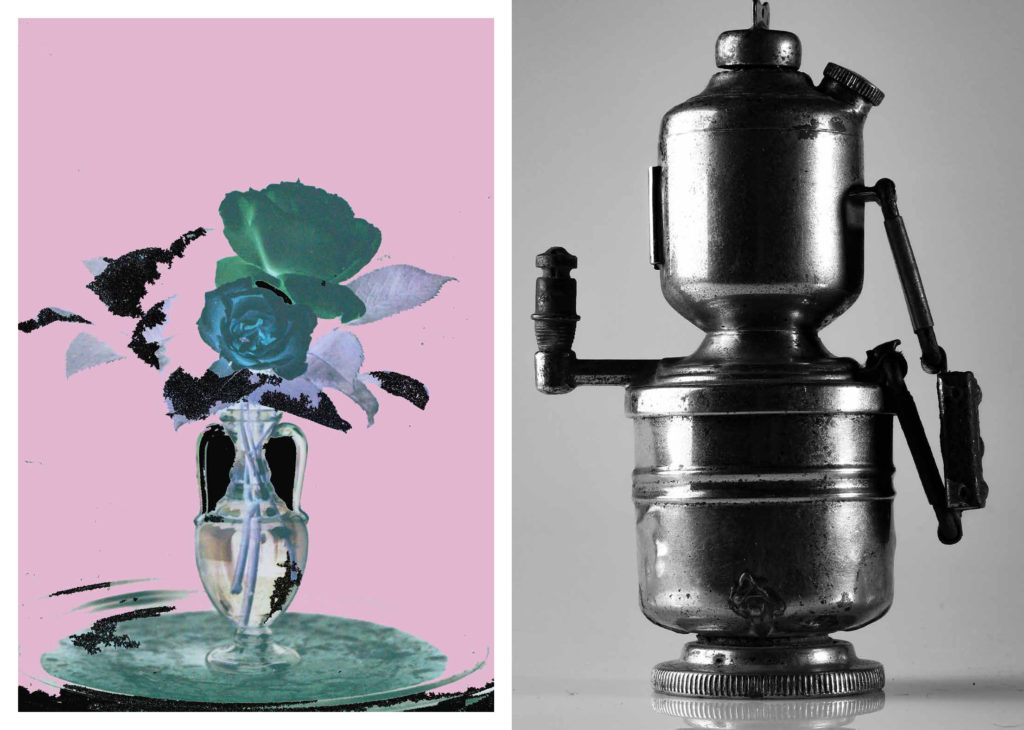
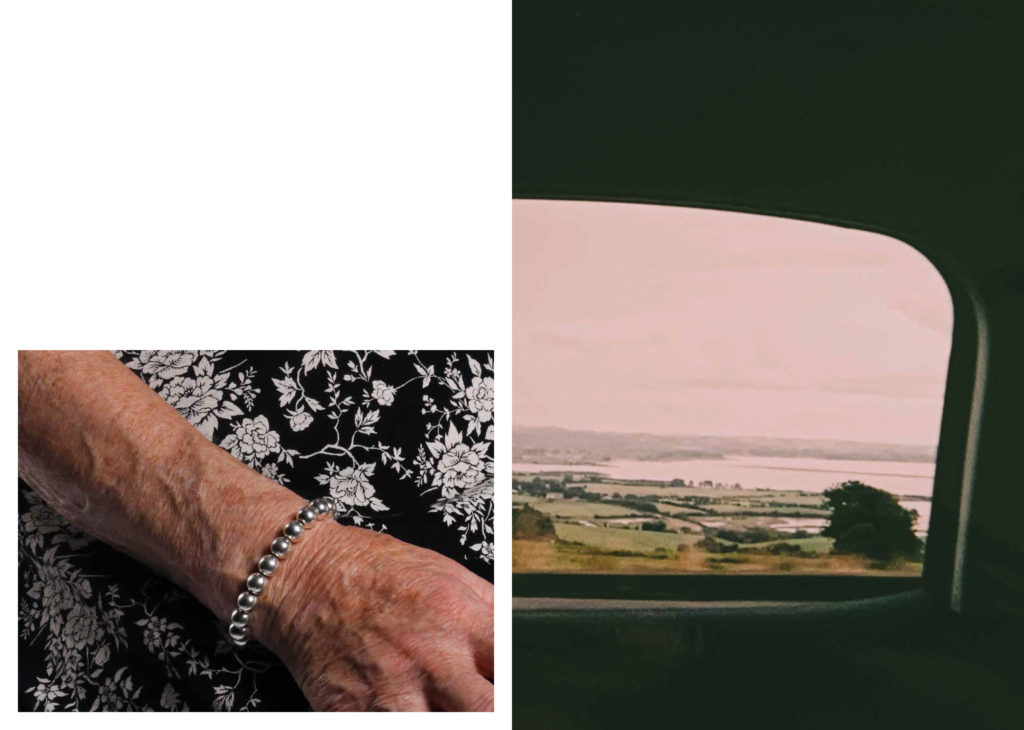
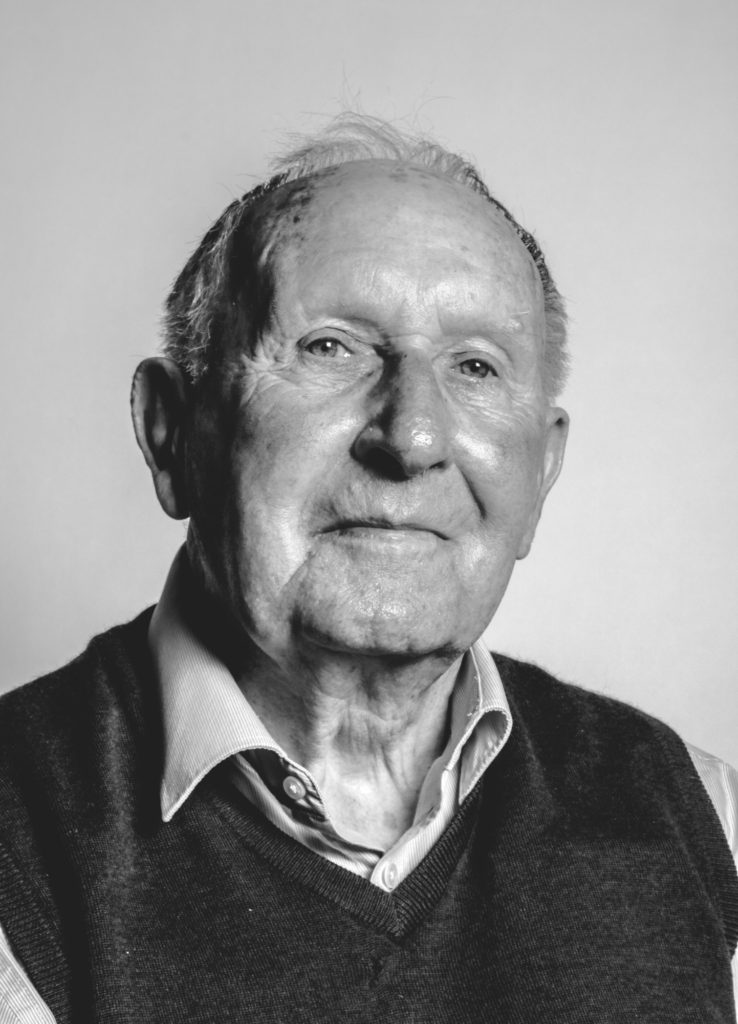
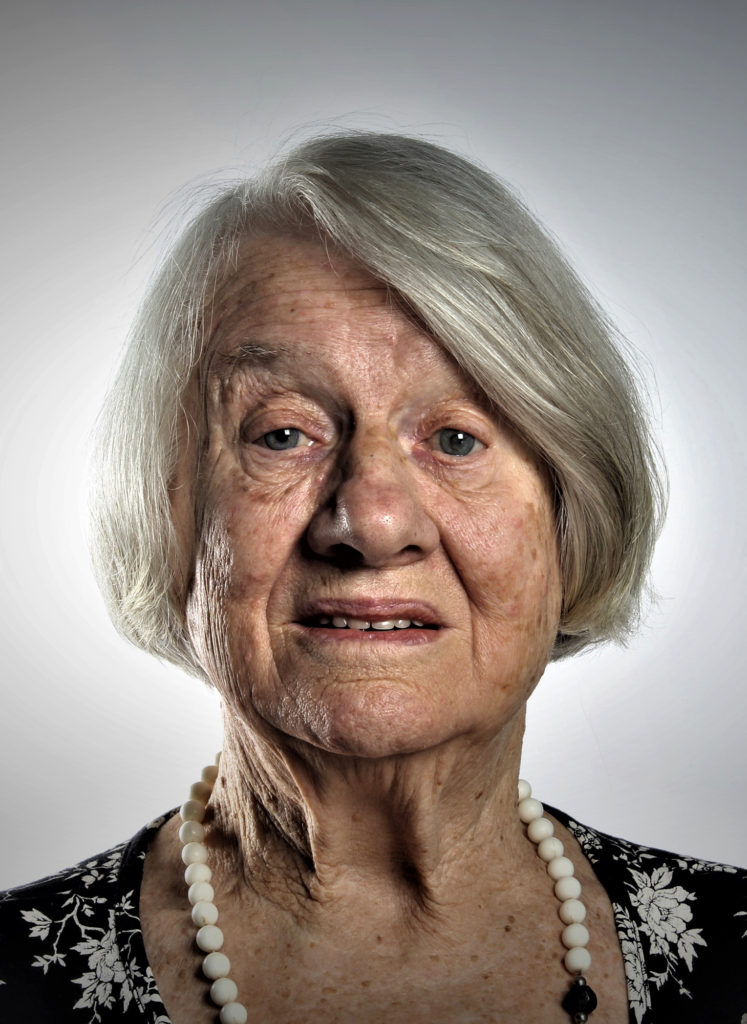
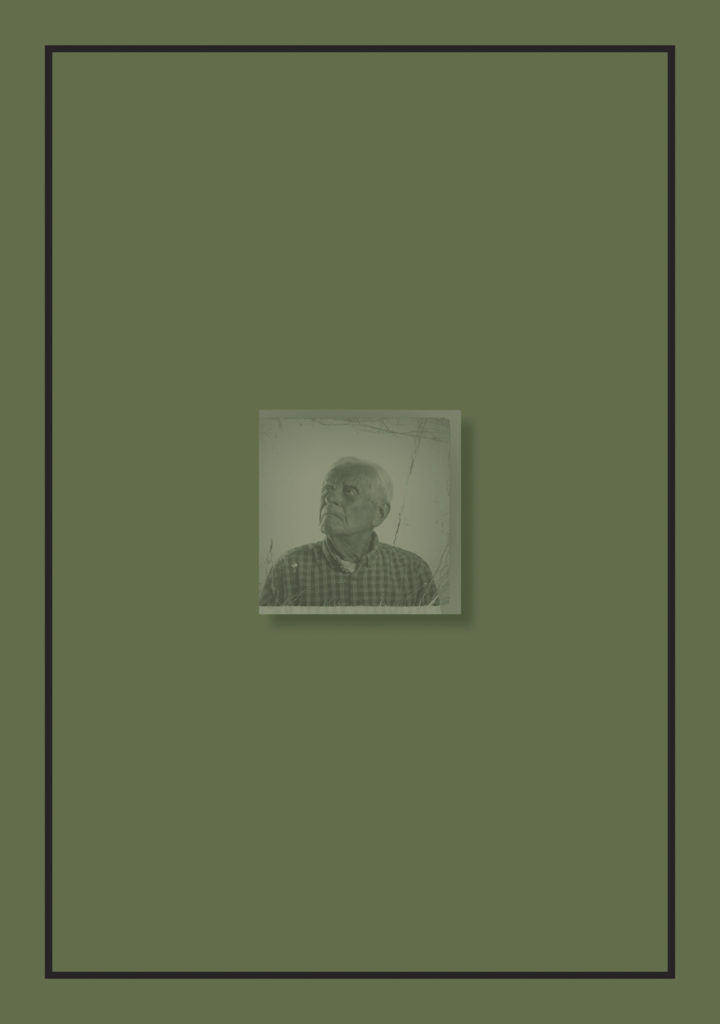
Personal stories and memories from islanders, Bob Le Seur, Hedley Hinault, Joyce De La Haye and Joan Tapley, experiencing the German Occupation first-hand were recounted to students in a series of workshops, that included portrait sessions in the photographic studio at Hautlieu School and photographing objects from 1940-45 held in the Occupation collection at Jersey Heritage. Students have interpreted how the themes of Liberation and Occupation relates to them as teenagers growing up in the 21st century and the combined outcome of their studies can be seen on the pages of this newspaper, and in a joint exhibition Bunker Archaeology 2020 with postgraduate students from École Européenne Supérieure d’art de Bretagne (EESAB) originally to be held at the Berni Gallery, Jersey Arts Centre 6 -30 May 2020, now postponed due to Covid-19.
The Bailiff Timothy Le Cocq, who has written a foreword in the newspaper expressed his delight with how this collaboration has played a wider role in cultural diplomacy by; ‘allowing Rennes-based Masters students to work with students from Hautlieu on a project that has helped to spread the message of our important history, shared heritage and bringing communities closer together.’
Photographer and teacher Martin Toft who led this project, commented: ‘Every student involved in this project engaged passionately in the subject of the German Occupation of Jersey and the images presented here in this newspaper are only a fragment of the enormous amount of work that each student has produced. It provides a fascinating insight into how young people have used the language of photography to explore and interpret events which happened many years ago.’
Here is a video browser of the Liberation Newspaper printed and distributed islandwide by Jersey Evening Post.
Zines: The editing and sequencing of this newspaper was derived from a number of photo-zines produced by A-Level photography students at Hautlieu School.
The final assessment of your Coursework will be done based on evidence published on your blog. Therefore it is essential that you complete your work following the instructions below. Some of you have completed everything and just need to double check everything.
DEADLINE for final completion is Fri 3 APRIL
LINK TO ONLINE BLURB BOOK
Your final blog post should be an online link to you BLURB book with an evaluation. If you have already written an evaluation as part of another blog post on your book design then add the online link to that blog post and change the date to make sure it sits at the top.
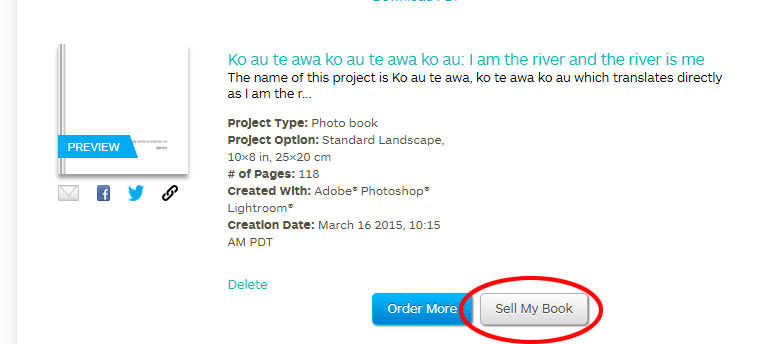
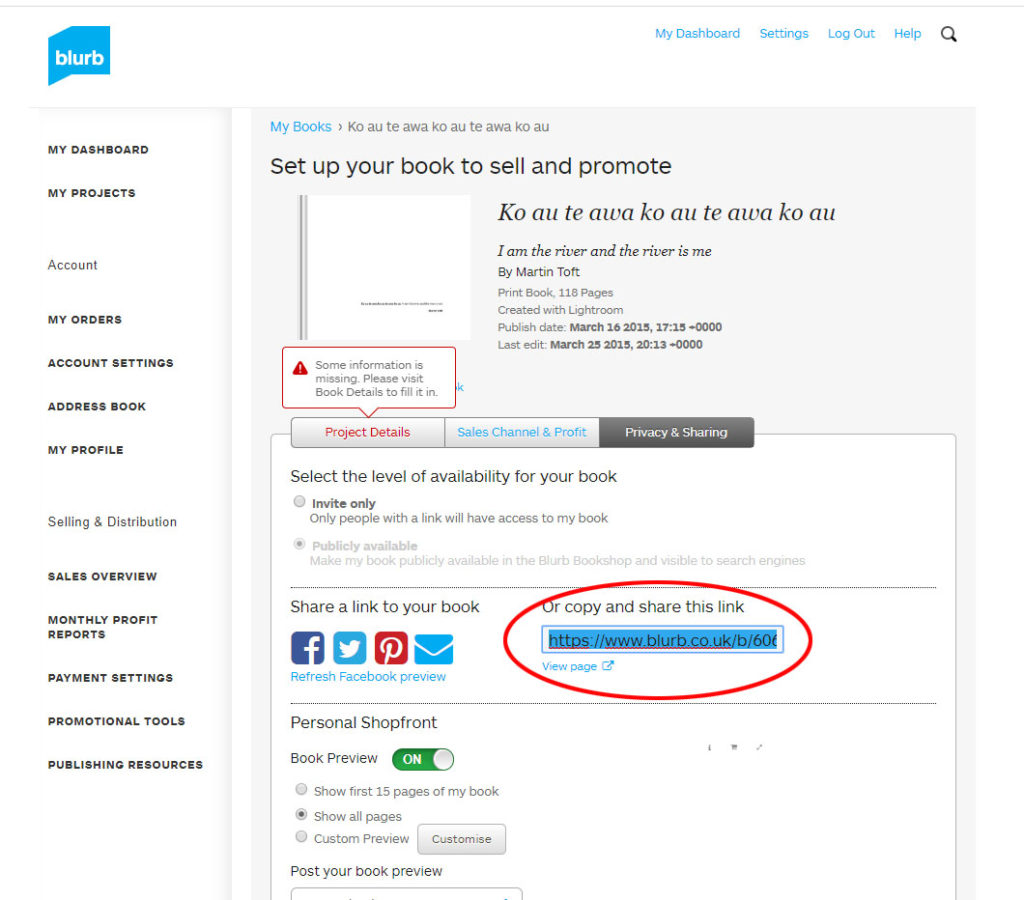
Log into your blurb account and click on Sell my book
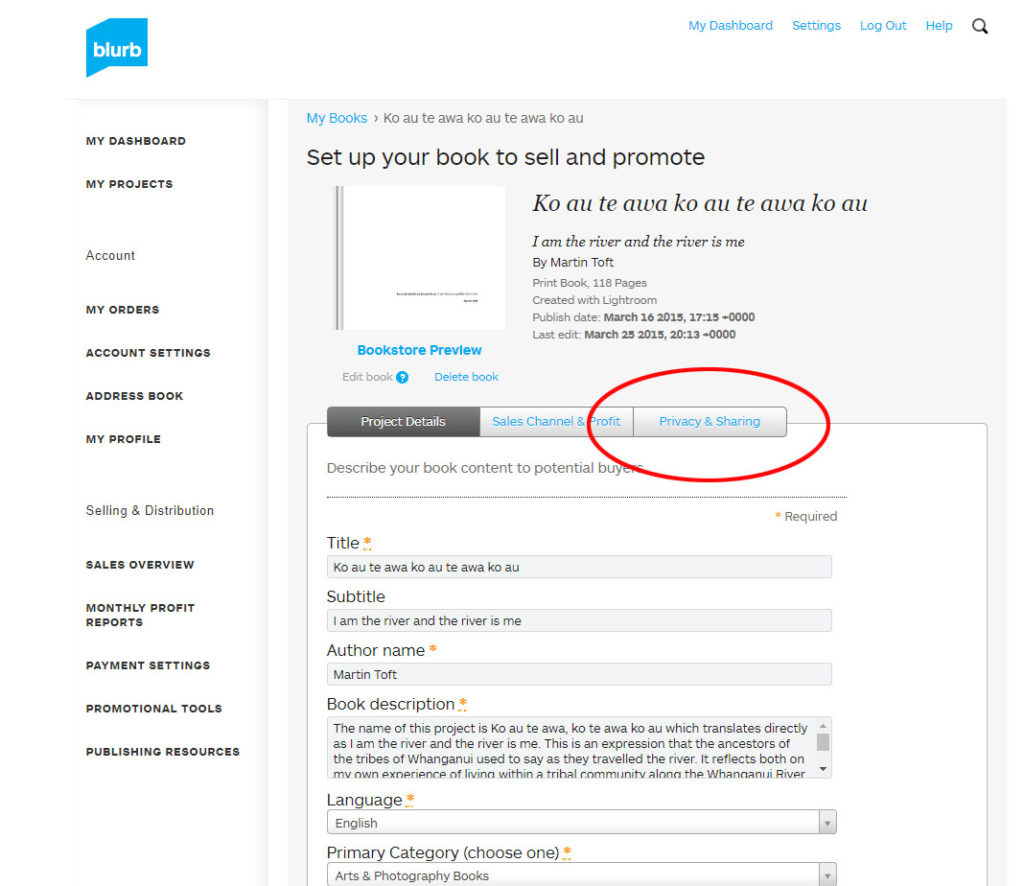
Click on Privacy & Sharing
Copy link circled in red above.
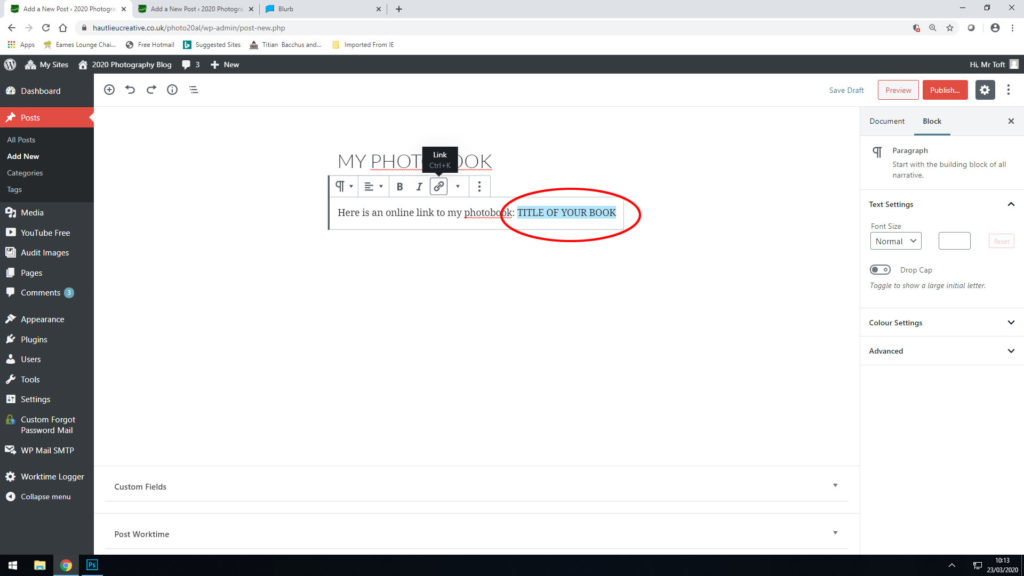
Make a new blog post: MY PHOTOBOOK and copy in link from Blurb into the title of your book using Link button above.
FINAL PRINTS + EVALUATION
Make sure you produced a blog post with presentation of your final prints and written an evaluation. You can either make mock examples of window mount in Photoshop or use images of your final prints mounted on foam board and/or window mounts. See example here from Nathan Healey.
If you have completed any other blogpost from the tracking sheet from previous tasks, please make sure that you back date them so they appear in the right chronology
DEADLINE: MOCK EXAM! Mon-WED 10-12 Feb Class 13C & 13E WED-FRI 12-14 Feb Class 13B
Interim deadline: Essay Draft MON 3 FEB
DEADLINE for Final Prints WED 5 FEB
INTERIM DEADLINE: FRI 7 FEB DRAFT PHOTOBOOK LAYOUT
IN PREPARATION FOR MOCK EXAM MAKE SURE THE FOLLOWING IS READY BY THE END OF NEXT WEEK:
A draft layout of your photobook before your Mock Exam day (that time is used to fine tune design with teacher)
Complete and proof read essay by Mon 10 FEB so it is ready to be incorporated into book design.
Select final prints (5-6) from book project and put into into shared PRINTING folder here M:\Departments\Photography\Students\Image Transfer\A2 PRINTING. DEADLINE for submission: WED 5 FEB
Make sure you monitor and track your progress by Fri 31 Jan using planner and tracking sheet below and publish on blog.
PLANNER – Download and save in your folder. Make sure you monitor and track your progress. 2 weeks remaining – including MOCK EXAM!
AT THE END OF YOUR FINAL MOCK EXAM DAY – ALL COURSEWORK MUST BE COMPLETE:
Structure your 3 day mock exam as follows:
Day 1: Complete essay, incl illustrations, referencing and bibliography + publish on blog (essay also needs to be added and presented at the end of your photobook)
Day 2: Complete photobook + blogpost showing design process and final evaluation. Use a combination of print screens + annotation
Day 3: Mount final prints + blogpost showing presentation of your final outcomes + evaluation. Finish and publish any missing blog posts as per planner and tracking sheet.
ESSAY Include essay in the back of your book. Layout in text columns and make sure to include illustrations of your own images and that of artists, as well as a bibliography. Also publish essay as a separate blogpost
PHOTOBOOK Final book design checked and signed off by teacher. make sure you have a made a blog post that charts your design decisions, including prints screens of final layout and write an evaluation.
BLURB – ORDER BOOK Upload book design to BLURB, log onto your account on their website, pay and order the book.
Consider spending a few extra pounds on choosing better paper, such as Premium Lustre in check-out, change colour on end paper or choose different cloth/ linen
BLOGPOST All blog posts in relation to the above must be published, including any other posts missing from previous work modules since the beginning of A2 academic year ie. Bunker, portraits and objects work, including zines which must be printed and bound ready for assessment and exhibition.
FINAL PRINTS Select your final prints from book project and make a blog post showing ideas about how to present them.
Extra prints Save each image in your name as a high-res image (4000 pixels) into shared PRINTING folder here M:\Departments\Photography\Students\Image Transfer\PRINTING
MOUNTING Complete all mounting of final prints from photobook and all other previous CW projects.
FOLDER Make sure each print is labelled with your name and candidate number and put in a BLACK folder together with all your other CW produced at AS.
See previous student, Stanley Lucas as a guide on blogposts that needs to be done and published before you the end of your Mock Exam
In the next four week focus on beginning to edit and collect all your images, archival material and texts, including finishing writing your essay needed to complete your photobook.
INTERIM DEADLINE: FRI 7 FEB DRAFT PHOTOBOOK LAYOUT
You want to aim for a draft layout and hand in draft version of your essay before your Mock Exam day, then use that day to fine tune design and complete essay.
1. Write a book specification and describe in detail what your book will be about in terms of narrative, concept and design. Produce a mood-board of design ideas and consider the following:
Narrative:What is your story? Describe in:
3 words
A sentence
A paragraphs
Design: Consider the following
How you want your book to look and feel
Paper and ink
Format, size and orientation
Binding and cover
Title
Structure and architecture
Design and layout
Editing and sequencing
Images and text
2. Create a BLURB account using your school email address. With Blurb you have different options on how you design your book:
a) Using Lightroom to design your book which is integrated with BLURB. Only for use on school computers, unless you have LR at home on your own laptop.
b) Download Bookwright via Blurb onto your own laptop and work offline at home and you can work indecently of school. Here you have full control of layout/ design features. Once completed, you upload photo book design to Blurb
c) Choose online option if you want to work directly online. Very limited layout/design options (not recommended!)
For those who wish to make their own hand-made photobook using Indesign follow the same steps as below in terms of documenting and annotating your design process. or if you want to customize your Blurb book see me for more details on how to do it.
3. Using Lightroom make a rough selection of your 40-50 best pictures from all shoots. Make sure you have adjusted and standardised all the pictures in terms of exposure, colour balance/ B&W, contrast/brightness etc.
4. Print a set of small work prints (4 to one A4 page) on the Laserjet, cut them up in guillotine and lay them out on the big white table for editing.
5. Decide on format (landscape, portrait) size and style of your photo-book. Begin to design your photo book, considering carefully, narrative, editing, sequencing, page spreads, juxtaposition, image size, text pages, empty pages, use of archival material etc.
6. Add your illustrated essay at the end of your photo book, including title, any captions (if needed), bibliography, illustrations of artists work (incl data) and images of your own responses. Think carefully about font type, size and weighting.
7. Produce screen prints of layout ideas as you progress and add to Blog for further annotation, commenting on page layout/ narrative/ sequencing/ juxtaposition of pictures.
Film/ Podcast; produce screen prints as work progress that show your editing skills/ decisions.
8. Final prints: Select a set of 5-6 photographs as final outcomes and evaluate – explaining in some detail how well you realised your intentions and reflect on what you learned in your Political Landscape project.
9. Save final prints in our shared PRINT folder (no later than 15:00 end of your Mock exam day) in a high-resolution (4000 pixels on the long edge.) Save each images in your name i.e. first name_surname_title_1, and 2, 3 and so on.
10. Make sure all blog posts are finished including, research, analysis, experimentation, annotation and an evaluation of final outcomes.
ESSAY: We will be spending 1 lesson a week every Wednesday on writing and developing your essay. However, you will need to be working on it independently outside of lesson time.
Objective:Criteria from the Syllabus
Be aware of some of the methods employed by critics and historians within the history of art and photography.
Demonstrate a sound understanding of your chosen area of study with appropriate use of critical vocabulary. – use for image analysis
Investigate a wide range of work and sources
Develop a personal and critical inquiry.
Academic Sources:
Research and identify 3-5 literary sources from a variety of media such as books, journal/magazines, internet, Youtube/video .
Begin to read essay, texts and interviews with your chosen artists as well as commentary from critics, historians and others.
It’s important that you show evidence of reading and draw upon different pints of view – not only your own.
Take notes when you’re reading…key words, concepts, passages
Write down page number, author, year, title, publisher, place of publication so you can list source in a bibliography
Quotation and Referencing:
Use quotes to support or disprove your argument
Use quotes to show evidence of reading
Use Harvard System of Referencing…see Powerpoint: harvard system of referencing for further details on how to use it.
Essay Plan:
Make a plan that lists what you are going to write about in each paragraph – essay structure.
Essay question:
Opening quote
Introduction (250-500 words): What is your area study? Which artists will you be analysing and why? How will you be responding to their work and essay question?
Pg 1 (500 words): Historical/ theoretical context within art, photography and visual culture relevant to your area of study. Make links to art movements/ isms and some of the methods employed by critics and historian. Link to powerpoints about isms andmovements M:\Departments\Photography\Students\Resources\Personal Study
Pg 2 (500 words): Analyse first artist/photographer in relation to your essay question. Present and evaluate your own images and responses.
Pg 3 (500 words): Analyse second artist/photographer in relation to your essay question. Present and evaluate your own images and responses.
Conclusion (250-500 words): Draw parallels, explore differences/ similarities between artists/photographers and that of your own work that you have produced
Bibliography: List all relevant sources used
Essay question: Hypothesis
Think of a hypothesis and list possible essay questions
Introduction (250-500 words). Think about an opening that will draw your reader in e.g. you can use an opening quote that sets the scene. You should include in your introduction an outline of your intention of your study e.g. what and who are you going to investigate. How does this area/ work interest you? What are you trying to prove/challenge, argument/ counter-argument? What historical or theoretical context is the work situated within. Include 1 or 2 quotes for or against. What links are there with your previous studies? What have you explored so far in your Coursework or what are you going to photograph? How did or will your work develop. What camera skills, techniques or digital processes in Photoshop have or are you going to experiment with?
Paragraph 1 Structure (500 words): Use subheading. This paragraph covers the first thing you said in your introduction that you would address.The first sentence introduces the main idea of the paragraph. Other sentences develop the subject of the paragraph.
Content: you could look at the following…exemplify your hypothesis within a historical and theoretical context. Write about how your area of study and own work is linked to a specific art movement/ ism. Research and read key text and articles from critics, historians and artists associated with the movement/ism. Use quotes from sources to make a point, back it up with evidence or an example (a photograph), explain how the image supports the point made or how your interpretation of the work may disapprove. How does the photograph compare or contrast with others made by the same photographer, or to other images made in the same period or of the same genre by other artists. How does the photograph relate to visual representation in general, and in particularly to the history and theory of photography, arts and culture.
Include relevant examples, illustrations, details, quotations, and references showing evidence of reading, knowledge and understanding of history, theory and context!
See link to powerpoints: Pictorialism vs Realism and Modernism vs Postmodernism here: M:\Departments\Photography\Students\Occupation vs Liberation\Presentations
Paragraph 2 Structure (500 words): Use subheading. In the first sentence or opening sentences, link the paragraph to the previous paragraph, then introduce the main idea of the new paragraph. Other sentences develop the paragraphs subject (use relevant examples, quotations, visuals to illustrate your analysis, thoughts etc)
Content: you could look at the following...Introduce your first photographer. Select key images, ideas or concepts and analyse in-depth using specific model of analysis (describe, interpret and evaluate) – refer to your hypothesis. Contextualise…what was going on in the world at the time; artistically, politically, socially, culturally. Other influences…artists, teachers, mentors etc. Personal situations or circumstances…describe key events in the artist’s life that may have influenced the work. Include examples of your own photographs, experiments or early responses and analyse, relate and link to the above. Set the scene for next paragraph.
Include relevant examples, illustrations, details, quotations, and references showing evidence of reading, knowledge and understanding of history, theory and context!
Paragraph 3 Structure (500 words): Use subheading. In the first sentence or opening sentences, link the paragraph to the previous paragraph, then introduce the main idea of the new paragraph. Other sentences develop the paragraphs subject (use relevant examples, quotations, visuals to illustrate your analysis, thoughts etc)
Content: you could look at the following…Introduce key works, ideas or concepts from your second photographer and analyse in-depth – refer to your hypothesis…Use questions in Pg 2 or add…What information has been selected by the photographer and what do you find interesting in the photograph? What do we know about the photograph’s subject? Does the photograph have an emotional or physical impact? What did the photographer intend? How has the image been used? What are the links or connections to the other photographer in Pg 2? Include examples of your own photographs and experiments as your work develop in response to the above and analyse, compare, contrast etc. Set the scene for next paragraph.
Include relevant examples, illustrations, details, quotations, and references showing evidence of reading, knowledge and understanding of history, theory and context!
Conclusion (500 words): Write a conclusion of your essay that also includes an evaluation of your final photographic responses and experiments.
List the key points from your investigation and analysis of the photographer(s) work – refer to your hypothesis. Can you prove or Disprove your theory – include final quote(s). Has anything been left unanswered? Do not make it a tribute! Do not introduce new material! Summarise what you have learned. How have you been influenced? Show how you have selected your final outcomes including an evaluation and how your work changed and developed alongside your investigation.
Bibliography: List all the sources that you used and only those that you have cited in your text. Where there are two or more works by one author in the same year distinguish them as 1988a, 1988b etc. Arrange literature in alphabetical order by author, or where no author is named, by the name of the museum or other organisation which produced the text. Apart from listing literature you must also list all other sources in alphabetical order e.g. websites, exhibitions, Youtube/TV/ Videos / DVD/ Music etc.
Blog: Produce a number of posts that show evidence of the following:
1. Research a photo-book (select one you have looked at previously in your project) and describe what story/ narrative the book is telling – its subject-matter, genre, style, approach etc.
2. Who is the photographer? Why did he/she make it? (intentions/ reasons) Who is it for? (audience) How was it received? (any press, awards, legacy etc.)
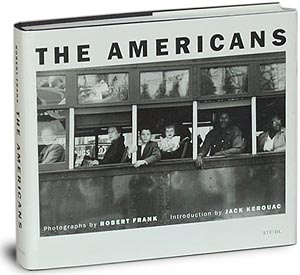
E.gRobert Frank’s “The Americans” was conceived with the help of a scholarship that allowed Frank to go on road trips across America during a two year period. He wanted to portray American society in the post-war period and his book has influenced (and still influence) many photographers since and also contributed to a new poetic style and subjective approach to documentary photography. Why?
Read an article in The Guardian by Sean O’Hagan, Photography Critic
3. Deconstruct the narrative, concept and design of the book such as:
Book in hand: how does it feel? Smell, sniff the paper.
Paper and ink: use of different paper/ textures/ colour or B&W or both.
Format, size and orientation: portraiture/ landscape/ square/ A5, A4, A3 / number of pages.
4. Look at BLURBonline book making website, photo books from photographers or see previous books produced by Hautlieu students on the table in class.
5. Write a book specification and describe in detail what your book will be about in terms of narrative, concept and design. Produce a mood-board of design ideas and consider the following:
Narrative:What is your story? Describe in:
3 words
A sentence
A paragraphs
Design: Consider the following
How you want your book to look and feel
Paper and ink
Format, size and orientation
Binding and cover
Title
Structure and architecture
Design and layout
Editing and sequencing
Images and text
Create a BLURB account using your school email address. With Blurb you have different options on how you design your book:
a) Using Lightroom to design your book which is integrated with BLURB. Only for use on school computers, unless you have LR at home on your own laptop.
b) Download Bookwright via Blurb onto your own laptop and work offline at home and you can work indecently of school. Here you have full control of layout/ design features. Once completed, you upload photo book design to Blurb
c) Choose online option if you want to work directly online. Very limited layout/design options (not recommended!)
Week 16: 6 – 13 Jan Editing images and write Essay paragraph 1
PHOTOBOOK:Lesson time (Mon, Tue, Thurs & Fri) Bring images from new photo-shoots to lessons and follow these instructions
Save shoots in folder and import into Lightroom
Organisation: Create a new Collection from each new shoot inside Collection Set: PHOTOBOOK
Editing: select 8-12 images from each shoot.
Experimenting: Adjust images in Develop, both as Colour and B&W images appropriate to your intentions
Export images as JPGS (1000 pixels) and save in a folder: BLOG
Create a Blogpost with edited images and an evaluation; explaining what you focused on in each shoot and how you intend to develop your next photoshoot.
Make references to artists references, previous work, experiments, inspiration etc.
Prep for photobook design: Make a rough selection of your 40-50 best pictures from all shoots. Make sure you have adjusted and standardised all the pictures in terms of exposure, colour balance.
Further experimentation:
Export same set of images from Lightroom as TIFF (4000 pixels)
Experimentation: demonstrate further creativity using Photoshop to make composite/ montage/ typology/ grids/ diptych/triptych, text/ typology etc appropriate to your intentions
Design: Begin to explore different layout options using Indesign and make a new zine/book. Set up new document as A5 page sizes. This is trying out ideas before you begin designing photobook.
Make sure you annotate process and techniques used and evaluate each experiment
Essay: Lesson time (Wed)
Complete Paragraph 1 and upload to the blog no later than WED 15 Jan.
Paragraph 1 Structure (500 words): Use subheading. This paragraph covers the first thing you said in your introduction that you would address.The first sentence introduces the main idea of the paragraph. Other sentences develop the subject of the paragraph.
Content: you could look at the following…exemplify your hypothesis within a historical and theoretical context. Write about how your area of study and own work is linked to a specific art movement/ ism. Research and read key text and articles from critics, historians and artists associated with the movement/ism. Use quotes from sources to make a point, back it up with evidence or an example (a photograph), explain how the image supports the point made or how your interpretation of the work may disapprove. How does the photograph compare or contrast with others made by the same photographer, or to other images made in the same period or of the same genre by other artists. How does the photograph relate to visual representation in general, and in particularly to the history and theory of photography, arts and culture.
Include relevant examples, illustrations, details, quotations, and references showing evidence of reading, knowledge and understanding of history, theory and context!
See link to powerpoints: Pictorialism vs Realism and Modernism vs Postmodernism here: M:\Departments\Photography\Students\Occupation vs Liberation\Presentations
Following on from monitoring and tracking your published work on the blog, and from 1-2-1s about your current personal study projects, it is clear that many of you have not completed the following tasks below from previous weeks.
By next week we will email you an updated version on Go4Schools, but by the end of this week you must have completes a self-tracking using the PERSONAL STUDY PLANNER here
If you have completed some of the points below, then make sure you publish blog posts and move onto the next task. Without having followed these steps below it is difficult for you to know what your project is about, why you are doing it and how.
Produce MIND-MAP and MOOD-BOARD based around how you interpret the theme of OCCUPATION vs LIBERATION now.
SPECIFICATION: Continue to develop your specification– WRITE A STATEMENT OF INTENT – and PLAN 4 SHOOTS(2 shoots before Christmas and 2 shoots during Xmas break) in response to artists references and any ideas you may have. It’s important that you begin to make images and experiment!
ARTISTS REFERENCES: Find inspirations and select 2-3 artists/photographers that you would like to research in depth, and who forms a basis for your Personal Study and influence your photographic shoots and experiments.
PLAN and RECORD your first PHOTO-SHOOT as a response to initial ideas. Must be published on the blog by WED 18 DEC.
XMAS: Make sure you produce at least 2 more shoots and bring back images first week in January
Once you have completed the above tasks continue to plan for your essay ie. finding relevant ACADEMIC SOURCES (at least 3), formulate possible ESSAY QUESTIONS, write an ESSAY PLAN and begun to draft INTRODUCTION and subsequent PARAGRAPHS – see details in the PLANNER: PERSONAL STUDY Week 13.
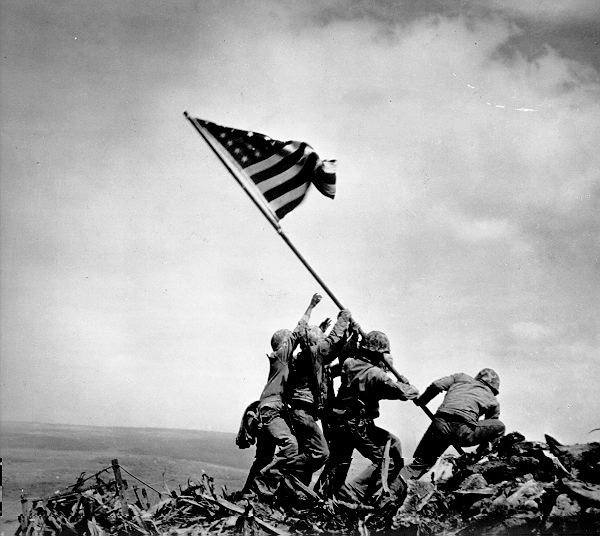
Joe Rosenthal, Raising the Flag on Iwo Jima, February 23, 1945
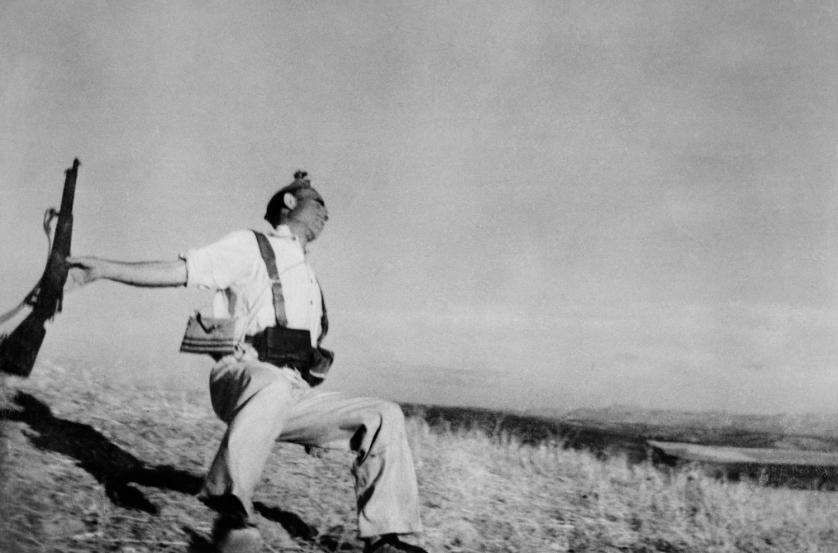
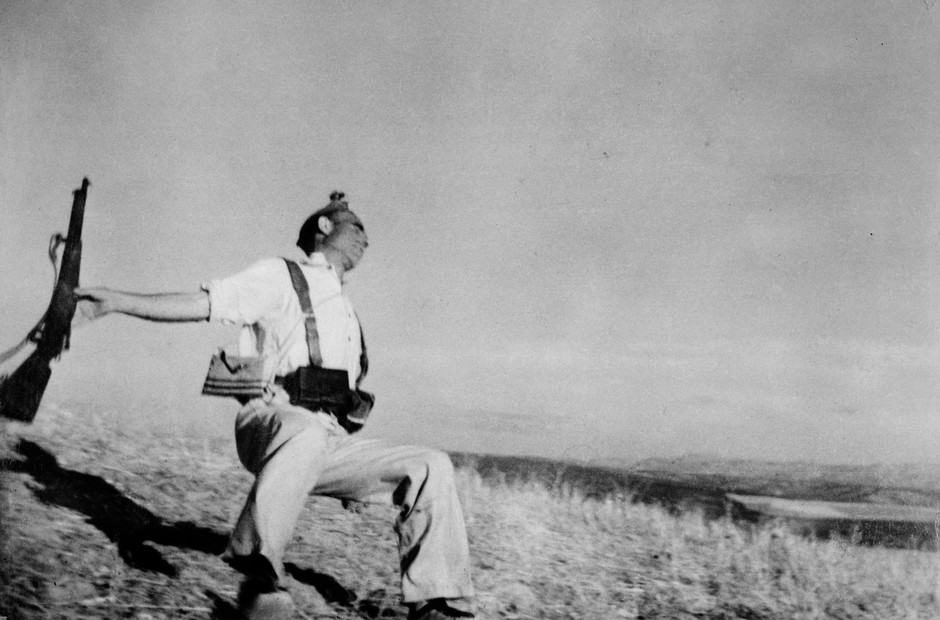
A photograph is a certain delivery of facts?
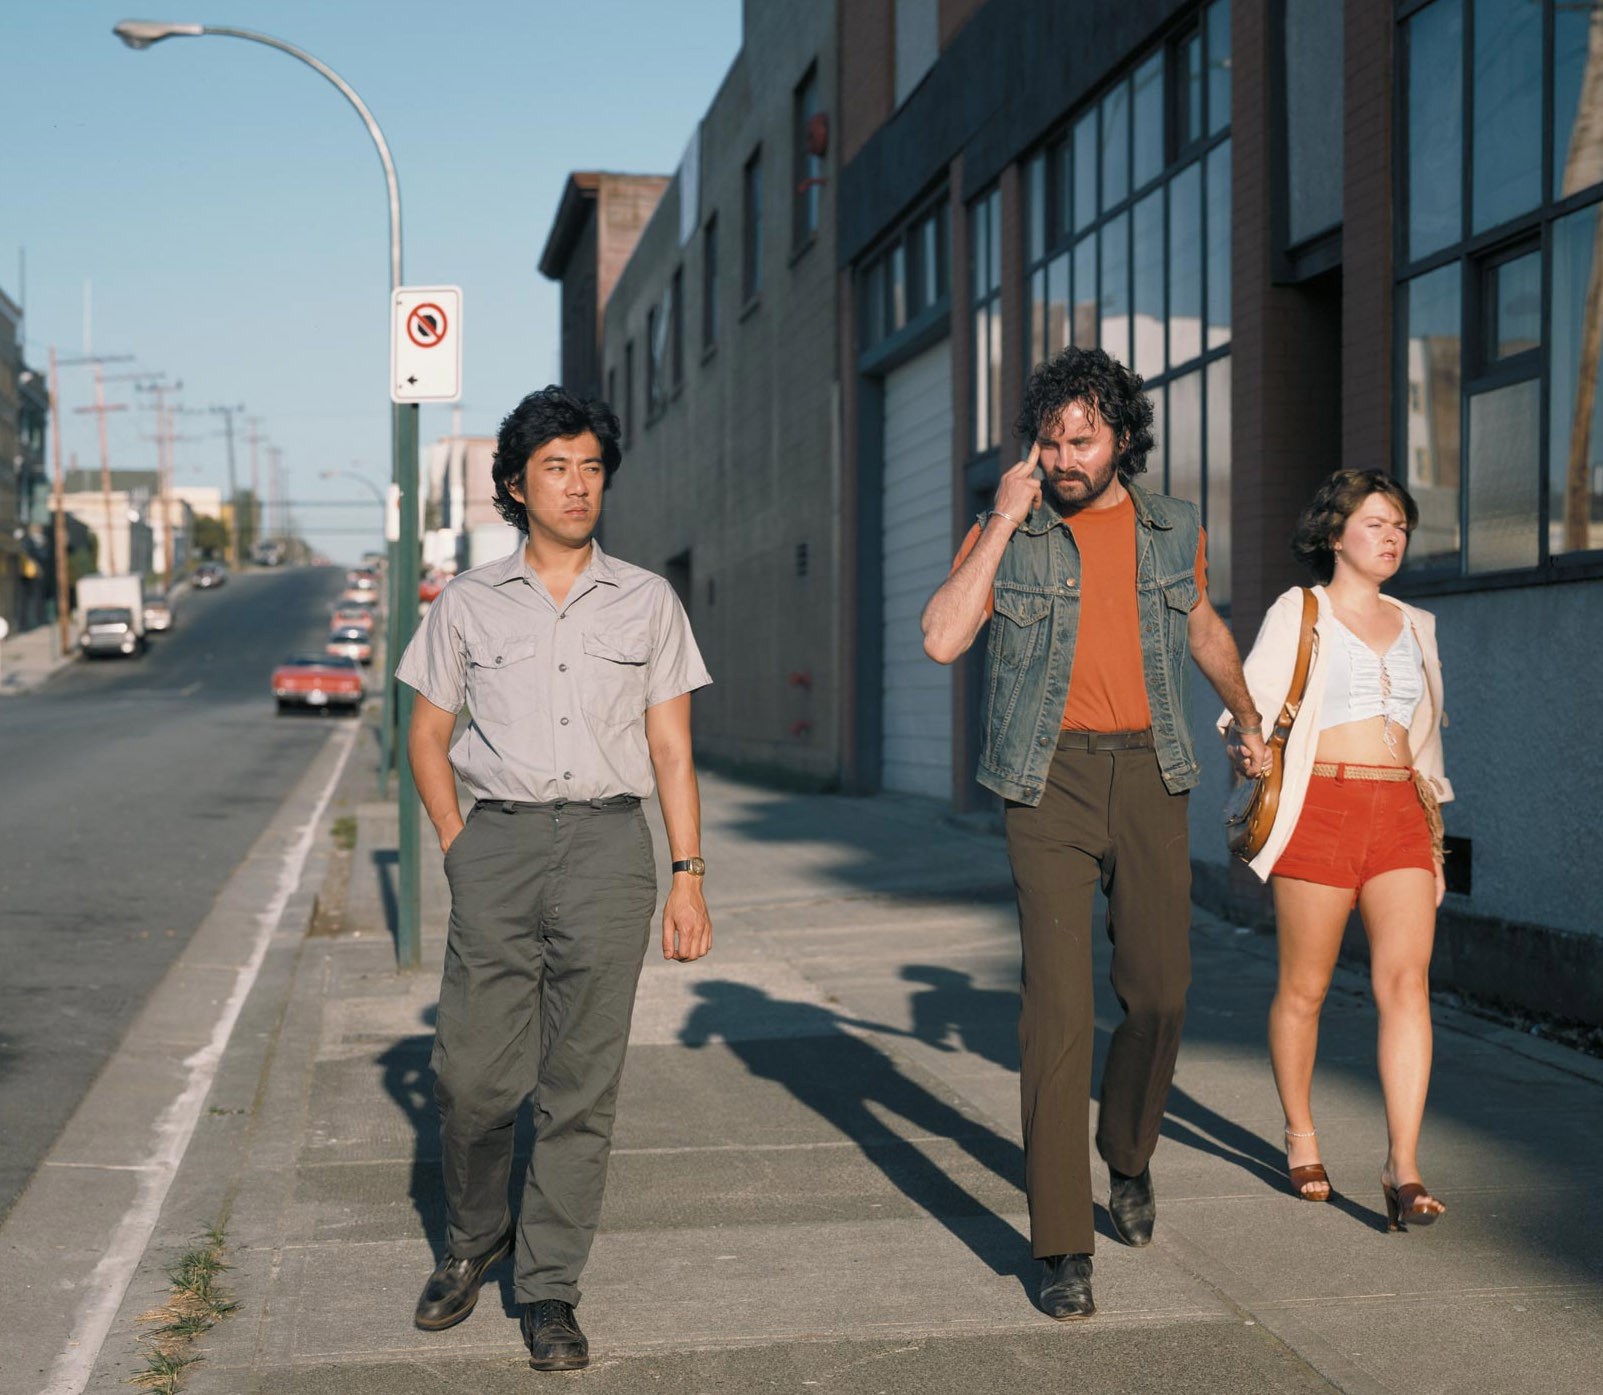
Jeff Wall, Mimic, 1982
Claims of truth that most people take for granted?
Tom Hunter, Woman Reading a Possession Order, 1997, after Johannes Vermeer (1632-1675) A Girl Reading a Letter by an Open Window, 1647-49after
You often hear a photographer saying: ‘the camera was there and recorded what I saw’.
A common phrase is to ‘shed light on a situation’ meaning to find out the truth.
‘A picture tells a 1000 words‘, is another aphorism that imply images are more reliable.
Picasso famously said: ‘We all know that art is not truth. Art is a lie that makes us realise truth.’
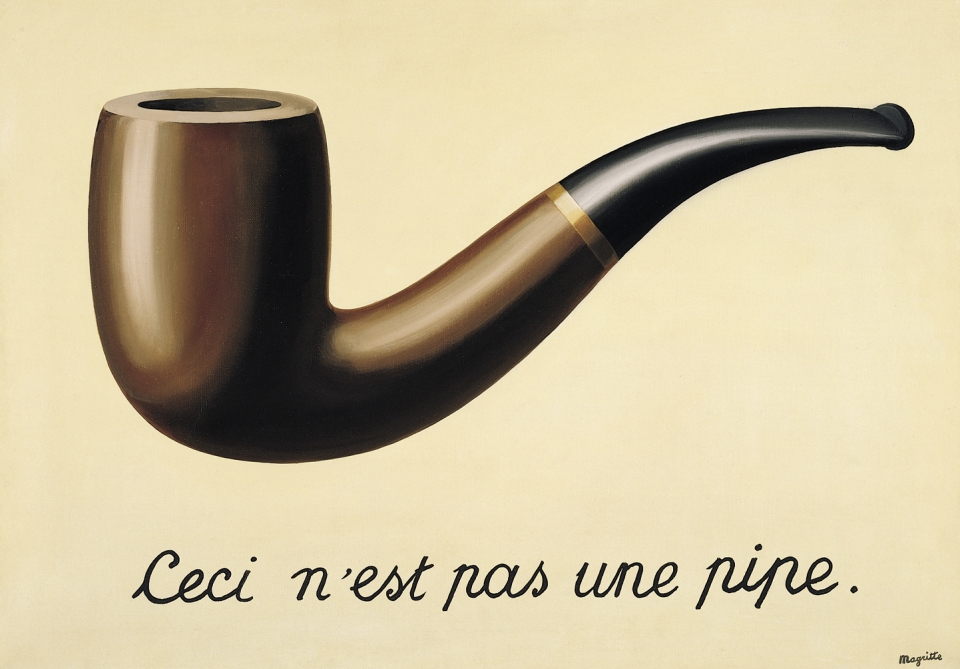
Magritte’s painting La Trahison des Images in which he painted a picture of a pipe with the words ‘Ceci n’est pas une pipe’ (This is not a pipe) goes some way towards an explanation.
Documentary photography’s central aesthetic, political and moral associations are:
depicting truth
recording life as it is
camera as a witness.
TASKS: Produce a number of blog posts that show evidence of the following
1. ANALYSIS: Choose one image from case studies listed below that questions the notion of truth regarding the photographic image and its relationship with reality and explain why.
Follow this method of analysis: TECHNICAL > VISUAL > CONTEXTUAL > CONCEPTUAL. Read more here on PhotoPedagogy
2. PHOTO-ASSIGNMENT: Based on your chosen theme of Political Landscape make two images, one that you consider truthful and one that is not.
The rationale behind this task is for you to consider the nature of the photograph to be a true representation of reality. In order to complete the tasks successfully, you must read and look through supporting material and consider the bullit points too that may prompt you in your answers . It is important that you do thourough research and use direct quotes and reference from sources included below
For a contemporary perspective on documentary practice read photographer, Max Pincher’s Interview: On Speculative Documentary To read this interview you must access it online from home as it is blocked the internet filter in school.
Documentary photography is based on assumptions that the photograph represents a one-to-one correspondence with reality, which is nearly accurate and adequate, and that the photographic image is capable of conveying information objectively.
Consider these points when you analyse your image
Traditional documentary believes the viewer to be a receptive subject taking in the objective information of the world through the photograph
Can we rely on its ability to capture a moment in time accurately as historical evidence or as a witness to the world?
Postmodernism points out that all forms of representation is subjective? How? Why?
Digital photography has made manipulation much easier?
READING: Background and context of the historical, conceptual and aesthetic approaches and differences between documentary practice and tableaux photography.
David Bate (2016), Art Photography. Tate Publishing
CASE STUDY 1:. In the terrorist attacks in Brussels in 2016 Fox News was reporting from the Place de la Borse. Video footage shows a young photographer posing a woman in front of a makeshift memorial: is it bad journalism ethics, or just the way it’s done?
Read the Guardian newspaper article here and make a blog post that expresses your own thoughts and views.
Following the second explosion, Kardava (the woman who took the image on her phone) fought her urge to run to a safe place. “I also wanted to take pictures. As a journalist, it was my duty to take these photos and show the world what was going on. I knew I was the only one at this spot.”
In this photo provided by Georgian Public Broadcaster and photographed by Ketevan Kardava two women wounded in Brussels Airport in Brussels, Belgium, after explosions were heard Tuesday, March 22, 2016. A developing situation left at least one person and possibly more dead in explosions that ripped through the departure hall at Brussels airport Tuesday, police said. All flights were canceled, arriving planes were being diverted and Belgium’s terror alert level was raised to maximum, officials said. (Ketevan Kardava/ Georgian Public Broadcaster via AP)
Is there a moral dilemma in photographing people injured or dying? As photojournalist should you take the image?
What is your view? How has this image become iconic of the terrorist attacks in Brussels airport?
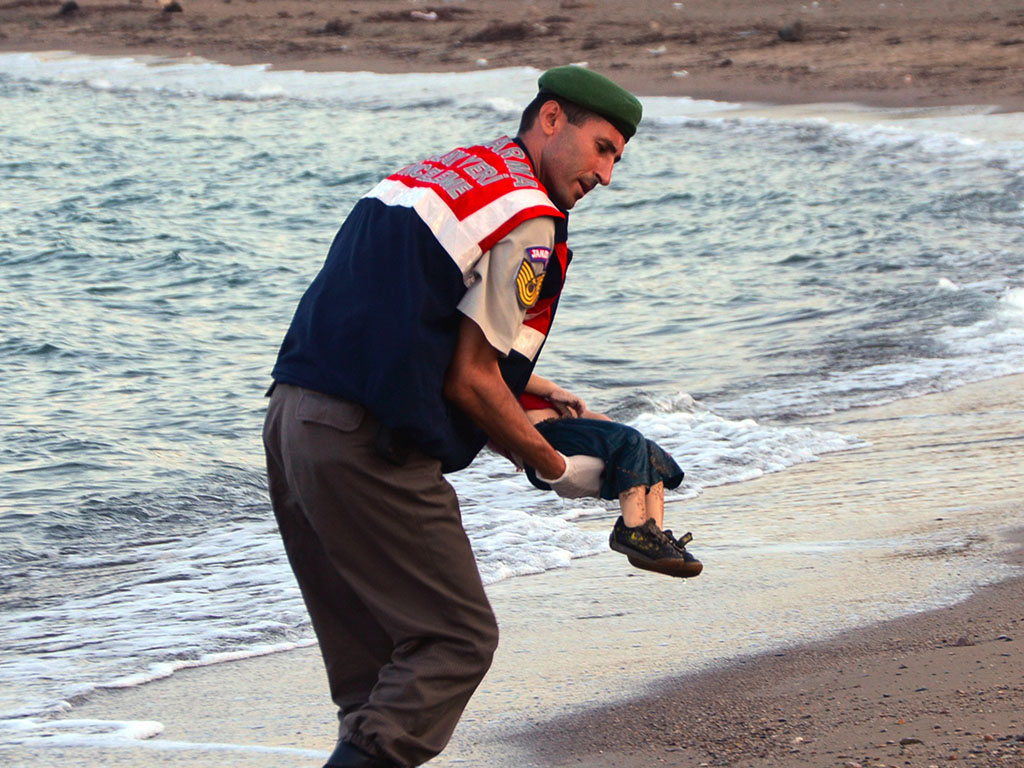
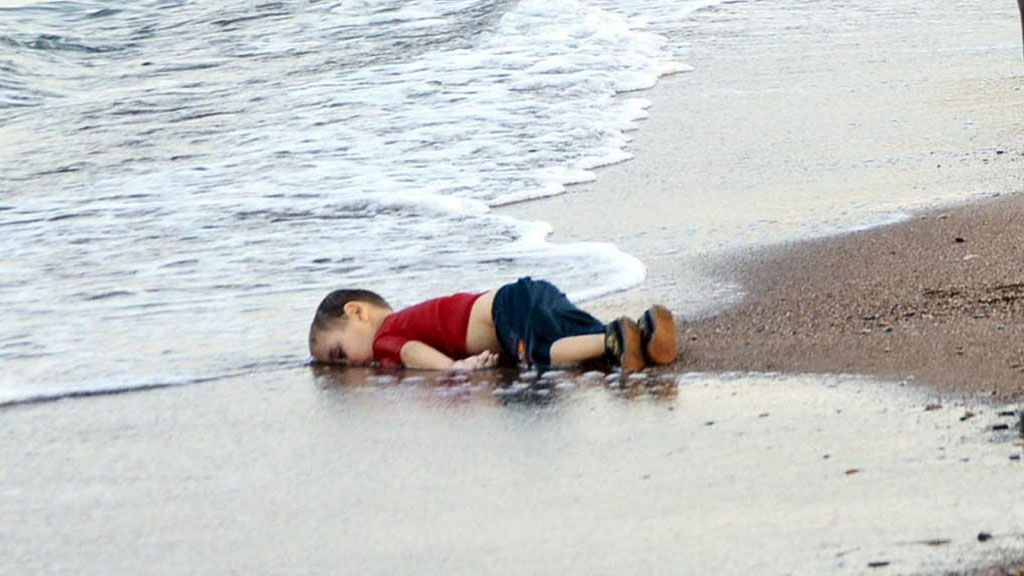
CASE STUDY 3: Using another news images as an example, such as the drowned Syrian boy (read article here), consider if photographs can change the world or change people’s perception?
Here is a link to another article about the photographer who took the photos of the dead Syrian boy where she speaks about why she took them.
For a different point of view read this blog post by photographer and lecturer, Lewis Bush where he discuss the above in light of recent images of dead Syrian refugees in Europe. Incorporate his views and include quotes, for or against your own analysis and point of view.
CASE STUDY 4: Jeff Wall, Canadian artists known for his large scale tableaux image presented in light-boxes
Today, most of his images resemble reportage and, as such, are likely to incense his detractors, who claim he’s not a “true” photographer. His most contentious new work, called Approach, shows a homeless woman standing by a makeshift cardboard shelter in which we spy the foot of what could be a sleeping vagrant. Wall tells me it was shot under an actual freeway where the homeless congregate and that “it took a month to make, working hands-on” – but he won’t divulge just how staged it is. Is this an actual homeless woman, or an actor? Is the shelter real, or was it built by Wall’s team of assistants to resemble one?
Re-creating images from memory is crucial to Wall’s practice – perhaps because it flies in the face of the tradition of photography as an act of instant witnessing.
“Something lingers in me until I have to remake it from memory to capture why it fascinates me,” he says. “Not photographing gives me imaginative freedom that is crucial to the making of art. That, in fact, is what art is about – the freedom to do what we want.”
In terms of truth or communicating an idea that make references to a real social problem such as homelessness, does it matter if the image is staged or not? Where does authenticity come into the picture?
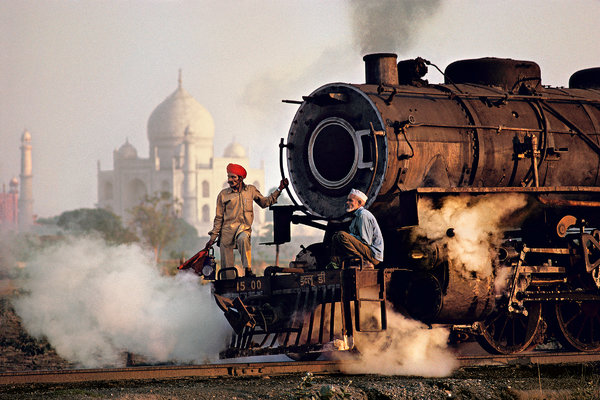
CASE STUDY 5. The images of renowned photographer Steve McCurry, who made the famous and iconic image of an Afghan girl for a front cover of National Geography has recently been criticized for making ‘too perfect pictures’ which not only are boring but reinforces a particular idea or stereotype of the exotic other.
Read this article by Teju Cole in the New York Times Magazine which compares McCurry’s representation of India with a native photographer, Raghubir Singh who worked from the late ’60s until his untimely death in 1999, traveling all over India to create a series of powerful books about his homeland.
Taj Mahal and train in Agra, 1983. Credit Steve McCurrySubhas Chandra Bose statue, Kolkata, 1987. Raghubir Singh
Reference to Coldplay’s new video also highlight the idea of cultural appropriation that harks back to Britain’s colonial rule and exploitation of the Orient.
Read this artcicle on Petapixel in In defense of Steve McCurry’s images
What is your view? Back it up with references to article read and include quotes for or against.
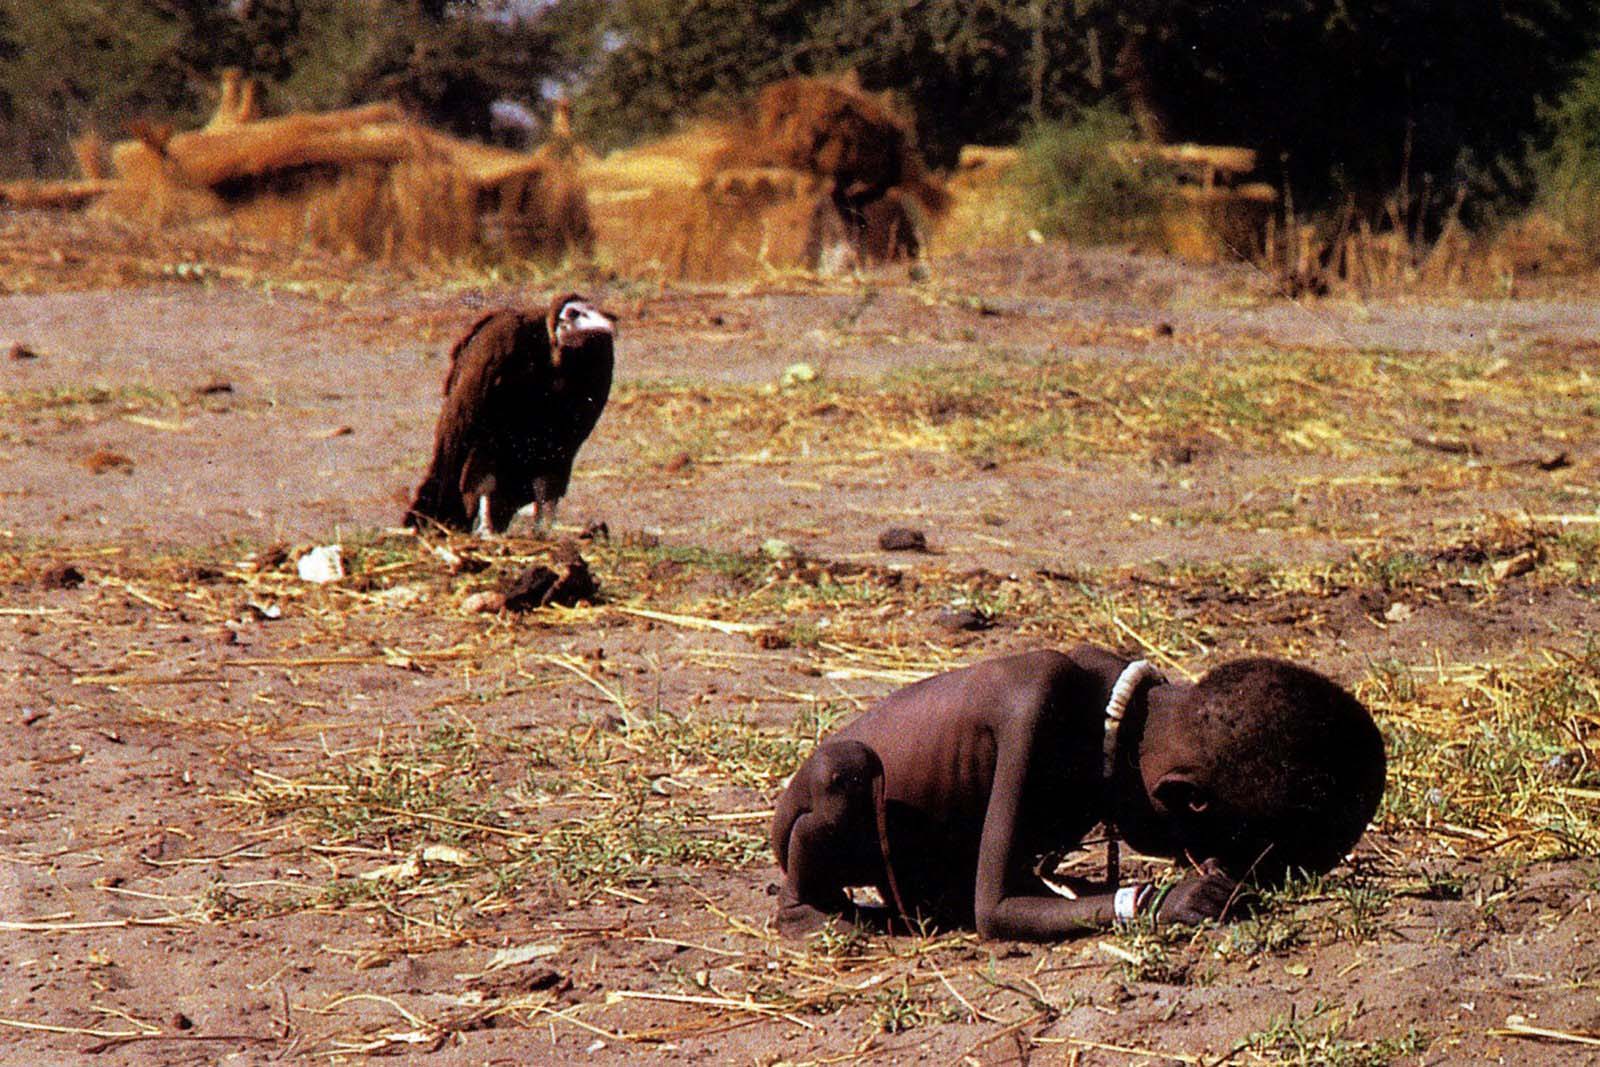
CASE STUDY 6:
Kevin Carter and The Bang Bang Club
Starving Child and Vulture
Kevin Carter knew the stench of death. As a member of the Bang-Bang Club, a quartet of brave photographers who chronicled apartheid-era South Africa, he had seen more than his share of heartbreak. In 1993 he flew to Sudan to photograph the famine racking that land. Exhausted after a day of taking pictures in the village of Ayod, he headed out into the open bush. There he heard whimpering and came across an emaciated toddler who had collapsed on the way to a feeding center. As he took the child’s picture, a plump vulture landed nearby. Carter had reportedly been advised not to touch the victims because of disease, so instead of helping, he spent 20 minutes waiting in the hope that the stalking bird would open its wings. It did not. Carter scared the creature away and watched as the child continued toward the center. He then lit a cigarette, talked to God and wept. The New York Times ran the photo, and readers were eager to find out what happened to the child—and to criticize Carter for not coming to his subject’s aid. His image quickly became a wrenching case study in the debate over when photographers should intervene. Subsequent research seemed to reveal that the child did survive yet died 14 years later from malarial fever. Carter won a Pulitzer for his image, but the darkness of that bright day never lifted from him. In July 1994 he took his own life, writing, “I am haunted by the vivid memories of killings & corpses & anger & pain.”Read more here: http://100photos.time.com/photos/kevin-carter-starving-child-vulture
Contextual Study Wed 23 Nov: Conversations on Photography
Methods > Practice
This task is about providing a critical perspective on an artist’s work or specific image by reading other people’s point of view which will inform your own understanding, as well as offering different interpretations.
First, let’s read the Introduction by David Campany’s new book: So present, so invisible and discuss in class.
Secondly, select one of the interviews from the book where he is talking with world-class artists about their various creative phases and their rapport with the medium of photography. These conversations go beyond the simple interview to reveal complex relations between art and photography, photography and the world, word and image.
Broomberg & Chanarin Daniel Blaufuks Robert Cumming LaToya Ruby Frazier Lewis Baltz John Stezaker Paul Graham Rut Blees Luxemburg Jeff Wall Susan Meiselas William Klein Stephen Shore
You can find the interviews here. M:\Departments\Photography\Students\ISLANDNESS\Contextual Studies\So present, so invisible
Read interview, make notes and identify 3 quotes (that are thought-provoking, revealing or contentious_
Select one image from the photographer and analyse in depth following this method: TECHNICAL, VISUAL, CONTEXTUAL, CONCEPTUAL – focus on the last two aspects of analysis to achieve highest marks
Incorporate the 3 quotes above into your analysis and interpretation of the image and artist’s work (this is essential to provide a critical perspective)
Make sure you comment on the quotes, either for or against, (do YOU agree or disagree with what the artist is saying) in developing a critique and informed argument.
Ensure you explain why agree / disagree with the comment!
EXTENSION: Research a second source of information about the artist or his/her work (interview, review, article, text in a book etc), identity quotes and incorporate in your writing.
DEADLINE: This is essentially a piece of Independent Study (homework) that you need to complete outside of lessons. Post must be published on blog by Wed 30 Nov.
Contextual Study WED6 Jan: Photography Decoded
Issues > Theory
This task is about adopting critical thinking about photography by applying theory into practice; interpreting and analysing an artist’s work or specific image.
Select one of the questions listed below from the book Photography Decoded authored by curator and writer Susan Bright and curator, writer and photo-historian Hedy van Erp.
Read text in detail, make notes and identify 3 quotes
Select one image from examples mentioned in text and apply your own interpretation of the photograph by applying the theory and critical thinking from what you have just learned from reading the text.
Incorporate the 3 quotes above into your interpretation of the image and make sure you comment on the quotes, either for or against, in developing a critique and informed argument. EXTENSION: Read a second text from above and apply theory and critical thinking into your writing.
DEADLINE: This is essentially a piece of Independent Study (homework) that you need to complete outside of lessons. Post must be published on blog by Wed 13 Jan.
For further reading and study go to this blog post here on Photography and Truth: