BLOG: End your blog with evidence of the following:
1. Show evidence of how you intend to present and display your final prints – make mock up in Photoshop – for example. a single image or diptych, triptych, predella, size A5, A4 or A3, typology-style grid, collage etc
2. If you have made a photobook – write a book specification and describe in detail what your book is about in terms of narrative, concept and design. Produce a mood-board of design ideas and consider the following:
How you want your book to look and feel
Format, size and orientation
Design and layout
Rhythm and sequencing
Structure and architecture
Narrative
Title
Images and text
Colour and B&W (or a mix)
Paper and ink
3. Write an overall final evaluation (250-500 words) that explain in some detail the following:
how successfully you fulfilled the EXAM brief and realised your intentions.
links and inspiration between your final images and exam theme including artists references
analysis of final prints/presentation in terms of composition, lighting, meaning, concept, symbolism etc.
4. Go through all your blog posts and make sure that you have completed them all to your best ability, e.g. good use of images/ illustrations, annotation of processes/ techniques used, analysis/ evaluation of images and experimentation
5. Present your final outcomes in window mounts or on foam board, label with name, candidate number, attach velcro and put in a BROWN/BEIGE/YELLOW folder.
To achieve a top marks we need to see a coherent progression of quality work from start to finish following these steps:
The following students have been selected for moderation:
Coursework:
Chiara Buesnel
Alisha Cadec
Elinor Dargie
Ben Fosse
Anna Houiellebecq
Peter Le Gal
Charlie Lucas
Zoe Pannenborg
Josie Robins
Lauryn Sutcliffe
Shaynee Whiteman
Externally Set Assignment:
Chiara Buesnel
Harrison Cummins
Felicity Flinders
Anna Houiellebecq
Darcy Kelly
Madison Lee
Ethan Moyse
Max Rivers
Jo Searle
Abbie Waller
Illuminanceis a series by Rinko Kawauchi about focusing on the tiny gestures and details throughout our day to day lives. She explores the extraordinary in the insignificant things that we would normally ignore or not even notice. All her images within her series contain this spiritual, unique style that she creates effortlessly. She has a feminine touch that you can see in the soft, pastel colours throughout the book. The photobook, Illuminance was published in 2011 and costs £40 to purchase. The form and functions of the book is the first thing we think about when seeing the book. It is produced as a cloth bound book using Japanese binding to hold it together. The book has a material texture too it because of the use of the cloth cover. This effect makes the book much more interesting because the cloth cover creates a rough texture for the hand to touch and feel. It gives the brain something extra to think about. The book is big and heavy to pick up because it contains hundreds of images by Kawauchi. The pages within the book are thick which improves the quality of the book and makes it feel and look more professional.
The book contains a spiritual and sublime aesthetic that runs throughout the whole series. Each image links to the next somehow. They flow in a sequence that symbolises a story or narrative that Kawauchi is trying to create. The images are about day to day events so the narrative Kawauchi is capturing could be in the time period of a day. She could be using the series of images to symbolise a series of events throughout a day. The images flow really well and link together in a good way because of the use of shape and colour. The pastel colours within each image is highlighted. Although some of the images presented next to each other are contrasting, its the contrast within them that works well together, such as the light and shadow and the line compared the circular shape.
Rinko Kawauchi has a very contemporary approach to her work. She breaks the rules within photography and creates her own unique perspective of the world. She has an unusual way of framing and she also uses symmetry and patterns to add to her complex series. Her images are very bright and contain a feminine touch which is delicate. As a viewer of the photobook I can tell that Kawauchi adds her own personality and emotion into each image.
Rinko Kawauchi is a Japanese photographer and I believe you can see this in her work. Japan is a very spiritual culture and they care a lot for the body and soul. They view things very differently to the western world. Everything is seen to contain a spirit and an element of beauty, no matter how insignificant it is. When looking through the photobook I can see Kawauchi’s point if view and imagine looking at the image through her mind. She sees more then just a tree or a reflection. She sees remarkable beauty. I think the name Illuminance suits this series really well because it is a word we would use to describe something bright, and something radiating beauty. This is how she describes the objects and scenes she’s captured.
After researching more about the photo book illuminance I came across an article by lens culture about Rinko Kawauchi and her many series such as ‘Search for the Sun’, and Illuminance. The article contains a paragraph describing the series. “Inspired by the subtle aesthetic of wabi-sabi—a philosophy of reduction, modesty and the beauty of imperfection—these luminous images offer an enchanting gaze on the world around us.” Wabi Sabi is the name of my project which ties in well with my whole theme and research because Kawauchi herself was also inspired by the aesthetic Wabi Sabi.
As I have previously stated, I intend to produce a magazine for my final piece for this project I am currently undertaking for my exam work.
I didn’t really have any ideas of what I wanted to achieve from my magazine cover and what I wanted to go for when producing the first few drafts if my cover because i knew that they would be drafts and that it would be likely I will change the cover’s layout or overall design for the final product. I began experimenting with different typography designs in Adobe Photoshop and I created one text design before the ones you see below but automatically decided it wasn’t what I wanted because it looked too polished and too f’forced’ as I was using default Adobe font types. I immediately took out my notebook and began handwriting the magazine title – which I already had an idea for in my head when I began – I wanted to call the magazine ‘Boys Will Be Boys’ a soon as I began the focus on teenage boys for the project because I felt it works really well.
The below images show the process of which I went through to create my current final draft of which I am very happy for and I intended to use this for my final product, however, with a few layout or design alterations if needed.
Drawing of the type ‘Boys Will Be Boys’ in my notepad so that I could photograph it and digitise the textExtra text that I handwrote to photograph and again digitise so that I could use it on my magazine cover as I realised after a couple of drafts that it would benefit from other slight touches to make it look more authentic. To fit the ‘handwrote’ style I was aiming for, I decided to use this theme for the ‘issue one’ and ‘£8’ text also.
The images below show the process I went through to create the handwritten title and it was actually the first attempt which I used in my Photoshop mock up of the magazine because it had the look I was going for. However, it is likely I will re-produce this text again both on paper and then digitized into Photoshop because I know I can create a better version of this through more careful production of the specific lines to create stick men as well more polished looking letters. However, the look is supposed to be very rough and not clean and polished like a default font on software would because it is handwritten and I want to keep this authenticity.
After creating a couple of versions of the cover using fonts provided by Photoshop in their wide selection, I felt it may look more realistic and it would fit the theme better if I also handwrote the text ‘issue one’ and ‘£8’. I did this on the same piece of paper as well as drawing some arrows to add in also. I also drew a squiggly line to import into the software to use as an underline because I was not able to do this using the underline feature I usually would when working with provided fonts.
My first draft of the magazine cover which includes just the type and basic front cover information of a magazine – the issue no. and price
When I first inserted the handwritten text into Photoshop from an imported picture I took with iPhone of the notepad and the writing on it, I made it priority to remove all the negative space around the text – being the white paper. I did this through selecting the magic wand tool to manually select the white space around the text. This allowed me to erase the white paper which left me with the text – what I needed for the title to work. In order for me to remove this white space cleanly without the selected area bleeding into the writing, I had to apply some basic colour correction effects onto the imported image first to ensure the black writing was as dark and heavy as possible and the white surroundings was as light as possible to provide a clearly defined area to select so that I could erase the white surrounding.
After this, I noticed the writing was actually quite fine and didn’t stand out too much – as expected because I was not able to apply any bold effects to the type as it was not directly imported through Photoshop’s selection of fonts. To make the text I had imported stand out more so against the blank background I had chosen, I applied Layer Style effects such as a colour overlay to change the colour of the text as well as a ‘stroke’ to give a darker, more defined and bold outline to the text. I then, later on, applied a drop shadow effect.
This provided me the basis to move forward from to create tweaked and better versions of this primary design of my title.
My second draft of the magazine coverMy second draft of the magazine cover (only difference is the background colour)
The second draft shown above includes major alterations from the first version as I have imported a photograph from my shoot with Max. As well, I have changed the look of the title through changing the colour, positioning, size and removed the underlines. I have re-sized the size of the ‘issue one’ and ‘£8’ text aas OI feel this would look better once printed – I was taking into consideration the proportions and sizes of features once printed.
I have also produced a second version of the same draft but just with a different coloured background to give me a couple of options to choose from if this was what I was to go for in the final stages.
My third draft of the magazine cover with the addition of extra touches such as underlines and the ‘issue one’ type as well as ‘£8’ type also hand drawn and digitised for the magazine cover. I have also added the focus of the magazines – the magazines theme on the front cover but in typed font directly from Adobe Photoshop.My third draft of the magazine cover with the addition of extra touches such as underlines and the ‘issue one’ type as well as ‘£8’ type also hand drawn and digitised for the magazine cover as well as a different background colour to give a couple options to choose from. I have also added the focus of the magazines – the magazines theme on the front cover but in typed font directly from Adobe Photoshop.
On Adobe Lightroom, I was also able to narrow down my edits even further to the ones I would likely use in the magazine end product and the ones shown below would be the selection I would again have to narrow down even further to leave me with just 5 images that I would be happy to show in my magazine. In real magazine publications of fashion coverage, a photographer/editor would only have room to select between 5 and 1- images, if that for the final cut as you need to keep the audiences interests hooked and this is easily done with a good handful of effective images. I was able to colour code the shortlist of edits I selected that I believe would work in a magazine whilst taking into account pairs of photos that could work and trying top include a range of portraits and landscapes as well as close ups and wide shots. Below is a primary screen of the selection process and the final selection of images to choose from for the final cut.
The yellow colour coded images represent the edits I may use and these are ones I am insure on in terms of if they would actually work in the magazine and although they are goof images I feel they work well, I have chosen to select, with a green colour code, the bets images that would look most effective in a magazine when put together, however, this distribution between the green and yellow images may change later on as I may decide to remove some green ones and replace these with some yellow ones.
Early last week, I uploaded a blog post outlining my intentions for my first two photoshoots and mentioned that I would be carrying out both of these shoots of that week (beginning Monday 12th). As well as this, I produced a blog post covering my plans for both of the shoots.
On Wednesday 14th, I did manage to carry out my first shoot of the project (excluding my practise shoot) and this was with Peter Le Gal. I have collated contact sheets from this shoot and have completed my edits of my best images also. Looking back on the photoshoot, it was very successful but it was the first stage at which I realised that my intentions may be more difficult to follow through than I first forecasted because doing this shoot made me realise that working with people I wasn’t very close with would be more difficult that I first anticipated because of the difficulties in communication we may have but I will become more comfortable and use to shooting and directing my models as I progress through the shoot. Apart from this, the shoot was successful and I retrieved many positive outcomes from it which I will present soon in another blog post.
However, I was also supposed to do another shoot on Thursday 15th – the day after but because of the weather, I had to cancel the shoot for that day that I was supposed to do with Max Feighan, as planned and postpone it until the week after (thus week beginning Monday 19th). The weather was looking very rainy and grey and this was not what I wanted to shoot in as it would make it very difficult to get a goof handful of successful outcomes from it and as it will be my first time shooting with Max, I wanted it to be the right conditions in all aspects. I have contacted Max again and ask ed if he is available to shoot on Saturday 24th instead which he said he was and is our shoot that was supposed to go ahead last week is now going ahead this Saturday. However, I have told him that this may change again depending on the weather. We will be basing the photoshoot in Les Quennevais Precinct as I feel this will be a very effective location for an urban look and feel Therefore, the post outlining this second shoot will not be published as soon as I thought and I have had ot re-arrange how I structure my work because of this unforeseen and external circumstance that cannot be controlled. However, this will still be my second shoot if it goes ahead for the 24th and I have also arranged my third shoot on Monday 26th with another confirmed model, Emanuel Nobrega and I will be uploading my planning process for this in the latter of this week.
My plan for the remainder of this week is to upload all relevant evidence of my shoot with Peter form last week including any contact sheets, edits and evaluation/analysis of the photoshoot as well as showing evidence of my recce report of the location we shot in which I carried out before the shoot on Wednesday. As well,m I will still be carrying out any relevant planning/research I need to in the background and this will be uploaded when a piece is completed thoroughly. I will also be staying in contact with models in the background as I have been so far to maintain a relationship and keep them in the loop of what is going on.
On Saturday 10th March, I carried out my first practise/experiment shoot with Lucy as my model for the day. I based my photoshoot at Les Quennevais Estate where there are many opportunities to capture my subject in an urban environment as the area is surrounded by maisonettes, apartment buildings and garages all within close proximity of each other and so I saw it is as the perfect opportunity to begin my project and I intend to re-visit this location again with another of my models.
From the shoot., I can take many positives but also many negatives and ways I can improve for next time however, I am pleased there were weaknesses in the shoot as this gives me a basis of which to judge on how to better my performance of my next shoot on Wednesday 14th March (today).
This shoot was a very successful and useful photoshoot as I have managed to retrieve several positives outcomes in terms of edits; I have edited my best images – this being around 30 images out of the 330 I took and I did this on Adobe Lightroom as it is a very easy software to import, edit and export images with. Using this software allowed me arrange my images into contact sheets and it also allowed me to reject any images I did not like or were not of a good compositional quality and I was also able to put aside and rate images that were a success and that I intend to use.
In terms of the actual day of the photoshoot, it was a perfect day for me to take photos. The weather was perfect – it was sunny and this was the perfect light for my shoot considering I was working solely with natural light – the clear sky and sun provided perfect lighting for the afternoon and this in-turn benefited the final outcomes because the colours were very warm and this complemented Lucy’;s makeup and I was able to get very clear and crisp shots using my new lens. However, I am aware that on my future shoots, the weather will be very varying and I may not get the best weather conditions and because of this I may have to postpone any shoots where I deem it is necessary. As well, it is likely that I will be shooting after school hours at about 4pm and I need to take into consideration that the lighting may also not be great as the sun will soon be going down so will have to work around this to get the best results.
I will discuss later on in this post about the location and why I chose it as well the problems I had using my camera and how this affected the final results. As well I will comment ton my edits and my reasoning behind my choice of images and why I edited them very subtly with the intention just to enhance any colours that needed lifting or to crop any images where the composition/framing was not the best.
Contact Sheets
These are all the contact sheets from the shoot which I have created using Adobe Bridge. Creating these contact sheets gave me the ability to view all images in an orderly fashion all in one place and from this I was able to roughly mentally discard of any images I was not happy with.
Once I had created my contact sheets, I was then able to import all my images into Adobe Lightroom to begin making a shortlist of my favourite images and begin editing them from this step onwards.
On this software, I was able to make a selection of my best images and discard any images that were not up to the standards of the others. From 330 images, it was quite difficult to narrow this down to a smaller array of images but at the same time it was quite easy because I was able to decipher easily between the successful images and weaker images; this being because most of my images were out of ficus and I was immediately able to understand the reason for this fault.
Because this photoshoot was the first time I was using my new 50mm fixed lens, I was not completely aware of the results of I was going to get from it as I was not sure on the right settings to use for different shots. Because it is a fixed lens and has a much lower f/stop of f1.4, I was very keen to use this feature as it is perfect for portraits shots where you want to focus on the subjects face and isolate them from the background in which they stand. I was using this throughout the shoot and kept my camera aperture between f/1.4 and f/3.6 for the majority of the time, rarely switching to much higher aperture which I needed to do. On top of this, I was often standing to far away from the subject for the camera to actually focus on anything in the frame and this is what the cause was for a large range of my shots being out of focus and I now know how to improve upon this for my next shoot where I will be more cautious of the f/stop I am using for specific shots.
On Adobe Lightroom, it gives me the ability to rate each image out of a star rating of 5. From all my successful frames and after editing them all how I wish, I did exactly this and rated all the images I had gathered into this one place to allow to understand my best ones and the weaker ones.
2 Stars
These are the edits which I have rated 2 stars because although they are still good images, they are my strongest ones and I would not be happy using them as finals if I was to keep these images as finals for the overall project.
3 Stars
For the following images I have given them a rating of 3 stars because I felt that they were a little better than the images above but still not the standard of my other edits. Furthermore, the edits below are other variations of the better shots that I have rated 5 stars later on in the post. Some of them are from the same area which we based a few of the shots and I have still edited them but have not out them in the 5 star rating because they are weaker variations of similar range of shots. However, the first two are still one of my favourites from the whole shoot and especially out of the photographs rated 4 stars because of the colour provided by the blue garage door behind Lucy.
The images following these two are also other variations of the better versions of the mini shoot we based on the road near Les Quennevais School where Lucy is seen on the road/pavement posing in front of a set of apartments on the green area behind her; but I still feel these images are strong and worth showing.
Also, most of the images I am showing work as a mini sequence if they were taken in close succession to each other and frame similar actions in the image and these would be obvious.
5 Stars
Below are my best images; the ones which I have rated 5 stars because of their quality and they are my favourite because of this.
In these images, I have also included a few images that do not frame Lucy and instead are images of landscape/environment we were surrounded by and where I was taking my images. I decided to do this and intend to do this throughout my perfect in all other shoots to provide consistency but more importantly, give the project something more that just portraits – it will fragment the structure of portraits and divide these up to give the audience a break to digest other images bit it will also provide a really effective look and a a basis for me to structure my other subject based images. It will show a different view to what is shown in the images that has a heavy focus on faces and subjects and will instead focus on admiring the beauty that is provided by a range of environments where I am basing the shoots.
On Adobe Lightroom, I was also able to narrow down my edits even further to the ones I would likely use in the magazine end product and the ones shown below would be the selection I would again have to narrow down even further to leave me with just 5 images that I would be happy to show in my magazine. In real magazine publications of fashion coverage, a photographer/editor would only have room to select between 5 and 1- images, if that for the final cut as you need to keep the audiences interests hooked and this is easily done with a good handful of effective images. I was able to colour code the shortlist of edits I selected that I believe would work in a magazine whilst taking into account pairs of photos that could work and trying top include a range of portraits and landscapes as well as close ups and wide shots. Below is a primary screen of the selection process and the final selection of images to choose from for the final cut.
The yellow colour coded images represent the edits I may use and these are ones I am insure on in terms of if they would actually work in the magazine and although they are goof images I feel they work well, I have chosen to select, with a green colour code, the bets images that would look most effective in a magazine when put together, however, this distribution between the green and yellow images may change later on as I may decide to remove some green ones and replace these with some yellow ones.
Once I had decided what it was that I wanted to follow through with for my exam project, this being fashion and streetwear photography of young people in Jersey, I felt it necessary to begin thinking of the types of models and different people I want to represent the face of my project so began collating names; a shortlist as such and then from this, I approaches a couple of people privately via a direct message on Facebook Messenger. I did this before I had distributed an advertisement for models to come forward if they are up for helping me. I approached, primary, two teen guys that I definitely knew I wanted in my project; these were Emanuel Nobrega and Max Feighan.
I first approached Emanuel through Messenger – a social media site that allows users to chat directly. I explained to him my intentions and what I wanted from the shoot an told him it would be my first shoot and would act as a practice/experimentation for e to understand what I want to achieve from the shoots to follow. We were chatting on this app and we were getting closer to arranging a date when we came across some difficulties – he wasn’t free for the next week and half because of other commitments. I knew this was going to be a problem when I began approaching people to be a model for my photoshoots because it heavily relies on when other people are free. However, I have to work around this and this is what myself and Emanuel did. I was looking to carry out a practiced shoot this week to get myself underway as soon as I could but I knew this was going to be difficult when I was advertising for models very last minute. However, myself and Emanuel have arrange for us to shoot on the week beginning the 19th March when we are both free and I believe we will be shooting on that Monday 19th after school at 4pm. The positive to take from our chat however is that Emanuel is up for helping me out and this is great.
After chatting with Emanuel and discovering that he wasn’t free for the next couple weeks, I approached my another mate I was keen on including in the project – Max Feighan. I knew I wanted Max to be a part of this project from the start but asked Emanuel if he would be my first model because of more friendly relationship with him – I have never really crossed oaths with Max but I was aware that I was going to have to work with people I had never really interacted with before.
I began talking to Max on Messenger as this is a very easy and accessible way to talk and it is quick – people respond quickly and there is the ability to, on the app, create plans for the participants to state whether they are attending or not. After explaining to Max my intentions and asking him politely if he would be willing to help, I got a very positive response from him as he said he would be very keen for this prospect. This then kick-started our further discussion where we began to arrange dates and times. Max told me he would be free during the middle of the week next week and once I was aware that I was also free, we put in a day and time and after talking with each for some time we had a plan arranged and this is set in place for next week. We will be shooting on Thursday 15th next week at 4pm and I am yet to organise a location to meet to shoot. I told Max I would be in touch with him closer to the time to arrange a location – something I need to plan more thoroughly before my other shoots.
With regards to location, I want to shoot in an urban setting. I have told myself that the “street” will be my studio as do not intend to enter the studio at any point because this is not what my project encompasses – it encompasses the teens of Jersey and where they spend their time most – where they show off their style – on the streets of Jersey, late at night – in town where Kings Street is filled with teens in groups being rowdy and showing off. I will be using these settings to base my photoshoots.
The screenshot of the note written on my photo which I then shared to my Instagram story
This was my method of advertising for models to come forward; I wrote up a note on my phone explaining what I was doing for my project and for models to come forward if they are willing to help and fit my vision which was briefly explained in this not also. I told them to private message me on Instagram but also said that I will be approaching people myself – which is what I ended up doing for most of my confirmed models and knew this was going to be the most efficient way to confirm people. I attempted to make the note/advertisement informal so that it didn’t seem too serious and too make myself look more appealing for people to be willing to help me. I then shared this screenshot onto my Instagram story where the photo would stay for 24 hours and then be removed. However, I may re-upload this closer to a time where I need more models but for now, I have a solid variety and number of people who have confirmed they are willing to be part of the project. I also followed up this photo with another bunch of text where I advertised my need to compete a shoot this week so if anyone can fir in a 30 minute to 1 hour shoot in their week, to come forward.
From this advertisement, as I stated above, I did not get many people come forward independently and tell me they were willing to help – which I was aware may happen when I shared it to my Instagram. This is why I explicitly approached people I definitely wanted to be models for different shoots over the next few weeks. However, from my persistence in asking people and persuading them to help, there was a positive turnout and response of people who wanted help. I privately messaged around 10 people on Instagram and fro this, they were all willing to help after I told them my intentions and showed them the type of work I wanted to replicate. So, from my first distribution of advertisement, the models confirmed for my project looking at fashion and streetwear among teenagers in Jersey are: Emanuel Nobrega, Max Feighan, Harrison Cummins, Peter Le Gal, Jai Petrovic, Alex Rogerson, Charlie McBride, Alex Amy, Jasper Crocker-Kilic, Peter Jones and Lucy Rountree will be model for my very first practice shoot where I experiment using my camera equipment and types of shots I want to achieve. I will be shooting with Lucy on Saturday or Sunday of this week and this will be a very informal and relaxed shoot because I am comfortable with her and have done several other photoshoots with her before for previous projects and the success form these has filled me with confidence that I can achieve positive results from this practice shoot. As well, Emanuel has told me that his group of mates would be willing to do a group shoot at some point also and so this is also confirmed. All models will be shot on a individual shoot apart from Charlie and Alex who have said they would do a shoot together after my suggestion for this. This is the same for Jai and Alex.
Next week, for my first couple of shoots I will be photographing Petr Le Gal and Max Feighan and these will be separate shoots in separate locations. I am shooting with Max on the date and time stated above and will be shooting my mate, Peter Le Gal on the day before my shot with Max, on Wednesday 14th at 4pm.
I decided to send to this advertisement as early as I have before I have really done any thorough artist research and references/analysis on my blog because I knew it was vital to get models confirmed so that I can be filled with confidence that I have a good array of models confirmed and can arrange dates/times/locations at a alter time when I actually need them after I have carried out through research and planning as well as a couple of practice shoots. I have also disclosed this information to them and they have all told me this is fine.
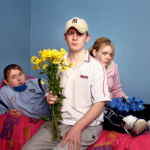
Furthermore, as you can tell from my lost of models above, they are all male apart from Lucy who will act as my practice shoot and may not be included in the final product. I have chosen to recruit all male models because I am unsure yet whether I want to focus my project solely on teenage boys and their behaviour/look/style/personas or whether I want to bring in a couple of female models. I am unsure on this yet but I am leaving more towards focusing it solely on boys so have confirmed all male guys. However, later on the project, if I feel I want to introduce the presence of females, I may do this and have some people in mind of who I could use. I also think another concept that could be effective would be if I was to produce ‘couples’ shoots where I photograph a guy and girl who are in a relationship. This could be effective and have retrieved inspiration for this from a couple of Vicky Grouts shots.
It is really important that you get off to a creative and productive start in your Exam preparation. You should aim to do something practical and photographic each week, either make new images with your camera or work digitally with images in post-production (Lightroom/ Photoshop/ Premiere.)
Those students who are disciplined and work with a real focus on a sustained investigation ie: go on shoots, experiment with images, explore ideas in-depth will achieve the highest marks and also enjoy the creative challenge of exploring an Exam paper.
Watch this video about John Baldessari narrated by Tom Waits as an inspiration first.
In the first week of the Exam preparation we want you to complete a photographic shoot where you break one of the rules of photography.
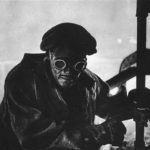
#1 The Rules of Objectivity – W. Eugene Smith, John Grierson, Mathieu Asselin #2 The Rule of Audience– Lewis Hine, Daile Kaplan, Mark Neville #3 The Rule of Manipulation – Steve McCurry, Errol Morris, Alice Wielinga #4 The Rule of Reality – John Grierson, Peter Watkins, Joshua Oppenheimer, Cristina de Middle, Paula Paredes #5 The Rule of Technicality – Laura El-Tantawy, Henrik Malmström #6 The Rule of Ownership – Thomas Sauvin, Mishka Henner #7 The Rule of the Camera – Donald Weber, Liz Orton #8 The Rule of Rule Breaking – Olivia Arthur, Carolyn Drake
Alice Wielange
Mathieu Asselin
Carolyn Drake
Cristina de Middel
Donald Weber- War Sand
Laura El-Tantawy
Lewis Hiner
Mark Neville
Mishka Henner
Thomas Sauvin
Donald Weber – War Sand
W Eugene Smith
Deadline: Wed 28 February– all posts uploaded!
Read: article Rule Breakers by Lewis Bush (Archisle Photographer-in-Residence 2018.)
Plan: Choose one rule of photography and develop an idea for a shoot – 1 blog post.
Research: At least two artists references in relation to your chosen rule that provide analysis and context – 1-2 blog posts.
Record: Produce at least one shoot.
Experiment: Edit a selection of 5 images with annotation – 1 blog post.
Evaluate: Choose your best image and evaluate with reference to Bush’ text and artists references – 1 blog post.
Present: Print best image and prepare a 1 min presentation Wed 28 Feb in class around the table.
Extension: Choose a second rule to break and repeat the above process.
In essence if you follow the above 7 step process in your exam preparation you will fulfil all assessment criteria and work towards a set of final and successful photographic outcomes.


 After researching more about the photo book illuminance I came across an article by