For my personal study I’ve mainly been looking at books filled with essays and the meaning behind photographers works rather than actual photo books. I would look at the work of Claude Cahun but she never made one it is only people that have created them for her afterwards. I have also studied Cindy Sherman and her work but I don’t really think much of the layout of her books and they aren’t really what I am looking for in my own book. I am going to be making a magazine for my main project but will be making an extra photo book for the images that I made during the school production. With these images I am unsure what kind of book I want to make as I really like the idea of having parts of the book that are like little notes or that aren’t the same size as the rest of the pages, add ins. However, I am unsure what I could use to create this or what would be best to add. I was thinking of adding in the tickets that I made for the school production as well as the programme as little add ins which would be quite interesting, I could also use some of the emails that we have made and add them in as extra little pop outs. I think that this will work well in my photo book and give a bit more context rather than just looking at the same style of images.
The Epilogue – Laia Abril
Cindy Sherman photo book
Th Longest Way Round – Chris Dorley-Brown
Claude Cahun photo book
When I Was Six – Phillip Toledano
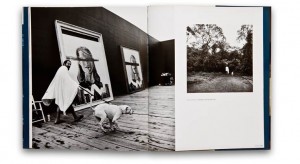
There are three books that I really like and will take inspiration from for my own photo book. I really like the pop out’s that they each have as it gives more context to the books and adds another layer making it more interesting to look at and for the spectator to get more of an insight as to what is going on. I really like the idea of having these pop outs and I really like the look of The Epilogue book. It really stands out to me and makes the whole book feel more personal, almost like a memoir or a diary style book. I have decided to focus in on The Epilogue by Laia Abril as this book is full of pop outs and I really like that style. I think that Abril’s book is really interests and shows a personal side to a young girl’s life and her family. The pop outs are really important in Abril’s book as they do bring in more context and allows the spectator into their lives as well as letting them know what was actually going on in their lives and how the young woman was feeling up until she died from bulimia.
This style really interests me and makes me want to make my book in a similar way. I want to add in a print out of the emails between me and Mrs Butler to show the preparation that went into finally making the images for the school productions as well as possibly a section of my own little diary showing it on my list of things to do. I will also be putting in pop outs of the tickets for both nights that I created for the show as well as the programme that I made and possibly the poster too. I think that this will be the best way to add in some more detail to my photo book and really make it a diary style photo book which is what I want as the images that I made on the day are not staged at all and are documentary photographs. This style stands out to me the most and is more exciting for the spectator than just flicking through a plain book of images.
The story behind Laia Abril’s book is that of the Robinson family and their lives in the aftermath suffering from the lose of their 26 year old daughter to bulimia. Abril worked very closely with the family and reconstructed the young woman’s, Cammy, life telling her story through flashbacks, memories, objects, letters, places as well as old images. Abril shows her spectators the dilemmas and struggles that many young girls are confronted with as well as the problems that the rest of the family face with guilt and the whole grieving process. Her whole book is based around the life of this girl and living with her illness, bringing the memory of her back to life. I really like this book as it interests me a lot and it really feels personal. Here spectators are able to get more of an insight into what it is like to live with bulimia as well as living with a family member with the illness. The pop outs are really interests as they really do add more layers to the story and brings the spectator in just that much closer to what is going on and what went on in the Robinson’s lives.
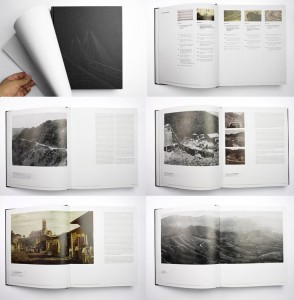
The Epilogue [mini analysis]The Epilogue [mini analysis]When analyzing a couple of pages from The Epilogue photo book I noticed that everything linked in together and it all worked towards making a solid story. This is something that I think all photo books follow to maintain fluidity within the book as so that it is easy reading/viewing for the spectator. I do really like the idea of having pop outs and am trying to think of the best ways to add this into my own ideas and my own photo book. I love that the add ins really bring more detail and a whole other layer to the story. This allows the spectator in and to find out more about what is going on within the story and in the lives of the Robinson family. I like how each of the images link together under the theme of Cammy’s life as well as how the family are dealing with the grief of losing their daughter and sister at such a young age of only 26. I think that I want to make my own photo book similar to this one and have those add ins to make it more interesting and to make it stand out more for my spectator to be able to get those added layers and just that much more detail about my story.
1. Create a BLURB account using your school email address. With Blurb you have different options on how you design your book:
a) Using Lightroom to design your book which is integrated with BLURB. Only for use on school computers, unless you have LR at home on your own laptop.
b) Download Bookwright via Blurb onto your own laptop and work offline at home and you can work indecently of school. Here you have full control of layout/ design features. Once completed, you upload photo book design to Blurb
c) Choose online option if you want to work directly online. Very limited layout/design options (not recommended!)
For those who wish to make their own hand-made photo-book or if you want to customize your Blurb book see me for more details on how to do it.
2. Using Lightroom make a rough selection of your 40-50 best pictures from all shoots. Produce contact-sheets in Lightroom and edit photos – make sure you have adjusted and standardised all the pictures in terms of exposure, colour balance, contrast, brightness and produced a duplicate a set in B&W.
3. Decide on format (landscape, portrait) size and style of your photo-book. Begin to design your photo book, considering carefully, narrative, sequencing, page spreads, juxtaposition, image size, text pages, empty pages, use of archival material etc.
4. At the end of your photo book, add your illustrated essay including title, any captions (if needed), bibliography, illustrations of artists work (incl data) and images of your own responses. Think carefully about font type, size and weighting.
5. Produce screen prints of layout ideas as you progress and add to Blog for further annotation. Photo-book; show screen prints of page layout and narrative/ sequencing/ juxtaposition of pictures. Podcast; produce screen prints as work progress that show your editing skills/ decisions.
6. Select a set of 5-6 photographs as final outcomes and evaluate – explaining in some detail how well you realised your intentions and reflect on what you learned in your Personal Study.
7. Save final outcomes in a shared folder, in a high-resolution (at least 3000 pixels on the long edge) and each images saved in your name i.e. first name_surname_title_1, and 2, 3 and so on.
See blog posts: Podcast/ Film for those of you who have made a film on how to show evidence of work on the blog, how to edit and upload/ completion.
UNDERSTANDING PHOTO BOOK DESIGN: LAYOUT, SEQUENCING, NARRATIVE, CONCEPT
DEADLINE: Fri 5 February
Blog: Produce a number of posts that show evidence of the following:
1. Research a photo-book that you have used as inspiration in your personal study and describe how it communicates a narrative, concept, subject-matter using a combination of images, text, archival material. Some of you may already have done this in your research.
Consider: Who is the photographer? Investigate background, conception and context of why he/she made the photo book and the photographs within it.
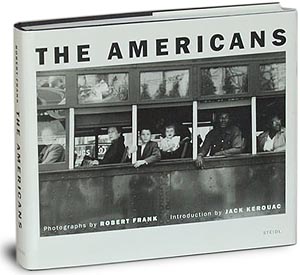
E.g Robert Frank’s “The Americans” was conceived with the help of a scholarship that allowed Frank to go on road trips across America during a two year period. He wanted to portray American society in the post-war period and his book has influenced (and still influence) many photographers since and also contributed to a new style and subjective approach to documentary photography. Why?
2. Deconstruct the layout of the book e.g. think about format (portraiture/ landscape/ square), size (A5, A4, A3), sequencing (single page, double-spread, multiple images on a page), juxtaposition of photographs on opposing pages etc. How is the narration of the images used, i.e. formal or conceptual relationship between images. Any use of archival or found material? How does it add value to the story being told? Describe also, how the book title, text (foreword, essay, statement by artists) and captions (if any) are use.
3. Research photo books for design ideas, look also at BLURB online book making website. Produce a moodboard of design ideas based on your research above and look at other photo book examples from photographers, incl what is shown on Blurb or see previous books produced by Hautlieu students. Describe in detail how you want to design your photo book in terms of look and feel considering the above layout options.
DEADLINE: Fri 5 February
Julian Germain For every minute you are angry you lose sixty seconds of happiness
Opening quote:Choose a quote from either one of your photographers or critics. It has to be something that relates to your investigation
Introduction (250-500 words).
Think about an opening that will draw your reader in e.g. you can use an opening quote that sets the scene. You should include in your introduction an outline of your intention of your study e.g. what and who are you going to investigate. How does this area/ work interest you? What are you trying to prove/challenge, argument/ counter-argument? Include 1 or 2 quotes for or against. What links are there with your previous studies? What have you explored so far in your Coursework or what are you going to photograph? How did or will your work develop. What camera skills, techniques or digital processes in Photoshop have or are you going to experiment with?
Paragraph 1 Structure (500 words): Use subheading. This paragraph covers the first thing you said in your introduction that you would address.The first sentence introduces the main idea of the paragraph. Other sentences develop the subject of the paragraph.
Content: you could look at the following…exemplify your hypothesis and introduce your first photographer. Select key works, ideas or concepts and analyse in-depth using specific model of analysis (describe, interpret and evaluate) – refer to your hypothesis. Contextualise…what was going on in the world at the time; artistically, politically, socially, culturally. Other influences…artists, teachers, mentors etc. Personal situations or circumstances…describe key events in the artist’s life that may have influenced the work. Include examples of your own photographs, experiments or early responses and analyse, relate and link to the above. Set the scene for next paragraph.
Include relevant examples, illustrations, details, quotations, and references showing evidence of reading, knowledge and understanding of history, theory and context!
Paragraph 2 Structure (500 words): Use subheading. In the first sentence or opening sentences, link the paragraph to the previous paragraph, then introduce the main idea of the new paragraph. Other sentences develop the paragraphs subject (use relevant examples, quotations, visuals to illustrate your analysis, thoughts etc)
Content: you could look at the following…Introduce key works, ideas or concepts from your second photographer and analyse in-depth – refer to your hypothesis…Use questions in Pg 1 or add…What information has been selected by the photographer and what do you find interesting in the photograph? What do we know about the photograph’s subject? Does the photograph have an emotional or physical impact? What did the photographer intend? How has the image been used? What are the links or connections to the photographer in Pg 1? Include examples of your own photographs and experiments as your work develop in response to the above and analyse, compare, contrast etc. Set the scene for next paragraph.
Include relevant examples, illustrations, details, quotations, and references showing evidence of reading, knowledge and understanding of history, theory and context!
Paragraph 3 Structure (500 words): Use subheading. In the first sentence or opening sentences, link the paragraph to the previous paragraph, then introduce the main idea of the new paragraph. Other sentences develop the paragraphs subject (use relevant examples, quotations, visuals to illustrate your analysis, thoughts etc)
Content:you could look at the following…Introduce key works, ideas or concepts from your third photographer and analyse in-depth – refer to your hypothesis…Use questions in pg 1 and pg 2 or add…How does the photograph compare or contrast with others made by the same photographer, or to other images made in the same period or of the same genre by other artists. How does the photograph relate to visual representation in general, and in particularly to the history and theory of photography, arts and culture. What are the links or connections to the photographers in pg 1 and 2? What are the similarities, differences or links and connections? How does this work compare to yours? Include examples of your own photographs and experiments as your work develop in response to the above and analyse, compare, contrast etc. If more paragraphs are required, set the scene for the next paragraph.
Include relevant examples, illustrations, details, quotations, and references showing evidence of reading, knowledge and understanding of history, theory and context!
Conclusion (500 words): Write a conclusion of your essay that also includes an evaluation of your final photographic responses and experiments.
List the key points from your investigation and analysis of the photographer(s) work – refer to your hypothesis. Can you prove or Disprove your theory – include final quote(s). Has anything been left unanswered? Do not make it a tribute! Do not introduce new material! Summarise what you have learned. How have you been influenced? Show how you have selected your final outcomes including an evaluation and how your work changed and developed alongside your investigation.
Bibliography: List all the sources that you used and only those that you have cited in your text. Where there are two or more works by one author in the same year distinguish them as 1988a, 1988b etc. Arrange literature in alphabetical order by author, or where no author is named, by the name of the museum or other organisation which produced the text. Apart from listing literature you must also list all other sources in alphabetical order e.g. websites, exhibitions, TV/ Videos / DVD/ Music etc.
DEADLINE: Hand in draft version of your essay Fri 29th Jan.
DON’T FORGET TO MAKE PHOTOGRAPHS & EXPLORE YORU IDEAS!!
Produce a photographic response to your investigation in Personal Study. You must plan and produce at least another 3 photo-shoots in the next 3 weeks (e.g. responding to photographers subject-matter, style, form, aesthetics, specific skills, techniques, methods)
Continue to review your responses and shootsand experiment with your pictures appropriate to yoru intentions Lightroom/Photoshop e.g. cropping, change colour balance/ b/w, brightness/ contrast, blurring/ movement, blending/ montage techniques.
Select your best experiments and picturesand include in your Personal Study for analysis and comparisons.
We will begin work on editing and designing a photobook next week. If you don’t have any content i.e. text and images you can’t make a photo book!
Establish coherent and sustainable links between your own practical work with that of historical and contemporary reference.
Show evidence for an on-going critical and analytical review of your investigation – both your written essay and own practical work in response to research and analysis.
Develop a personal and critical enquiry.
Week 16: 4th – 11th Jan
Blog: Produce a number of posts that show evidence of the following:
1.Think of a hypothesis and list possible questions.
Here are some hypothesis/ essay questions from previous personal studies: possible questions to investigate (update on return in Jan)
2.Essay Plan: make a plan that lists what you are going to write about in each paragraph.
3.Finish a draft version of your introduction (500 words) and hand in Mon 11th Jan.
Think about an opening that will draw your reader in e.g. you can use an opening quote that sets the scene. You should include in your introduction an outline of your intention of your study e.g. what and who are you going to investigate. How does this area/ work interest you? What are you trying to prove/challenge, argument/ counter-argument? Include 1 or 2 quotes for or against. What links are there with your previous studies? What have you explored so far in your Coursework or what are you going to photograph? How did or will your work develop. What camera skills, techniques or digital processes in Photoshop have or are you going to experiment with?
Produce a photographic response to your investigation in Personal Study. You must plan and produce at least another 3 photo-shoots in the next 3 weeks (e.g. responding to photographers subject-matter, style, form, aesthetics, specific skills, techniques, methods)
Continue to review your responses and shootsand experiment with your pictures appropriate to yoru intentions Lightroom/Photoshop e.g. cropping, change colour balance/ b/w, brightness/ contrast, blurring/ movement, blending/ montage techniques.
Select your best experiments and picturesand include in your Personal Study for analysis and comparisons.
The aim of this unit is to critically investigate, question and challenge a particular style, area or work by artists/ photographer(s) which will inform and develop your own emerging practice as a student of photography.
Your Personal Study is a written and illustrated dissertation, including a written essay (2000-3000 words) and a photographic body of work (250- 500 photos) with a number of final outcomes.
This year you have to make a photo book which you design to include both your essay (with title) and a final selection and sequence of your photographs produced as a response to your chosen theme of FAITH, FAMILY and COMMUNITY
In addition, we are also expecting that those of you who want to go above and beyond to achieve top grades will produce a podcast i.e. mini film with sound and images based on the same above
All your usual research, analysis, planning, recording, experimentation and evaluation will be posted onto your BLOG
Link to Planner & Tracker Monitor and track your progress every first 5 mins of lessons on Fridays and upload onto the blog
Week 15 and Christmas Holidays: 8th Dec – 4th Jan
Objective:Criteria from the Syllabus
Essential that students build on their prior knowledge and experience developed during the course.
Develop your written dissertation in the light of your chosen focus from the practical part of previous coursework and projects.
Select artists work, methods and art movements appropriate to your previous coursework work as a suitable basis for your study.
Investigate a wide range of work and sources.
Blog: Produce a number of posts that show evidence of the following:
1.Reflect on your previous projects/modules and write and overview of what you learned. Link your chosen area of study to your previous work, knowledge and understanding based upon your chosen theme of FAITH, FAMILY and COMMUNITY. Include examples of previous work to illustrate your thinking.
2.Select artists/photographers work, methods and art movement appropriate to your chosen area of study. Find 3 different texts to read over Christmas that support your study from a variety of sources (books, articles, journals, magazines, websites, films/dvd.)
3.Write a specification that outlines your main focus, intentions and area of study, including what artists/ photographers you wish to investigate, respond to and write about in your essay.
4.Produce a detailed plan of a 3 photo-shoot for this Christmas holidays. MAKE PHOTOGRAPHS!
Link to folder with more examples M:\Departments\Photography\Students\Resources\Personal Study\student exemplars
A few Personal Studies from last year.
Bryony Sanderson: Gie us a wee word wi’ yer Mum: The title of this work is phrase I would hear both my Scottish Grandparents say almost every time I answered the phone. During this project, I focused on my Scottish Heritage and the difficultly living in Jersey has bought to our relationship with my Grandparents.
Bryony_Sanderson_giv_us_wee_yer
Bryony_Sanderson_giv_us_wee_yer
Bryony_Sanderson_giv_us_wee_yer
Bryony’s exam project:Artificial: Being surrounded and fascinated in the prosthetic world through my parents’ occupation, I felt that this to be an appropriate area to explore under the theme flaws and imperfections. From the moment the idea sprung to mind, I knew this was going to be a challenge, being well aware it would push my abilities as an amateur photographer. However, I was firm in my decision to pursue this, making it my goal to depict the power, strength and determination of amputees, and how in-fact, their ‘imperfection’ or ‘flaw’ as some would call it, is certainly not a flaw at all. Stuart Penn, the focus of my photographs, was such a pleasure to work and a huge inspiration, giving us the powerful message that anything really is possible. I feel honoured to have had the opportunity of taking his photographs and gaining insight into his incredible lifestyle.
Bryony_Sanderson_Artificial
Eve Ozouf A Lekker Christmas: For this project I captured the highlights of my family holiday to Durban, South Africa for Christmas 2014. The images were captured in a documentary style, which is my preferred approach as I enjoy capturing family life as well as landscapes where human activity has occurred. The word ‘Lekker’ which I used to describe my Christmas means ‘good’ in the native language of Afrikaans. My photographs show a variety of environments that South Africa has to offer with its vast land including urban built up areas to the deserted African plains. Some images show the ‘Durbanite’ way of life, including where my 14-year-old cousin demonstrates how to use my grandfather’s rifle to shoot the annoyingly noisy ‘Hadeda’ birds. South Africa is full of vibrant colours and textures which I particularly focused on when producing this body of work as a photograph isn’t just about how it looks, it’s how you imagine it feeling. A lot of experimentation was used to bring out different styles of photography including slow shutter speeds to dramatise events such as the bonfire sprites floating towards the sky. For me, these images capture the quality of life South Africa has to offer and should make the viewers want to visit this beautiful country for themselves.
Eve_Ozouf_Durban-1
Eve_Ozouf_Durban-1
Eve_Ozouf_Durban-1
Oliver Sharman You’s Company, Me’s a Crowd is a photo book in an autobiographical form, whereby I am re-enacting events that occurred in my recent life, venturing from visiting my brother at university and the hungover pain this brough, to partying and hanging out with friends in all manner of ways and the aftermath of this. So, here is an insight into me, often eventful life of a teen in the island of Jersey.
Oliver_Sharman_You’s Company, Me’s a Crowd-2
Oliver_Sharman_You’s Company, Me’s a Crowd-2
Oliver_Sharman_You’s Company, Me’s a Crowd-2
Matt Palmer: A Little Bit Longer: Not all disabilities are visible. You could know some your whole life and never know that they have a severe, life-long condition. On Tuesday 14th July 2009, I was diagnosed with an invisible illness; Diabetes Mellitus Type 1, a condition when the pancreas in the body loses the ability to produce insulin independently. Day to day, my life hasn’t changed; however, I have to inject myself four times a day, and manually balance my sugar levels for the rest of my life.
As diabetes is something you cannot see, it was very hard to photograph it. I took inspiration from Elinor Carucci, an Israeli-American photographer who photographed herself with her children from when she was pregnant, through the birth to her children growing up. Her work involves very revealing, close-up self-portraits to capture her emotions. I found this style to be inspiring in capturing one’s self, and adopted this style into my own.
This is the first time I have ever turned the camera on myself. You would think it would be hard, however, it was just like I was being a model for someone else, and since I’m very open, talking about my diabetes, I found it easy to show my emotions. Photographing events from having low blood sugar level in the middle of the night, to a regular check-up at the diabetes Centre, to an eye-screening at the hospital, and the different physiological outcomes I had to injure, all within one week.
Matt Palmer: I Need A Shovel is the story of my Granddad, the house he has lived in since the 1960s and the clearing out of the house as it is now need to be sold. The name of this project came from my Dad. Him and a couple of others when ahead to my Granddad’s house whilst I went with my Aunt to pick my Granddad up. My Dad had the job of removing the upstairs toilet, which, when it stopped working, my Granddad kept on using it until it overflowed. When my Aunt and I arrived the first thing my Dad said to his sister was ‘I Need A Shovel.’ We all found that line funny when we heard it and then that line just stuck with me.
Lots of people can see little bits of themselves when they see my granddad’s hoarding, be it from collecting newspapers, or postcards, or whatever they’ve collected, it can all be related to what my Granddad has done over the past 50 years.
It is a growing problem. The family need to sell the house as the people next door want to buy the house, however, my Granddad doesn’t want anything to go or be moved. I feel that this could be happening to lots of people across not just the UK but the world. This project will speak to lots of families who are facing the same problem.
Tom Rolls: Angel; The Perfect being? With this work, I am exploring Angels in relation to the project brief “Perfection/Imperfection” which I chose as part of my A2 final Photography exam. Throughout the project, my aim was to rekindle an idea of the Angelic being in relation to different people’s perceptions; for faith, protection, happiness, balance etc. I spoke with a number of different people about their definition of an Angel and what it meant to them. I interviewed my local church vicar who gave me a very brought insight into angels in both a religious and personal sense. I came away bewildered at the fact that Angels are a very important part of people’s lives, and realised that there is a whole other dimension to the subject. Having researched and gained enough primary knowledge, I began transforming these different perceptions into my own interpretations and pieced together a visual binding of all the ways in which an Angel spoke to me through others. I made a film which documents my journey in the sense of exploring what angels actually symbolise today, and how its image and meaning has changed over time. I hope you will also find this a journey for yourself and come away reflecting on this inner dimension from your own personal viewpoint. Are angels in fact the perfect being, or is it in fact their imperfections which make them so sacred?
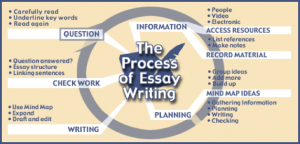
This case study is about developing academic study skills for your next module Personal Study which involves developing a self-directed study based around a hypothesis of your own choice. The final outcome from your Personal Study is to produce a photo-book with a coherent set of photographs (30-40 images) that tell a story or express a personal point of view, including a 2-3000 word essay which relates directly to your hypothesis and body of work.
QUINTESSENCE is a group exhibition celebrating the first five years of Archisle: The Jersey Contemporary Photography Programme (www.archisle.org.je). The Archisle Programme, hosted by the Société Jersiaise Photo Archive promotes contemporary photography through an ongoing programme of exhibitions, education and commissions. Archisle connects photographic archives, contemporary practice and experiences of island cultures and geographies through the development of a forum for creative discourse between Jersey and international artists. Quintessence selects works commissioned for the new Archisle Contemporary Collection at the Société Jersiaise Photographic Archive since 2011 to celebrate, critique, contrast and discuss what has been achieved over the first five years of the project. The exhibition features works by:
Martin Parr / Tony Ray-Jones / Jem Southam / Michelle Sank / David Goldblatt / Yury Toroptsov / Elsie Wright and Frances Griffiths / Tom Pope / Peter Finnemore / Mark le Ruez / John Gibbons / Martin Toft / Finn Larsen
Since its launch in 2011, Archisle has engaged diverse approaches to contemporary lens based media to lead creative research into the condition of islandness, ‘a complex expression of identity that attaches to places smaller than continents and surrounded entirely by water’ (Stratford 2008). Quintessence contrasts works in the Archisle collection in a group exhibition for the first time to analyse the ways in which the Island’s culture and landscape has been interpreted by Jersey and international photographers. The Archisle project recognises that Jersey as a small island community needs to go out and discover the world because the world will not come looking for us! Through internationalism we have developed a growing network of colleagues, friends, influences and inspirations. To reflect these connections, for Quintessence, artists represented in the Archisle collection were invited to nominate colleagues who have influenced or inspired their own visual language.
Curator Gareth Syvret remarked, ‘We do not travel alone; we take with us the histories, knowledge, influences and ideas of others; others we have met and other places we have known.’
As a starting point we will visit the exhibition currently on show at The Berni Gallery, Jersey Arts Centre where Gareth will give a little introduction to his desire to mount this exhibition and discuss possible connections and relationships between exhibited artists.
Meet at Jersey Arts Centre for coffee, Danish Christmas cake and talk
Class 13B Tue 8 Dec Pd 1 – 9:00 am Class 13E Wed 9 Dec Pd 5 – 2:20 pm
This Case Study has three parts. First you need to view the exhibition and answer the questions listed below. Second, you need to write a 1000 word mini-essay that reflect your visit and critical engagement with a paring of artists from the exhibition. Third, you must plan and produce a shoot as response to the above.
Deadline and presentation is Mon 14 Dec. Gareth will be assisting me in reading your essay and view photographs and will be providing some feedback for further improvements/ developments.
Present your answers, essay and images in a number of blog posts.
Task 1:In advance of our visit, read the Exhibition text below and make notes. Think of at least 3 questions that you want to find answers to on your visit an write them down. Bring text and notes with you.
Task 2:Upon visiting the exhibition try and answer the following questions.
a) Write down the first thought about the exhibition that enters your head when you walk in?
b) Look at all the images on the walls. Now find a set of images that you like/ don’t like and write short descriptions of them.
Link to folder with exhibited images; M:\Departments\Photography\Students\Resources\Personal Study\Case Study Quintessence\images of exhibited work
c) Using exhibition text, note down artist name, title of work(s), his/her nominated colleague and consider the following:
What are the connections, influences, relationships between your chosen pairing of artists? Look also broader at common themes, subject-matter, form, aesthetics, visual language, methodologies among your chosen artists and across others featured in the show.
Have a closer look at photo books and newspapers on show at the exhibition. This will provide a much deeper understanding of their work.
Task 3.Conduct further independent research and write a 1000 word essay.
a) Try and think of an essay question (hypothesis) as a starting point for further investigation.
b) Incorporate your answers to the questions above and any other notes from exhibition text and gallery talk with the Curator.
c) Include direct quotes from sources using Harvard System of Referencing (I will demonstrate how it work).
d) Illustrate your essay with images of artists work from the exhibition. Make sure you include name, title of work, year of production, dimensions, collections (if known.)
Link to shared folder with images from exhibition here M:\Departments\Photography\Students\Resources\Personal Study\Case Study Quintessence
Task 4:Plan a photo-shoot and make a set of images that respond to your chosen pairing of artists and your essay.
a) Upload shoot, process and select best 3 images
b) Show experimentation with images using Lightroom/Photoshop appropriate to your intentions.
c) Evaluate and present images on the blog.
DEADLINE: bothessay and photographic response Mon 14 Dec.
A selection of video with featuring exhibited artists where they talk about their work
David Goldblatt on his seminal body of work: In Boksburg
Michelle delivering a lecture on her work
Yury Toroptsov talking about Fairyland the work he produce while IPR in Jersey 2014
Jem Southam on his study of rockfalls
Finn Larsen presenting his work in Greenland over a 25 year period
Atlantus film with interviews
The world according to Martin Parr
From exhibition: Only in England showing work by Tony Ray Jones and Martin Parr
For my headlines i wrote ‘Living with Anxiety’ as my title for my picture story of my mum. I think that this was the best thing to name the picture story as it says what is going to be put across into the images. On the images in this picture story the text i put for it was –
Your wedding day can be one of the most special days of your life, by sharing it with the ones that you love it will make the day, all that more special for you and your loved one. By placing all of your friends and family in the same room all together it will bring back memories of ones that you once all shared. All of the decorations at a wedding usually represents the personalities of who is getting married, this can be shown through sentimental little things. On the day of the wedding the bride will be in her wedding gown with natural makeup on, which will make her natural beauty shine, the groom will be in his suit and will be looking the best he has ever looked, as this is the most special day of both of their lives.
For my mums picture story the images shows my mums everyday life and things that she does. The largest photo which is on the page is the establishing shot where it sets the scene for all of these images. In my text i looked up anxiety online and wrote about my thoughts on it.
Traditional picture story:
For one of my other headlines on my wedding shoot i choose ‘The Wedding’ as my title, then for my text i wrote about weddings in general and also added a tiny bit of information about this wedding and the style of weddings.
Your wedding day can be one of the most special days of your life, by sharing it with the ones that you love it will make the day, all that more special for you and your loved one. By placing all of your friends and family in the same room all together it will bring back memories of ones that you once all shared. All of the decorations at a wedding usually represents the personalities of who is getting married, this can be shown through sentimental little things. On the day of the wedding the bride will be in her wedding gown with natural makeup on, which will make her natural beauty shine, the groom will be in his suit and will be looking the best he has ever looked, as this is the most special day of both of their lives.
These are my two picture stories that are on my wedding shoot. In these two picture stories i wrote about a traditional wedding setting.
I wanted to create a more interest set of picture stories that go more into a modern style magazine article as I find this style is becoming more popular and magazines are getting more and more graphic and visual. I want to use geometric shapes to make my picture story more interesting too and to make the images look cooler. I think I like the look of my professional/classic photographic style and will adapt my picture story layout to look sleek and professional too. I think that I prefer the style and layout of a magazine article but then again I am unsure whether or not my specific images will look right with this style, either way I am going to experiment and see how it goes.
Editing inspiration:
Title and text:
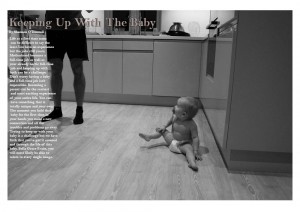
For my picture story I have found that my favourite title is ‘Keeping Up With The Baby because it is so true that as a parent you would be constantly running around and having to watch over your baby because they can get up to something the second you look away. I also like this as I took inspiration from the reality show Keeping Up With The Kardashians which is a TV show that follows round a family through their everyday life and the use of the play on words that I did for mine basically shows how as a parent the only thing you’ll be able to keep up with is your child. For the text I have been changing it around each time and find the more times I change it the better it gets so for now I am still just experimenting with what I’m writing and keeping to the third person story/not making it sound like a blog post.
Experimentation 1
I really do not like this layout as I find it just looks so cluttered and isn’t good enough. I am going to have to choose between colour and black and white because otherwise the images look too different to me and they kind of look like separate images and shoots rather than one big picture story. This is a lot more difficult than it looks as I just can’t seem to find a design that I actually like. I think the grey background also doesn’t look very good along with the grey triangles, it looks very basic and unprofessional. Through my next edit I will make it a lot better and work on which images I will be selecting to go into the magazine itself. I actually really dislike this layout and think that it looks majorly tacky and will have to have a rethink and make changes to make it a whole lot better.
More editing inspiration:
Experimentation 2
First edit
This picture story was inspired by one of my inspiration images above titled Isolation’, I found that this one looked really great and wanted to give it a go myself. I do think that this is a strong image and works well with the text on the left hand side, however I do think that I need to use more images and possibly change the position of the text to make it look better and more like a traditional picture story rather than one that just has one image explaining the entire story. I do really like this image and think that it all works well but I am going to carry on experimenting with this one and possibly some new designs to make the best picture story that I can.
Edit progression
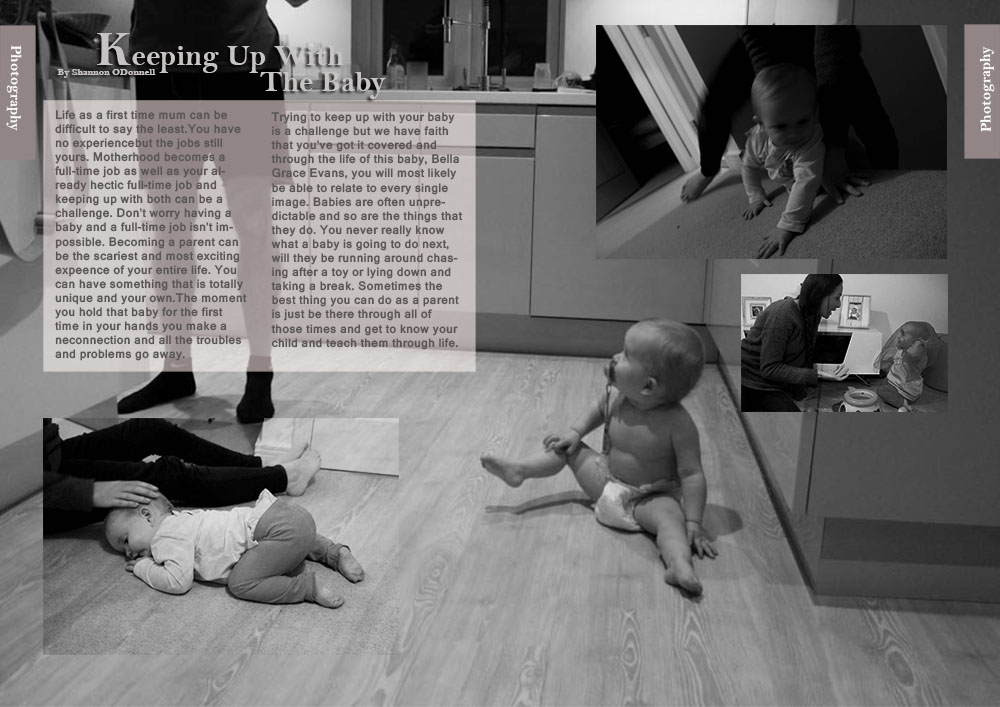
I decided to carry on experimenting with this layout as I do think that it is an interesting one visually and looks a lot better for a magazine layout than any other ones that I have done previously. I think that I just need to focus on what I think looks good and makes sense to me rather than trying to follow a traditional template of what a newspaper photography article would look like. I added three more images down the right side of the double page spread as I thought it added more depth to the shoot and really works well with the title of Keeping Up With The Baby’ as there are plenty of images of the baby running and moving about and playing constantly. I do really like this edit as I think it is the best one that I have done so far. It isn’t visible in this post but I actually made a white boarder around the whole double page spread as this is what I have seen in my magazine style models.
Experimentation 3
I actually really like this edit as well. I think that I was trying to hard to make my picture story fit into the idea of making it like a newspaper which didn’t really work out well for me. I definitely prefer the layout of a magazine as it is a lot more visually interesting and is a lot nicer to look at. I took inspiration for this layout from another of my magazine layouts as I thought it was really interesting. I prefer these layouts and think that it looks good in black and white as it allows the reader/spectator to focus in on the images and the writing instead of being constantly sidetracked or distracted by the different pops of colour within each individual image. I also find these particular images look better in black and white as they were taken inside and the lighting isn’t really amazing and the colours around the house are very neutral.
Experimentation 4
I do like this edit although it is similar to the one above. I decided to make my key image one of my niece with her mouth open looking as if she is shouting and so I decided to duplicate this to make it look like an echo of her shouting, it represents the noise she was most likely making when this image was created. The text is the same as above and basically talks about life as a parent and how hectic it is. The three other images I chose reflect the title of my picture story with the one of the far right being my niece quickly running down the stairs as my sister is trying to jump down before her so she can watch out for her and try to keep up with her. The middle image is one of my niece in her nappy looking up at her dad with a dummy in her mouth. I thought that this image worked well within the picture story as it is interesting to look at and with her leg slightly elevated it looks as though she is ready to crawl away. The far left image is one of my niece drinking from the little medicine tube that my sister uses to give her any medicine that she needs, in reality it’s just sugary liquid. I do like this picture story as it is interesting and would make the reader want to read more and look at the images.
Experimentation 4
I decided to create another layout design for a magazine article. This one I added the page sides that you would usually find in the different sections of a magazine. I think that the text works well in the two columns and looks a lot better than just down one line. I also like that it looks as though my niece is looking up at the text too. I really like this background image as it is interesting and I like the position that my niece is sitting in. I do think that I need to work a bit more on this design and add images around the blank areas to create more of a story for the spectator to be able to look at. I think that this layout looks the most like a magazine article and I like how it looks so far. I think that I will continue editing to try and make it better and more interesting to look at.
I really do not like this second design. I think that it just looks like a bit of a mess. The original edit of this page looks a lot better as it is simple and looks a whole lot more professional than this page that I have added to. I don’t like the way the images look as they aren’t all an equal shape, usually that would look fine but I just think that in this page it doesn’t look good at all. I also do not really like the box around the text but it does help the text and makes it easier to read and stand out a bit more. I do like the image in the bottom left hand corner as it kind of blends in with the background image and looks as though it is part of the same photograph a part from having the boarders around the rest of the image. I think that it does work well with this page and looks good with it.
This is my favourite layout out of the three in this experiment as I do like the boarder behind the text. I find this a whole lot better as the text is easier to read and stands out a bit more and I like that the focus is on the one image of my niece looking up innocently at the text. I prefer this image in black and white as it stands out more as the colour version is really dull as there aren’t that many colours at all to make the image interesting. This one does look the most like a magazine layout and I do think that it looks professional but I don’t think that I will want to use it for a final as it isn’t really a picture story and doesn’t stand out enough for me personally.
Reflection
I don’t really like working with a picture story that I’m not 100% with in the beginning and if I don’t think that I can make it any better then I will completely start over and create a new one. I just find this method a lot easier and more effective. I want to create the best picture stories that I can without making them look tacky at all and I want them to stand out and look professional. I came up with the title/headlineof Keeping Up With The Baby and took inspiration from the reality TV program Keeping Up With The Kardashians where a camera crew follow the lives of one family. I thought that this was a good play on words and works well as my niece is always so manic and crawls around everywhere until she goes to bed. I came up with the caption by just writing generically about what being a parent is like and basically relating to my target audience of parents and how they would be able to relate to the text as well as the images as every parent tends to go through very similar kinds of things. Here is my caption: ‘Life as a first time mum can be difficult to say the least.You have no experiencebut the jobs still yours. Motherhood becomes a full-time job as well as your already hectic full-time job and keeping up with both can be a challenge. Don’t worry having a baby and a full-time job isn’t impossible. Becoming a parent can be the scariest and most exciting expeence of your entire life. You can have something that is totally unique and your own.The moment you hold that baby for the first time in your hands you make a neconnection and all the troubles and problems go away. Trying to keep up with your baby is a challenge but we have faith that you’ve got it covered and through the life of this baby, Bella Grace Evans, you will most likely be able to relate to every single image. Babies are often unpredictable and so are the things that they do. You never really know what a baby is going to do next, will they be running around chasing after a toy or lying down and taking a break. Sometimes the best thing you can do as a parent is just be there through all of those times and get to know your child and teach them through life.’ I didn’t really add separate captions to each of my images in the edits above as I thought that it looked better without as a magazine layout but for my newspaper articles I did add some captions underneath all of the images as it did look a lot better.
To create the document in Photoshop – New document, International paper, A3, RGB colour.
First off place the images in Photoshop and place them onto the page. You should make all of the images into a line and re-size them all to the same size for some of the images. Place another image in the is larger which will be the establishing shot and tilt the image so that it is slanted. Then to place a shape into the picture story – elliptical marquee tool will make circle shapes that you can place into the picture story, you can use the paint bucket to change the colours of the shape. Polygon lasso tool will give you a triangular shape and rectangular marquee tool with give a rectangle shape. Place another image into Photoshop that can be placed into the background of the image, use blending modes to blend the image into the background so that it sits behind all of the other images. By adding a layer mask you can choose black and white, black foreground, white black ground, then you can erase back and keep the the parts of the real images that you want to keep. In addition by changing the opacity of some of the layers it will make the images more clear that you want, once you have used the blending modes as some of the images may be covered.
The writing
The writing has to be journalistic, you have to write about the story which you have explored. This will be written from a third person perspective. What i will look up is what is anxiety, and why do people struggle from anxiety. The text will be a deign feature, columns will make the text look more interesting on the picture story. You can look up different fonts by looking on Adobe and looking at all the the different fonts which you can download to add to the picture story.
I made this picture story on what we learnt in class and by placing my image differently to create a unique looking picture story. I think that placing the right side of the picture story images into black and white it makes them stand out from the other image. On the images on the left i copied them using the duplicate tool to make this dragged out effect which i think looks really interesting because of the colours that are in this image. For this picture story i need to make a title.
Experiment 1:
I added a title to this picture story which i slanted on the side which i think fits in with these images that are in this story board.
Experiment 2:
This is my second edit from my wedding shoot that i took, i placed one of my images as the background and placed the image in black and white, i think that this image looks good because the images are in colour and the background is in black and white. In this text i wrote about how a wedding can be special to someone and how it is shared between two people.
Experiment 3:
For this experiment i selected over my image and (select, layer via copy) and changed the colour of the background, i did this by placing a colour overlay over my image, and then i changed the colour of it to purple to match the purple in one of my images. I used the blending modes to blend the colour overlay into the image and then changed the opacity to soften it. I also selected a strip down the right hand side to made it darker also, this makes some of the features in the image stand out as well and makes the image better.


![The Epilogue [mini analysis]](https://hautlieucreative.co.uk/photo16a2/wp-content/uploads/sites/2/2016/02/the-epilogue-page-analysis-1.png)
![The Epilogue [mini analysis]](https://hautlieucreative.co.uk/photo16a2/wp-content/uploads/sites/2/2016/02/the-epilogue-analysis-2.png)