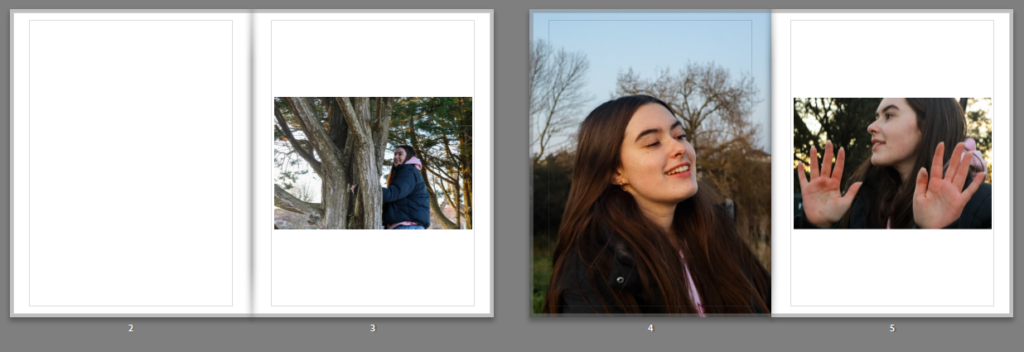
Overall, I think my project turned out well. I managed to stick to the photoshoot 1 idea from when I first planned this project which was a focus on gender stereotypes where id photograph teenagers in their natural environments and explore the activities they engage in. However, I was unable to carry out the other photoshoots I planned. This meant that my project only had one focus which was female teenagers as that’s where most of my images were from. I did manage to take a few photos of males however this was only a small shoot and didn’t end up being in my photobook.
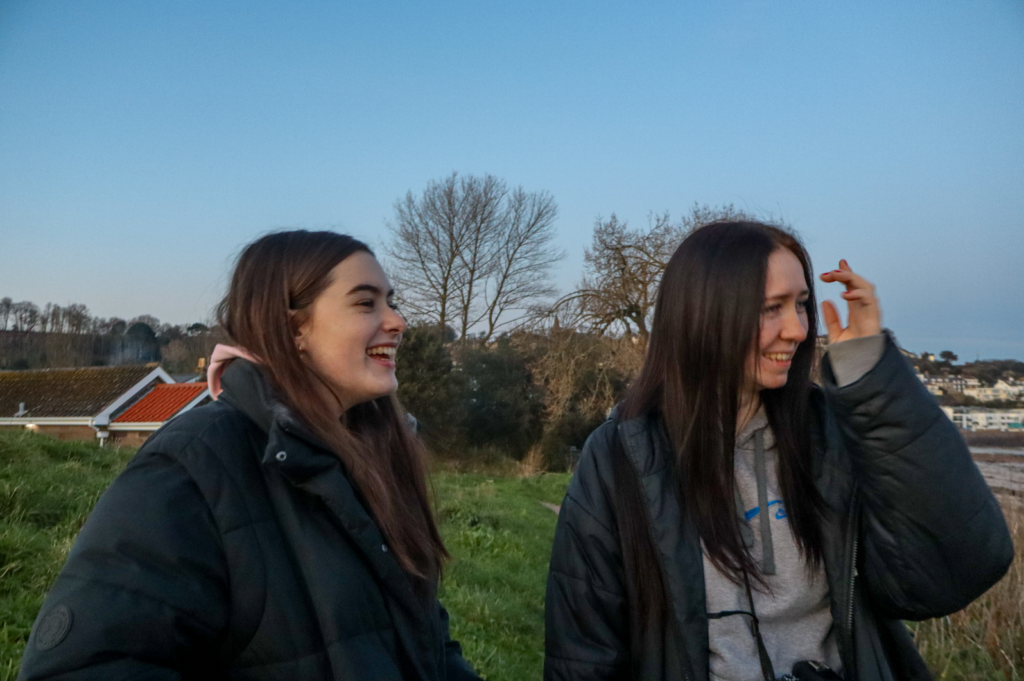
I think the photoshoot I focussed on turned out quite well. I was able to show natural moments in the lives of the subjects by focussing on taking images in the moment and minimising the amount of times I would tell the subject how to pose. I think this worked well as it makes the images a lot more natural and less staged. One thing I really liked about this shoot was the time of day I decided to conduct the shoot. as it was late afternoon/early evening, the sun was beginning to set which made my photos have very good lighting and have a warmer tone which I think makes the images look more appealing to the viewer and brings across a sense of happiness.
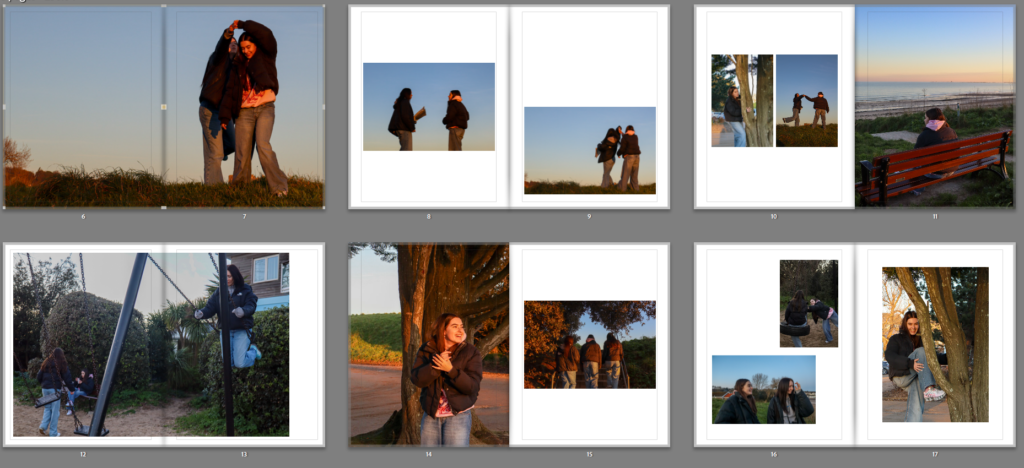
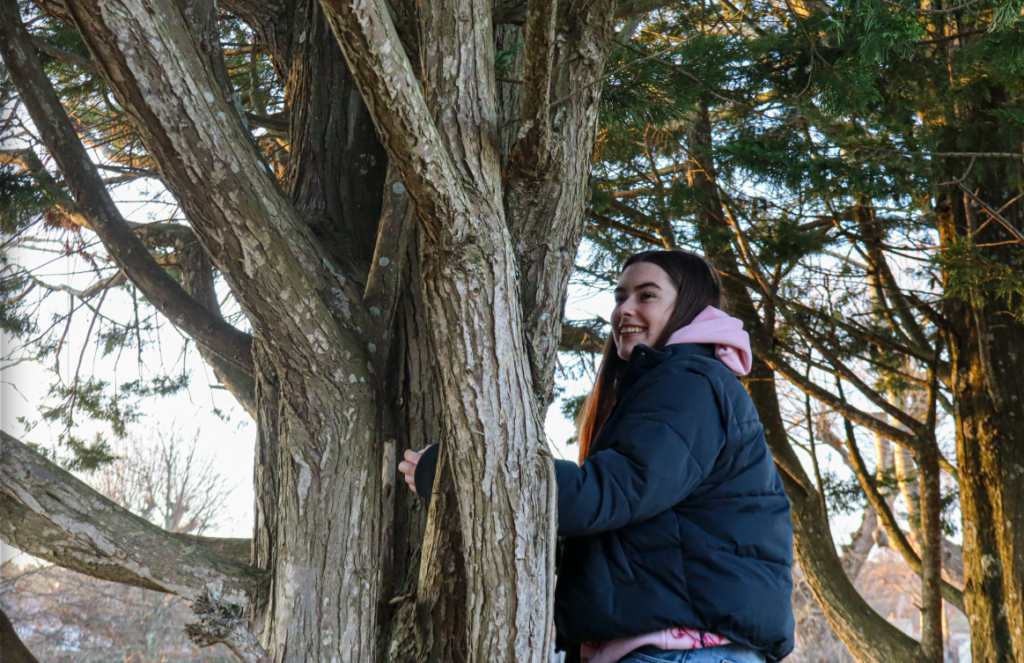
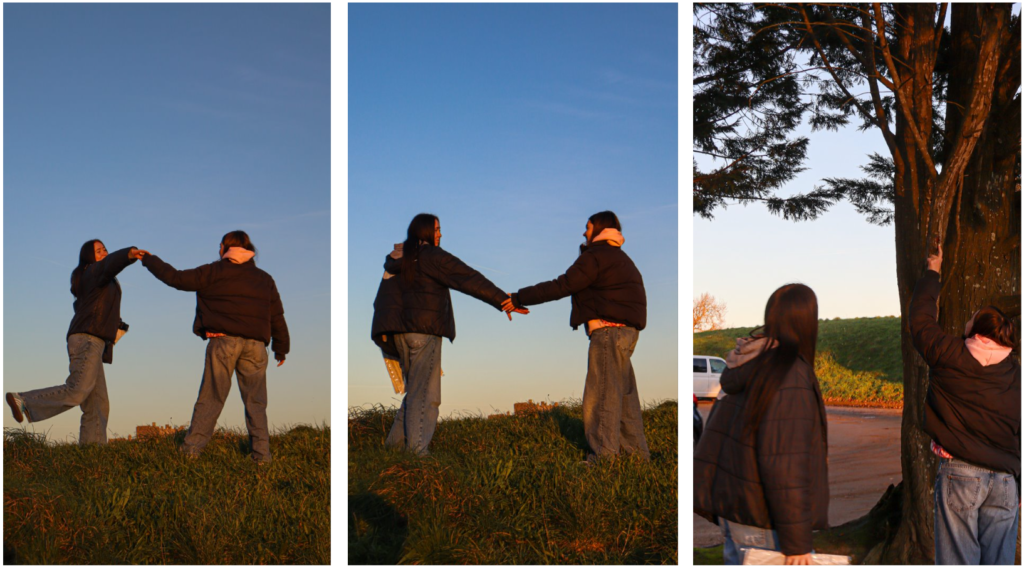
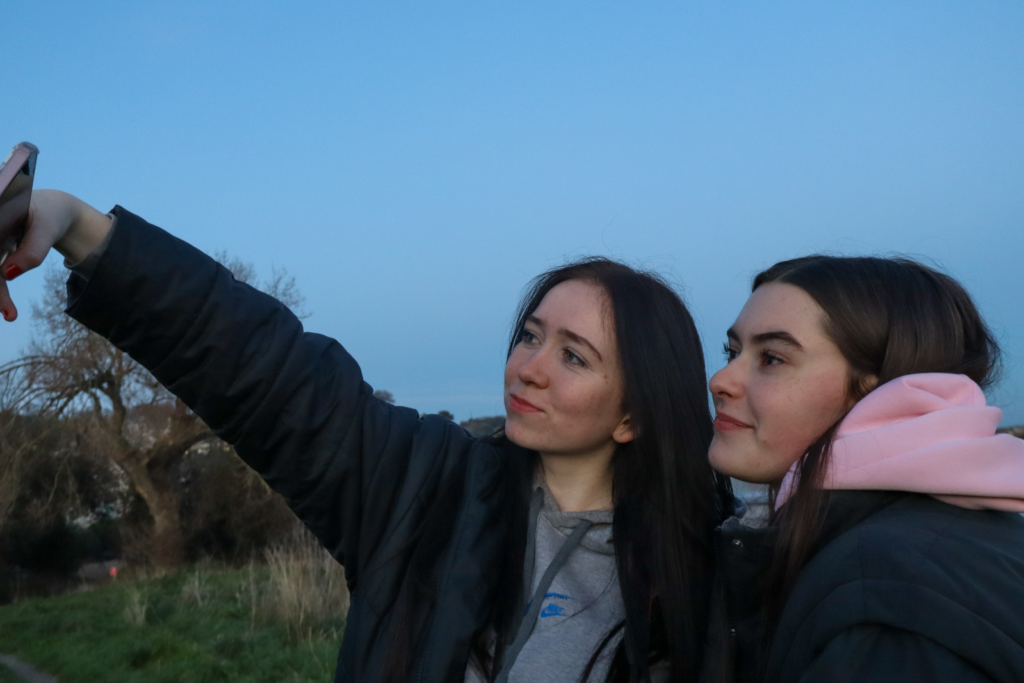
In terms of inspiration from the artists I focused on, I think I did well when making my images link quite closely with Justine Kurland in particular. In one of my photoshoots, it focussed on group of my friends who were all girls. This already links with Kurland’s work as she also takes images of groups of girls. The settings of hers and my work could be seen as fairly similar as I also used places such as fields to take my photographs and got the subjects of the images to engage in activities such as tree climbing. In terms of Cindy Sherman, as a large majority of my images surround females I am able to compare mine to hers as a similarity. I believe that, like Kurland, my images would be seen as mirrors as I am reflecting my life through the use of my friends. in comparison to this idea, some of my other photoshoots could be seen as windows as I photograph the subject engaging in activities that is normalised for them (for example dancing) and so this would be a window as its taking a look into someone else’s normal activity that I don’t relate to. One of the photoshoots that focuses on one of my friends dancing links to Cindy Sherman and the idea of female stereotypes as dancing could be considered a female stereotypical sport (especially in the past).
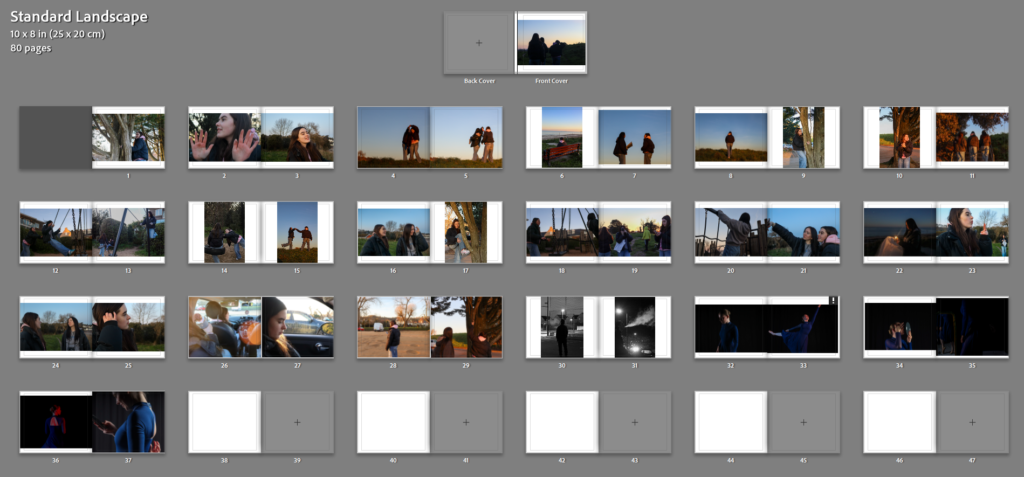
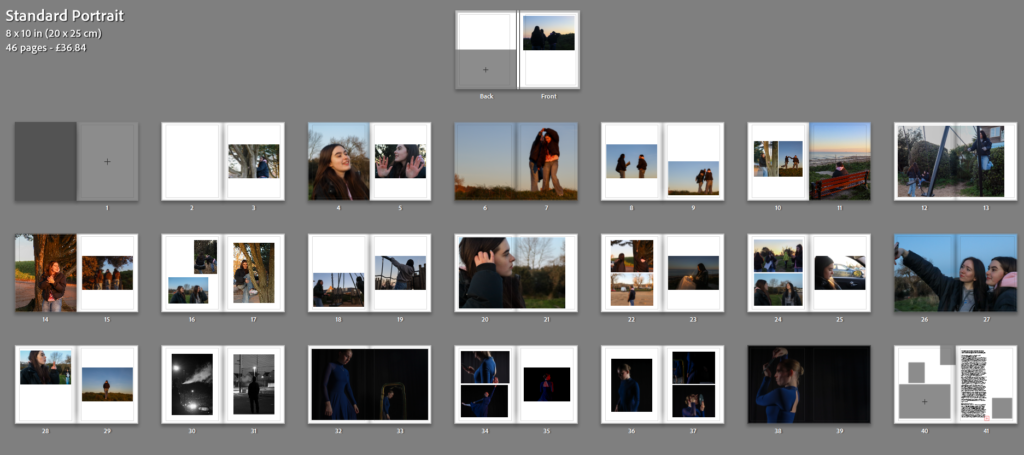
I experimented with my photos between landscape and portrait layouts and found that the portrait layout worked much better for my project. When I had the landscape I also didn’t explore the uses of templates throughout my book which made it look too busy on the pages as there was no black spaces making the book crowded and confusing.
After changing to portrait, I found it easier to use templates like two page spread as it meant my images weren’t stretched out to fill a landscape layout. I managed to create variations of layout on each page such as having two at different positions and sizes, followed by a two page spread. I also did a few pages with 3 images.
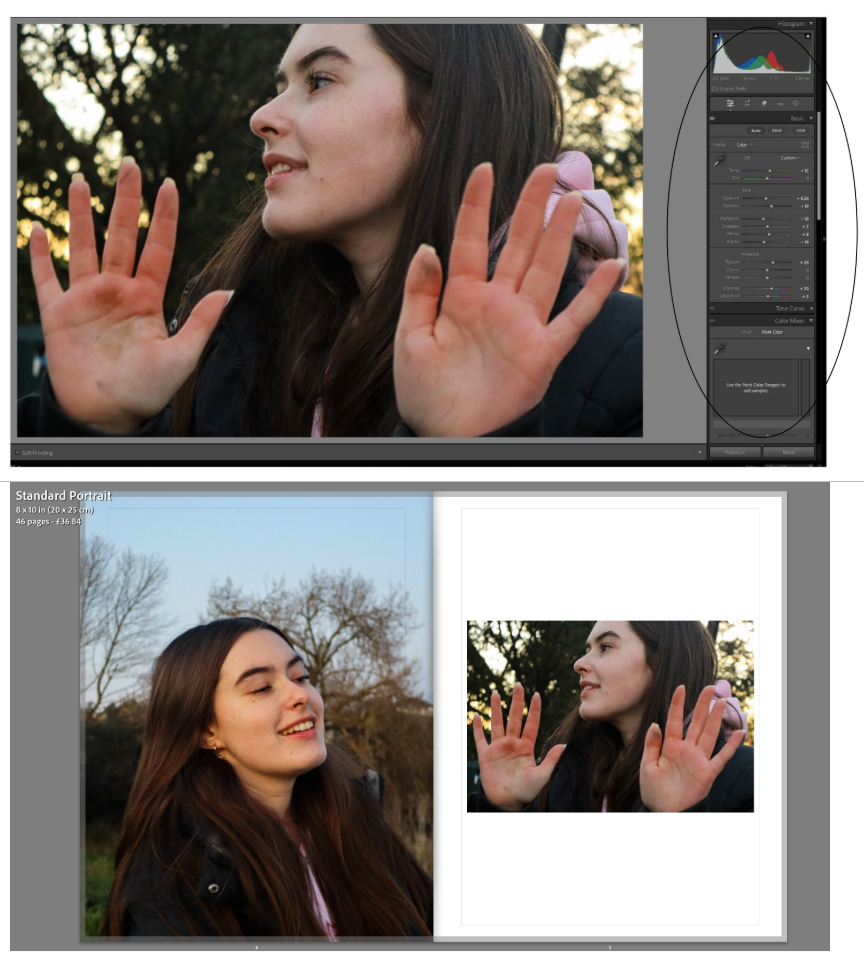
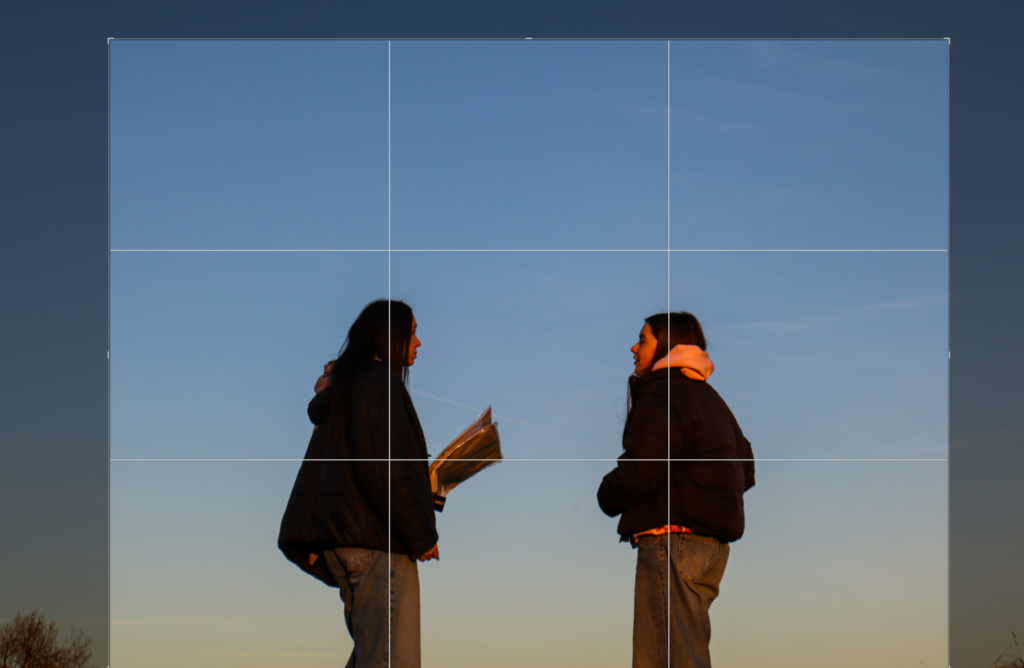
On some images I needed to use the zoom tool which zooms into the photo and fills the page. this cancelled out a lot of empty space in the image and resulted with making sure the main focus was the subjects face. One problem with this page was the composition of colour. The image on the left is a lot warmer than the right due to the left image being directly in front of the light from the sunset creating an orange tint on the skin. In comparison, the right image is a lot cooler as the subject is in a shaded area not being directly hit by the sun.
To fix this, I went back to the develop page where I edited the exposure, contrast and temperature of the image to match it more closely with the tone of the image on the left. This was the result.
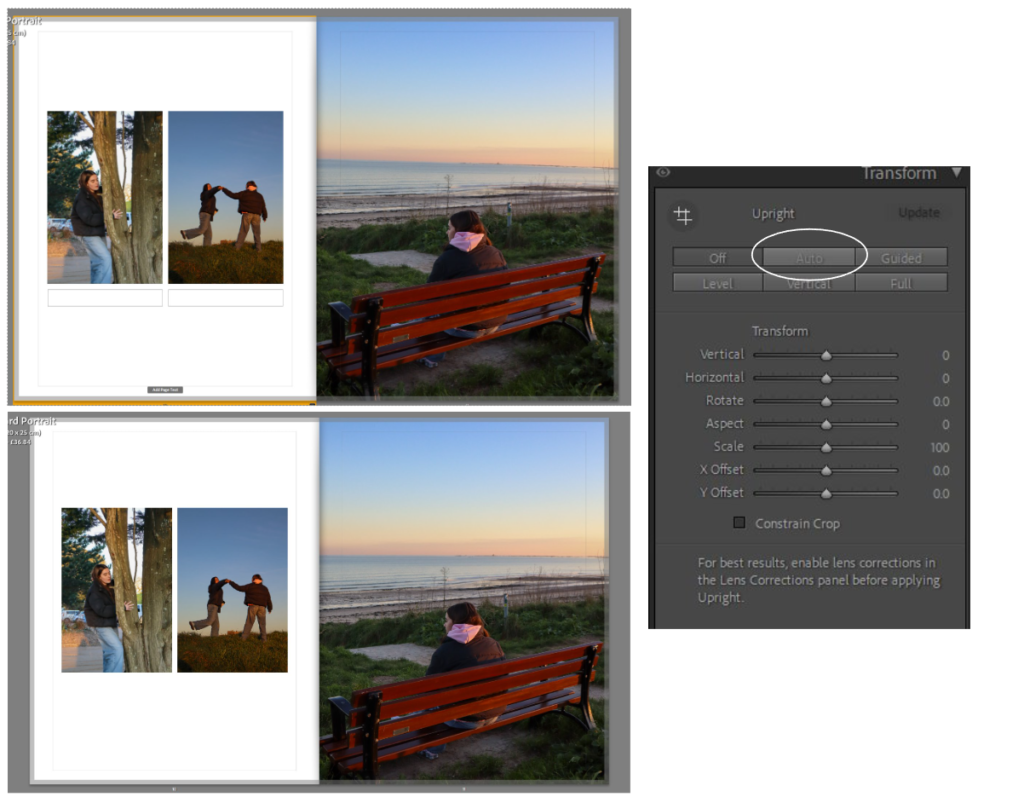
Another change I made was transforming the images that aspects of the image such as the horizon was straight and not at an angle. to do this I selected the image I needed to edit (the right image) and the went back onto the develop page where I scrolled to transform and then clicked auto. This straightened out the image by automatically zooming in slightly and tilting the image so that the horizon went across the image straight and not diagonal. though is was a very minimal and slight change, it made a difference.
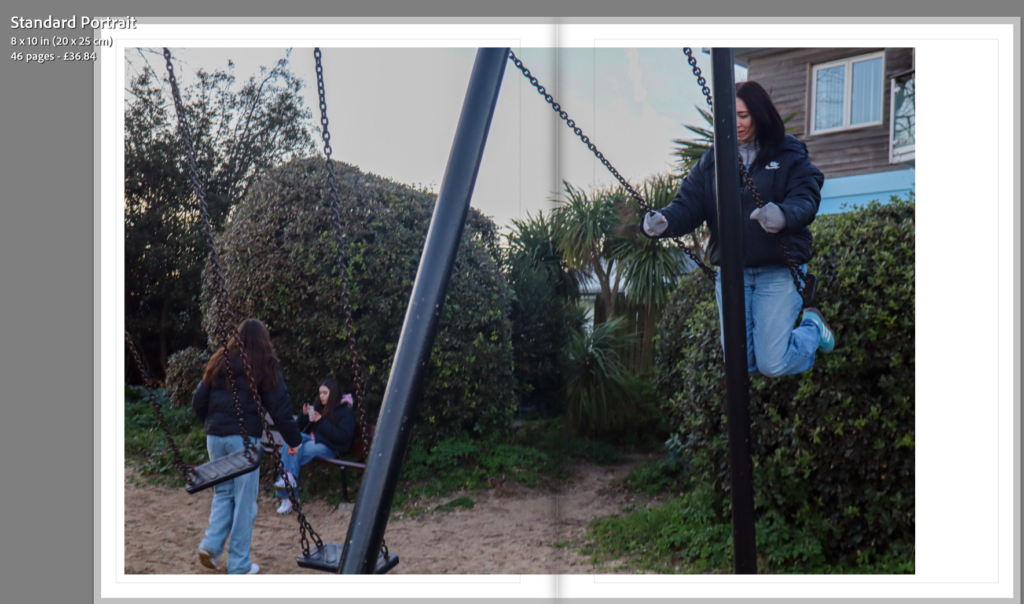
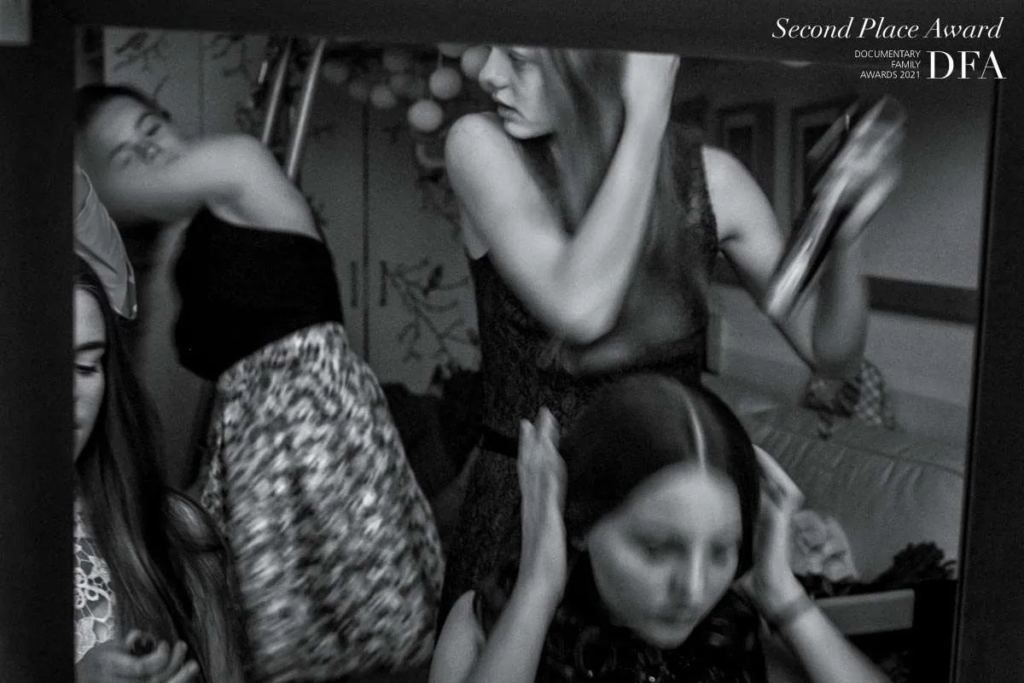
When working on double page spreads such as the one below, I needed to make sure that I wasn’t putting the main subject of the image in the centre as this would be stuck in the fold of the book. With this image, it nicely splits in the middle where the left shows two girls and the right shows another girl. this meant the split in the middle of the book did not interfere with any important features of the image and the main subjects are still very visible which being across two pages.
To what extent does Cindy Sherman and Justine Kurland explore female stereotypes.
‘To collect photographs is to collect the world’ Susan Sontag, On Photography 1977
To explore stereotypes means to focus on something that is aset idea that people have about what someone or something is like, especially an idea that is wrong. They are able to shape our perceptions of groups of individuals which can lead to misunderstanding and sometimes discrimination. I am going to be looking at the area of female and teenage stereotypes. The artists I want to explore are Cindy Sherman and Justine Kurland. I have chosen Cindy Sherman as she focuses on female stereotypes within her work, her photography is important because of the way it depicts how women are viewed in society. I have also chosen Justine Kurland as her focus in photography is on girlhood. Her images are representations of both childhood adventures and current experiences. Both artists explore the issues with stereotypes and draw attention to it. Both photographers stage their photo shoots instead of them being documentary photographs. Cindy Sherman regularly alters her appearance beyond recognition through make-up, prosthetics, and costumes. To create her images, she assumes the multiple roles of photographer, model, makeup artist, hairdresser, and stylist. She becomes the character in the story she is attempting to portray through her images. Justine Kurland also sets up her images but not with herself, instead using real people she approach in her elaborate staging of photographs. Kurland has used staged tableaux to explore the social landscape of girlhood, life on communes, and life in the wilderness. Both photographers’ images represent mirrors. Mirror images are usually called this when the photographer is trying to demonstrate or reflect something that they feel about themselves. John Szarkowski in his text, said a mirror is ‘reflecting a portrait of the artist who made it’ and ‘a mirror- a romantic expression of the photographer’s sensibility as it projects itself on the things and sights of the world (Szarkowski 1978). These two artists are mirrors as Cindy Sherman is a women herself and is trying to reflect her feelings and opinions on it to the viewers, and Kurland mirrors her own childhood through the use of other girls a representation.
Historical context: Feminism
Both of he artists I am focussing on have images published between 1977-2002. Cindy Sherman’s Untitled Film Stills composes of over seventy black and white photographs made between 1977 and 1980. By 1970, feminists had inspired women and men across the United States. Whether in politics, the media, or private households, the topic of feminism was everywhere. The representation of women in art in the past shared the idea that women were good enough to be painted, but not to paint. They were usually represented for their physical appearance and not as the ones who would do the paintings. Theorist L van Zoomen said, ‘a core element of western patriarchal culture is the display of woman’s spectacle to be looked at, [and] subjected to the gaze of the (male) audience.’ (van Zoomen 2019). I agree with this quote as it was usual for women to be in the paintings and not be the painter, usually posing in certain ways that would be more appealing for a male audience. Historical female photographers include artists such as Julia Margaret-Cameron and Claude Cahun. Cameron (1815-79) revolutionised photography and immortalised the age of the eminent Victorian through her monumental photographs with their muzzy focus and dramatic use of light. Cahun presents herself in a variety of guises, adopting different personas and exploring the fluidity of identity. She dresses as both men and women when exploring the theme of identity and gender roles. A quote she said was: ‘Masculine? Feminine? It depends on the situation. Neuter is the only gender that always suits me.’ (Cahun, Claude (2008). Disavowals: or cancelled confessions. The MIT Press. p. 151.) This shows her link with the theme of masculinity and femininity as she does not care which identity she takes and in a few of her photographs you can see her looking more feminine than others. Cindy Sherman’s work is one of the most direct link with the male gaze in art history. her images show woman in roles hat seem disempowered. she makes the image appealing but also leaves the viewer to interpret certain things which can often be unsettling as they wonder what the real meaning is behind the image.
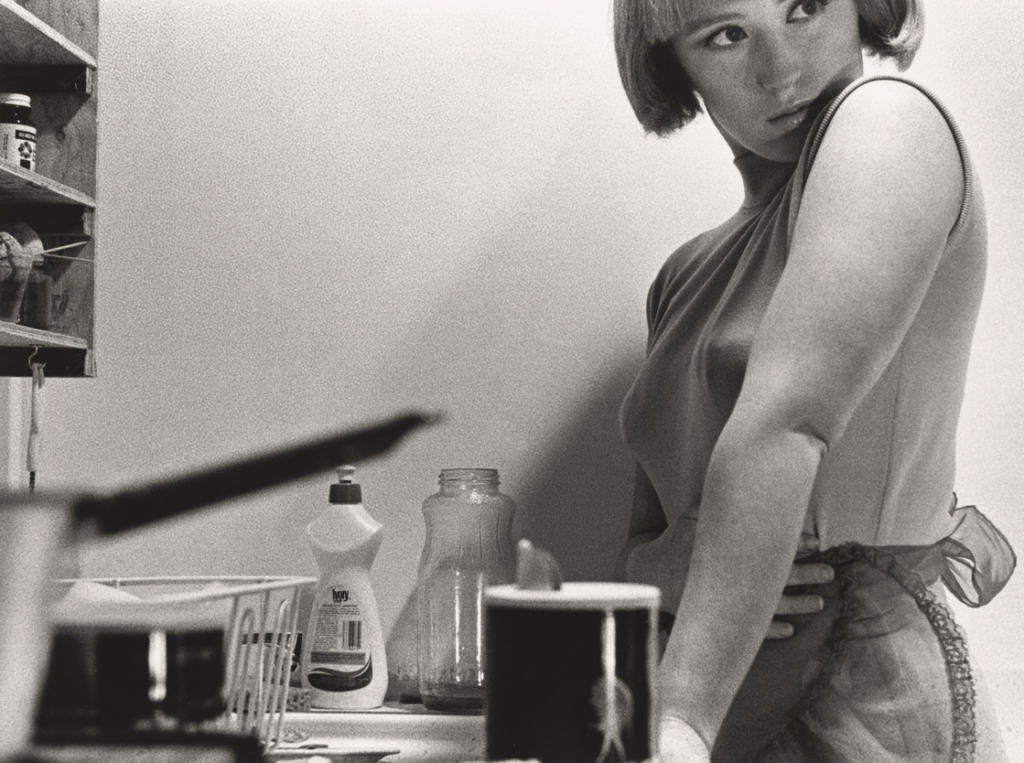
Cindy Sherman Cindy Sherman makes her photos come to life by using herself as the main aspect. She doesn’t merely represent stereotypes, she embodies them in different ways which then draws attention to the roles she plays which captivate the viewers. Sherman is known for creating fictional characters in her photographs, often using props, makeup and clothing to transform her appearance which is seen as an exploration of identity. Sherman uses elaborate makeup and costumes to create transformations in her appearances and characters. This allows her to explore issues of identity, subjectivity and gender, while challenging the conventions of visual representation. Cindy Sherman said,‘I never thought I was acting. When I became involved with close-ups I needed more information in the expression. I couldn’t depend on background or atmosphere. I wanted the story to come from the face. Somehow the acting just happened.’ Being a woman, she is able to share her ideas possibly from her own experience which could make the images more personal to her and important to her. Sherman satirizes the audience’s gaze on the female body and solidifies female aesthetic standards. Cindy Sherman’s work has had a major impact on contemporary photography. Many artists were influenced by her work, and her technique of deconstructing stereotypes and conventional representations is still an important reference for many artists today. Sherman’s work is often credited as a major influence for contemporary portrait photographers. One such photographer is Ryan Trecartin, who manipulates themes of identity in his videos and photography. Now 30, he began taking pictures of himself and his friends role playing and cross-dressing while still in junior high school, when he was also introduced to Sherman’s work. Sherman’s influence on other artists work was known as “The Cindy Sherman Effect”. She focusses on stereotypes to the extent where it has an impact on the community where she considers social and political issues surrounding stereotypes and woman in general such as female representation in popular culture and the performative nature of identity. In the image below, It could be interpreted by the viewer that Sherman is impersonating a stereotypical house wife from the late 1950s or early 1960s. This can be clear by the objects she adds to the image to subtly create this thought. The use of the sauce pan and soap bottle suggest to the viewer that she could be pictured in a kitchen. As well as this, she is also wearing an apron. The construction of the picture hints at a number of possible narratives and is open to a range of analyses. One analysis a viewer could make is a negative event occurring. The black and white can cause an ominous feeling or sense of tension and the tone of the image makes it feels like a dark and scary moment for the woman. she can be seen to be looking over her shoulder and the viewer can interpret that to what they like but it was usually be a negative thing she may be looking at as her eyes look concentrated on something that could be making her scared. Sherman is also seen holding her stomach which could be a usual comfort for a woman so this could further suggest something to make her uncomfortable is going on and further shows how she depicts the theme of vulnerability in her photos.
Cindy Sherman – Untitled Film Stills #03, 1977
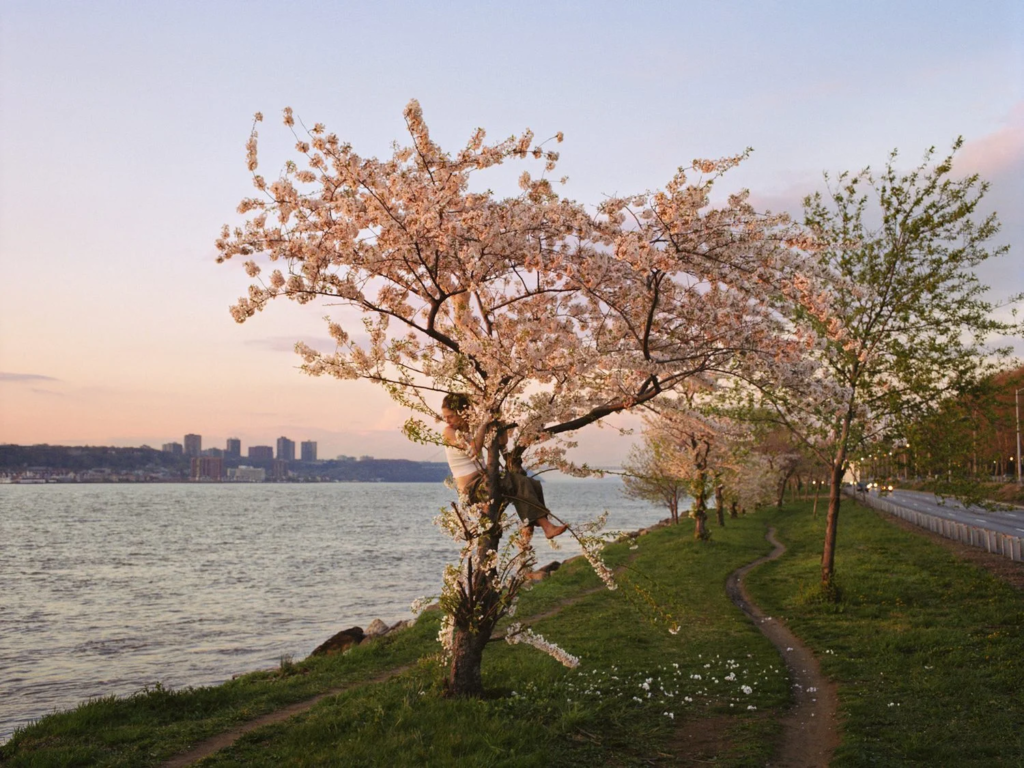
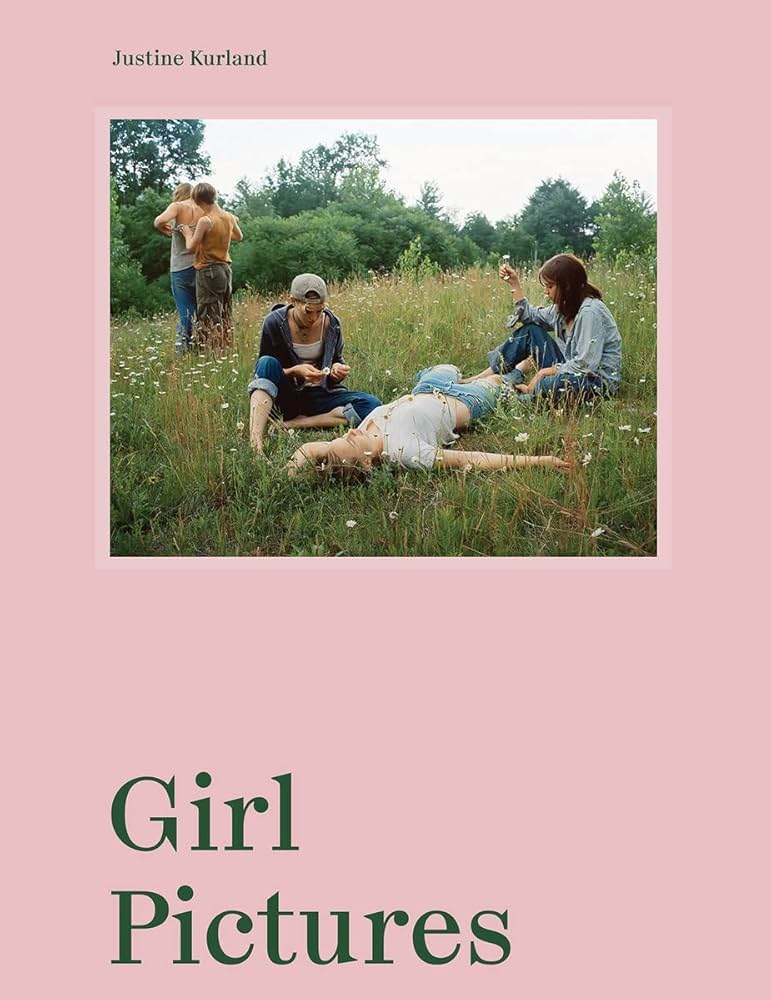
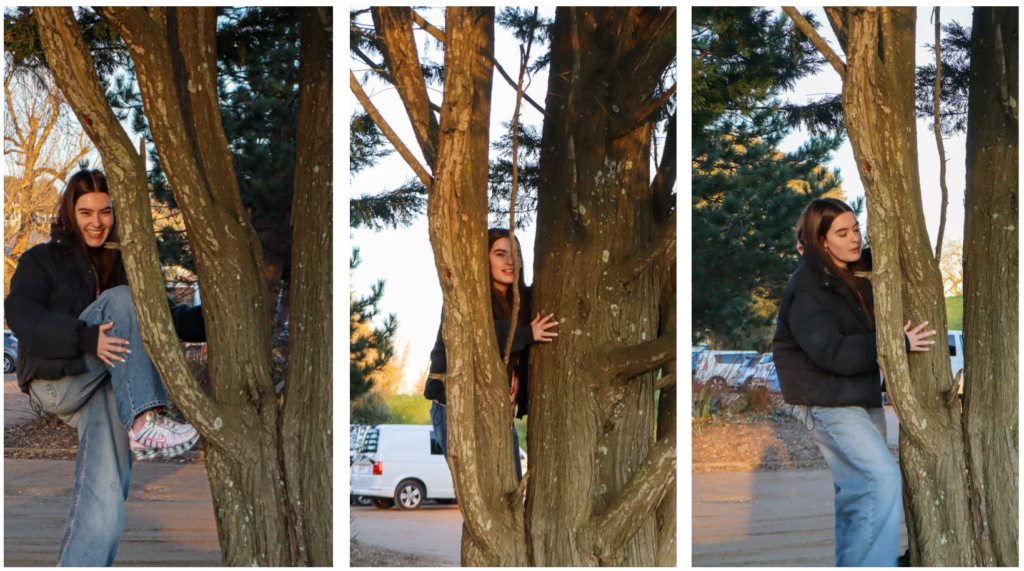
Justine Kurland Justine Kurland focusses on themes of freedom, rebellion, and the defiance of gender expectations. Kurland’s main project was called Girl Pictures. Kurland started this project in 1997 when she was a graduate student at Yale. Kurland decided to reverse certain stereotypical representations by rather than showing girls as passive or vulnerable, she represented them as strong, confident and free-spirited. The main environment of her images are usually in wild settings like rural or urban places which would be the opposite of a typical environment where girlhood would be imagined to be placed. She first photographed a fifteen year old girl called Alyssum who was the daughter of Kurland’s partner at the time. As well as this she also photographed groups of friends who were teenage girls and she staged the images where she depicted life on communes and life in the wilderness. In her project Girl Pictures. writer Rebecca Bengal says, ‘one in six of us will never figure it out. One in six of us will never leave here. One in six of us is bound to disappear. One in six of us, she’ll surprise you’. (Bengal 2020) This quote important as its showing how every teenagers life is different and the decisions they make now will impact where they end up. She represents the stereotype of a teenager who is figuring things out at the same time as going through things. The lighting in the image below is natural and seems to be at either sunrise or sunset. The lighting sets a feeling of calmness to the viewer as it looks tranquil and relaxing. The warming tone also contributes to the idea of tranquillity. In this image, Kurland is photographing her partners daughter, Alyssum. This image shows Alyssum in the centre of the image holding onto a tree. The way she is holding onto he tree creates a sense of fear as she seems to be clinging onto it and not wanting to let go. Her being in the centre of the image I think works really well to create a deeper meaning of the image. the water next to her seems to be travelling one way on the left of the image whereas the direction of the headlights of the cars suggest the road travel the opposite way. as well as that, there’s a pathway on the grass which is also creating a direction. Alyssum’s body faces the road whereas she’s looking over her shoulder at the water which creates the idea that she doesn’t know what direction to go in or what path to take and seems to be lost. This links to stereotypes of young people as its showing the confusion of the mind and having the ability to make decisions for yourself but still not knowing which direction to go. Teenagers could relate to this image as they may also not know what to do or where to go as they enter the part of their life where their decisions have a major impact on their futures.
Justine Kurland, Pink tree, 1999
Conclusion
Both Cindy Sherman ands Justine Kurland are two of the most important photographers when it comes to themes such as identity, gender and roles in society. They have different techniques such as Sherman taking her images as self portraits which have been constructed an staged way. Whereas Kurland takes her images of other individuals and not herself in open naturalistic aesthetics where the environment is a rural wide-space. Though they have differences, their main themes are femininity, gender roles and identity. Both photographers attempt to present themselves in their images when focussing on the theme of identity however they do this in slightly different ways. Sherman uses her identity to show her opinions on the stereotypical female roles through using herself. She embodies them in different ways which then draws attention to the roles she plays and ultimately captivates the viewers. She is able to transform her appearance which is seen as an exploration of identity. Kurland shows her opinions and thoughts by using other people to reflect herself onto them. In her work Girl Pictures she depicts young women in wilderness settings and shows the ongoing theme of freedom and rebellion where she often places the individuals (herself) in natural environments in the wild. Another difference is how they explore identity in different ways. Sherman shows the stereotypical female societal roles in her images where she sticks to showing how woman are viewed where they are presented as disempowered and link largely with the male gaze. Whereas Kurland shows the female identity in opposite ways by depicting girls rebelling and being out in fields and rural areas where hey seem to be empowered rather than disempowered which would usually not be the typical image of a female. Both artists don’t just use their images to represent themselves, they represent everyone who can relate. Sherman represents every woman and Kurland represents most teenage girls. Though the artists approaches to this theme differ, they both manage to challenge the reality of being a woman. With the work I have produced, I would say it is more similar to Kurland’s work than Sherman’s. In one of my photoshoots, it focussed on group of my friends who were all girls. This is already a similarity between Kurland’s work and she also takes images of groups of girls. The settings of hers and my work could be seen as fairly similar as I also used places such as fields to take my photographs and got the subjects of the images to engage in activities such as tree climbing. In terms of Cindy Sherman, as a large majority of my images surround females I am able to compare mine to hers as a similarity. My photographs are images of others which links with Kurland’s work rather than Sherman’s as she tends to do self-portraits instead. I also believe that, like Kurland, my images would be seen as mirrors as I am reflecting my life through the use of my friends. in comparison to this idea, some of my other photoshoots could be seen as windows as I photograph the subject engaging in activities that is normalised for them (for example dancing) and so this would be a window as its taking a look into someone else’s normal activity that I don’t relate to. One of the photoshoots that focuses on one of my friends dancing links to Cindy Sherman and the idea of female stereotypes as dancing could be considered a female stereotypical sport (especially in the past).
My own image inspired by Justine Kurland (Pink Tree)
Bibliography
Feminist theory van Zoomen, L. (2019). ‘Feminist Theory’ in Dixon, M. Media Theory for A-Level Students. London: Routledge.
Justine Kurland
Bengal, R. (2020) ‘The Jeremys’ in Girl Pictures. New York: Aperture.
Historical paragraph Claude Cahun
Cahun, Claude (2008). Disavowals: or cancelled confessions.
1. Write a book specification and describe in detail what your book will be about in terms of narrative, concept and design with reference to the same elements of bookmaking as above.
Narrative:What is your story? Describe in:
3 words
friendship, life, enjoyment
A sentence
This photobook explores the lives of teenagers
A paragraph
This photobook shows the moments of happiness in the lives of the people shown in the images. The images capture moments of someone doing what they love to do whether its being with a group of people close to them or engaging in an activity they find important to them. The book brings across a sense of comfort where all the images capture happy moments where the subject is living their normal life in ways they love.
Design: Consider the following
How you want your book to look and feel
Paper and ink
Format, size and orientation
Binding and cover
Title
Structure and architecture
Design and layout
Editing and sequencing
Images and text
I want my book to look engaging to the viewer by keeping the front cover coloured with warm tones and an inviting image on the front. The format and size of the book is a Standard Portrait 8 x 10 in (20 x 25cm) with 46 pages . For the design and layout of my photobook, I tried to match certain photographs together that worked well when put alongside each other. My photograph consists of 3 separate photoshoots, with the first being the biggest, so I’ve made sure to keep each photoshoot together and not mixed with the others. I edited the images by making sure that they matched with the tones of the images alongside them. I did this by editing the exposure levels, temperatures and contrast of the images. I kept the sequence of my book at a variation of layouts making sure not to repeat the same layout after each other by adding ones such a two page spreads in between pages with two images
1. Research a photo-book and describe the story it is communicating with reference to subject-matter, genre and approach to image-making.
between 1997 and 2002, Justine Kurland travelled across the United States photographing girls living different lives. The story communicates the rebellious life of a teenage girl where she depicts them in rural areas and in the wilderness. Justine Kurland focusses on themes of freedom, rebellion, and the defiance of gender expectations
2. Who is the photographer? Why did he/she make it? (intentions/ reasons) Who is it for? (audience) How was it received? (any press, reviews, awards, legacy etc.)
The photographer is Justine Kurland. Kurland’s main project was called ‘Girl Pictures’. Kurland started this project in 1997 when she was a graduate student at Yale. Kurland decided to focus on teenagers because of their everlasting state of becoming. She wanted to show girls’ lives, centring them by creating an all-female society. Kurland decided to reverse certain stereotypical representations by rather than showing girls as passive or vulnerable, she represented them as strong, confident and free-spirited. The main environment of her images are usually in wild settings like rural or urban places which would be the opposite of a typical environment where girlhood would be imagined to be placed. Kurland shows her opinions and thoughts by using other people to reflect herself onto them. In her work ‘Girl Pictures’ she depicts young woman in wilderness settings and shows the ongoing theme of freedom and rebellion where she often places the individuals (herself) in natural environments.
3. Deconstruct the narrative, concept and design of the book and apply theory above when considering:
Kurland’s book is a portrait hard cover which is slightly bigger than A4. It has a single photo imprinted on the top half of the book in colour which depicts 5 teenagers in a field. the title of her project (Girl Project) is imprinted on the bottom half of the front cover and it stands out so that when you run your hand across it you can feel where the words are risen above the page. She also has the same on the spine, along with her name. The book is a saddle stitch. Kurland has chosen a single colour for her book which is a light/soft pink. this resembles the stereotypical girl colour and works really well for the theme of her project. If she had used blue it would not have the same effect as it may not match the theme as blue is a stereotypical boy colour. throughout the book, Kurland either puts one phot0 on each side of the page or she puts one big image across the two page spread. these images are glossy and in colour. This theme is consistent apart from the first page where the large image is printed onto pink paper and also in black and white to create a coloured effect to the image. the photo is also textured and not glossy. She also does this at the end of the book as well as the start.
Book in hand: how does it feel? Smell, sniff the paper.
Paper and ink: use of different paper/ textures/ colour or B&W or both.
Format, size and orientation: portraiture/ landscape/ square/ A5, A4, A3 / number of pages.
I decided to crop many of the images such as the ones below because there was a lot of empty space in many images. This usually worked quite well to have a large amount of space however in some images I decided to crop them to further focus on the main subject of the image rather then having background aspects interfering.
Editing of backgrounds
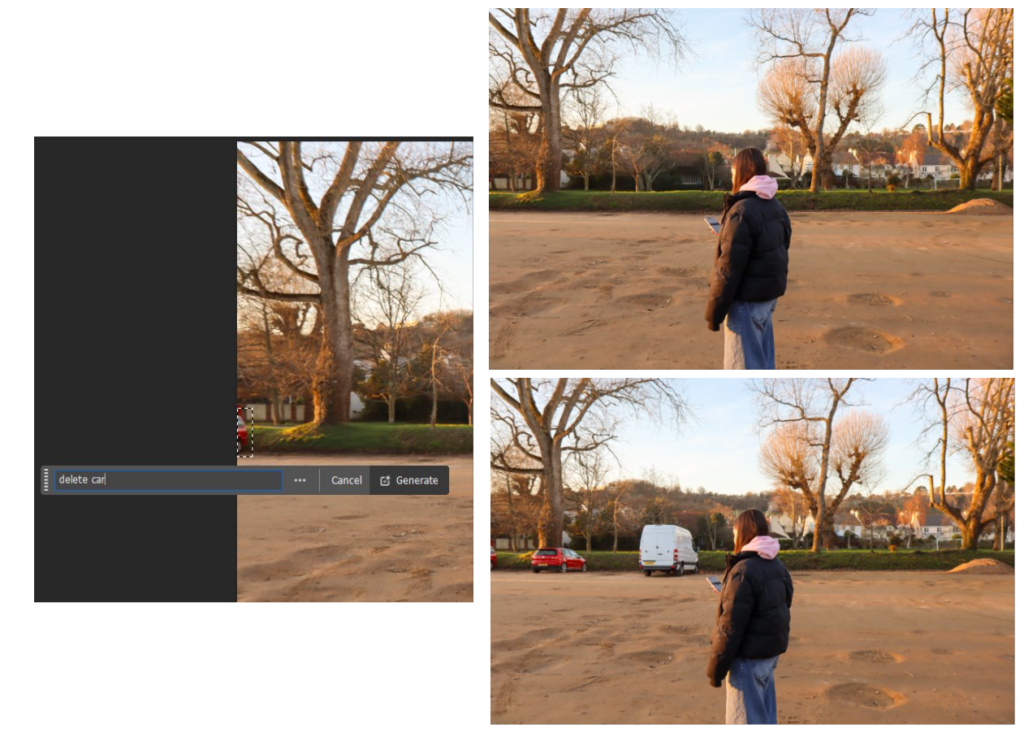
In many images, the background had unnecessary objects which ruined the main photo. When in the carpark, there were cars that got into the photos which couldn’t be helped during the shoot since there were everywhere. I decided to export the images from Lightroom onto photoshoot and used the AI generator tool to get rid of the things I didn’t want. I did this by selecting the part of the image I didn’t want and typing in what I wanted to be gone. I made sure to specify what I wanted gone as if I had just put delete it may have edited more than just the cars. For example below I put ‘ delete car’ and for the white van I put ‘delete white van’.
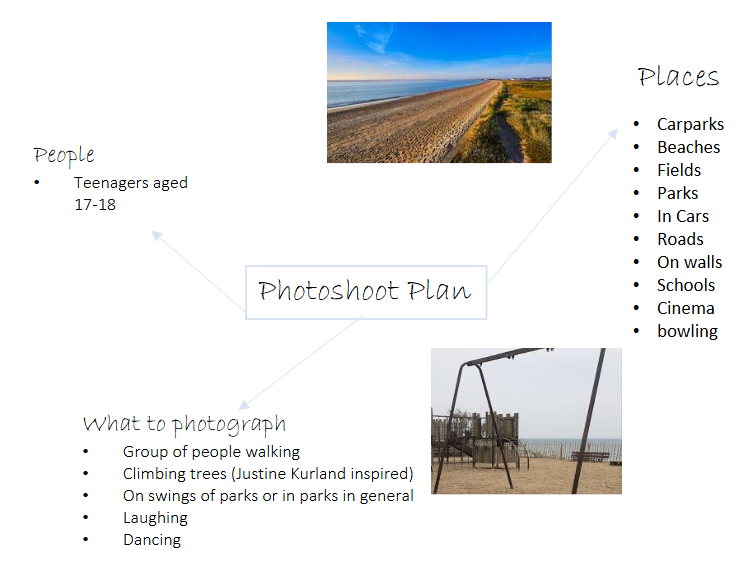
For the first photoshoot I am planning to get a group of friends to drive to a location where we can take photographs in a outdoor setting with good lighting. I will use the school camera to insure I get good quality images rather than using my phone. I am planning to go at a time where the sun is setting but the lighting is still good for images. I also will try and get images in the dark as well after the sun has set.
Teenage Stereotypes
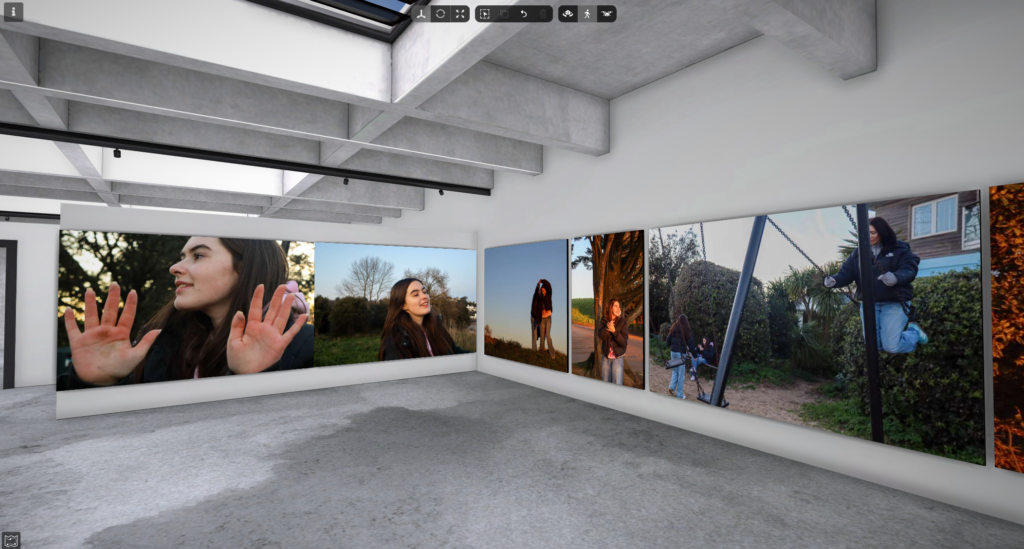
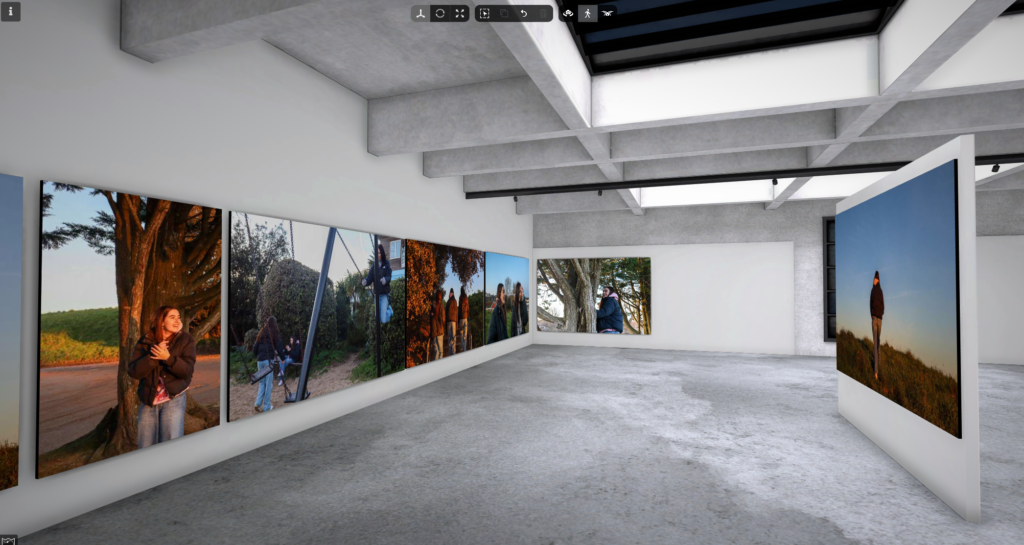
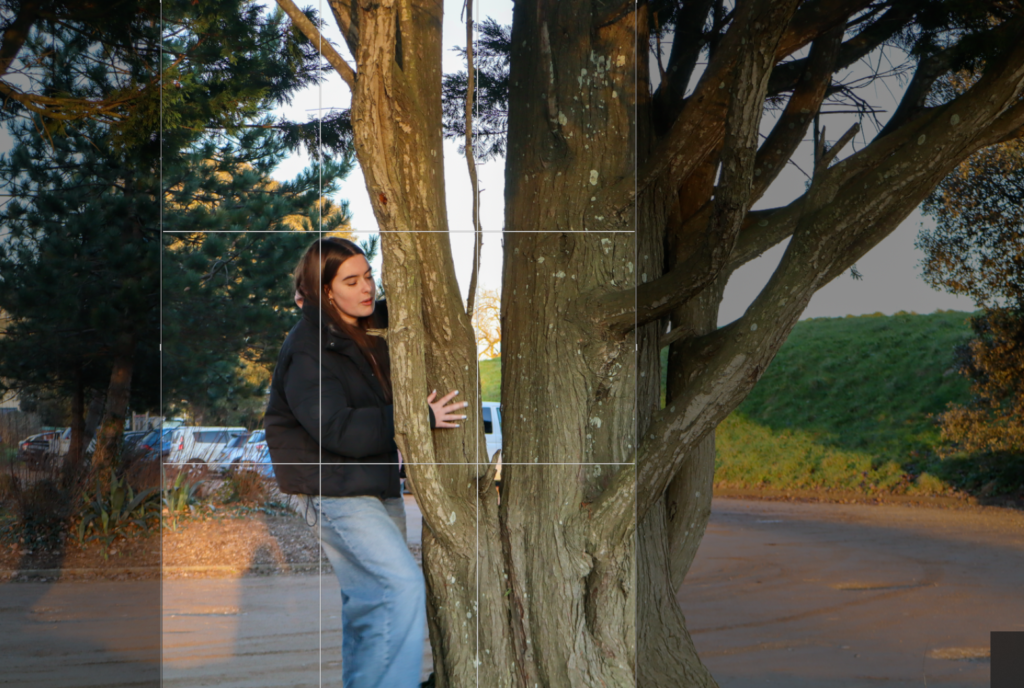
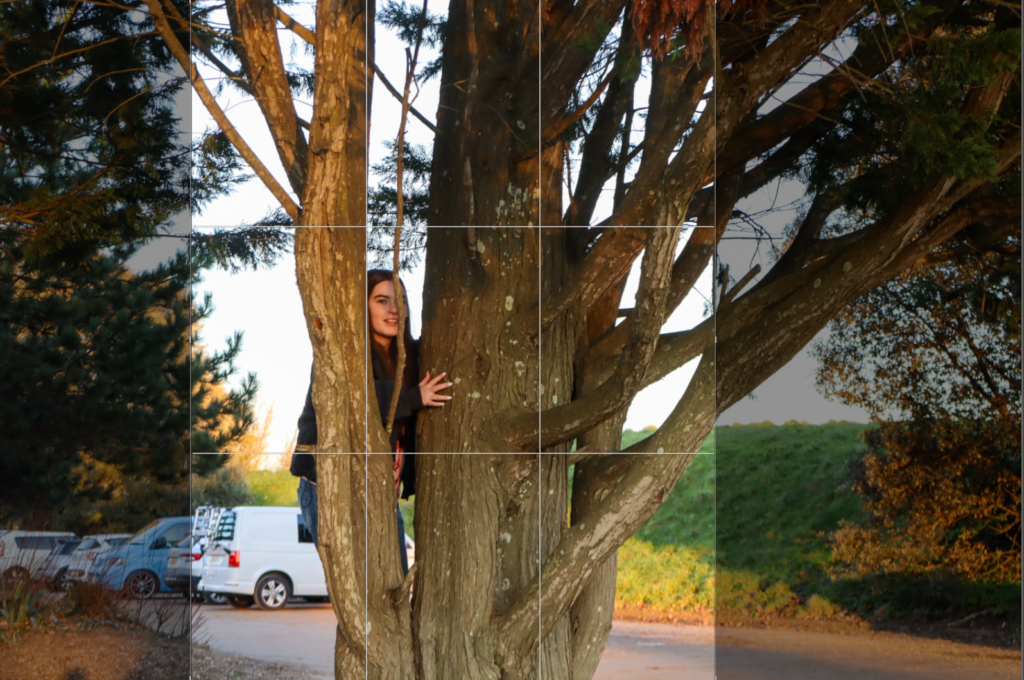
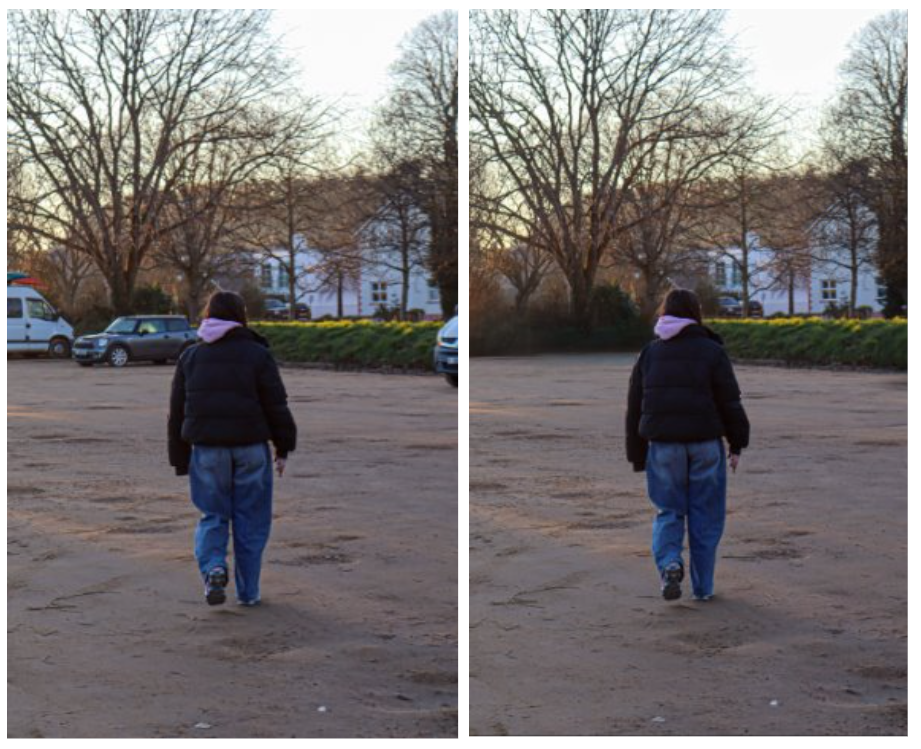
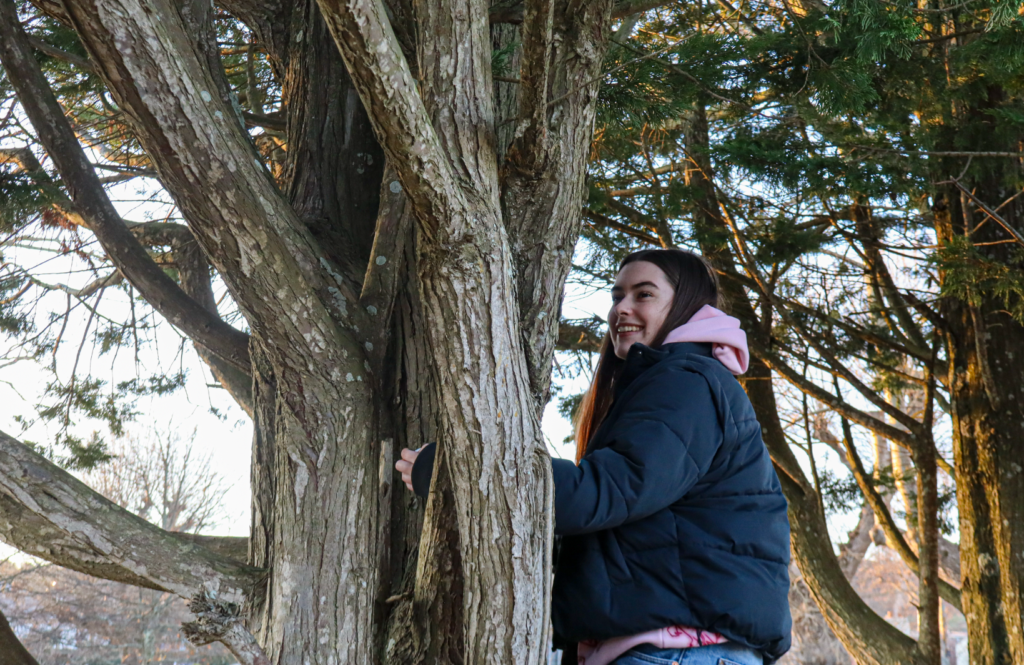
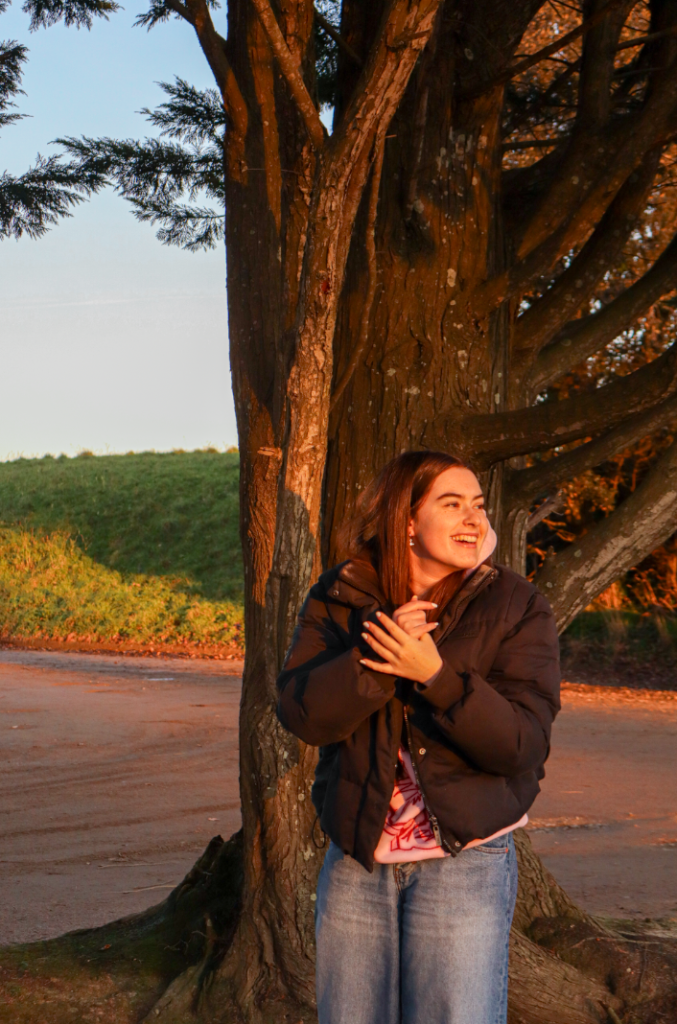
This photoshoot was based in Gorey at around 4-6pm where I took images in a carpark, park and on grass fields. I got a few images which included a group of individual but most images tended to focus on one person as the model. My images also aimed to be inspired by a few of Justine Kurland’s photographs by making the photo based in trees, grass areas and open spaces. The lighting in the images work really well to create a warm and happy feeling to the images. the use of the sunset creates a soft tone and makes the lighting of the images a lot better.
This image above is also one of my favourite images as it brings a sense of happiness to the image and I also really like how the lighting turned out. I think this link really well too teenage stereotypes as it explores the theme of friendships and you are able to see the enjoyment being shown by the face expressions.
Literary sources: Go to this blog post here: Theory: Literary Sources and copy relevant key texts relating to the subject of your essay and list in alphabetical order in your bibliography. In addition, find your own key texts in relation to artists selected for in-depth analysis in your essay and list these too. These texts could be interviews with the artist, or reviews/ critique’s written by others. See useful online sites/ sources here .
Research and identify 3-5 literary sources from a variety of media such as books, journal/magazines, internet, Youtube/video that relates to your personal study and artists references .
Begin to read essay, texts and interviews with your chosen artists as well as commentary from critics, historians and others.
It’s important that you show evidence of reading and draw upon different pints of view – not only your own.
Take notes when you’re reading…key words, concepts, passages, page number to be used for in-text referencing etc.
Essay Question
Think of a hypothesis and list possible essay questions
Below is a list of possible essay questions that may help you to formulate your own.
Some examples of Personal Study essays from previous students:
Essay Plan Make a plan that lists what you are going to write about in each paragraph – essay structure
Essay question:
Opening quote
To what extent does Cindy Sherman and Justine Kurland explore female stereotypes.
‘To collect photographs is to collect the world’ Susan Sontag, On Photography 1977
Introduction (250-500 words): What is your area study? Which artists will you be analysing and why? How will you be responding to their work and essay question?
Pg 1 (500 words): Historical/ theoretical context within art, photography and visual culture relevant to your area of study. Make links to art movements/ isms and some of the methods employed by critics and historian.
Pg 2 (500 words): Analyse first artist/photographer in relation to your essay question. Present and evaluate your own images and responses.
Pg 3 (500 words): Analyse second artist/photographer in relation to your essay question. Present and evaluate your own images and responses.
Conclusion (250-500 words): Draw parallels, explore differences/ similarities between artists/photographers and that of your own work that you have produced
Bibliography: List all relevant sources used
Sontag, S. (1977) ‘In Plato’s Cave’ In On Photography. London: Penguin Books
Essay writing: Here is a link to another blog post which will provide you with guideline about how to structure each paragraph in your essay.
To what extent does Cindy Sherman and Justine Kurland explore female stereotypes.
‘To collect photographs is to collect the world’ Susan Sontag, On Photography 1977
To explore stereotypes means to focus on something that is aset idea that people have about what someone or something is like, especially an idea that is wrong. They are able to shape our perceptions of groups of individuals which can lead to misunderstanding and sometimes discrimination. I am going to be looking at the area of female and teenage stereotypes. The artists I want to explore are Cindy Sherman and Justine Kurland. I have chosen Cindy Sherman as she focuses on female stereotypes within her work, her photography is important because of the way it depicts how women are viewed in society. I have also chosen Justine Kurland as her focus in photography is on girlhood. Her images are representations of both childhood adventures and current experiences. Both artists explore the issues with stereotypes and draw attention to it. Both photographers stage their photo shoots instead of them being documentary photographs. Cindy Sherman regularly alters her appearance beyond recognition through make-up, prosthetics, and costumes. To create her images, she assumes the multiple roles of photographer, model, makeup artist, hairdresser, and stylist. She becomes the character in the story she is attempting to portray through her images. Justine Kurland also sets up her images but not with herself, instead using real people she approach in her elaborate staging of photographs. Kurland has used staged tableaux to explore the social landscape of girlhood, life on communes, and life in the wilderness. Both photographers’ images represent mirrors. Mirror images are usually called this when the photographer is trying to demonstrate or reflect something that they feel about themselves. John Szarkowski in his text, said a mirror is ‘reflecting a portrait of the artist who made it’ and ‘a mirror- a romantic expression of the photographer’s sensibility as it projects itself on the things and sights of the world (Szarkowski 1978). These two artists are mirrors as Cindy Sherman is a women herself and is trying to reflect her feelings and opinions on it to the viewers, and Kurland mirrors her own childhood through the use of other girls a representation.
Historical context: Feminism
Both of he artists I am focussing on have images published between 1977-2002. Cindy Sherman’s Untitled Film Stills composes of over seventy black and white photographs made between 1977 and 1980. By 1970, feminists had inspired women and men across the United States. Whether in politics, the media, or private households, the topic of feminism was everywhere. The representation of women in art in the past shared the idea that women were good enough to be painted, but not to paint. They were usually represented for their physical appearance and not as the ones who would do the paintings. Theorist L van Zoomen said, ‘a core element of western patriarchal culture is the display of woman’s spectacle to be looked at, [and] subjected to the gaze of the (male) audience.’ (van Zoomen 2019). I agree with this quote as it was usual for women to be in the paintings and not be the painter, usually posing in certain ways that would be more appealing for a male audience. Historical female photographers include artists such as Julia Margaret-Cameron and Claude Cahun. Cameron (1815-79) revolutionised photography and immortalised the age of the eminent Victorian through her monumental photographs with their muzzy focus and dramatic use of light. Cahun presents herself in a variety of guises, adopting different personas and exploring the fluidity of identity. She dresses as both men and women when exploring the theme of identity and gender roles. A quote she said was: ‘Masculine? Feminine? It depends on the situation. Neuter is the only gender that always suits me.’ (Cahun, Claude (2008). Disavowals: or cancelled confessions. The MIT Press. p. 151.) This shows her link with the theme of masculinity and femininity as she does not care which identity she takes and in a few of her photographs you can see her looking more feminine than others. Cindy Sherman’s work is one of the most direct link with the male gaze in art history. her images show woman in roles hat seem disempowered. she makes the image appealing but also leaves the viewer to interpret certain things which can often be unsettling as they wonder what the real meaning is behind the image.
Cindy Sherman Cindy Sherman makes her photos come to life by using herself as the main aspect. She doesn’t merely represent stereotypes, she embodies them in different ways which then draws attention to the roles she plays which captivate the viewers. Sherman is known for creating fictional characters in her photographs, often using props, makeup and clothing to transform her appearance which is seen as an exploration of identity. Sherman uses elaborate makeup and costumes to create transformations in her appearances and characters. This allows her to explore issues of identity, subjectivity and gender, while challenging the conventions of visual representation. Cindy Sherman said,‘I never thought I was acting. When I became involved with close-ups I needed more information in the expression. I couldn’t depend on background or atmosphere. I wanted the story to come from the face. Somehow the acting just happened.’ Being a woman, she is able to share her ideas possibly from her own experience which could make the images more personal to her and important to her. Sherman satirizes the audience’s gaze on the female body and solidifies female aesthetic standards. Cindy Sherman’s work has had a major impact on contemporary photography. Many artists were influenced by her work, and her technique of deconstructing stereotypes and conventional representations is still an important reference for many artists today. Sherman’s work is often credited as a major influence for contemporary portrait photographers. One such photographer is Ryan Trecartin, who manipulates themes of identity in his videos and photography. Now 30, he began taking pictures of himself and his friends role playing and cross-dressing while still in junior high school, when he was also introduced to Sherman’s work. Sherman’s influence on other artists work was known as “The Cindy Sherman Effect”. She focusses on stereotypes to the extent where it has an impact on the community where she considers social and political issues surrounding stereotypes and woman in general such as female representation in popular culture and the performative nature of identity. In the image below, It could be interpreted by the viewer that Sherman is impersonating a stereotypical house wife from the late 1950s or early 1960s. This can be clear by the objects she adds to the image to subtly create this thought. The use of the sauce pan and soap bottle suggest to the viewer that she could be pictured in a kitchen. As well as this, she is also wearing an apron. The construction of the picture hints at a number of possible narratives and is open to a range of analyses. One analysis a viewer could make is a negative event occurring. The black and white can cause an ominous feeling or sense of tension and the tone of the image makes it feels like a dark and scary moment for the woman. she can be seen to be looking over her shoulder and the viewer can interpret that to what they like but it was usually be a negative thing she may be looking at as her eyes look concentrated on something that could be making her scared. Sherman is also seen holding her stomach which could be a usual comfort for a woman so this could further suggest something to make her uncomfortable is going on and further shows how she depicts the theme of vulnerability in her photos.
Cindy Sherman – Untitled Film Stills #03, 1977
Justine Kurland Justine Kurland focusses on themes of freedom, rebellion, and the defiance of gender expectations. Kurland’s main project was called Girl Pictures. Kurland started this project in 1997 when she was a graduate student at Yale. Kurland decided to reverse certain stereotypical representations by rather than showing girls as passive or vulnerable, she represented them as strong, confident and free-spirited. The main environment of her images are usually in wild settings like rural or urban places which would be the opposite of a typical environment where girlhood would be imagined to be placed. She first photographed a fifteen year old girl called Alyssum who was the daughter of Kurland’s partner at the time. As well as this she also photographed groups of friends who were teenage girls and she staged the images where she depicted life on communes and life in the wilderness. In her project Girl Pictures. writer Rebecca Bengal says, ‘one in six of us will never figure it out. One in six of us will never leave here. One in six of us is bound to disappear. One in six of us, she’ll surprise you’. (Bengal 2020) This quote important as its showing how every teenagers life is different and the decisions they make now will impact where they end up. She represents the stereotype of a teenager who is figuring things out at the same time as going through things. The lighting in the image below is natural and seems to be at either sunrise or sunset. The lighting sets a feeling of calmness to the viewer as it looks tranquil and relaxing. The warming tone also contributes to the idea of tranquillity. In this image, Kurland is photographing her partners daughter, Alyssum. This image shows Alyssum in the centre of the image holding onto a tree. The way she is holding onto he tree creates a sense of fear as she seems to be clinging onto it and not wanting to let go. Her being in the centre of the image I think works really well to create a deeper meaning of the image. the water next to her seems to be travelling one way on the left of the image whereas the direction of the headlights of the cars suggest the road travel the opposite way. as well as that, there’s a pathway on the grass which is also creating a direction. Alyssum’s body faces the road whereas she’s looking over her shoulder at the water which creates the idea that she doesn’t know what direction to go in or what path to take and seems to be lost. This links to stereotypes of young people as its showing the confusion of the mind and having the ability to make decisions for yourself but still not knowing which direction to go. Teenagers could relate to this image as they may also not know what to do or where to go as they enter the part of their life where their decisions have a major impact on their futures.
Justine Kurland, Pink tree, 1999
Conclusion
Both Cindy Sherman ands Justine Kurland are two of the most important photographers when it comes to themes such as identity, gender and roles in society. They have different techniques such as Sherman taking her images as self portraits which have been constructed an staged way. Whereas Kurland takes her images of other individuals and not herself in open naturalistic aesthetics where the environment is a rural wide-space. Though they have differences, their main themes are femininity, gender roles and identity. Both photographers attempt to present themselves in their images when focussing on the theme of identity however they do this in slightly different ways. Sherman uses her identity to show her opinions on the stereotypical female roles through using herself. She embodies them in different ways which then draws attention to the roles she plays and ultimately captivates the viewers. She is able to transform her appearance which is seen as an exploration of identity. Kurland shows her opinions and thoughts by using other people to reflect herself onto them. In her work Girl Pictures she depicts young women in wilderness settings and shows the ongoing theme of freedom and rebellion where she often places the individuals (herself) in natural environments in the wild. Another difference is how they explore identity in different ways. Sherman shows the stereotypical female societal roles in her images where she sticks to showing how woman are viewed where they are presented as disempowered and link largely with the male gaze. Whereas Kurland shows the female identity in opposite ways by depicting girls rebelling and being out in fields and rural areas where hey seem to be empowered rather than disempowered which would usually not be the typical image of a female. Both artists don’t just use their images to represent themselves, they represent everyone who can relate. Sherman represents every woman and Kurland represents most teenage girls. Though the artists approaches to this theme differ, they both manage to challenge the reality of being a woman. With the work I have produced, I would say it is more similar to Kurland’s work than Sherman’s. In one of my photoshoots, it focussed on group of my friends who were all girls. This is already a similarity between Kurland’s work and she also takes images of groups of girls. The settings of hers and my work could be seen as fairly similar as I also used places such as fields to take my photographs and got the subjects of the images to engage in activities such as tree climbing. In terms of Cindy Sherman, as a large majority of my images surround females I am able to compare mine to hers as a similarity. My photographs are images of others which links with Kurland’s work rather than Sherman’s as she tends to do self-portraits instead. I also believe that, like Kurland, my images would be seen as mirrors as I am reflecting my life through the use of my friends. in comparison to this idea, some of my other photoshoots could be seen as windows as I photograph the subject engaging in activities that is normalised for them (for example dancing) and so this would be a window as its taking a look into someone else’s normal activity that I don’t relate to. One of the photoshoots that focuses on one of my friends dancing links to Cindy Sherman and the idea of female stereotypes as dancing could be considered a female stereotypical sport (especially in the past).
My own image inspired by Justine Kurland (Pink Tree)
Conclusion (250-500 words): Draw parallels, explore differences/ similarities between artists/photographers and that of your own work that you have produced
347, 315, 576, 502, 332
(Male vs female gaze, representation of women in art, feminism, staging of photographs or tableaux takes it origin from Pictorialism. Examples of historical female photographers: Julia Margaret-Cameron, Claude Cahun
Read some of the key texts in bibliography below here and reference them in the paragraph here)
Bibliography
Feminist theory van Zoomen, L. (2019). ‘Feminist Theory’ in Dixon, M. Media Theory for A-Level Students. London: Routledge.
Justine Kurland
Bengal, R. (2020) ‘The Jeremys’ in Girl Pictures. New York: Aperture.
Cahun, Claude (2008). Disavowals: or cancelled confessions. The MIT Press. p. 151.
For this photoshoot, I want to take photos in a natural environment of the individual/individuals who are being photographed as this will further show stereotypes within teenagers as it shows where they are and what they do. I could also use the studio for these images as well.
I want to restage a photoshoot that I conducted in the femininity and masculinity project. This was a photoshoot which included my friend being the model and wearing her dance outfit and doing dance moves which I was able to capture on the camera. I want to redo this photoshoot again with her wearing a different dance outfit to show the difference in the photoshoots but also include some photos from the previous photoshoot as I really like those images. The location of these images will be in the studio. This is because I want to make use of the studio lighting and also explore using different colours on the lights as well. I also think these photos turned out well with a plain background instead of an environment such as a dance studio
I also want to take photos that represent other things that are stereotypical to a specific gender out of the studio and in the environment of that person. eg a male on a football pitch, females doing make up, males looking at cars/ in cars etc. And also show the opposite.
The editing process and the format of my photos:
apart from editing the quality of these images, I want to keep these photos fairly natural without any further editing such as AI so that I can show a good representation of teenage stereotypes. However, I may need to use AI if I am unable to show the stereotype with just the image on its own. Some of the images that I take in the studio I might edit further such as colour splash or layering to make the photo more interesting to the viewer.
Photoshoot 2– Exploring stereotypes over generations
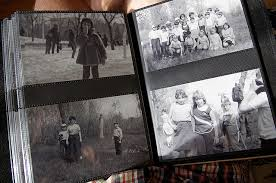
This photoshoot will focus on older photographs from photobooks which will then be restaged. This explores generations and how thing have changed overtime. I will ask my Nan if I could look at photo albums of her and also of my mum.
The location of these photoshoots will generally only be in the studio as the restaging can’t be in the same place as the older photos as they will all be based in the UK.
I am not planning to use myself as the model in the restage photoshoot, instead I will use my friend. This still works as it still will represent my generation as she is the same age.
Things that ill focus on in the photographs:
Changes in women clothing
Changes in camera quality
Changes in how women pose for photos
Black and white vs colour
The editing process and the format of my photos:
The old photos will stay in their original form as the camera quality in the photos will reflect the generation that its from. I will keep some of my own photos in colour and some in black and white. I am also going to keep some of the photo album photos as a main image and possibly use AI to change it into my own.
Write a Statement of Intent of 250-500 words that clearly contextualise;
What you want to explore?
Why it matters to you?
How you wish to develop your project?
Which form you wish to present your study (photobook, film, prints etc)
When and where you intend to begin your study?
The topic I am most interested to explore is Stereotypes, in particular, gender stereotypes. I chose this topic as I really enjoyed the Femininity vs masculinity project that we did as a previous class topic and I think I produced a few of my best photos during that theme. Stereotypes are a set idea that people have about what someone or something is like, especially an idea that is wrong. They are able to shape our perceptions of groups of individuals which can lead to misunderstanding and sometimes discrimination. I want to be able to show things such as stereotypical activities, clothing and actions that are done by each gender as well as showing opposites. I also want part of my project to explore the evolution of male and female stereotypes over the decades and uncover how different expectations in our society have shifted with time. My project will consist of a range of photographic techniques including portraiture, staged shoots, group shoots and individual ones too. I’m hoping for my photoshoots to include different ages and genders, since I will be focussing on generations I am hoping that I will be able to get family members involved. My project will have separate parts to it as I’m conducting a few different ideas under the topic of stereotypes. This will include the evolution of stereotypes over generations, male and female stereotypes now amongst teenagers and the current generation and also exploring opposites within stereotypes.
The first idea I am wanting to explore is stereotyped of male and female teenagers nowadays. This is generally focussing on gender stereotypes but within my age group. My aim is to show through photos groups of teenagers in their usual life engaging in their usual activities. this would include groups of male friends, groups of female friends and also them together. I plan to use many different environments when creating the staged images such as schools, urban spaces and private environments to fully show the individuals lives and how environment can affect certain traits and experiences. I also want to conduct some photos in the studio using artificial lighting to gather more in depth images focussing on one person. this idea links mostly with Cindy Sherman who very clearly focussed on the topic of female stereotypes. She regularly alters her appearance beyond recognition through makeup, prosthetics, and costumes. To create her images, she assumes the multiple roles of photographer, model, makeup artist, hairdresser, and stylist. She becomes the character in the story she is attempting to portray through her images. My idea links to her the most as I am also showing gender stereotypes however I am focussing on both genders and also the stereotypes of teenagers. I want this idea to explore both documentary (windows, observational) and tableaux (mirrors, staged) images as I can create staged images using my own models but I also can observe others and collect photos in that way. This idea also links with the artist Justine Kurland who is known for her elaborate staging of photographs. Kurland has used staged tableaux to explore the social landscape of girlhood, life on communes, and life in the wilderness. My shoot will also focus on stereotypical roles of genders and showing how they can be shown by both genders and not just one. This idea is mostly going to be conducted in the studio using artificial lighting. My main idea was also used during the femininity and masculinity project where I photographed my friend who is a dancer. I really enjoyed taking and editing those photos and I think it works well with the stereotype theme as dance is stereotypically a ‘girl sport’ and I can show that by using a female model engaging with her sport but I could also try showing a male doing the same thing as nowadays there aren’t really female or male sports because its been normalized for all genders to take part in any sport. This idea links mostly to the artist Claude Cahun who was known mostly for her photography work where she would dress up as different people to create different stories within her photos. Cahun presents herself in a variety of guises, adopting different personas and exploring the fluidity of identity. She dresses as both men and women when exploring the theme of identity and gender roles.
My second idea is exploring stereotypes over generations. I want to show how stereotypes have transformed over time and how society has adapted overtime. I will mostly focus on females for this project and use my own family members. I want to show how things such as clothing, activities and styles have changed over generations by using my Nan’s, Mum’s and my own generation. I am basing this shoot mostly on photo albums as that will be my own source of photos for the past generations. However, I also plan to hopefully find a model in my own generation who will recreate photos that were in my Nan/Mum’s generation.
All of my photos will include people as the main focus however some of the photos in photoshoot 1 will also focus on the place and background as it will show the environment of the groups of people. My photoshoots will include both outdoor and indoor locations as I will focus on the environments of that individual as well as including set up shoots in the studio. the shoots will be a mix of documentary and tableaux as some will be photos of observation of certain groups of people making it a window however some tableaux images will be staged and more mirror based images. I’d want to present these images in a book where each photoshoot has its own part of the layout. I’d want to include text to some images to explain them but also leave some of the photos down to interpretation for the viewer. I will also include editing such as AI technology to make my images more interesting to the viewer and show different skills within the photos.