This week all students will be encouraged and expected to tackle and complete the following tasks…
Tidy up your File Management (blog ready / print ready images)
Final edits of strongest Environmental Portraits and Street Photography (3-5 images per photoshoot)
Select 1 x A3 and 1 x A4 FINAL IMAGES
THESE MUST BE HIGH QUALITY, HIGH RESOLUTION IMAGES SAVED IN A PRINTING FOLDER IN M:DRIVE
An analysis of your current assessment material and introduction to the marking criteria and comparisons to exemplar material
Completion of Street Photography Homework ( photoshoot) so you can edit and present these too…
Analyse and evaluate what you have achieved so far…
Check that you have completed EACH INDIVIDIAUL BLOG POST
HALF TERM HOMEWORK ASSIGNMENT // Halloween inspired photoshoot
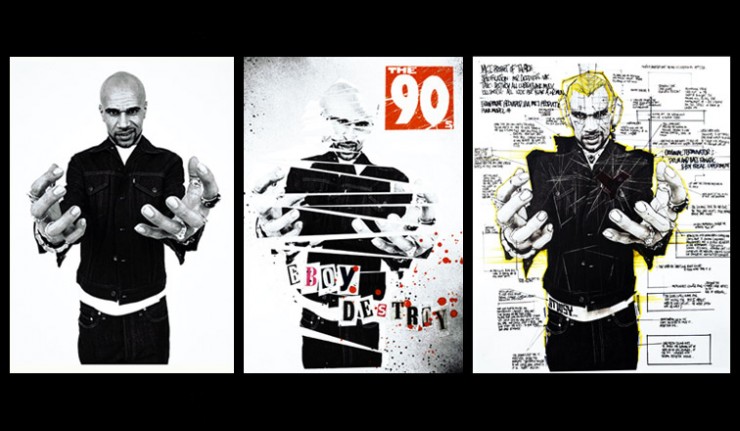
COMPLETE A PERSONAL PHOTO-SHOOT (50-100 PHOTOS) BASED ON THE WORK OF RANKIN… or you can choose another studio photographer whose style you wish to emulate and develop
TAKE NOTE OF HIS USE OF LIGHTING AND USE OF PROPS, BODY LANGUAGE, CLOTHING AND CHOICE OF MODELS….
[LOOK CLOSELY AT HIS DESTROY / DE-CONSTRUCT PROJECTS before starting to inspire ways in which you can adapt and edit your images next term…Rankin makes a point of encouraging the celebrities he photographs to adapt their portraits in a way that reflects their character / profession]
Thom Yorke, Radiohead
Joe Strummer, The Clash
Goldie, Graffiti Artist, drum and bass musician and producer
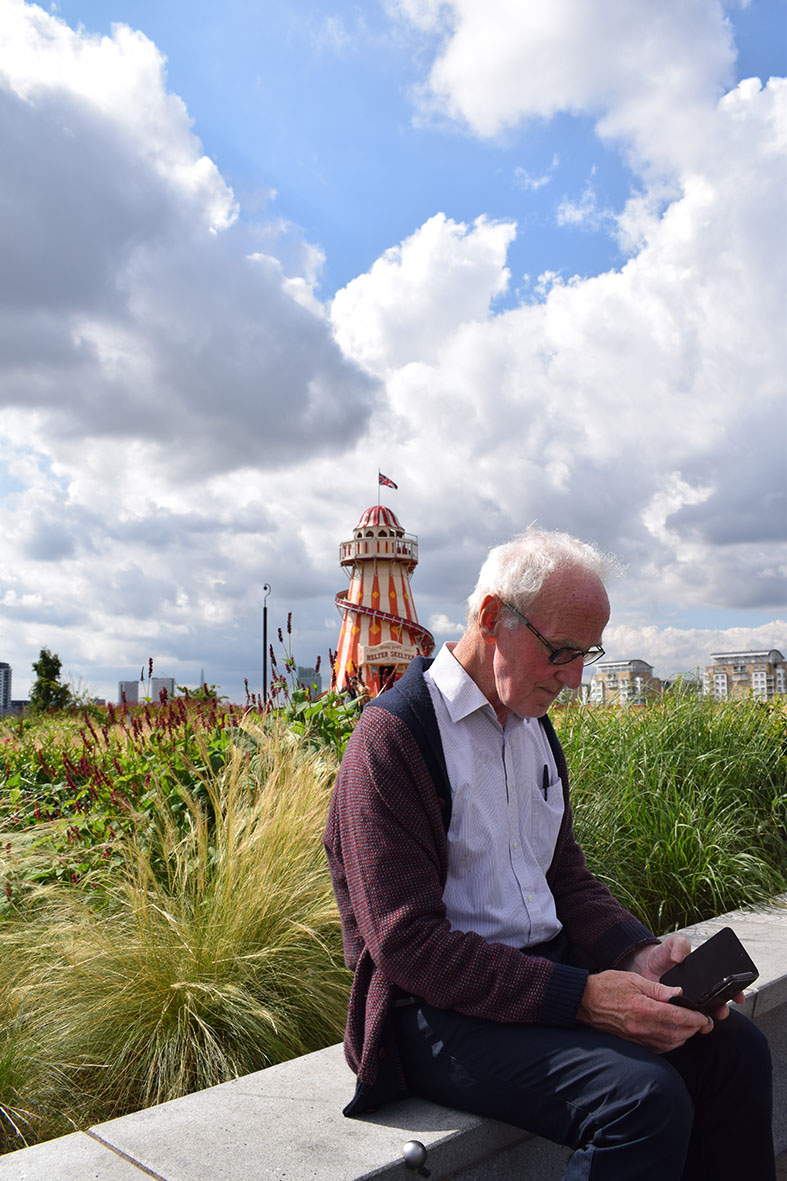
Here I have taken a picture of an old man sitting on a wall with a Helter Skelter behind him. When editing I cropped the photo so only the important objects would be in the photo. I then increased the contrast and brightness on the image. When I looked at the image I really wanted the clouds to look more dramatic and heavy. So I used the burn tool to bring out the darkest parts of the clouds. However, the Helter Skelter looked very dark as well as the mans face. So to add a little more light to certain parts of the picture I used the dodge tool. I also used this tool on some of the edges of the clouds to give them some light. I did no other editing as I did not want to change the picture too much.
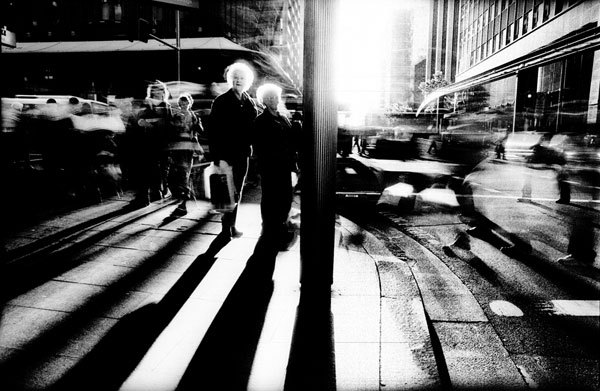
Street photography is photography conducted for art or enquiry that features unmediated chance encounters and random incidents within public places. Street photography does not necessitate the presence of a street or even the urban environment. The concept of the “flaneur” or people watcher is often referred to…as is the candid portrait.
…was a French humanist photographer considered a master of candid photography, and an early user of 35 mm film. He pioneered the genre of street photography, and conceived of photography as capturing a decisive moment.
Henri Cartier-Bresson
Task / blog post 1 [ Introduction to Street Photography]
Design an introductory post to define and explain what street photography is / can be
Choose 2 x street photographers from the list below and write a short biography about them and their work
Select a key image from both photographers and analyse using a combination of the 3 types of analysis you have learned
Task / blog post 2 [How we use shutter speed and angles in street photography]
Explore the use of shutter speed to capture a range of street photographs / candid portraits (your images)
Explore the use of various angles and viewpoints (POV) to capture a range of your own street photographs in various locations
Include your contact sheet and describe and explain your process / analyse
Task / blog post 3 [Selection of successful images from Week 5]
Choose a small range of images (3-5) to edit and present
Analyse and discuss your choices…why, how, what , who etc
Compare and contrast your work to your 2 x Street Photographers
EXTENSION TASK…LOOK AT EXAMPLES OFjuxtaposition IN STREET PHOTOGRAPHY AND CREATE A POST DESCRIBING AND EXPLAINING HOW WE CAN EXPLOIT THIS TECHNIQUE
Homework Assignment STREET PHOTOGRAPHY
AIM TO TAKE 100-150 PHOTOGRAPHS
SHOW THE INFLUENCE OF AT LEAST 1 STREET PHOTOGRAPHER IN YOUR IMAGES
EXPLORE 3 DIFFERENT AREAS OF TOWN / VILLAGE / HOUSING AREA ETC
SHOW HOW YOU CAN USE SHUTTER SPEED TO CREATE different effects WITHIN STREET PHOTOGRAPHY
DEADLINE MONDAY 10TH OCTOBER 2016
INSPIRATIONAL STREET PHOTOGRAPHERS
Trent Parke, Bruce Gilden, Diane Arbus, Robert Frank, Raghubir Singh, William Klein, Elliott Erwitt, Garry Winogrand, William Egglestone, Lee Friedlander, Martin Parr, Joel Meyerowitz, Paul Strand, Bill Brandt…but there are many more to discover and explore
Robert Frank (USA) Trolley Car, New Orleans, 1955 (From “The Americans”…a photo essayRaghubir Singh, From a Way Into India, 1995Trent Parke
Tony Ray-Jones listed the following shooting advice to himself in his personal journal:
Be more aggressive
Get more involved (talk to people)
Stay with the subject matter (be patient)
Take simpler pictures
See if everything in background relates to subject matter
Vary compositions and angles more
Be more aware of composition
Don’t take boring pictures
Get in closer (use 50mm lens or smaller)
Watch camera shake (shoot 250 sec or above)
Don’t shoot too much
Not all eye level
No middle distance
Tony Ray-Jones
Some more tips to help with your Street Photography…
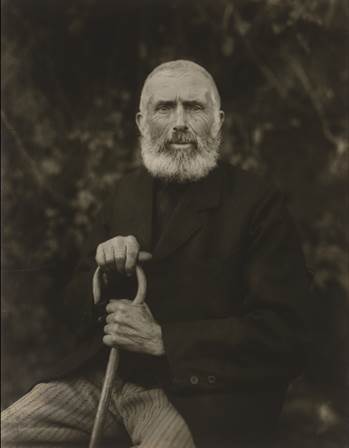
When I compare my picture (left) to August Sanders picture (right) I don’t see many similarities. The similarities I do see are that they are both elderly men who have lived many years and have seen a lot. They are both dressed fairly smartly wearing clothes that are fairly dark and holding an object that means a lot them. They are both in the center of the image as well as sitting at an angle.
However, when I contrast my picture with August Sander’s I see many differences. First of all the man in my picture isn’t looking at the camera instead the man in my picture is looking his phone. Also in August Sanders picture the background isn’t that significant and is completely out of focus. Where as when you look at my picture you see the green from the plants, the bright reds and whites from the Helter Skelter as well as the deep dark shadows from thick grey clouds with a hint on blue from the sky. Another contrast is that there isn’t much light shining on the mans face in my picture where as August Sanders picture there is plenty of light on the mans face. The differences in these photos are fairly big.
However, I think this represents the change in times. The fact that these men are about the same age in these photos you can really see how times have changed from1910 to modern day . The man in my photo can’t even look at the camera as he is so distracted by his phone. This is probably because he found the situation awkward. In world today we can often use our devices and technology as an escape from reality. When you look at August Sanders picture he is looking straight at the camera, you can see the emotion in his eyes. His photo has so much formality to it the fact that the man is staring straight at the camera, wearing smart clothes and it’s in black and white clearly shows this. This in itself shows the difference between times.
Even though its not ideal that the man in my picture doesn’t have any light on his face I think it could represent how we can be so controlled by technology that it can almost feel like a cloud is over us and maybe once and while if we just looked up from our phones and devices we would feel better about ourselves and more connected with the world. We use technology so much to escape the world we live in, that sometimes we miss the beauty and experiences that are in it. That’s what photography is about noticing the world we live from our own eyes and capturing it. Whether it be the good, the bad, the beautiful, the ugly, the strange, the normal.
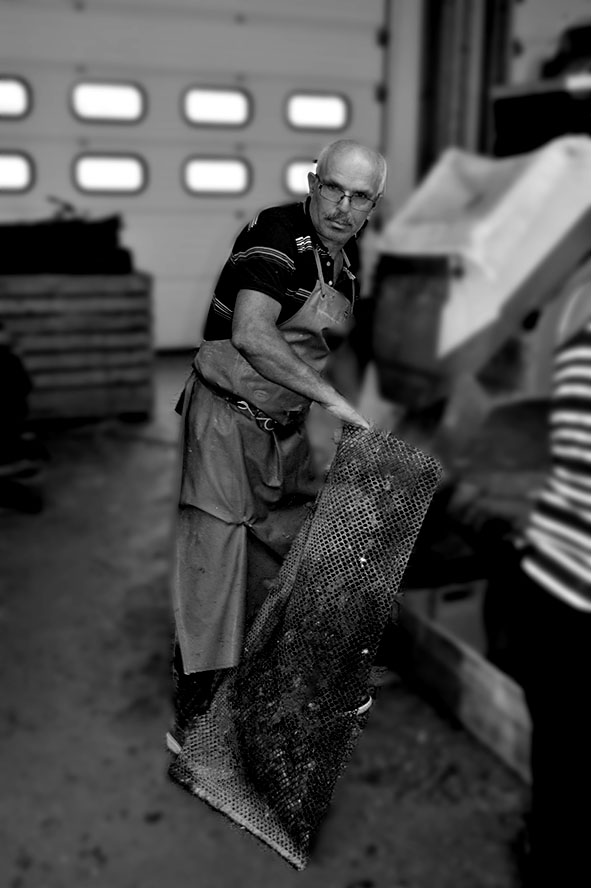
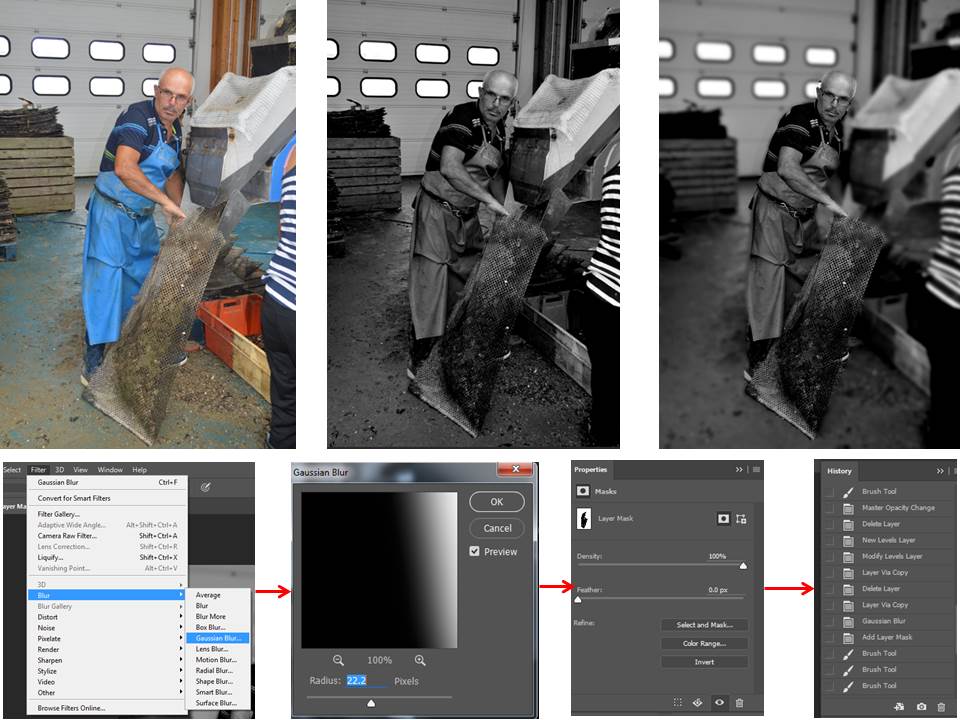
I cropped a bit off of the side of this image and the bottom so that the worker was in the place i wanted and the composition was right. The image was taken from a front on view point with the camera looking directly at the persons face this creates an original environmental portrait. The image was taken so that his whole body was in the image with an even boarder as i wanted people to be able to see the work they were doing. When editing the image i made sure the portrait was central so that they were the focal point. i wanted this image to break the rule of thirds as i like the simplistic effect of the worker being the focus of the image. The original image didnt have high contrast to begin with so when editing i turned the image black and white and increased the brightness and contrast so there was a bigger contrast between pure white and pure black. the image is over exposed and under exposed in different parts to create an even contrast. I blurred the background of the image so that the man was the complete focal point of the image, i also blurred the background because it was messy and took away from the image. i blurred the image to a radius of 22 so that it was blurred but not to harsh.


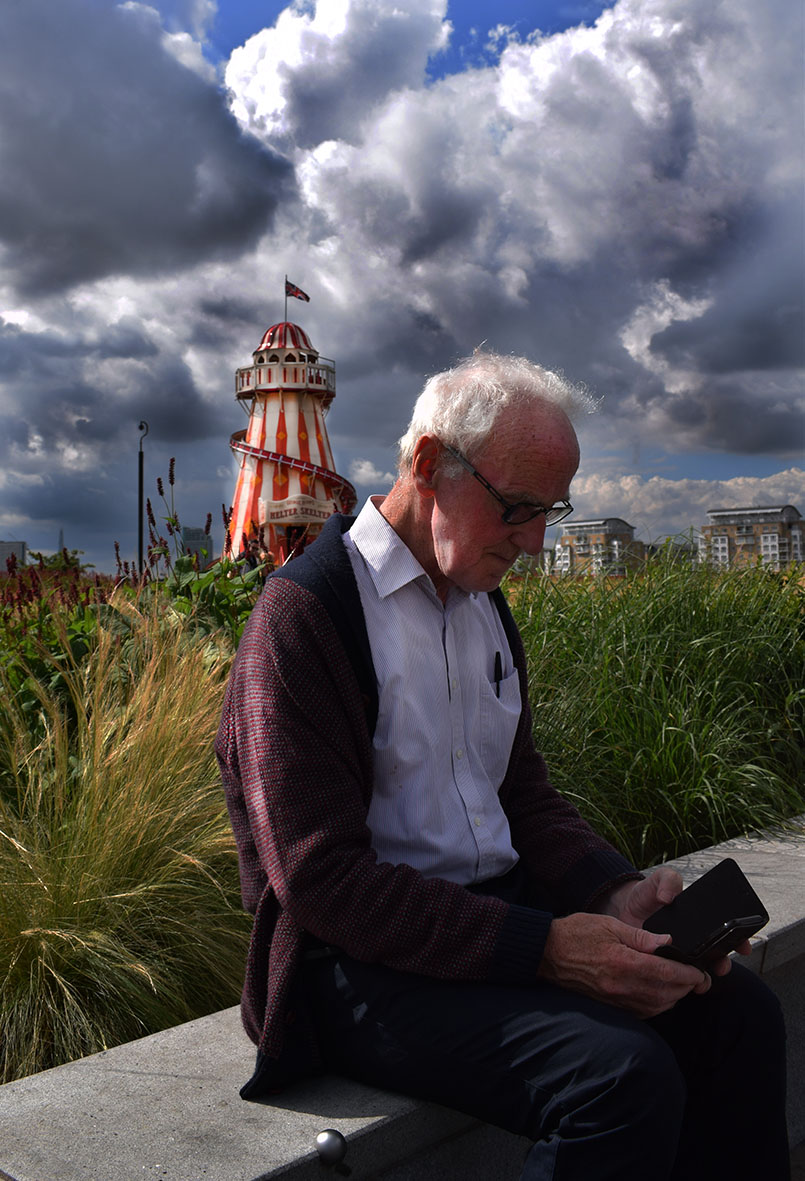
 So I used the burn tool to bring out the darkest parts of the clouds. However, the Helter Skelter looked very dark as well as the mans face. So to add a little more light to certain parts of the picture I used the dodge tool. I also used this tool on some of the edges of the clouds to give them some light. I did no other editing as I did not want to change the picture too much.


 Trolley Car, New Orleans, 1955")