Different media forms have different media language and set of rules. There are 3 key aesthetic concepts which are; size, scale and space.
THE CAMERA
The most important tool in a camera is the focus and depth of field used to direct and prioritise elements in a shot and therefore prioritise certain information. It may switch our focus (known technically as a pull focus / rack focus / follow focus) between one element and another.
With rack focus you gain: focused attention, layer images, visual storytelling, economic filmmaking and emotional connection.
Angles, movement and size
High angle / Low angle / bulls-eye / birds eye / canted angle
Tracking / Panning / Craning / Tilting / Hand held / Steadicam
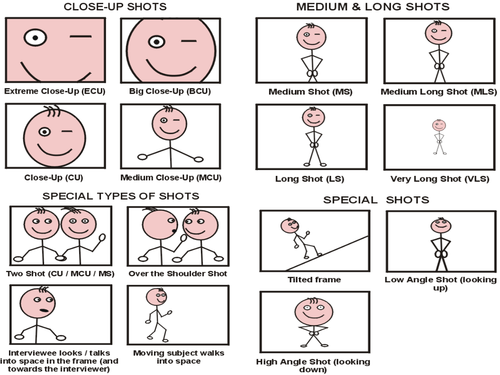
Establishing Shot / Long Shot / Medium Shot / Close-up / Big Close-Up / Extreme Close Up
Insert Shot
contains visual detail that is inserted into a scene (typically a close-up) for informational clarity or to provide dramatic emphasis
THE EDIT
Camera and edit tools are used to deliberately and consciously ‘stitch‘ the audience into the text in a deliberate and particular way.
“Screen theory” approach — Colin MacCabe, Stephen Heath and Laura Mulvey considers filmic images as signifiers that do not only encode meanings but also mirrors in which viewers accede to subjectivity (focuses on diversity rather than unity).
Moving image is constructed around the concept of putting one thing next to another.
Editing is the process of manipulating separate images into a continuous piece of moving image which develops characters, themes, spaces and ideas through a series of events, interactions and occurrences. It is usually be LINEAR and SEQUENTIAL.
1.The basic edit: cut/fade/dissolve– The basic rule in editing is you don’t show everything literally, ELLIPSIS (what you leave out) is just as important as what you put in. Frame your shots with appropriate SIZE AND SCALE and trim your shots.
- EDIT ON ACTION
- EDIT ON A MATCHING SHAPE, COLOUR, THEME
- EDIT ON A LOOK, A GLANCE, EYELINE
- EDIT ON A SOUND BRIDGE
- EDIT ON A CHANGE OF SHOT SIZE
- EDIT ON A CHANGE OF SHOT CAMERA POSITION (+30′)
Shot sequencing 1: Montage
Kuleshov effect, in that adding one element / idea to another actually produces a third idea / element, which if constructed well can produce in the audience an idea that isn’t actually present. Compresses the timeline.
Shot sequencing 2: Shot progression
to create VERISIMILITUDE (ie realism), uses these shots below to allow the audience to understand SPATIAL RELATIONSHIPS between locations, people, movements etc.
- establishing shot / ES, moving to
- wide shot / WS,
- to medium shot / MS,
- to close up / CU,
- to big close up / BCU;
- and then back out again
Shot Sequencing 2: Shot / Reverse Shot
runs from a wide angle master shot that is at a 90′ angle to (usually) two characters (usually over the shoulder shots).
First, include both characters – which are called EXTERNAL REVERSES. Then moves in to a much closer over the shoulder shot – which are called INTERNAL REVERSES.
POV shot- character looks directly at camera
Over the shoulder shots, close-ups, reaction shots, internal and external reverses are used to create a range of subjective / objective positions for the audience as they engage with characters
Shot Sequencing 3: Continuity Editing
Is the opposite of montage editing; aim is to create a sense of realism (verisimilitude)
- match on action
- eye-line match
- graphic match
- sound bridge
- 30′ rule
- 180′ rule (shot/reverse shot)
Shot Sequencing 4: Parallel Editing
two events editing together – so that they may be happening at the same time, or not?
- enigma
- dramatic irony
- foreshadowing
- repetition / reiteration
- back story
- exposition of theme / character / setting / plot
- development of theme / character / setting / plot
- pay off or resolution of theme / character / plot
- denouement
- dramatic arc
- climax / resolution
- interior monologue
- cause and effect
- resolution
- non sequitur
- ellipsis
- cliff-hanger