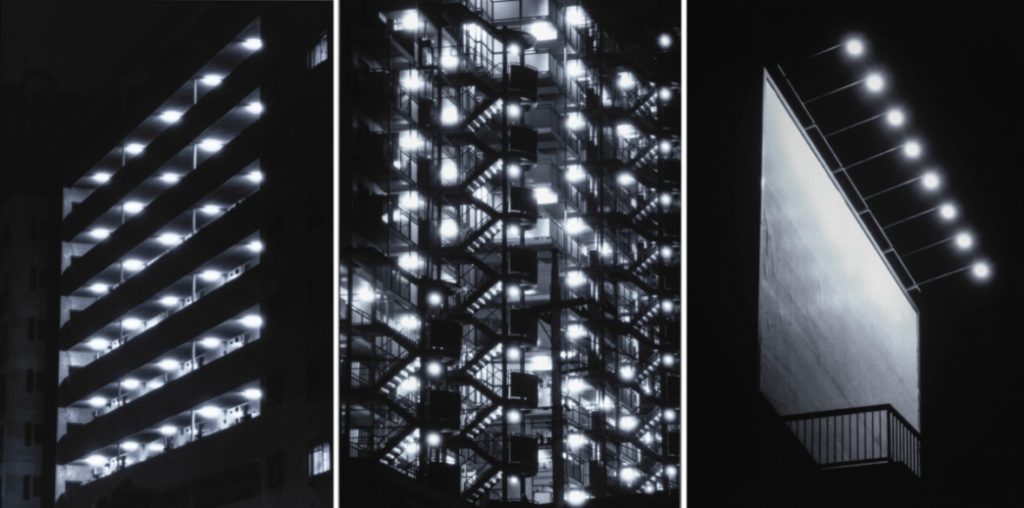
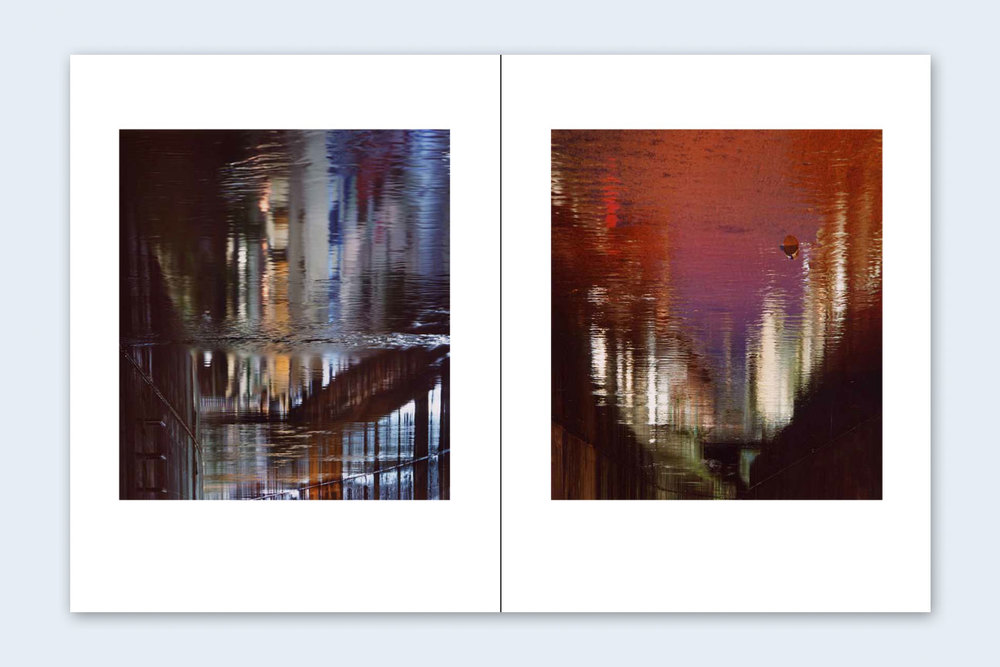
Category Archives: History of Photography

Filters

Author:
Category:

Origins of Photography – Fixing The Shadows JAC

Watch the documentary on ‘Fixing the Shadows’ from BBC Genius of Photography, Episode 1.

To embed your understanding of the origins of photography and its beginnings you’ll need to produce a blog post / word / powerpoint presentation which outlines the major developments in its practice. Some will have been covered in the documentary but you may also need to research and discover further information.

Your presentation must contain information about the following and keep it in its chronological order: (Click on each of the bullet points to learn more).

Each must contain dates, text and images relevant to each bullet point above. In total aim for about 1,000 words.

Complete the presentation and publish on your blog by Friday 20th September

In addition, research at least one photographer from the list at the bottom of this blog post


Further reading to support your blog post….

Camera Obscure

  • What is Camera Obscura?
  • Why does this make it hard to dictate the origins of photography?

A camera obscura is the natural phenomenon in which the rays of light passing through a small hole into a dark space form an image where they strike a surface, resulting in an inverted and reversed projection of the view outside.

Because this is a natural phenomenon, it’s hard to pinpoint the exact origins of photography….

Watch this video of a camera obscura in a truck


Nicephore Niepce

  • Who is Nicephore Niepce in the world of photography?
  • Why wasn’t he always considered the first photographer?

Nicephore NIepce was the first person who found a way to use the Camera Obscura and make the image permanent…

Original Image

View from the Window at Le Gras

Enhanced version:

It wasn’t always considered the first photograph….


Henry Fox Talbot

  • What is Photogenic Drawing?
  • How did Talbot’s Mousetraps work?

The invention of photography, was not synonymous with the invention of the camera. Cameraless images were an important part of the story. William Henry Fox Talbot patented his Photogenic Drawing process…

Using a sheet of fine writing paper, coated with salt and brushed with a solution of silver nitrate, Talbot found that the paper would darkened in the sun. Talbot used this discovery to make precise tracings of botanical specimens: he set a pressed leaf or plant on a piece of sensitized paper, covered it with a sheet of glass, and set it in the sun. Wherever the light struck, the paper darkened, but wherever the plant blocked the light, it remained white. He called his new discovery “the art of photogenic drawing.”

As his chemistry improved, Talbot returned to the idea of photographic images made in a camera. During the “brilliant summer of 1835,” he took full advantage of the unusually abundant sunshine and placed pieces of sensitized photogenic drawing paper in miniature cameras— “mouse traps,” his wife called them—set around the grounds to record the silhouette of Lacock Abbey’s animated roofline and trees.

The mousetraps are sturdy little wooden boxes with a brass tube housing a lens at one end, and a sliding wooden panel at the other. Into the wooden panel at the back Talbot would stick a piece of normal writing paper that he had made chemically sensitive to light.

Once the paper was inserted, the camera would be placed in front of the subject being photographed and left for several hours to expose. After that, the paper inside would be carefully removed and chemically treated to bring out and then stabilise the latent negative image. If the experiment reached this point successfully, the negative was used to create positive prints by sensitising a further sheet of paper, laying the negative on top of it in a frame, and exposing it in the sun for several hours. The resulting print would then need to be fixed to stop the image from fading. Getting the right balance of chemicals and treatments for this stage of the process was one of the most vexed areas of research for the duration of early photographic experimentation.

In the month of August 1835, William Henry Fox Talbot produced the first photographic negative to have survived to this day. The subject is a window. Despite the clear connection, it is an entirely different image compared to those of his colleagues Niépce and Daguerre. Those are photographs taken from a window, while this is the photograph of a window. While the window constitutes the most immediate metaphor to refer to photography, Talbot doesnʼt use it but more simply he photographs it. He thus takes a photograph of photography.


Daguerreotype

  • What is a daguerreotype?
  • Why was the daguerreotype not as successful as Talbot’s system?

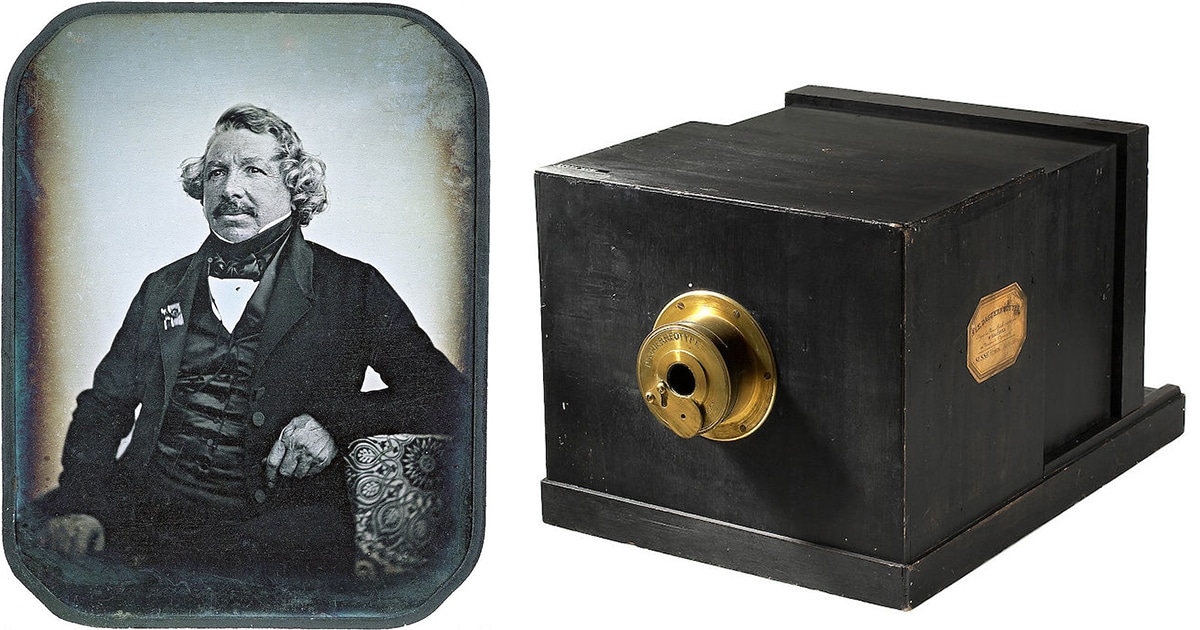
While Talbot quietly continued his experiments, he discovered that he had a rival. In January 1839, Louis Daguerre thrilled the prestigious Académie Française in Paris with news of his own method for fixing the shadows.

The daguerreotype was the first commercially successful photographic process (1839-1860) in the history of photography. Named after the inventor, Louis Jacques Mandé Daguerre, each daguerreotype is a unique image on a silvered copper plate.

In contrast to photographic paper, a daguerreotype is not flexible and is rather heavy. The daguerreotype is accurate, detailed and sharp. It has a mirror-like surface and is very fragile. Since the metal plate is extremely vulnerable, most daguerreotypes are presented in a special housing. Different types of housings existed: an open model, a folding case, jewelry…presented in a wooden ornate box dressed in red velvet. LD a theatre set designer
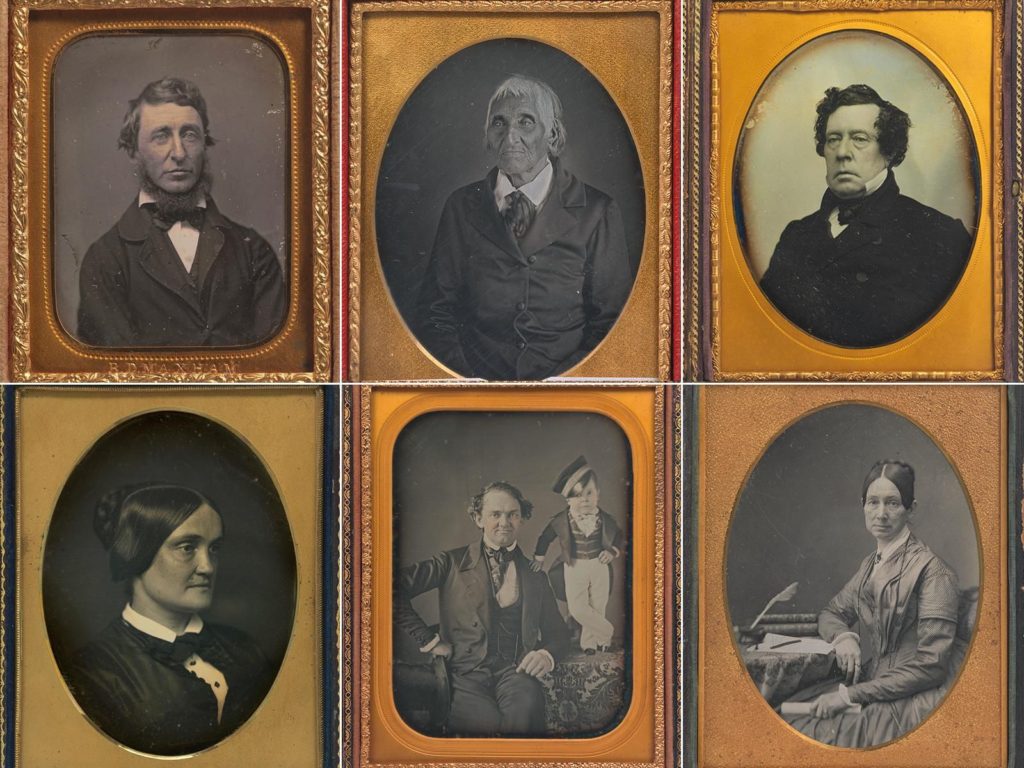
This image has an empty alt attribute; its file name is daguerreotype4-1024x768.jpg

Unlike Talbot’s negative-positive process, Daguerre’s produced one-off images, like a Polaroid.

The big weakness of the dageurreotype was that you could not make multiple reproductions from the original image, and that’s where ultimately Talbot’s system came to dominate the dageurreotype.
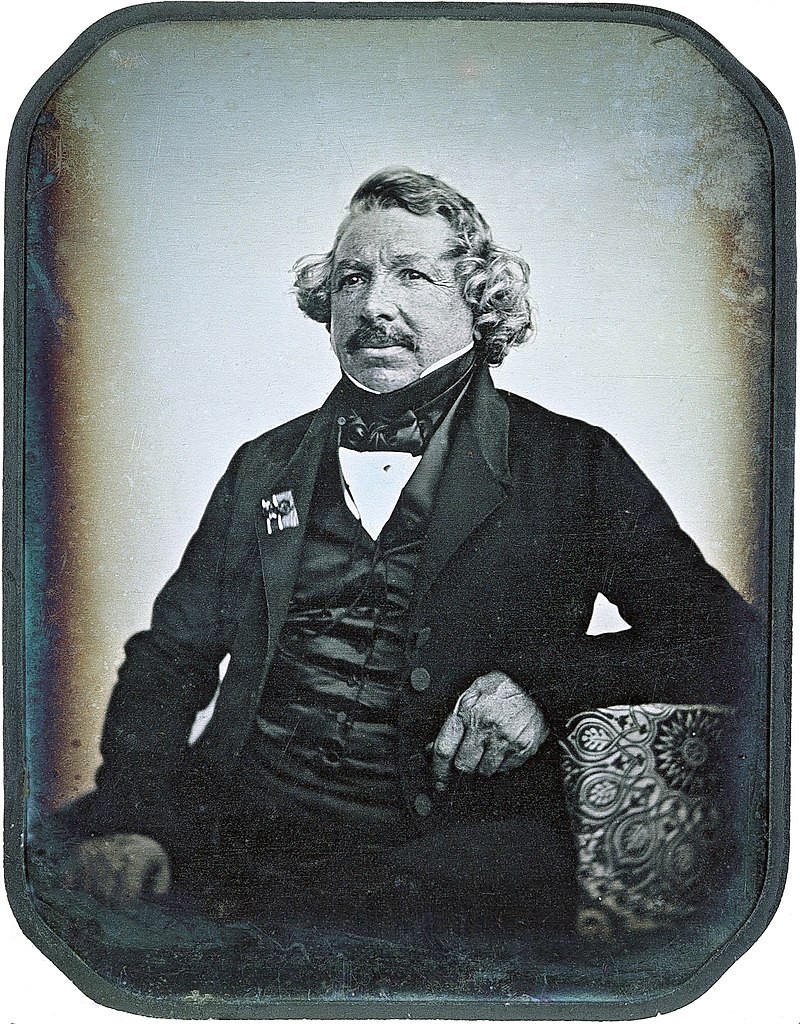
This image has an empty alt attribute; its file name is Louis_Daguerre_2-1.jpg
Daguerreotype

Anna Atkins

Anna Atkins‘ British Algae: Cyanotype Impressions of 1843 is the first use of photographic images to illustrate a book. This method of tracing the shapes of objects with light on photosensitive surfaces has, from the very early days, been part of the repertoire of the photographer.

The cyanotype (from Ancient Greek: κυάνεος, kyáneos ‘dark blue’ and τύπος, týpos ‘mark, impression, type’) is a slow-reacting, economical photographic printing formulation sensitive to a limited near ultraviolet and blue light spectrum, the range 300 nm to 400 nm known as UVA radiation.[1] It produces a monochrome, blue coloured print on a range of supports, often used for art, and for reprography in the form of blueprints. For any purpose, the process usually uses two chemicals: ferric ammonium citrate or ferric ammonium oxalate, and potassium ferricyanide, and only water to develop and fix. Announced in 1842, it is still in use


Richard Maddox

  • What did Richard Maddox Invent?
  • Why was his invention so pioneering for photography?

Richard Maddox was an English photographer and physician who invented lightweight gelatin negative plates for photography in 1871. Dry plate is a glass plate coated with a gelatin emulsion of silver bromide. It can be stored until exposure, and after exposure it can be brought back to a darkroom for development at leisure.

The advantages of the dry plate were obvious: photographers could use commercial dry plates off the shelf instead of having to prepare their own emulsions in a mobile darkroom. Negatives did not have to be developed immediately. Also, for the first time, cameras could be made small enough to be hand-held, or even concealed:


Muybridge’s famous Motion Studies

  • How did Muybridge work with Stanford?
  • Why if Muybridge considered the precursor of cinema?

Eadweard Muybridge’s famous Motion Studies were the precursor of cinema, and the product of the wealth and the whim of the railroad baron Leland Stanford.

Born in the ancient market town of Kingston upon Thames, his restless ambitions brought him to San Francisco, a boom city, founded on gold rush wealth, and sustained by the new transcontinental railway, financed by Leland Stanford. In this thoroughly modern metropolis, Muybridge established a reputation with mammoth plate landscapes and spectacular panoramas, including an eye-boggling 360-degree view of his adopted city.

Stanford came to Muybridge because he had a rich man’s problem. A passionate racehorse breeder, he wanted to prove that a horse lifted all four feet off the ground when it trotted, something that had evaded human perception for millennia.

0n a specially whited-out section of a racetrack, Muybridge placed a row of 24 cameras with electric shutters, which would be triggered in sequence, four every second, as the horse passed by.By this means, Muybridge did more than freeze the moment. He took a scalpel to time itself.

(Solnit) Muybridge’s photographs were the first source of accurate information about the gait of a horse.It’s the beginning of this change where the camera allows human beings to see faster than our own eyes, to break down the world and to dissect motion. And it’s part of that kind of intrusion into the flow of time.

For Stanford, the project was always about horses, whereas Muybridge understood that this was potentially about everything he could find, and really create an encyclopaedia of zoological motion.


George Eastman

  • How did he make photography available to the masses?
  • What company did he form?

Initially, Mr Eastman was working in a bank as a bank teller. He became interested in photography as he wanted to document a vacation he was planning.
But he became more interested in photography than going on vacation. He never did go. Eastman revolutionised photography by degrees…..

In 1879, London was the center of the photographic and business world. George Eastman went there to obtain a patent on his plate-coating machine. An American patent was granted the following year.

In April 1880, Eastman leased the third floor of a building on State Street in Rochester, and began to manufacture dry plates for sale.

Eastman built his business on four basic principles:

  • a focus on the customer
  • mass production at low cost
  • worldwide distribution
  • extensive advertising

As Eastman’s young company grew, it faced total collapse at least once when dry plates in the hands of dealers went bad. Eastman recalled them and replaced them with a good product. “Making good on those plates took our last dollar,” he said. “But what we had left was more important — reputation.”

“The idea gradually dawned on me,” he later said, “that what we were doing was not merely making dry plates, but that we were starting out to make photography an everyday affair.” Or as he described it more succinctly “to make the camera as convenient as the pencil.”

Eastman’s experiments were directed to the use of a lighter and more flexible support than glass. His first approach was to coat the photographic emulsion on paper and then load the paper in a roll holder. The holder was used in view cameras in place of the holders for glass plates. In 1883, he eventually announced something we now take for granted, a roll of film.


Kodak (Brownie)

The roll of film became the basis for the first Kodak camera, initially known as the “roll holder breast camera.” The term Kodak, coined for the occasion by Eastman himself, first appeared in December 1887.

With the KODAK Camera, Eastman put down the foundation for making photography available to everyone. The Brownie was a basic box camera with a single lens. It used a roll film, another innovation from Eastman Kodak. Users received the pre-loaded camera, took their photographs, and returned it to Kodak. Kodak would develop the film, print the photos, reload the camera with new film, and return it to the customer.


The dawn of colour photography

While people were amazed with the invention of photography, they didn’t understand how a process that could record all aspects of a scene with such exquisite detail could fail so dismally to record its colours. The search immediately began for a means of capturing accurately not only the form but also the colours of nature.

While scientists, photographers, businessmen and experimenters laboured, the public became impatient. Photographers, eager to give their customers what they wanted, soon took the matter, literally, into their own hands and began to add colour to their monochrome images. As the writer of A Guide to Painting Photographic Portraits noted in 1851:

When the photographer has succeeded in obtaining a good likeness, it passes into the artist’s hands, who, with skill and colour, give to it a life-like and natural appearance.

Hand-coloured stereo daguerreotype of a young man in military uniform, c.1855

The three colour process

In 1861, a young Scottish physicist, James Clerk Maxwell, conducted an experiment to show that all colours can be made by an appropriate mixture of red, green and blue light.

Maxwell made three lantern slides of a tartan ribbon through red, green and blue filters. Using three separate magic lanterns—each equipped with a filter of the same colour the images had been made with—he then projected them onto a screen. When the three images were superimposed together on the screen, they combined to make a full-colour image which was a recognisable reproduction of the original.

James Clerk Maxwell, Tartan ribbon, 1861. Vivex print (1937) from original negatives

Early Experiments:

While the fundamental theory may have been understood, a practical method of colour photography remained elusive.

In 1891 Gabriel Lippmann, a professor of physics at the Sorbonne, demonstrated a colour process which was based on the phenomenon of light interference—the interaction of light waves that produces the brilliant colours you see in soap bubbles. This process won Lippmann a Nobel Prize in 1908 and was marketed commercially for a short time around the turn of the 19th century.

Not long after Maxwell’s 1861 demonstration, a French physicist, Louis Ducos du Hauron, announced a method for creating colour photographs by combining coloured pigments instead of light. Three black-and-white negatives, taken through red, green and blue filters, were used to make three separately dyed images which combined to give a coloured photograph. This method forms the basis of today’s colour processes.

While this work was scientifically important, it was of limited practical value at first. Exposure times were long, and photographic materials sensitive to the whole range of the colour spectrum were not yet available.

Autochrome

(read more here)

The first properly usable and commercially successful screen process—the autochrome—was invented early in the 20th century by two French brothers, Auguste and Louis Lumière.

In 1904 they gave the first presentation of their process to the French Academy of Science, and by 1907 they had begun to produce autochrome plates commercially.

Anon, Couple with a motor car, c.1910, autochrome
Baron de Meyer, Flower study, 1908, autochrome

The First Digital Image:

Russell Kirsch was an American who worked a steady job at the National Bureau of Standards. in 1950, he and his colleagues developed the USA’s first operational stored-program computer, known as the Standards Eastern Automatic Computer, or SEAC.

The Standards Eastern Automatic Computer that scanned the first digital image.

This computer would be used for all sorts of applications. It was Russell Kirsch who first looked at the hulking machine – (which back then was considered to be a relatively slimline computer )– and had the thought, ‘Gee, y’know, we could probably load a picture into this thing.’

Kirsch and the team built their own drum scanner that would allow them to ‘trace variations of intensity over the surfaces of photographs’. With this, they were able to make the first digital scans. One of the first – possibly the very first – was an image of Russell Kirsch’s newborn son, Walden Kirsch.

The digitally scanned photograph of Walden Kirsch.

Digital Photography

1969 – CCD Chips
The beating heart of a digital camera is its sensor. Fulfilling the same function as a frame of film, a sensor records the light that hits it, and sends it to the processor for the necessary translation that makes it a digital image.

At this point in the digital photography story, sensors start to enter the picture. In 1969, Willard Boyle and George Smith of Bell Labs developed something they called a charge-coupled device, which digital photographers with long memories might find more familiar if we refer to it by its more common name – a CCD. Essentially, it used a row of tiny metal-oxide-semiconductor (MOS) capacitors to store information as electrical charges (fulfilling the same function as the magnetic tape in the older cameras).

Though Boyle and Smith were mostly concerned with computing, subsequent inventors made the connection that if you were to pair this device with something photosensitive, you’ve got yourself a rudimentary camera sensor. In 1972, the first published digital colour photograph splashed on the front of Electronics magazine, taken by British-born engineer Dr Michael Tompsett.

Artist Research – Extend your work

In addition, research at least one Jersey photographer from the list below and choose one image that references some of the early photographic processes, such as: daguerreotypecalotypesalt paper printswet plate collodionalbumen printsautochrome and colour transparencies as part of the origins and evolution of photography and include it in your essay.

Further helpful research:

Photography did not spring forth from nowhere: in the expanding capitalist culture of the late 18th and 19th centuries, some people were on the look-out for cheap mechanical means for producing images […] photography emerged experimentally from the conjuncture of three factors: i) concerns with amateur drawing and/or techniques for reproducing printed matter, ii) light-sensitive materials; iii) the use of the camera obscura
— Steve Edwards, Photography – A Very Short Introduction

20th Century Landscapes / Part 1 : Ansel Adams

Blog Posts To Make

  1. Blog post 1: ‘Landscapes Use this website to help you explore how Landscapes evolved as a genre. Some points to consider are listed below. Include images.
  2. Blog post 2: Romanticism’What is Romanticism? What are the ideals / characteristics of Romanticism? Include a case study of a Romantic Artists – John Constable. What is The Sublime? Include a case study of a an artist who includes the sublime in their work. – J.M.W Turner is a good example.
  3. Blog post 3: Landscape photoshoot 1. Include photos that you took over half term showing your personal response to rural landscapes / romanticism: Contact sheet, selection process, editing and final images
  4. Blog Post 4 Ansel Adams: Who is Ansel Adams? Explore ideas of visualisation and Zone System, include photo analysis.
  5. Blog Post 5: Exposure Bracketing – Show understanding of exposure bracketing and HDR imagery.
    HW: respond to Ansel Adams / focus on…exposure bracketing and HDR
  6. Blog Post 6: Photoshoot in response to Ansel Adams. Include contact sheet, selection process, editing and final outcomes.
  7. Blog Post 7: Panoramic Landscapes and Joiner photos – research and understanding
  8. Blog Post 8: Photoshoot 3: Show understanding of Panoramic Landscapes + Joiner Landscapes + own photo
  9. Extension Blog Post: Creative edits
    Explore and experiment with some creative ways to edit and present your landscape photos. You can find some options here or research your own.

Intro / Photographing the environment

“…it is hard to consider the birth of the environmental movement without mentioning Carleton Watkins and the rippling, far-reaching influence of his 1861 images of Yosemite National Park. All that came after President Lincoln’s signing of the Yosemite Grant, Muir’s nature writing, the founding of conservation groups such as the Sierra Club – can be traced back to the intake of breath when his images were seen for the first time.”


Tasayac, the Half Dome, 5000 ft., Yosemite
Carleton E. Watkins American 1865–66

20th Century 1900 —

Ansel Adams

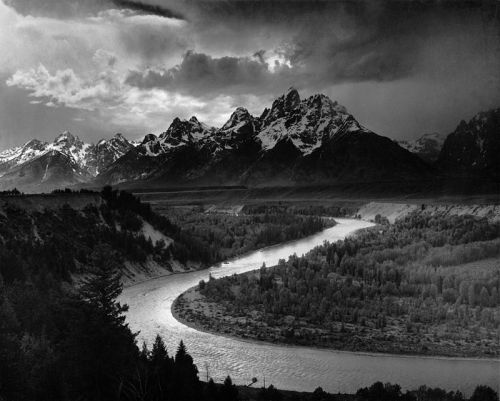
Ansel Adams Snake River 1942 USA

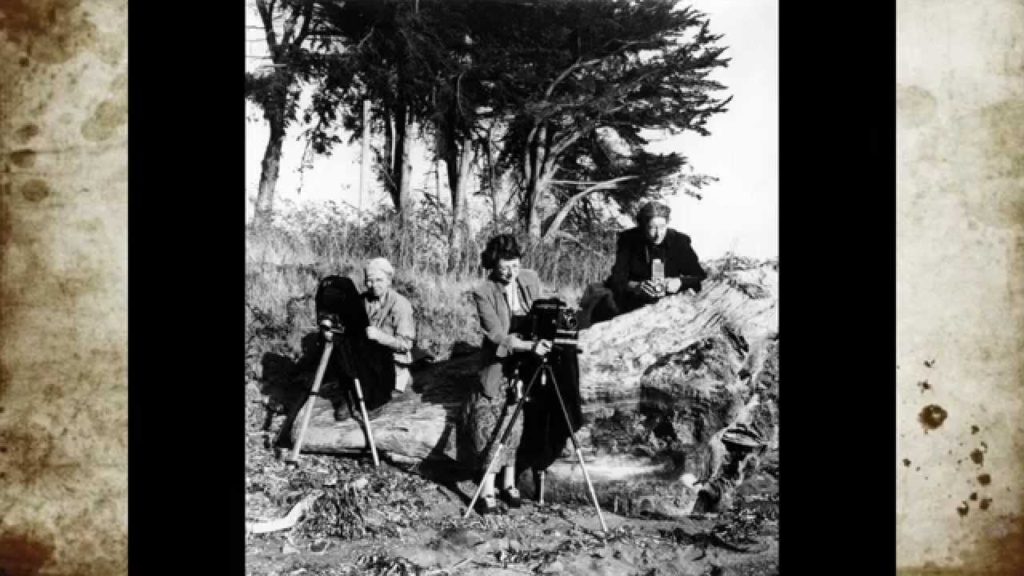
Ansel Adams was an American landscape photographer and environmentalist known for his black-and-white images of the American West. He helped found Group f/64, an association of photographers advocating “pure” photography which favored sharp focus and the use of the full tonal range of a photograph…even creating a Zonal System to ensure that all tonal values are represented in the images. Ansel Adams was an advocate of environmental protection, national parks and creating an enduring legacy of responses to the power of nature and sublime conditions…Other members in Group f/64 included Edward Weston, but also Imogen Cunningham among other female photographers who have often been overlooked in the history of photography.

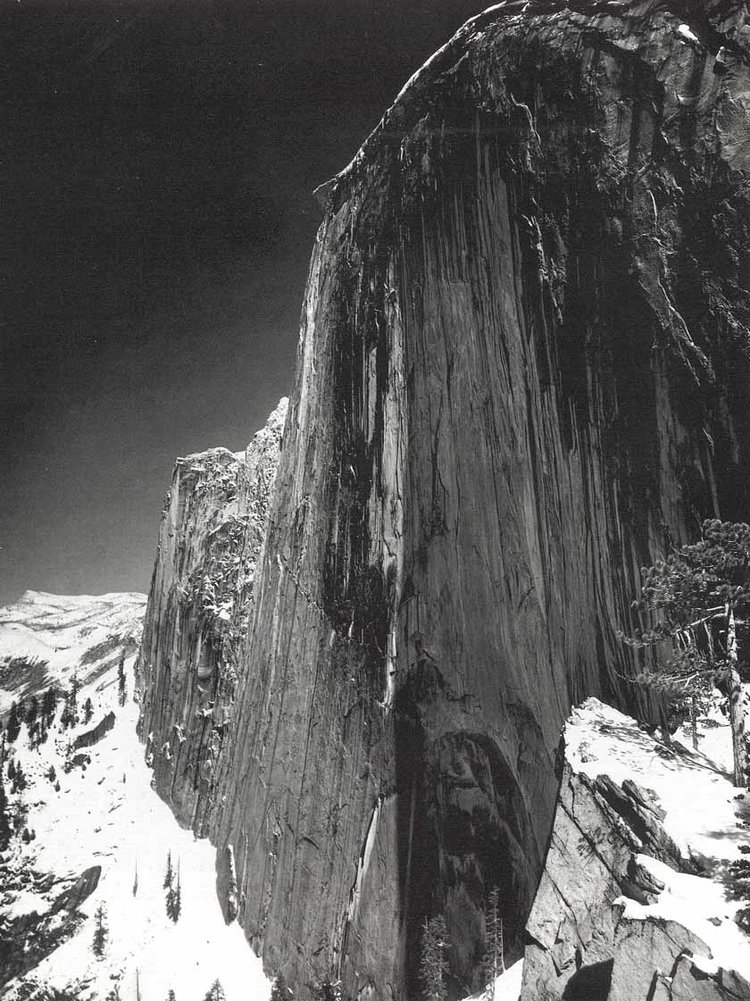
Ansel Adams, Monolith, the face of Half Dome, 1927
See the source image
Pixelation of Halfdome image in Photoshop
Edward Weston: Dunes, OceanoDunes, Oceano, photograph by Edward Weston, 1936.

Key Features

Ansel Adams’s photographic style is characterized by its sharp focus, exceptional detail, and dramatic use of light and shadow. He sought to capture the grandeur and beauty of the natural world, emphasizing the importance of preserving these pristine landscapes.

One of the key compositional techniques that Adams employed in many of his images was to place the horizon about two-thirds of the way up the frame. This would mean the composition was biased in favour of the landscape rather than the sky and would help to communicate the epic scale of the scene

IMAGE ANALYSIS:

IMAGE ANALYSIS: For your analysis of Adams’ work and practice, try and find the story behind the image – as an example, see Monolith, the face of Half Dome, 1927

EXTENSION > COMPARE & CONTRAST: Compare and contrast the work of Ansel Adams and Edward Weston using Photo Literacy Matrix. Find 3 quotes that you can use in your analysis, that either supports/ disapprove your own view. Make sure that you comment on the quote used.

For example, you can use quotes:
1. a quote from Adams’ on Weston’s influence
2. a quote from Adams’ on his own practice, eg. technique, pre-visualisation (zone system), subject (nature), inspiration etc.
3. a quote from Weston on Adams’ images.
4. a quote from someone else, for example a critic, historian that comments either on Adams’ or Weston’s work.

I can’t tell you how swell it was to return to the freshness, the simplicity and natural strength of your photography … I am convinced that the only real security lies with a certain communion with the things of the natural world

— A letter from Edward to Ansel in 1936

Practical / Creative Responses

Create a mind-map + mood-board of potential locations around Jersey that you could record as a response to Ansel Adams….look for extremes (either calm or wild, derelict, desolate, abandoned or stormy, battered and at the mercy of nature)

HOMEWORK Monday 24th Feb – Monday 3rd March deadline

Monday 24th Feb – Monday 3rd March deadline

  • Take 150-200 photos of landscapes in response to Ansel Adams and the f/64 groups work. 
  • There are plenty of areas to explore locally…woods, streams, fields, beaches, coastal paths, sand dunes etc
  • Add your edited selective contact sheets / select your best 6-10 images / include edits and screen shots to show this process on the blog
  • Ensure you include both monochrome and colour examples
  • You could use exposure bracketing to create HDR images inspired by Ansel Adams.

AIM to photograph the coastline, the sea, the fields, the valleys, the woods, the sand dunes, Cliffs etc.
USE the wild and dynamic weather and elements to help create a sense of atmosphere, and evoke an emotional response within your photo assignment.
PHOTOGRAPH before dark, at sunset or during sunrise…and include rain, fog, mist, ice, wind etc in your work
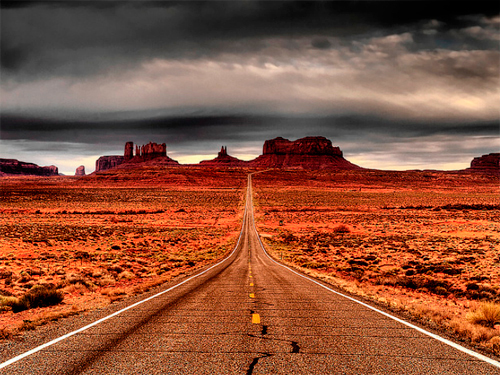
LOOK for LEADING LINES such as pathways, roads etc to help dissect your images and provide a sense of journey / discovery to them.

Ensure that you include the following key terms in your blog posts…

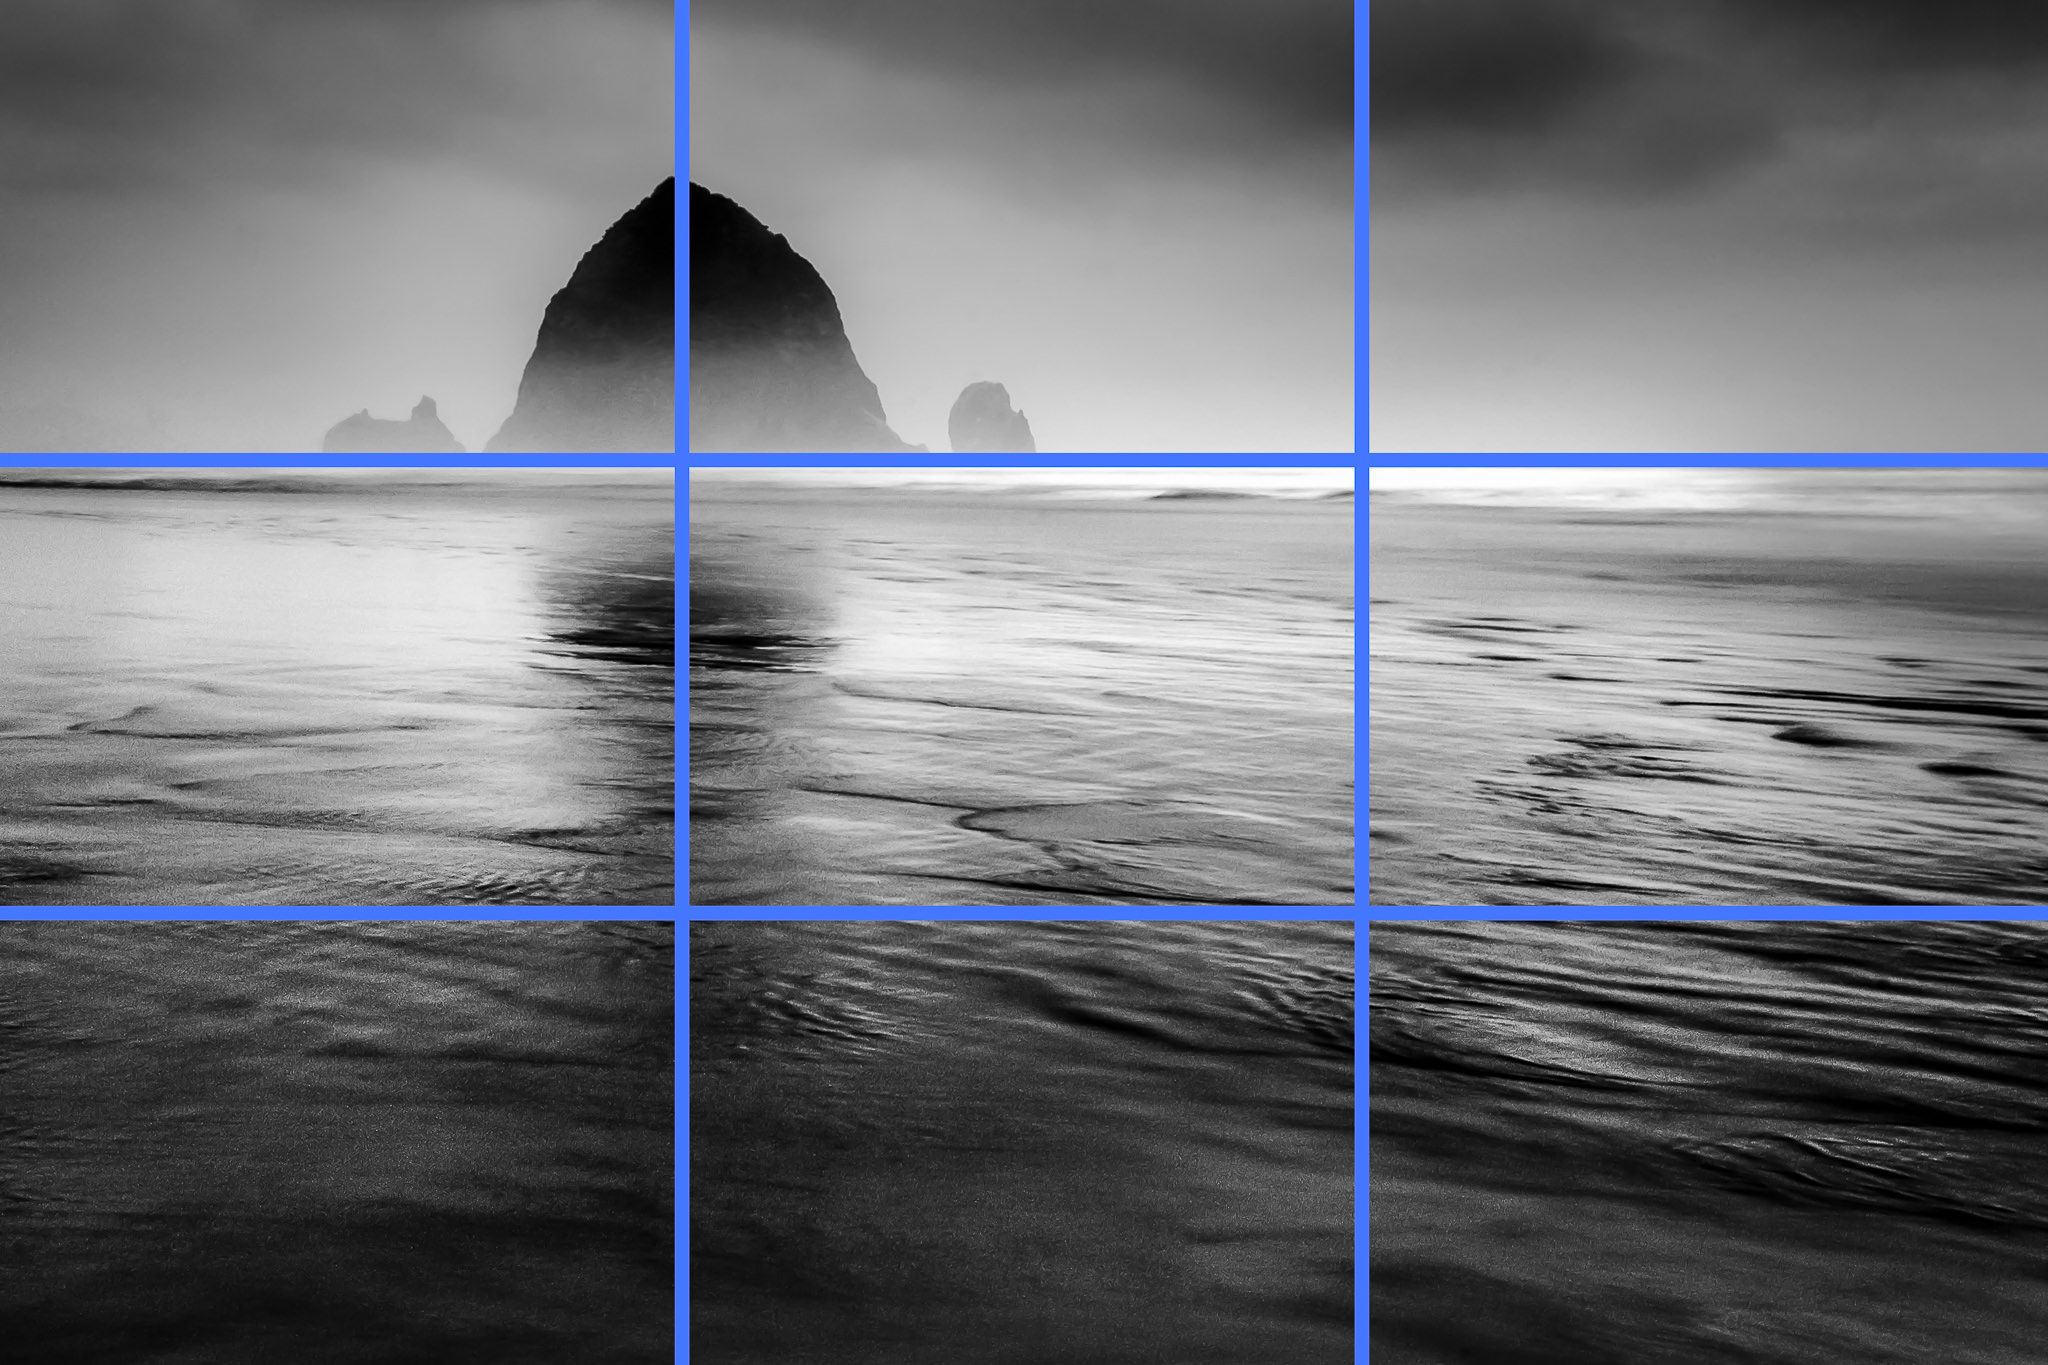
  • Composition (rule of thirds, balance, symmetry)
  • Perspective (linear and atmospheric, vanishing points)
  • Depth (refer to aperture settings and focus points, foreground, mid-ground and back-ground)
  • Scale (refer to proportion, but also detail influenced by medium / large format cameras)
  • Light ( intensity, temperature, direction)
  • Colour (colour harmonies / warm / cold colours and their effects)
  • Shadow (strength, lack of…)
  • Texture and surface quality
  • Tonal values ( contrast created by highlights, low-lights and mid-tones)

REMEMBER you MUST use PHOTO-LITERACY (TECHNICAL / VISUAL / CONTEXTUAL / CONCEPTUAL) to analyse effectively.

This image has an empty alt attribute; its file name is landscape-photography_using-lines-effectively-while-shooting-landscapes.jpg
Leading Lines
Image result for rule of thirds landscape photography
Composition : The Rule of Thirds Grid
Image result for fibonacci sequence landscape photography
Composition : Fibonacci Curve / Golden ratio

Definitions

development: a chemical process, carried out in the dark, which makes the image exposed on the film visible and permanent in negative form.

exposure: the amount of light that falls on the film (which will become the photographic negative). This is regulated by controlling the size of the aperture through which light enters the camera and/or the length of the exposure.

gray card: a standardized card, used for measuring light, which corresponds to Zone V, or mid-tone gray.

hand-held light meter: a light-measuring device that is separate from the camera. A spot meter, which covers a one degree angle, is ideal for measuring target zones.

previsualization: a mental exercise in which the photographer imagines the subject in terms of the black, white, and grays desired in the final photographic print.

spot meter: a type of hand-held meter that allows the photographer to easily measure light falling on very small areas within the subject matter.

zones: a specific set of tonal values consisting of pure black, the base white of the black-and-white photographic paper, and eight or nine shades of gray in between [see Zone Scale Card]. When the Zone System is used, the darkest areas of a photographic image are referred to as low values (Zones I — III), the gray areas are called middle values (Zones IV — VI), and the light areas are high values (Zones VII — IX). The zones are always referred to by roman numerals.

EXPOSURE BRACKETING

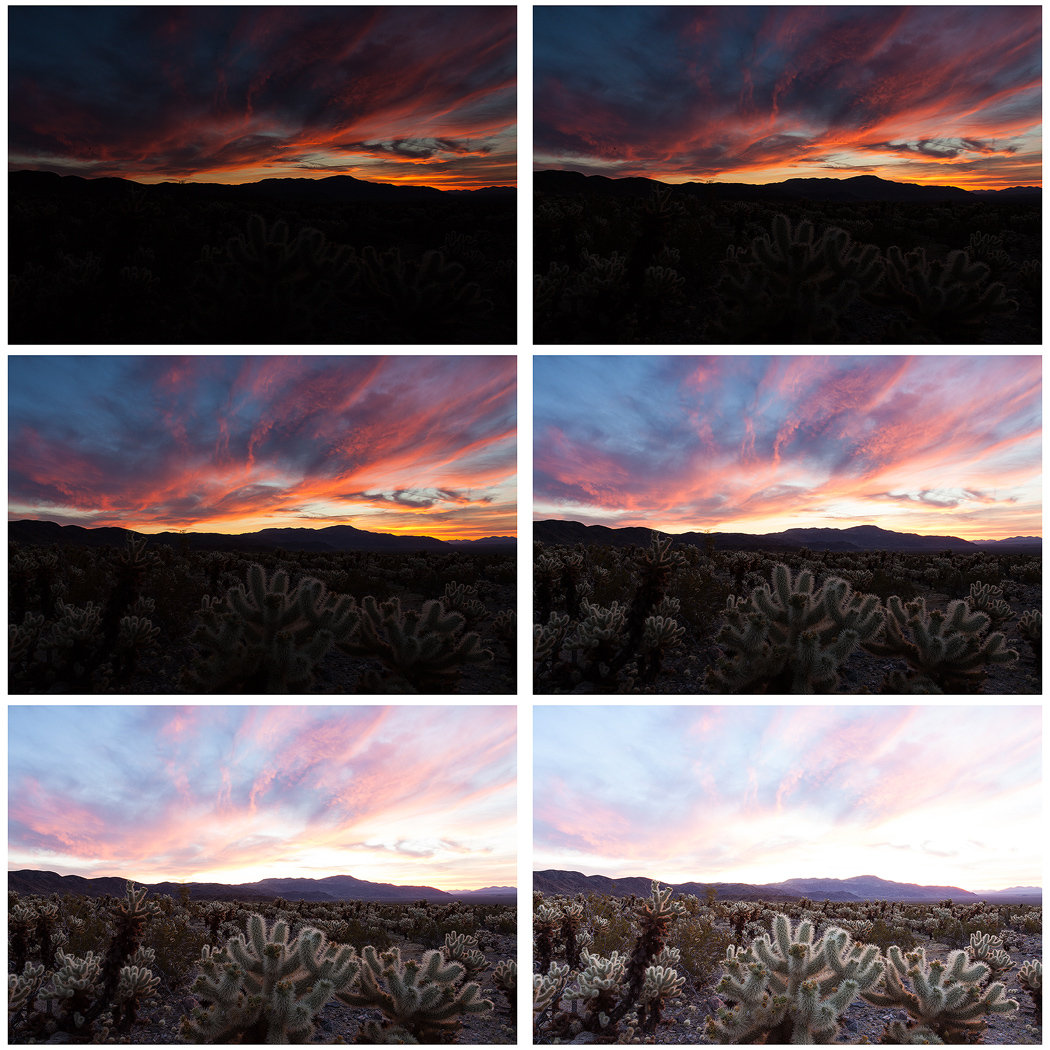
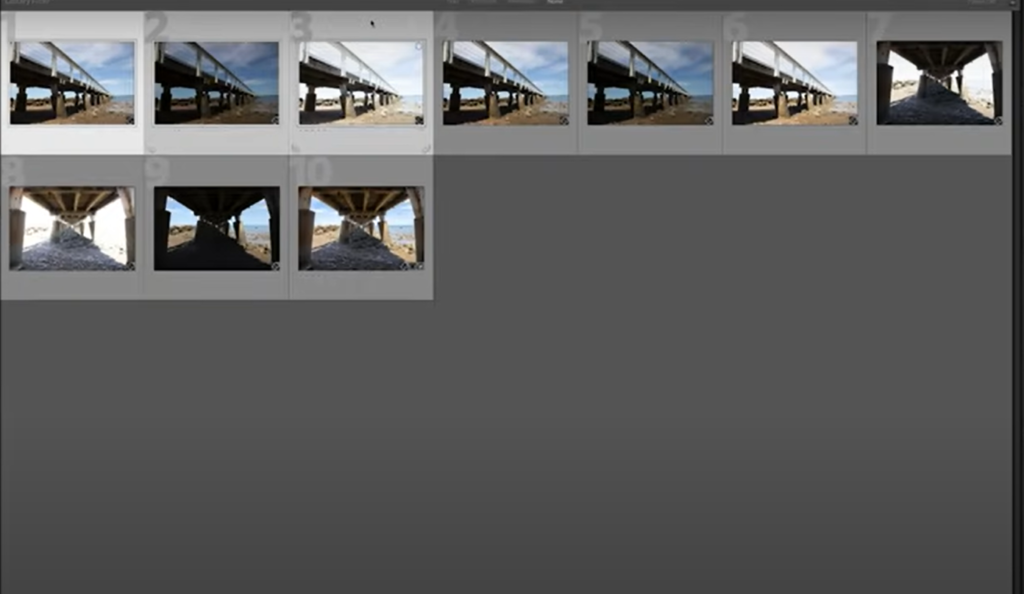
Exposure bracketing means that you take two more pictures: one slightly under-exposed (usually by dialing in a negative exposure compensation, say -1/3EV), and the second one slightly over-exposed (usually by dialing in a positive exposure compensation, say +1/3EV), again according to your camera’s light meter.

TASK : try a few variation of exposure bracketing to create the exposures that you want…you may already have pre-sets on your phone or camera to help you do this, but experimenting manually will help your understanding!

AEB:
Many digital cameras include an Auto Exposure Bracketing (AEB) option. When AEB is selected, the camera automatically takes three or more shots, each at a different exposure. Auto Exposure Bracketing is very useful for capturing high contrast scenes for HDR (HDR stands for High Dynamic Range and refers to a technique that expresses details in content in both very bright and very dark scenes.).

…by taking the same photograph with a range of different exposure settings

bracketed-exposures

How to use Exposure Bracketing on the Camera:

There are two ways to use Exposure Bracketing on your camera: 1. With exposure compensations. 2. With the AEB Setting (Automatic Exposure Bracketing)

Exposure Compensation:
– This is how you manually set the exposure for each photo…
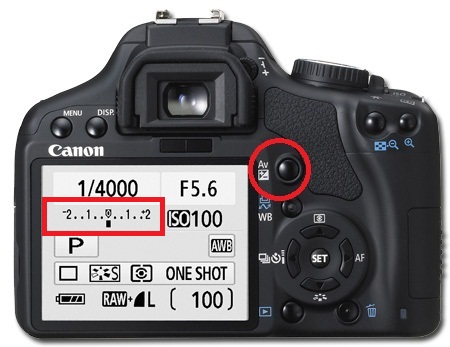
– You can use Exposure Compensation to quickly adjust how light or how dark your exposure will be using these controls…
– Start with 1 stop variations. So, take a shot at -1 on the exposure compensation dial, then turn the dial so it reads -2 and then -3. Repeat, this time overexposing at +1, +2, and +3. You may not use all these images in the final HDR but it’s good to have the data just in case

canon

AEB:

Or set the amount of “bracketing” like below…

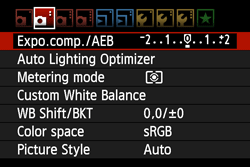
(If you are using the larger DSLR cameras from school, follow the instructions below… if you are using the smaller mirrorless cameras from school, follow this link for instructions)

  • In the menu, select the second tab and go to ‘Expo. Comp. /AEB
g0101331
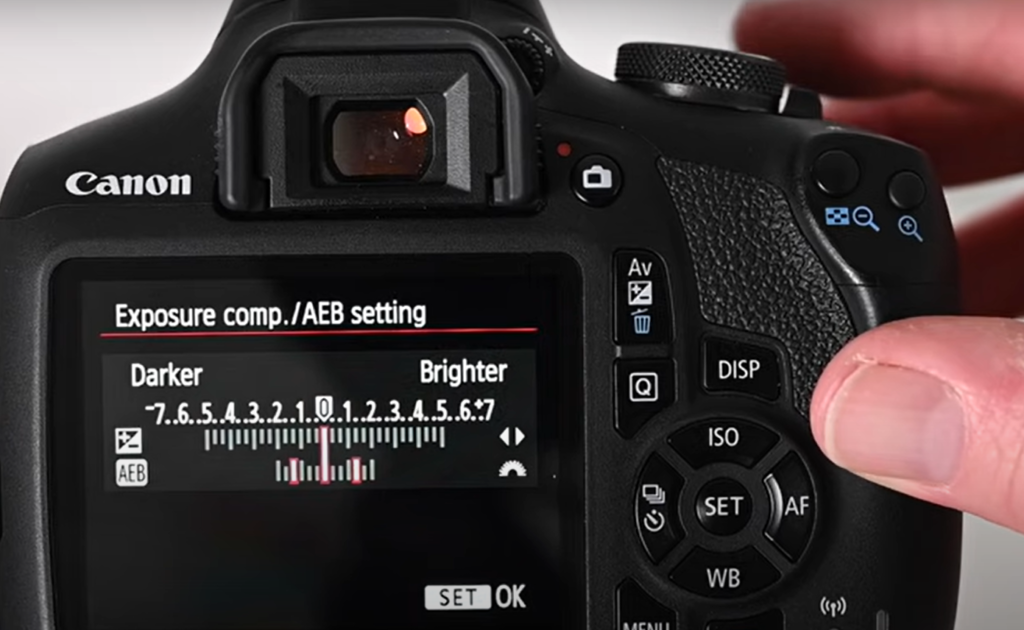
  • Use the dial on the top of the camera to set the range of exposure you want to capture with your 2nd and 3rd photo
  • After you have set the exposure range, you will see two extra marks on the exposure metre…
  • Now take 3 photos and your camera will automatically change the exposure for each one.
  • TIP: You can also set the camera to continuous shooting, to take 3 photos in close succession – all you need to do is hold the shutter button down.

HDR photography is a technique where multiple bracketed images are blended together to create a single beautifully exposed photograph with a full dynamic range of tones from the very dark to the very brightest.

Your camera can only capture a limited range of lights and darks (i.e., it has a limited dynamic range). If you point your camera at a dark mountain in front of a bright sunset, no matter how much you tweak the image exposure, your camera will generally fail to capture detail in the mountain and the sky; you’ll either capture an image with a beautiful sky but a dark, less detailed mountain, or you’ll capture an image with a detailed mountain but a bright, blown-out sky. High dynamic range photography (HDR) aims to address this issue. Instead of relying on the camera’s limited dynamic range capabilities, you take multiple photos that cover the entire tonal range of the scene.

A set of three bracketed shots: -1 EV (left), 0 EV (middle), +1 EV (right). EV = exposure value

Ansel Adams zone system was in essence a pre-cursor of HDR with the outcome of producing an image with a full range of tones showing details in both the bright areas and dark shadows.

How to merge your images to create your HDR images in Photoshop:

1. Open your photos in Lightroom Classic

2. highlight the 3 images you want to merge

3. Go to the top and click Photo>Photo Merge>HDR

4. If you’re happy with the preview, click merge

This will create a new HDR image and add it to your library.

Further Creative Responses

During the month of March you will carry out further photo-assignments designed to encourage more creative approaches…

  1. Panoramic Landscapes
  2. Joiner Landscapes

Panoramic Landscapes

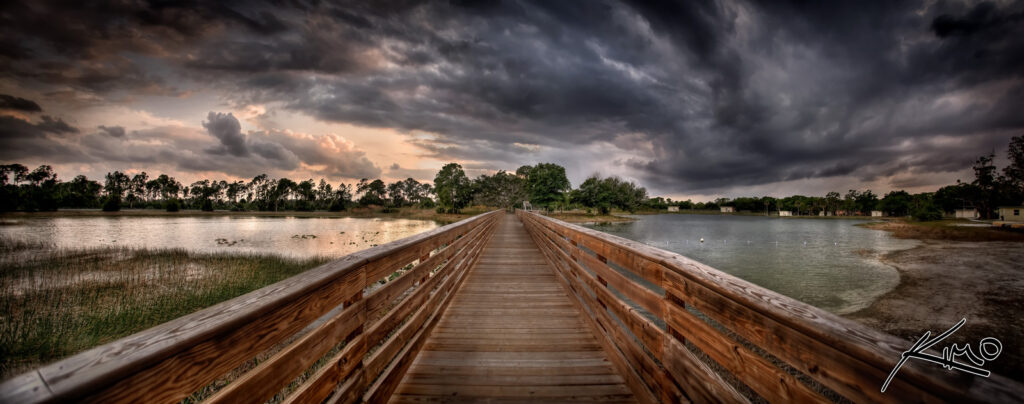
Panoramic landscapes are wide, expansive views that capture a large area of scenery in one image, often showcasing the beauty of nature.

Considerations When taking your photos:

Level surface, arc-like open landscape. Try to visualise how your landscape will look divided into slices (5-10 slices). Move your camera along a steady plane, use a tripod if possible.

How to create your own Panoramic photos in Lightroom

  1. Select the source images in Lightroom Classic.
    • For standard exposure photos, select Photo > Photo Merge > Panorama 
    • For exposure bracketed photos, select Photo > Photo Merge > HDR Panorama to merge them into an HDR panorama.
  2. In the Panorama Merge Preview / HDR Panorama Merge Preview dialog box, choose a layout projection:
    Spherical: Aligns and transforms the images as if they were mapped to the inside of a sphere. This projection mode is great for really wide or multirow panoramas / HDR panorama.
    Perspective: Projects the panorama / HDR panorama as if it were mapped to a flat surface. Since this mode keeps straight lines straight, it is great for architectural photography. Really wide panoramas may not work well with this mode due to excessive distortion near the edges of the resulting panorama.
    Cylindrical: Projects the panorama / HDR panorama as if it were mapped to the inside of a cylinder. This projection mode works really well for wide panoramas, but it also keeps vertical lines straight.All of these projection modes work equally well for both horizontal and vertical panoramas / HDR panoramas.Lightroom Classic CC Cylindrical layout projection for wide panoramas
    Cylindrical layout projection for wide panoramas/ HDR panoramas
  3. You can use Boundary Warp slider setting (0-100) to warp panoramas / HDR panoramas to fill the canvas. Use this setting to preserve image content near the boundary of the merged image, that may otherwise be lost due to cropping. The slider controls how much Boundary Warp to apply. Higher slider value causes the boundary of the panorama/ HDR panorama to fit more closely to the surrounding rectangular frame.
  4. Select Fill Edges to automatically fill the uneven edges of the merged image.
  5. While previewing the panorama / HDR panorama, select Auto Crop to remove undesired areas of transparency around the merged image. 

    Lightroom Classic CC Auto Crop to remove areas of transparency
    Auto Crop to remove areas of transparency, shown in white in this illustration
  6. To  group  the source images and the panorama / HDR panorama image into a stack (after the images are merged), select the Create Stack option. The merged panorama / HDR panorama image is displayed at the top of the stack.
  7. Once you’ve finished making your choices, click Merge. Lightroom Classic creates the panorama / HDR panorama and places it in your catalogue.

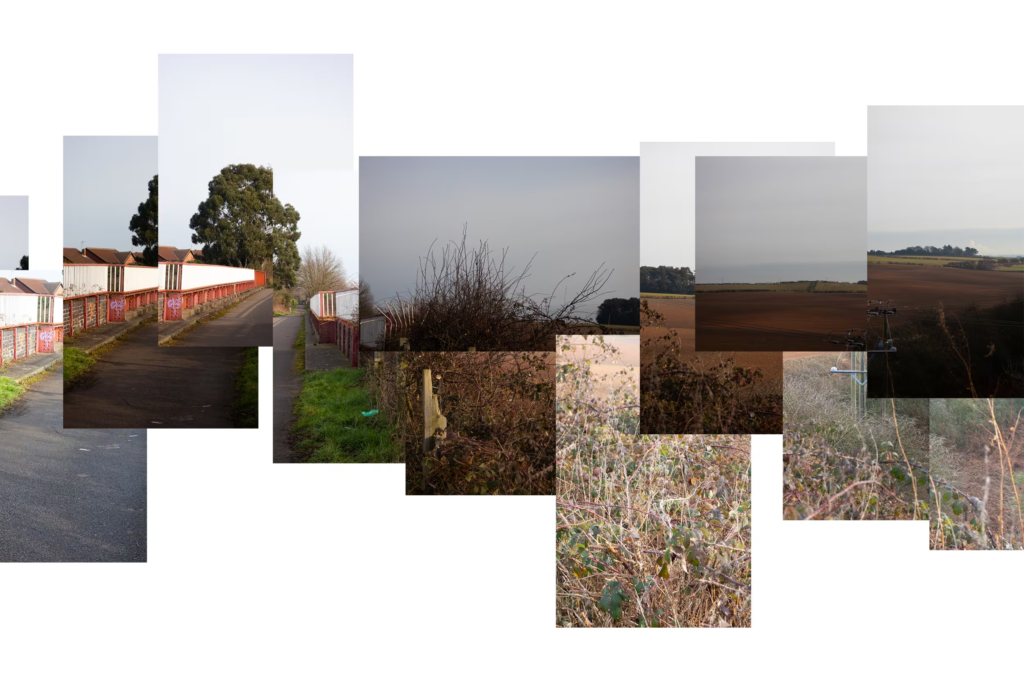
David Hockney Joiner Photo-collage

Pearblossom Highway is a piece of art created by the British artist David Hockney. It depicts a view of an American Highway. It is a collage compiled from over 700 separate photographs. The artist himself describes his work as a drawing as opposed to a photographic piece.

‘Pearblossom Highway’ shows a crossroads in a very wide open space, which you only get a sense of in the western United States. . . . [The] picture was not just about a crossroads, but about us driving around. I’d had three days of driving and being the passenger. The driver and the passenger see the road in different ways. When you drive you read all the road signs, but when you’re the passenger, you don’t, you can decide to look where you want. And the picture dealt with that: on the right-hand side of the road it’s as if you’re the driver, reading traffic signs to tell you what to do and so on, and on the left-hand side it’s as if you’re a passenger going along the road more slowly, looking all around. So the picture is about driving without the car being in it.

Thus David Hockney described the circumstances leading to the creation of this photocollage of the scenic Pearblossom Highway north of Los Angeles. His detailed collage reveals the more mundane observations of a road trip. The littered cans and bottles and the meandering line where the pavement ends and the sand begins point to the interruption of the desert landscape by the roads cutting through it and the imprint of careless travellers.

Create a joiner collage in Photoshop

Considerations

Choose a suitable landscape. Visualise how you can photograph the view in “chunks”. Start on one side and work your way around the view carefully photographing it in a grid-like manner. Do not worry if your images overlap—often this is better anyway…then merge your images in photoshop or print them out, arrange and glue together

Always follow the 10 Step Process and create multiple blog posts for each unit to ensure you tackle all Assessment Objectives thoroughly :

  1. Mood-board, definition and introduction (AO1)
  2. Mind-map of ideas (AO1)
  3. Artist References / Case Studies (must include image analysis) (AO1)
  4. Photo-shoot Action Plan (AO3)
  5. Multiple Photoshoots + contact sheets (AO3)
  6. Image Selection, sub selection, review and refine ideas (AO2)
  7. Image Editing/ manipulation / experimentation (AO2)
  8. Presentation of final outcomes (AO4)
  9. Compare and contrast your work to your artist reference(AO1)
  10. Evaluation and Critique (AO1+AO4)

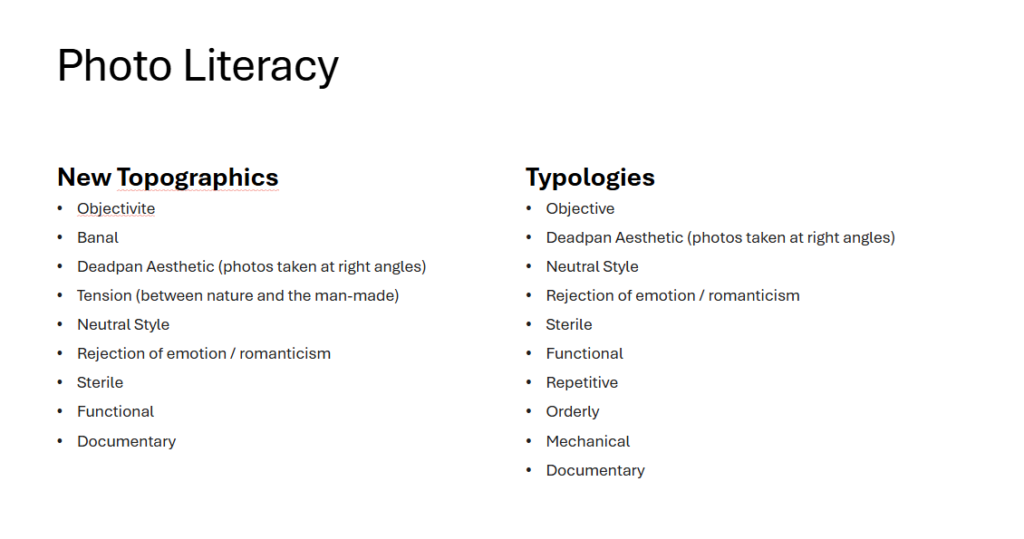
Photo Literacy Matrix

The New Topographics // Typologies +++ JAC 2025

Mon 24th March – April Fri 4th April 2025

Blog Posts to Make:

  1. The New Topographics Overview
  2. The New Topographics Artist Reference and Image Analysis
  3. The New Topographics Photoshoot and Outcome (Havre Des Pas Photo Walk)
  4. Typologies overview (more information if you scroll down the blog:
  5. Typologies Artist Reference: Complete a case study for Bernd and Hilla Becher (Research who they are and analyse their typology photos).
  6. After Easter: Upload your Typologies Photoshoot – edits and final images
  7. After Easter: Upload your second New Topographics Photoshoot – edits and final photos
  8. After Easter (optional): Upload any other photoshoots you completed as part of your Easter Homework

URBAN AND INDUSTRIAL LANDSCAPES

Over the next two weeks you will be looking at producing blog posts and responding photographically to:

  • New Topographics
  • Urban Landscapes
  • Industrial Landscapes
  • Camera Skills – vantage points/ Typologies (dead-pan aesthetic)

The New Topographics

The New Topographics focused on man-altered landscapes

 The New Topographics

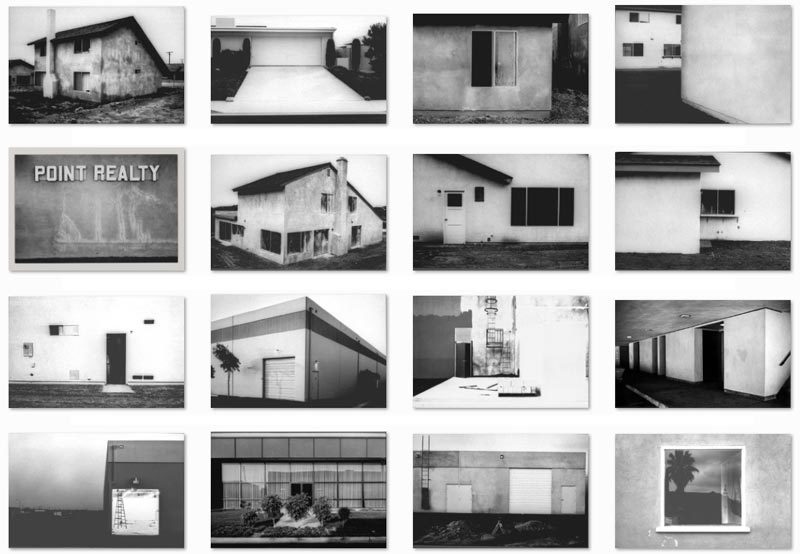
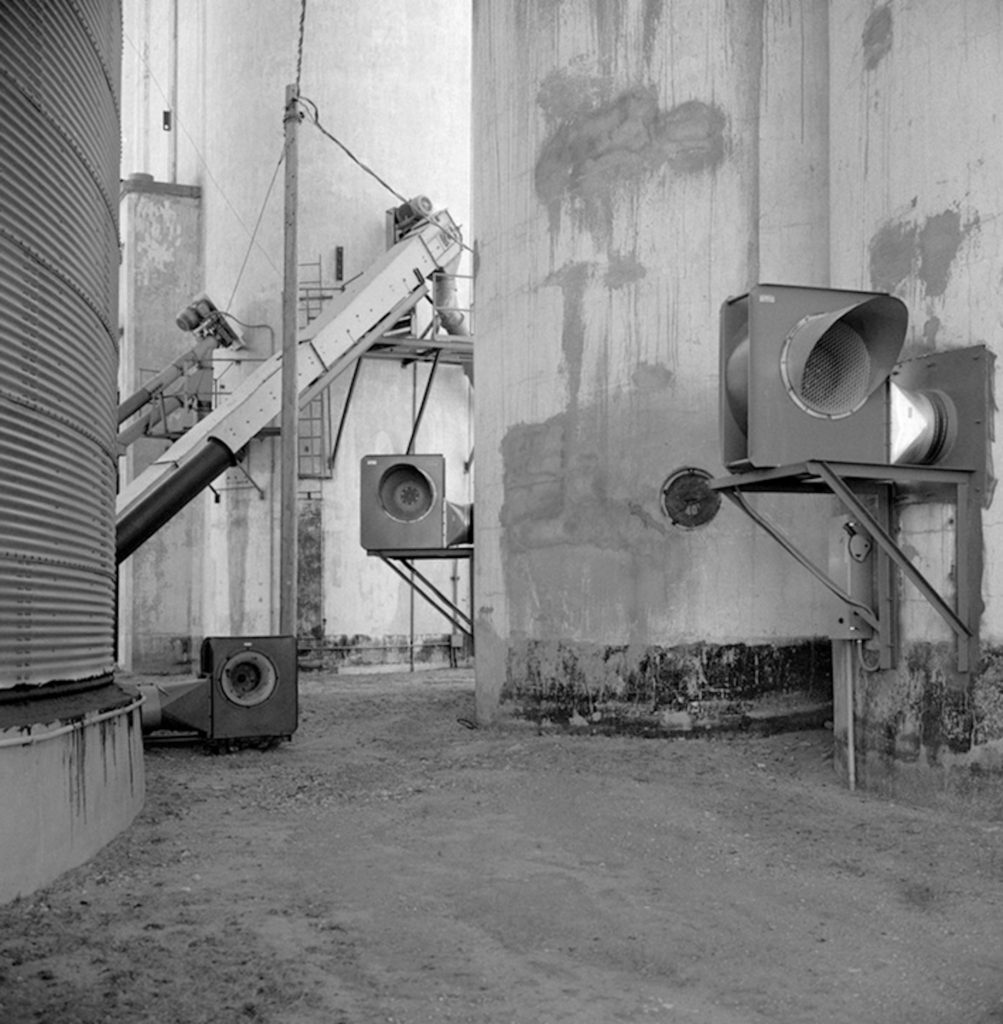
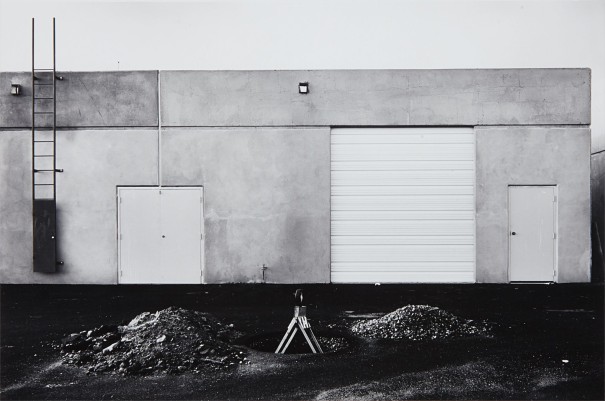
New Topographics was a term coined by William Jenkins in 1975 to describe a group of American photographers (such as Robert Adams and Lewis Baltz) whose pictures had a similar banal aesthetic, in that they were formal, mostly black and white prints of the urban landscape…

The beginning of the death of “The American Dream”

This image has an empty alt attribute; its file name is baltz-00-featured-800x554.jpg
LEWIS BALTZ
Many of the photographers associated with The New Topographics including Robert Adams, Lewis Baltz, Nicholas Nixon and Bernd and Hiller Becher, were inspired by the man-made…selecting subject matter that was matter-of-fact.

New Topographics was partly inspired by the likes of Albert Renger Patszch and the notion of The New Objectivity and was a rejection of pictorialist or even romanticised landscapes

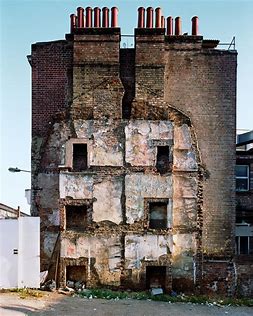
Parking lots, suburban housing and warehouses were all depicted with a beautiful stark austerity, almost in the way early photographers documented the natural landscape. An exhibition at the International Museum of Photography in Rochester, New York featuring these photographers also revealed the growing unease about how the natural landscape was being eroded by industrial development.

What was the New Topographics a reaction to?

The stark, beautifully printed images of the mundane but oddly fascinating topography was both a reflection of the increasingly suburbanised world around them, and a reaction to the tyranny of idealised landscape photography that elevated the natural and the elemental

Historical Context : Post-war America struggled with

  • Inflation and labor unrest. The country’s main economic concern in the immediate post-war years was inflation. …
  • The baby boom and suburbia. Making up for lost time, millions of returning veterans soon married and started families…
  • Isolation and splitting of the family unit, pharmaceuticals and mental health problems
  • Vast distances, road networks and mobility
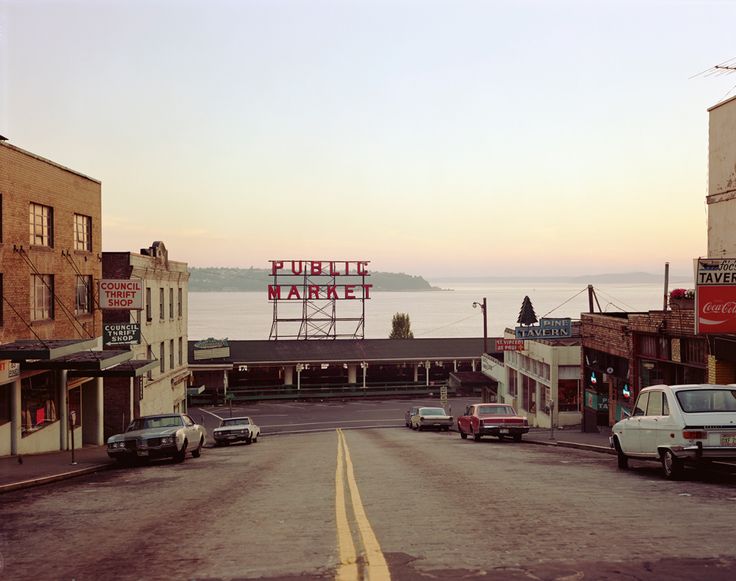
STEPHEN SHORE

The New Topographics were to have a decisive influence on later photographers including those artists who became known as the Düsseldorf School of Photography.

Research a selection of the photographers associated with New Topographics and respond with…

Links to help with researching of Topographic Photographers:

Respond with:

  • similar imagery from your own photo-shoots / image library
  • analytical comparisons and contrasts
  • a presentation of final images

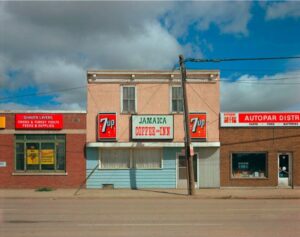
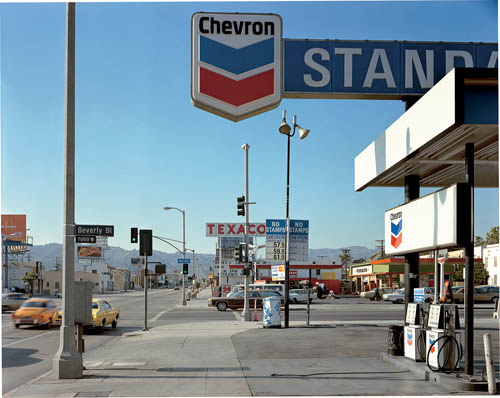
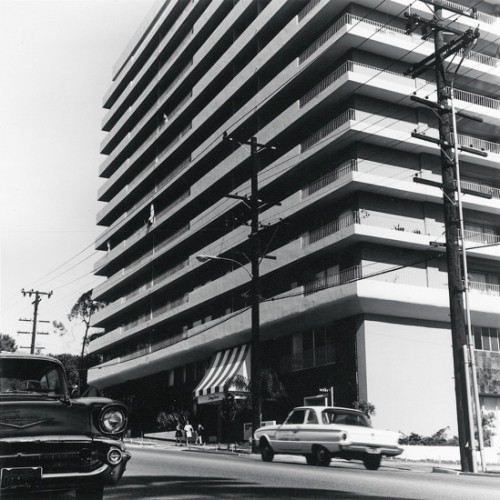
CASE STUDY: Stephen Shore, Beverly Boulevard and La Brea Avenue, Los Angeles, California, June 21, 1975, chromogenic colour print

Analysis and discussion… starting points and key features of The New Topographics

  • Foreground vs background | Dominant features
  • Composition | low horizon line | Square format
  • Perspective and detail / cluttering
  • Wide depth of field | Large Format Camera
  • Colour | impact and relevance
  • Nationalism vs mobility vs isolation
  • Social commentary | The American Dream ?
  • An appreciation of the formal elements : line, shape, form, texture, pattern, tone etc
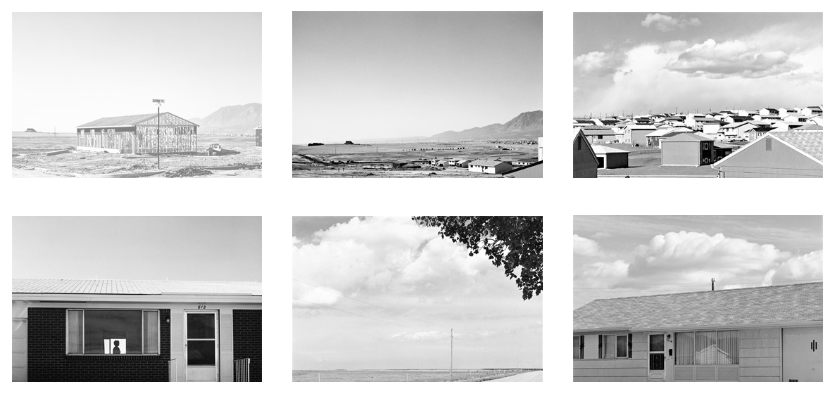
Robert Adams. Colorado Springs, Colorado, 1968. Gelatin silver print; 11 x 14 inches. © Robert Adams. Courtesy Fraenkel Gallery, San Francisco and Matthew Marks Gallery, New York.

Explore Robert Adams seminal photobook: The New West here

Critic Sean O’Hagan, writing in The Guardian, said “his subject has been the American west: its vastness, its sparse beauty and its ecological fragility…What he has photographed constantly – in varying shades of grey – is what has been lost and what remains” and that “his work’s other great subtext” is silence…

Bernd and Hilla Becher

You could also look at these photographers who has been influenced by New Topographics…see below for images/ examples under RESOURCES…

Remember to use this

Picture

Follow this 10 Step Process and create multiple blog posts for each unit to ensure you tackle all Assessment Objectives thoroughly :

  1. Mood-board, definition and introduction (AO1)
  2. Mind-map of ideas (AO1)
  3. Artist References / Case Studies (must include image analysis) (AO1)
  4. Photo-shoot Action Plan (AO3)
  5. Multiple Photoshoots + contact sheets (AO3)
  6. Image Selection, sub selection (AO2)
  7. Image Editing/ manipulation / experimentation (AO2)
  8. Presentation of final outcomes (AO4)
  9. Compare and contrast your work to your artist reference(AO1)
  10. Evaluation and Critique (AO1+AO4)
Image result for urban landscapes gurtsky
  1. Research and explore The New Topographics and how photographers have responded to man’s impact on the land, and how they found a sense of beauty in the banal ugliness of functional land use… 
  2. Create a blog post that defines and explains The New Topographics and the key features and artists of the movement.
  3. ANSWER : What was the new topographics a reaction to?
  1. case study on your chosen NEW TOPOGRAPHIC landscape photographer. Choose from…ROBERT ADAMS, STEPHEN SHORE, JOE DEAL, FRANK GOLKHE, NICHOLAS NIXON, LEWIS BALTZ, THE BECHERS, HENRY WESSEL JR, JOHN SCHOTT ETC to write up a case study that will inspire your own photography.
  2. Analyse one image of this photographers work. Use the vocabulary support sheet to help. https://hautlieucreative.co.uk/photo22al/2020/08/20/photo-vocab-support/

Photo Walk – urban

Once you have completed your photo walk from Havre Des Pas to La Collette you should aim to make comparisons with photographers and their work…as well as the notion of psychogeography to help understand your surroundings

Your image selection and editing may be guided by this work…and you must show that you can make creative connections.

For Example Albert Renger Patszch and The New Objectivity

https://www.atlasofplaces.com/photography/new-objectivity/

or Keld Helmer Petersen

https://www.keldhelmerpetersen.com/1950-1959

  1. Produce a list of places in Jersey you could go and shoot urban landscapes. Create a blog post of a visual mood board and photo shoot plan.

    Scrapyards, building sites, cranes, restoration yards, derelict ruins, car parks, underpass, harbours and dockyards, industrial centres, retail park, stadiums, floodlight arenas, staircases, road systems, circuit boards, pipework, telephone poles, towers, pylons, shop displays, escalators, bars, libraries, theatres and cinemas, gardens, parks, playgrounds, swimming pools, etc.
  2. Possible titles to inspire you and choose from… Dereliction / Isolation / Lonely Places / Open Spaces / Close ups / Freedom / Juxtaposition / Old and new / Erosion / Altered Landscapes / Utopia / Dystopia / Wastelands / Barren / Skyscapes / Urban Decay / Former Glories / Habitats / Social Hierarchies / Entrances and Exits / Storage / Car Parks / Looking out and Looking in / Territory / Domain / Concealed and Revealed

Explore these options…

  • St Helier
  • Residential areas
  • Housing estates
  • High
  • Retail Parks and shopping areas
  • Industrial Areas
  • Car Parks (underground and multi-storey too)
  • Leisure Centres
  • Building sites
  • Demolition sites
  • Built up areas
  • Underpass / overpass
  • The Waterfont
  • Harbours
  • Airport
  • Finance District (IFC buildings)

What do I photograph?

ROADS / BUILDINGS / STREETS / ST HELIER / FLATS / CAR PARKS / OFFICE BLOCKS / PLAYING FIELDS / SCHOOL / SHOPS / SUPERMARKETS / BUILDING SITES / TRAFFIC / HOTELS

Where to shoot ?

ORDANCE YARD / ST AUBINS HIGH STREET / COBBLED BACK STREETS / OLD ST HELIER / NEW ST HELIER / FLATS / ESPLANADE / TOWN / CAR PARKS / FORT REGENT / FINANCE DISTRICT / UNDERPASS / TUNNEL / NIGHT TIME / PIER ROAD CAR PARK / HUE COURT / LE MARAIS FLATS / PLAYING FIELDS / SCHOOLS / ANN STREET BREWERY BUILDING SITE / SPRINGFIELD STADIUM / WATERFRONT / SH HARBOUR / LA COLLETTE

WHERE IN JERSEY ??

  1. First photoshoot inspired and influenced by New Topographics. (+100 photographs). Remember to include examples of work by photographers associated with that exhibition/ movement that have influenced your work.
  2. Select, consider and decide on best images (show contact sheets)
  3. Develop ideas through digital manipulation (ie: cropping, contrast, colour balance etc.)
  4. Realise a final outcome.
  1. Second photoshoot inspired and influenced by your case study of your chosen urban landscape photographer. see list below URBAN PHOTOGRAPHERS (+100 photographs). Can be any urban landscape photographer, but remember to include a brief case study and examples of their work that have influenced your work.

    You could experiment with different vantage points eg: worms eye view, or birds eye view OR create a study on TYPOLOGY.

  2. Select, consider and decide on best images (show contact sheets)
  3. Develop ideas through digital manipulation (ie: cropping, contrast, colour balance etc.)
  4. Realise a final outcome.

Technical: Shoot using different vantage points.

Why Is Vantage Point Important?

Your vantage point affects the angles, composition, and narrative of a photograph. It is an integral part of the decision-making process when taking a photograph.

We often spend more time considering camera settings and lighting, than exploring viewpoints. A picture taken from a unique vantage point makes us think about the subject in a different way. Perspectives from high or low angles add emotion to the photograph.

Eye-level vantage points provide a feeling of directness and honesty. Changing your vantage point can include or exclude part of the photo’s story.

As you look through your viewfinder, ask yourself some questions:

  • How could I add interest to the subject?
  • How can I show the viewer a new perspective on this subject?
  • Do I always stand in this position when taking photos?
  • What else can I include in the frame to tell the story? How can I make this happen?

TRY LOOKING UP, LOOKING DOWN, AT AN ANGLE, FROM A DISTANCE, A WORMS EYE VIEW and BIRDS EYE VIEW ETC.

WORMS EYE VIEW

  1. Select one of your photographs to compare and contrast against one photograph of your chosen photographer.
  2. Create a venn diagram to illustrate the similarities and differences between the images.
  3. Using this information and prompts from the Photo Vocab Sheet write an in depth and thorough analysis. https://hautlieucreative.co.uk/photo22al/2020/08/20/photo-vocab-support/

Always ensure you have enough evidence of…

  1. moodboards (use influential images)
  2. mindmap of ideas and links
  3. case studies (artist references-show your knowledge and understanding)
  4. photo-shoot action plans / specifications (what, why, how, who, when , where)
  5. photo-shoots + contact sheets (annotated)
  6. appropriate image selection and editing techniques
  7. presentation of final ideas and personal responses
  8. analysis and evaluation of process
  9. compare and contrast to a key photographer
  10. critique / review / reflection of your outcomes

MORE RESOURCES / IDEAS / INSPIRATIONS

TYPOLOGIES and the landscape

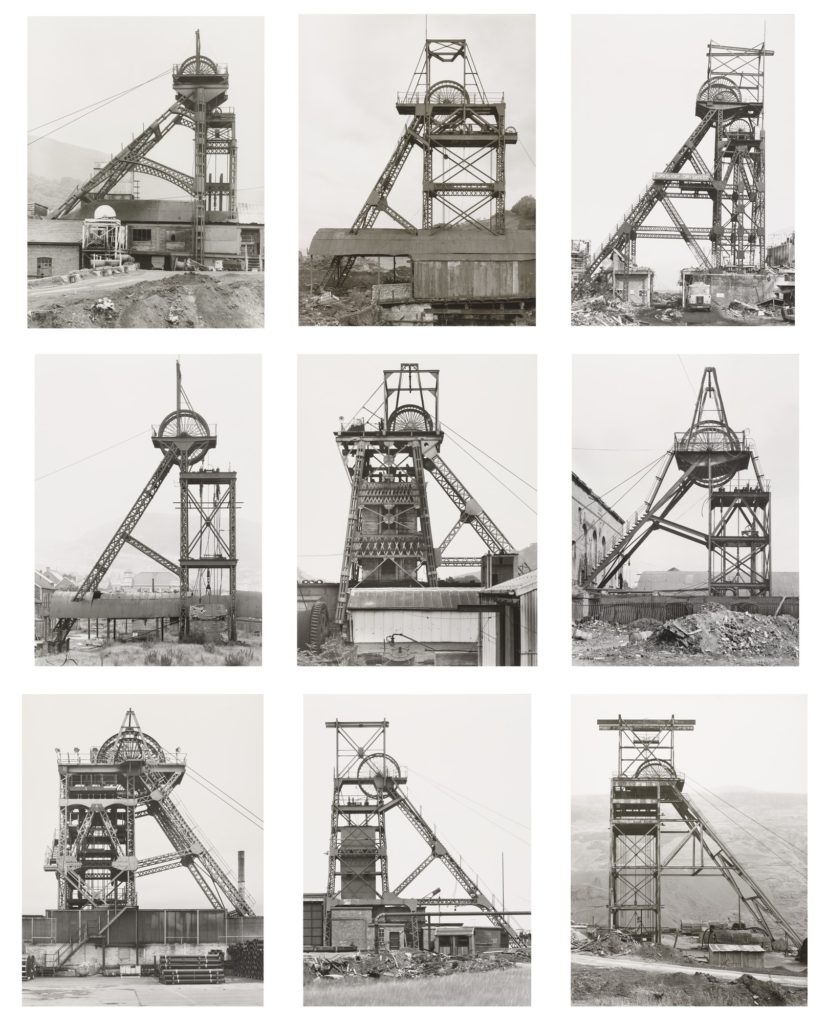
Bernd and Hilla Becher – Typologies of industrial architecture

Read this overview here of the Becher’s work at Tate Gallery which describes their interest in the ‘Grid’ and their influence on future generations of photographers, members of the Düsseldorf School.

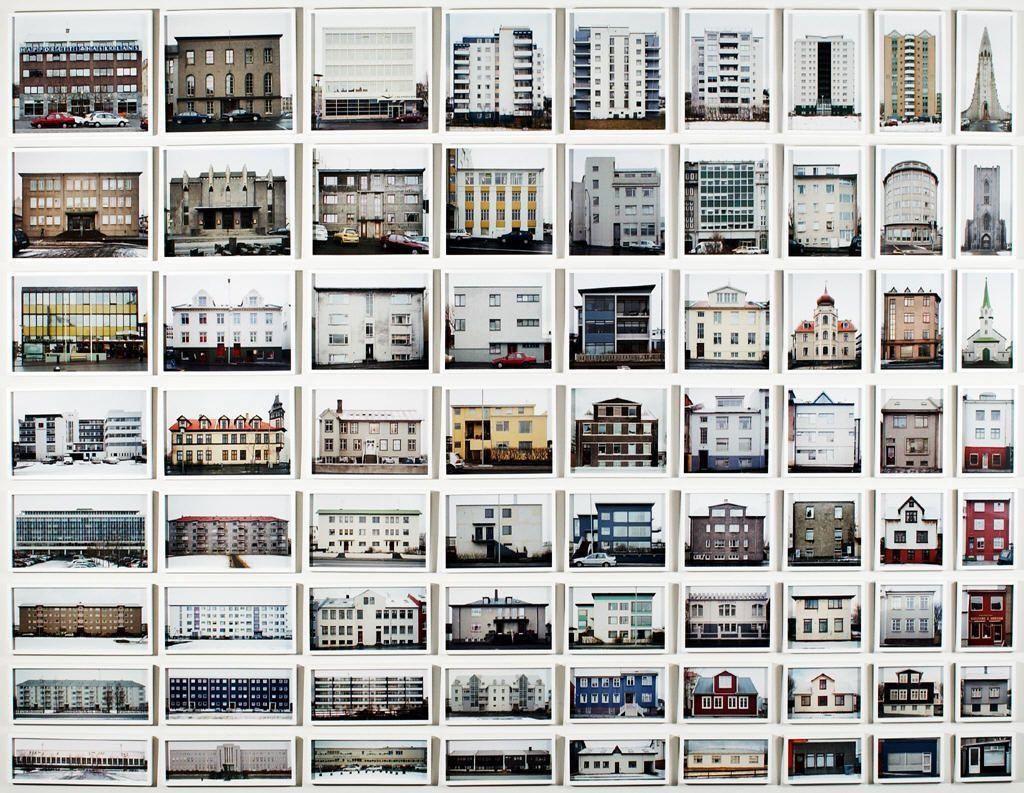
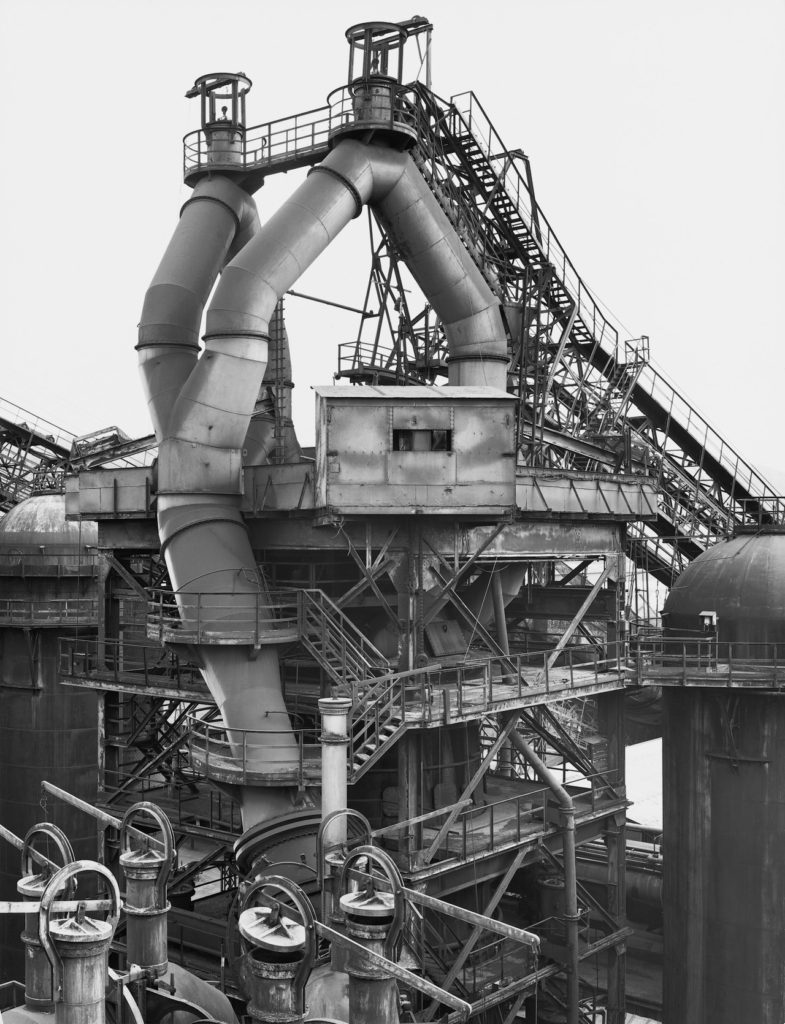
The term ‘Typology’ was first used to describe a style of photography when Bernd and Hilla Becher began documenting dilapidated German industrial architecture in 1959. The couple described their subjects as ‘buildings where anonymity is accepted to be the style’.

Partly inspired by the likes of Karl Blossfeldt, August Sander and The New Objectivity (that we looked at in the previous project)

Stoic and detached, each photograph was taken from the same angle, at approximately the same distance from the buildings. Their aim was to capture a record of a landscape they saw changing and disappearing before their eyes so once again, Typologies not only recorded a moment in time, they prompted the viewer to consider the subject’s place in the world.

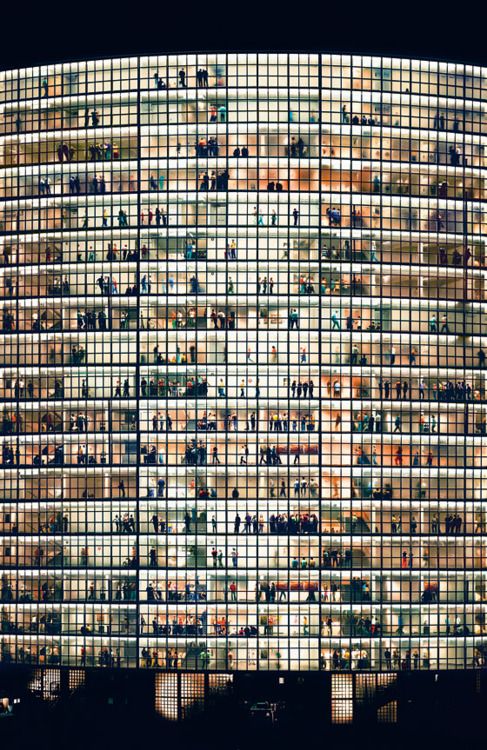
The Bercher’s influence as lecturers at the The Dusseldorf School of Photography passed Typologies onto the next generation of photographers. Key photographic typologists such as Thomas Struth, Thomas Ruff, Thomas Demand and Gillian Wearing lead to a resurgence of these documentary-style reflections on a variety of subject matter from Ruff’s giant ‘passport’ photos to Demand’s desolate, empty cities.

This image has an empty alt attribute; its file name is image-155-1024x320.png

Questions to consider in relation to the Bechers and their concept of Typology:

1. How did they first meet?
2. What inspired them to begin to record images of Germany’s industrial landscape?
3. How did the Bechers explain the concept of Typology?
4. Which artists/ photographers inspired them to produce typology images?
5. What is the legacy of the Bechers and their work?

Here is another short film which discusses their work in more context.


You could:

Create your own typological series documenting repeated forms within your surroundings.  For example, you might like to choose one of the following subjects:

  • front doors on the street where you live
  • cracks in the pavement
  • fences and walls
  • the colours of all the cars in the supermarket car park
  • telegraph poles viewed from below
  • TV aerials silhouetted against the sky

KEVIN BAUMAN


Images from 100 Abandoned Houses – A record of abandonment in Detroit in the mid 90’s by Kevin Bauman

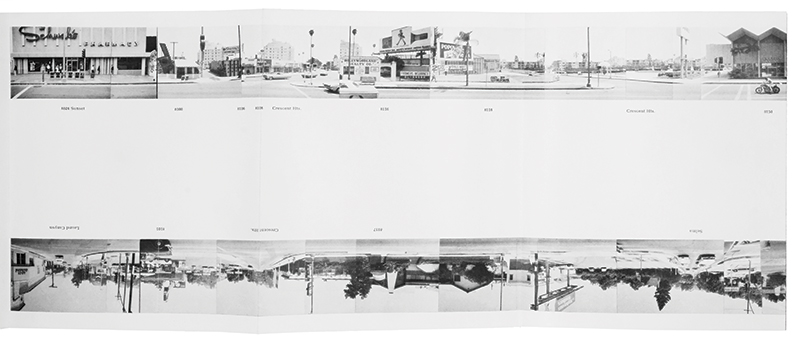
Ed Ruscha, “Every Building On The Sunset Strip” 

The artist Ed Ruscha is famous for his paintings and prints but is also known for his series of photographic books based on typologies, among them Every Building on the Sunset Strip, Twentysix Gasoline Stations, Some Los Angeles Apartments, and Thirtyfour Parking Lots. Ruscha employs the deadpan style found in many photographic topologies. The book shown above is a 24 foot long accordion fold booklet that documents 1 1/2 miles of the Sunset Strip in Hollywood. 

Various Small Books,' Inspired by Ed Ruscha, and More - The New York Times
Ed Ruscha
Edward Ruscha. Standard Station. 1966 | MoMA
Ed Ruscha, Standard Station, 1966

Here’s another topology for you to look at by Ólafur Elíasson  : 

Thom and Beth Atkinson “Missing Buildings”2016 
https://www.thomatkinson.com/missing-buildings

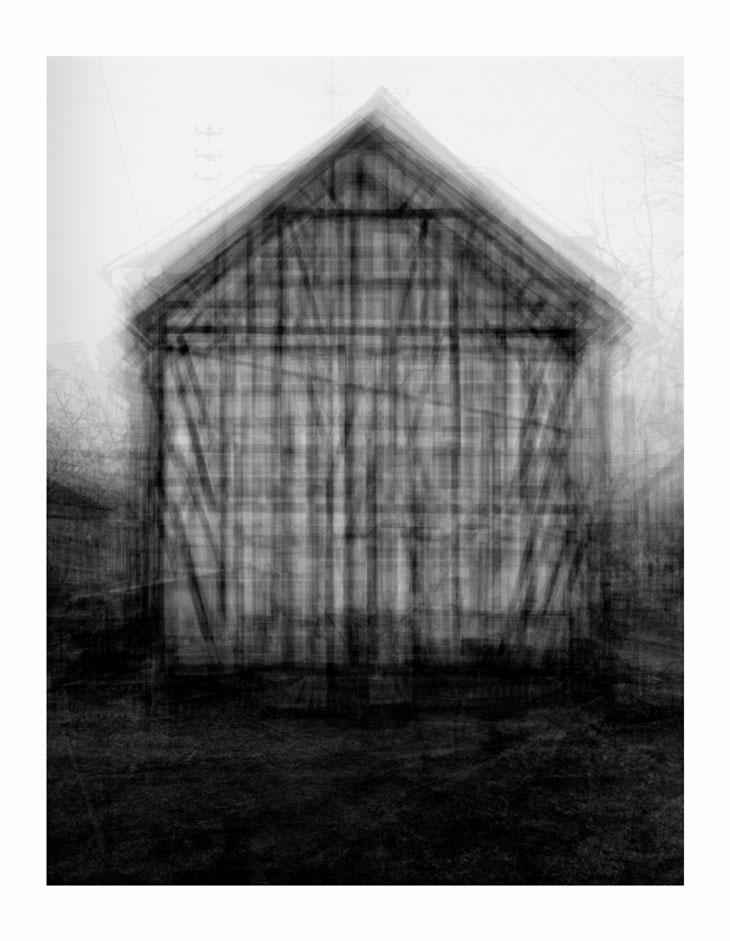
Idris Khan: Every…Bernd And Hilla Becher Gable Sided Houses, 2004, Photographic print 208 x 160 cm

The structures in the Bechers’ original photographs are almost identical, though in Khan’s hands the images’ contrast and opacity is adjusted to ensure each layer can be seen and has presence. Though Khan works in mechanised media and his images are of industrial subjects, their effect is of a soft ethereal energy. They exude a transfixing spiritual quality in their densely compacted details and ghostly outlines. …Prison Type Gasholders conveys a sense of time depicted in motion, as if transporting the old building, in its obsolete black and white format, into the extreme future.

Creative Outcomes Can include : grids, animations, GIFs, Timelapse etc


  • Eugene Agtet
  • Ed Ruscha
  • Thomas Struth
  • Gabrielle Basilico
  • Gerry Johansson
  • W. Eugine Smith
  • Rut Blees Luxemburg
  • Panos Kokkinios
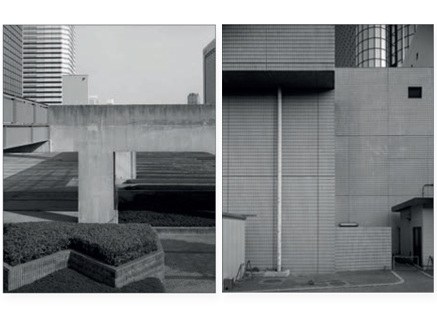
  • Naoya Hatakeyama

Eugene Agtet

Ed Ruscha

Thomas Struth

Gabrielle Basilico

Gerry Johansson

W. Eugene Smith

Rut Blees Luxemburg

Panos Kokkinios

Naoya Hatakeyama

  • Alexander Apostol
  • Bernd & Hilla Becher
  • Donovan Wylie
  • Edward Burntsky
  • Frank Breuer
  • Gerry Johansson
  • Joel Sternfeld
  • Josef Schultz
  • Lewis Baltz
  • Charles Sheeler

Alexander Apostol

Bernd & Hilla Becher

Donovan Wylie

Edward Burntsky

Frank Breuer

Gerry Johansson

Joel Sternfeld

Josef Schultz

Lewis Baltz

Charles Sheeler

Surface and Texture

NIGHT PHOTOGRAPHY

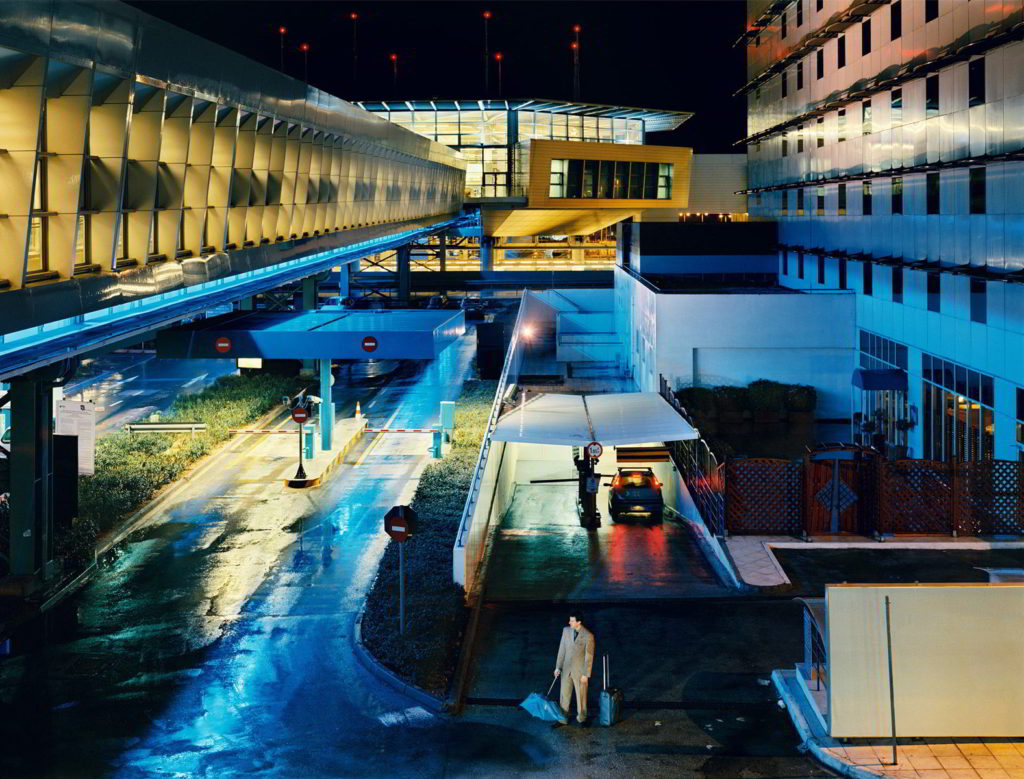
Many urbanised areas are great to photograph at night or in low light conditions…

Naoya Hatakayama
Naoya Hatakayama
Photography Exhibition | Edgar Martins
Edgar Martins
Image result for rut blees luxemburg
Rut Blees Luxemburg , A Modern Project, 1996
  • use a tripod
  • use slow shutter speeds (experiment with your TV Mode / Shutter speeds !
  • be safe…take a friend and let your parents know where you are going
  • Check your EXPOSURE SETTINGS according to the light and what you are photographing…

Follow this 10 Step Process and create multiple blog posts for each unit to ensure you tackle all Assessment Objectives thoroughly :

  1. Mood-board, definition and introduction (AO1)
  2. Mind-map of ideas (AO1)
  3. Artist References / Case Studies (must include image analysis) (AO1)
  4. Photo-shoot Action Plan (AO3)
  5. Multiple Photoshoots + contact sheets (AO3)
  6. Image Selection, sub selection (AO2)
  7. Image Editing/ manipulation / experimentation (AO2)
  8. Presentation of final outcomes (AO4)
  9. Compare and contrast your work to your artist reference(AO1)
  10. Evaluation and Critique (AO1+AO4)