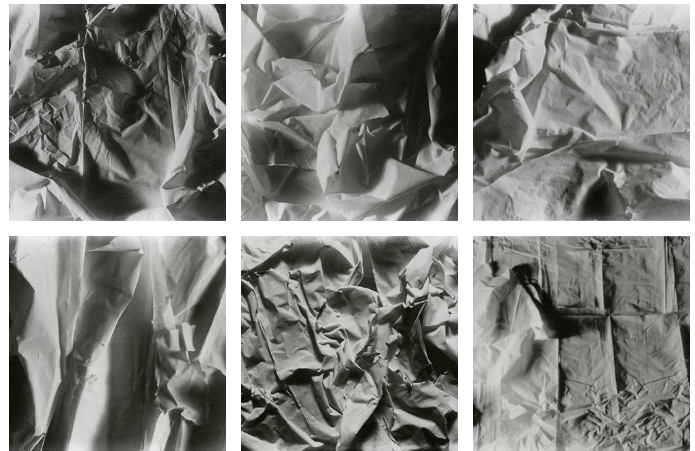
Aaron Siskind was born in New York City in 1903 to a Russian-Jewish immigrant family. Initially drawn to poetry and music, Siskind’s artistic journey shifted when he received a camera as a wedding gift in 1930. This sparked his passion for photography, leading him to join the New York Photo League, where he became known for his social documentary work during the Great Depression, particularly his photographs of Harlem.
In the 1940s, Siskind’s style evolved as he became influenced by Abstract Expressionism. He began to focus on abstract forms in everyday objects, emphasizing texture, line, and composition. His photography blended “straight” documentary realism with abstraction, making him one of the pioneers in transforming photography into a medium for abstract art. His work often reflected his emotional experiences and a modernist concern with flatness, influenced by close friendships with artists such as Franz Kline and Willem de Kooning.
Siskind taught photography at the Institute of Design in Chicago and later at the Rhode Island School of Design, shaping the next generation of photographers. His contributions to photography are marked by his ability to merge the literal and abstract, influencing both his peers and future photographers. He passed away in 1991 at the age of 87.
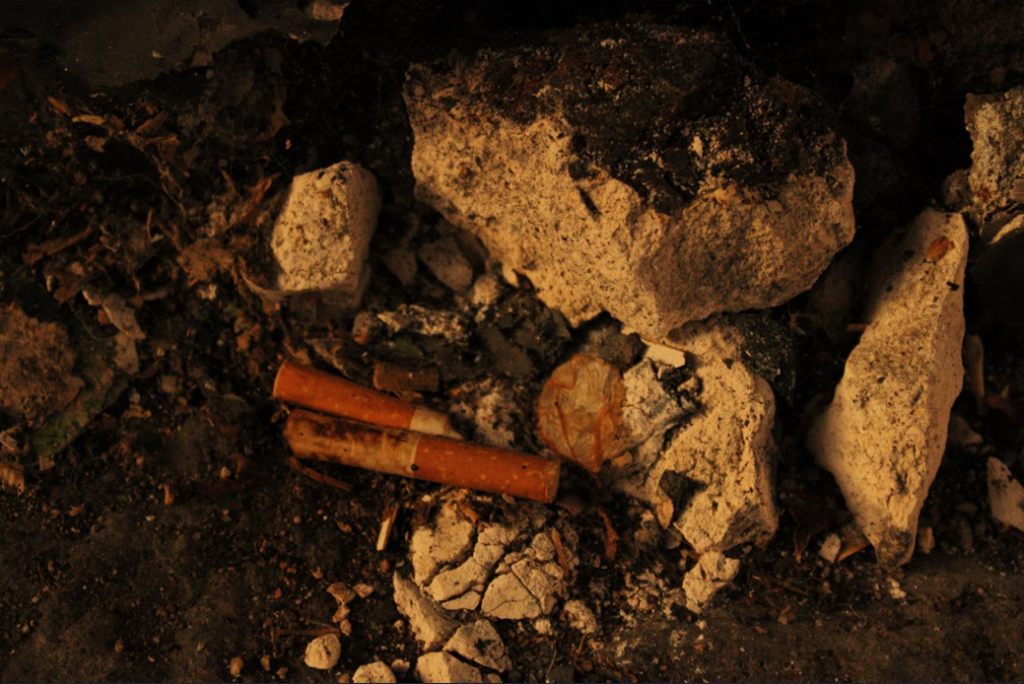
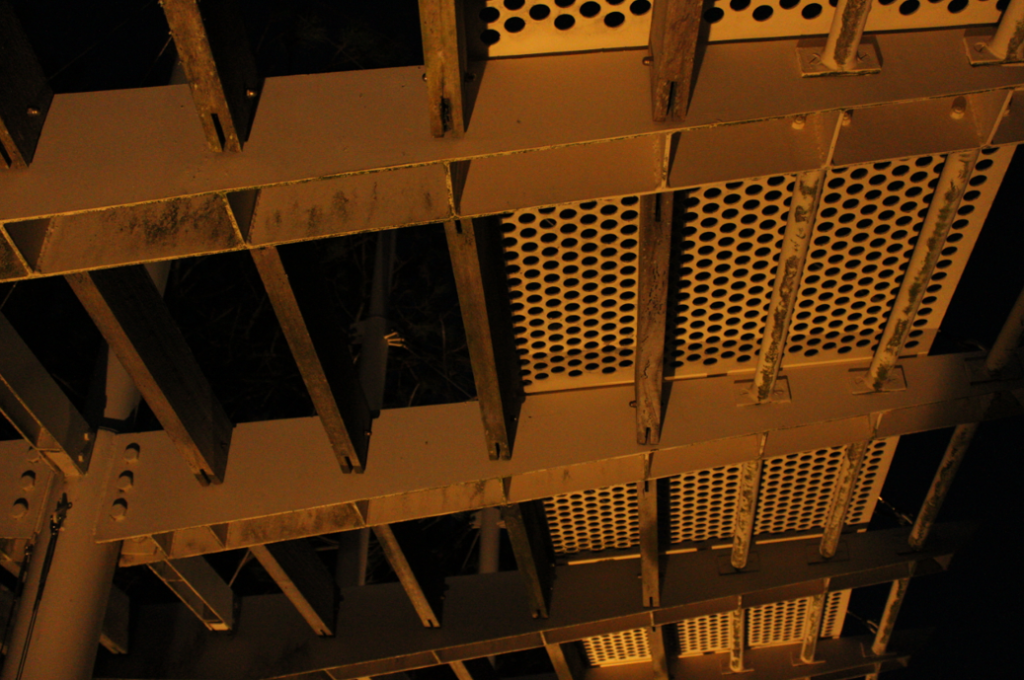
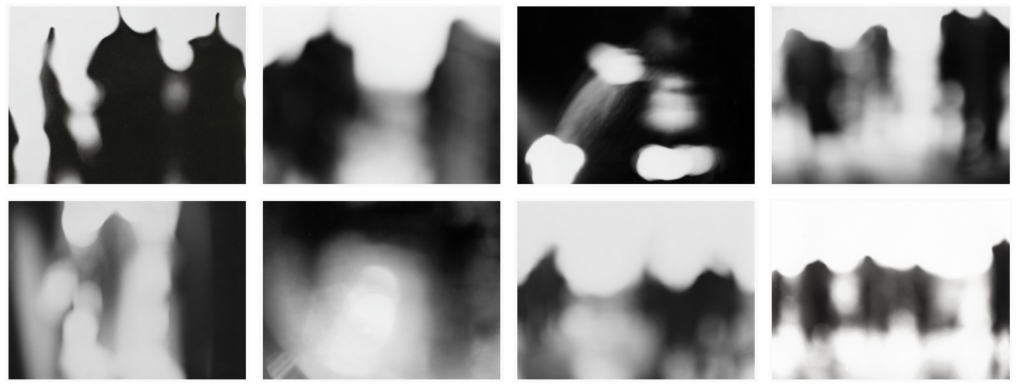
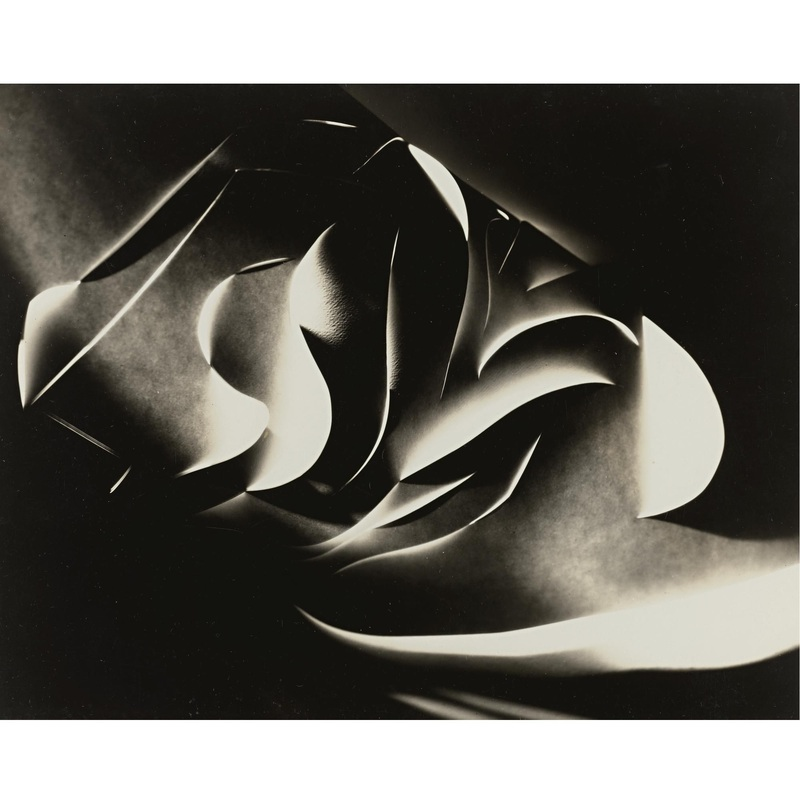
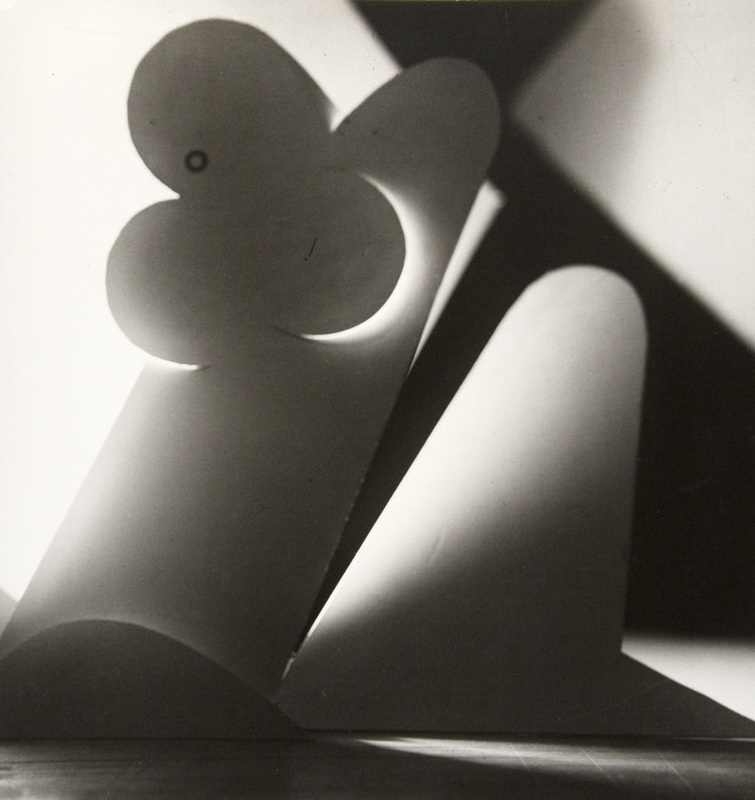
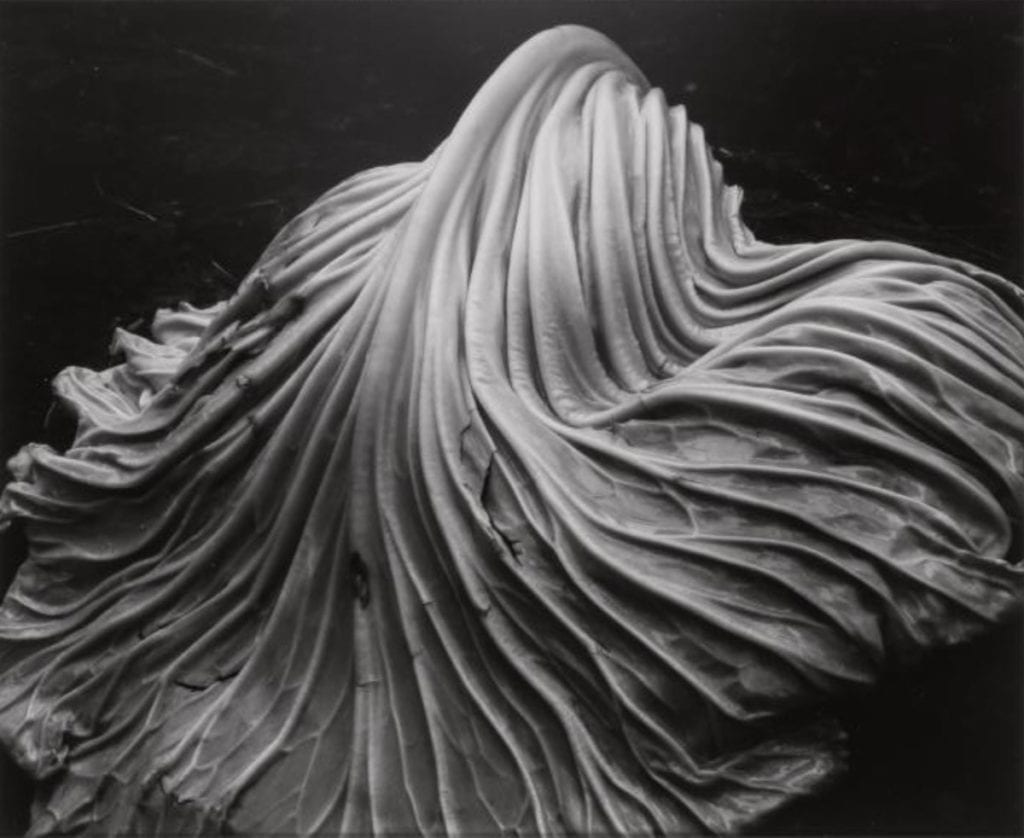
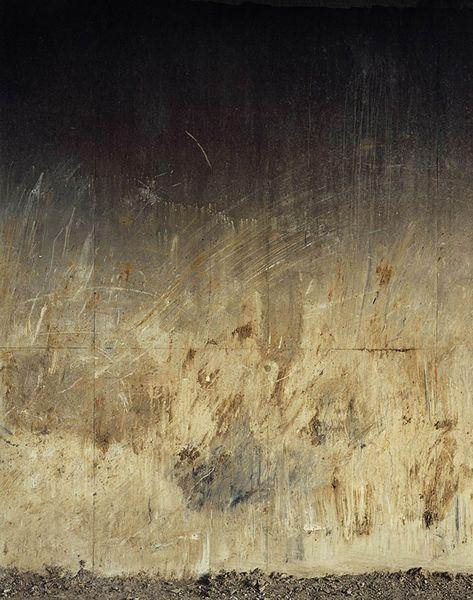
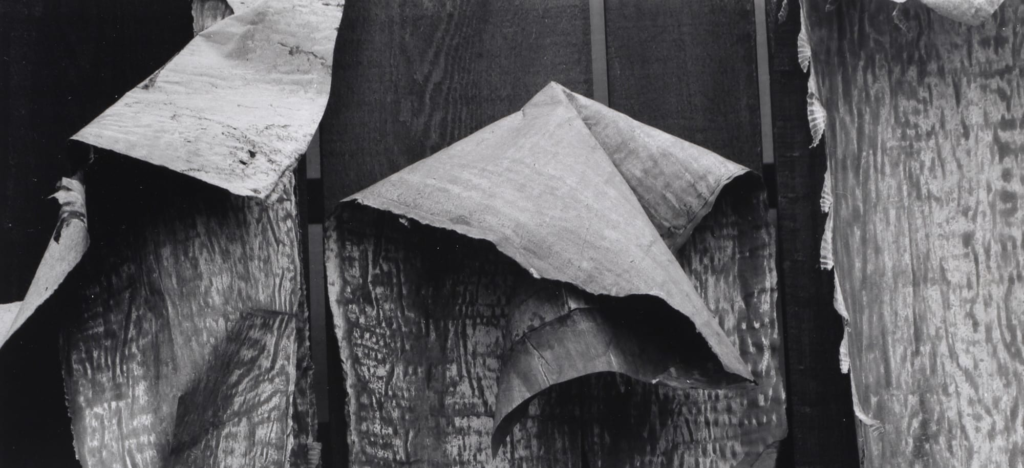
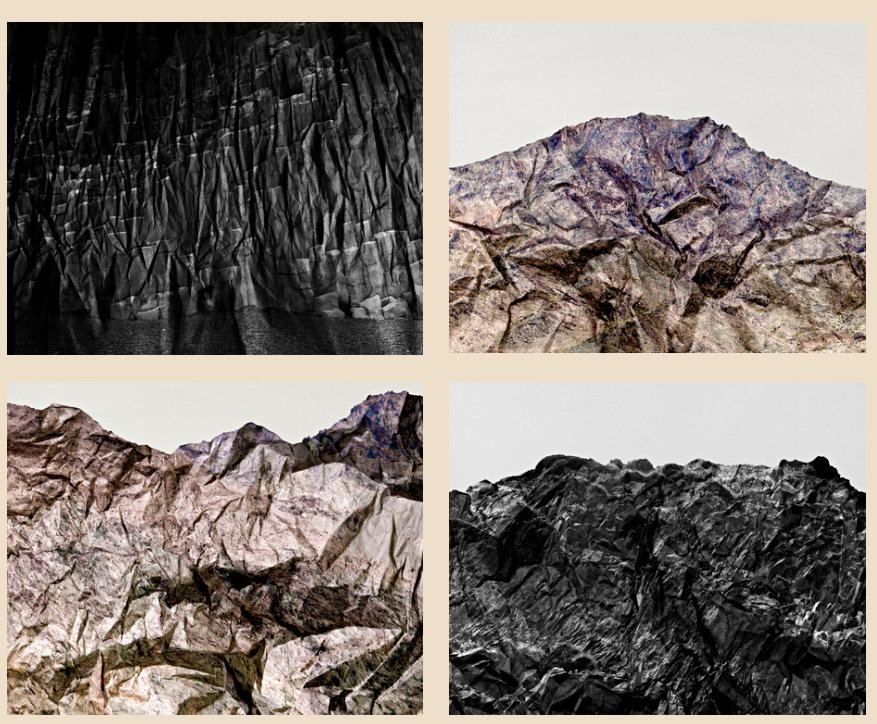
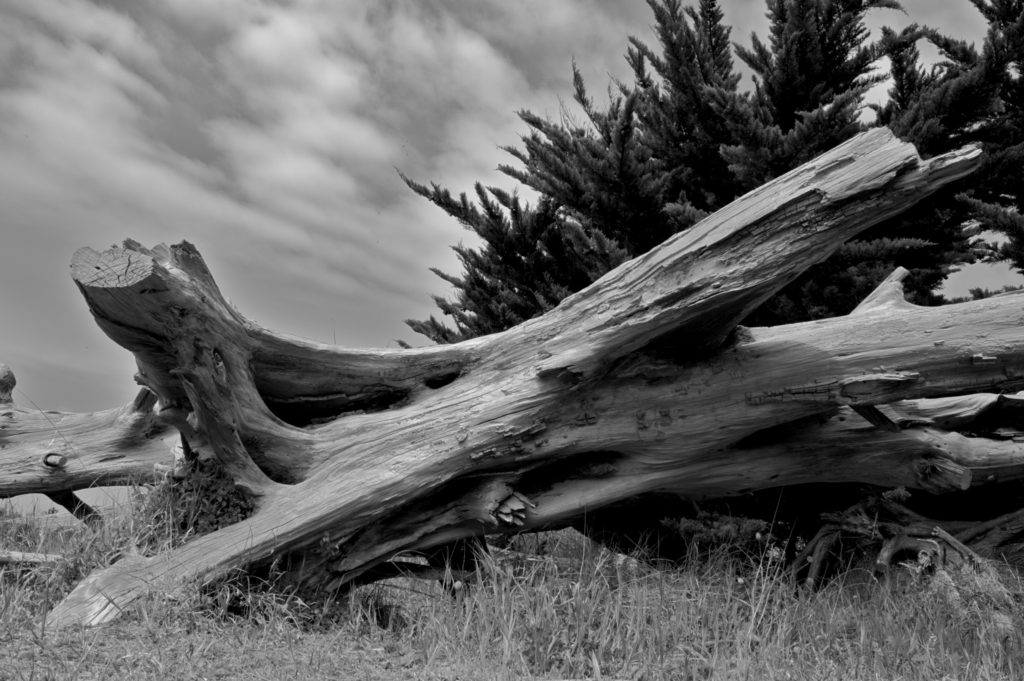
Siskind was interested in surfaces and textures, both from the natural world but also the urban environment. He gets in close to his subjects and fills the frame with detail. There is always a strong sense of design and all over interest for the viewer.
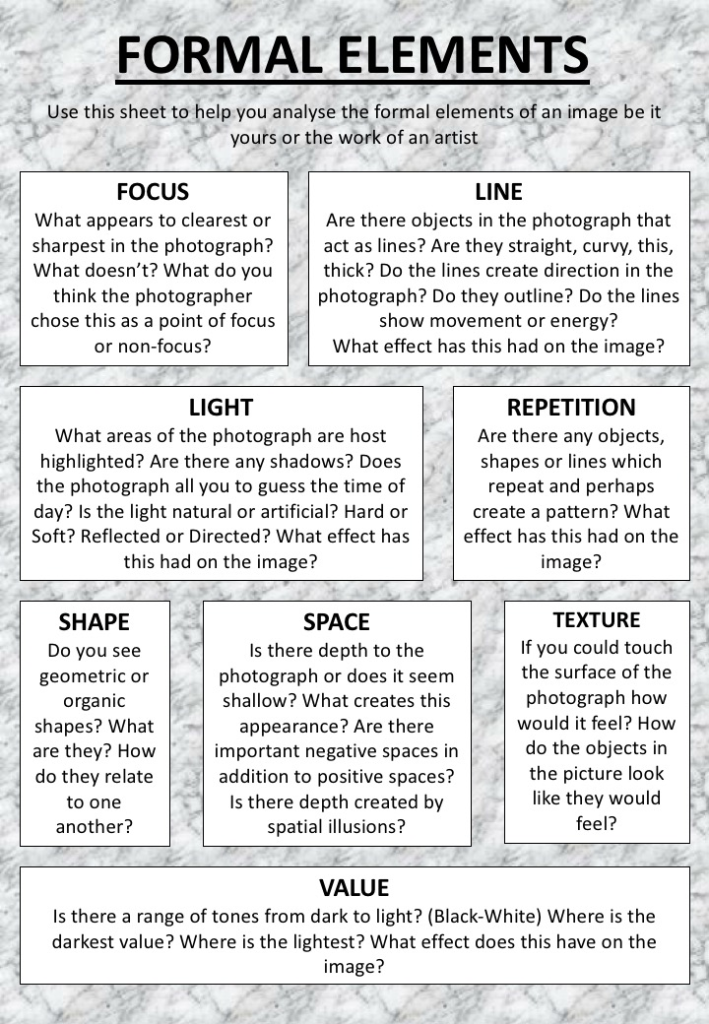
Line – Are there any elements in the photograph that function as lines? Consider whether they are straight, curved, thin, or thick. Do these lines direct the viewer’s eye in a particular direction? Do they outline forms or suggest movement and energy?
Shape – Can you identify any shapes within the image? Are they geometric with straight edges or organic with more fluid, curving forms?
Tone – Does the photograph display a variety of tones ranging from dark to light? Where is the darkest area located? Where is the lightest?
Repetition / Pattern – Are there objects, shapes, or lines that repeat, forming a pattern within the composition?
Texture – Imagine touching the surface of the photograph. How do you think it would feel? How do the objects within the image appear in terms of texture?
Space – Does the photograph convey a sense of depth, or does it seem more shallow? What elements contribute to this perception? Are there notable negative (empty) spaces in contrast to positive (solid) areas? Is there any illusion of depth created through techniques like perspective?
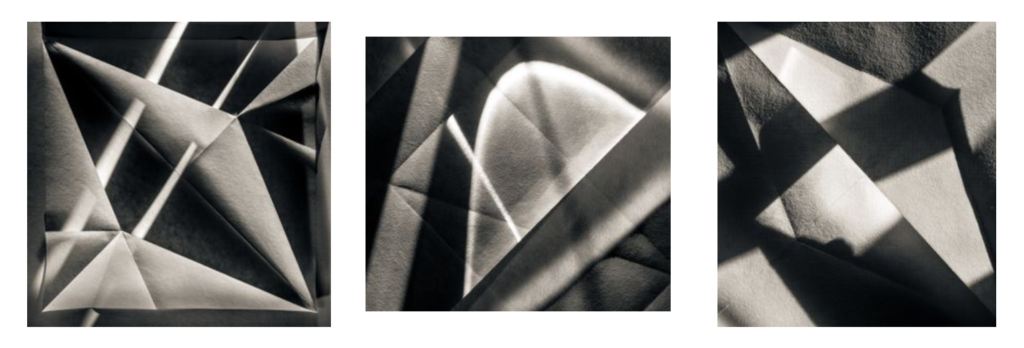
My Favourite Images
Fully unedited
~ All photos are originals taken on a cannon 2000D ~
The first Half Term in Year 12 is designed to encourage you to develop Core Skills in…
Observe – Seek – Challenge
Camera Handling Skills
Using the Hautlieu Creative Blog
Discussing, sharing and analysing examples of photography
Fundamental image selection, editing and enhancement
Explore the formal elements skillfully and creatively
Learning about key artists and concepts
Task 1
Watch : Genius of Photography / Fixing The Shadows and take
Discussion Points (remember to include these in your presentation)
Camera Obscura
Nicephore Niepce
Louis Daguerre
Daguerreotype
Henry Fox Talbot
Richard Maddox
George Eastman
Kodak (Brownie)
Digital Photography
Think – Pair – Share activities
To embed your understanding of the origins of photography and its beginnings you’ll need to produce a blog post / word / powerpointpresentation which outlines the major developments in its practice. Some will have been covered in the documentary but you may also need to research and discover further information. Add plenty of visual evidence and examples to help articulate your understanding…
Wordcount Guideline = 1000 Words
Structure
Introduction – Key Content – Conclusion / Summary
Due Date Friday 20th September
Task 2
Summer Task Critique
Think – Pair – Share
Blog intro and upload of Summer Task
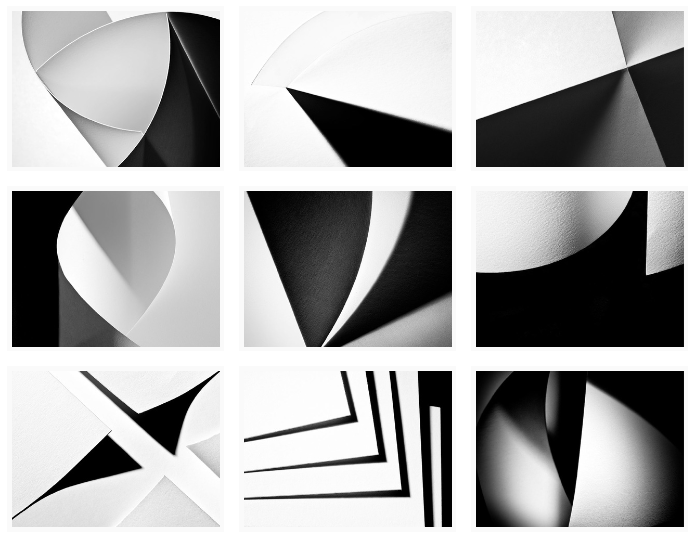
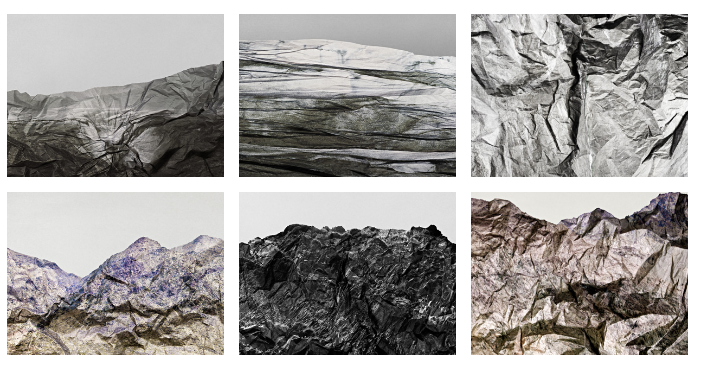
Develop a range Paper Experiments / photographing white paper
Create a blog post titled ‘Focus Control and Aperture’
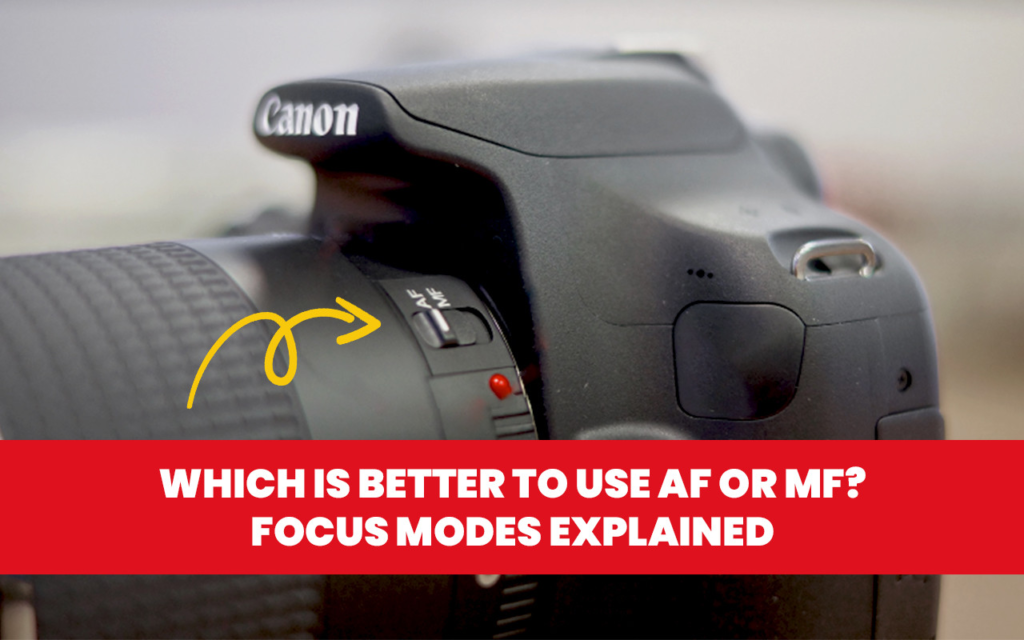
Explain different ways of focusing on a camera (AF and MF)
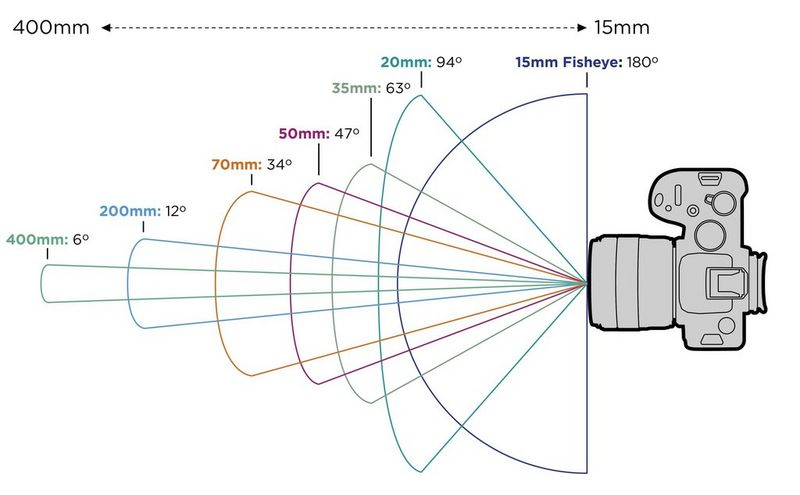
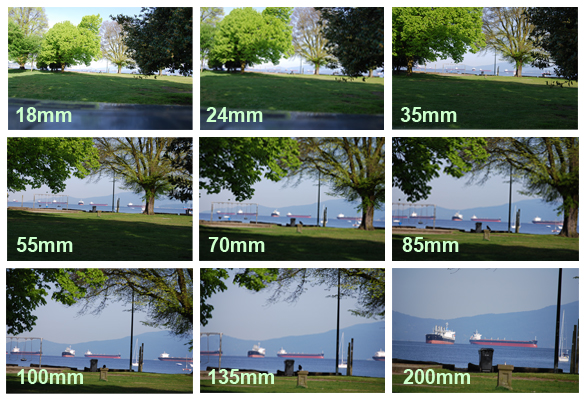
Explain what focal length is. Include an image to help illustrate this.
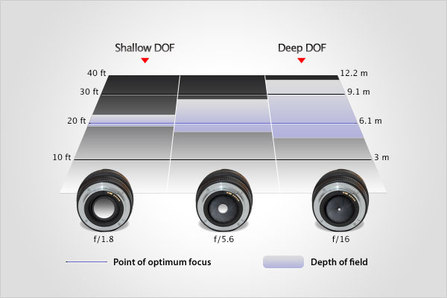
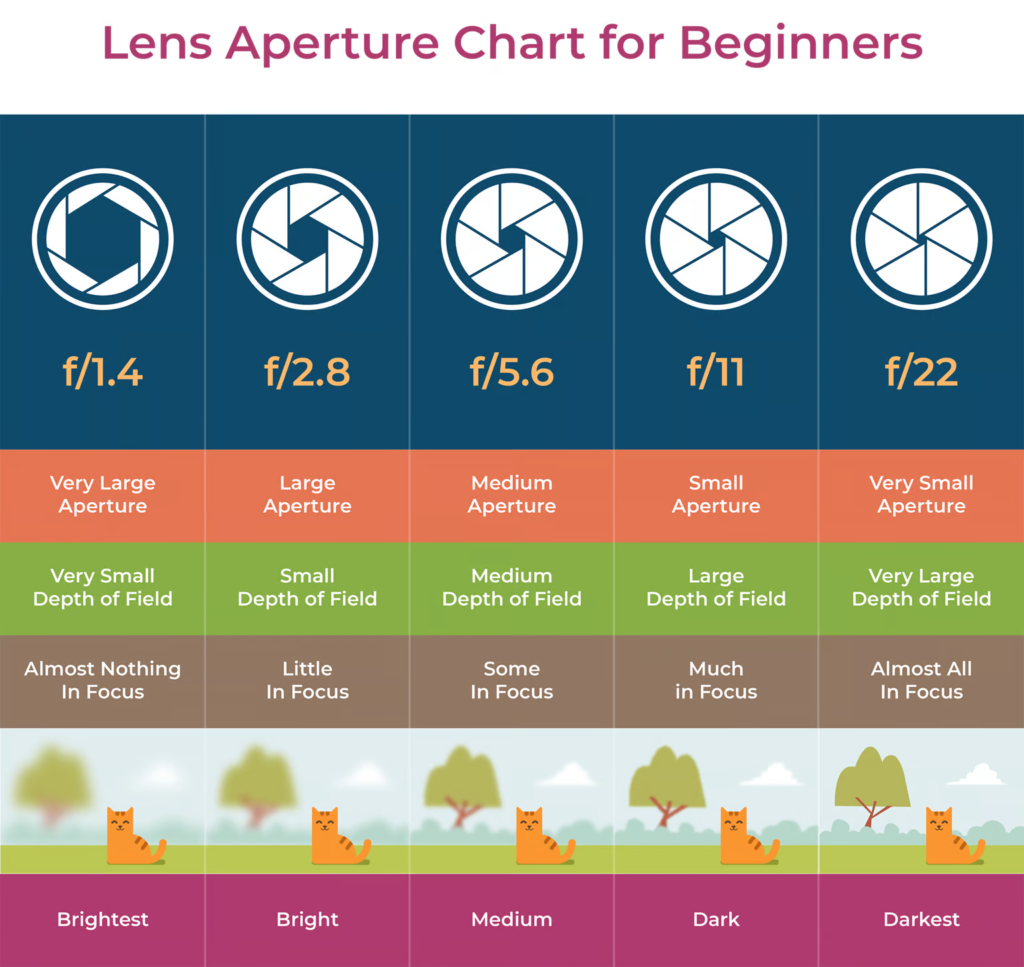
Explain what Aperture is and give examples of different Apertures
Explain what Depth of Field is
Include your experiments using the Camera Simulator. Clearly label your experiments to explain what’s going on.
Include research of photographers who use depth of field / focus in their work – Choose from: Ralph Eugene Meatyard,(particularly his Zen Twigs and No Focus photos), Saul Leiter, or Uta Barth
Autofocus = general use
Manual focus = close ups and fine detail ( use the focus ring on the end of the lens and adjust for each shot !)
Focal length and types of lenses
The focal length of a lens is the optical distance (usually measured in mm) from the centre of a lensand its focus.
This determines what you “see” when using a camera…
Spot the differences when using different focal lengths whilst photographing the same thing…
Setting Focus Points…advanced techniques
Exploring depth of field and focus with Ralph Eugene Meatyard, Saul Leiter and Uta Barth.
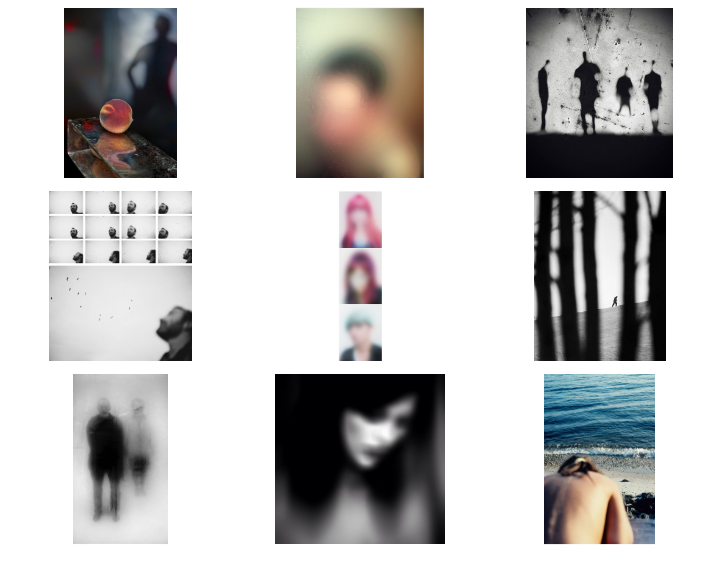
One of the ways that cameras see the world differently to the way we view it with our eyes is that they can selectively focus on the subject. This phenomenon is related to the mechanics and optics of the camera lens. The photographer can change the settings on the camera in order to alter the amount of light entering the lens. This directly affects the depth of field of the subject being viewed.Some photographers have experimented with a variety of effects that can be achieved by manipulating the camera’s ability to bring subjects in and out of focus.
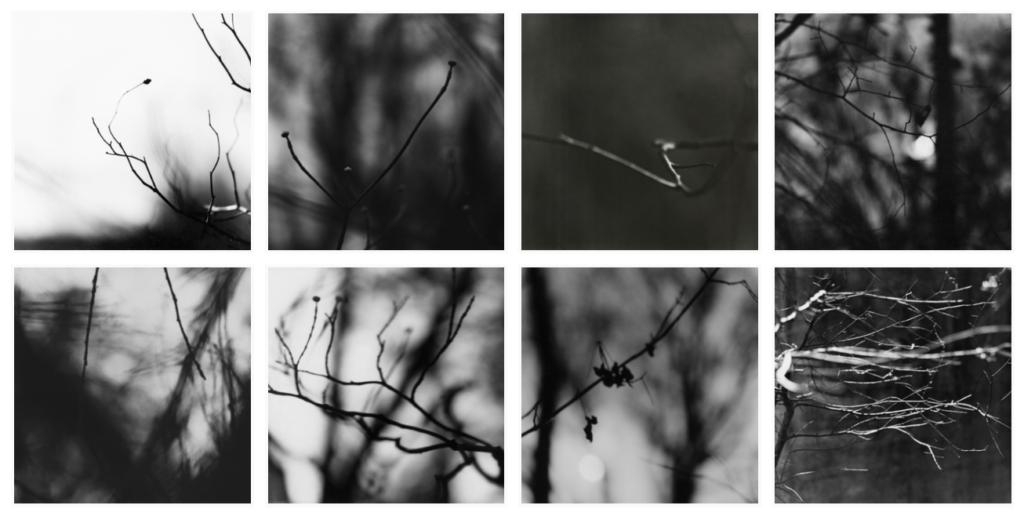
Meatyard made his living as an optician,born in 1925 and died in 1976. He was a member of the Lexington Camera Club and pursued his passion for photography outside the mainstream. He experimented with various strategies including multiple exposures, motion blur, and other methods of photographic abstraction. Two of his series are particularly concerned with focus and depth of field, both stretching the expressive potential of photography, film and cameras when looking with the ordinary world.
No focus- Reducing groups of human figures to indistinct abstractions, the artist proposes an alternate notion to the traditional photographic portrait.
Zen Twigs – A meditative study of the mysterious forms of twigs and tree branches, inspired and informed by the artist’s deep study of Zen Buddhism.
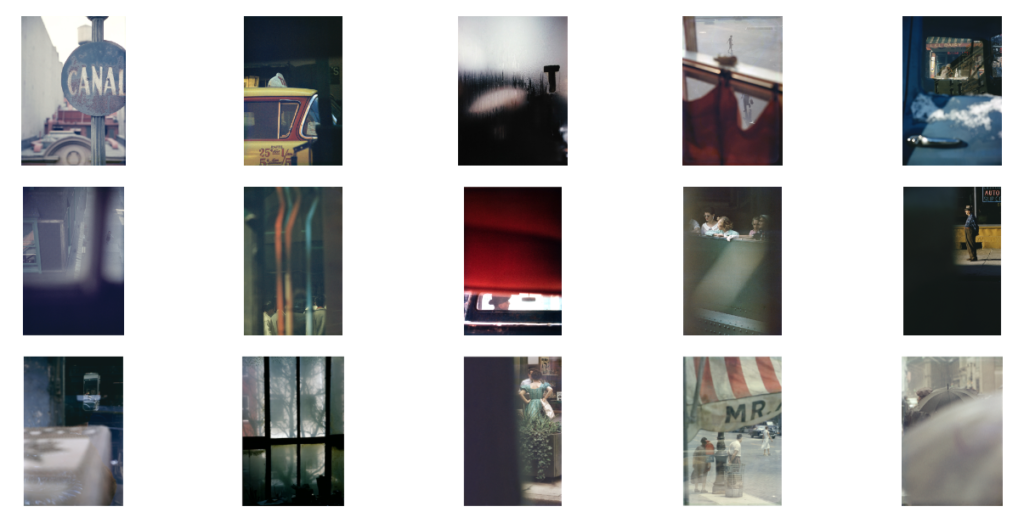
Saul Leiter
Leiter was foremost a painter who discovered the possibilities of colour photography. He created an extraordinary body of work, beginning in the 1940s. His images explore colour harmonies and often exploit unusual framing devices – shop signs, umbrellas, curtains, car doors, windows dripping with condensation – to create abstracted compositions of everyday street life in the city. Leiter was fond of using long lenses, partly so that he could remain unobserved, but also so that he could compress space, juxtaposing objects and people in unusual ways. Many of his images use negative space, with large out of focus areas, drawing our eye to a particular detail or splash of colour.
Examples of Saul Leiter’s work…
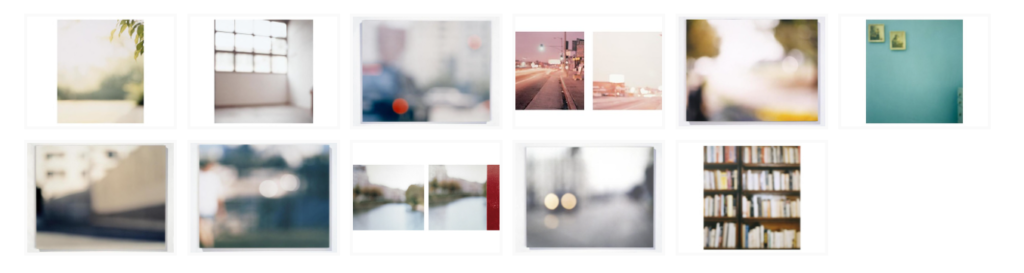
Uta Barth
Throughout the past two decades, Uta Barth has made visual perception the subject of her work. Regarded for her “empty” images that border on painterly abstraction, the artist carefully renders blurred backgrounds, cropped frames and the natural qualities of light to capture incidental and fleeting moments, those which exist almost exclusively within our periphery. With a deliberate disregard for both the conventional photographic subject and point-and-shoot role of the camera, Barth’s work delicately deconstructs conventions of visual representation by calling our attention to the limits of the human eye. — Tanya Bonakdar Gallery
Uta Barth’s work…
What to do…
Research the work of Ralph Eugene Meatyard, Saul Leiter and Uta Barth. How have they experimented with focus and depth of field in their work? Choose specific images to comment on in detail. You could also find other photographers who are interested in experimenting with focus effects.
Explore the effects of changing the aperture settings on your camera to alter depth of field. You could illustrate this with a series of photos of the same subject shot with different aperture settings.
Create a series of deliberately out of focus images. Consider the degree of abstraction in the final image. How out of focus are the subjects and are they still recognisable? Experiment with colour and black and white.
Create a series of images which explore dramatic depth of field (selective focus). Experiment with switching between foreground, middle ground and background focus. Remember, you will need to use a wide aperture (small number e.g. f2.8) and/or a longer lens for this. Remember to share all of the images you make (including those that you deem failures) in a gallery/contact sheet.
Curate your images into different groupings (see below). Experiment with editing the images in each set differently. Give each set a title and write a short evaluation explaining your editorial decisions.
Make a blog post about your development of ideas based on the prompts listed above…
Ensure you use technical vocab throughout using the photoliteracy matrix here
Some more examples…
Week 4Shutter Speed and movement
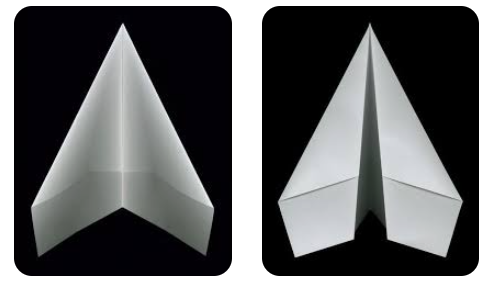
Throwing – rolling – spinning – bouncing paper
Explore Shutter Speed and movement / light
Paper Experiments
Throw, move , roll paper aeroplanes, balls, spirals
HW Experiment with Shutter Speed and movement / light / water
Find examples of fast shutter speed in action
Find examples of slow shutter speed (long exposure) in action
What kind of control does adjusting the shutter speed give us?
Think about and plan a set of photoshoots that show your understanding of shutter speed
What do we need to be aware of / careful of with different shutter speeds ?
Blog Posts to create:
Create a blog post titled ‘Shutter Speed’
Explain what Shutter Speed is – make sure you include how it affects light and movement
Include images to illustrate your point
Include research of photographers who use shutter speed to impact the outcome of their photos
Take your own photos inspired by the artist you have focused on, edit and present your photos on the blog post
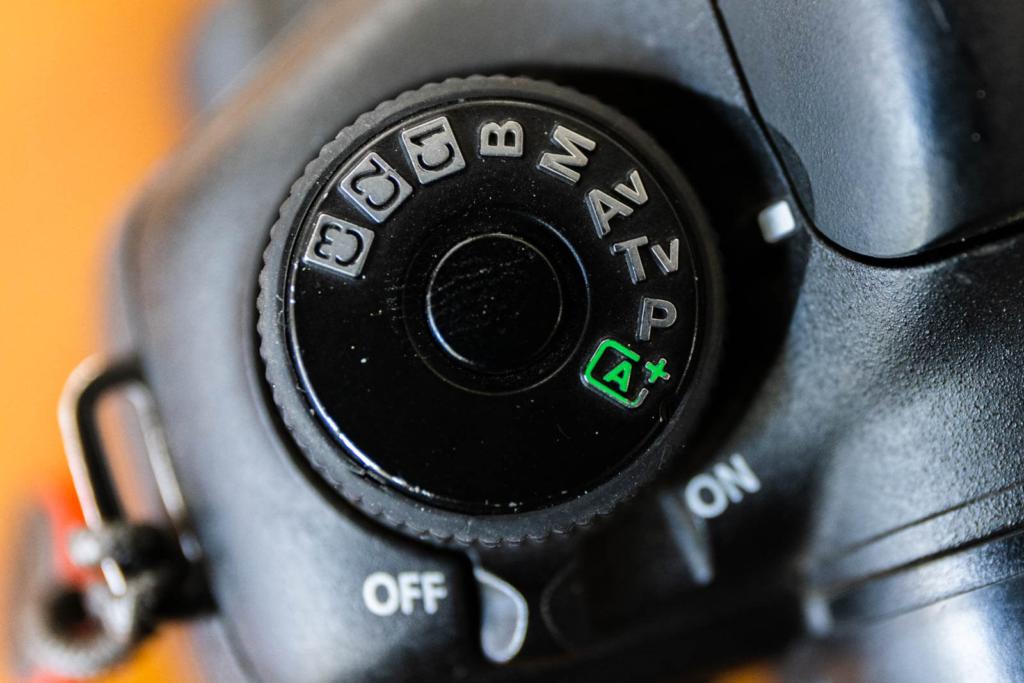
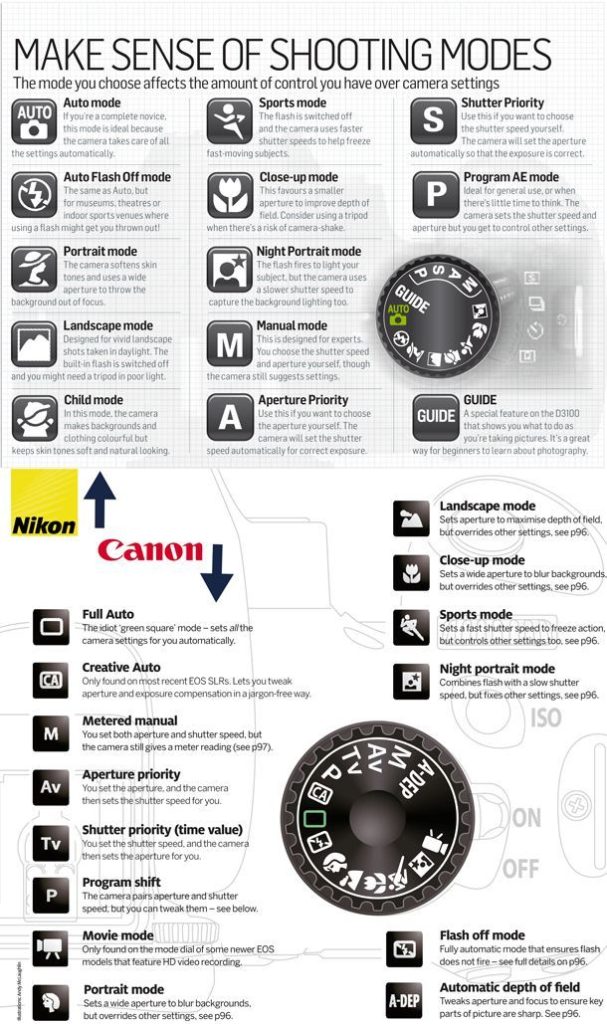
Choosing the setting on your camera
TV – TV stands for Time-value mode, but is better known as shutter-priority shooting mode. It’s one of the Creative Zone modes. This mode allows you to set the shutter speed, leaving the camera to choose the aperture needed for correct exposure. ‘Tv’ is used to identify this setting on the mode dial.
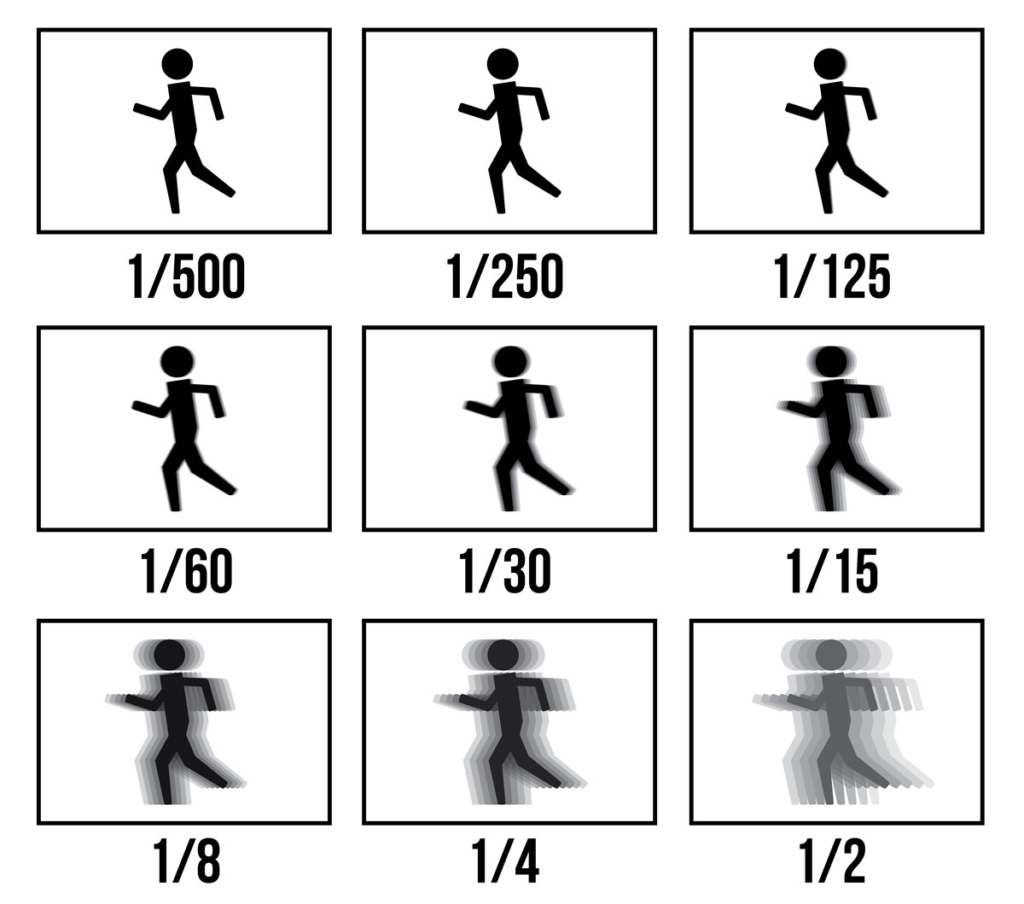
Shutter Speed…what is it?
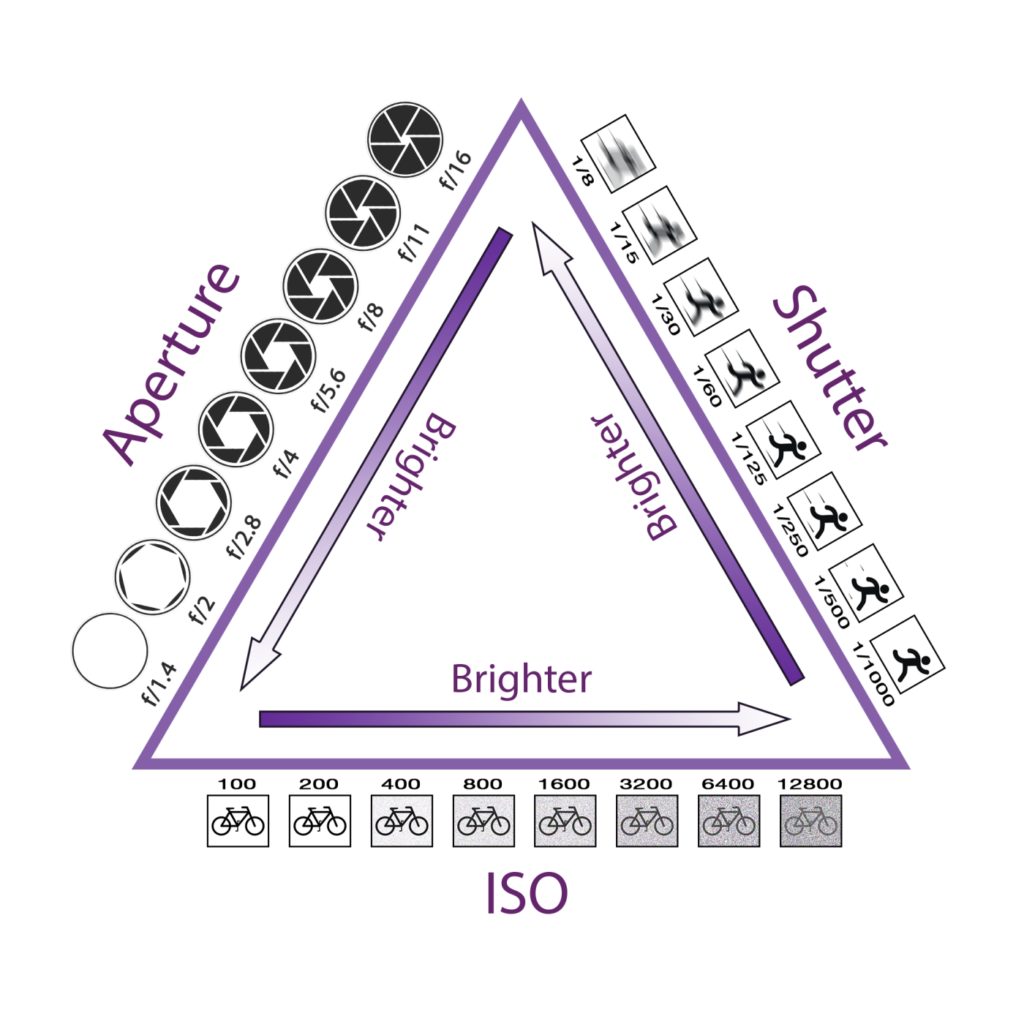
Shutter speed is the length of time your camera’s shutter stays open, and therefore how long the sensor is exposed to light. The longer it’s open, the more light hits the sensor and the brighter the image. Shutter speed is one side of the exposure triangle – the three factors that determine the exposure of an image.
Controlling and adapting shutter speed is vital for capturing either sharp images of moving things…or exploring creative blurring in moving things…or night photography and light trails too,
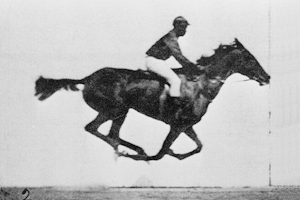
Eadweard Muybridge fast shutter speeds
Eadweard Muybridge is remembered today for his pioneering photographic studies of motion, which ultimately led to the development of cinema. He was hired to photograph a horse’s movement to prove that a horse’s hooves are clear of the ground at a trot.
Muybridge is known for his pioneering chronophotography of animal locomotion between 1878 and 1886, which used multiple cameras to capture the different positions in a stride; and for his zoopraxiscope, a device for projecting painted motion pictures from glass discs that predated the flexible perforated film strip used in cinematography
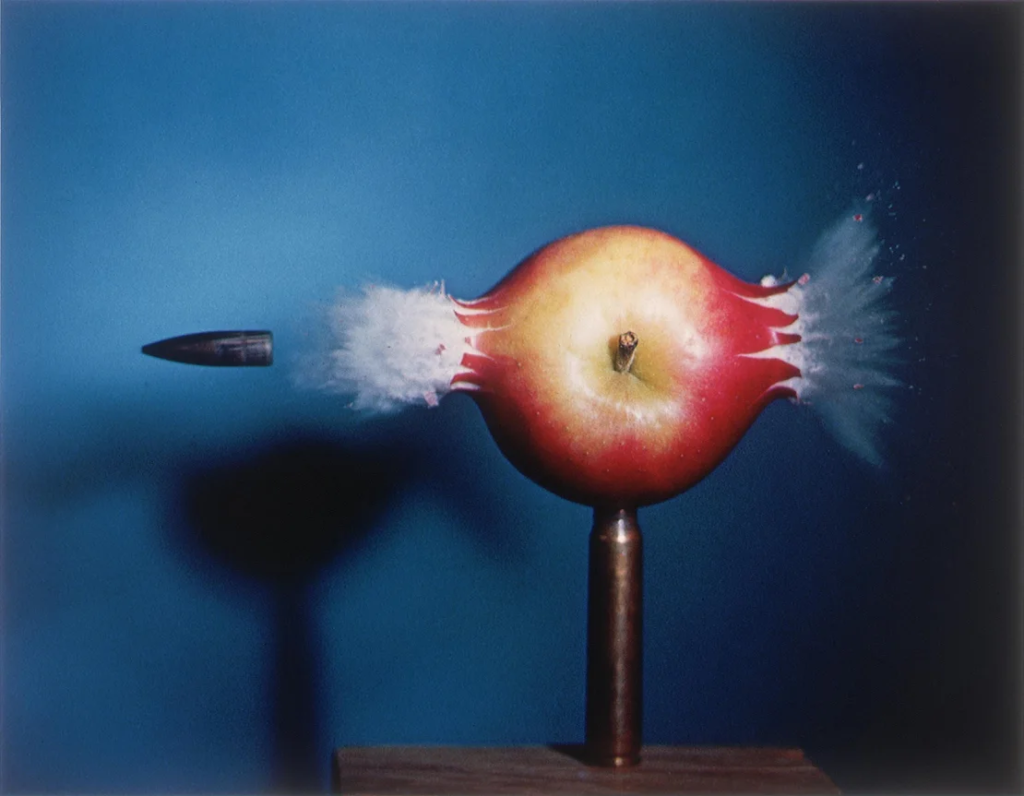
Harold Edgerton – fast shutter speeds
Harold Edgerton / MIT / 1957
Harold Edgerton / MIT / 1964
Harold Edgerton, Squash Stroke, 1938, gelatin silver print, National Gallery of Art, Washington, Gift of the Harold and Esther Edgerton Family Foundation
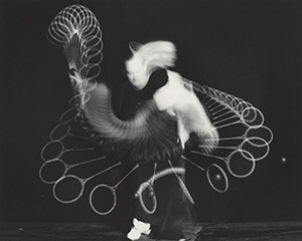
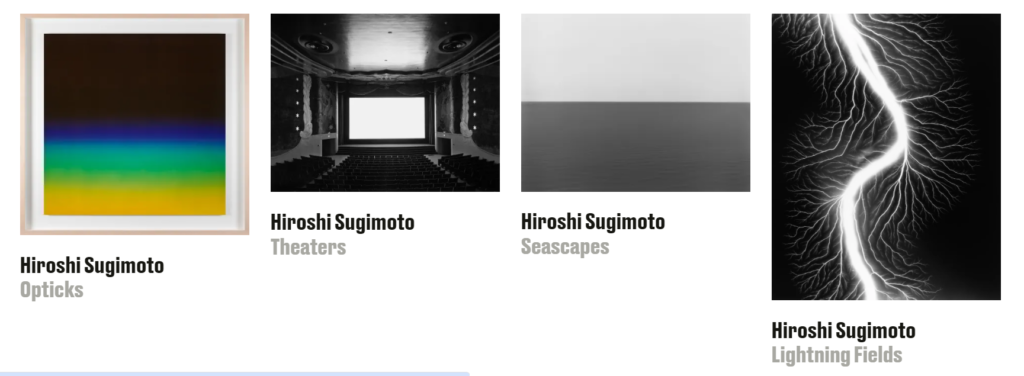
Hiroshi Sugimoto – slow shutter speeds
“With contemporary art, you get to represent your uniqueness, your own reality.” Early 20th-century Cubist and Dadaist artist Marcel Duchamp influenced Sugimoto’s conceptual take on art and time.
Sugimoto often employs large format cameras and long exposure times (slow shutter speeds) to capture light behaving / performing in expected but controlled ways
Francesca Woodman’s family spent their summers at her parents’ farmhouse in the countryside near Florence in Italy and many of her photographs were taken there. European culture and art had a significant impact on her artistic development. The influence of surrealist art, particularly the photographs of Man Ray and Claude Cahun can be seen in the themes and style of her work. She developed her ideas and skills as a student at Rhode Island School of Design.
Her importance as an innovator is significant, particularly in the context of the 1970s when the status of photography was still regarded as less important than painting and sculpture. She led the way for later American artists who used photography to explore themes relating to identity such as Cindy Sherman and Nan Goldin.
What to do…
Research the work of Eadward Muybridge, Harold Edgerton, Hiroshi Sugimoto and Francesca Woodman. How have they experimented with shutter speed and long exposures in their work? Choose specific images to comment on in detail. You could also find other photographers who are interested in experimenting with similar effects.
Explore the effects of changing the shutter speed on your camera to alter exposure times. You could illustrate this with a series of photos of the same subject shot with different settings.
Create a series ofimages. Consider the degree of abstraction in the final image. How sharp / blurry are the subjects and are they still recognisable? Experiment with colour and black and white.
Create a series of images which explore dramatic shutter speed effects. Remember to share all of the images you make (including those that you deem failures) in a gallery/contact sheet.
Curate your images into different groupings (see below). Experiment with editing the images in each set differently. Give each set a title and write a short evaluation explaining your editorial decisions.
Make a blog post about your development of ideas based on the prompts listed above…
RememberAs a rule of thumb, your shutter speed needs to be double (or more) than the lens focal length. So, for example, if using a 50mm lens, your shutter speed should be 1/100th sec or faster. If shooting with a 75mm lens, your shutter speed should be at least 1/150th sec.
Remember : A slow shutter speed keeps the shutter open for longer. This not only allows more light to be recorded, it also means any moving objects will appear blurred. Slow shutter speeds are commonly used for photographing in low light conditions, or to capture motion blur.
Week 5 ISO
Blog Post to Create:
What is ISO? How does it affect your camera?
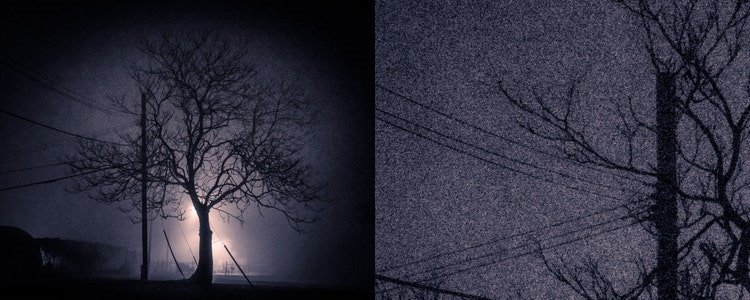
What does a high ISO / low ISO mean? What effect can this have on your photos? What is meant by visual noise? (include images to illustrate your points)
When might you want to use a high ISO?
Research one of the photographers below who look at texture in their photography.
Explore the effects of changing the ISO on your camera to alter grain but also the brightness of your images. You could illustrate this with a series of photos of the same subject shot with different settings. When taking/editing photos of the texture, consider the degree of abstraction in the final image. Are the images still recognisable? Experiment with colour and black and white.
Present at least 6 final photos (of the same subject), 3 should show visual noise and 3 should show no visual noise.
Look at a range of artists who explore texture in different ways
HW Experiment with Texture and Surface
What is ISO?
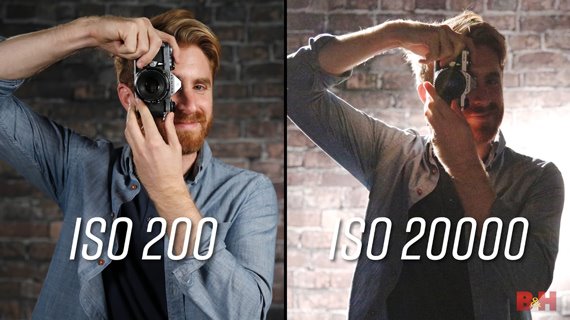
ISO is a number that represents how sensitive your camera sensor is to light.
What does a low/high ISO mean?
A lower ISO value means less sensitivity to light, and the more light you will need to take the photo.
While a higher ISO means more sensitivity, and the less light you need to take a picture.
It’s one element of photography’s exposure triangle — along with aperture and shutter speed — and plays an essential role in the quality of your photos.
LOW ISO v HIGH ISO
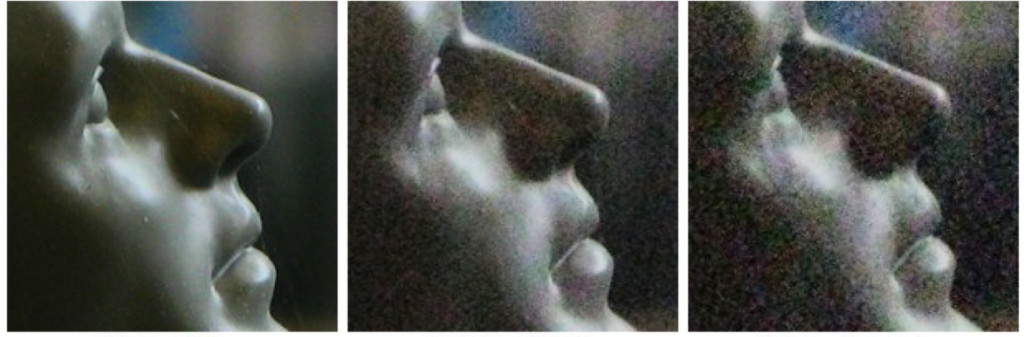
If you use a High ISO…. The trade-off is that higher ISOs can lead to degraded image quality and cause your photos to be grainy or “noisy.”
The lower the ISO number, the lower your camera’s sensitivity, and the more light you need to take a picture
Low Light Situations
In low light situations, it is often necessary to raise the ISO in order to get a clear picture. The big problem with raising the ISO, though, is that it introduces ‘noise’ into the image (we talk about this more below), which can make it appear grainy.
If you are taking a picture in ideal light conditions, you will want to keep the ISO low in order to avoid introducing noise into the image.
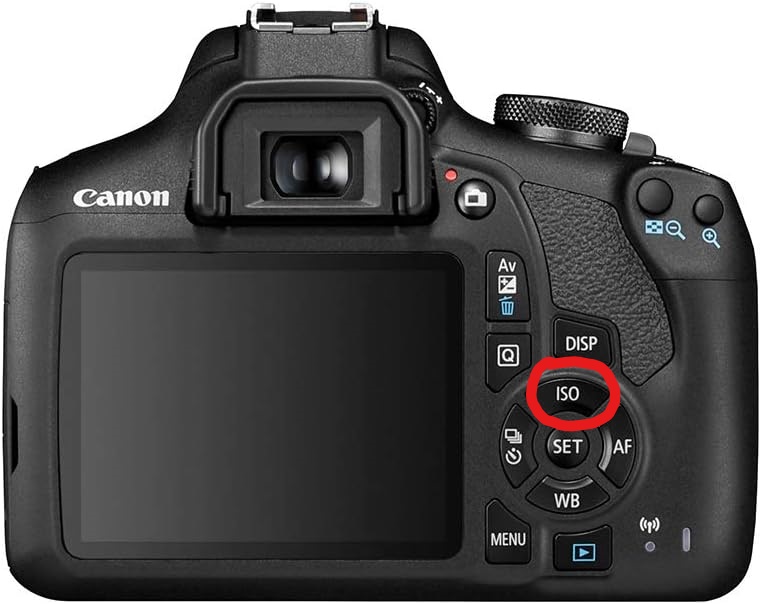
How to adjust ISO on the Camera
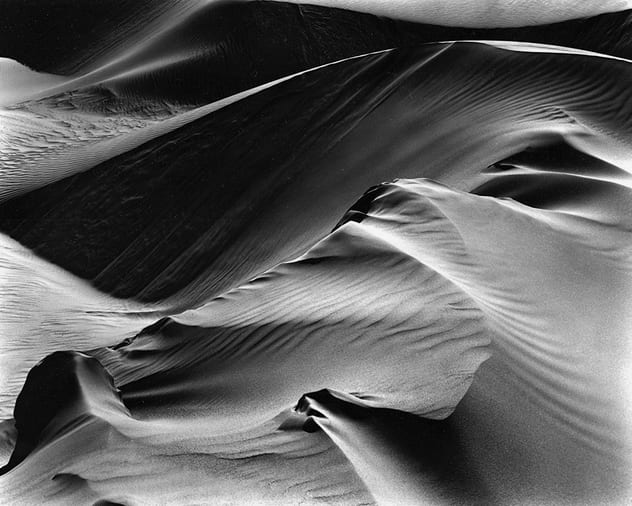
Texture
When talking about photography, texture refers to the visual quality of the surface of an object, revealed through variances in shape, tone and colour depth. Texture brings life and vibrance to images that would otherwise appear flat and uninspiring.
Research one of the below photographers
and then experiment with taking your own textural photos: When you find a texture you want to capture, take a series of photos of the same subject, shot with different settings. When taking photos of the texture, consider the degree of abstraction in the final image. Are the images still recognisable? Experiment with colour and black and white.
Present at least 6 final photos (of the same subject), 3 should show visual noise and 3 should show no visual noise.
Research the work of the photographers listed above. How have they experimented with texture work? Choose specific images to comment on in detail. You could also find other photographers who are interested in experimenting with similar effects.
Explore the effects of changing the ISO on your camera to alter grain but also the brightness of your images. You could illustrate this with a series of photos of the same subject shot with different settings.
Create a series ofimages. Consider the degree of abstraction in the final image. Are the images still recognisable? Experiment with colour and black and white.
Create a series of images which explore TEXTURAL effects. Remember to share all of the images you make (including those that you deem failures) in a gallery/contact sheet.
Curate your images into different groupings (see below). Experiment with editing the images in each set differently. Give each set a title and write a short evaluation explaining your editorial decisions.
Make a blog post about your development of ideas based on the prompts listed above…
Make Blog Post that describes and explains your learning journey through Adobe Lightroom Library Mode and Develop Mode
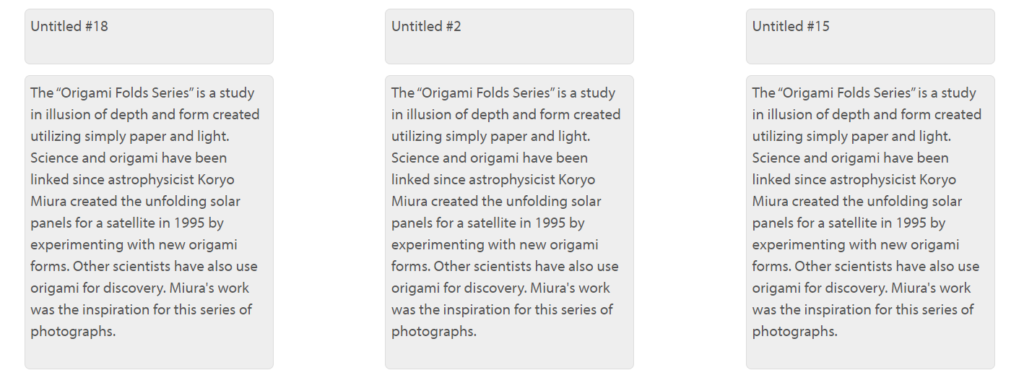
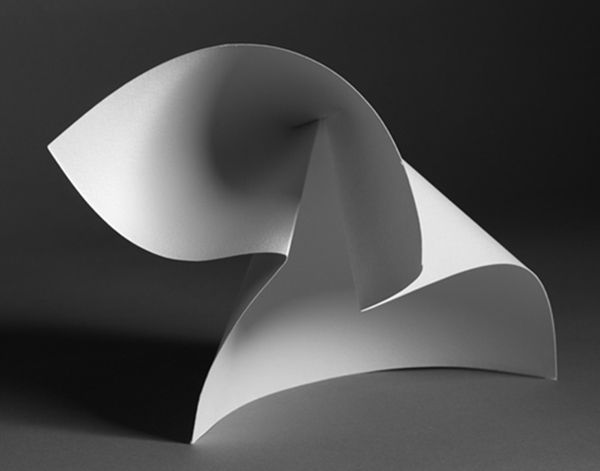
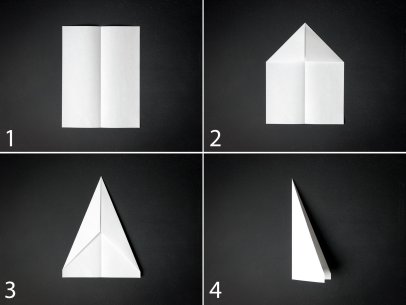
Week 6 Paper Experiments
Paper Experiments
Adobe Lightroom / Photoshop edits
Look at…The Formal Elements and make connections
Explore Exposure Compensation and Light Meter awareness / use
BLOG POSTS to make…
“Paper Experiments”…remember to describe and explain your processes, how your ideas have been influenced (artists) and what aspects of the formal elements you are exploring…
Blog post 1: ‘Landscapes Use this website to help you explore how Landscapes evolved as a genre. Some points to consider are listed below. Include images.
Blog post 2: Romanticism’ – What is Romanticism? What are the ideals / characteristics of Romanticism? Include a case study of a Romantic Artists – John Constable. What is The Sublime? Include a case study of a an artist who includes the sublime in their work. – J.M.W Turner is a good example.
Blog post 3: Landscape photoshoot 1. Include photos that you took over half term showing your personal response to rural landscapes / romanticism: Contact sheet, selection process, editing and final images
Blog Post 4 Ansel Adams: Who is Ansel Adams? Explore ideas of visualisation and Zone System, include photo analysis.
Blog Post 5: Exposure Bracketing – Show understanding of exposure bracketing and HDR imagery. HW: respond to Ansel Adams / focus on…exposure bracketing and HDR
Blog Post 6: Photoshoot in response to Ansel Adams. Include contact sheet, selection process, editing and final outcomes.
Blog Post 7: Panoramic Landscapes and Joiner photos – research and understanding
Blog Post 8: Photoshoot 3: Show understanding of Panoramic Landscapes + Joiner Landscapes + own photo
Extension Blog Post: Creative edits Explore and experiment with some creative ways to edit and present your landscape photos. You can find some options here or research your own.
Intro / Photographing the environment
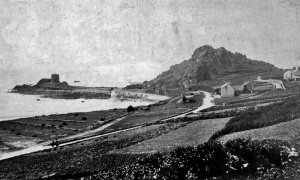
“…it is hard to consider the birth of the environmental movement without mentioningCarletonWatkins and the rippling, far-reaching influence of his 1861 images of Yosemite National Park. All that came after President Lincoln’s signing of the Yosemite Grant, Muir’s nature writing, the founding of conservation groups such as the Sierra Club – can be traced back to the intake of breath when his images were seen for the first time.”
Tasayac, the Half Dome, 5000 ft., Yosemite Carleton E. Watkins American 1865–66
20th Century 1900 —
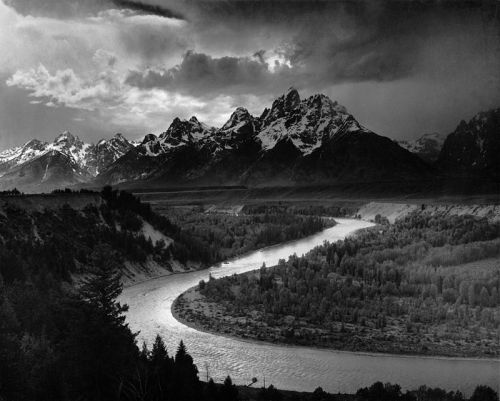
Ansel Adams
Ansel Adams Snake River 1942 USA
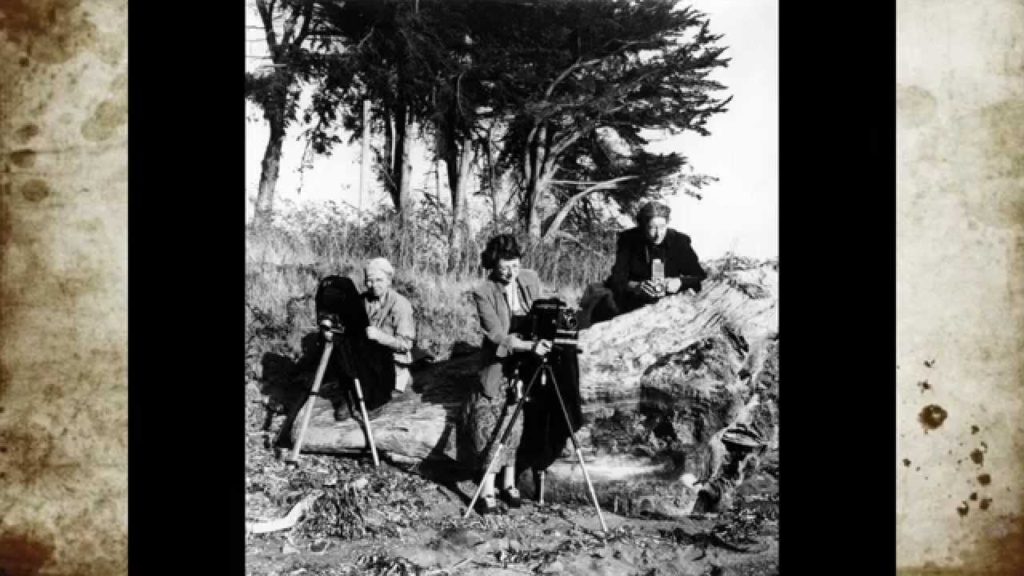
Ansel Adams and his large-format camera
Ansel Adams was an American landscape photographer and environmentalist known for his black-and-white images of the American West. He helped found Group f/64, an association of photographers advocating “pure” photography which favored sharp focus and the use of the full tonal range of a photograph…even creating a Zonal System to ensure that all tonal values are represented in the images. Ansel Adams was an advocate of environmental protection, national parks and creating an enduring legacy of responses to the power of nature and sublime conditions…Other members in Group f/64 included Edward Weston, but also Imogen Cunningham among other female photographers who have often been overlooked in the history of photography.
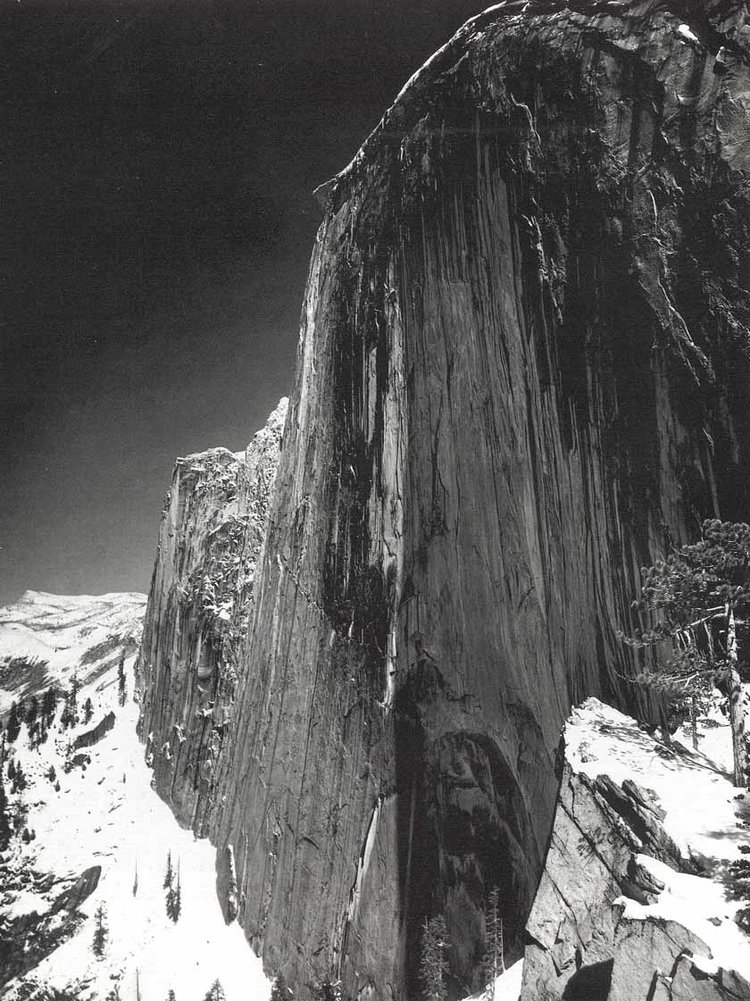
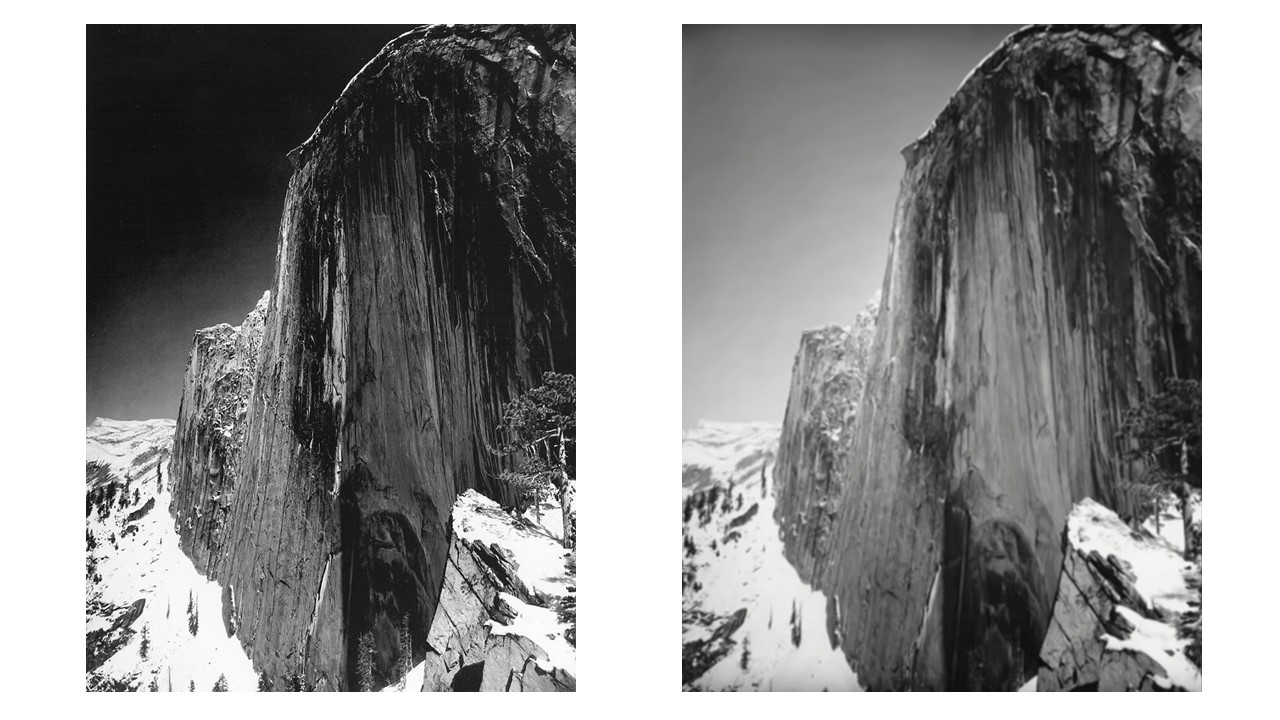
Ansel Adams, Monolith, the face of Half Dome, 1927
Ansel Adams’s photographic style is characterized by its sharp focus, exceptional detail, and dramatic use of light and shadow. He sought to capture the grandeur and beauty of the natural world, emphasizing the importance of preserving these pristine landscapes.
One of the key compositional techniques that Adams employed in many of his images was to place the horizon about two-thirds of the way up the frame. This would mean the composition was biased in favour of the landscape rather than the sky and would help to communicate the epic scale of the scene
IMAGE ANALYSIS:
IMAGE ANALYSIS: For your analysis of Adams’ work and practice, try and find the story behind the image – as an example, see Monolith, the face of Half Dome, 1927
EXTENSION > COMPARE & CONTRAST: Compare and contrast the work of Ansel Adams and Edward Weston using Photo Literacy Matrix. Find 3 quotes that you can use in your analysis, that either supports/ disapprove your own view. Make sure that you comment on the quote used.
For example, you can use quotes: 1. a quote from Adams’ on Weston’s influence 2. a quote from Adams’ on his own practice, eg. technique, pre-visualisation (zone system), subject (nature), inspiration etc. 3. a quote from Weston on Adams’ images. 4. a quote from someone else, for example a critic, historian that comments either on Adams’ or Weston’s work.
I can’t tell you how swell it was to return to the freshness, the simplicity and natural strength of your photography … I am convinced that the only real security lies with a certain communion with the things of the natural world
— A letter from Edward to Ansel in 1936
Practical / Creative Responses
Create a mind-map + mood-board of potential locations around Jersey that you could record as a response to Ansel Adams….look for extremes (either calm or wild, derelict, desolate, abandoned or stormy, battered and at the mercy of nature)
HOMEWORK Monday 24th Feb – Monday 3rd March deadline
Monday 24th Feb – Monday 3rd March deadline
Take 150-200 photos of landscapes in response to Ansel Adams and the f/64 groups work.
There are plenty of areas to explore locally…woods, streams, fields, beaches, coastal paths, sand dunes etc
Add your edited selective contact sheets / select your best 6-10 images / include edits and screen shots to show this process on the blog
Ensure you include both monochrome and colour examples
You could use exposure bracketing to create HDR images inspired by Ansel Adams.
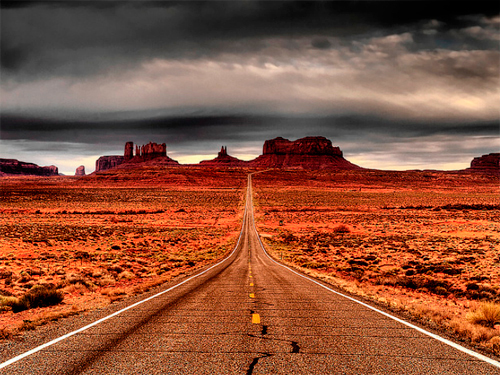
AIM to photograph the coastline, the sea, the fields, the valleys, the woods, the sand dunes, Cliffs etc. USE the wild and dynamic weather and elements to help create a sense of atmosphere, and evoke an emotional response within your photo assignment. PHOTOGRAPH before dark, at sunset or during sunrise…and include rain, fog, mist, ice, wind etc in your work LOOK for LEADING LINES such as pathways, roads etc to help dissect your images and provide a sense of journey / discovery to them.
Ensure that you include the following key terms in your blog posts…
Composition (rule of thirds, balance, symmetry)
Perspective (linear and atmospheric, vanishing points)
Depth (refer to aperture settings and focus points, foreground, mid-ground and back-ground)
Scale (refer to proportion, but also detail influenced by medium / large format cameras)
Light ( intensity, temperature, direction)
Colour (colour harmonies / warm / cold colours and their effects)
Shadow (strength, lack of…)
Texture and surface quality
Tonal values ( contrast created by highlights, low-lights and mid-tones)
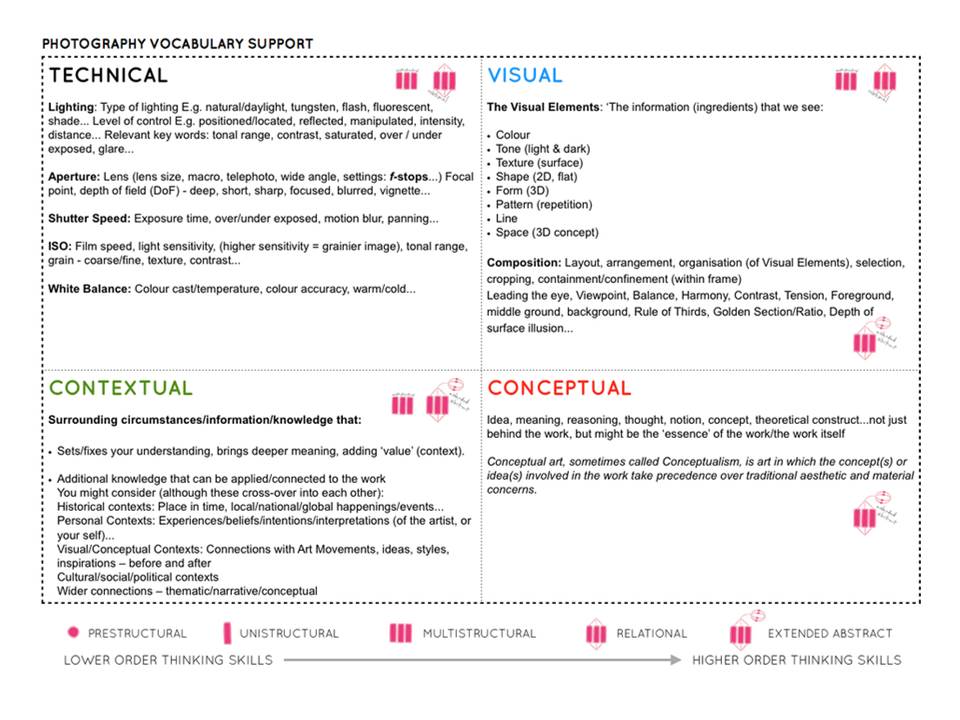
REMEMBER you MUST use PHOTO-LITERACY (TECHNICAL / VISUAL / CONTEXTUAL / CONCEPTUAL) to analyse effectively.
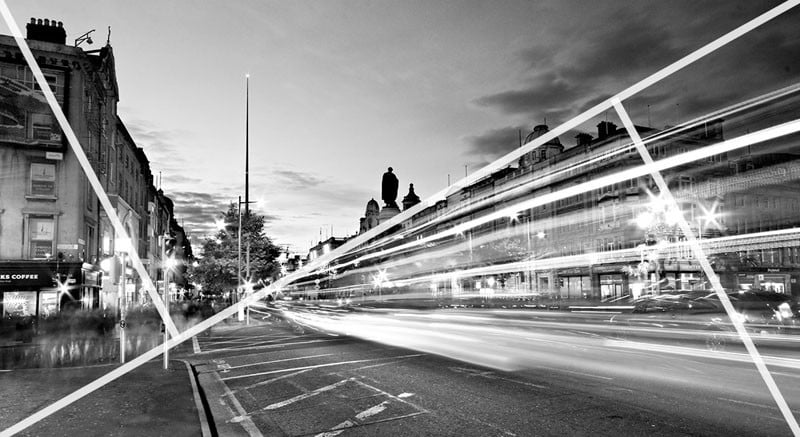
Leading Lines
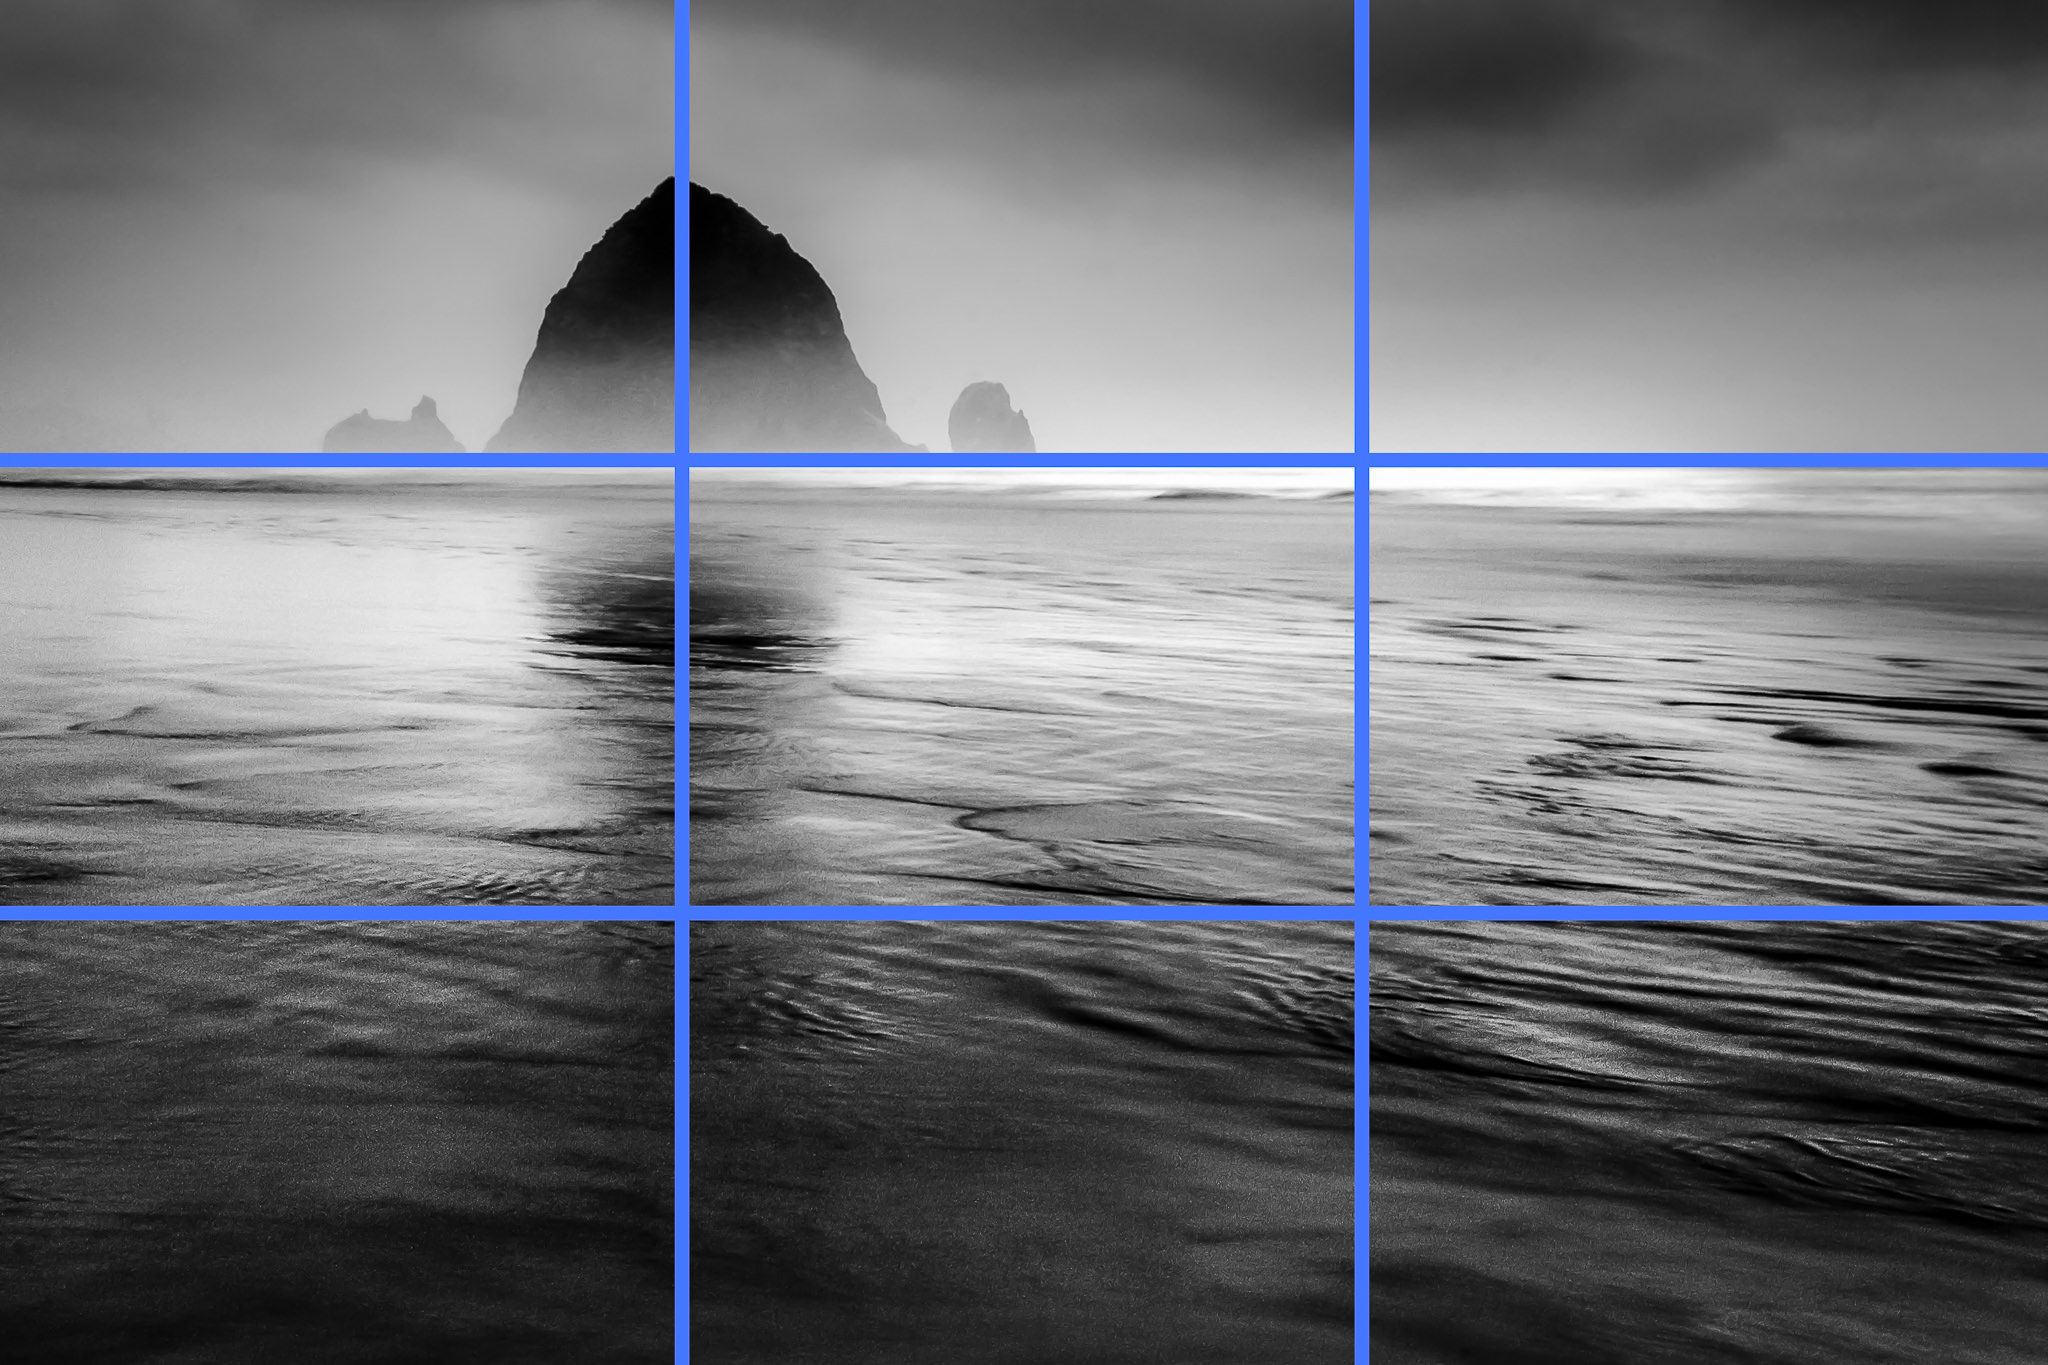
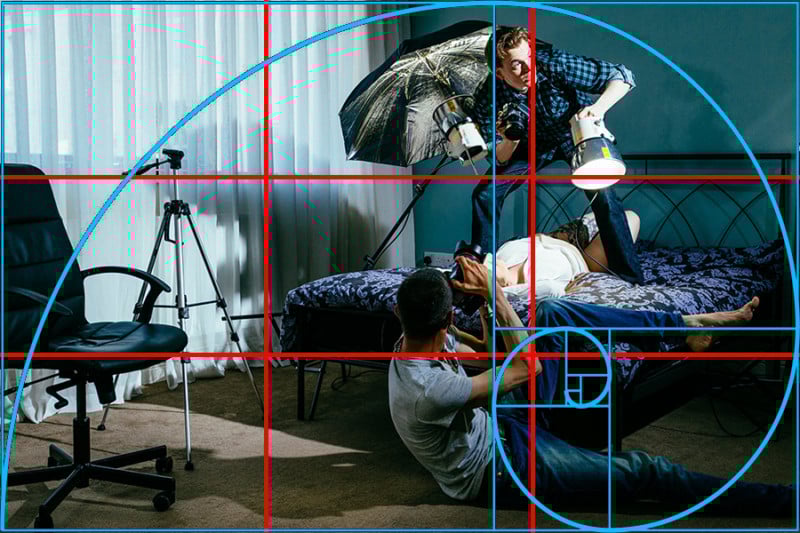
Composition : The Rule of Thirds Grid
Composition : Fibonacci Curve / Golden ratio
Definitions
development: a chemical process, carried out in the dark, which makes the image exposed on the film visible and permanent in negative form.
exposure: the amount of light that falls on the film (which will become the photographic negative). This is regulated by controlling the size of the aperture through which light enters the camera and/or the length of the exposure.
gray card: a standardized card, used for measuring light, which corresponds to Zone V, or mid-tone gray.
hand-held light meter: a light-measuring device that is separate from the camera. A spot meter, which covers a one degree angle, is ideal for measuring target zones.
previsualization: a mental exercise in which the photographer imagines the subject in terms of the black, white, and grays desired in the final photographic print.
spot meter: a type of hand-held meter that allows the photographer to easily measure light falling on very small areas within the subject matter.
zones: a specific set of tonal values consisting of pure black, the base white of the black-and-white photographic paper, and eight or nine shades of gray in between [see Zone Scale Card]. When the Zone System is used, the darkest areas of a photographic image are referred to as low values (Zones I — III), the gray areas are called middle values (Zones IV — VI), and the light areas are high values (Zones VII — IX). The zones are always referred to by roman numerals.
EXPOSURE BRACKETING
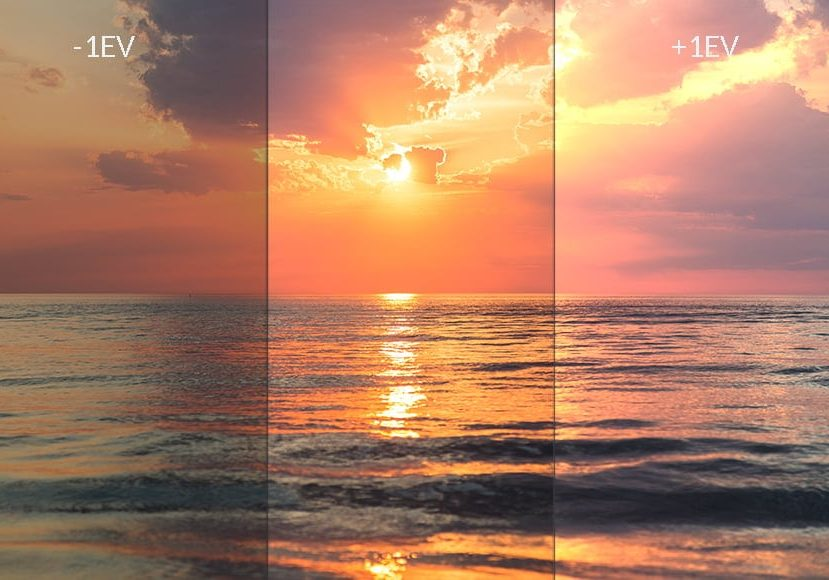
Exposure bracketing means that you take two more pictures: one slightly under-exposed (usually by dialing in a negative exposure compensation, say -1/3EV), and the second one slightly over-exposed (usually by dialing in a positive exposure compensation, say +1/3EV), again according to your camera’s light meter.
TASK : try a few variation of exposure bracketing to create the exposures that you want…you may already have pre-sets on your phone or camera to help you do this, but experimenting manually will help your understanding!
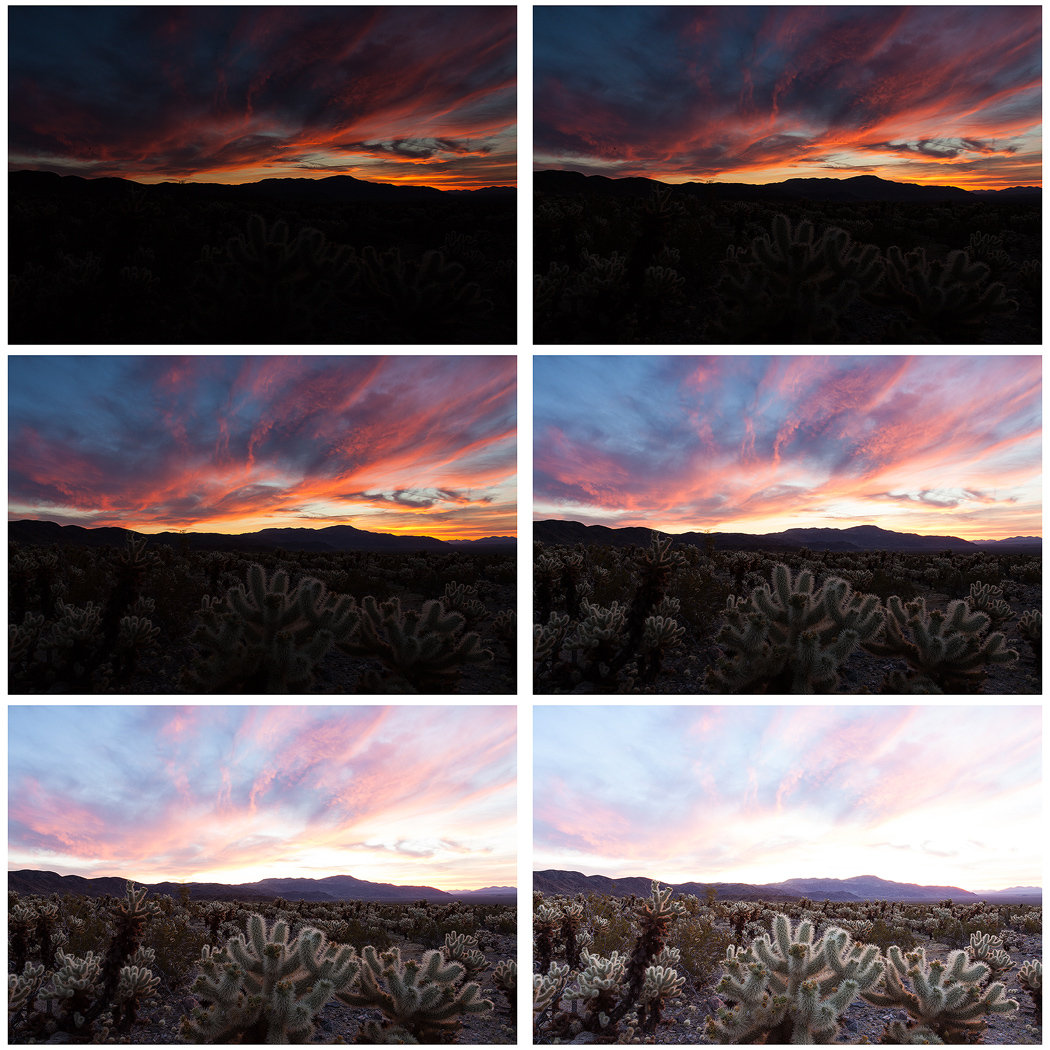
AEB: Many digital cameras include an Auto Exposure Bracketing (AEB) option. When AEB is selected, the camera automatically takes three or more shots, each at a different exposure. Auto Exposure Bracketing is very useful for capturing high contrast scenes for HDR (HDR stands for High Dynamic Range and refers to a technique that expresses details in content in both very bright and very dark scenes.).
…by taking the same photograph with a range of different exposure settings
How to use Exposure Bracketing on the Camera:
There are two ways to use Exposure Bracketing on your camera: 1. With exposure compensations. 2. With the AEB Setting (Automatic Exposure Bracketing)
Exposure Compensation: – This is how you manually set the exposure for each photo… – You can use Exposure Compensation to quickly adjust how light or how dark your exposure will be using these controls… – Start with 1 stop variations. So, take a shot at -1 on the exposure compensation dial, then turn the dial so it reads -2 and then -3. Repeat, this time overexposing at +1, +2, and +3. You may not use all these images in the final HDR but it’s good to have the data just in case
AEB:
Or set the amount of “bracketing” like below…
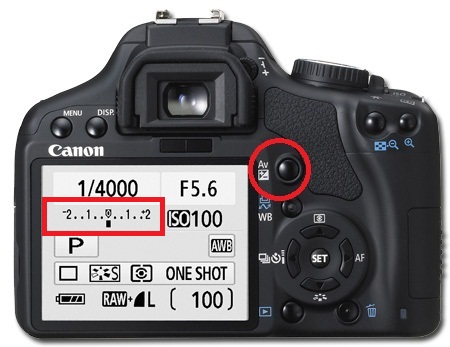
(If you are using the larger DSLR cameras from school, follow the instructions below… if you are using the smaller mirrorless cameras from school, follow this link for instructions)
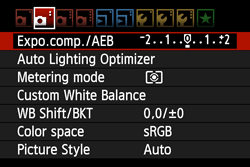
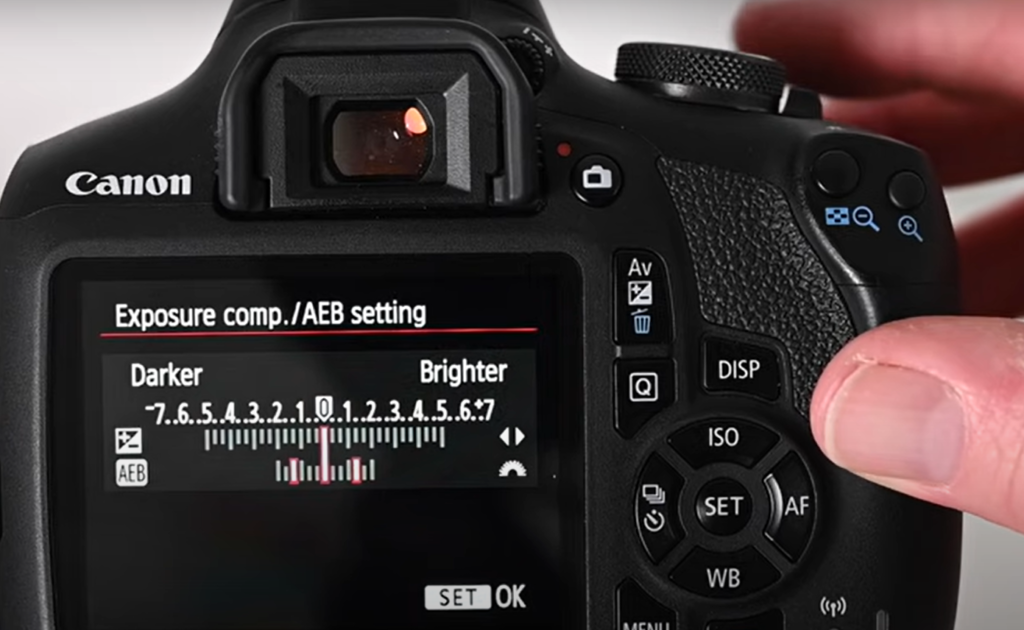
In the menu, select the second tab and go to ‘Expo. Comp. /AEB
Use the dial on the top of the camera to set the range of exposure you want to capture with your 2nd and 3rd photo
After you have set the exposure range, you will see two extra marks on the exposure metre…
Now take 3 photos and your camera will automatically change the exposure for each one.
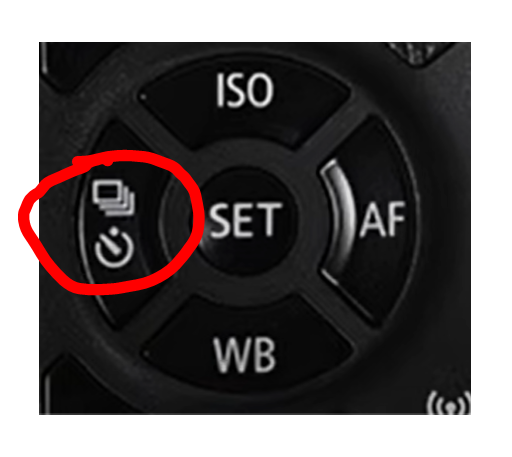
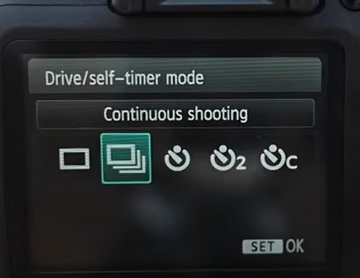
TIP: You can also set the camera to continuous shooting, to take 3 photos in close succession – all you need to do is hold the shutter button down.
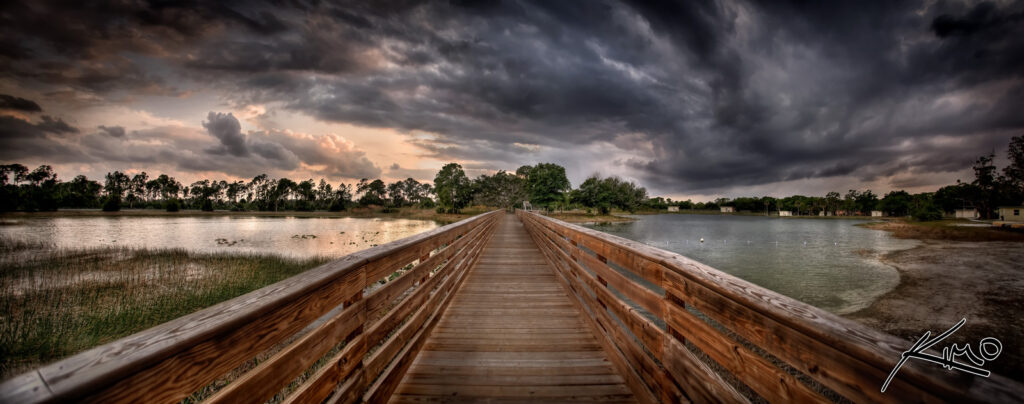
HDR photography is a technique where multiple bracketed images are blended together to create a single beautifully exposed photograph with a full dynamic range of tones from the very dark to the very brightest.
Your camera can only capture a limited range of lights and darks (i.e., it has a limited dynamic range). If you point your camera at a dark mountain in front of a bright sunset, no matter how much you tweak the image exposure, your camera will generally fail to capture detail in the mountain and the sky; you’ll either capture an image with a beautiful sky but a dark, less detailed mountain, or you’ll capture an image with a detailed mountain but a bright, blown-out sky. High dynamic range photography (HDR) aims to address this issue. Instead of relying on the camera’s limited dynamic range capabilities, you take multiple photos that cover the entire tonal range of the scene.
A set of three bracketed shots: -1 EV (left), 0 EV (middle), +1 EV (right). EV = exposure value
Ansel Adams zone system was in essence a pre-cursor of HDR with the outcome of producing an image with a full range of tones showing details in both the bright areas and dark shadows.
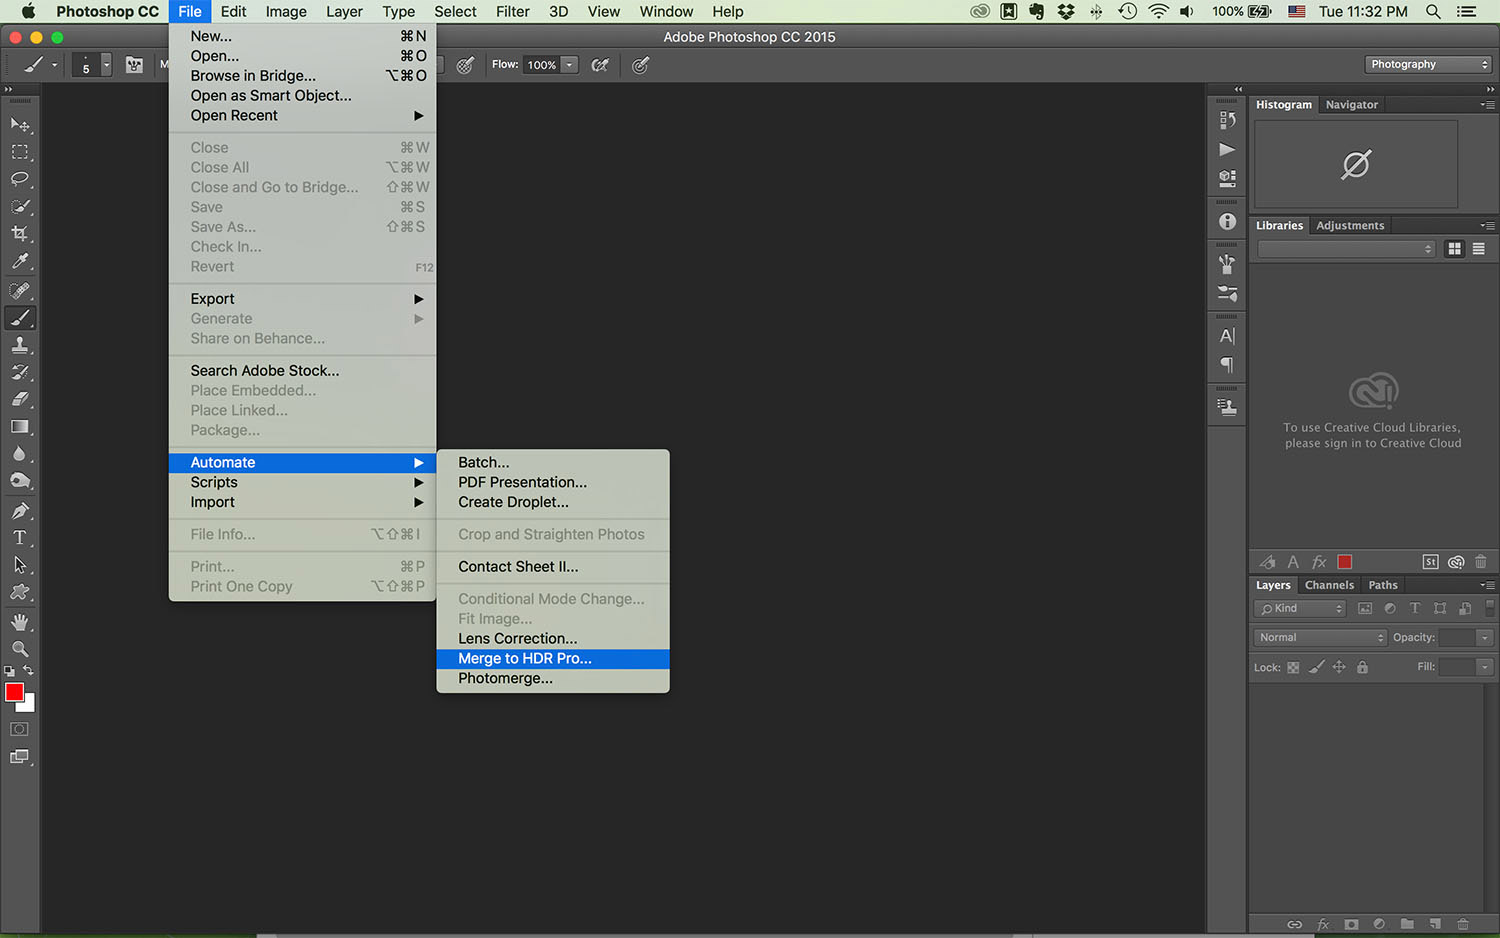
How to merge your images to create your HDR images in Photoshop:
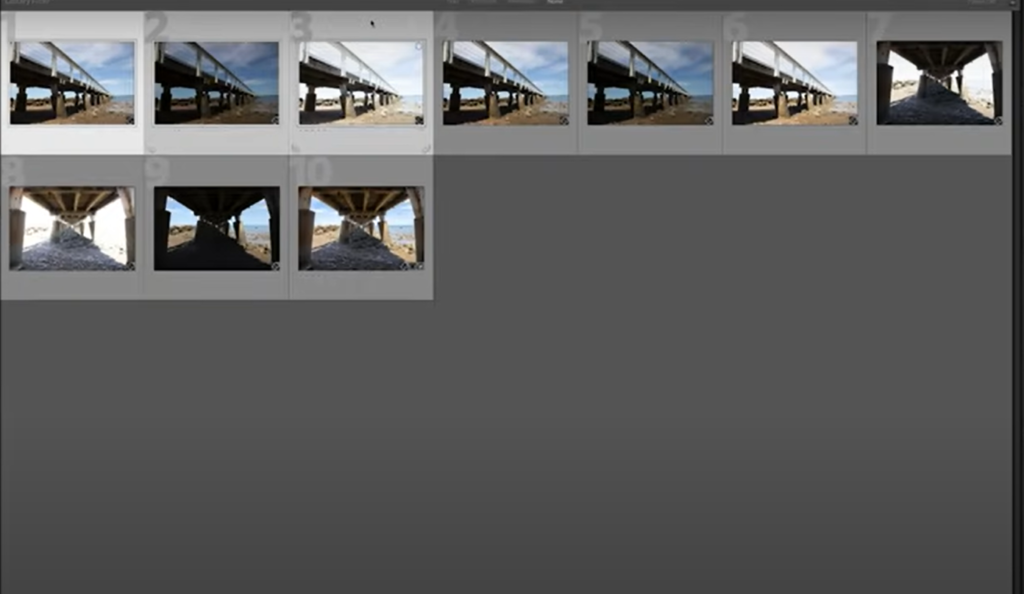
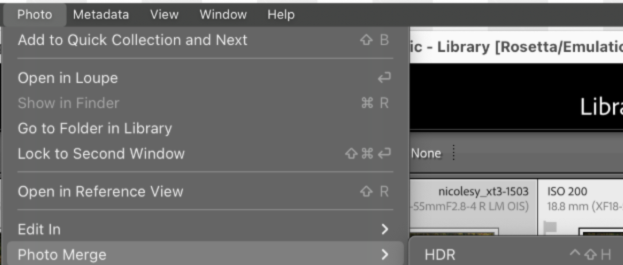
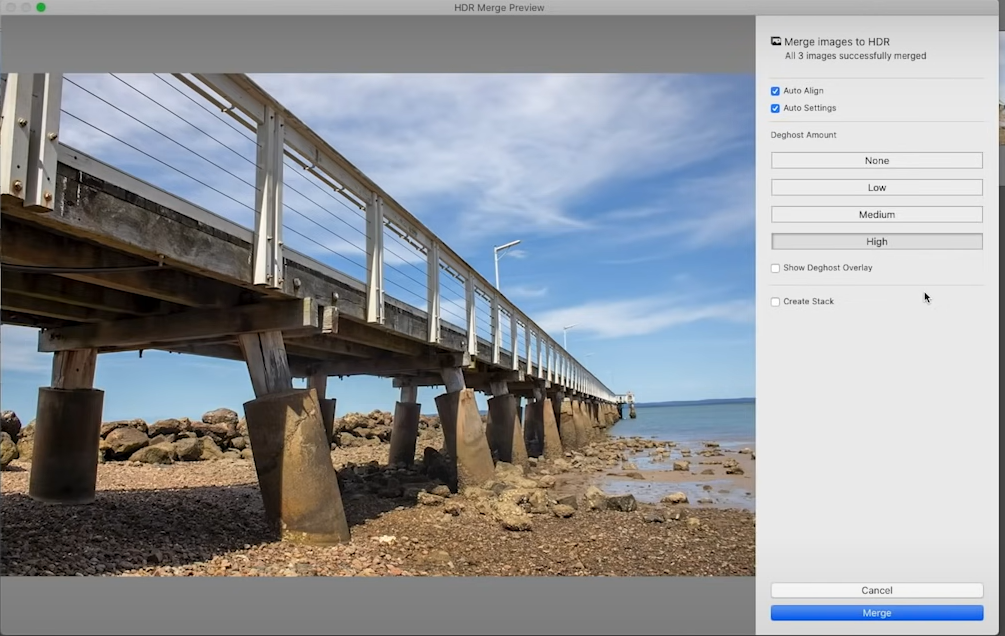
1. Open your photos in Lightroom Classic
2. highlight the 3 images you want to merge
3. Go to the top and click Photo>Photo Merge>HDR
4. If you’re happy with the preview, click merge
This will create a new HDR image and add it to your library.
Further Creative Responses
During the month of March you will carry out further photo-assignments designed to encourage more creative approaches…
Panoramic Landscapes
Joiner Landscapes
Panoramic Landscapes
Panoramic landscapes are wide, expansive views that capture a large area of scenery in one image, often showcasing the beauty of nature.
Considerations When taking your photos:
Level surface, arc-like open landscape. Try to visualise how your landscape will look divided into slices (5-10 slices). Move your camera along a steady plane, use a tripod if possible.
How to create your own Panoramic photos in Lightroom
Select the source images in Lightroom Classic.
For standard exposure photos, select Photo > Photo Merge > Panorama
For exposure bracketed photos, select Photo > Photo Merge > HDR Panorama to merge them into an HDR panorama.
In the Panorama Merge Preview / HDR Panorama Merge Preview dialog box, choose a layout projection: Spherical: Aligns and transforms the images as if they were mapped to the inside of a sphere. This projection mode is great for really wide or multirow panoramas / HDR panorama. Perspective: Projects the panorama / HDR panorama as if it were mapped to a flat surface. Since this mode keeps straight lines straight, it is great for architectural photography. Really wide panoramas may not work well with this mode due to excessive distortion near the edges of the resulting panorama. Cylindrical: Projects the panorama / HDR panorama as if it were mapped to the inside of a cylinder. This projection mode works really well for wide panoramas, but it also keeps vertical lines straight.All of these projection modes work equally well for both horizontal and vertical panoramas / HDR panoramas. Cylindrical layout projection for wide panoramas/ HDR panoramas
You can use Boundary Warp slider setting (0-100) to warp panoramas / HDR panoramas to fill the canvas. Use this setting to preserve image content near the boundary of the merged image, that may otherwise be lost due to cropping. The slider controls how much Boundary Warp to apply. Higher slider value causes the boundary of the panorama/ HDR panorama to fit more closely to the surrounding rectangular frame.
Select Fill Edges to automatically fill the uneven edges of the merged image.
While previewing the panorama / HDR panorama, select Auto Crop to remove undesired areas of transparency around the merged image.
Auto Crop to remove areas of transparency, shown in white in this illustration
To group the source images and the panorama / HDR panorama image into a stack (after the images are merged), select the Create Stack option. The merged panorama / HDR panorama image is displayed at the top of the stack.
Once you’ve finished making your choices, click Merge. Lightroom Classic creates the panorama / HDR panorama and places it in your catalogue.
Pearblossom Highway is a piece of art created by the British artist David Hockney. It depicts a view of an American Highway. It is a collage compiled from over 700 separate photographs. The artist himself describes his work as a drawing as opposed to a photographic piece.
‘Pearblossom Highway’ shows a crossroads in a very wide open space, which you only get a sense of in the western United States. . . . [The] picture was not just about a crossroads, but about us driving around. I’d had three days of driving and being the passenger. The driver and the passenger see the road in different ways. When you drive you read all the road signs, but when you’re the passenger, you don’t, you can decide to look where you want. And the picture dealt with that: on the right-hand side of the road it’s as if you’re the driver, reading traffic signs to tell you what to do and so on, and on the left-hand side it’s as if you’re a passenger going along the road more slowly, looking all around. So the picture is about driving without the car being in it.
Thus David Hockney described the circumstances leading to the creation of this photocollage of the scenic Pearblossom Highway north of Los Angeles. His detailed collage reveals the more mundane observations of a road trip. The littered cans and bottles and the meandering line where the pavement ends and the sand begins point to the interruption of the desert landscape by the roads cutting through it and the imprint of careless travellers.
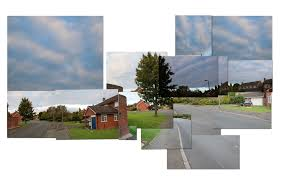
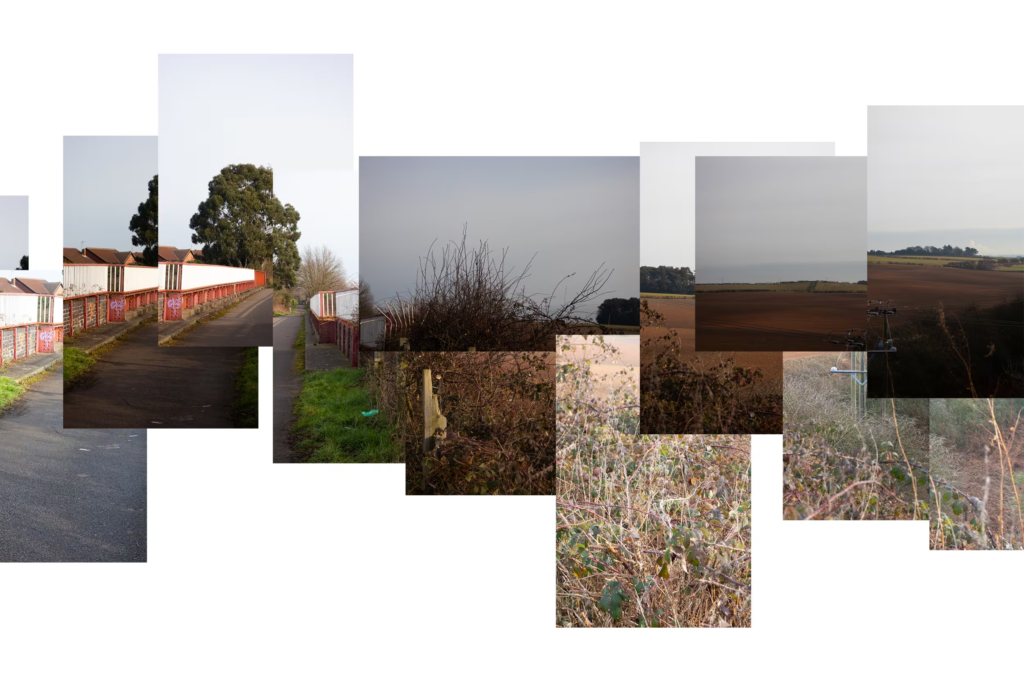
Create a joiner collage in Photoshop
Considerations
Choose a suitable landscape. Visualise how you can photograph the view in “chunks”. Start on one side and work your way around the view carefully photographing it in a grid-like manner. Do not worry if your images overlap—often this is better anyway…then merge your images in photoshop or print them out, arrange and glue together
Alwaysfollow the 10 Step Process and create multiple blog posts for each unit to ensure you tackle all Assessment Objectives thoroughly :
Mood-board, definition and introduction (AO1)
Mind-map of ideas (AO1)
Artist References / Case Studies (must include image analysis) (AO1)
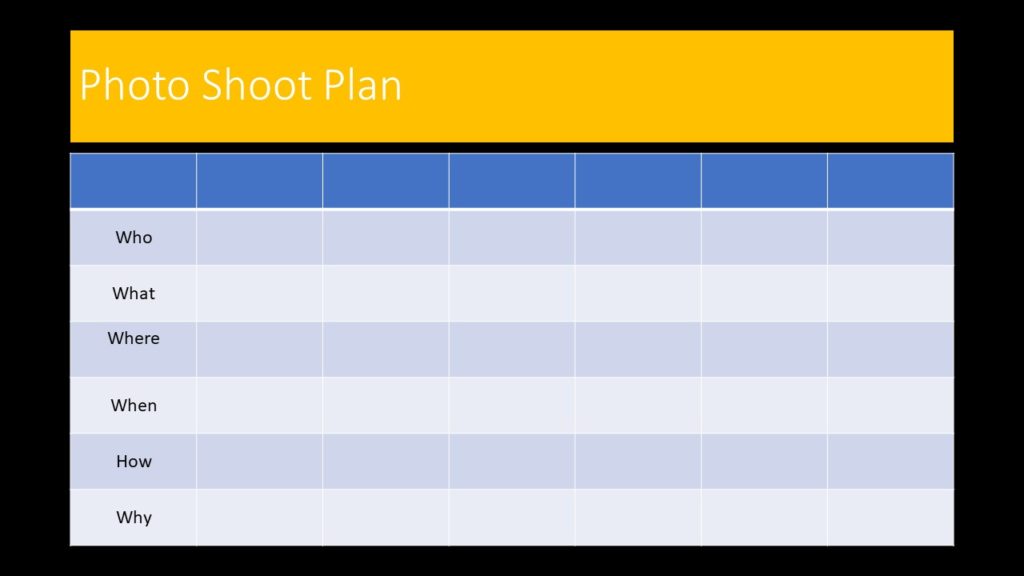
Photo-shoot Action Plan (AO3)
Multiple Photoshoots + contact sheets (AO3)
Image Selection, sub selection, review and refine ideas (AO2)
Please refer to this resource to help you navigate your camera’s function and settings. You will learn how to apply these skills learning to various photo-shoots over the next few months…and you should aim to provide evidence of these skills throughout your coursework.
Remember to practice and experiment. Use your eyes and look. The more you look, the more you will see. How you see the world will determine what kind of photographer you will become.
A camera is only a tool, and it is down to you to get the best out of your equipment by becoming confident and comfortable
You must experiment with each of these skill areas as we move through our sequence of photo-shoots. Remember to include / produce a blog post on each that includes evidence of your experiments and successes…
Remember to use What / How / Why / When when describing and explaining what you are experiencing and achieving with each of these…
Using Auto-Focus
Using Manual Focus
White Balance
ISO
Aperture
Focal Length : wide, standard and telephoto lenses
Depth of Field
Show / fast Shutter Speed
Exposure and exposure compensation
Exposure bracketing
Ansel Adams and the visualisation of an image
Exposure Triangle : ISO – Shutter Speed- Aperture
Depth of Field
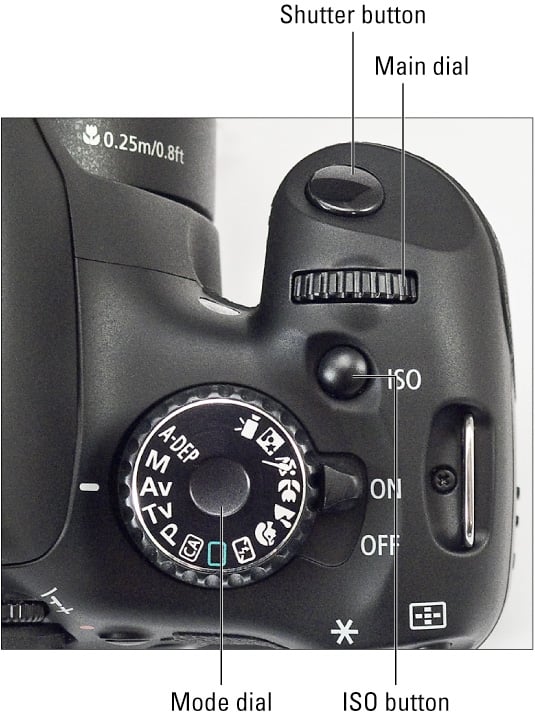
Camera function layout
Camera function layout
Ensure you are using technical vocab too…use the helpsheet to guide your literacy
Exposure Bracketing
Many digital cameras include an Auto Exposure Bracketing (AEB) option. When AEB is selected, the camera automatically takes three or more shots, each at a different exposure. Auto Exposure Bracketing is very useful for capturing high contrast scenes for HDR like this…
…by taking the same photograph with a range of different exposure settings
You can use Exposure Compensation to quickly adjust how light or how dark your exposure will be using these controls…
Or set the amount of “bracketing” like this…
Then you can create your High Dynamic Range images by using this process in Adobe Photoshop…
Understanding Composition
The Rule of Thirds
One of the fundamentals of painting and photography, the Rule of Thirds is a technique designed to help artists and photographers build drama and interest in a piece. The rule states that a piece should be divided into nine squares of equal size, with two horizontal lines intersecting two vertical lines.


