Use this simplified list to check that you are on task. Every item on the list represents at least one piece of work = one blog post. It is your responsibility as an A-level student to make sure that you complete and publish appropriate blog posts each week.
WEEK 1: 2 – 8 June 1. History & Context: Genre of street photography – Homework task 2. Theory & Practice: Henri Cartier-Bresson and the ‘decisive moment’
WEEK 2: 9 – 15 June 1. Artist Case-studies: Compare & Contrast > Henri Cartier-Bresson and William Klein 2. Planning & Recording: St Malo photoshoot – Fri 13 June
WEEK 3: 16 – 22 June 1. Selecting & Editing: St Malo photoshoot 2. Developing & Experimenting: Cropping & Generative AI
WEEK 4: 23 – 29 June 1. Picture-story: Research & Mood-board 2. Picture-story: Design & Layout
WEEK 6: 7-13 July 1. Picture-story: Printing & Binding 2. Final prints: Mounting & Presenting
WEEK 7: 14-19 July 1. Final prints: Mounting & Presenting
Assessment Objectives & Grade Boundaries
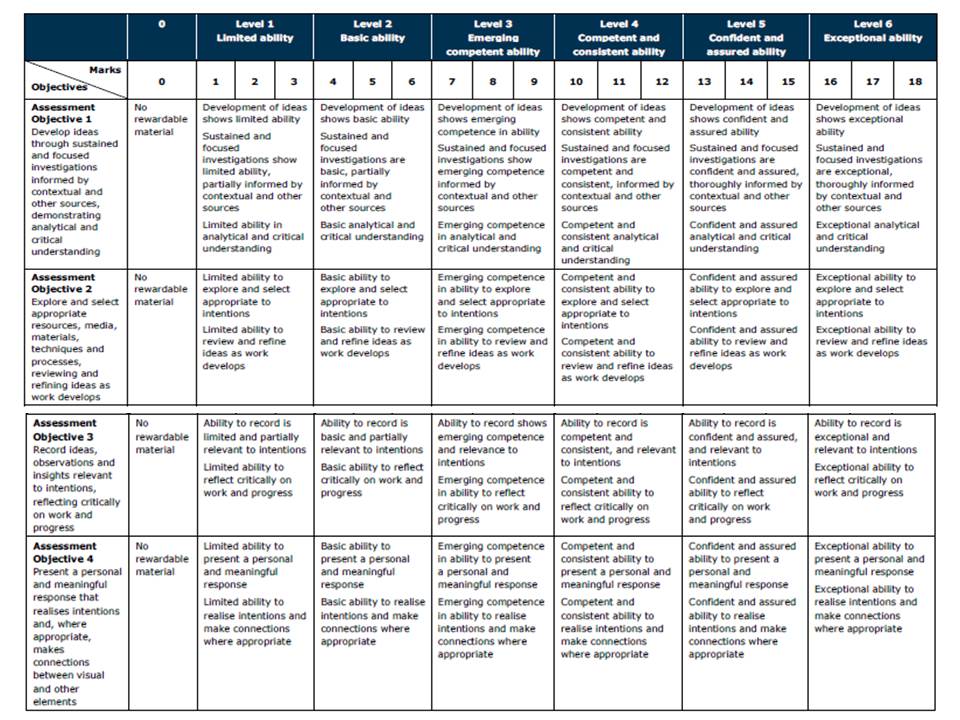
You should provide evidence that fulfils the four Assessment Objectives: AO1 Develop ideas through sustained and focused investigations informed by contextual and other sources, demonstrating analytical and critical understanding AO2 Explore and select appropriate resources, media, materials, techniques and processes, reviewing and refining ideas as work develops AO3 Record ideas, observations and insights relevant to intentions, reflecting critically on work and progress AO4 Present a personal and meaningful response that realises intentions and, where appropriate, makes connections between visual and other elements.
Coursework Marking Criteria
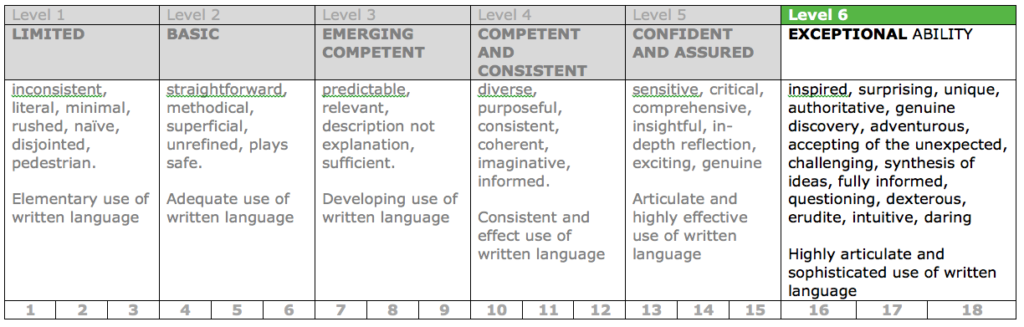
Marking Criteria Levels for Personal Study Essay
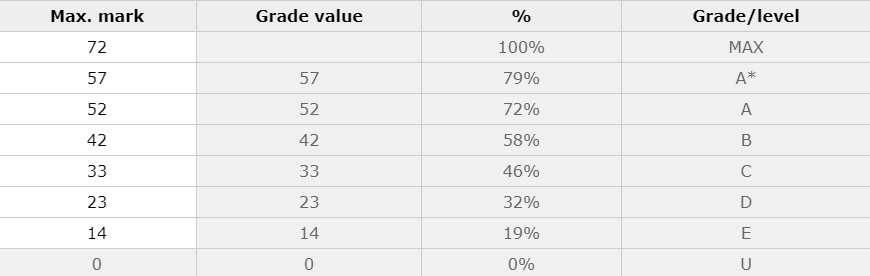
Grade Boundaries 2025
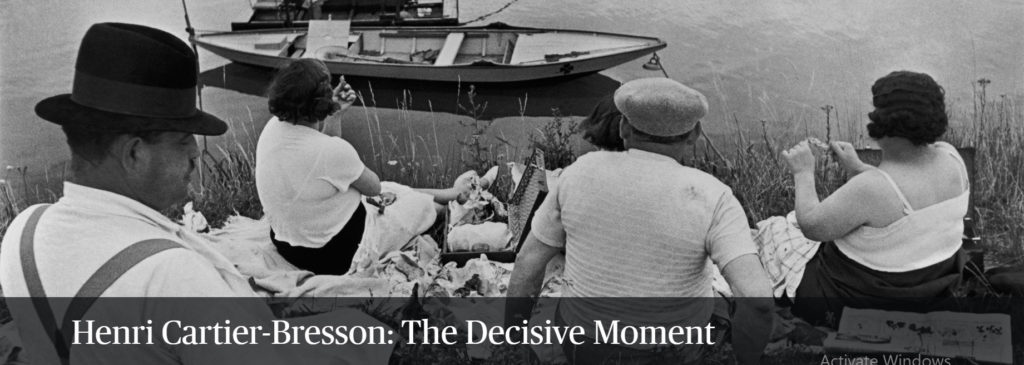
WEEK 1:2 – 8 June Street Photography Henri Cartier-Bresson and the ‘decisive moment’
INDEPENDENT STUDY – HOMEWORK TASK
Blog post 1: HISTORY & CONTEXT > Describe in 250-500 words what the genre of street photography is and produce a mood board of different images that represent this visual style and approach to image-making.
Read a couple of texts, first an historical overview here and Street Photography between Reportage, Cinema and Theatre by David Campany as a good introduction to the genre of street photography. Identity at least two quotes from sources above and include in your writing. Make sure you comment on quotes used, ie. do you agree/ disagree and why.
Explore iN-PUBLiC a group of contemporary street photographers that have the ability to see the unusual in the everyday and to capture the moment.
DEADLINE: Wed 11th June
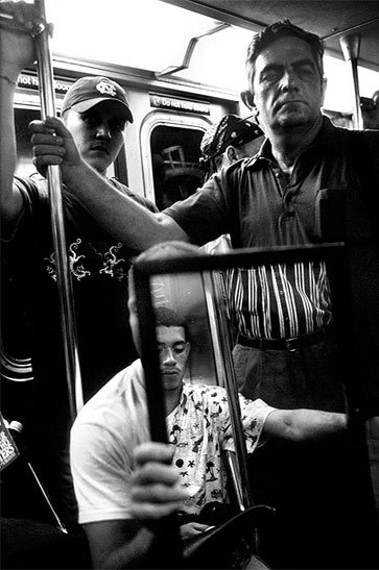
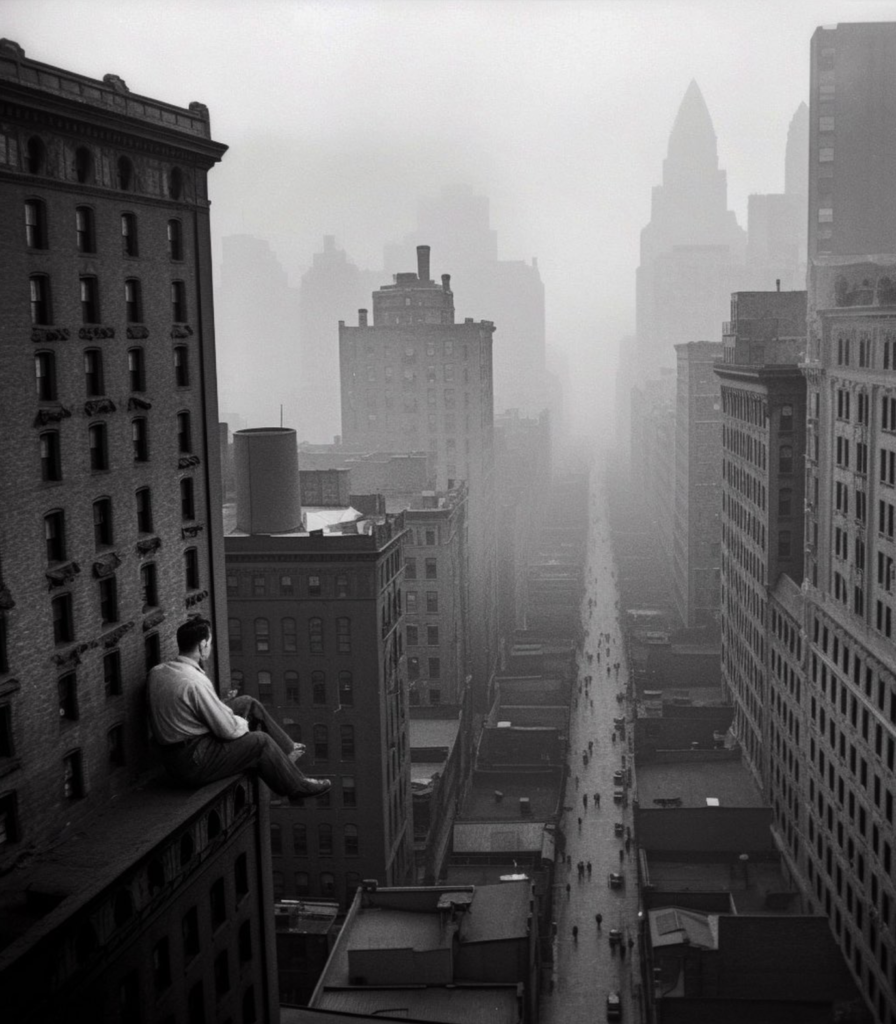
“Stare. It is the way to educate your eye, and more. Stare, pry, listen, eavesdrop. Die knowing something. You are not here long.”
Walker Evans, ca. 1960 from Afterword in Many Are Called, a photobook featuring Evans’ snapshots of subway riders in New York.
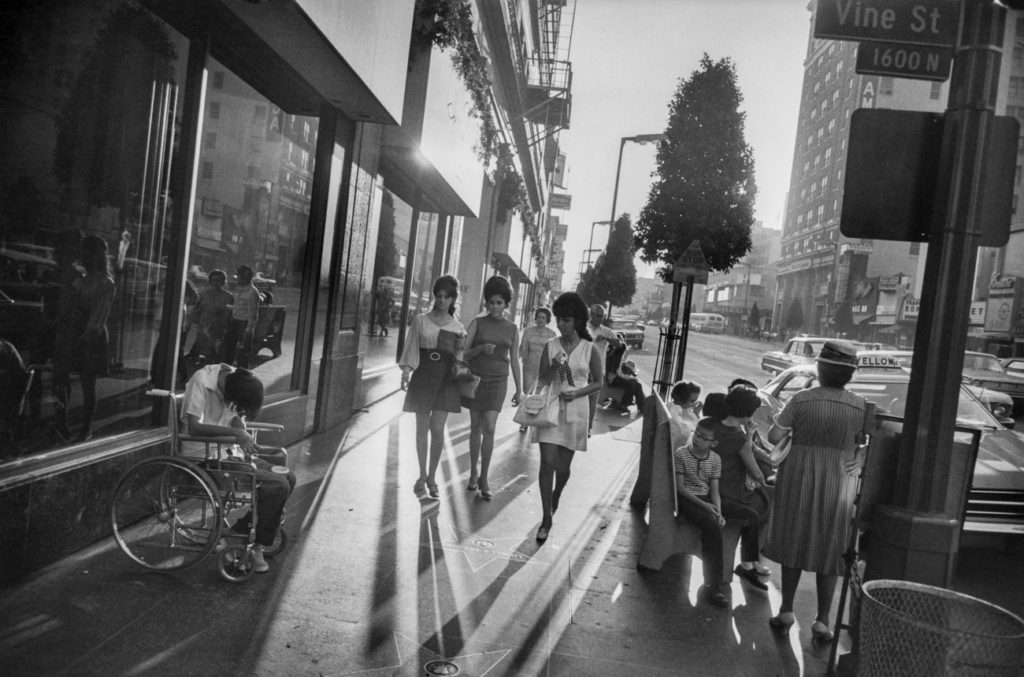
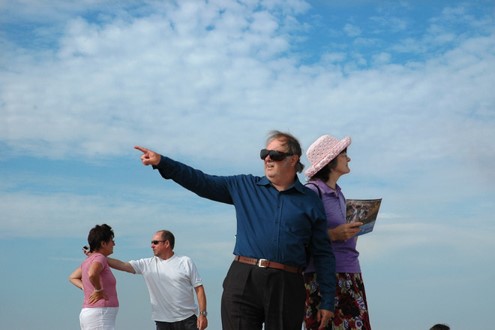
Street Photography:The genre of street photography is the impulse to take candid pictures in the stream of everyday life. Street photography is a form of documentary but it is decidedly not reportage and rarely simply tells a story. Sometimes a street photographer captures something truly unusual – an extraordinary face, an accident, or a crime in the making. But more often a good street photograph is remarkable because it makes something very ordinary seem extraordinary.
Flaneur: The street photographer is the archetypal flaneur, an urban type popularised by the French poet Charles Baudelaire in the mid-nineteenth century, around the same time that photography itself came into popular circulation. Baudelaire defined the flaneur as ‘a botanist of the sidewalk’ an apt description for most of street photographers. Read more here
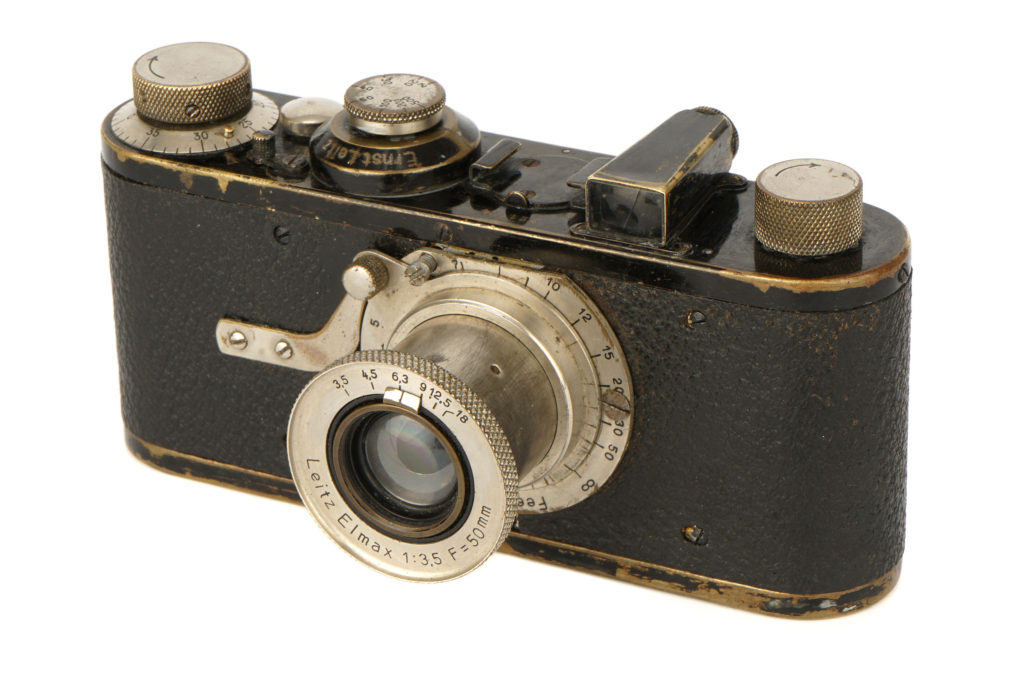
Technology: The Leica handheld camera, commercially available as of 1924, was the ticket to allowing a photographer to be on the move, as well as to capturing movement. A 35-mm film camera, the Leica had a wide aperture that required a short exposure time, especially for pictures taken outdoors, and it could advance quickly, which allowed the photographer to take numerous pictures of a subject in quick succession. Read more here on the history of the Leica camera
The Leica became the camera of choice in the 1930s for photographers such as André Kertész, Ilse Bing, Henri Cartier-Bresson, and others, all of whom worked primarily in Europe. Those photographers did not call themselves street photographers even if some of their subject matter fit the genre’s current definition, but instead they identified themselves as photojournalists, fashion photographers (many worked for magazines), or simply as experimenters with a new medium. The Leica continued to be the go-to device for photographers after World War II, especially for New York City photographers such as Roy DeCarava, Lisette Model, William Klein, and Helen Levitt. Robert Frank, who is best known for his book The Americans (1959) and was the leading influence on street photographers of the succeeding generation, documented culture throughout the United States and in Europe. Street photography took off in Mexico as well, with Manuel Álvarez Bravo and Graciela Iturbide. Paris had Robert Doisneau, Czechoslovakia had Josef Koudelka, and London had Bill Brandt.
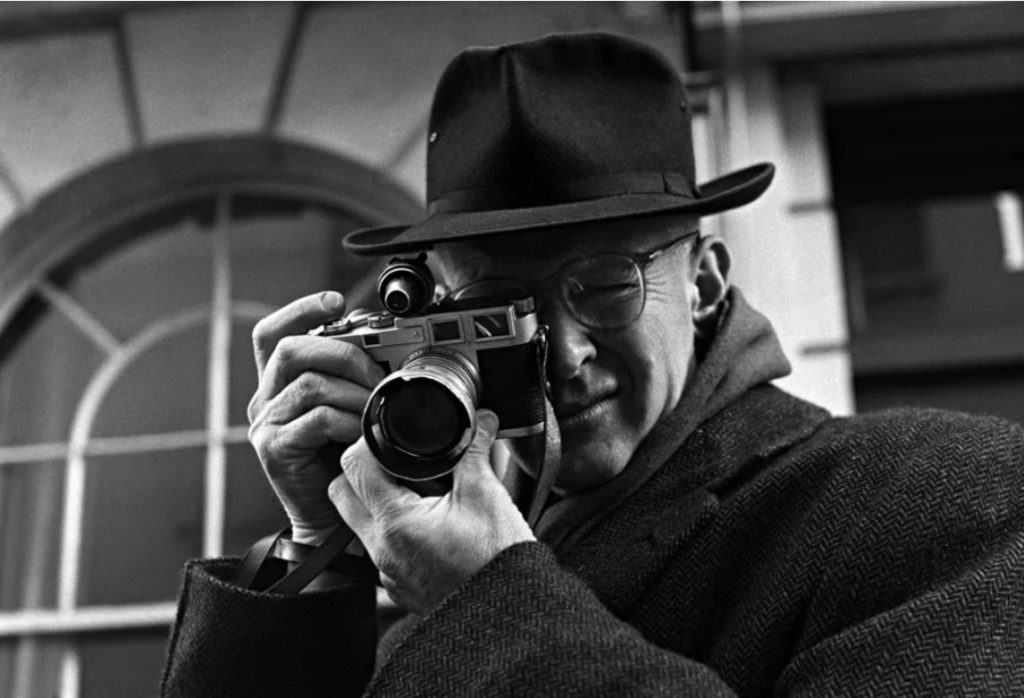
Henri Cartier-Bresson and his trusted Leica range finder camera
Blog post 2: THEORY & PRACTICE > Henri Cartier-Bresson and the ‘decisive moment’
Add your answers to the questions below to your blog post!
Lesson 1: THINK, PAIR, SHARE
Question: How does Henri Cartier-Bresson view the act of photography?
Watch film: 5 mins
Name 3 things and write on Show Me Boards (SMB)
For example, consider the following: Why is a camera an extension of the eye? What is the physical pleasure in making photographs? How can photography be likened to hunting?
Thinking time: 30 sec
Talk in pairs: 1 mins
Cold-calling: Sample students responses
BLOG > Add your answer to the question and new knowledge gained from class discussion.
Extra: Create a moodboard of images made by Henri Cartier-Bresson
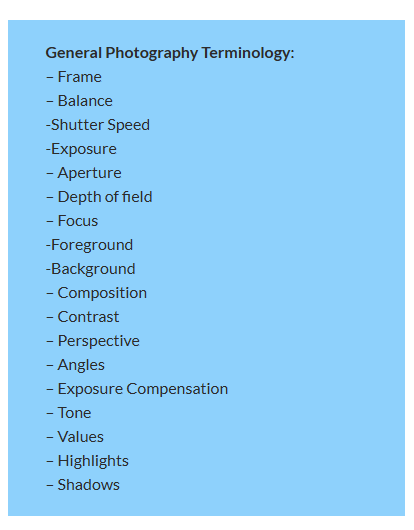
Key Words to use…
Flaneur = people watcher / observer / wanderer
Decisive moment = critical timing
Lesson 2: THINK, PAIR, SHARE
Question: Describe Cartier-Bresson’s theory of The Decisive Moment.
“The simultaneous recognition, in a fraction of a second, of the significance of an event as well as the precise organization of forms which gives that event its proper expression.”
Watch second film: 5 mins Make notes on SMB
Thinking time: 30 sec
Talk in pairs: 1 mins > Discuss Henri Cartier-Bresson’s theory of the decisive moment using knowledge gained from watching the film and direct quotes from his own writing on the table.
Cold-calling: Sample students responses
BLOG > Add your answer to the question and new knowledge gained from class discussion.
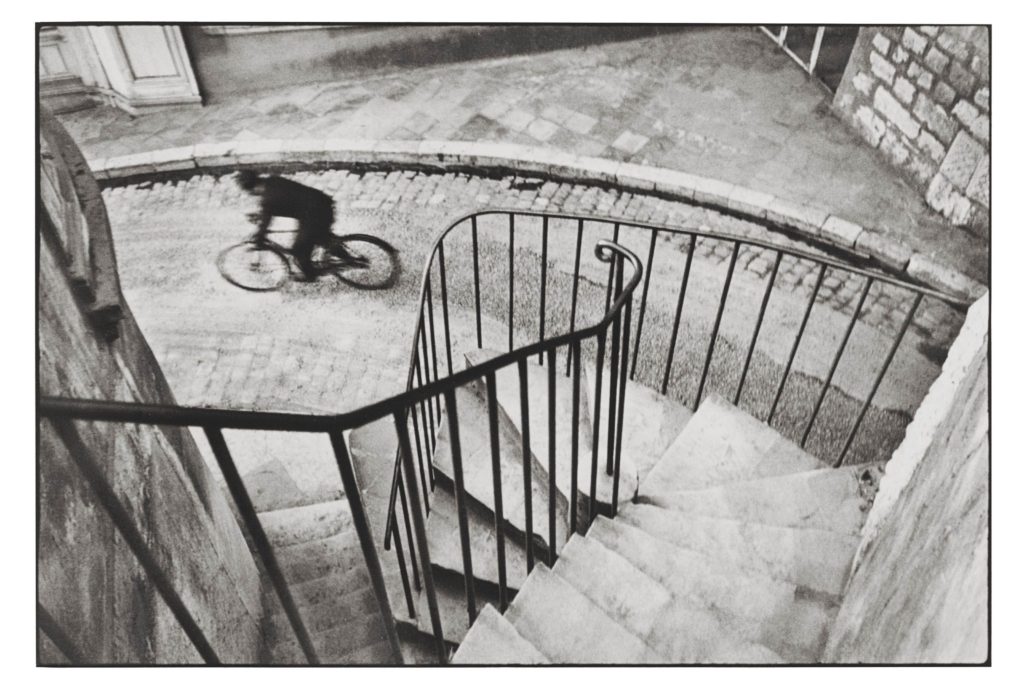
Select one image of his work and apply the theory of the decisive moment to your understanding of the photograph with detailed analysis of its form(what it looks like), composition(how it is arranged) and capturing a moment(essence of an event, action or movement) .
The decisive moment is particularly concerned with the overall structure and composition of the photograph, such as shapes, geometry, patterns, action and movement. Comment on these elements as well as other formal elements such as:
The seven formal elements are commonly known as:
– Line – Shape & Form – Pattern – Tone – Colour – Texture – Space
Also make use of other specialist photography vocabulary such as, rule of third, depth of field – see Photography Vocabulary below.
Lesson 3: THINK, PAIR, SHARE, ACTION
Question: Which camera techniques are useful for street photography and capturing ‘decisive moments’?
Thinking time: 30 sec
Talk in pairs: 1 mins and write answers on SMB
Cold-calling: Sample students responses
CAMERA TASK > In pairs use a camera and explore techniques discussed above. 10 Mins of shooting, return to classroom, upload images in Image Transfer folder below:
Thurs-Fri: Independent study time to produce blog post about Henri Cartier-Bresson and the ‘decisive moment’.
RESOURCES
“Your eye must see a composition or an expression that life itself offers you, and you must know with intuition when to click the camera.” – Henri Cartier-Bresson
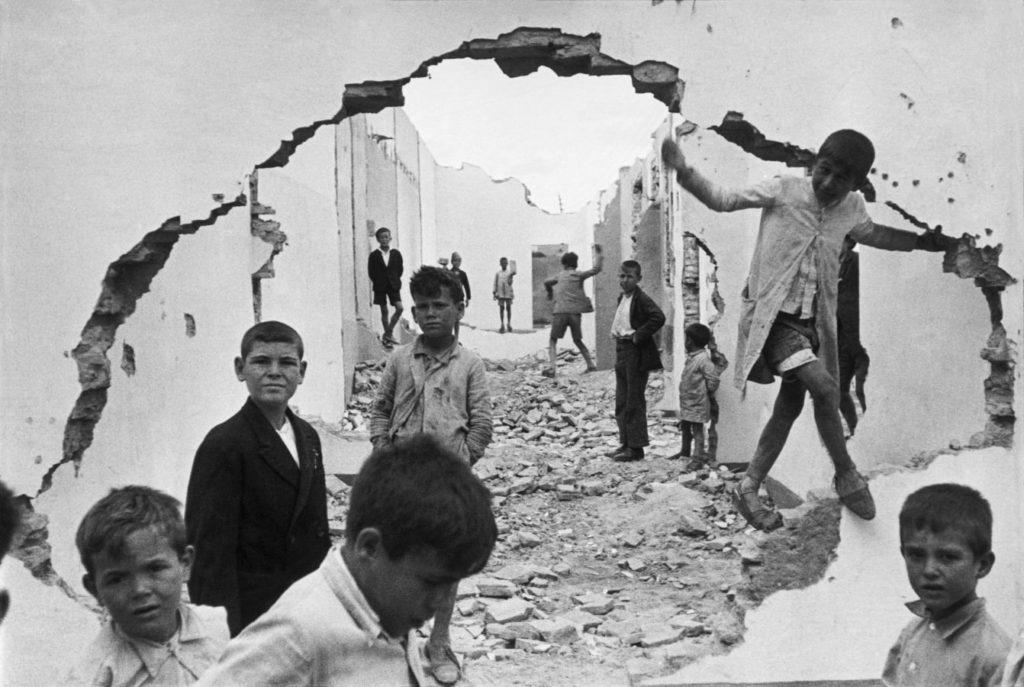
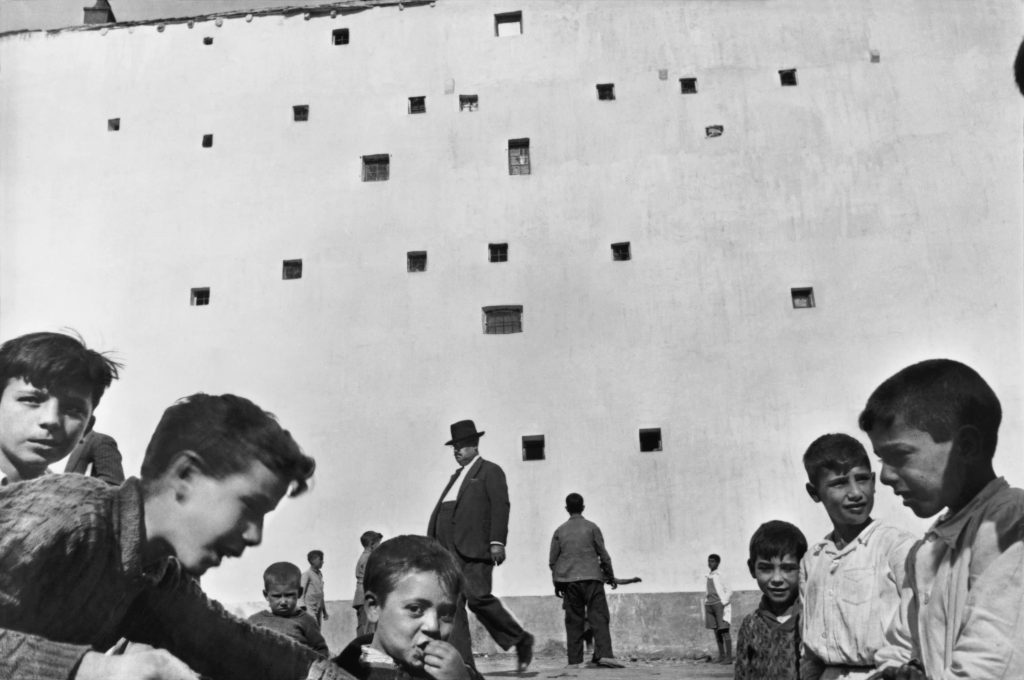
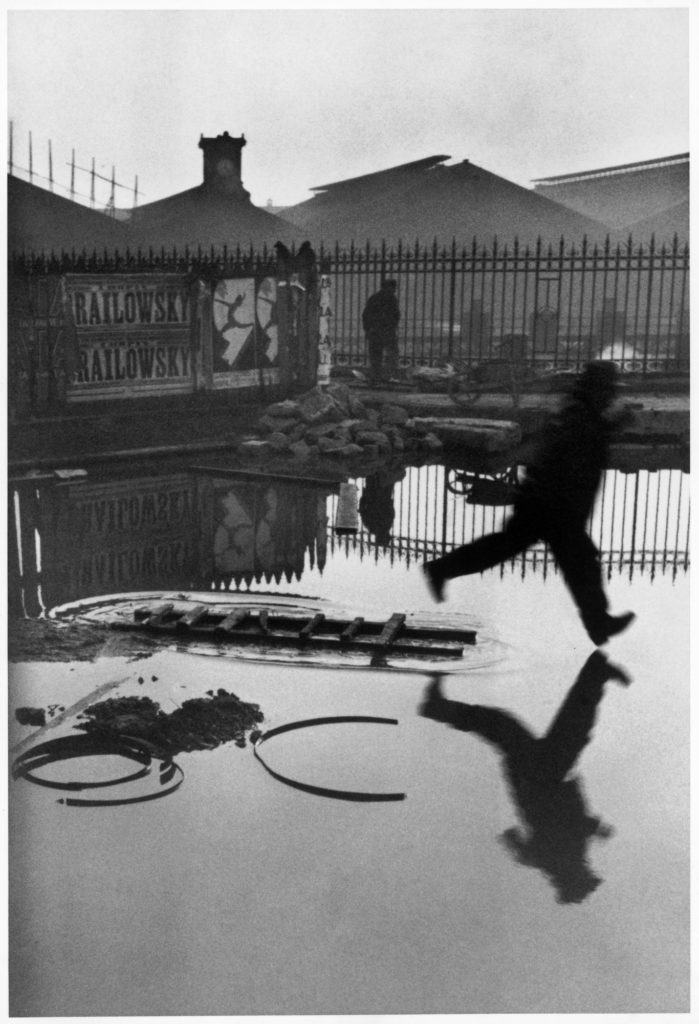
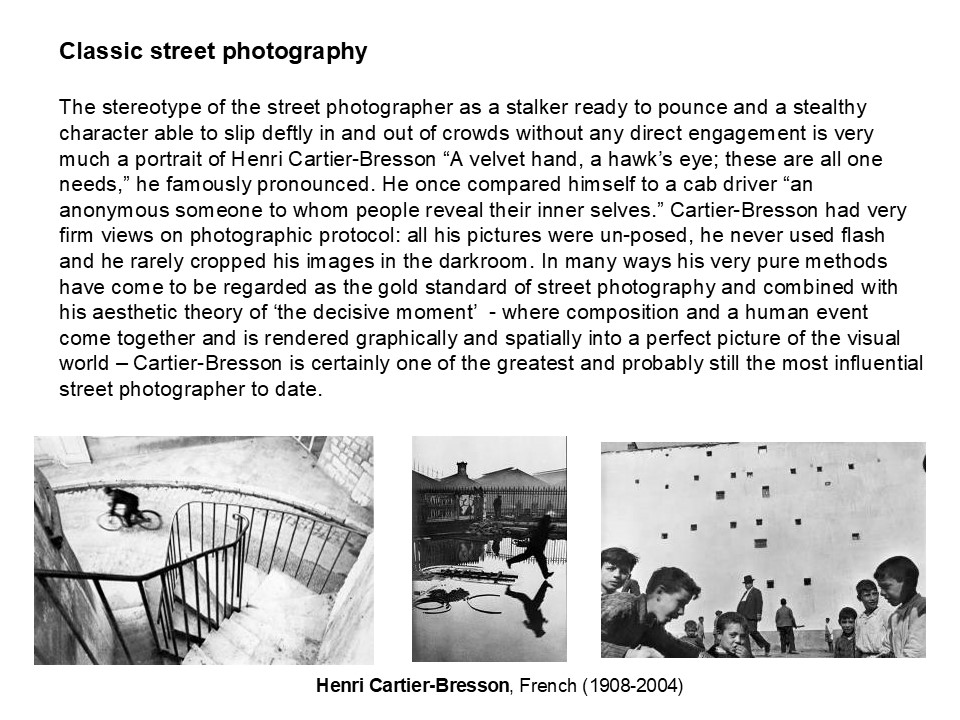
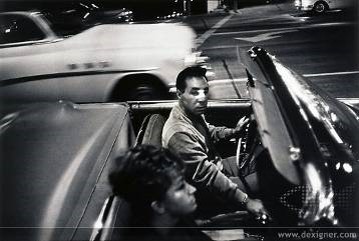
Henri Cartier-Bresson (1908-2004), a French photographer who is considered to be one of the fathers of photojournalism and masters of candid photography. He sought to capture the ‘everyday’ in his photographs and took great interest in recording human activity. He wrote,
“For me the camera is a sketch book, an instrument of intuition and spontaneity, the master of the instant which, in visual terms, questions and decides simultaneously. In order to ‘give a meaning’ to the world, one has to feel involved in what one frames through the viewfinder. This attitude requires concentration, discipline of mind, sensitivity, and a sense of geometry. It is by economy of means that one arrives at simplicity of expression.”
As a reporter and co-founder of the Magnum photography agency, Cartier-Bresson accepted his responsibility to supply information to a world in a hurry. He documented the liberation of Paris, the collapse of the Nationalist regime in China, Gandhi’s funeral and the partitioning of Berlin. Cartier-Bresson helped develop the street photography style that has influenced generations of photographers that followed. He was influenced by Surrealism and began his career in film working with renowned French director, Jean Renoir as second assistant director to films such as La vie est à nous (1936) and Une partie de campagne (1936), and La Règle du Jeu (1939 – considered one of the most influential films in 20th century.
“The simultaneous recognition, in a fraction of a second, of the significance of an event as well as the precise organization of forms which gives that event its proper expression.”
Henri Cartier-Bresson’s precise definition of ‘the decisive moment’
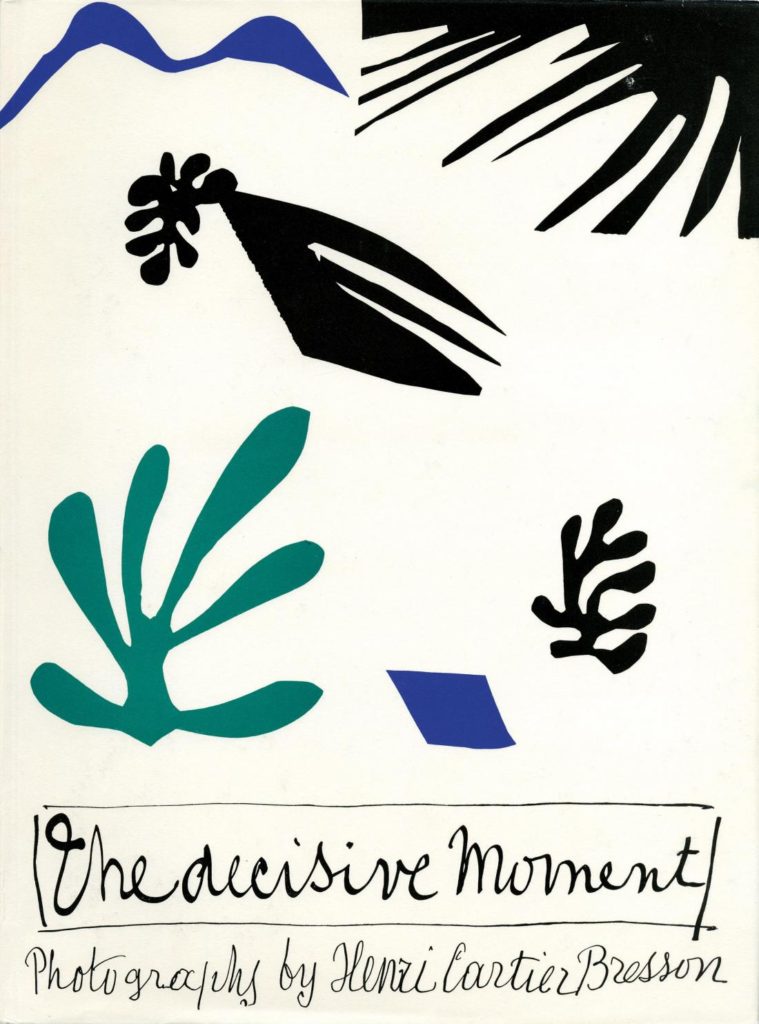
Henri Cartier-Bresson, Images à la sauvette (The Decisive Moment), 1952
The Decisive Moment, Henri Cartier-Bresson’s influential publication, is widely considered to be one of the most important photobooks of the twentieth century. Pioneering for its emphasis on the photograph itself as a unique narrative form, The Decisive Moment was described by Robert Capa as “a Bible for photographers.” Originally titled Images à la Sauvette (“images on the run”) in the French, the book was published in English with a new title, The Decisive Moment, which unintentionally imposed the motto which would define Cartier-Bresson’s work. The exhibition details how the decisions made by the collaborators in this major project—including Cartier-Bresson, French art publisher Tériade, American publisher Simon & Schuster, and Henri Matisse, who designed the book’s cover—have shaped our understanding of Cartier-Bresson’s photographs.
WEEK 2: 9 – 15 June Compare & Contrast Henri Cartier-Bresson and William Klein St Malo Photo-shoot
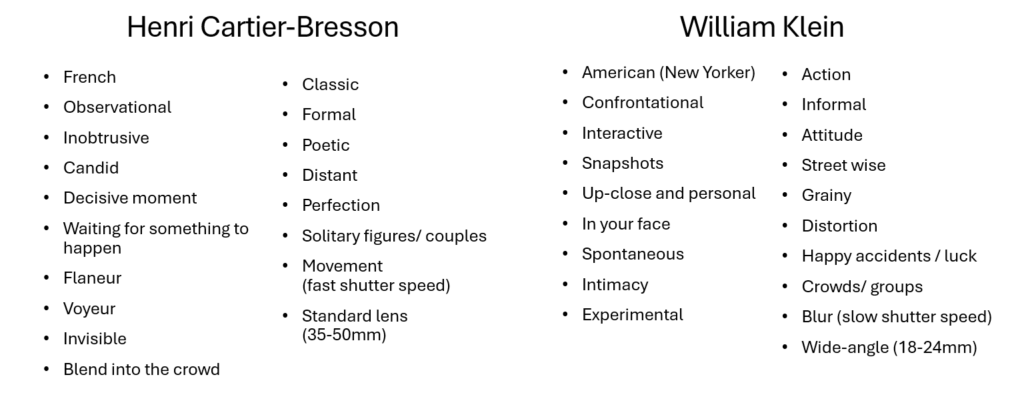
Blog post 3: Compare & Contrast > Henri Cartier-Bresson and William Klein and their different approach to street photography which can be described as observational vs confrontational.
1. Describe the difference in their approach to image-making in the streets.
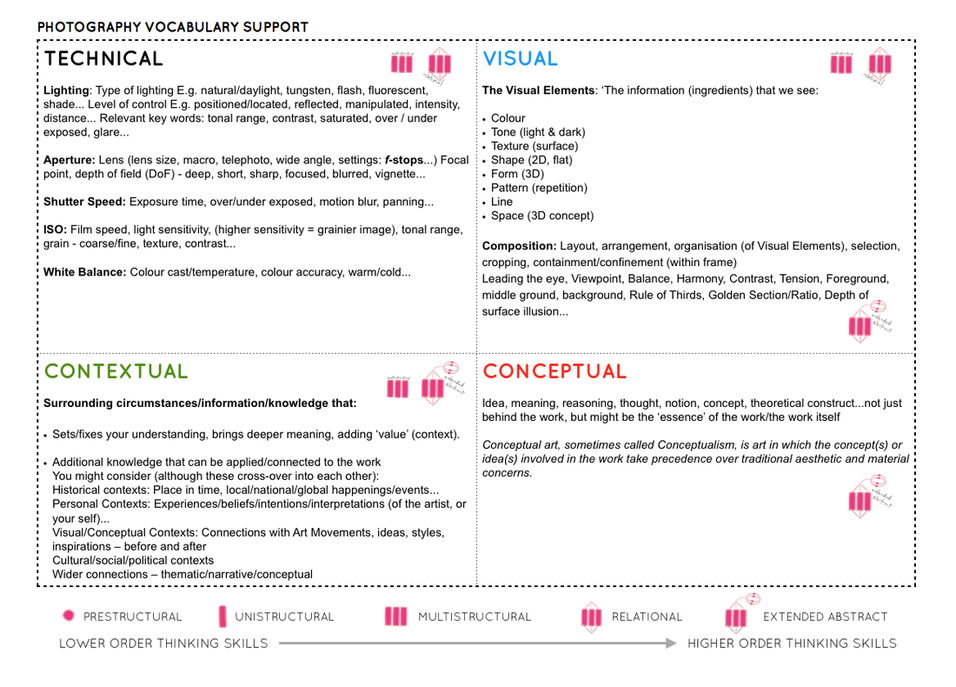
2. Choose one key image from each and compare looking at: TECHNICAL (camera settings), VISUAL (composition), CONTEXTUAL (artistic, cultural, historical and personal differences), CONCEPTUAL (idea, concept, meaning)
3. Add your own responses to making observational and confrontational images and evaluate in relation to what you have learned about the two different approaches.
Lesson: THINK, PAIR, SHARE, ACTION
Question: How is William Klein’s approach to street photography different than Henri Cartier-Bresson and his theory of the decisive moment?
Watch film: 5 mins Make notes on SMB
An exclusive interview with photographer William Klein and a first-ever glimpse behind the scenes at his Paris studio.
Thinking time: 30 sec
Talk in pairs: 1 mins and write answers on SMB
Cold-calling: Sample students responses
CAMERA TASK > In pairs use a camera and explore making images in the school environment that are observational and confrontational. 10 Mins of shooting, return to classroom, upload images in Image Transfer folder below:
BIOGRAPHY > William Klein (b.1928-2022) was born in New York City. After graduating early from high school, he began studying sociology at the City College of New York. In 1946 he joined the U.S. Army and was stationed in Germany, where he won his first camera in a poker game. After relocating to Paris in 1948, he continued his studies at the Sorbonne with the assistance of the G.I. Bill. At the time, his focus was abstract painting and sculpture. After studying with the French artist Fernand Léger, Klein’s early career breaks came from two exhibitions in Milan, where he was discovered by the architect Angelo Mangiarotti. They began to collaborate when Mangiarotti asked Klein to recreate once of his abstract paintings on the rotating room dividers of a Milanese apartment—his first commissioned work. It was the experience of documenting these panels in motion that lead him to reconsider photography.
FASHION PHOTOGRAPHY: In 1954, Alexander Liberman—then the art director of American Vogue—asked to meet with Klein after seeing his kinetic sculptures in the Paris group show, Le Salon des Réalitiés Nouvelles. Subsequently, Vogue published his photographs of Dutch barns, reminiscent of Mondrian, soon after their meeting. Thus began his foray into fashion photography, as well as his well-known photographic street photography essays on various cities. Shooting for Vogue during a brief return to New York , Klein let loose on the city, taking fashion photography in a whole new direction. He captured the beautiful and the grotesque all within wide-angle and telephoto shots. Taking models out of the studio and onto the streets, his revolutionary techniques pioneered a new vision.
STYLE > APPROACH: His photographs; often blurred or out of focus, his use of high-contrast prints, high-grain film and wide angles, shocked the established order of the photography world. Uncompromising in his vision and technique, it was this raw approach that served Klein well to capture his subjects with an honesty that truly echoed the diversity of moods, people and situations so present in life.
PHOTOBOOKS: Widely acknowledged as a significant innovator in the history and design of the photo book, Klein published his first book Life is Good and Good For You in New York in 1956, which won the Prix Nadar the following year. Capturing the rough and tumble of daily life, Klein’s brutally honest images caused a major sensation. Three more books were published, each with photography from a different city, Rome in 1958-59, followed in 1964 by Moscow and Tokyo (reissued in limited edition in 2014 by Akio Nagasawa Publishing).
FILMS: In 1958, Klein began to explore the moving image, creating his first Pop film, Broadway by Light, in 1958. He went on to produce feature films and documentaries including a satire about the fashion world, Qui-Êtes Vous Polly Maggoo? (1966); Far From Vietnam (1967); Muhammad Ali, The Greatest (1969); and The Little Richard Story (1980). His last film to date, Messiah (1999), reveals on an epic scale a summary of the themes present throughout his artistic career.
INFLUENCE > LEGACY: Despite initial outrage at the methods of William Klein, his work continued to progress in style, reputation and across several mediums including filmmaking, graphic design and fashion photography. His influence can be seen in the work of other artists such as Japanese photographer Daido Moriyama and his work has earned him several solo and retrospective exhibitions throughout the world in venues such as the International Center of Photography and the Museum of Modern Art, New York, The Stedelijk Museum, Amsterdam and Tate Modern, London. He has won several awards and honours across his career, including Commander of Arts and Letters in France in 1989, the Medal of the Century by the Royal Photographic Society in London in 1999, the International Center of Photography Infinity Award for Lifetime Achievement in 2007, and the Outstanding Contribution to Photography Award at the 2012 Sony World Photography Awards.
READ another good text, ‘William Klein: Yes’ by David Campany where he explores the kaleidoscopic creativity of the late William Klein, one of the great image makers of the 20th century.
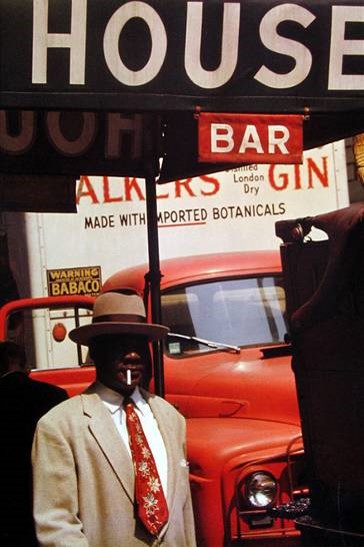
William Klein’s confrontational style
William Klein is considered one of the most influential street photographers of all time. He had a ‘no non-sense’ attitude to street photography and liked to confront people. He rebelled against many of the contemporary styles of photography during his time, especially that of Henri Cartier-Bresson and other “classic” street photographers.
1. Get close and personal
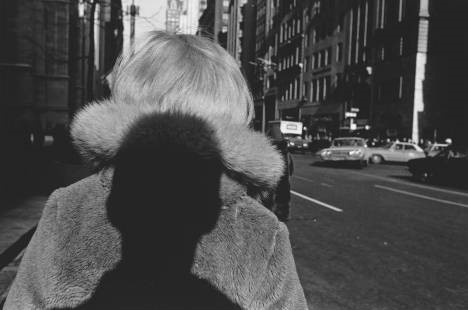
William Klein. Big face, big buttons, St Patrick’s Day, Fifth Avenue, New York, 1955.
Klein experimented with lots of different focal lengths during his career– but he is most well-known for his up-and-close and personal work with a wide-angle lens.
“I photograph what i see in front of me, I move in close to see better and use a wide-angle lens to get as much as possible in the frame.”
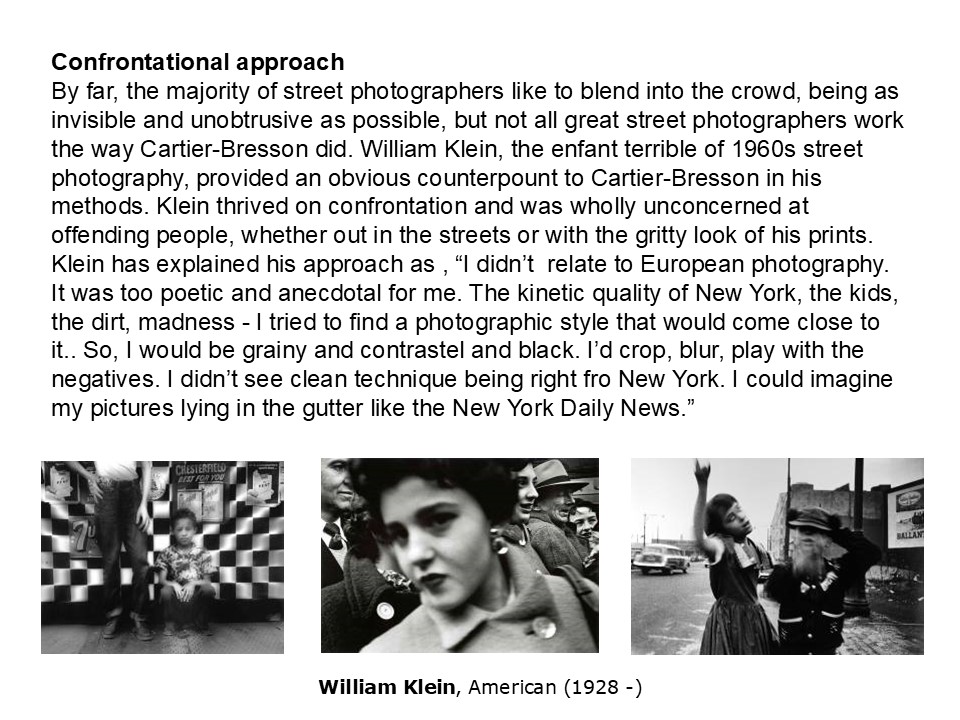
2. Interact with your subjects
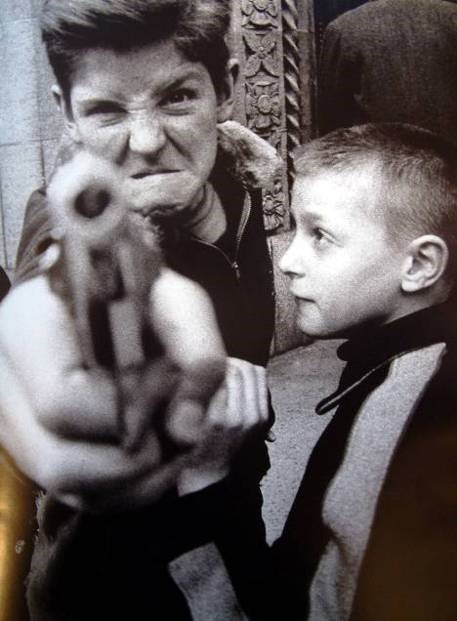
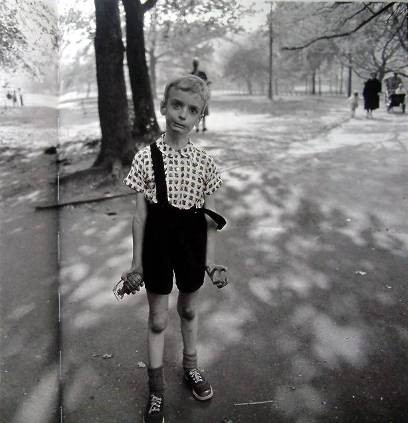
William Klein, Kid with Gun. 1955. New York
Street photography is generally understood as capturing candid moments of everyday life. However the paradox is that some of the most memorable street photographs taken in history were either posed or as a result of the interaction with the photographer.
Think of Klein’s famous “Kid with gun” photograph. Although the moment looks raw and candid, the photograph was actually a result of what Klein said to the kid. When Klein saw the kid with the gun, he told him: “Look tough.” The kid then turned toward Klein, and pointed his gun straight at him– giving an incredibly brutal look.
3. Go against the grain
William Klein, Brooklyn, New York, 1955
When Klein was shooting in the streets in the 50’s, there were certain “taboos” when it came to photography. This included grain, high-contrast, blur, decomposition, and happy accidents.
However Klein used these techniques to his advantage. His photographs weren’t clean, sterile, and clinical. Rather, they were full of energy, vibrance, and a sense of rebellion that went against the grain.
“The resulting book went against the grain thirty years ago. My approach was not fashionable then nor is it it today.” – William Klein (1990)
4. Don’t worry about technical settings
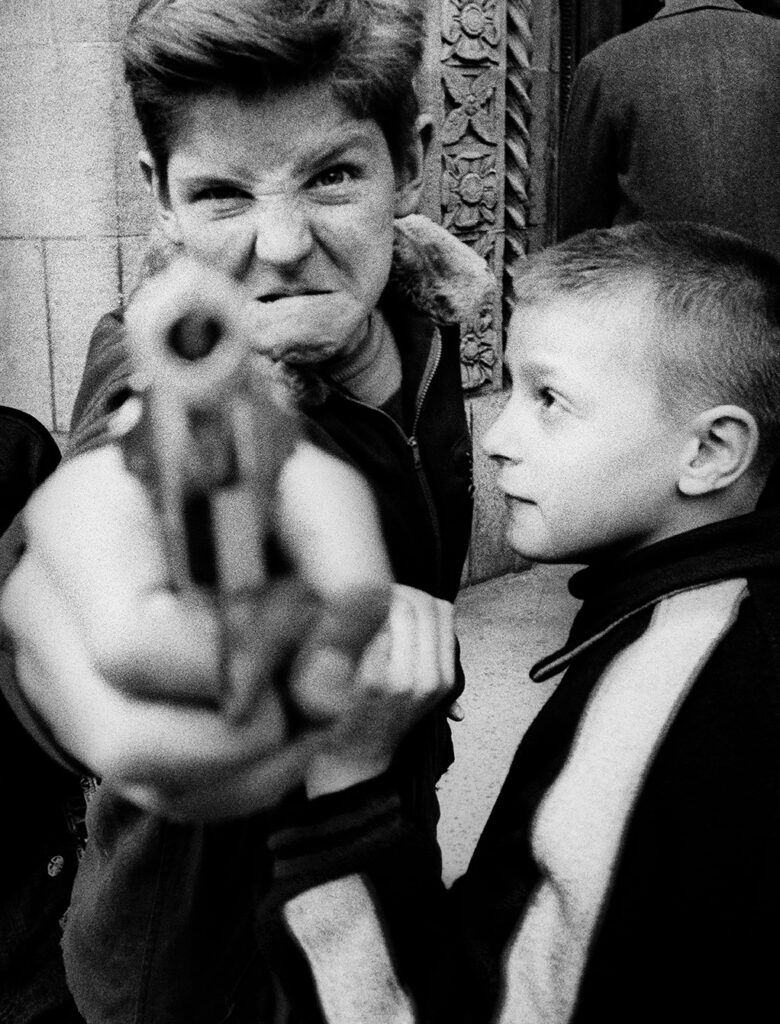
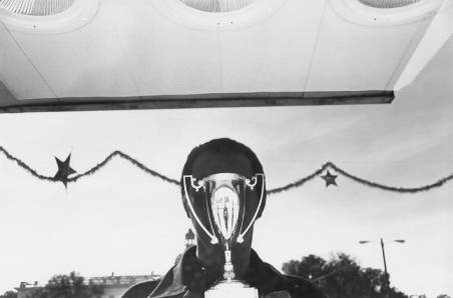
William Klein, Candy Store, Amsterdam Avenue, New York, 1955
Many photographers I know tend to obsess over the technical settings. They need to have the “ideal” lens for a certain situation, to use the “ideal” f-stop, to use an “ideal” shutter speed, and the “ideal composition.”
Klein gave the middle finger to all of that. He was the master of experimentation and trying everything unconventional–especially when it came to the technical details. Klein shares:
“I have always loved the amateur side of photography, automatic photographs, accidental photographs with uncentered compositions, heads cut off, whatever.”
In one of his most famous images of a kid in front of a checkerboard tile wall, he jiggled the enlarge head slightly up and down to give the impression that the photograph was rushing at the viewer. Certainly a technique that wasn’t conventional at the time.
Klein would often shoot with slow shutter speeds to create motion and blur in his photographs. This was also against the grain at the time, in which sharp and in-focus photographs were the standard. When asked about why he used blur in his photographs, Klein responded:
“If you look carefully at life, you see blur. shake your hand. Blur is a part of life.”
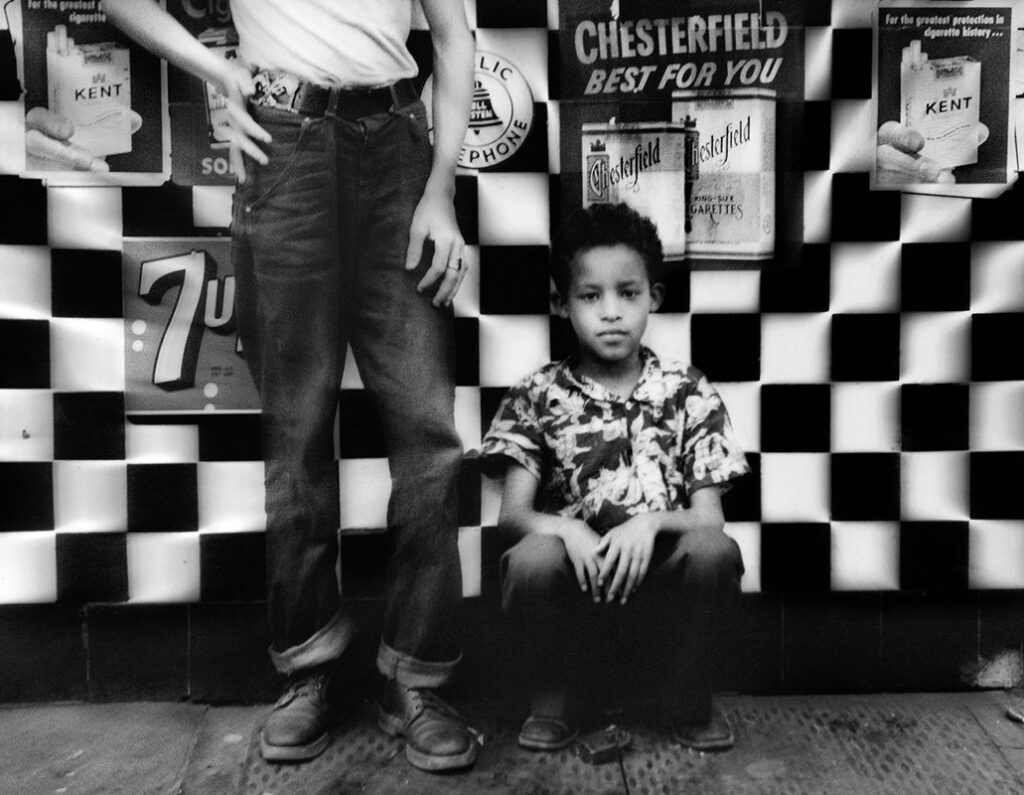
5. Be opinionated
William Klein, Red Light, Rome. 1956
Klein’s street photography was very subjective. He travelled to places all around the world and photographed things how he saw them. He shares how he approached street photography in New York:
“In New York I took responsibility for the people I photographed. I felt I knew them – the people, the way they relate to each other, the streets, the buildings, the city. And I tried to make sense of it all. I just photographed what I saw though its true I used the camera as a weapon in New York.
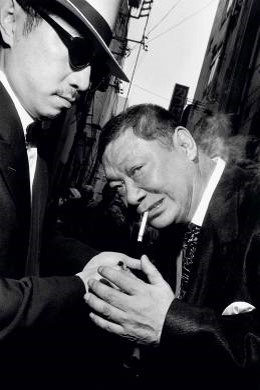
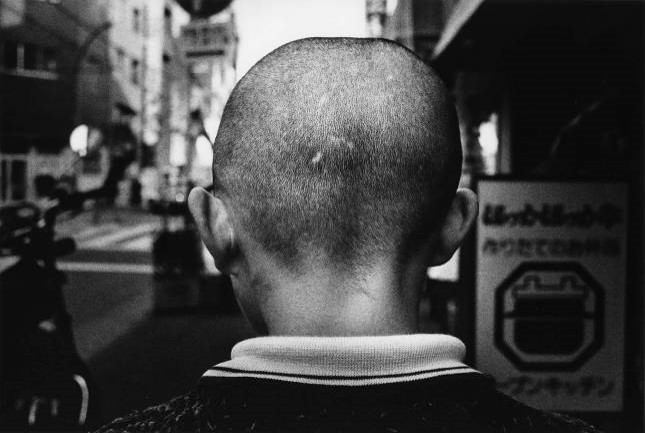
When Klein visited Tokyo, he approached street photography there much differently:
“In Tokyo [the camera] was more of a mask, a disguise. I had only the vaguest clue to what was going on. I wasn’t there to judge anything. I was an outsider and felt pretty uncomfortable sometimes. Have you ever eaten an official Japanese dinner for four hours on your knees? It was different in New York.“.
Klein also explains how he believed in getting personally involved in his photography:
“In a way its true I had a lot of old scores to settle. I was involved. According to the Henri Cartier-Bresson scriptures, you’re not to intrude or editorialize, but I don’t see how that’s possible or why it should be. I loved and hated New York. Why shut up about it?”
With Henri Cartier-Bresson being almost like a demigod in the photography world, he set most of the standards for photographers. But Klein stayed true to himself and rebelled. This is what he had to say about Cartier-Bresson:
“I liked Cartier-Bresson’s pictures, but I didn’t like his set of rules. So I reversed them. I thought his view that photography must be objective was nonsense. Because the photographer who pretends he’s wiping all the slates clean in the name of objectivity doesn’t exist.”
6. Have fun
What was the main impetus which drove Klein to first start taking photographs? Klein mentions the sense of fun and enjoyment that he got shooting on the streets:
“I was taking pictures for myself. I felt free. Photography was a lot of fun for me. First of all I’d get really excited waiting to see if the pictures would come out the next day. I didn’t really know anything about photography, but I loved the camera.
Read more here from 10 Lessons William Klein Has Taught Me About Street Photography by street photographer Eric Kim.
Hunting for characters on the Streets of New York City with Magnum Photographer Bruce Gilden.
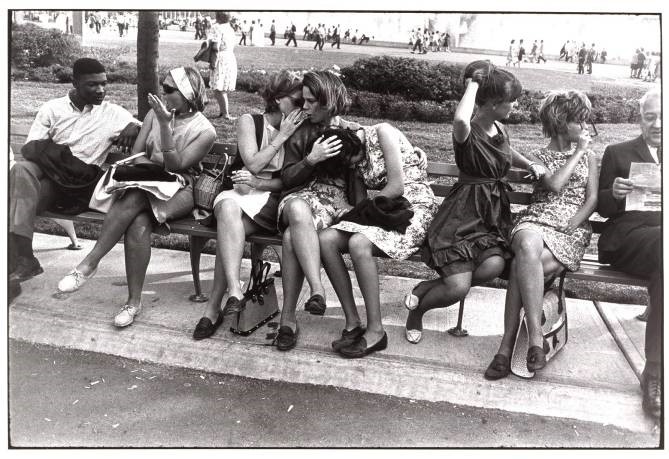
A preview of the exhibition Diane Arbus: In The Beginning, on view at The Met Breuer from July 12 through November 27, 2016.
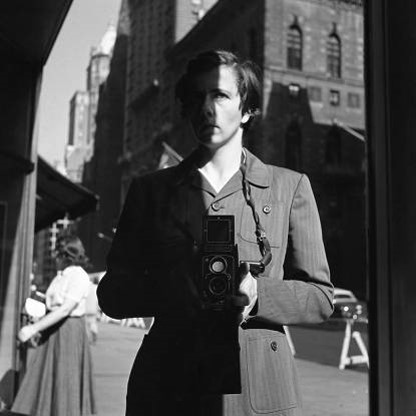
Finding Vivian Maier Official US Theatrical Trailer #1 (2013) – Photography Documentary HD
In this episode, I try to take photos like Vivian Maier.
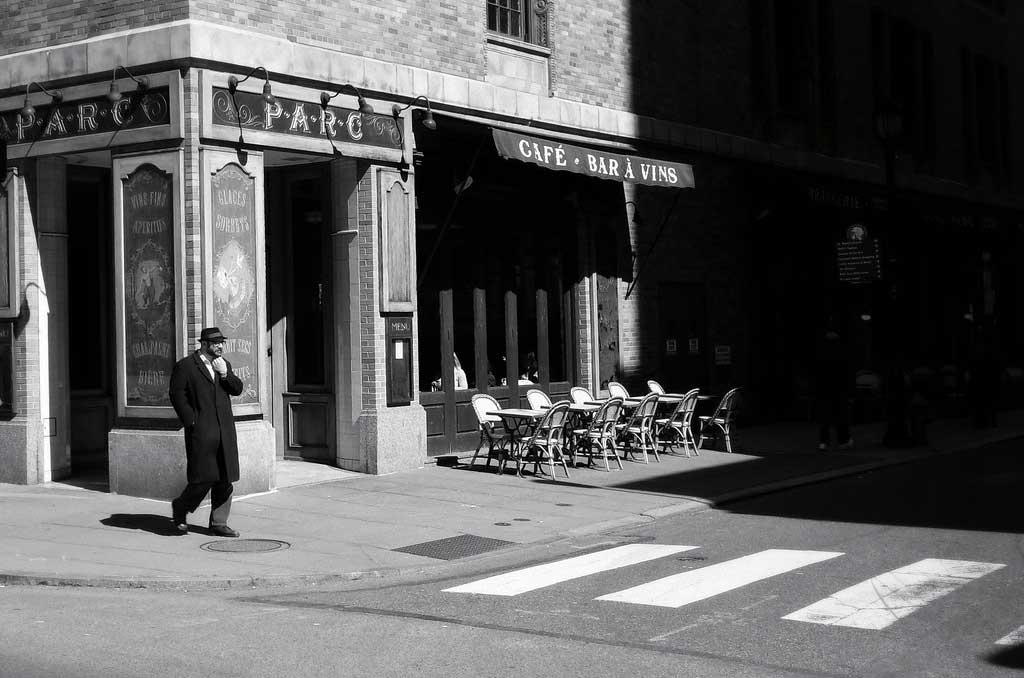
Fri 13 June: PLANNING & RECORDING > St Malo photoshoot Photo-assignment: ‘Lunch Hour and Decisive Moments in St Malo (250-400 images)
American street photographer Gary Winogrand famously said that, ‘I photograph things to see what they look like photographed.’
Using Cartier-Bresson’s theory of ‘the decisive moment’ try and capture images where the overall composition and visual elements are combined with an essence of movement. Find a location or spot that works as a compositional structure and anticipate or wait for something to happen within the photographic frame, eg. movement of people, a passer-by, or a dog, or some other fleeting moment of street life. Consider the following:
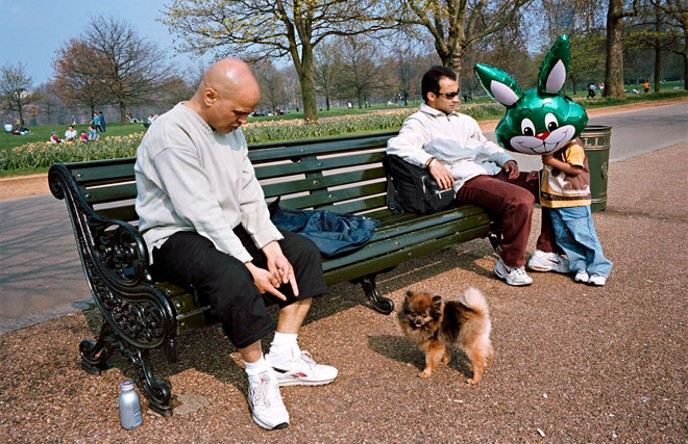
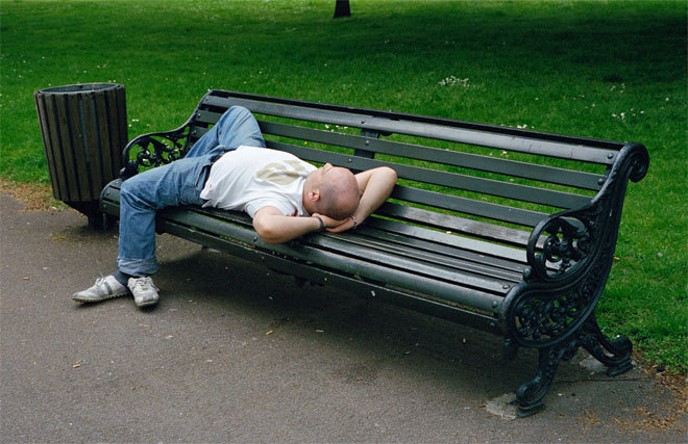
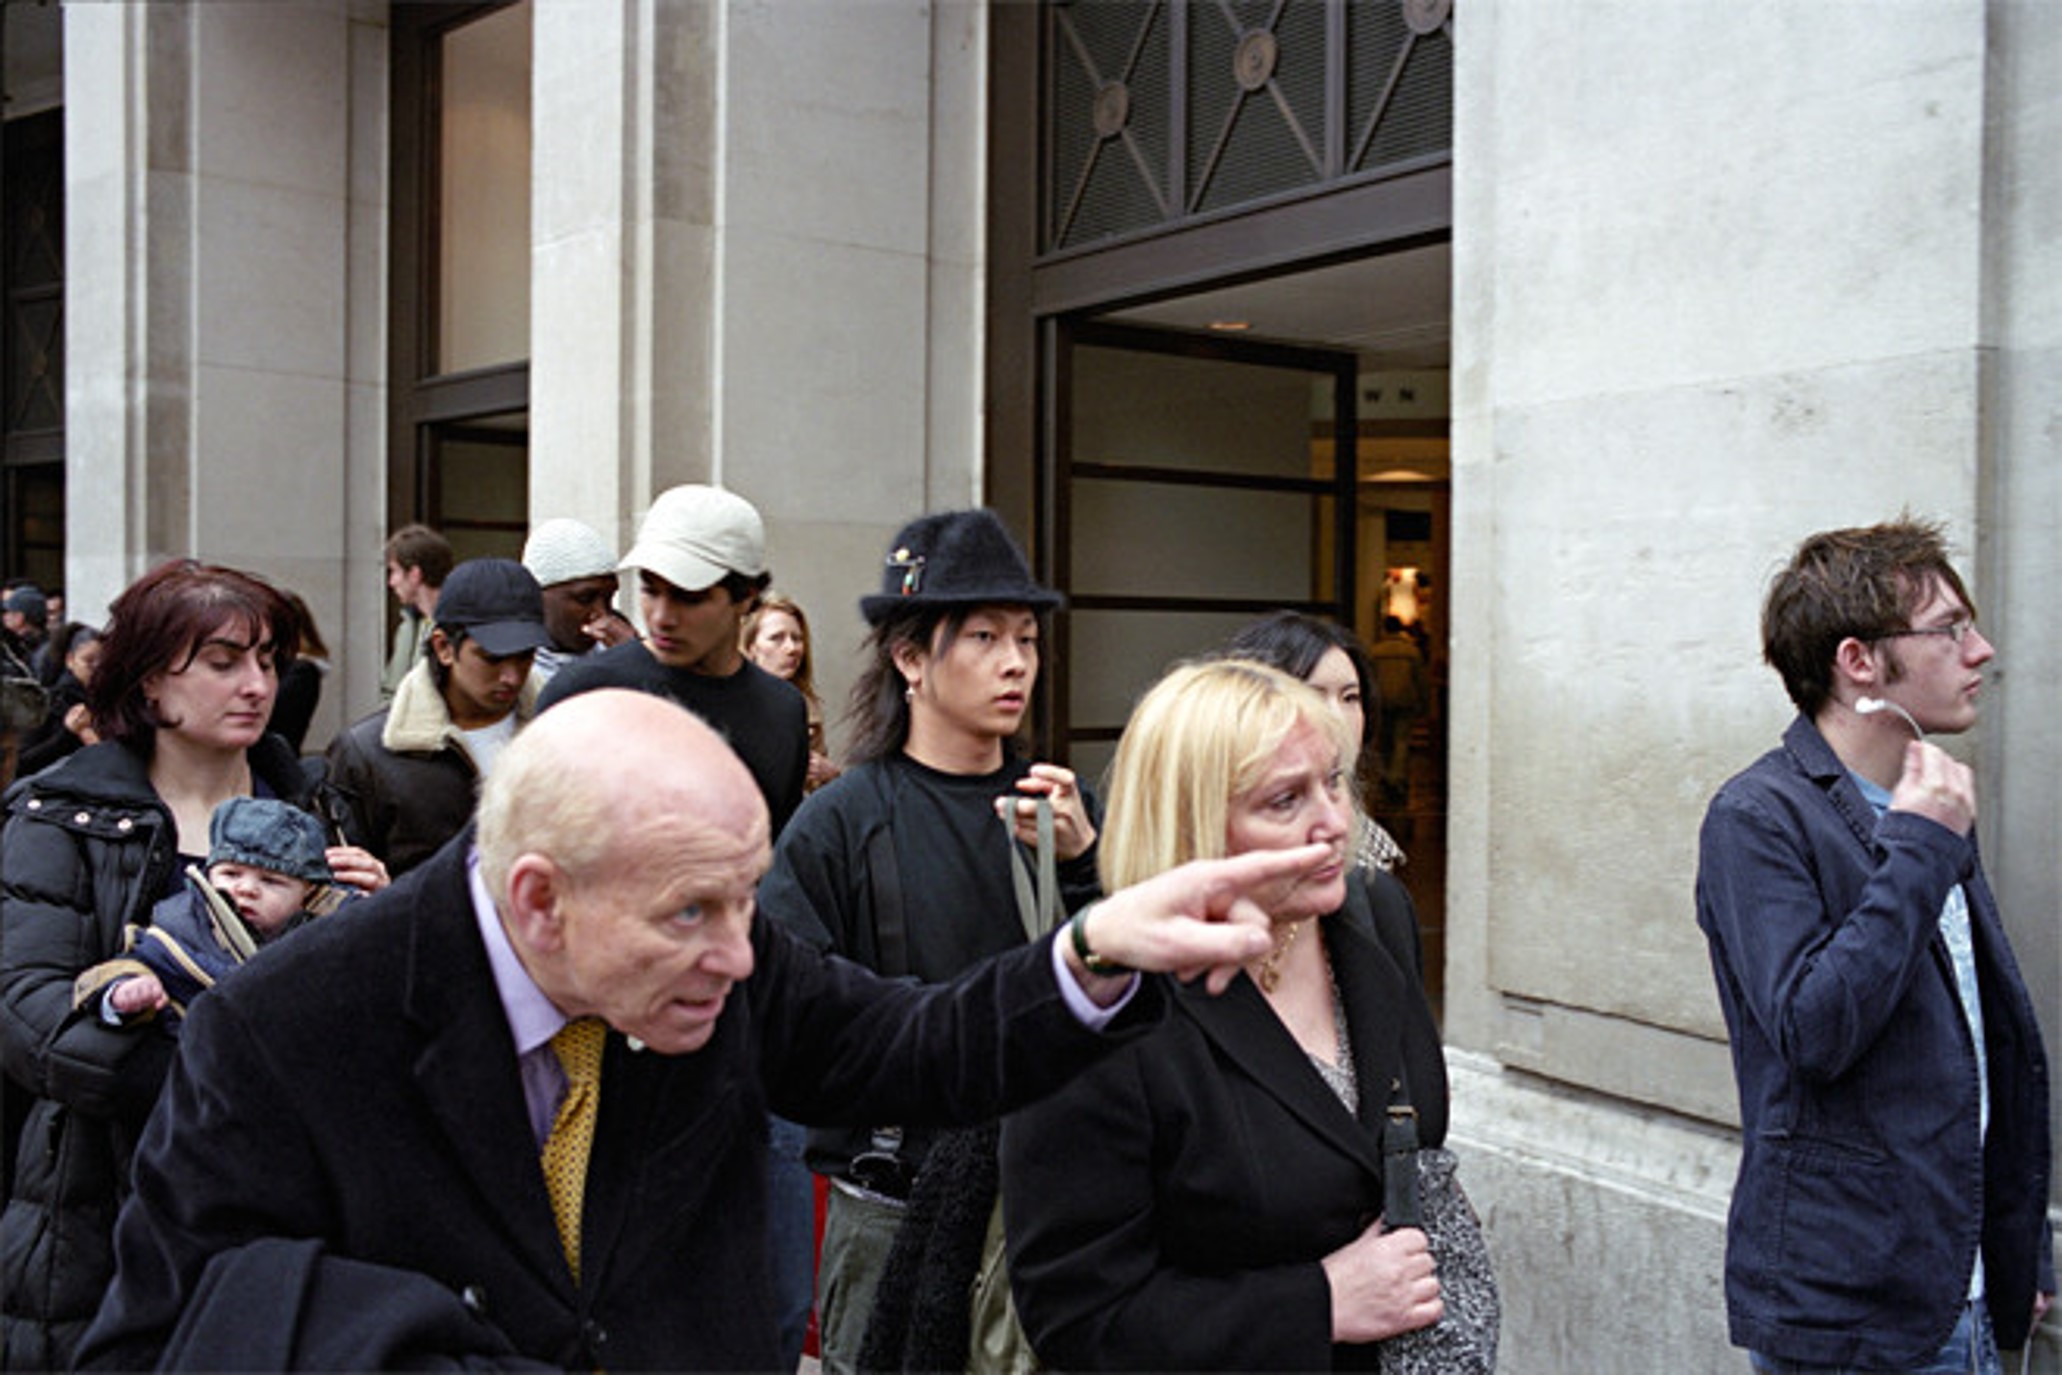
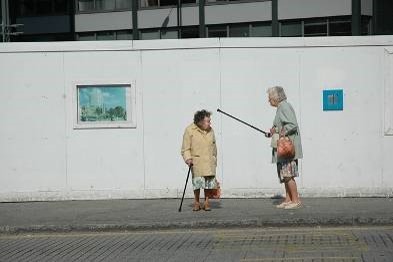
SUBJECT MATTER/ CAPTURING A MOMENT> people and humanity, theatre of everyday life, poetics of streets, comic absurdities and humour, small acts of kindness, scenes of unexpected beauty, ordinary moments, visual pun and humour, gestures and poses, faces and crowds.
LOCATIONS & PLACES > inside the walls and on the ramparts, back alleys and sidewalks, beaches and coastal promenades, parks and public spaces, cafes and shops, street corners and intersections, signs and advertising, facades and architecture.
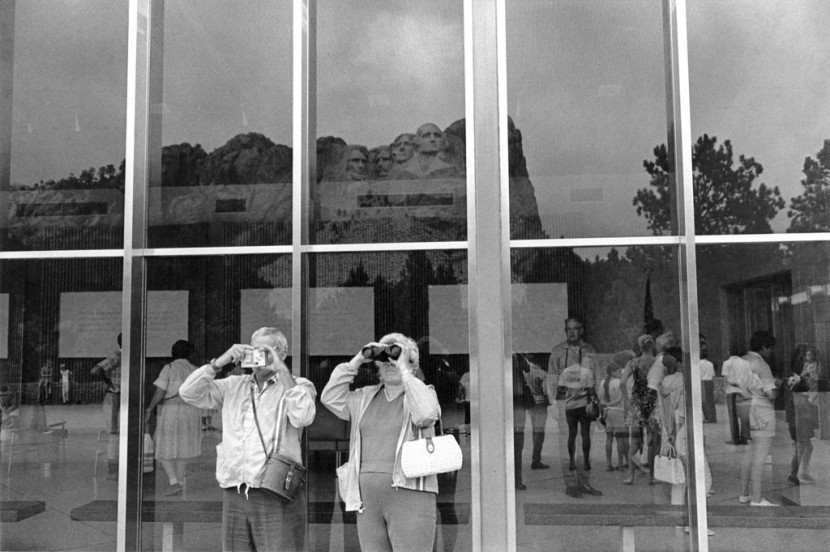
POINTS OF VIEW > low/ high/ canted angles, deadpan approach, light and shadows, intensity of colour, reflections in shop windows, shoot through glass, frame within a frame, focusing and un-focusing, up-close and details, shallow depth of field, artful and funny juxtapositions, geometry and space, lines and form, textures and patterns, signs and shop windows, advertising and graphics, reflections and mirrors.
APPROACH > capturing decisive moments, candid portraits, informal snapshots, inobtrusive observations (Cartier-Bresson style), interactive and confrontational (William Klein approach), spontaneous and subconscious reactions, poetic possibilities, inquisitive mind and roaming eye, looking and prying, shoot from the hip, serendipity and good luck.
CAMERA HANDLING >Lenses (focal length): use wide (18-35mm) to standard lenses (50mm). Focusing: automatic or manual – whatever you prefer. Exposure mode: S or T mode – (shutter-speed priority). Shutter-speeds: experiment with fast (1/125-1/500) and slow shutter-speeds (1/15-1/60). ISO: 100 (sunny weather), 200-400 (overcast ), 800-3200 ISO (inside or evening/ night). White Balance: auto
For further inspiration see the work of historical and contemporary street photographers below. Or, for a comprehensive Powerpoint presentation with many examples of street photographers, styles and approaches – go to folder here:
Upload redux file – if possible M:\Radio\Departments\Photography\Students\YR 13 COURSEWORK 2025-26\Presentations\Street photography
WEEK 3: 16 – 22 June 1. Selecting & Editing: St Malo photoshoot 2. Developing & Experimenting: Cropping & Generative AI
Editing > Selecting Photo-shoots from St Malo
PHOTO-SHOOTS: Upload new images from St Malo to M:drive and begin to edit in Lightroom. Follow these instructions:
EDITING:
Save shoots in folder on M:drive and import into Lightroom
Organisation: Create new Collection Set: St Malo Create a new Collection from new shoot inside Collection Set: St Malo
Editing: select 10-12 images from your shoot.
Experimenting: Adjust images in Develop, both as Colour and B&W images appropriate to your intentions.
Make sure you have standardised all the pictures in terms of exposure, brightness/ contrast, colour balance using Sync Settings
Export images as JPGS (1000 pixels) and save in a folder: BLOG
Create a Blogpost with edited images and an evaluation; explaining what you focused in your shoot and how you intend to develop your next photoshoot.
Analyse a couple of your best shots and describe the Decisive Moment within the images
Select one image and compare with an image from Henri Cartier-Bresson in relation to the theory of the Decisive Moment
EVALUATING: Upon completion of photoshoot and experimentation, make sure you evaluate and reflect on your next step of development. Comment on the following:
How successful was your photoshoot and experimentation?
What references did you make to artists references? – comment on technical, visual, contextual, conceptual?
How are you going to develop your project from here? – comment on research, planning, recording, experimenting.
What are you going to do next? – what, why, how, when, where?
WEEK 4: 24 – 30 June Developing > Experimenting Cropping and AGI: Artificial Generative Intelligence
This week you have some time to catch up with work not completed, such as:
EXPERIMENTING 1: CROPPING: Using cropping tool only begin to make some radical changes by selecting areas of your images for a different visual impact. Produce at least 3 different crops for 6 images.
EXPERIMENTING 2: AI Produce a set 10 AI generated images / variations using text prompts > 1 blog post with annotation
Compare camera-based images with AI generated images > 1 blog post
Inspirations: Case Study 2 on artist(s) using AI as part of their image-making process > 1 blog post
Review, improve or complete any outstanding research, analytical/ contextual blog posts on Henri Cartier-Bresson and the decisive moment > 1 blog post
ESSAY >deadline Mon 10 July
If all above is completed, begin research task below collecting a variety of picture-stories as inspiration for your page-spread design.
CROPPING
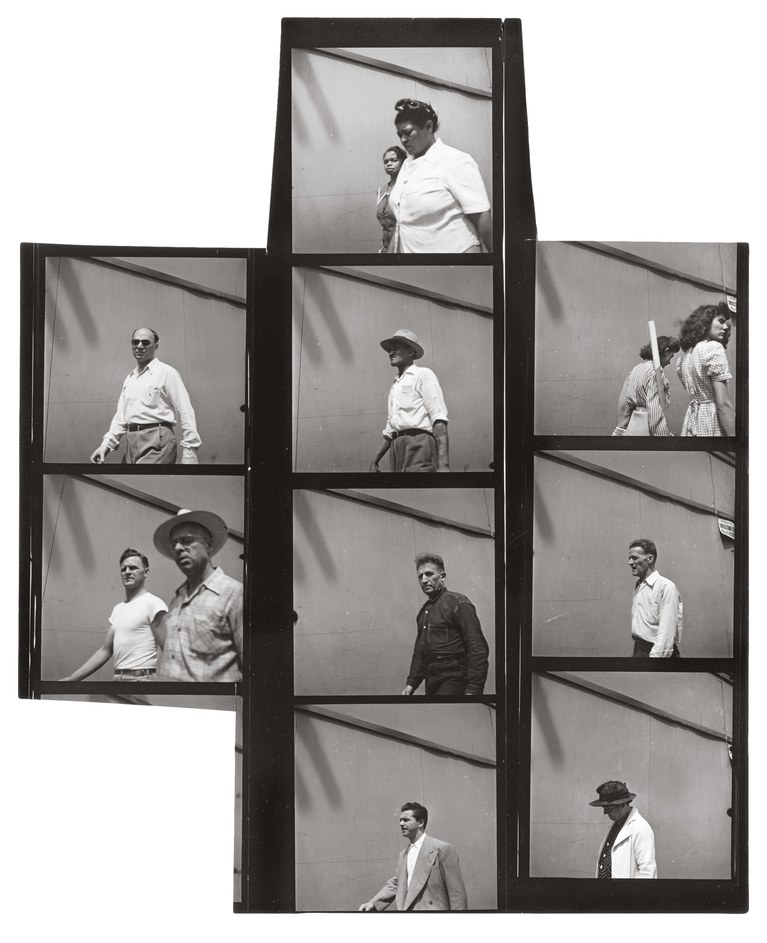
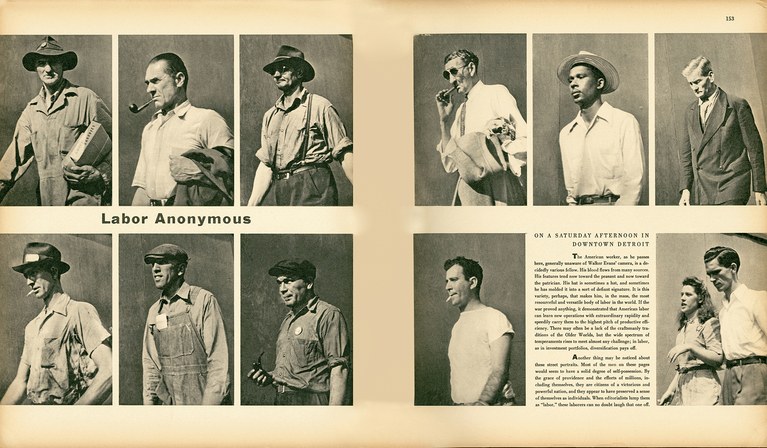
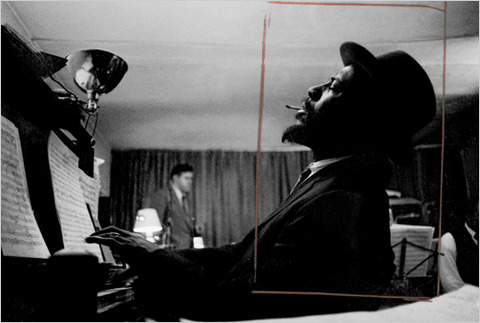
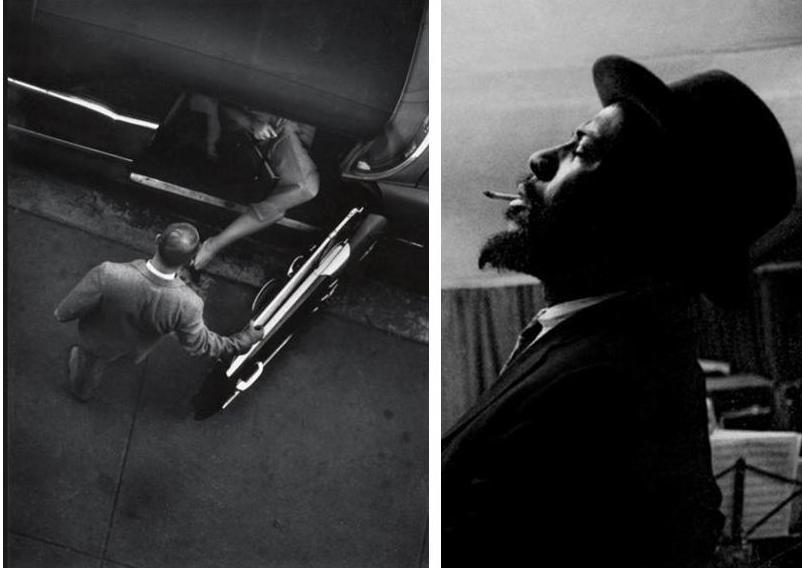
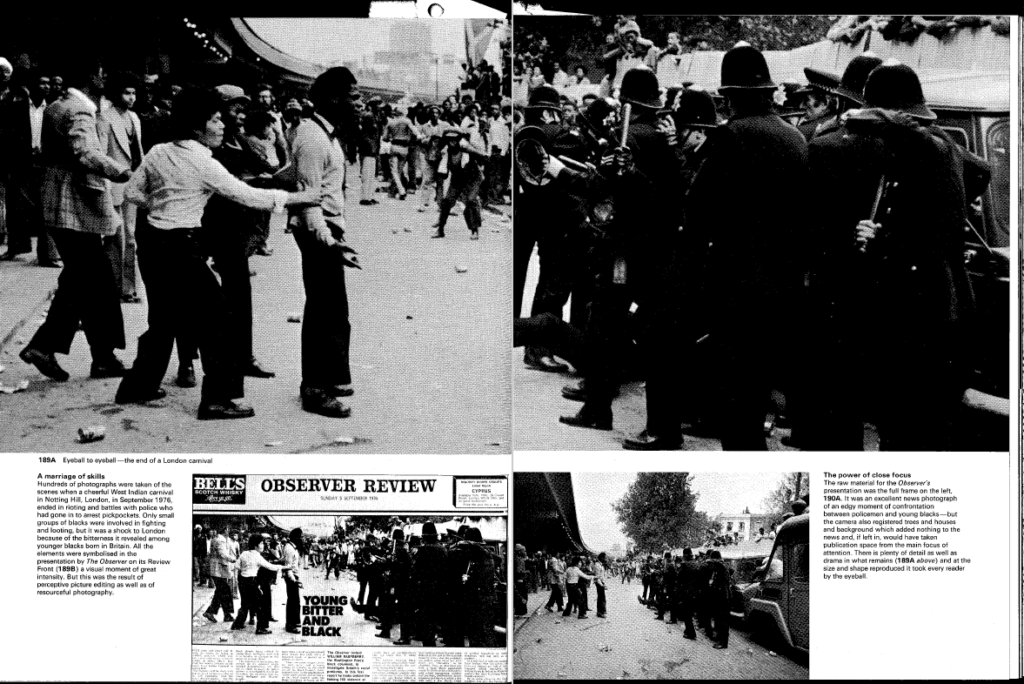
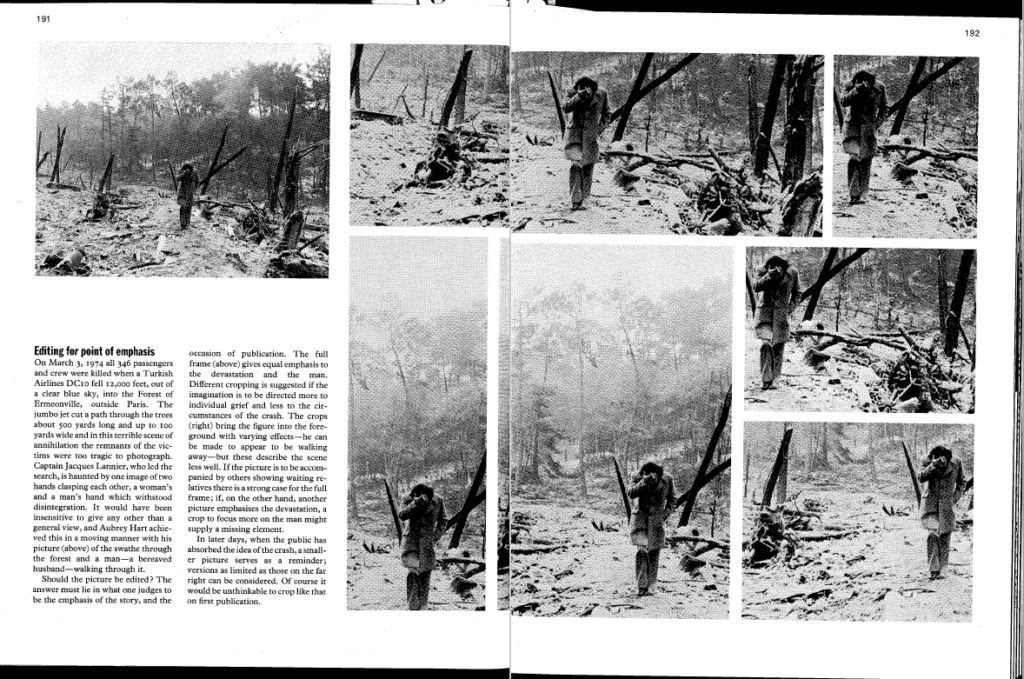
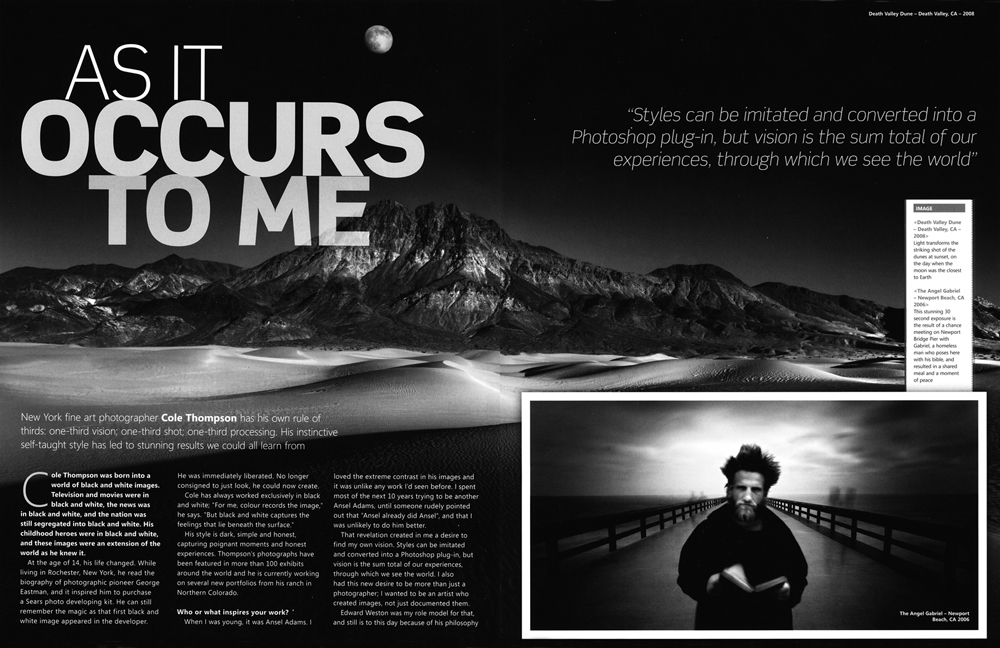
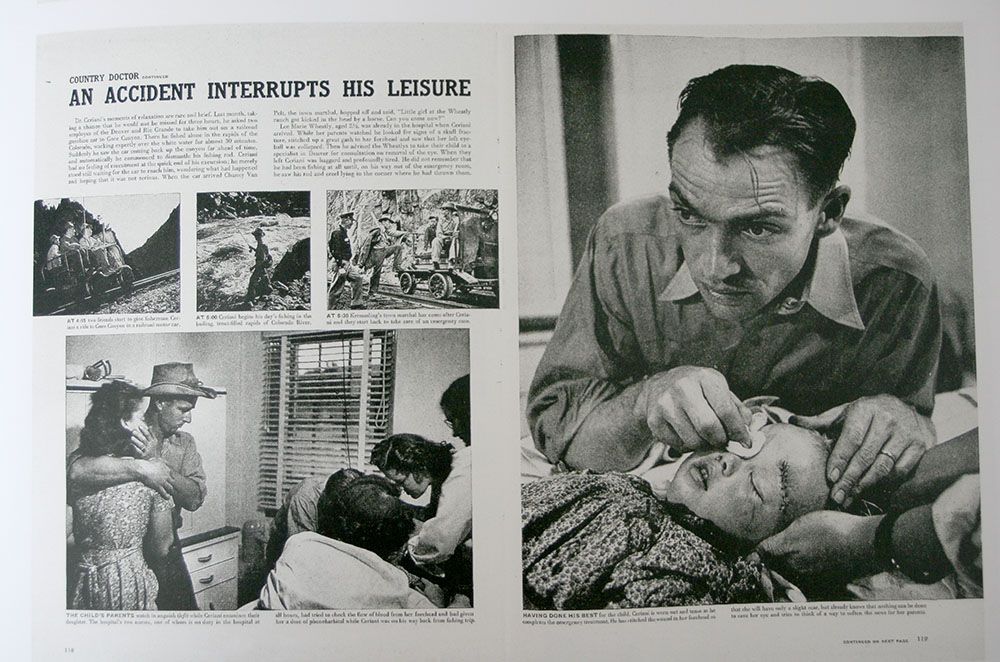
One of the founding fathers of Documentary Photography Walker Evans used cropping as part of his work. Another pioneer of the photo-essay, W. Eugene Smith also experimented with cropping is his picture-stories.
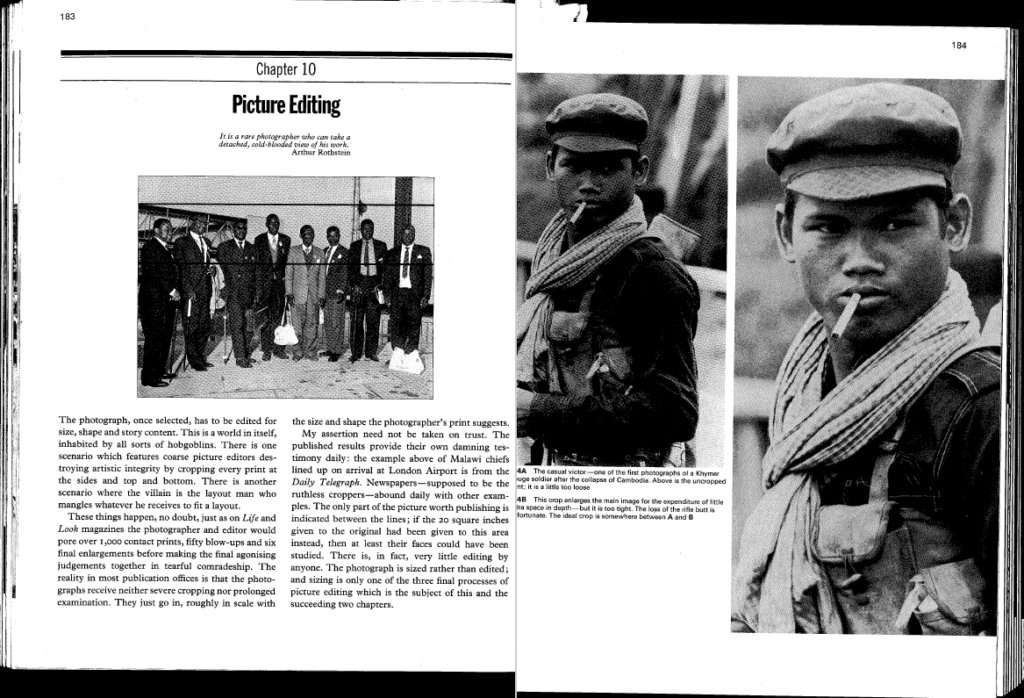
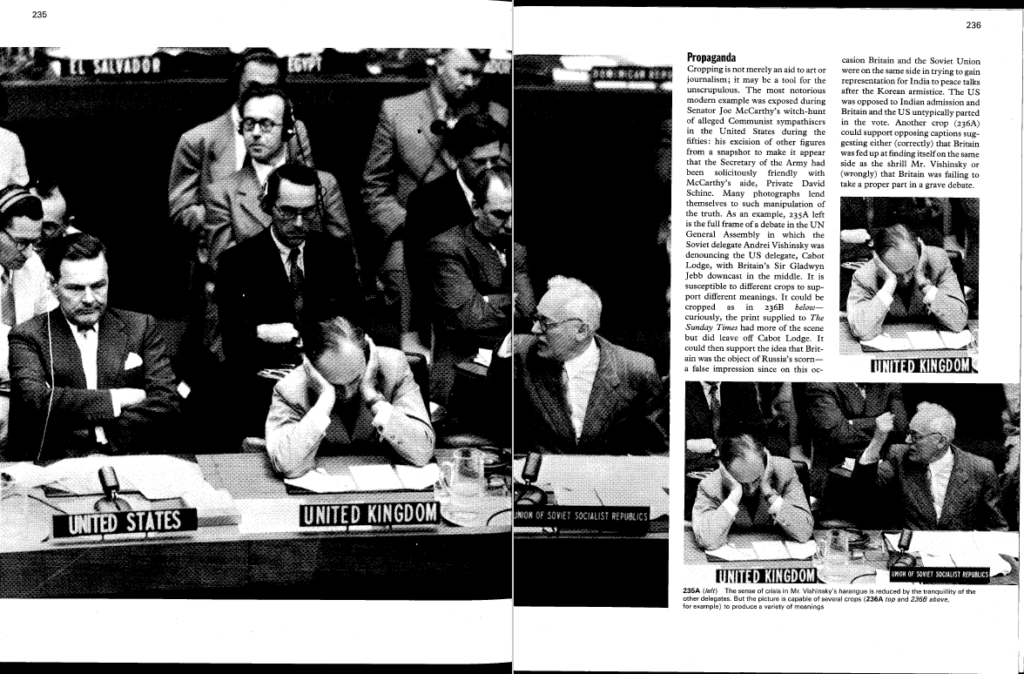
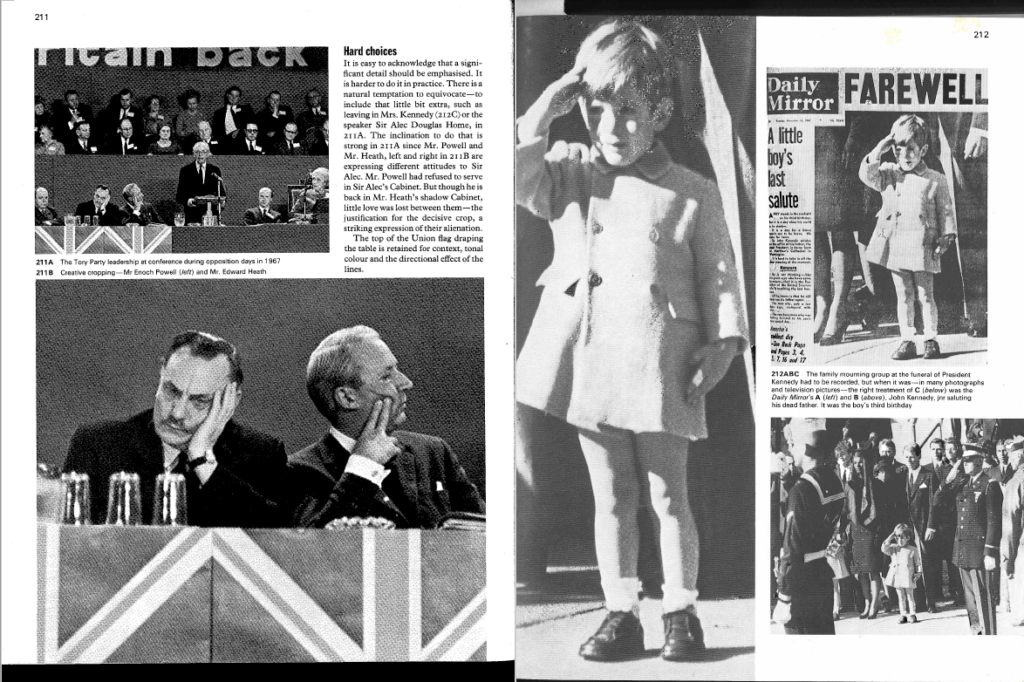
There are many different types of crops used for different effects. The way in which a photo is cropped can add or alter the meaning significantly, especially in photojournalism. Sometimes, artistic qualities within photos are destroyed by careless cropping in order to make it fit into a particular layout in a newspaper or magazine for example.
For more history and context see Pictures on a Page, written almost 50 years by legendary newspaperman, Harold Evans who was the Picture Editor for The Sunday Times Magazine. Pictures on a Page, generally considered the definitive text on photojournalism, graphics and picture editing. Read more here
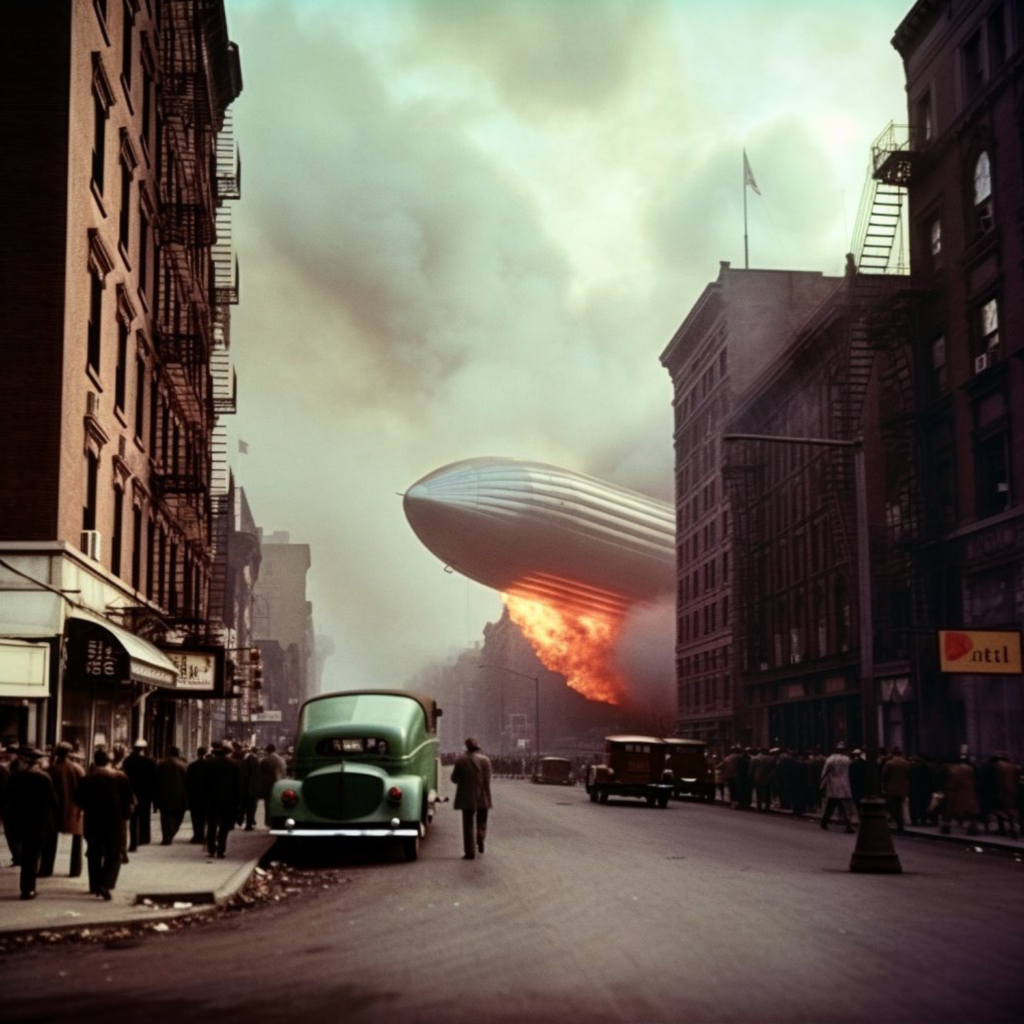
AI EXPERIMENTATION
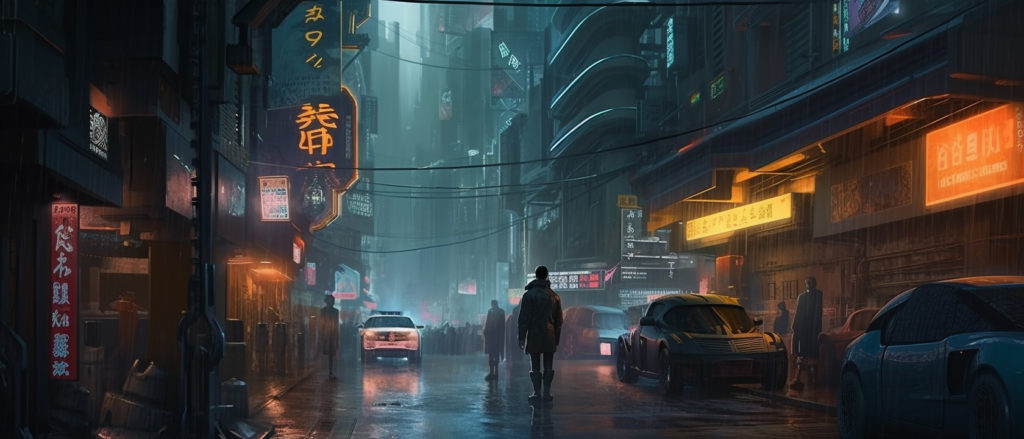
AI EXPERIMENTING > Using your images from St Malo as inspiration produce a variety of AI generated images (at least 10 variants) using Photoshop AI, DreamStudio or Midjourney. Explore your experiences in St Malo and generate AI images inspired by street photography and Cartier-Bresson’s theory around the decisive moment. Either ‘train’ AI on your original images or recreate street photographs using relevant text prompts linked to your photo-assignment last week – see above. Use key terminology, such as specific words and phrases linked to subject matter, capturing moment, locations & places, points of view, approaches, composition and formal analysis, camera handling and techniques.
Show creative process using a combination of screen grabs and annotation > 1 blog post
ARTISTS REFERENCES > INSPIRATIONS
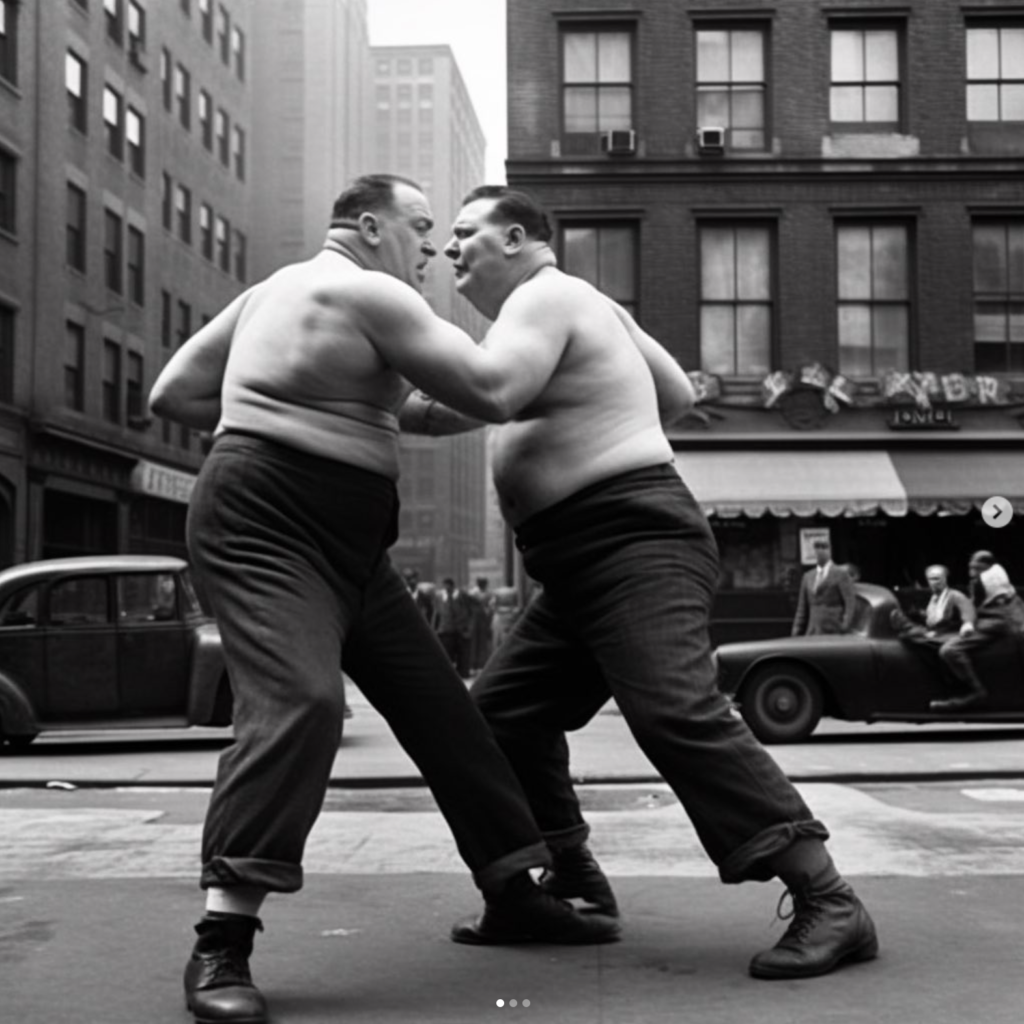
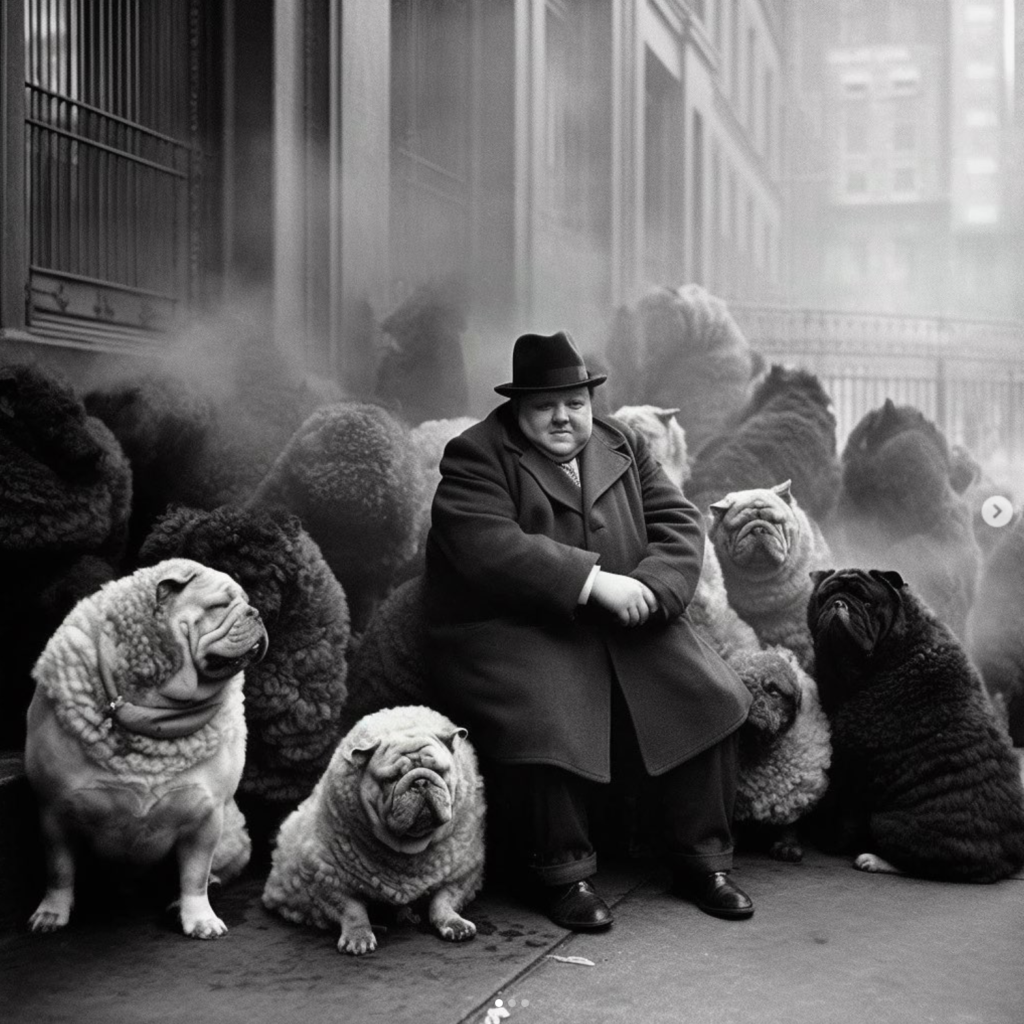
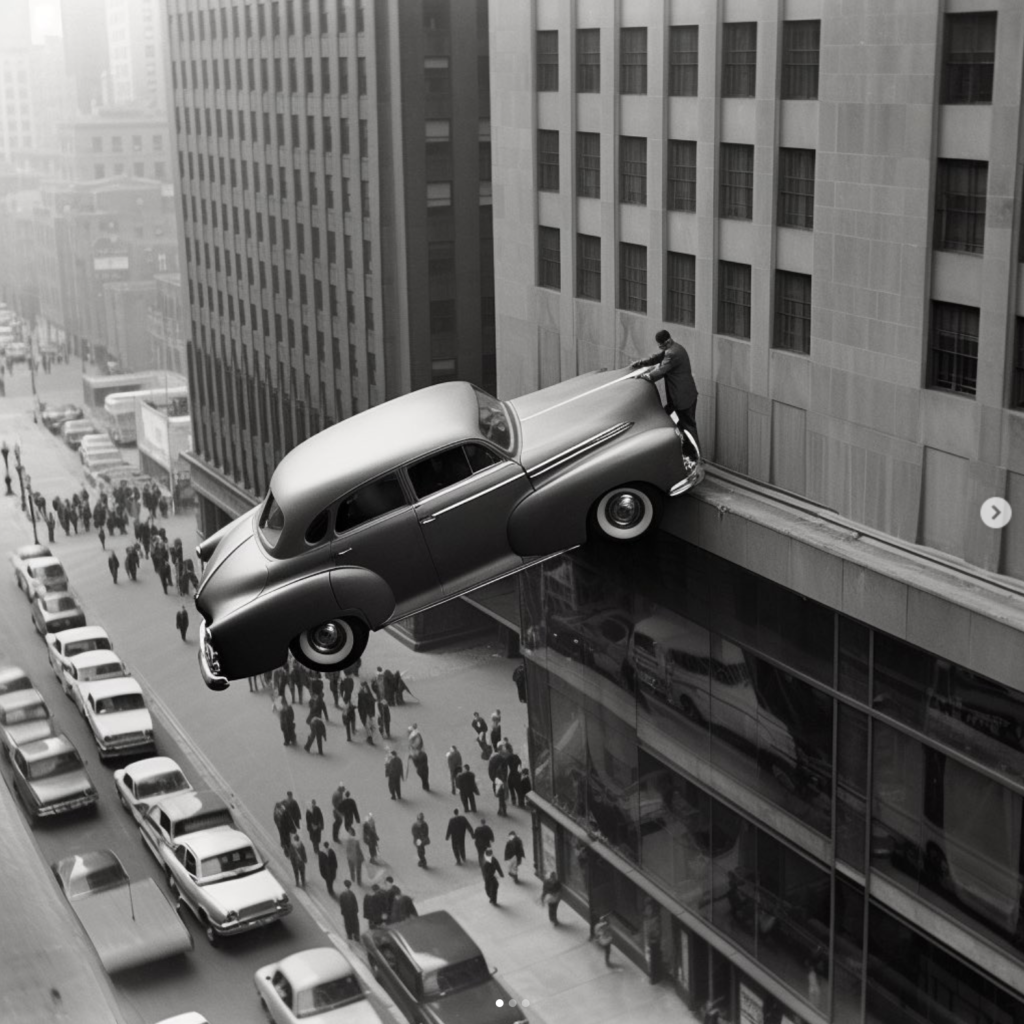
Philip Toledano: I’ve noticed a lot of work uses ai to recreate photography as it is now-some sort of reflection of reality -but what’s utterly intriguing is that AI has its own voice. For instance, this image of the two men fighting I would argue is much more interesting than the one I posted yesterday (can you see what’s different ?) because (metaphorically) I allowed ai to have a say -now this image asks more questions (which is ALWAYS a good thing in art)
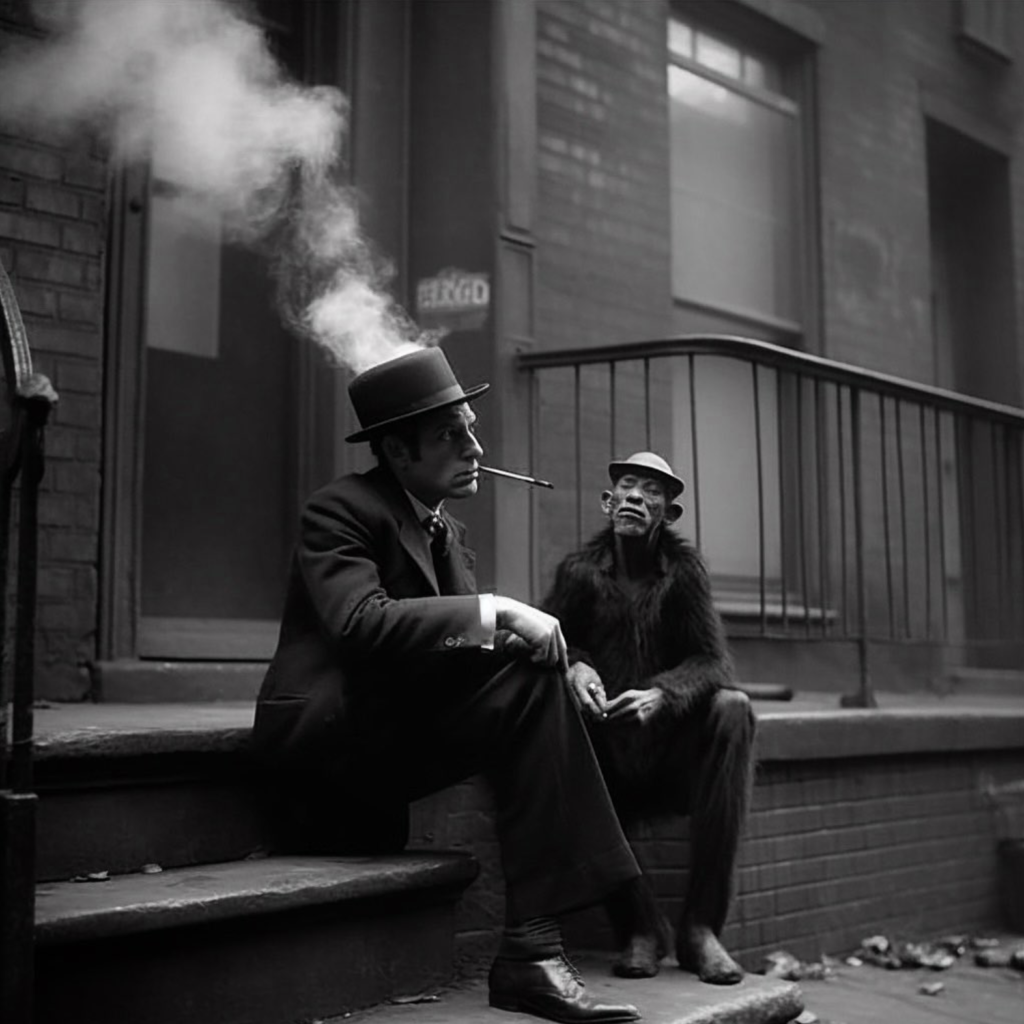
I’m also surprised to see how it handles the animal images I’ve been doing -especially the monkeys and apes-the images have such emotion in them -and finally, I’m very much enjoying the way in which you can abstract the human form …
From his series, another America …
Photos courtesy of the latest version of Midjourney, an AI program which generates realistic deepfakes – Copyright Reddit – Twitter. Read article here
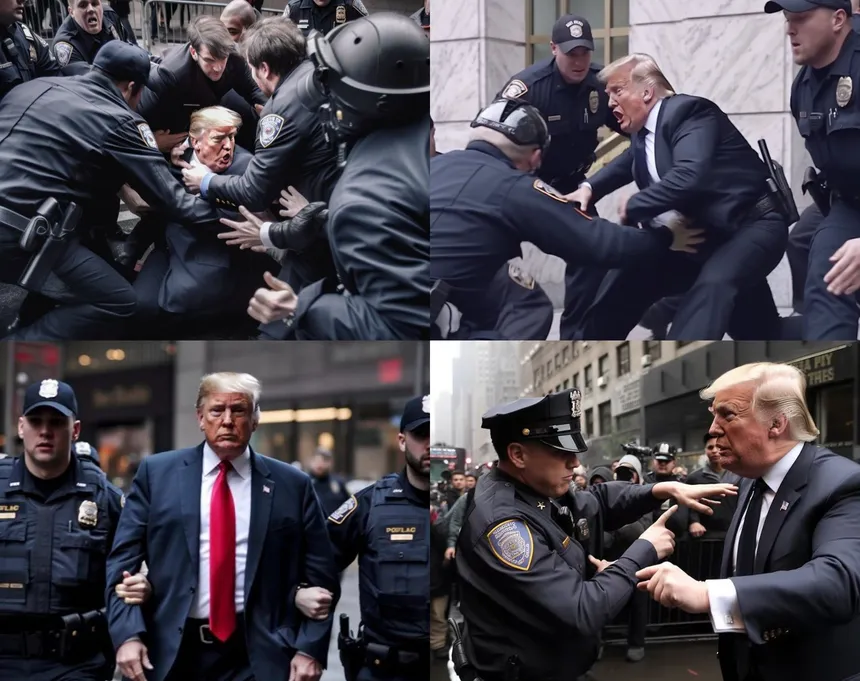
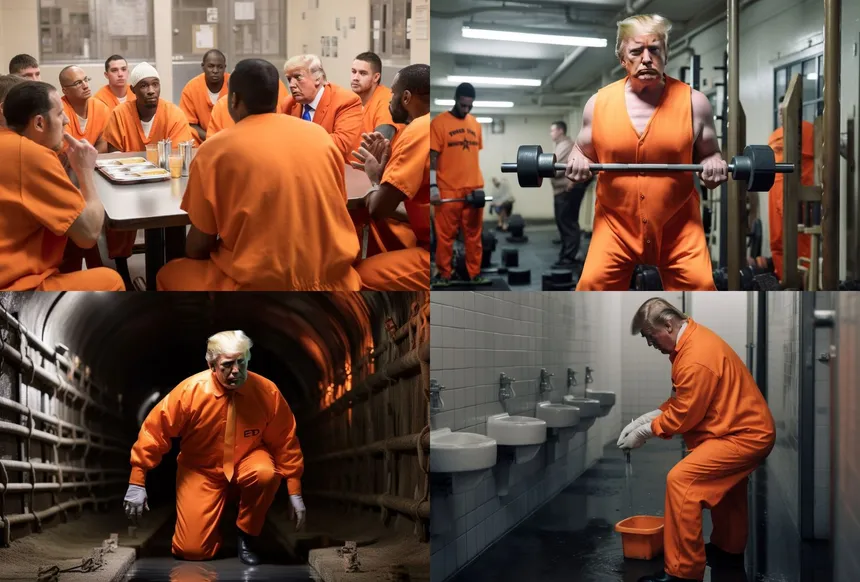
AI-created images of Donald Trump, shared by @EliotHiggins’s account. – Twitter – Midjourney
AI-created images of Donald Trump, shared by @EliotHiggins’s account. – Twitter – Midjourney
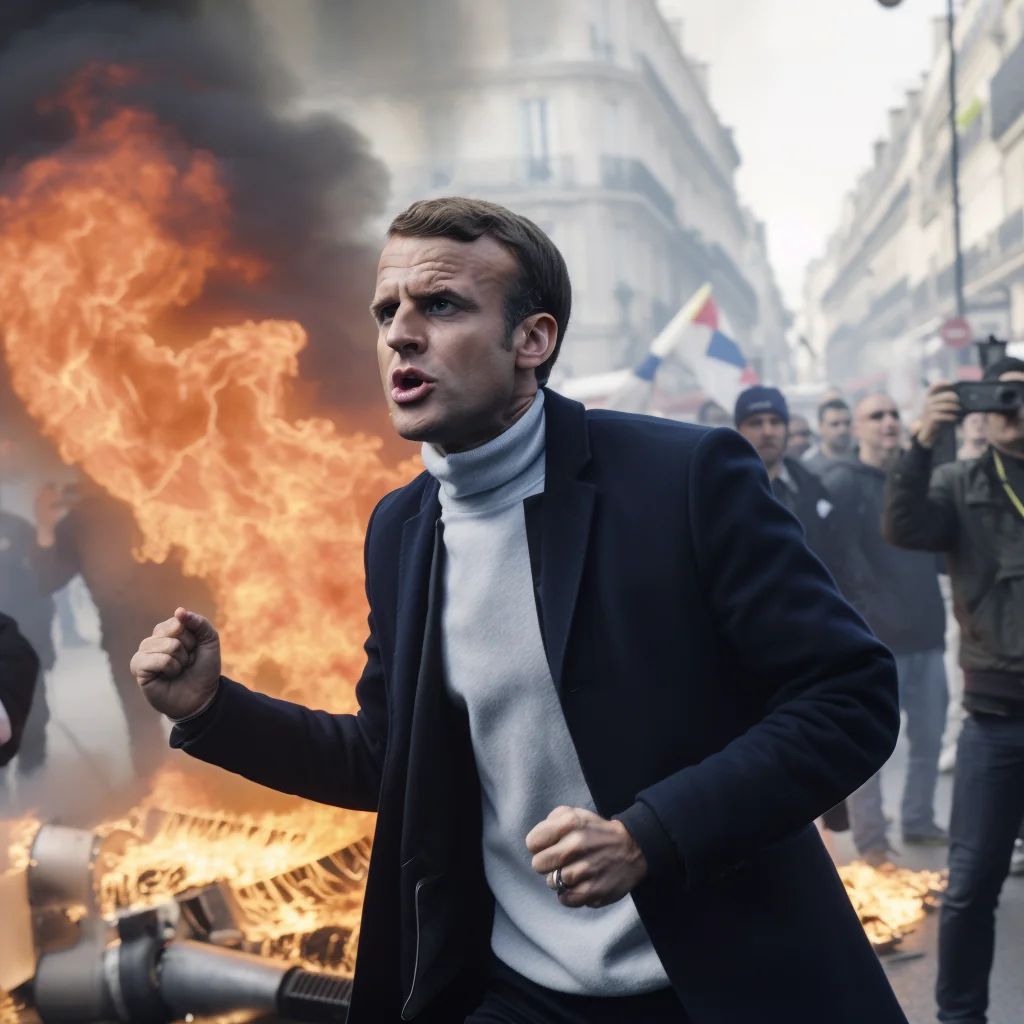
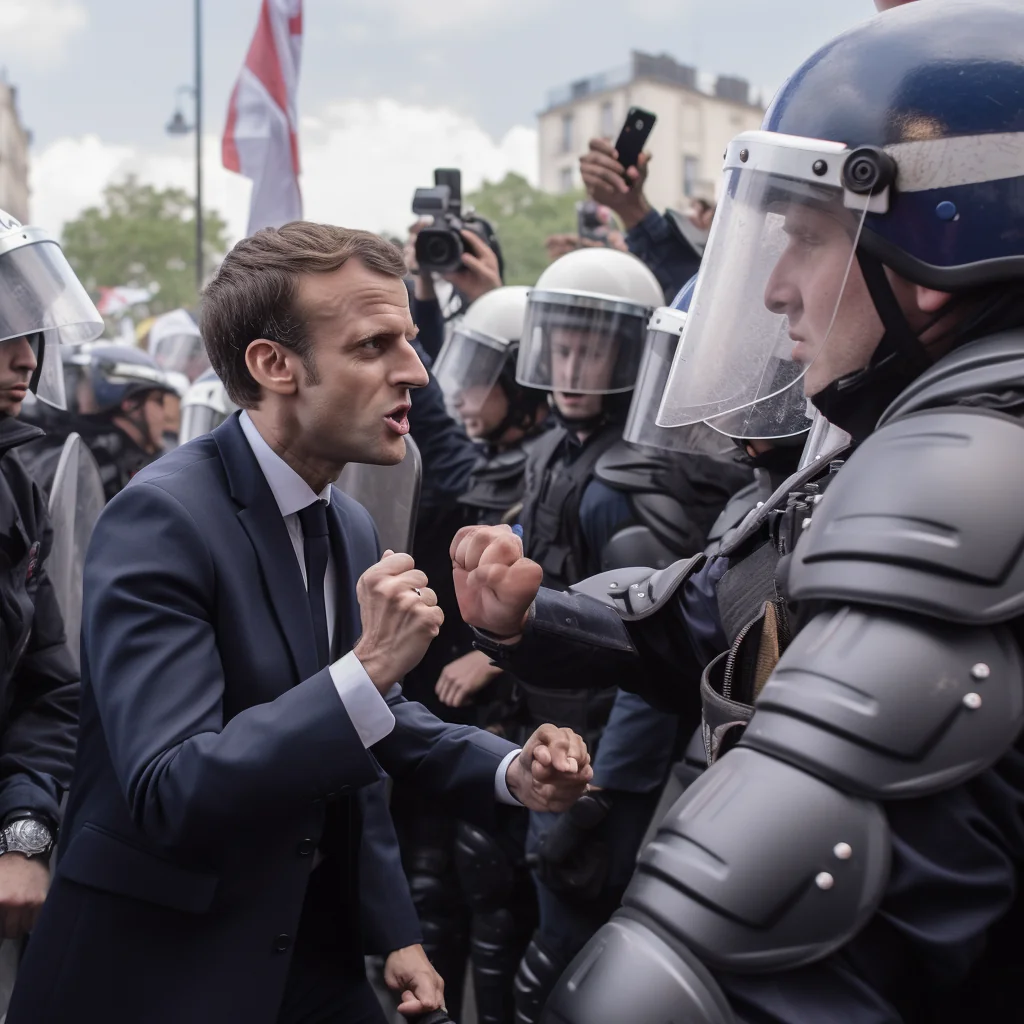
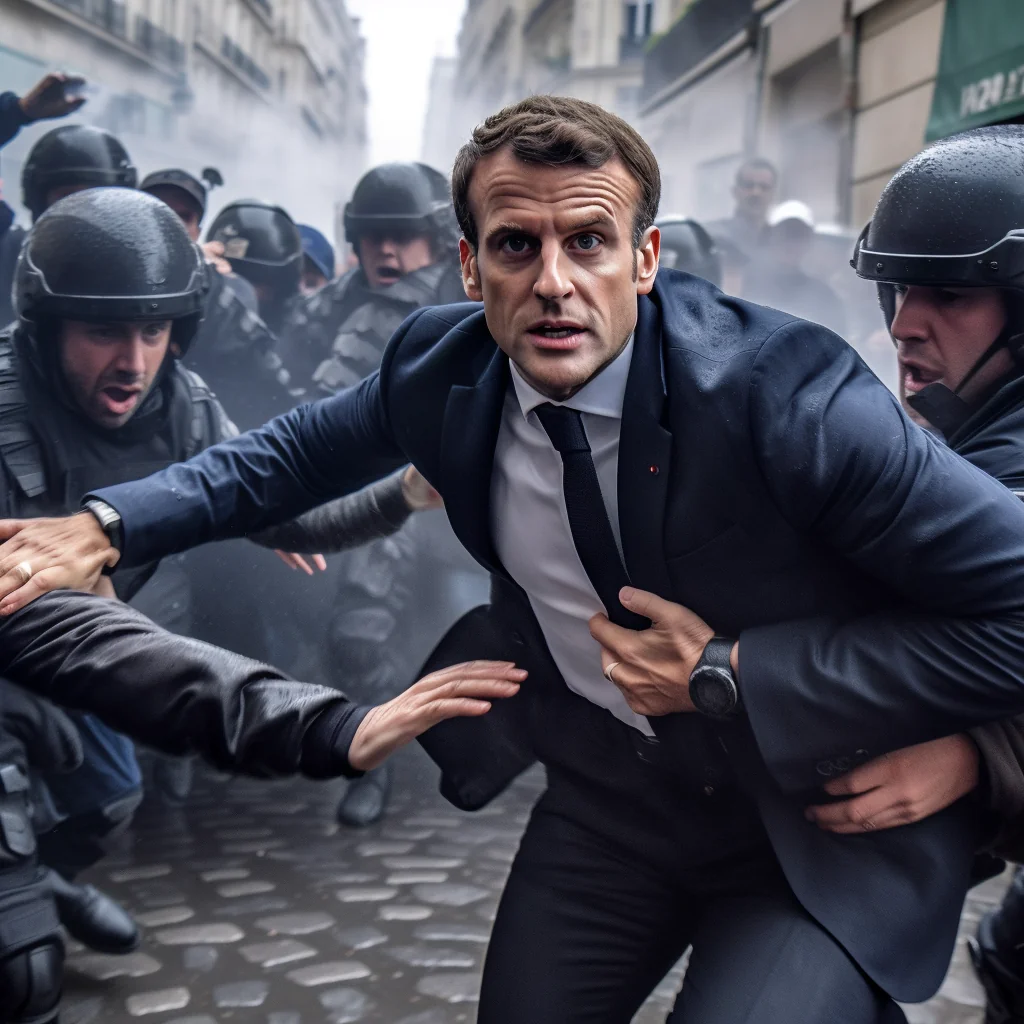
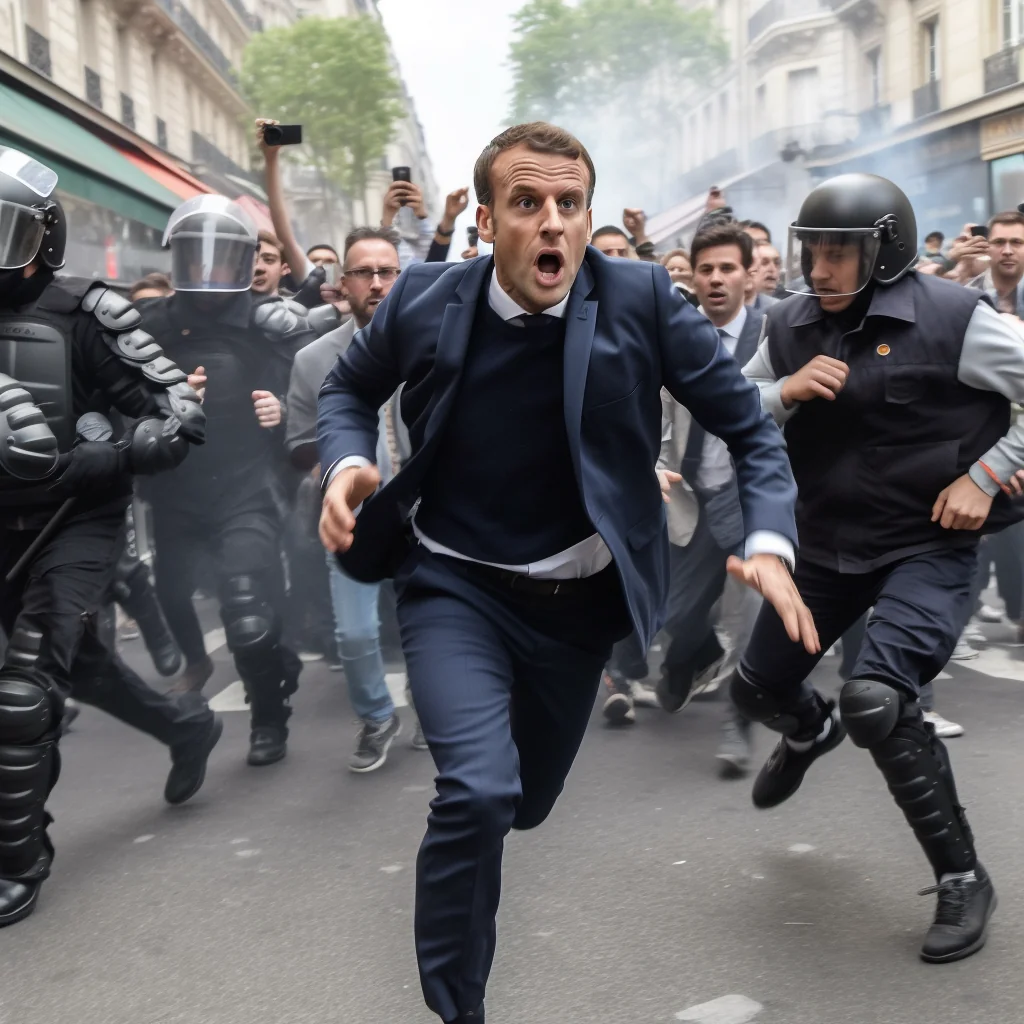
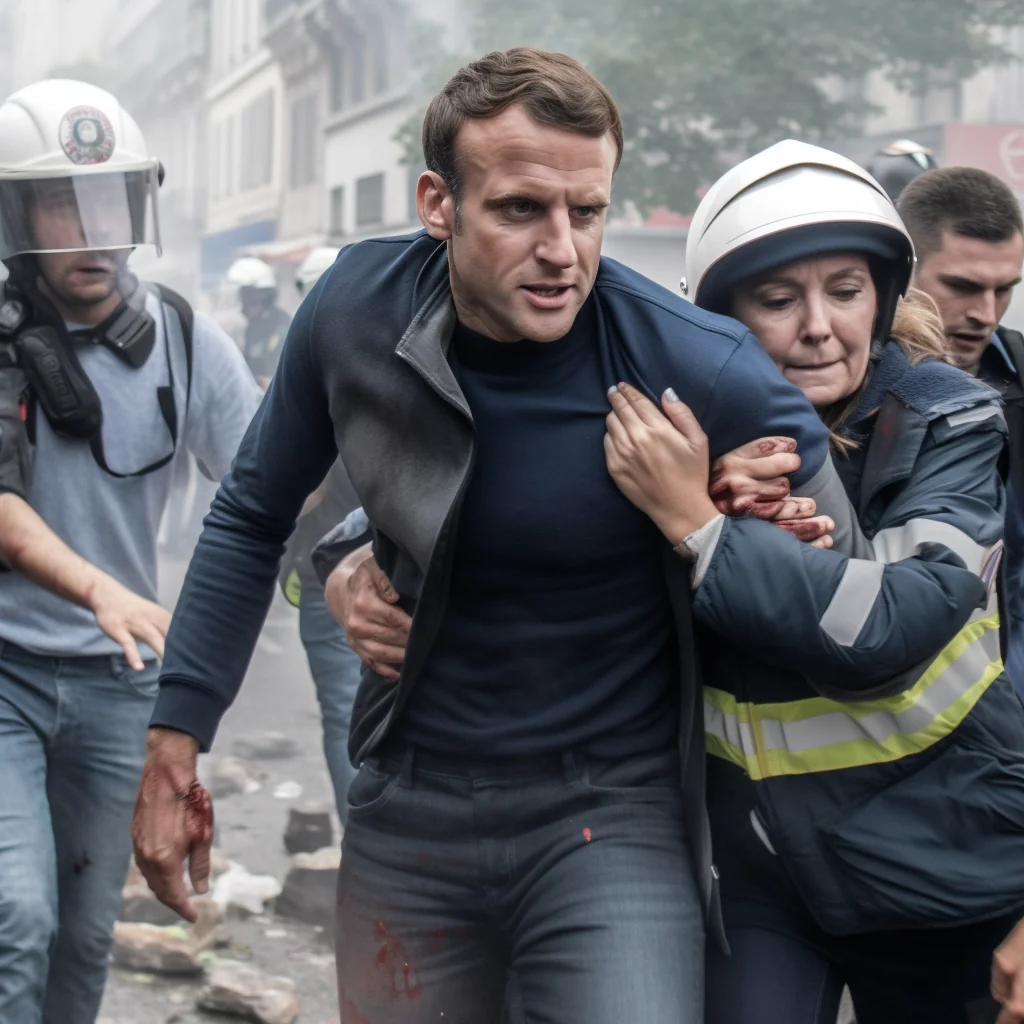
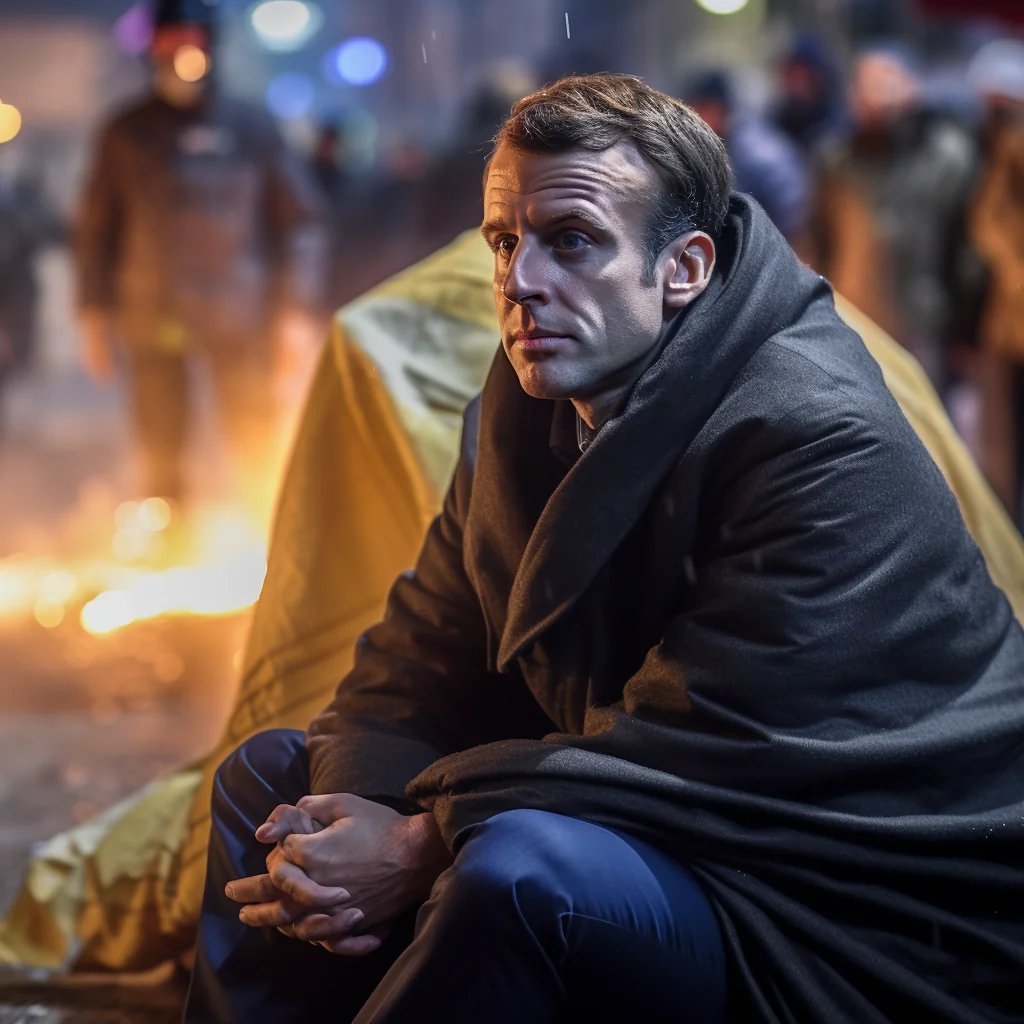
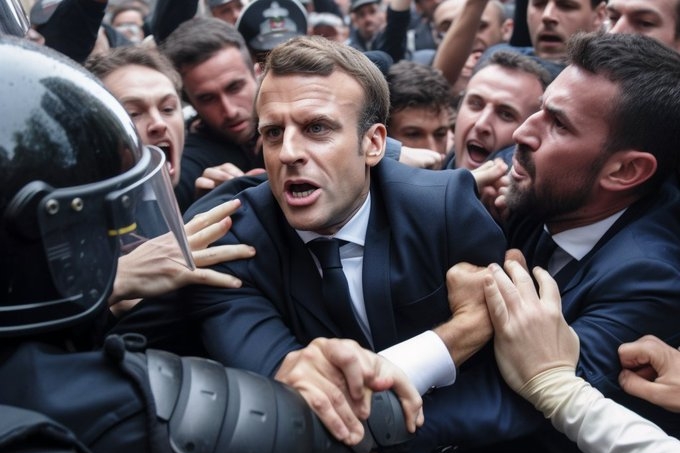
David Fathi: False image generated by photographer David Fathi via Midjourney showing Emmanuel Macron in contact with police officers. Credit: David Fathi / Midjourney
AI Image generating software: DreamStudio, Midjourney, DALL-E 2, Dream by Wombo, Craiyonand new version of Photoshop with AI
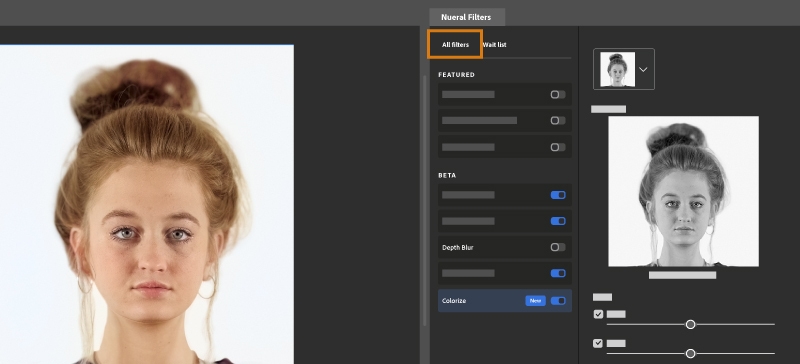
Photoshop AI
A general tip in Photoshop is just to get familiar with Layers, Selections, Masking, and Groups. Almost every complex task just involves being better at these and most problems proceed from small misunderstandings in them. There are free videos explaining any of these, for people who want targeted learning there is a short video on every tool available on Phlearn. The site will try and get you to pay for Premium Content, but there’s loads of free stuff.
For example, these are all free/quick, the presenter is great, and most contain free sample files to practice on.You can teach yourself a good standard of Photoshop just by following along. Click here for tutorials.
Introduction from Adobe to Photoshop AI: Nearly three and a half decades since we first brought Photoshop to the world, we’re writing a new chapter in our history with the integration of Generative AI and Adobe Firefly into Photoshop. Today we deliver an incredible new capability into creators’ hands that empowers them to work at the speed of their imagination while fundamentally transforming the experience into something more natural, intuitive and powerful.
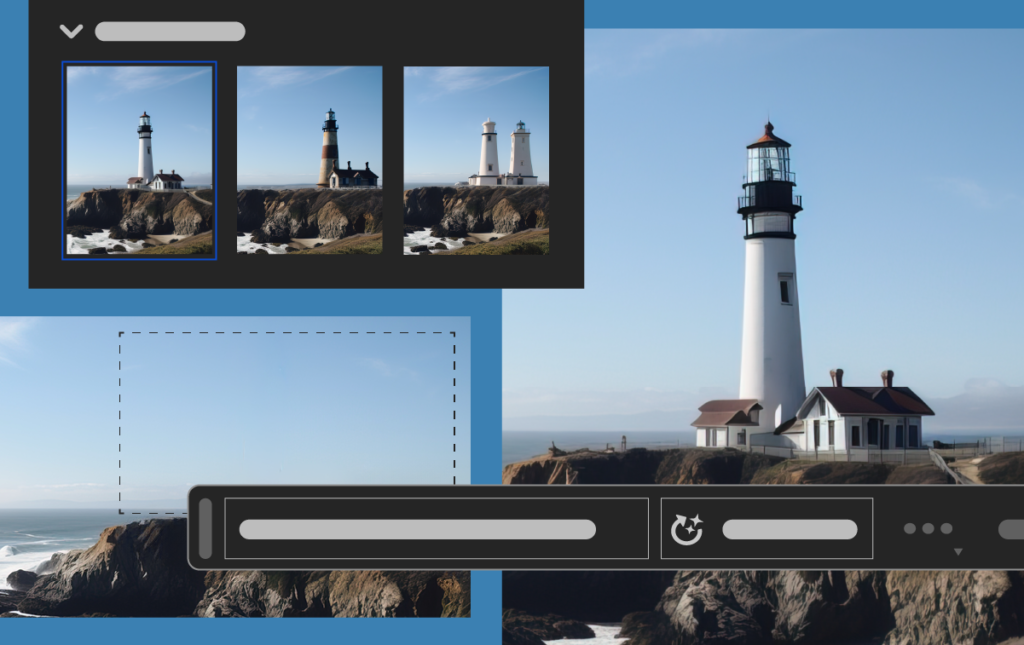
Generative Fill – Adobe Photoshop Quickly create, add to, remove or replace images right in Adobe Photoshop with simple text prompts powered by Adobe Firefly generative AI.
Learn the basics of Generative Fill that is now integrated into the Beta version of Adobe Photoshop. This technology allows you to write simple text prompts to enhance your own images directly in Photoshop.
What’s new in Photoshop
The new features introduced to Photoshop are designed to accelerate everyday creative workflows, streamline complex tasks, and reduce clicks.
Adjustment Presets
Adjustment Presets are filters that speed up complex tasks by enabling you to preview and change the appearance of images in just a few steps to achieve a distinctive look and feel, instantly.
There are 32 new presets in the Adjustments panel that you can hover over to see what your image would look like with each preset applied before selecting it. Once a preset is selected, it can be further refined by editing the automatically created adjustment layers in the layers panel.
Neural Filters is a new workspace in Photoshop with a library of filters that dramatically reduces difficult workflows to just a few clicks using machine learning powered by Adobe Sensei. Neural Filters is a tool that empowers you to try non-destructive, generative filters and explore creative ideas in seconds. Neural Filters helps you improve your images by generating new contextual pixels that are not actually present in your original image.
Click here for a tutorial on how to use Generative Fill
Gradients update
The Gradients feature has been significantly improved, and the workflow has been expedited.
The feature enables you to create gradients in just a few steps and now includes new on-canvas controls which help you have precise controls over many aspects of the gradient in real-time. A live preview that’s created automatically shows you instantly how the changes you make affect your image.
You can now also make non-destructive edits to your gradients, which means you can go back and make changes to your gradient without permanently altering your original image.
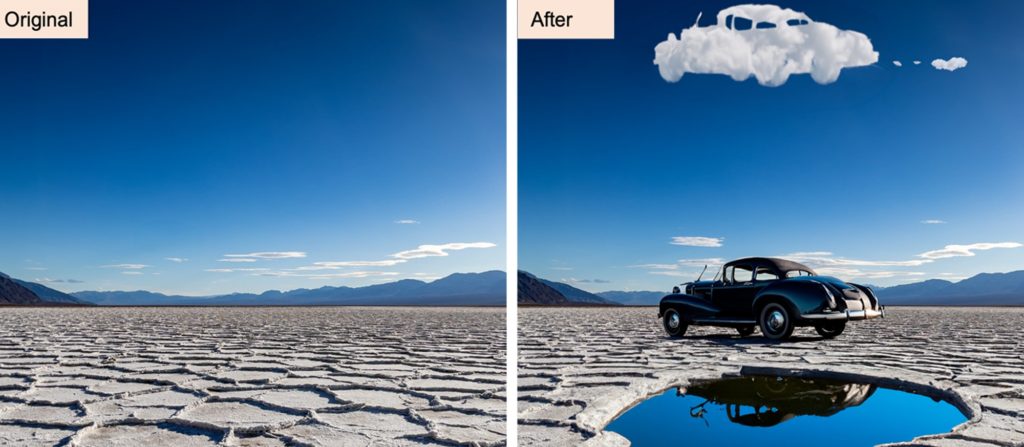
The Remove Tool is an AI-powered feature that enables you to replace an unwanted object by simply brushing over it, preserving the integrity of nearby objects and providing an uninterrupted transition on complex and varied backgrounds.
The Remove Tool is particularly powerful when removing larger objects and matching the smooth focus shift across the image. For example, the tool can remove an entire building or car from an alpine landscape image while seamlessly maintaining the fidelity of the progression from meadow to mountains.
Use the Remove tool for:
Big objects
An object near other objects
An object on a varied-focus background
An object with structure behind it (think lines, like a fence or horizon)
The Contextual Task Bar is an on-screen menu that recommends the most relevant next steps in several key workflows, reducing the number of clicks required to complete a project, and making the most common actions more easily accessible.
For example, when an object is selected, the Contextual Task Bar appears below your selection and suggests actions for selection refinement that you might want to use next, such as Select and Mask, Feather, Invert, Create Adjustment Layer, Fill Selection, or generate something with the new Generative Fill capabilities.
The revolutionary and magical new suite of AI-powered capabilities grounded in your innate creativity, enabling you to add, extend, or remove content from your images non-destructively using simple text prompts. You can achieve realistic results that will surprise, delight, and astound you in seconds.
Click here for a tutorial on how to use Generative Fill
DreamStudio
Tutorial as we explore the amazing capabilities of DreamStudio, from creating realistic portraits to coming up with prompts and structuring your work for maximum impact,
Follow more advanced tutorial hereExplore AI artist: Rune S Nielsen site here
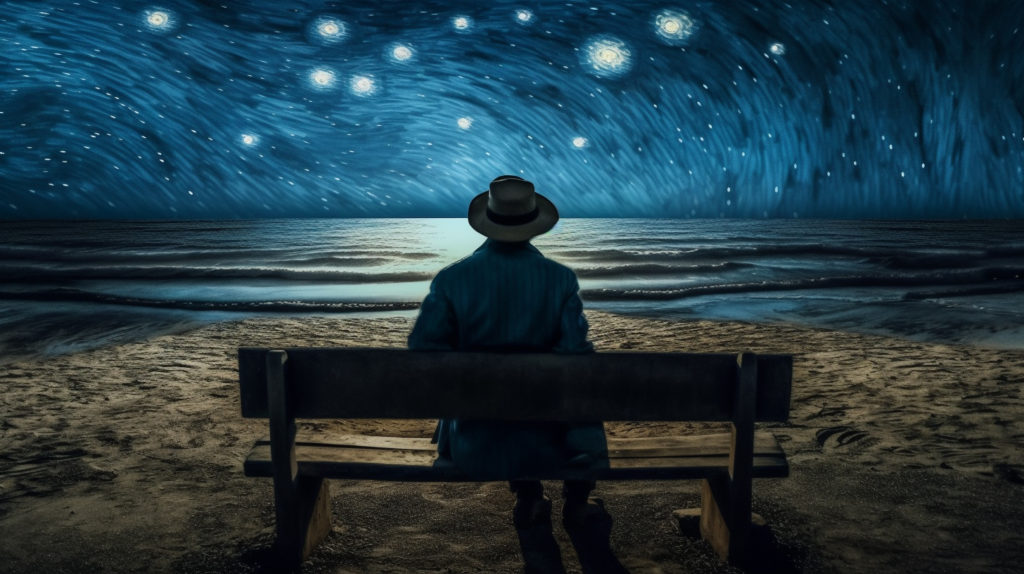
Some experiments with realistic portraits. Image credits: created with Midjourney V5 by CineDScreenshot from the Midjourney Bot on Discord, highlighting the correct use of the “v 5” parameterThe result of requesting an image in the style of Vincent van Gogh. Image credit: created with Midjourney V5 by CineDOn the left: the old output from V4. On the right: the result of the same prompt in the new V5. Image credits: created with Midjourney by CineDAn example of a picture generated in Cinemascope by adding “–ar 21:9” to the prompt. Image credit: created with Midjourney V5 by CineD
DALL-E and DALL-E 2 are deep learning models developed by OpenAI to generate digital images from natural language descriptions, called “prompts”. DALL-E was revealed by OpenAI in a blog post in January 2021, and uses a version of GPT-3 modified to generate images. In April 2022, OpenAI announced DALL-E 2, a successor designed to generate more realistic images at higher resolutions that “can combine concepts, attributes, and styles”.
WEEK 4 – 5:23 June – 6 July Picture story: design newspaper / magazine page spreads
WEEK 4: 23 – 29 June 1. Picture-story: Research & Mood-board 2. Picture-story: Design & Layout
Make A3 page spreads based on images made in-camera (analogue/ observational) and/or AI generated images (digital/ constructed). Follow the steps below:
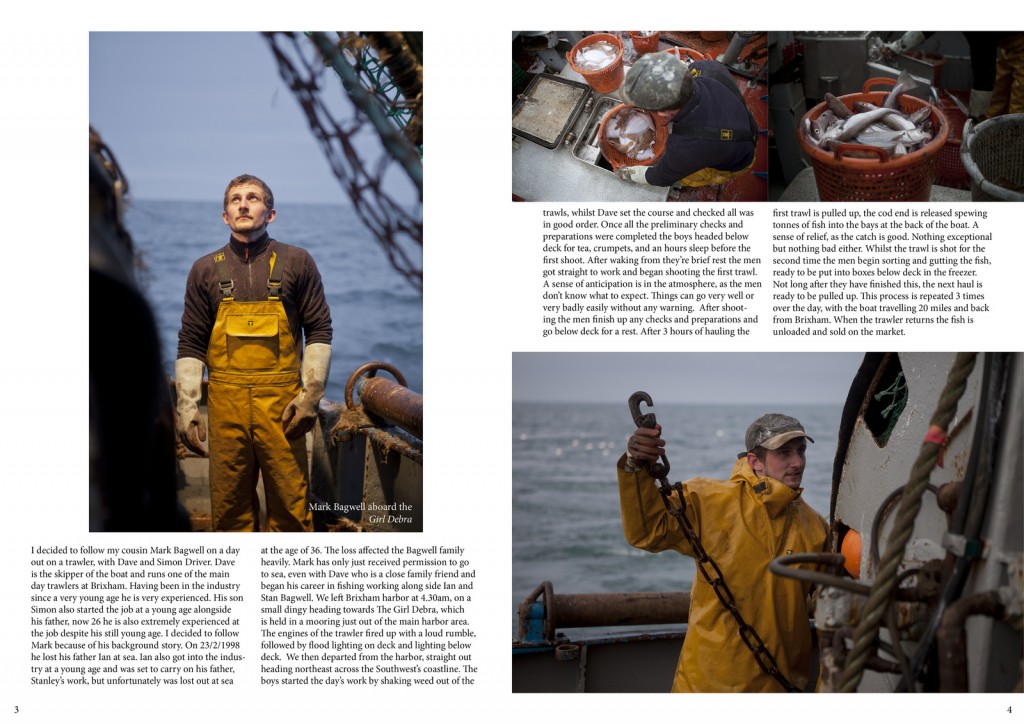
1. Research Picture-Stories: Produce a mood board of newspaper layouts and magazine style picture stories. For reference use look at local stories from the JEP as well as international stories from magazine supplements in UK broadsheets newspaper ( e.g. The Sunday Times, The Guardian, The Telegraphs, Financial Times etc). Look at also at digital picture stories from the internet (see photo-agency websites: Lensculture, Magnum Photos, World Press Photo, AgenceVU, Panos Pictures. Alec Soth’s LBM Dispatch
Find picture-stories here in this folder: M:\Radio\Departments\Photography\Students\YR 13 OBSERVE, SEEK, CHALLENGE 2024-2025\Picture-stories
2. Analysis and deconstruction: Look at the layout of pictures and analyse how individual pictures relate and tell a story according to the construction of a traditional picture-story. Identify what types of pictures are more important than others e.g. which are major (establishing shots) or minor pictures (detail, relationship shot), and which types of portraits are used (formal, informal, environmental and person at work) see Powerpoint: A Traditional Picture Story below for further guidance. Analyse also the use of headline, text and captions to convey and construct a particular meaning or point of view.
Blogpost: Produce 1 Blogpost with moodboard of picture stories + analysis of one in relation to Traditional picture story
3. Headline, text, captions: Think of a creative title and write a selection of headlines that tell your story. Write also an introduction/ abstract that provide further context for your pictures story. Also write captions for each picture: who, what, where, when and put into a new post
4. A3 Page-Spread Designs: Produce at least two different designs/ picture-stories from your photographs. Class tutorial on page design using InDesign. Be creative in your layout and experiment with different ways to communicate your message by clever cropping, sequencing, juxta-positioning, typography, use of graphics etc. Think of catchy headline and also write a short text (50-100 words) and captions for images. Start with a rough sketch of how the page might work and begin to lay out pictures, major and minors.
a) Design a traditional newspaper layout b) Design a magazine double-page spread
5. Experimentation: Edit your final layout and designs – make sure you show experimentation in your blog of different design and layout ideas combining images, graphics and typography in a personal and creative manner. Produce at least 3 versions of each design
Blogpost: Produce 1 Blogpost which shows evidence of you design process using screen grabs and annotation.
6. Evaluation: Reflect on your final design ideas and explain in some detail how well you realised your intentions and reflect on what you learned/ What could you improve? How?
WEEK 6 – 7:7 – 19 July Printing pagespreads Mount and present final images
WEEK 6: 7-13 July 1. Picture-story: Printing & Binding 2. Final prints: Mounting & Presenting
WEEK 7: 14-19 July 1. Final prints: Mounting & Presenting
7. Presentation: Print, mount and present final designs and any other final outcomes, such your best 3-5 images and present as final print.
Blogpost: Produce 1 Blogpost with your final page-spreads and write an evaluation.
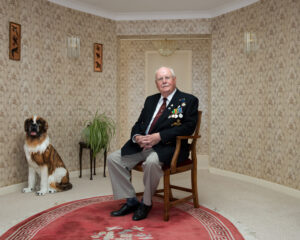
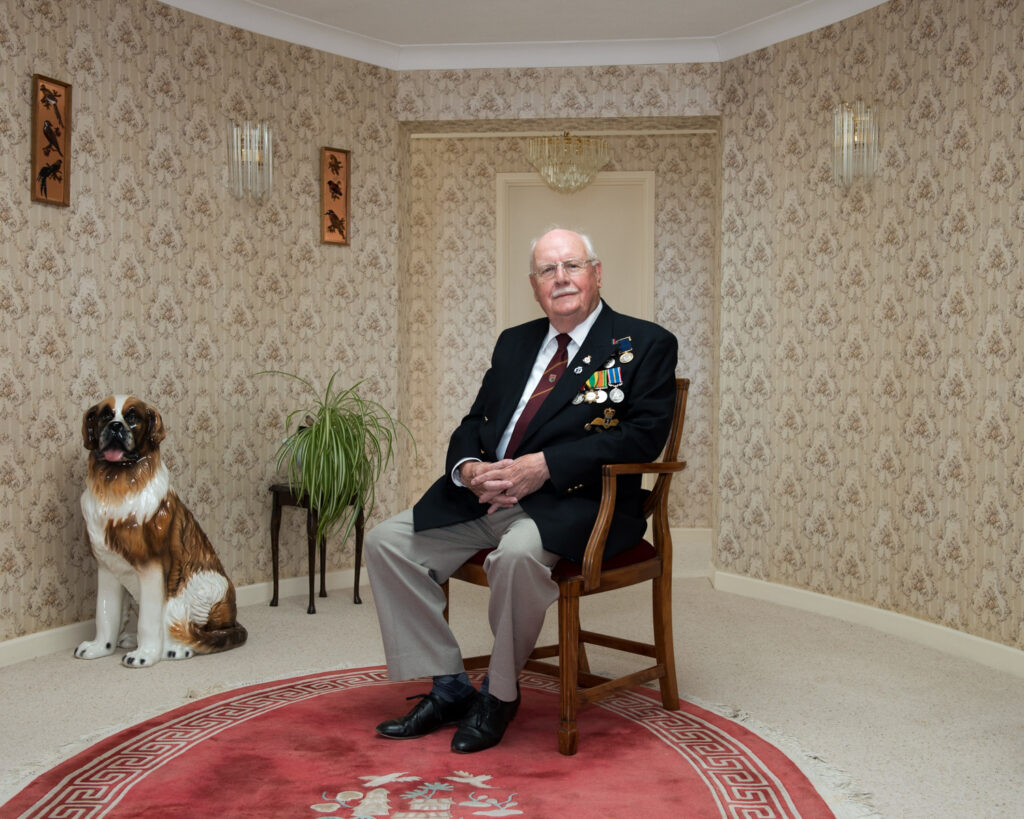
Key features to consider with environmental portraiture:
LIGHTING: natural light or artificial light < Outdoors > hard light > sunny weather creates hard contrast between light and shadows. < soft light > overcast weather and clouds acts as soft box and diffuses the light. < Indoors > use of window light > roof light > studio lights < Direction of light > from the side > 45 degree angle > frontal > back light
ENVIRONMENT: location or setting that can add context to the portrait < Tell a story about the sitter > lifestyle, social class, gender, ethnicity, age etc. < Use of props > tools of the trade > personal items > clothing > fashion
FRAMING: arrangement of person(s) < Full length body > three quarter length > half body < Angle > low angle > deadpan > canted angle
GAZE: Eye contact > engagement with the camera Averted gaze > looking away from camera TECHNICAL (CAMERA SETTING): < Focal length > standard lens (50mm) > wide-angle lens (35mm) < Depth of field > aperture settings > f/8, a mid f-stop number < Movement > shutter speed settings > no less than 1/60 hand held or use a tripod for slower shutter speeds. < ISO > outdoors > crisp image > low ISO > 100-400 ISO < indoors > grainy image > high ISO > 400-1600 ISO < White balance > outside daylight < inside either daylight or tungsten, or tube light – depending on light conditions.
Stuart Weaving , High Net Worth Individual (HNWI). Marina Court Penthouse, St Helier, Jersey. 7 June 2015