What type of image is this (photo, painting, illustration, poster, etc.)?
What do you notice first? Describe what else you see.
What’s happening in the image?
What people and objects are shown? How are they arranged? How do they relate to each other?
What is the physical setting? Is place important?
What, if any, words do you see?
Are there details that suggest the time period this image relates to? Is the creation date listed in the bibliographic record? If the creation date is listed, was this image created at or around the same time period the image relates to?
What other details can you see?
REFLECT: Generate and test hypotheses
What tools might have been used to create this image?
Why do you think this image was made? What might have been the creator’s purpose? What evidence supports your theory?
Why do you think the creator chose to include these particular details? What might have been left out of the frame?
Who do you think was the audience for this image?
What do you think the creator might have wanted the audience to think or feel? Does the arrangement or presentation (lighting, angle, etc.) of the details affect how the audience might think or feel? How?
What do you feel when looking at this image?
Does this image show clear bias? If so, towards what or whom? What evidence supports your conclusion?
What was happening during the time period this image represents? If someone made this image today, what would be different/the same?
What did you learn from examining this image? Does any new information you learned contradict or support your prior knowledge about the topic or theme of this image?
Once you have been instructed on how to use the lighting studio safely and respectfully, you will be able to use the studio during lesson times or in study periods. You must book the facility in advance via one of your teachers JAC / MM / MVT / LJS
You must always leave the studio in a clean and tidy, safe manner. All equipment must be switched off and packed away. Any damage must be reported and logged.
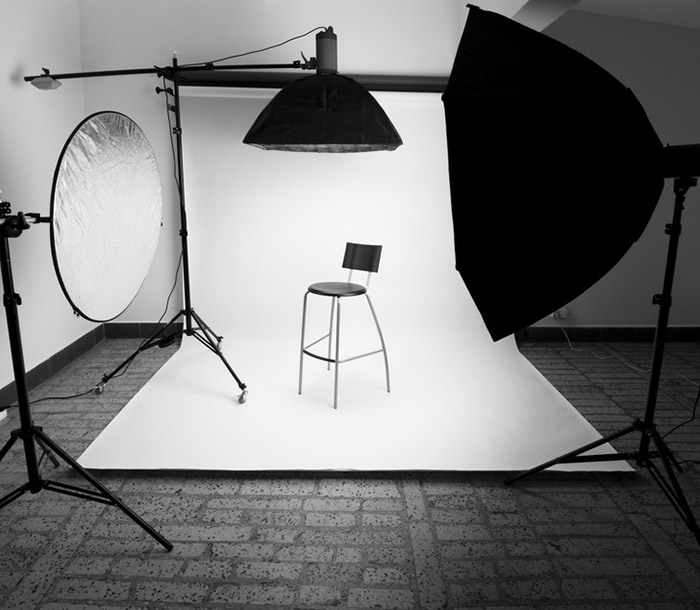
Typical studio set up with infinity screen back-drop
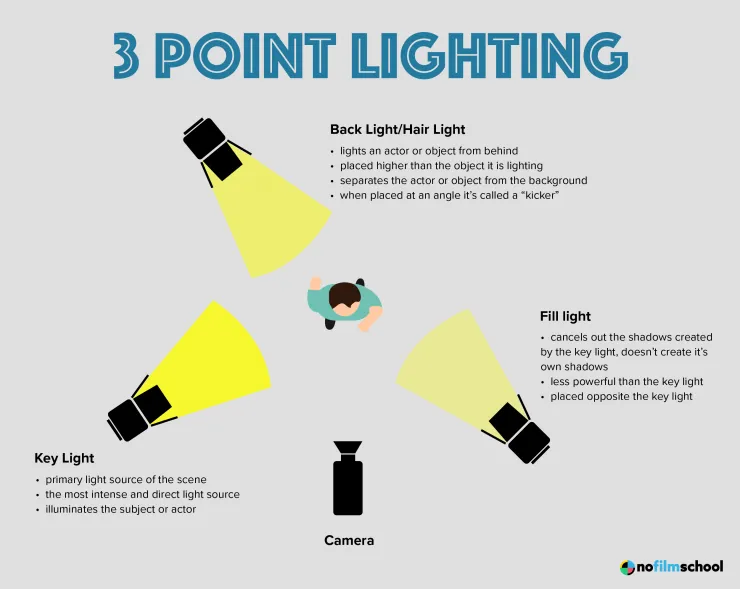
Types of lighting available
Continous lighting (spot / flood)
Flash head
Soft box
Reflectors and coloured gels
Chiarascuro effects and single point lighting
Still Life Photography and using the product table / copy stand
Product table set-up, with back light and infinity screen
Still-life Studio Shoot:
You can choose to photograph each object individually or group together several objects for a more complex still life arrangements.
Technical stuff
Continuous Lights – photograph objects three dimensionally
Camera setting: Manual Mode ISO: 100 White Balance: Daylight Aperture: F/16 Shutter: 0.5 sec to 0.8 sec (depending on reflection of each object) Lights in room must be switched off to avoid reflections
Continuous Lights – portrait
Camera setting: Manual Mode ISO: 100 White Balance: Daylight Shutter Speed 1/125 sec Aperture f/16
Camera setting: Manual Mode ISO: 100 White Balance: Daylight Aperture: F/16 Shutter: 1/125-1/200 (depending on reflection of each object) Flash heads set to power output: 2.0 Use pilot light for focusing
PORTRAITS
Camera settings (flash lighting) Tripod: optional Use transmitter on hotshoe White balance: daylight (5000K) ISO: 100 Exposure: Manual 1/125 shutter-speed > f/16 aperture – check settings before shooting Focal lenght: 105mm portrait lens
Camera settings (continuous lighting) Tripod: recommended to avoid camera shake Manual exposure mode White balance: tungsten light (3200K) ISO: 400-1600 – depending on how many light sources Exposure: Manual 1/60-1/125 shutter-speed > f/4-f/8 aperture – check settings before shooting Focal length: 50mm portrait lens
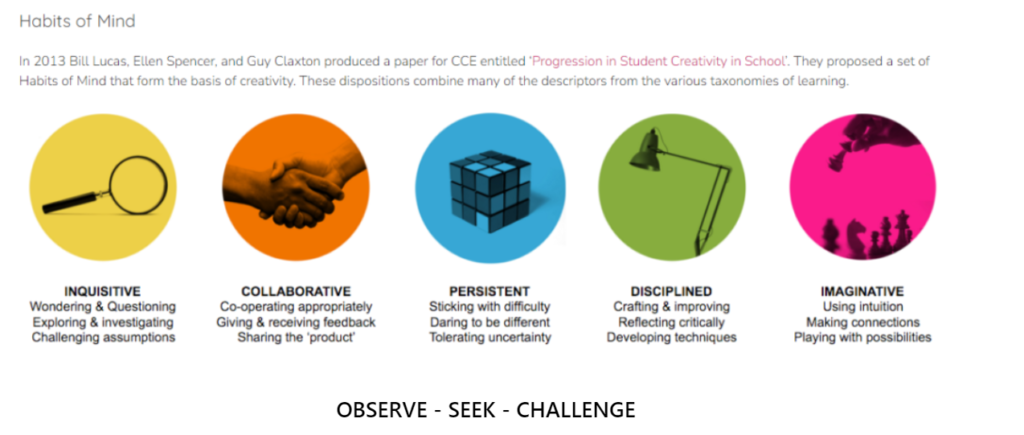
The first Half Term in Year 12 is designed to encourage you to develop Core Skills in…
Observe – Seek – Challenge
Camera Handling Skills
Using the Hautlieu Creative Blog
Discussing, sharing and analysing examples of photography
Fundamental image selection, editing and enhancement
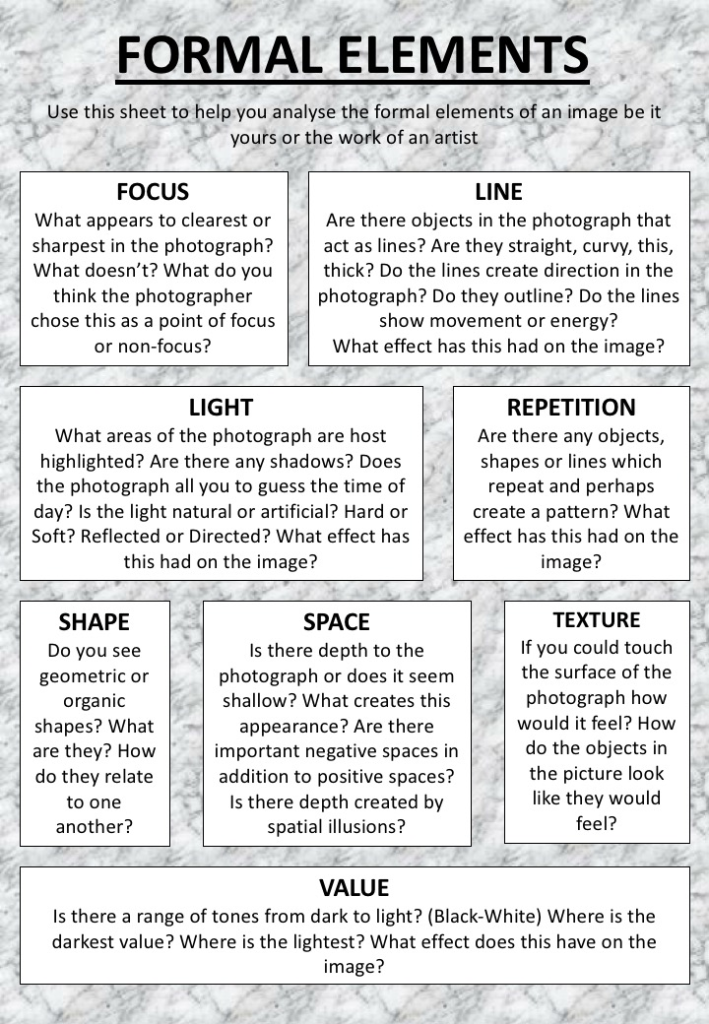
Explore the formal elements skillfully and creatively
Learning about key artists and concepts
Task 1
Watch : Genius of Photography / Fixing The Shadows and take
Discussion Points (remember to include these in your presentation)
Camera Obscura
Nicephore Niepce
Louis Daguerre
Daguerreotype
Henry Fox Talbot
Richard Maddox
George Eastman
Kodak (Brownie)
Digital Photography
Think – Pair – Share activities
To embed your understanding of the origins of photography and its beginnings you’ll need to produce a blog post / word / powerpointpresentation which outlines the major developments in its practice. Some will have been covered in the documentary but you may also need to research and discover further information. Add plenty of visual evidence and examples to help articulate your understanding…
Wordcount Guideline = 1000 Words
Structure
Introduction – Key Content – Conclusion / Summary
Due Date Friday 20th September
Task 2
Summer Task Critique
Think – Pair – Share
Blog intro and upload of Summer Task
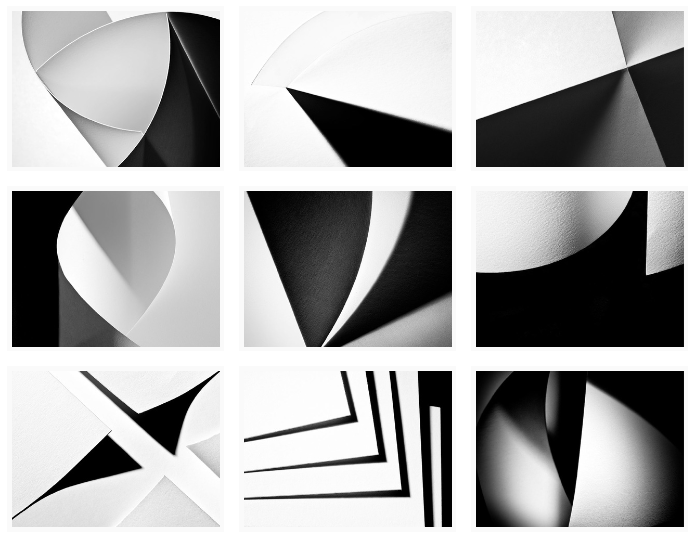
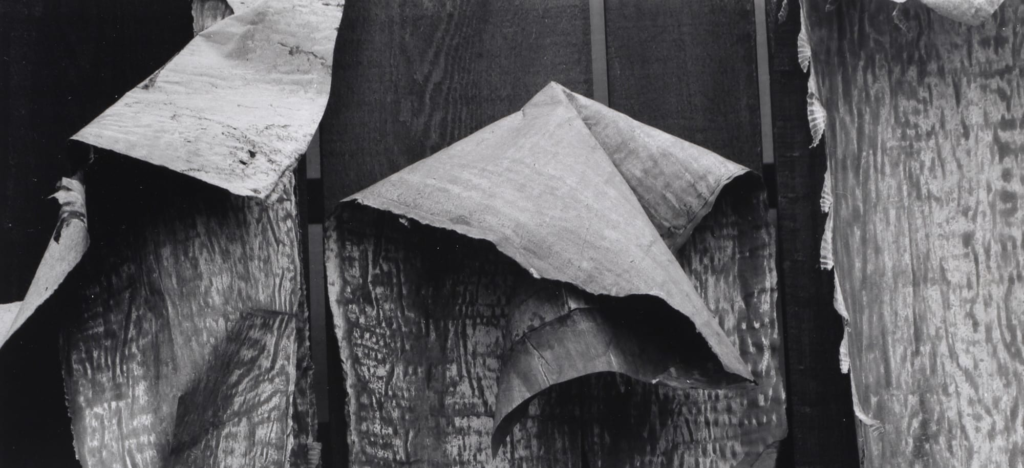
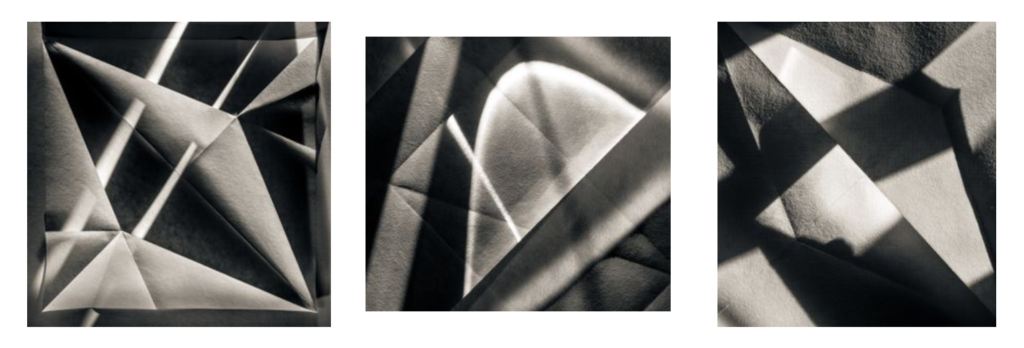
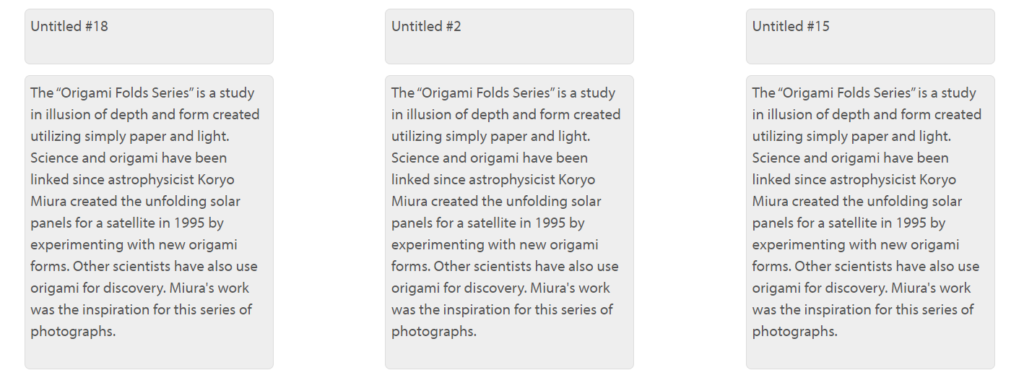
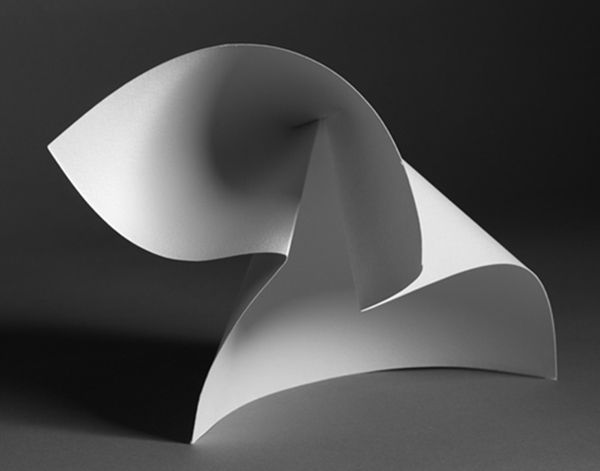
Develop a range Paper Experiments / photographing white paper
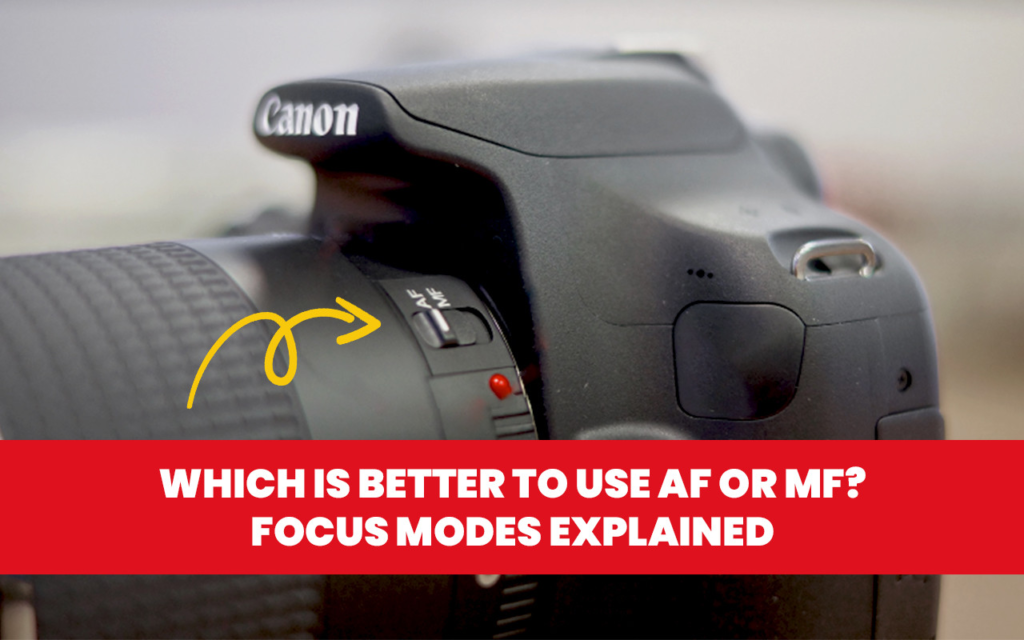
Create a blog post titled ‘Focus Control and Aperture’
Explain different ways of focusing on a camera (AF and MF)
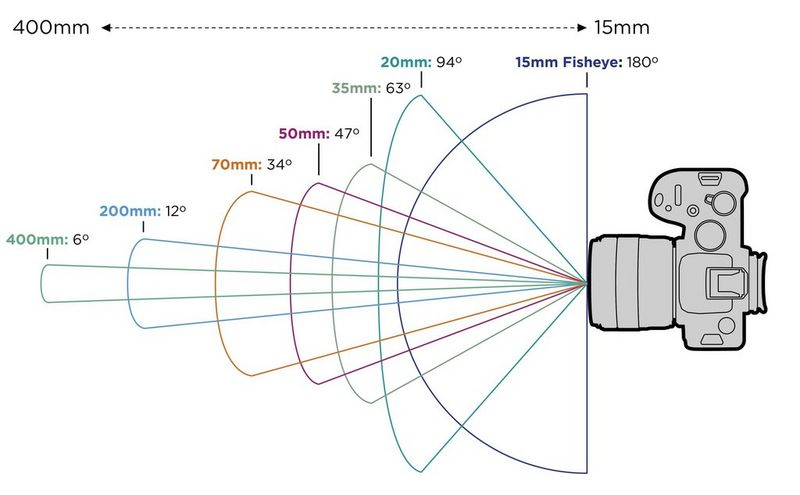
Explain what focal length is. Include an image to help illustrate this.
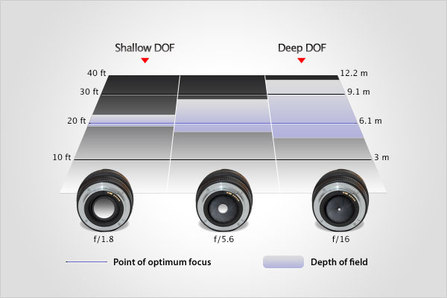
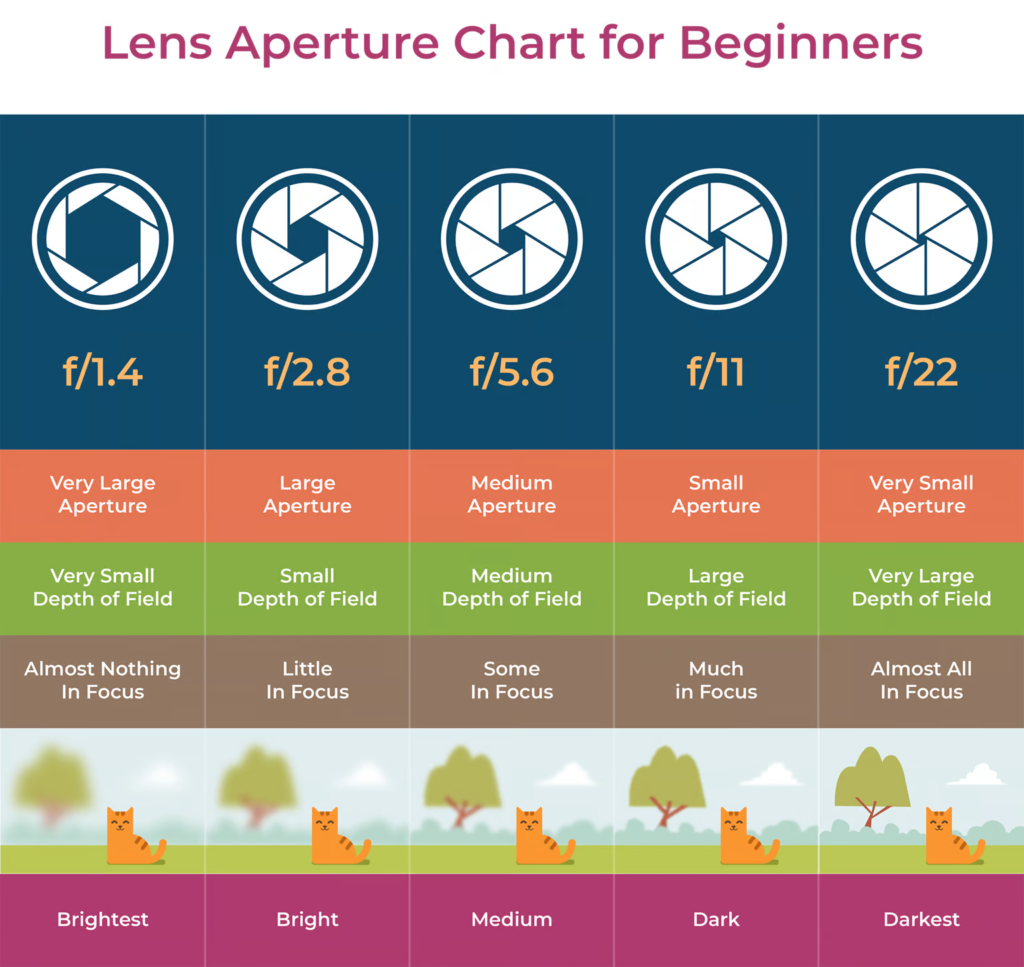
Explain what Aperture is and give examples of different Apertures
Explain what Depth of Field is
Include your experiments using the Camera Simulator. Clearly label your experiments to explain what’s going on.
Include research of photographers who use depth of field / focus in their work – Choose from: Ralph Eugene Meatyard,(particularly his Zen Twigs and No Focus photos), Saul Leiter, or Uta Barth
Autofocus = general use
Manual focus = close ups and fine detail ( use the focus ring on the end of the lens and adjust for each shot !)
Focal length and types of lenses
The focal length of a lens is the optical distance (usually measured in mm) from the centre of a lensand its focus.
This determines what you “see” when using a camera…
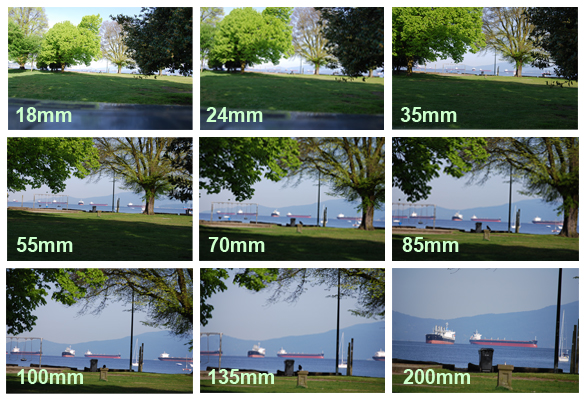
Spot the differences when using different focal lengths whilst photographing the same thing…
Setting Focus Points…advanced techniques
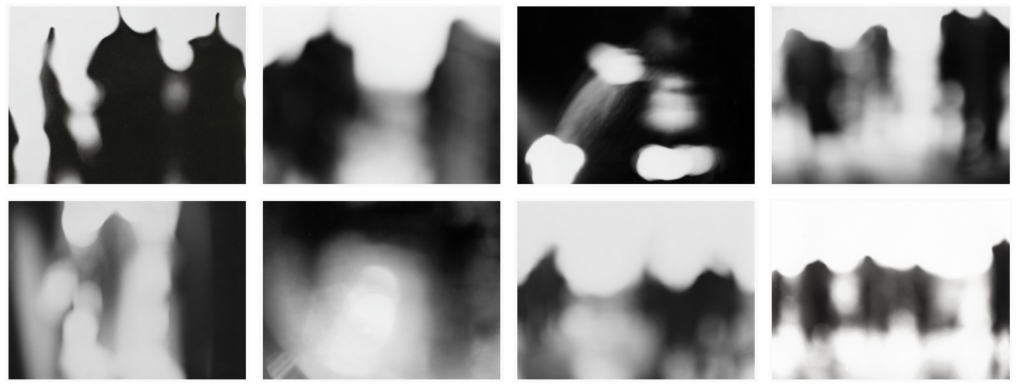
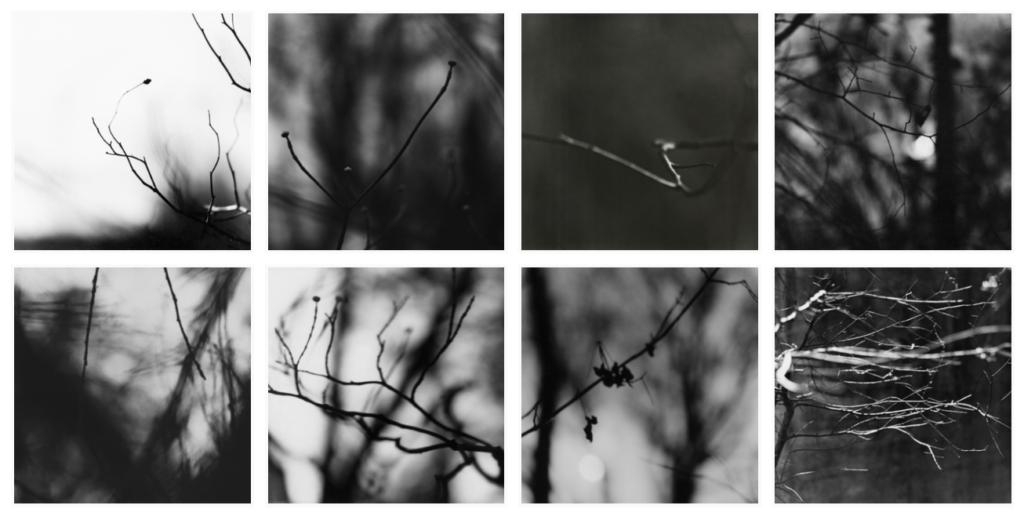
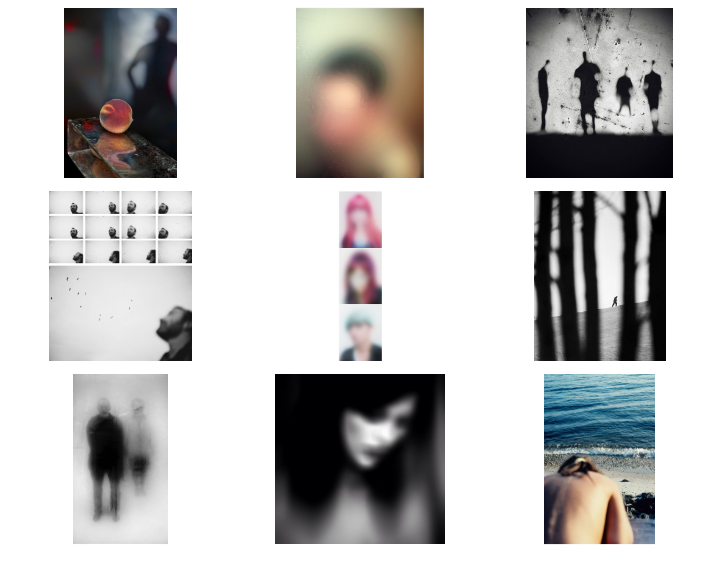
Exploring depth of field and focus with Ralph Eugene Meatyard, Saul Leiter and Uta Barth.
One of the ways that cameras see the world differently to the way we view it with our eyes is that they can selectively focus on the subject. This phenomenon is related to the mechanics and optics of the camera lens. The photographer can change the settings on the camera in order to alter the amount of light entering the lens. This directly affects the depth of field of the subject being viewed.Some photographers have experimented with a variety of effects that can be achieved by manipulating the camera’s ability to bring subjects in and out of focus.
Meatyard made his living as an optician,born in 1925 and died in 1976. He was a member of the Lexington Camera Club and pursued his passion for photography outside the mainstream. He experimented with various strategies including multiple exposures, motion blur, and other methods of photographic abstraction. Two of his series are particularly concerned with focus and depth of field, both stretching the expressive potential of photography, film and cameras when looking with the ordinary world.
No focus- Reducing groups of human figures to indistinct abstractions, the artist proposes an alternate notion to the traditional photographic portrait.
Zen Twigs – A meditative study of the mysterious forms of twigs and tree branches, inspired and informed by the artist’s deep study of Zen Buddhism.
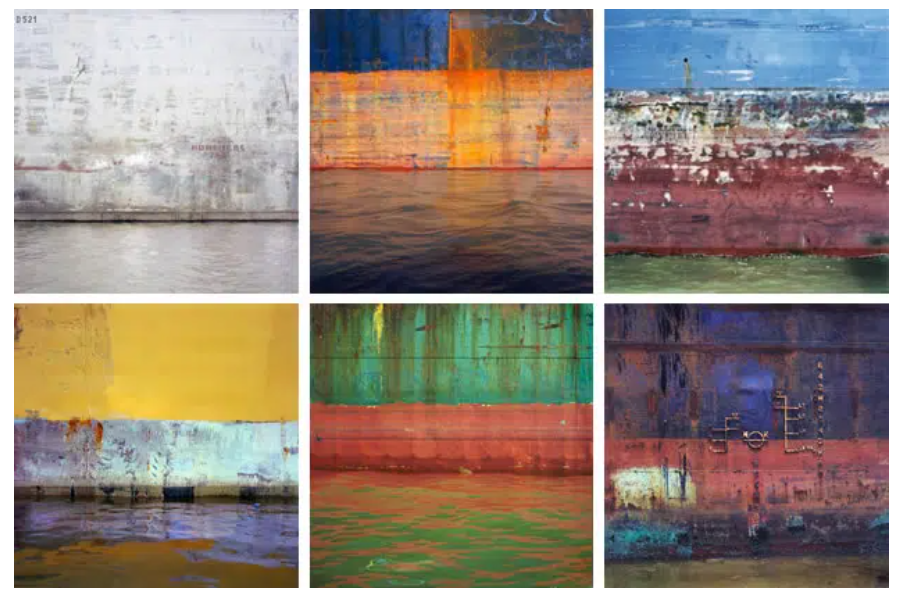
Saul Leiter
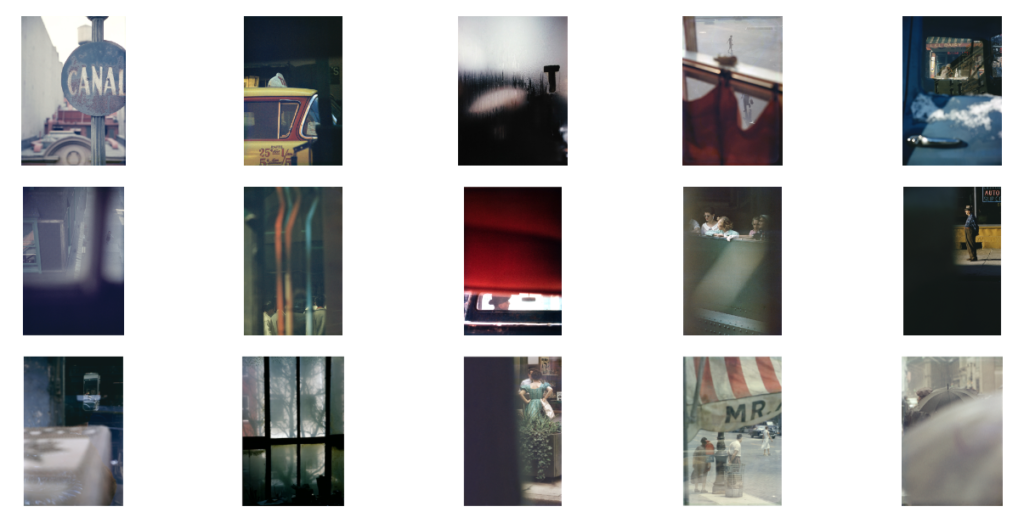
Leiter was foremost a painter who discovered the possibilities of colour photography. He created an extraordinary body of work, beginning in the 1940s. His images explore colour harmonies and often exploit unusual framing devices – shop signs, umbrellas, curtains, car doors, windows dripping with condensation – to create abstracted compositions of everyday street life in the city. Leiter was fond of using long lenses, partly so that he could remain unobserved, but also so that he could compress space, juxtaposing objects and people in unusual ways. Many of his images use negative space, with large out of focus areas, drawing our eye to a particular detail or splash of colour.
Examples of Saul Leiter’s work…
Uta Barth
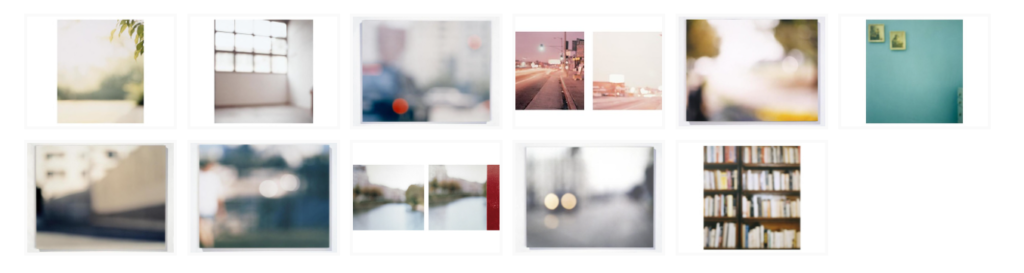
Throughout the past two decades, Uta Barth has made visual perception the subject of her work. Regarded for her “empty” images that border on painterly abstraction, the artist carefully renders blurred backgrounds, cropped frames and the natural qualities of light to capture incidental and fleeting moments, those which exist almost exclusively within our periphery. With a deliberate disregard for both the conventional photographic subject and point-and-shoot role of the camera, Barth’s work delicately deconstructs conventions of visual representation by calling our attention to the limits of the human eye. — Tanya Bonakdar Gallery
Uta Barth’s work…
What to do…
Research the work of Ralph Eugene Meatyard, Saul Leiter and Uta Barth. How have they experimented with focus and depth of field in their work? Choose specific images to comment on in detail. You could also find other photographers who are interested in experimenting with focus effects.
Explore the effects of changing the aperture settings on your camera to alter depth of field. You could illustrate this with a series of photos of the same subject shot with different aperture settings.
Create a series of deliberately out of focus images. Consider the degree of abstraction in the final image. How out of focus are the subjects and are they still recognisable? Experiment with colour and black and white.
Create a series of images which explore dramatic depth of field (selective focus). Experiment with switching between foreground, middle ground and background focus. Remember, you will need to use a wide aperture (small number e.g. f2.8) and/or a longer lens for this. Remember to share all of the images you make (including those that you deem failures) in a gallery/contact sheet.
Curate your images into different groupings (see below). Experiment with editing the images in each set differently. Give each set a title and write a short evaluation explaining your editorial decisions.
Make a blog post about your development of ideas based on the prompts listed above…
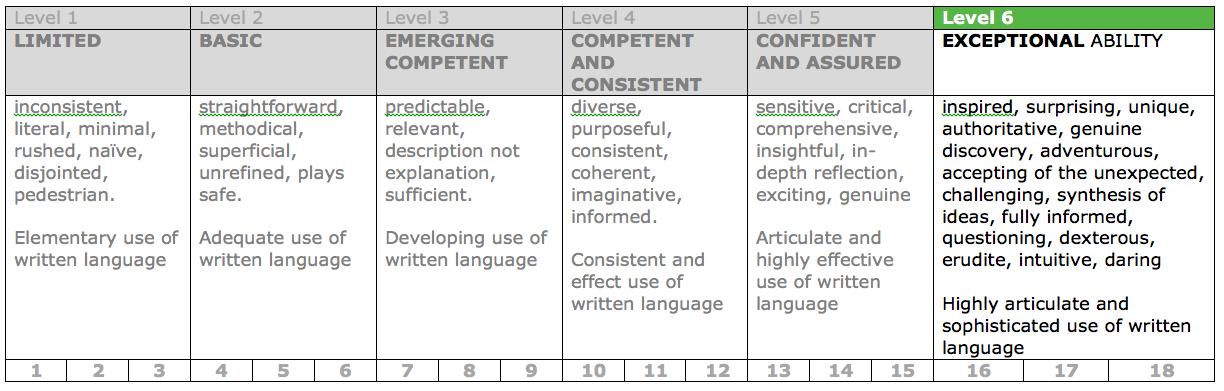
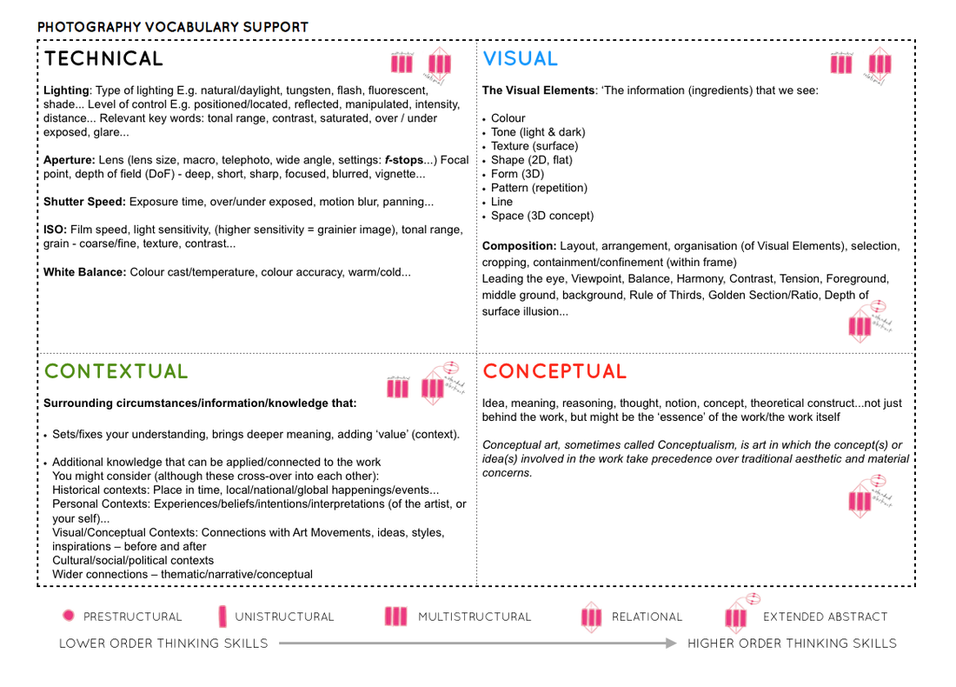
Ensure you use technical vocab throughout using the photoliteracy matrix here
Some more examples…
Week 4Shutter Speed and movement
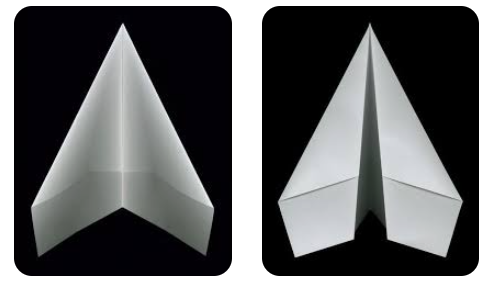
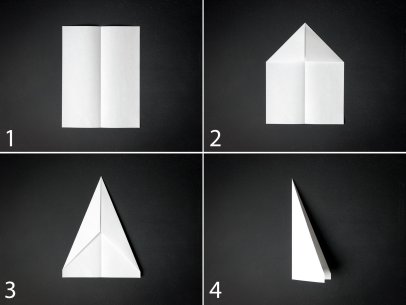
Throwing – rolling – spinning – bouncing paper
Explore Shutter Speed and movement / light
Paper Experiments
Throw, move , roll paper aeroplanes, balls, spirals
HW Experiment with Shutter Speed and movement / light / water
Find examples of fast shutter speed in action
Find examples of slow shutter speed (long exposure) in action
What kind of control does adjusting the shutter speed give us?
Think about and plan a set of photoshoots that show your understanding of shutter speed
What do we need to be aware of / careful of with different shutter speeds ?
Blog Posts to create:
Create a blog post titled ‘Shutter Speed’
Explain what Shutter Speed is – make sure you include how it affects light and movement
Include images to illustrate your point
Include research of photographers who use shutter speed to impact the outcome of their photos
Take your own photos inspired by the artist you have focused on, edit and present your photos on the blog post
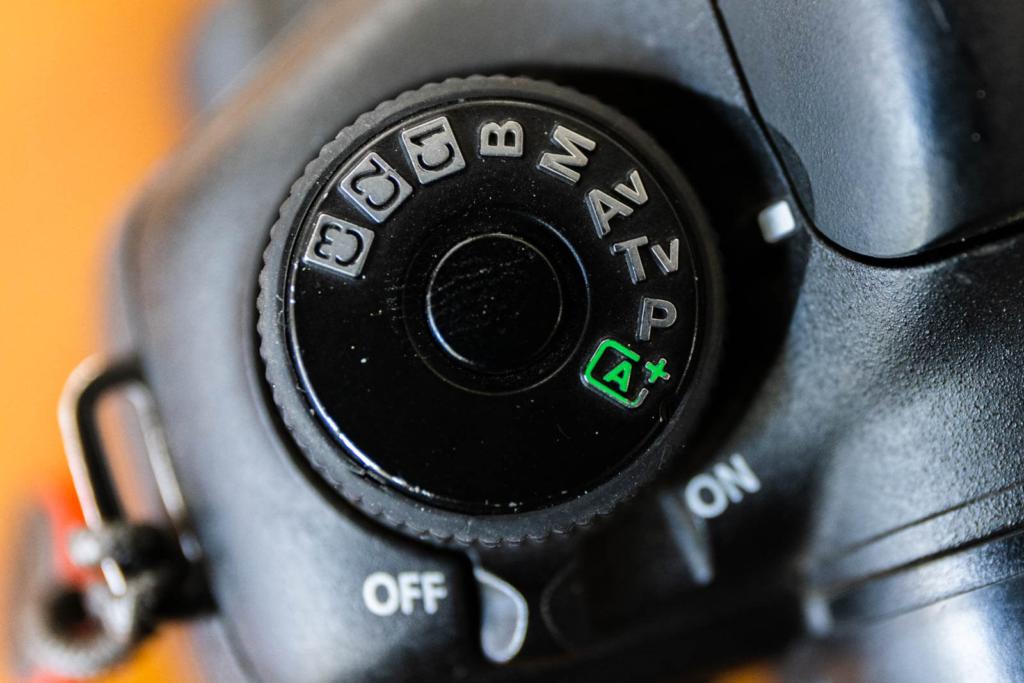
Choosing the setting on your camera
TV – TV stands for Time-value mode, but is better known as shutter-priority shooting mode. It’s one of the Creative Zone modes. This mode allows you to set the shutter speed, leaving the camera to choose the aperture needed for correct exposure. ‘Tv’ is used to identify this setting on the mode dial.
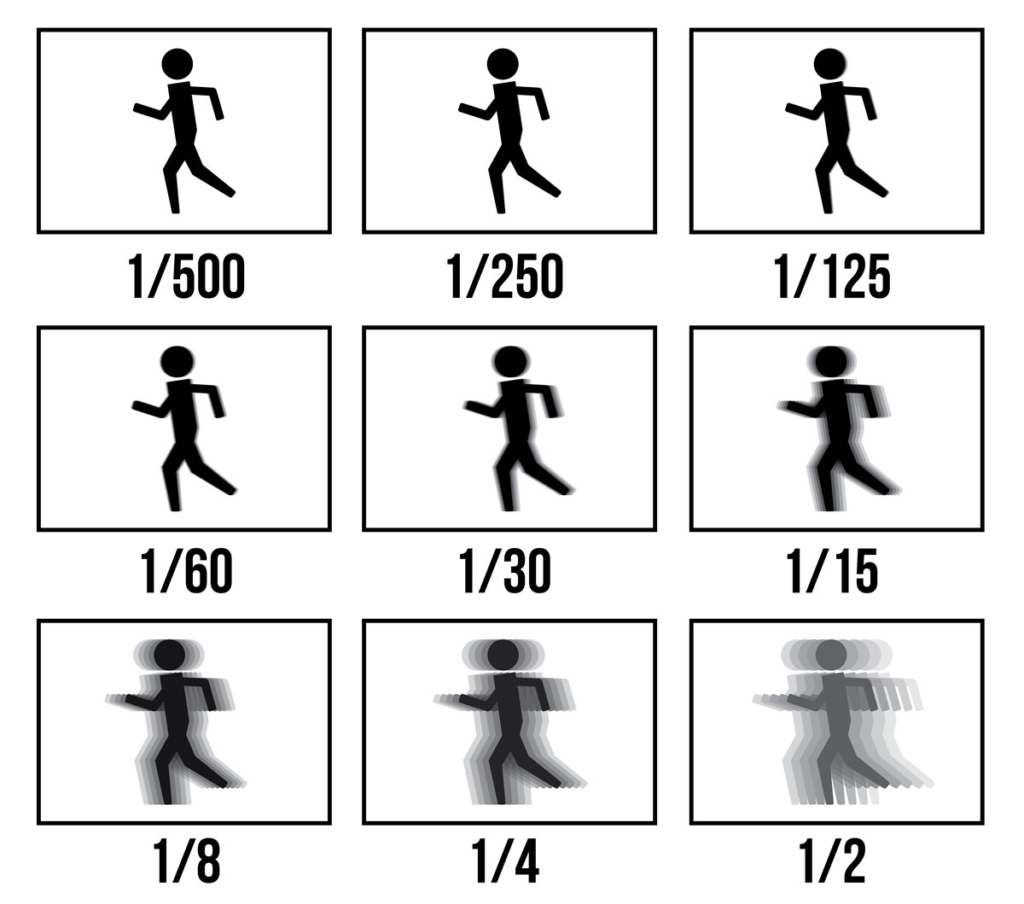
Shutter Speed…what is it?
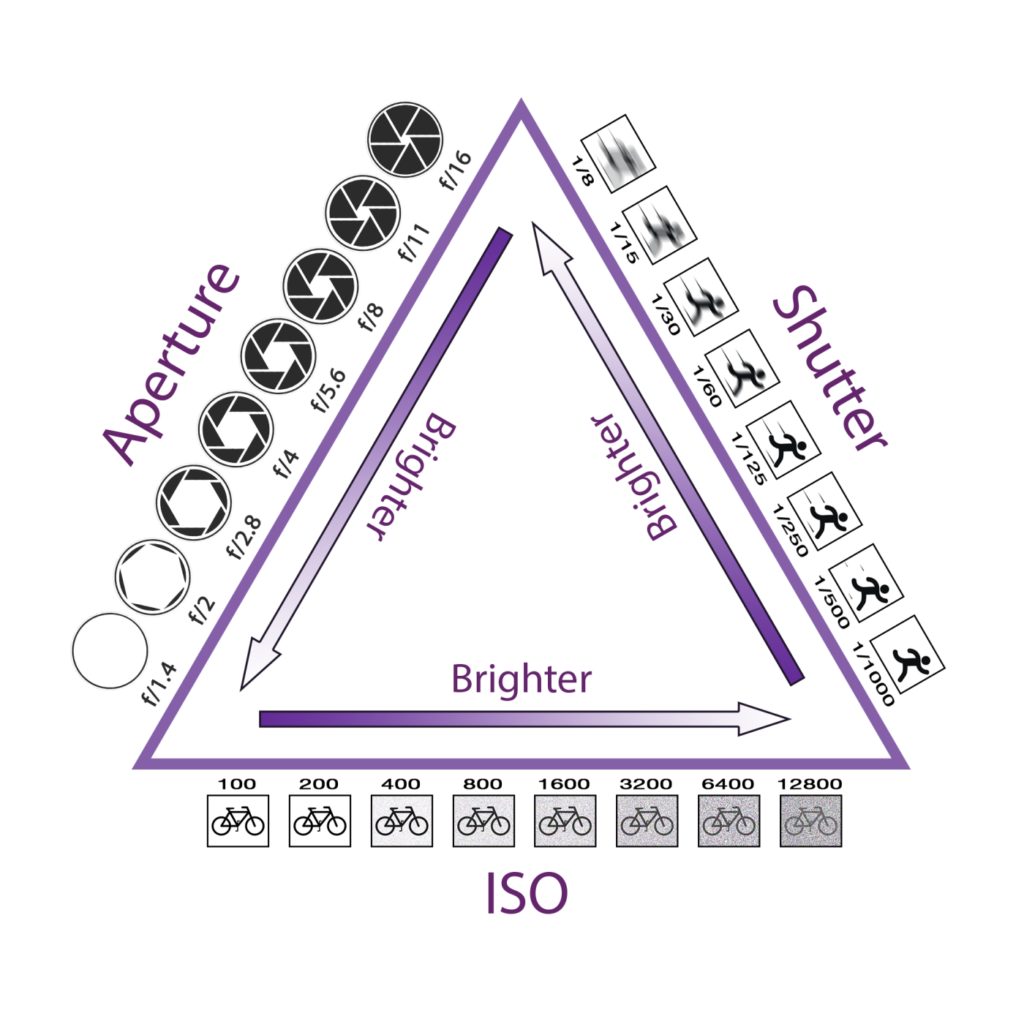
Shutter speed is the length of time your camera’s shutter stays open, and therefore how long the sensor is exposed to light. The longer it’s open, the more light hits the sensor and the brighter the image. Shutter speed is one side of the exposure triangle – the three factors that determine the exposure of an image.
Controlling and adapting shutter speed is vital for capturing either sharp images of moving things…or exploring creative blurring in moving things…or night photography and light trails too,
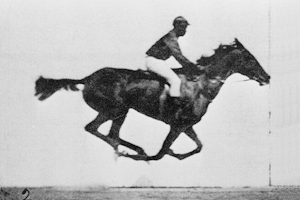
Eadweard Muybridge fast shutter speeds
Eadweard Muybridge is remembered today for his pioneering photographic studies of motion, which ultimately led to the development of cinema. He was hired to photograph a horse’s movement to prove that a horse’s hooves are clear of the ground at a trot.
Muybridge is known for his pioneering chronophotography of animal locomotion between 1878 and 1886, which used multiple cameras to capture the different positions in a stride; and for his zoopraxiscope, a device for projecting painted motion pictures from glass discs that predated the flexible perforated film strip used in cinematography
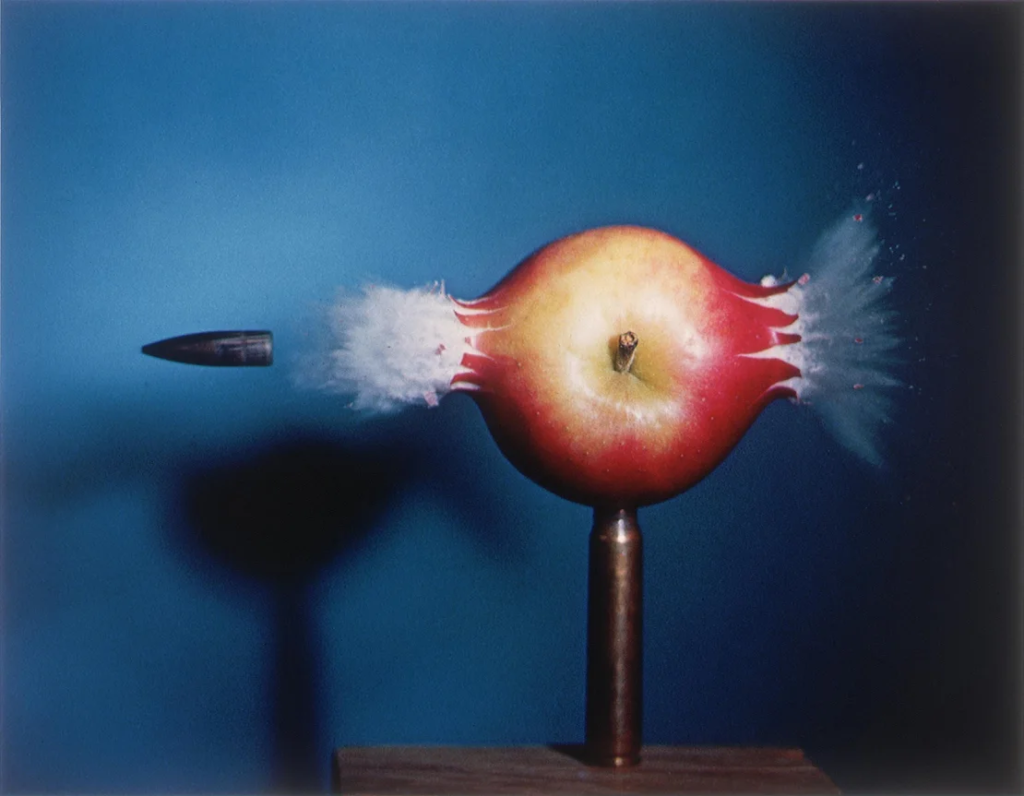
Harold Edgerton – fast shutter speeds
Harold Edgerton / MIT / 1957
Harold Edgerton / MIT / 1964
Harold Edgerton, Squash Stroke, 1938, gelatin silver print, National Gallery of Art, Washington, Gift of the Harold and Esther Edgerton Family Foundation
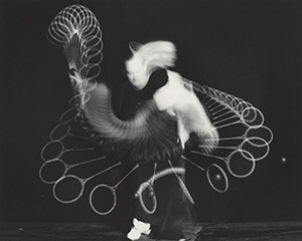
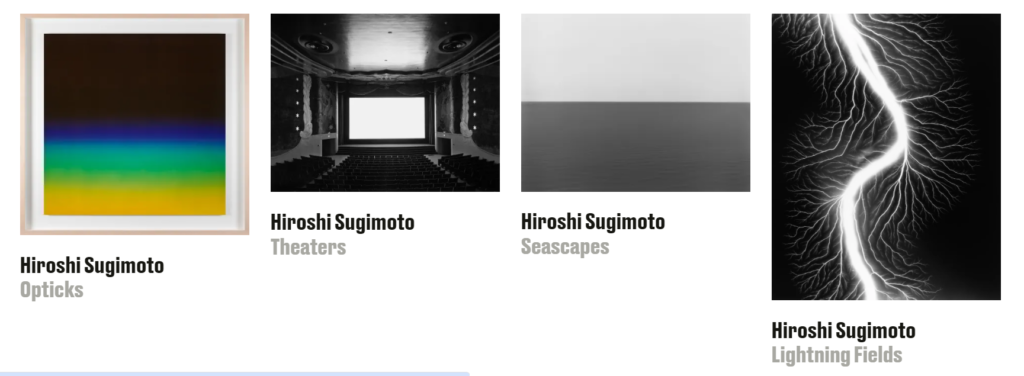
Hiroshi Sugimoto – slow shutter speeds
“With contemporary art, you get to represent your uniqueness, your own reality.” Early 20th-century Cubist and Dadaist artist Marcel Duchamp influenced Sugimoto’s conceptual take on art and time.
Sugimoto often employs large format cameras and long exposure times (slow shutter speeds) to capture light behaving / performing in expected but controlled ways
Francesca Woodman’s family spent their summers at her parents’ farmhouse in the countryside near Florence in Italy and many of her photographs were taken there. European culture and art had a significant impact on her artistic development. The influence of surrealist art, particularly the photographs of Man Ray and Claude Cahun can be seen in the themes and style of her work. She developed her ideas and skills as a student at Rhode Island School of Design.
Her importance as an innovator is significant, particularly in the context of the 1970s when the status of photography was still regarded as less important than painting and sculpture. She led the way for later American artists who used photography to explore themes relating to identity such as Cindy Sherman and Nan Goldin.
What to do…
Research the work of Eadward Muybridge, Harold Edgerton, Hiroshi Sugimoto and Francesca Woodman. How have they experimented with shutter speed and long exposures in their work? Choose specific images to comment on in detail. You could also find other photographers who are interested in experimenting with similar effects.
Explore the effects of changing the shutter speed on your camera to alter exposure times. You could illustrate this with a series of photos of the same subject shot with different settings.
Create a series ofimages. Consider the degree of abstraction in the final image. How sharp / blurry are the subjects and are they still recognisable? Experiment with colour and black and white.
Create a series of images which explore dramatic shutter speed effects. Remember to share all of the images you make (including those that you deem failures) in a gallery/contact sheet.
Curate your images into different groupings (see below). Experiment with editing the images in each set differently. Give each set a title and write a short evaluation explaining your editorial decisions.
Make a blog post about your development of ideas based on the prompts listed above…
RememberAs a rule of thumb, your shutter speed needs to be double (or more) than the lens focal length. So, for example, if using a 50mm lens, your shutter speed should be 1/100th sec or faster. If shooting with a 75mm lens, your shutter speed should be at least 1/150th sec.
Remember : A slow shutter speed keeps the shutter open for longer. This not only allows more light to be recorded, it also means any moving objects will appear blurred. Slow shutter speeds are commonly used for photographing in low light conditions, or to capture motion blur.
Week 5 ISO
Blog Post to Create:
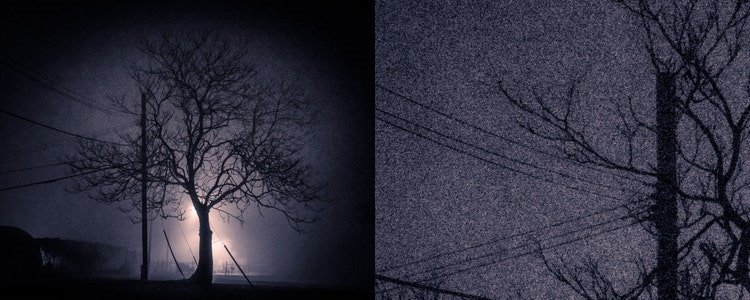
What is ISO? How does it affect your camera?
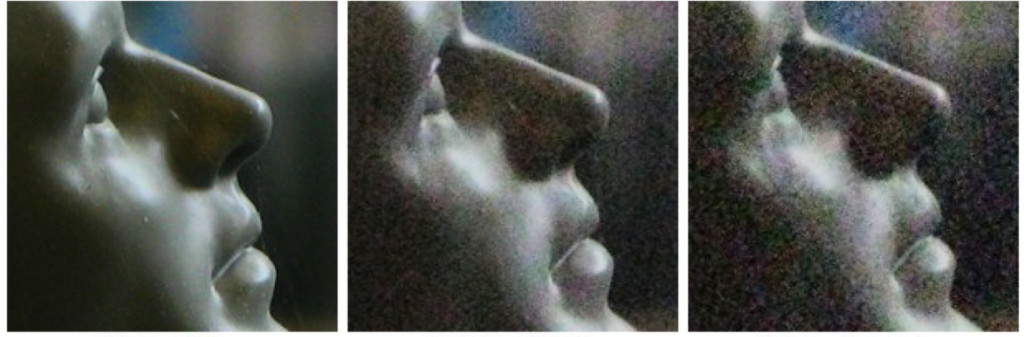
What does a high ISO / low ISO mean? What effect can this have on your photos? What is meant by visual noise? (include images to illustrate your points)
When might you want to use a high ISO?
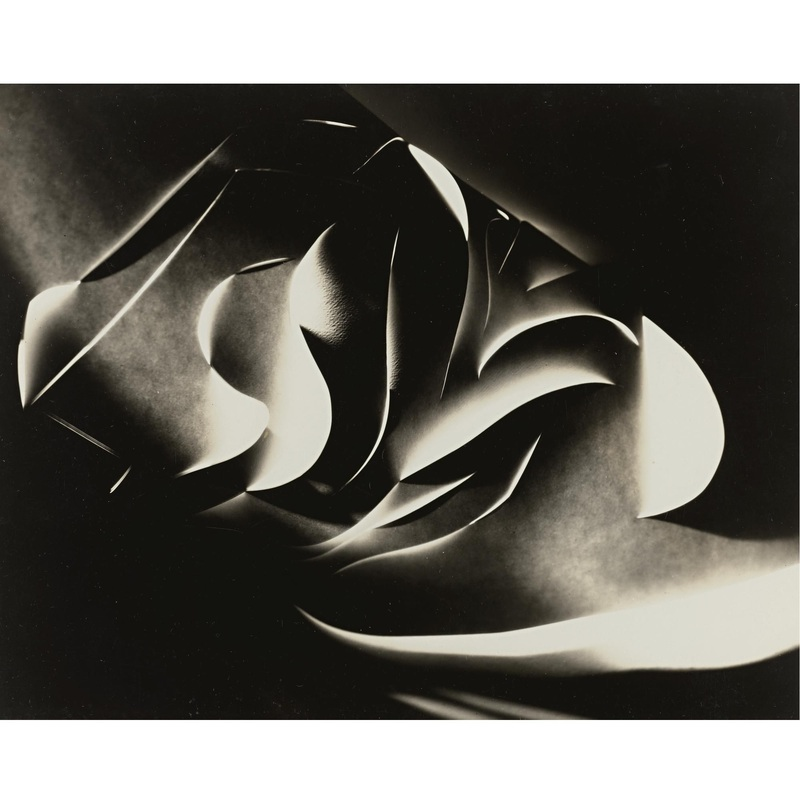
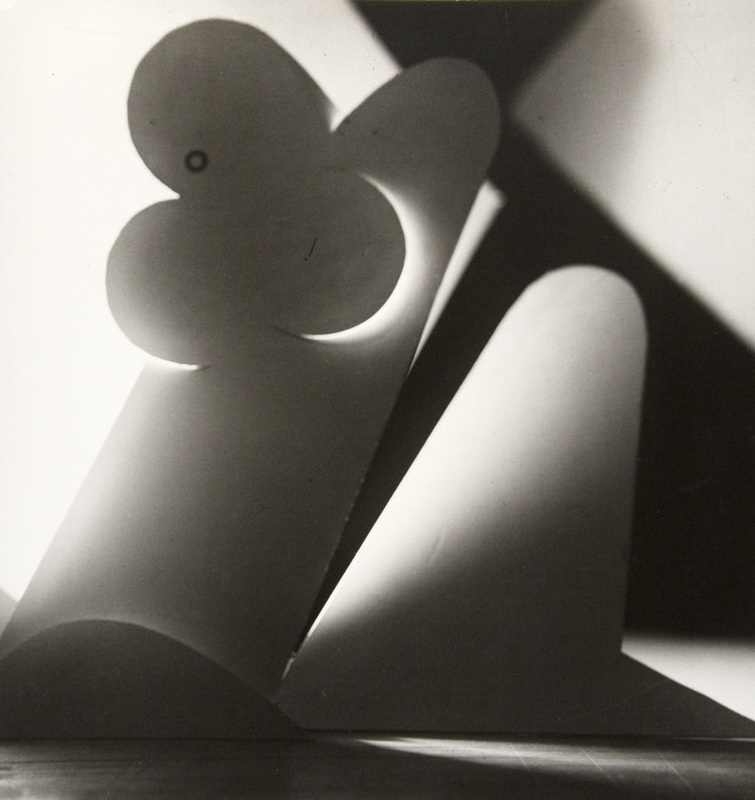
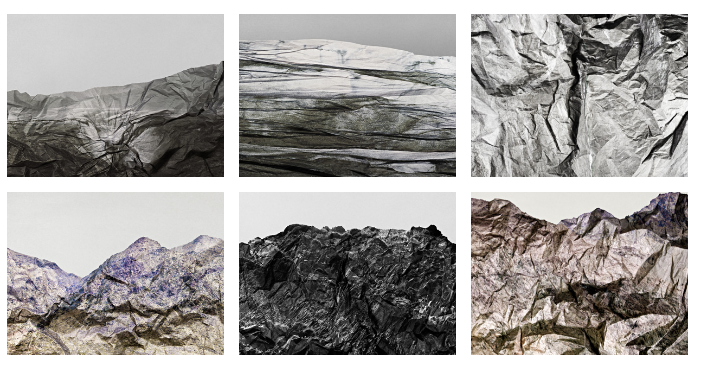
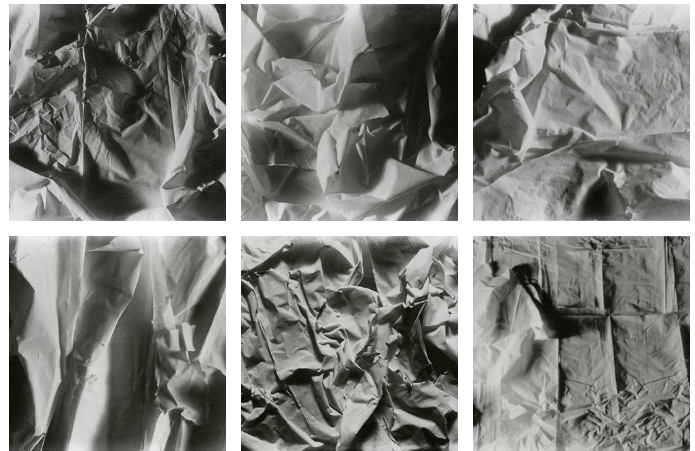
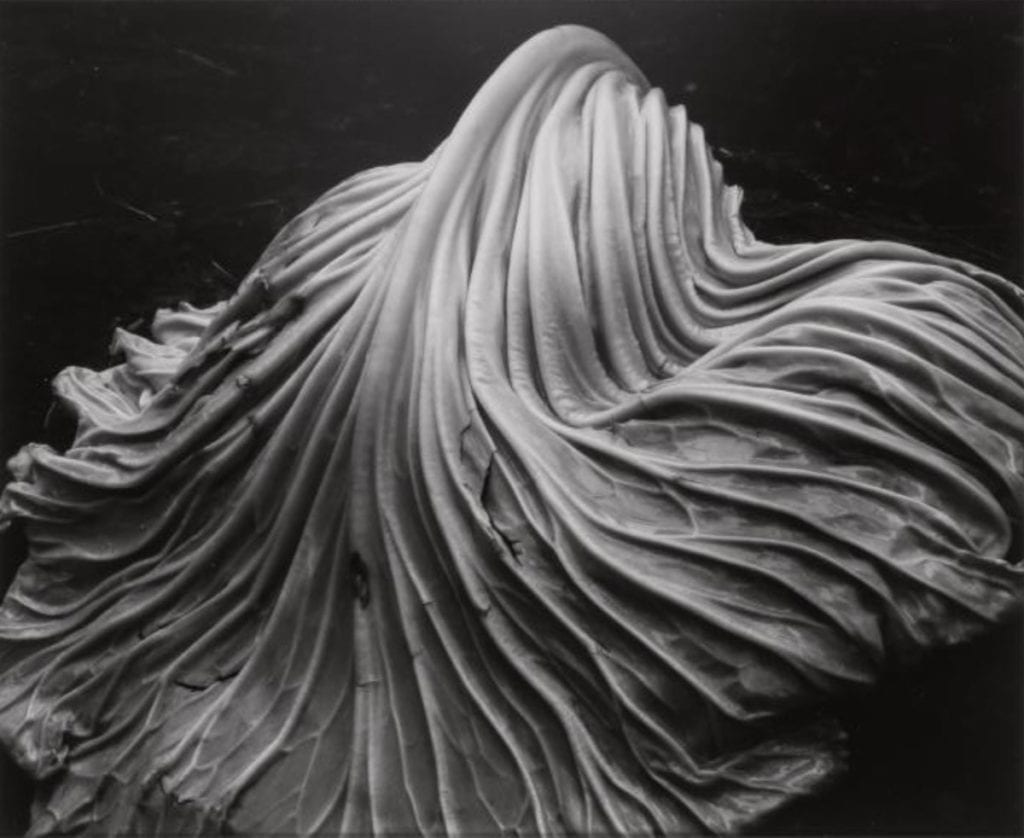
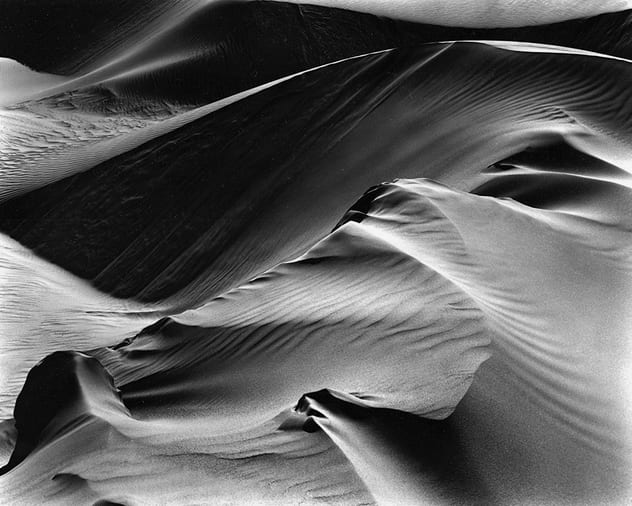
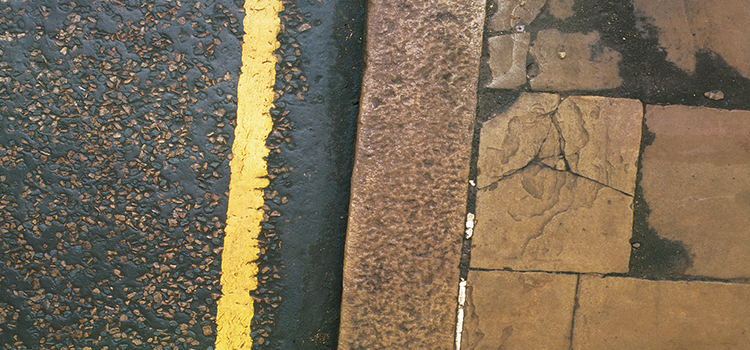
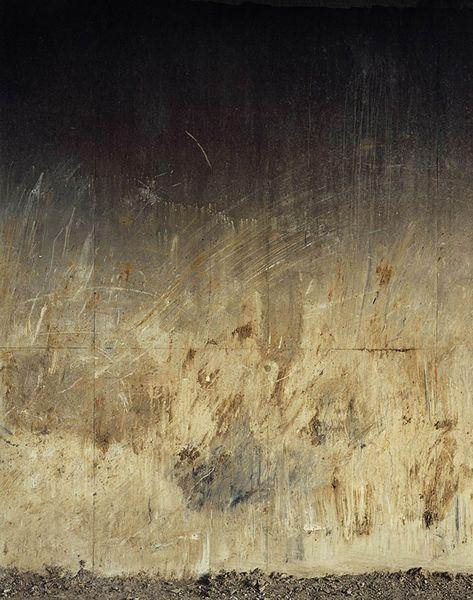
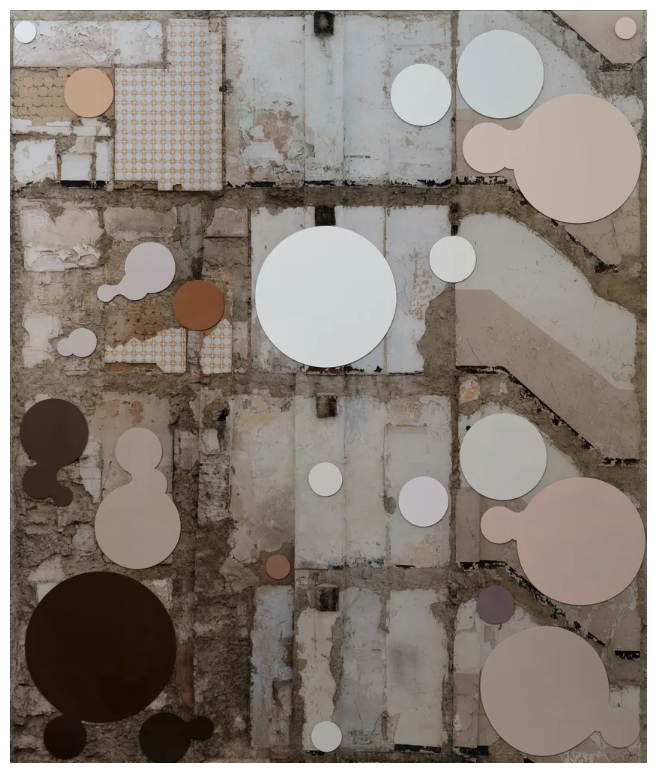
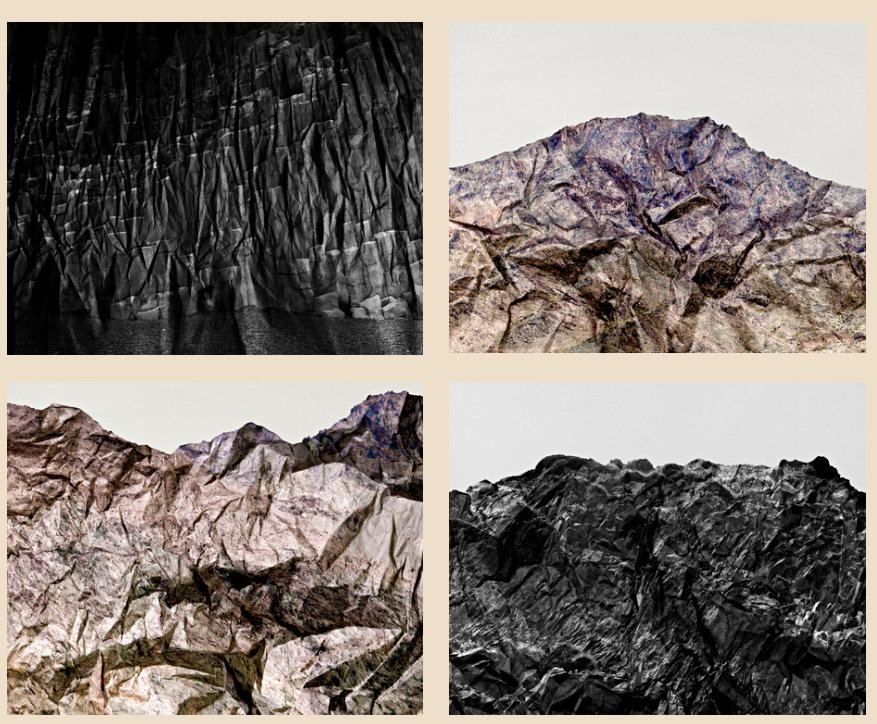
Research one of the photographers below who look at texture in their photography.
Explore the effects of changing the ISO on your camera to alter grain but also the brightness of your images. You could illustrate this with a series of photos of the same subject shot with different settings. When taking/editing photos of the texture, consider the degree of abstraction in the final image. Are the images still recognisable? Experiment with colour and black and white.
Present at least 6 final photos (of the same subject), 3 should show visual noise and 3 should show no visual noise.
Look at a range of artists who explore texture in different ways
HW Experiment with Texture and Surface
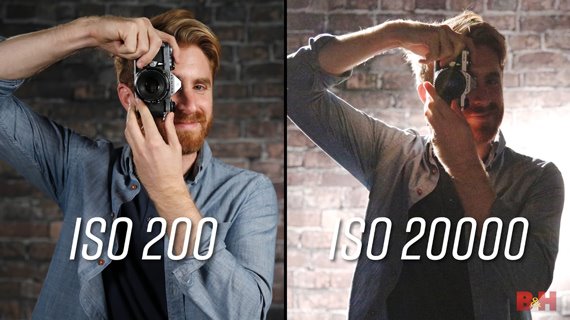
What is ISO?
ISO is a number that represents how sensitive your camera sensor is to light.
What does a low/high ISO mean?
A lower ISO value means less sensitivity to light, and the more light you will need to take the photo.
While a higher ISO means more sensitivity, and the less light you need to take a picture.
It’s one element of photography’s exposure triangle — along with aperture and shutter speed — and plays an essential role in the quality of your photos.
LOW ISO v HIGH ISO
If you use a High ISO…. The trade-off is that higher ISOs can lead to degraded image quality and cause your photos to be grainy or “noisy.”
The lower the ISO number, the lower your camera’s sensitivity, and the more light you need to take a picture
Low Light Situations
In low light situations, it is often necessary to raise the ISO in order to get a clear picture. The big problem with raising the ISO, though, is that it introduces ‘noise’ into the image (we talk about this more below), which can make it appear grainy.
If you are taking a picture in ideal light conditions, you will want to keep the ISO low in order to avoid introducing noise into the image.
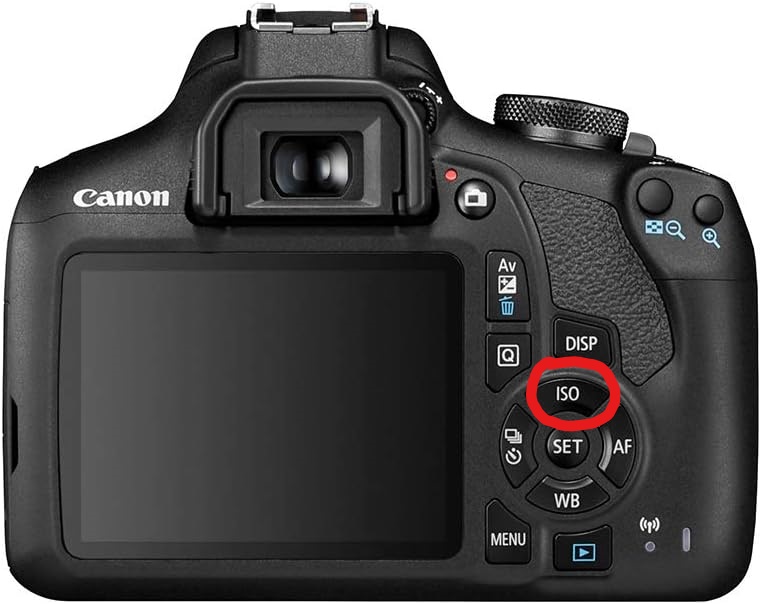
How to adjust ISO on the Camera
Texture
When talking about photography, texture refers to the visual quality of the surface of an object, revealed through variances in shape, tone and colour depth. Texture brings life and vibrance to images that would otherwise appear flat and uninspiring.
Research one of the below photographers
and then experiment with taking your own textural photos: When you find a texture you want to capture, take a series of photos of the same subject, shot with different settings. When taking photos of the texture, consider the degree of abstraction in the final image. Are the images still recognisable? Experiment with colour and black and white.
Present at least 6 final photos (of the same subject), 3 should show visual noise and 3 should show no visual noise.
Research the work of the photographers listed above. How have they experimented with texture work? Choose specific images to comment on in detail. You could also find other photographers who are interested in experimenting with similar effects.
Explore the effects of changing the ISO on your camera to alter grain but also the brightness of your images. You could illustrate this with a series of photos of the same subject shot with different settings.
Create a series ofimages. Consider the degree of abstraction in the final image. Are the images still recognisable? Experiment with colour and black and white.
Create a series of images which explore TEXTURAL effects. Remember to share all of the images you make (including those that you deem failures) in a gallery/contact sheet.
Curate your images into different groupings (see below). Experiment with editing the images in each set differently. Give each set a title and write a short evaluation explaining your editorial decisions.
Make a blog post about your development of ideas based on the prompts listed above…
Make Blog Post that describes and explains your learning journey through Adobe Lightroom Library Mode and Develop Mode
Week 6 Paper Experiments
Paper Experiments
Adobe Lightroom / Photoshop edits
Look at…The Formal Elements and make connections
Explore Exposure Compensation and Light Meter awareness / use
BLOG POSTS to make…
“Paper Experiments”…remember to describe and explain your processes, how your ideas have been influenced (artists) and what aspects of the formal elements you are exploring…