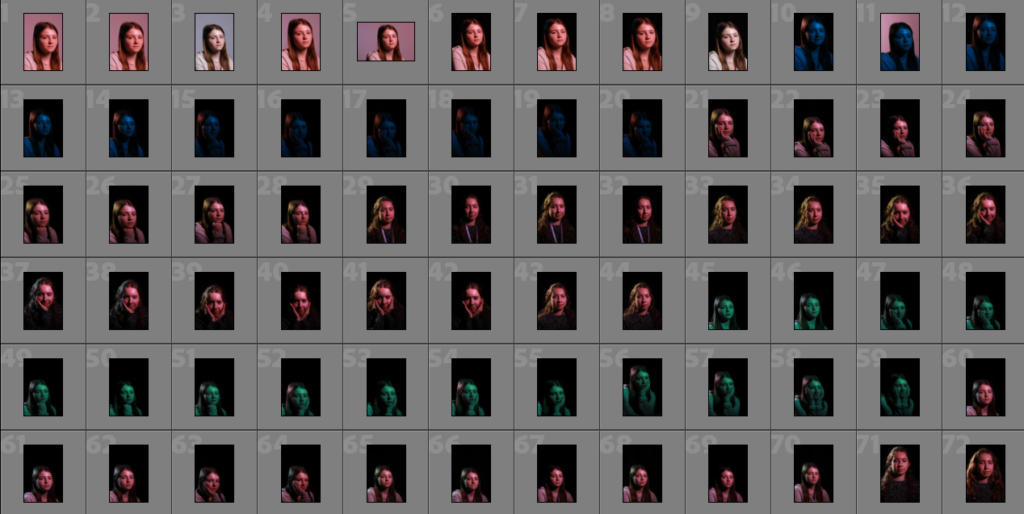
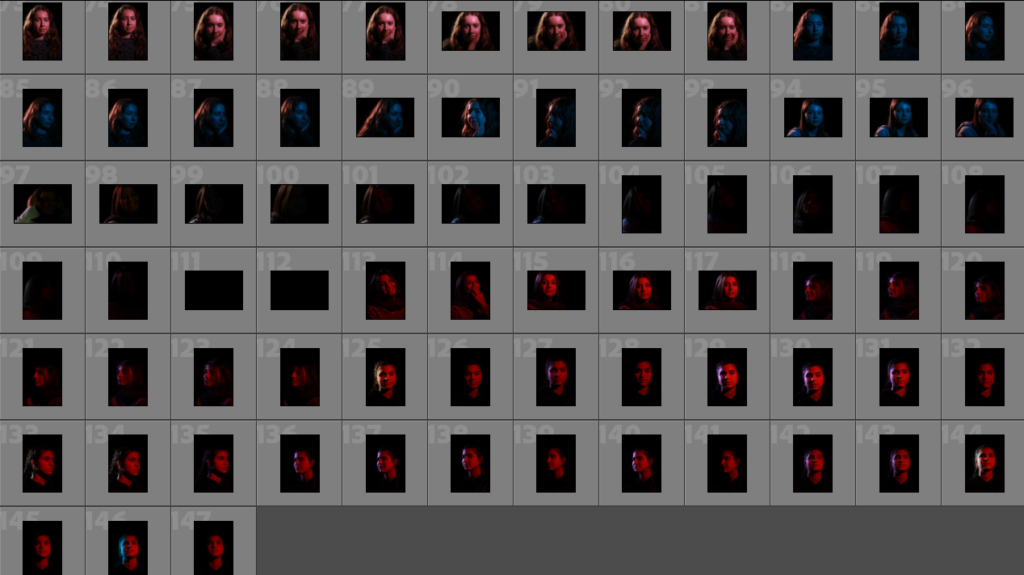
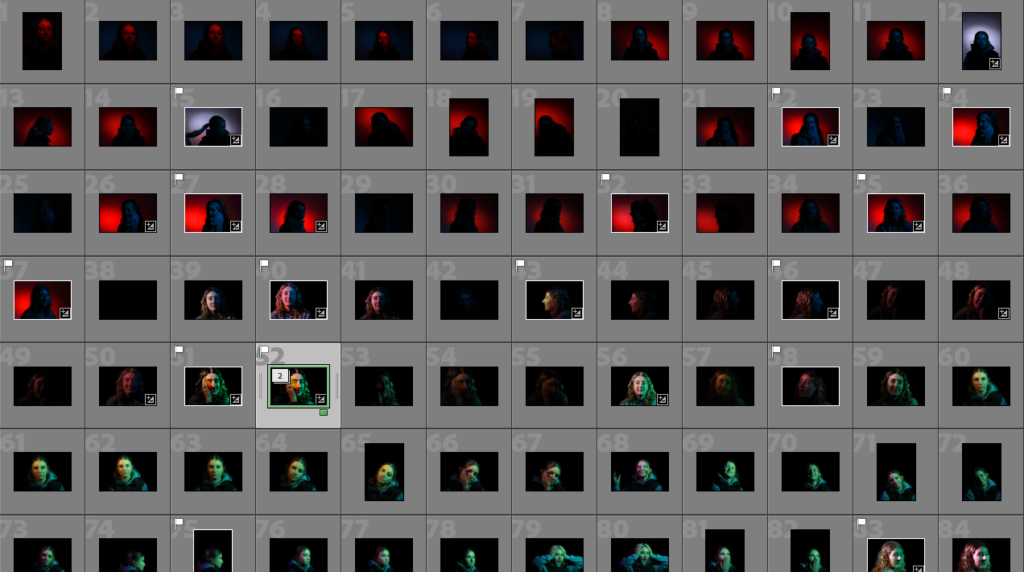
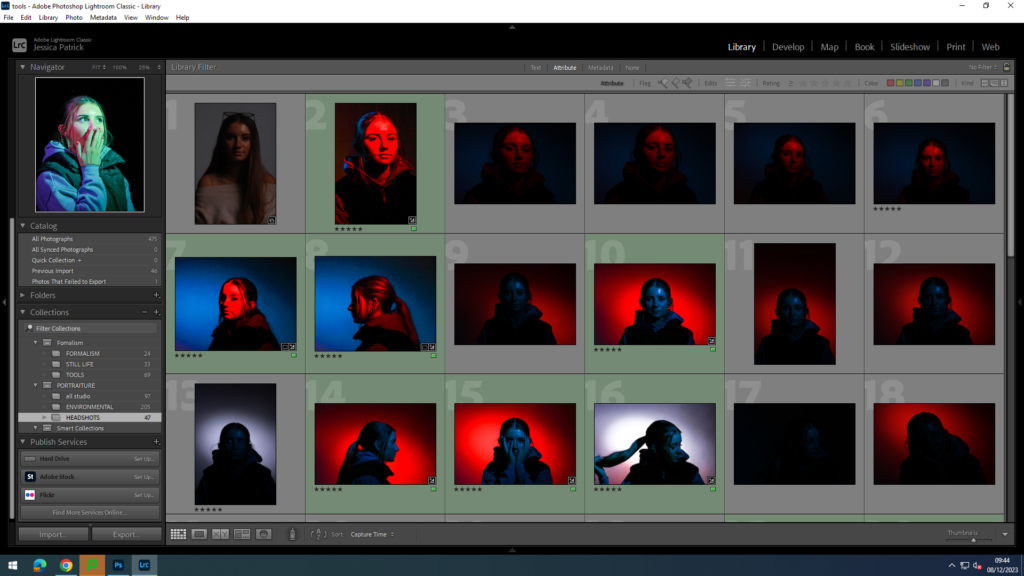
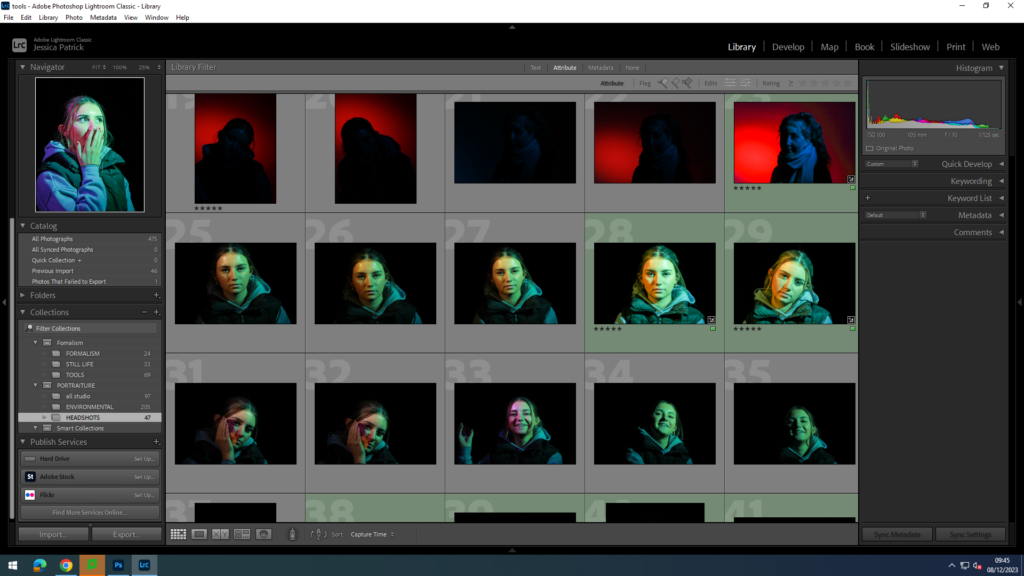
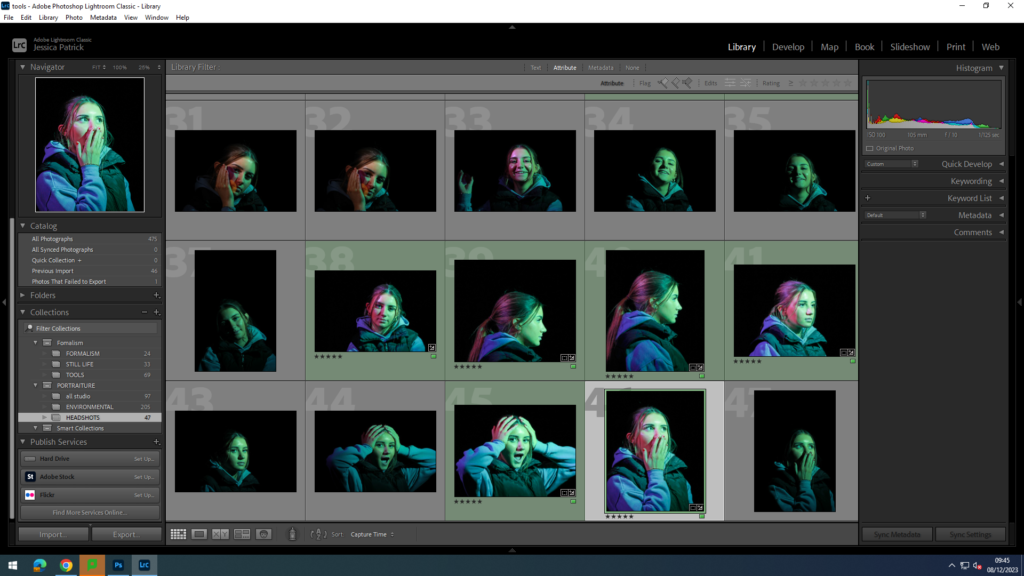
Headshots

Photoshoot- Edits

The photographs that are highlighted green are the photos I have chosen to edit, because they use a variety of lighting, positioning and poses.
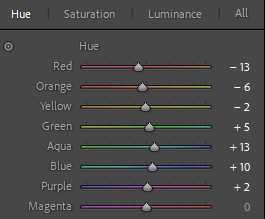
Set Up

There were multiple different set ups for the different types of lighting used. However, the same two studio lights were used. One light was a honey comb light, while the other had a snout. The snout directs the light to a specific place, whereas the honey comb light creates a strong spot light effect. I also used coloured disks and sheets to create different coloured lighting.
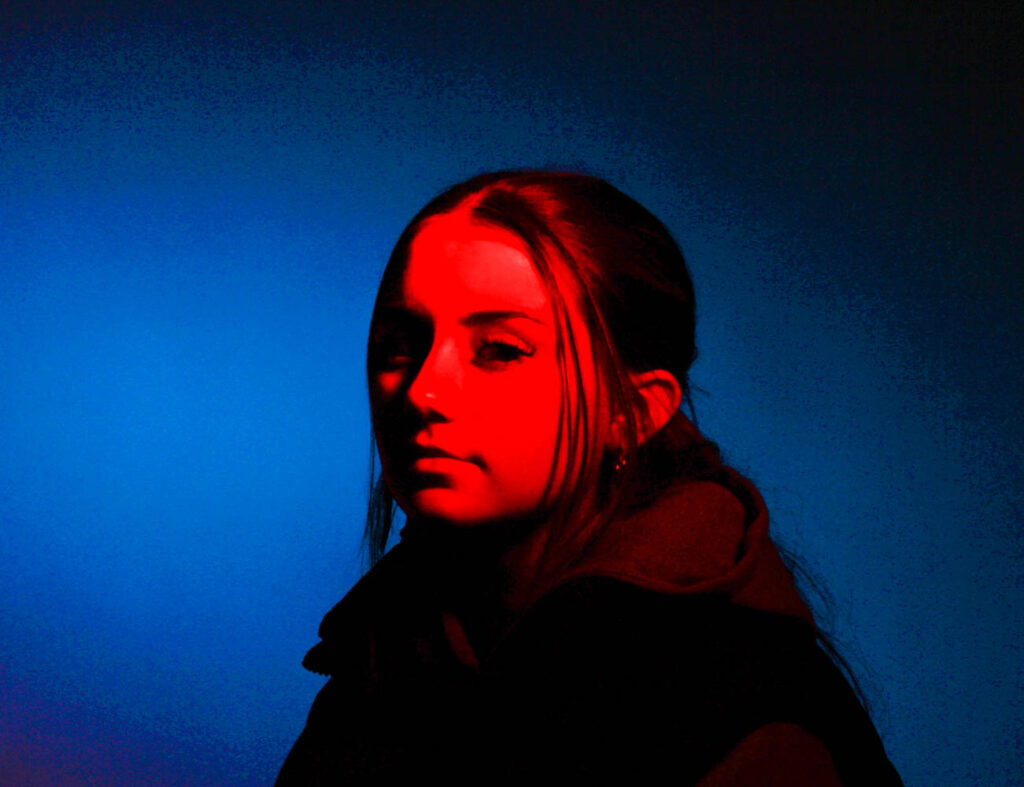
Split lighting-

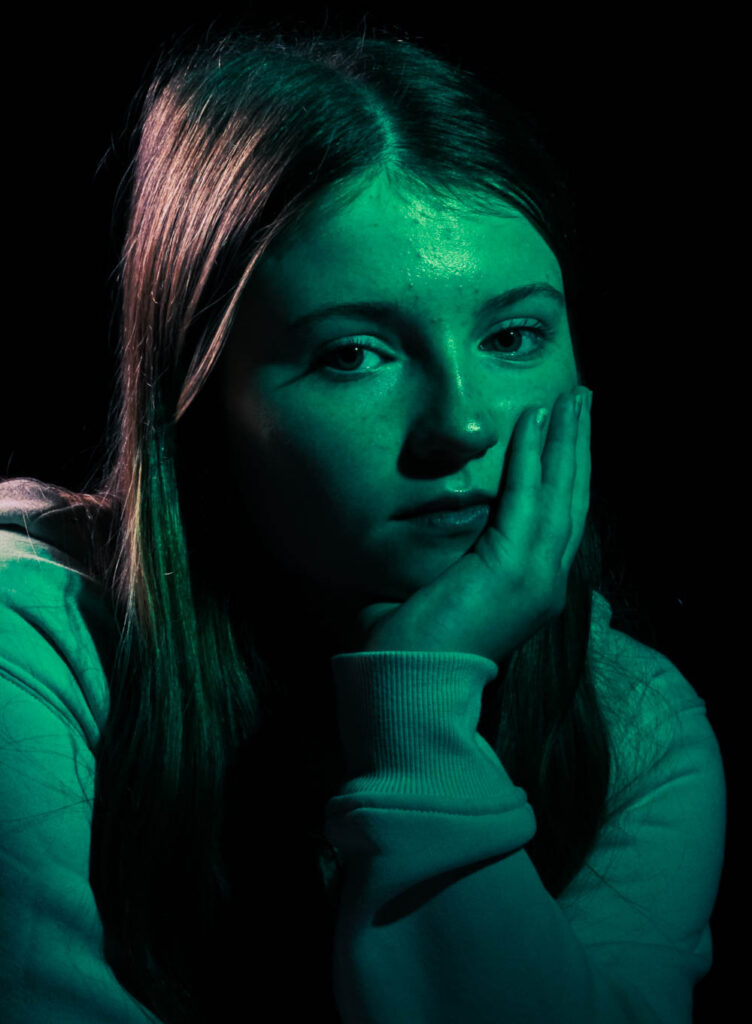
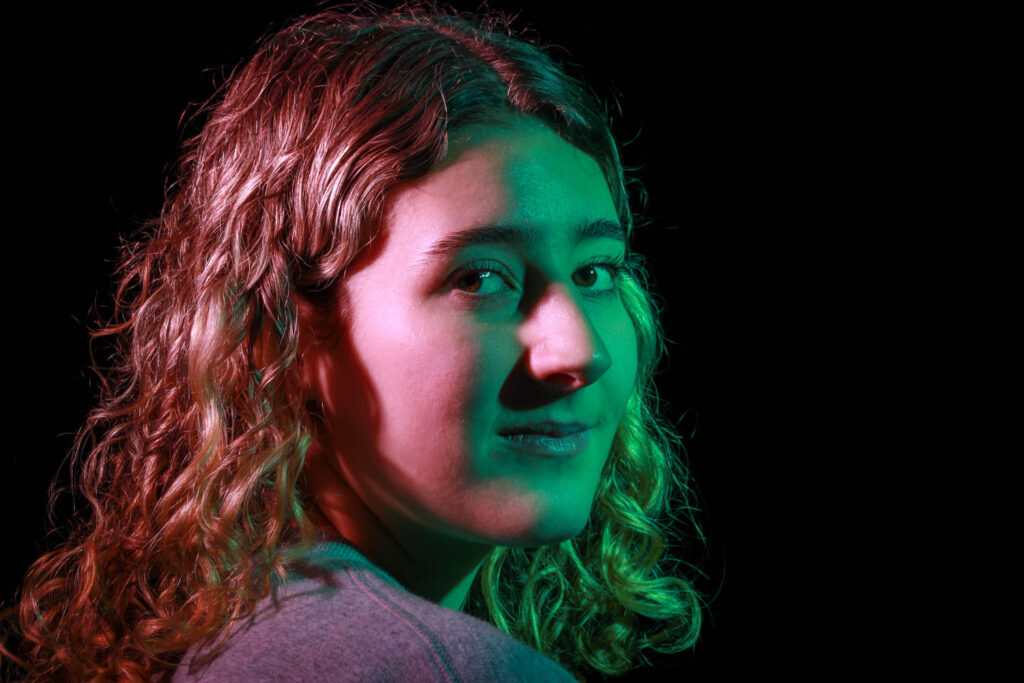
For the split coloured lighting the light with the snout was on the right side of the model with a coloured disk inside it and the honeycomb light was on the left of the model with a coloured sheet help over it. Both lights were to the side of the camera at a 45 degree angle, but the snout light was slightly closer the the model, as it is a less powerful and bright light.
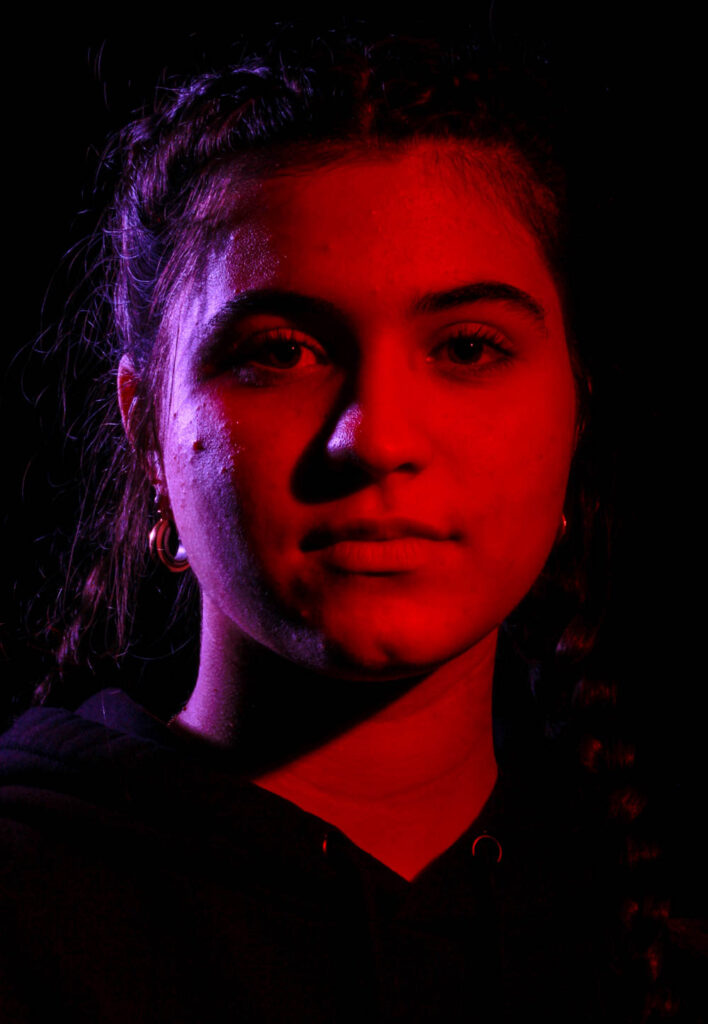
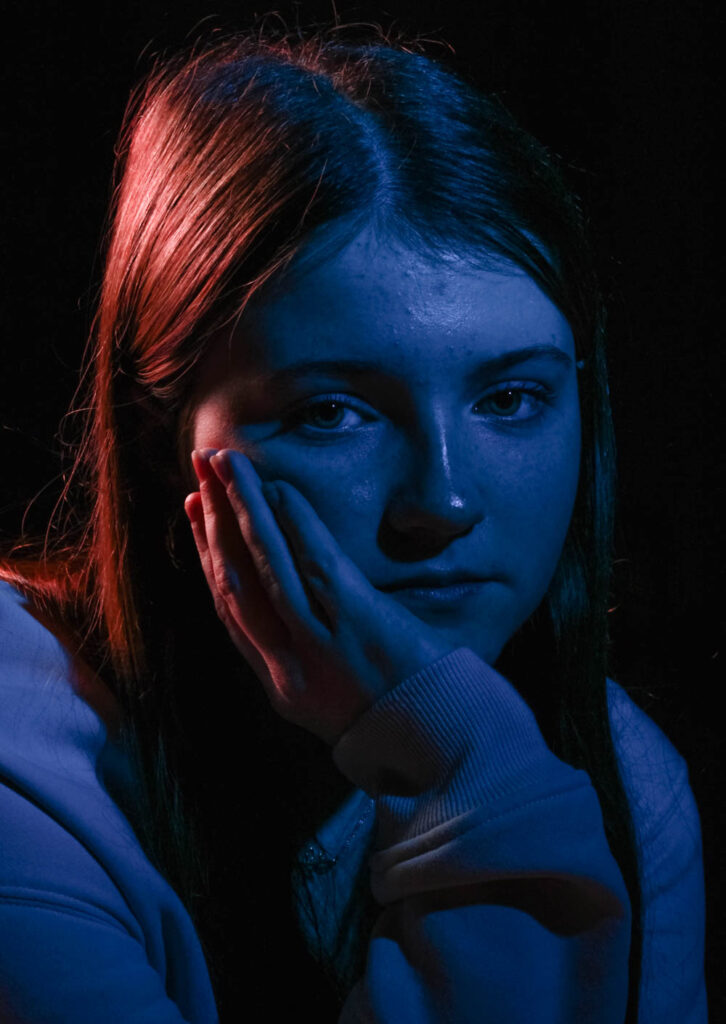
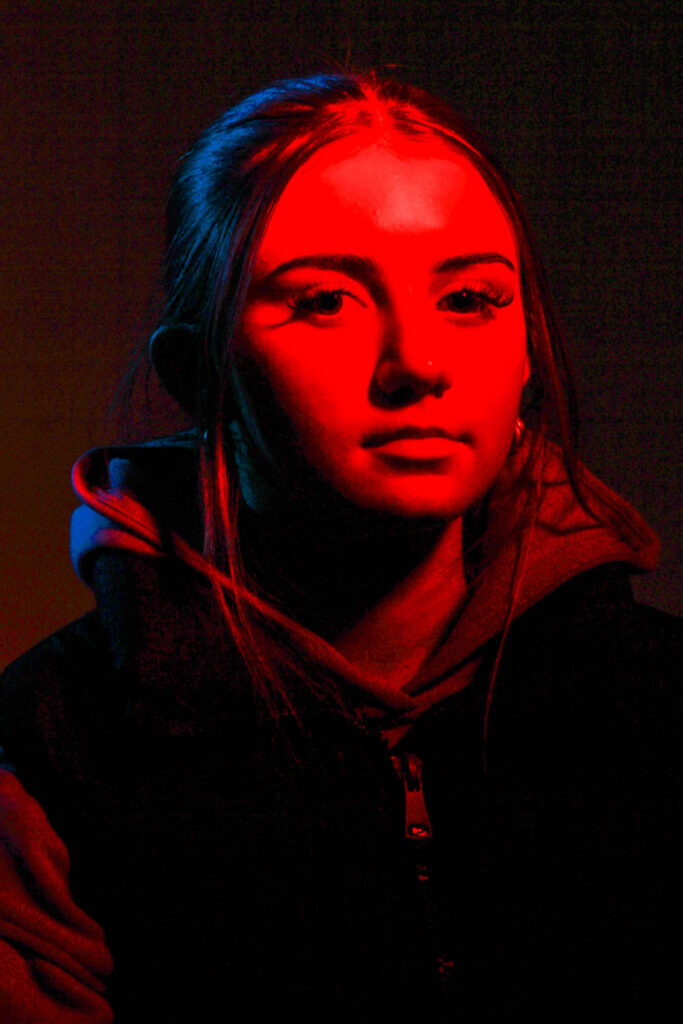
Spotlight behind-

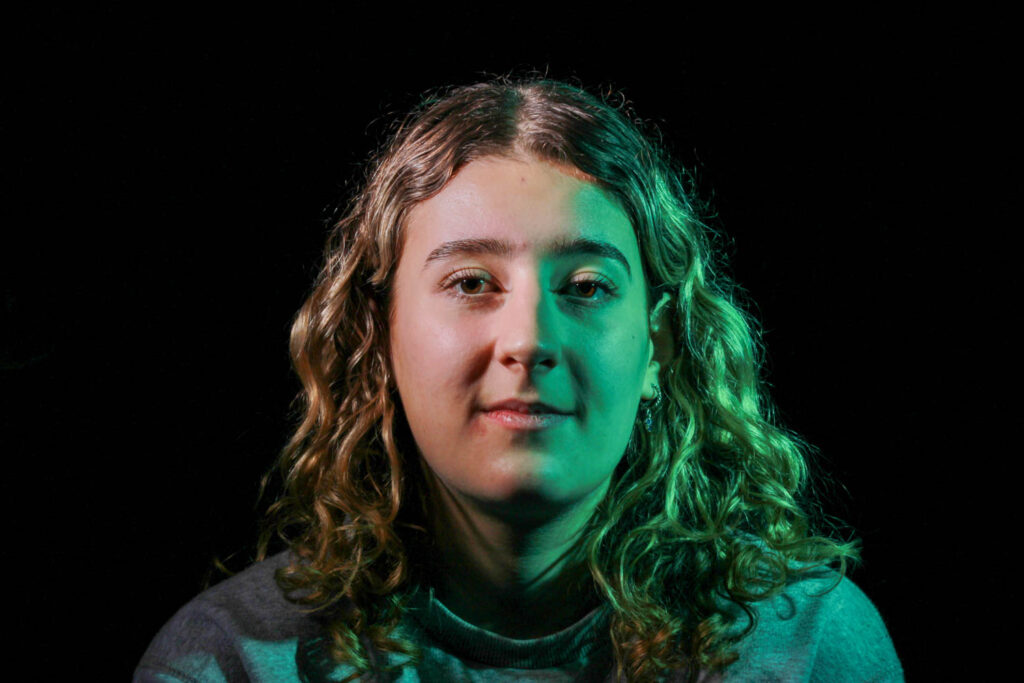
To create the coloured spot light behind the model. while the model is a different colour, the snout light needs to be behind the model on her left pointing at a 45 degree angle onto the background wall. Whereas, the honeycomb light needs to be on the right of the model in line with the camera on a 45 degree angle directly onto the model. The snout light has a coloured disk inside and the honey comb light has a coloured sheet held in front of it.

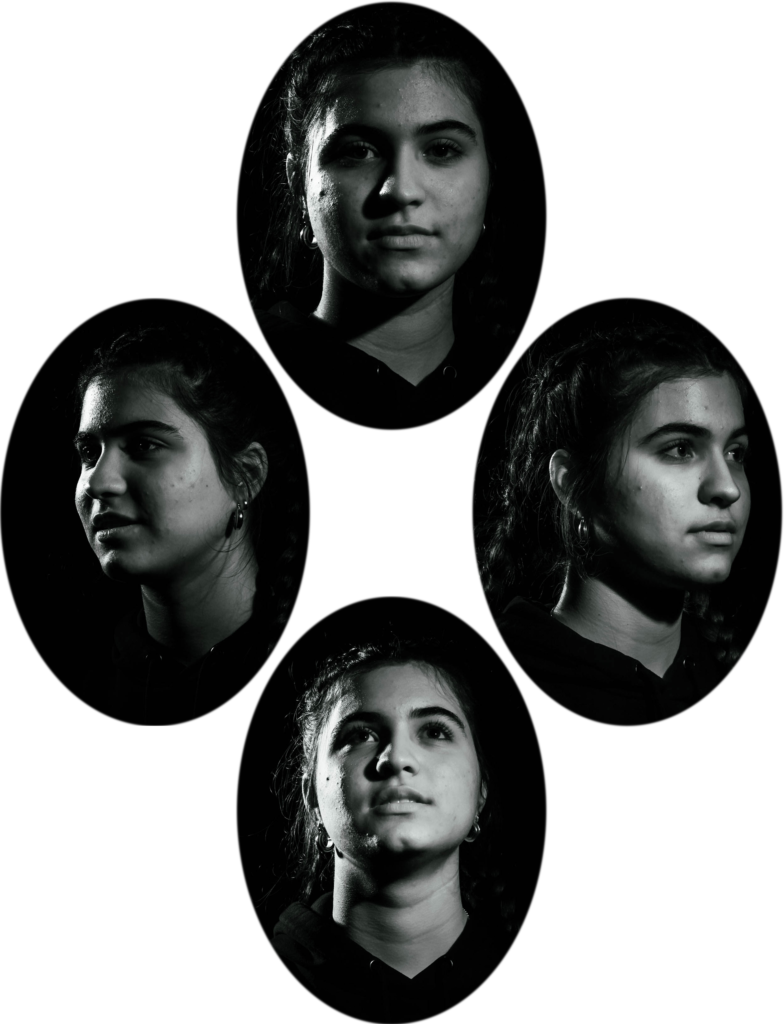
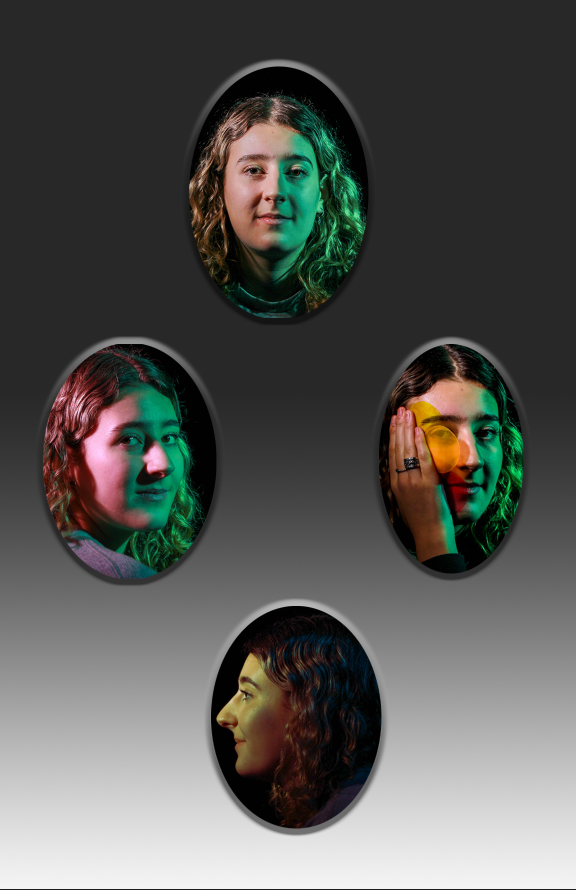
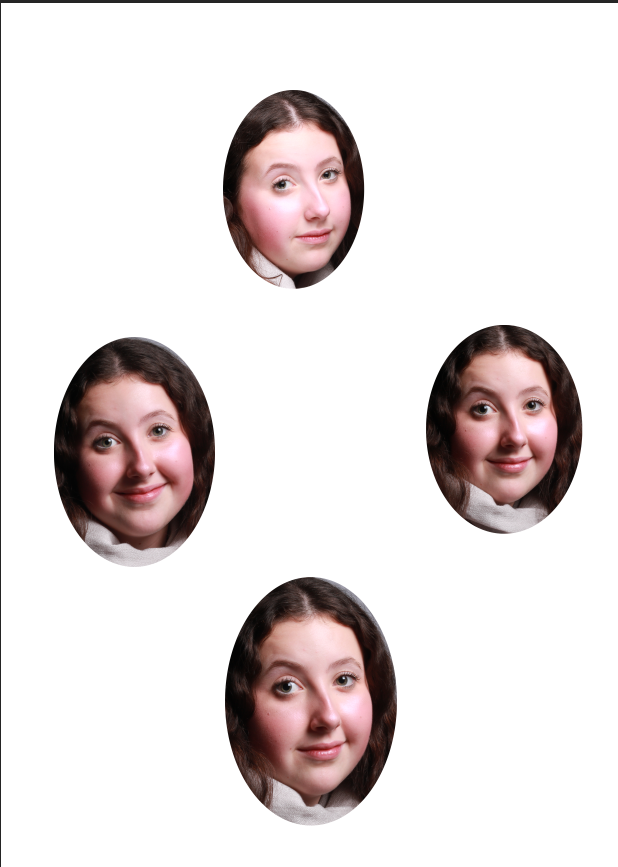
Editing- Diamond Cameo

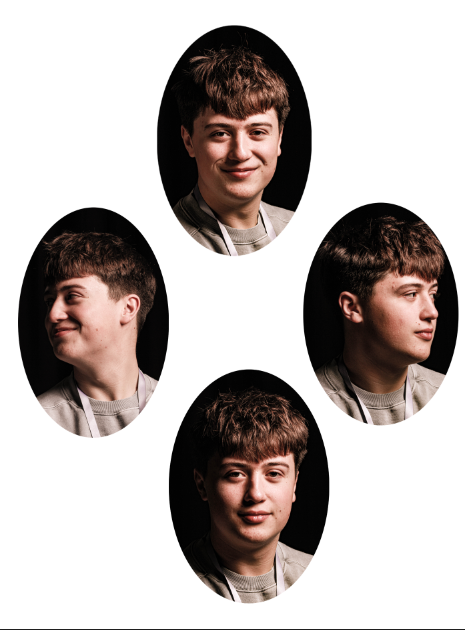
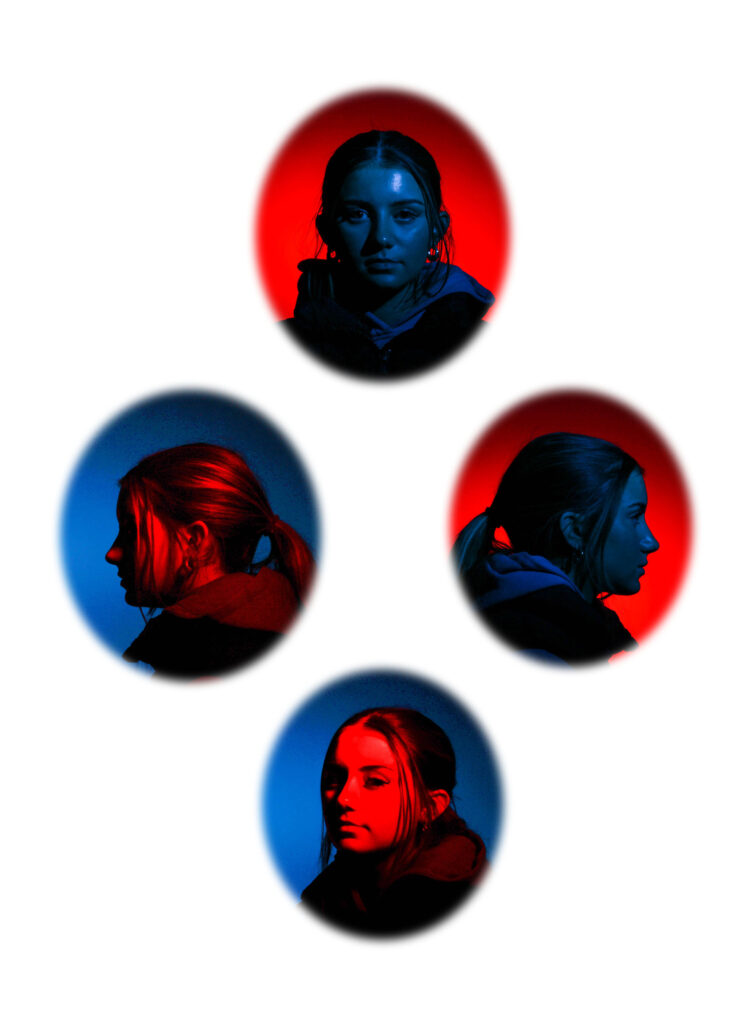
I chose to edit these 4 photos, so I would be able to create a Diamond Cameo with them, as they include all the positions/ angles needed for it.

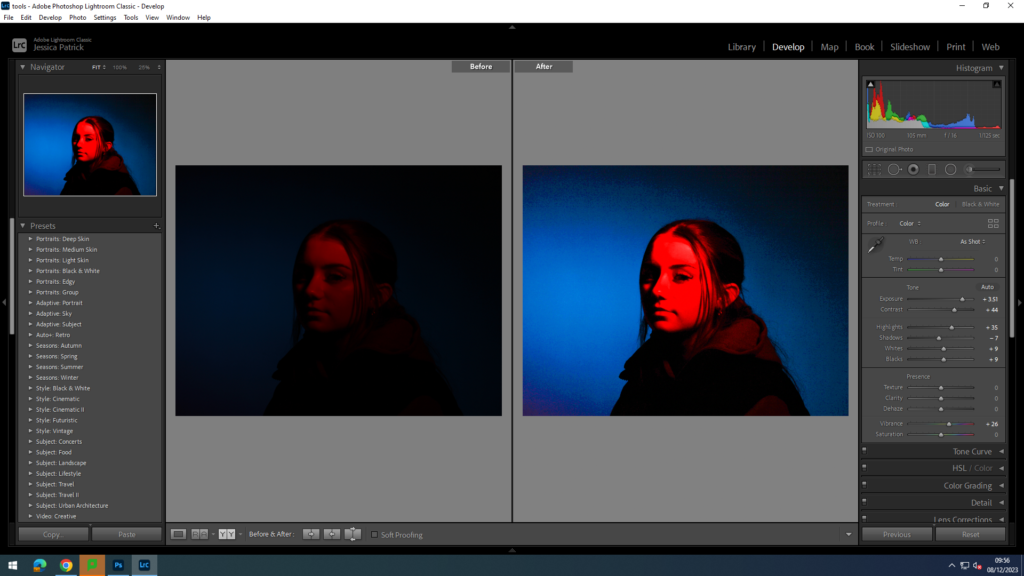
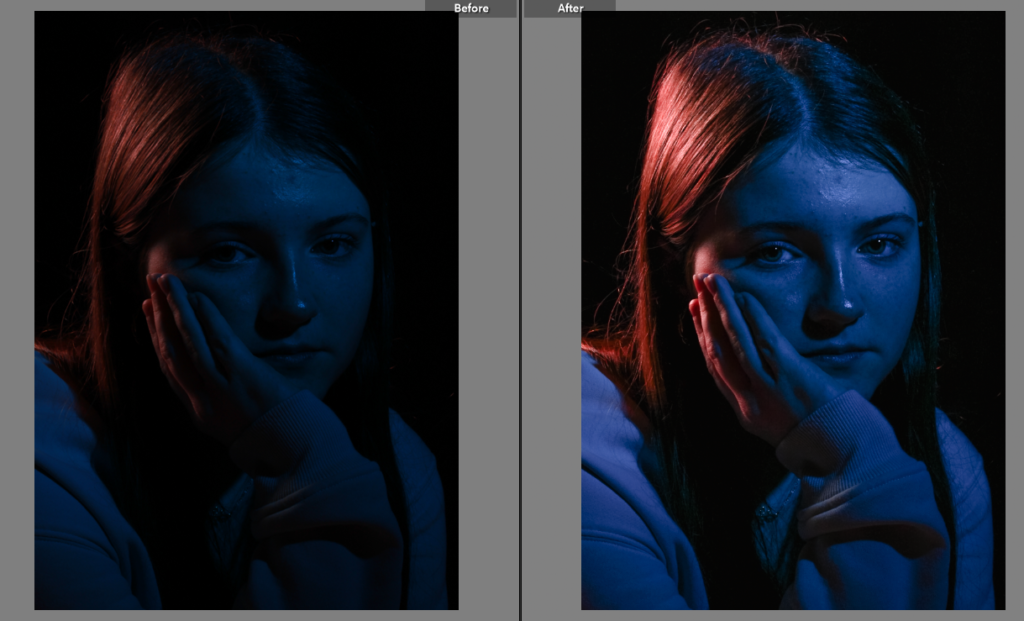
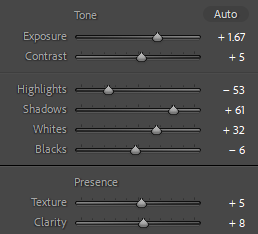
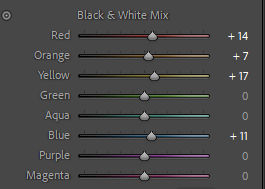
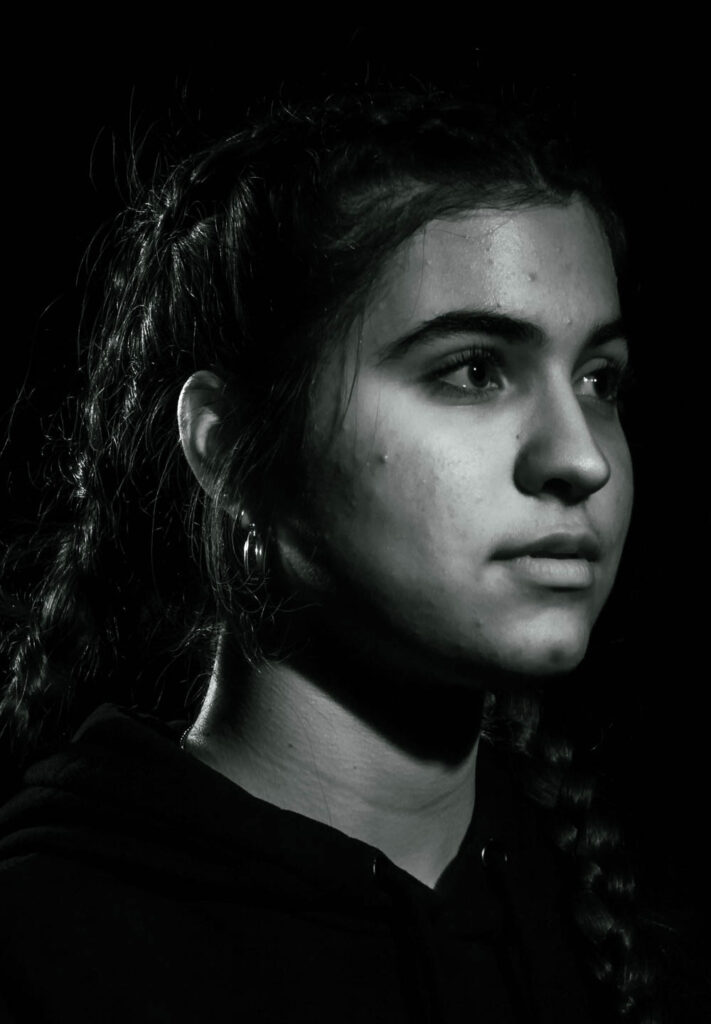
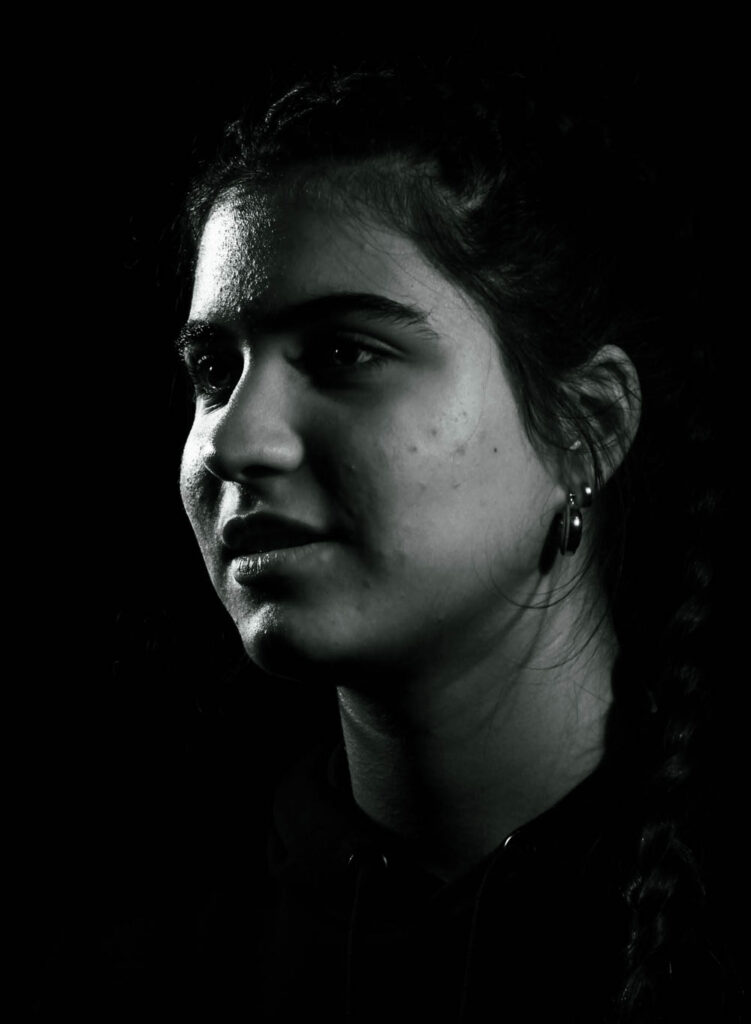
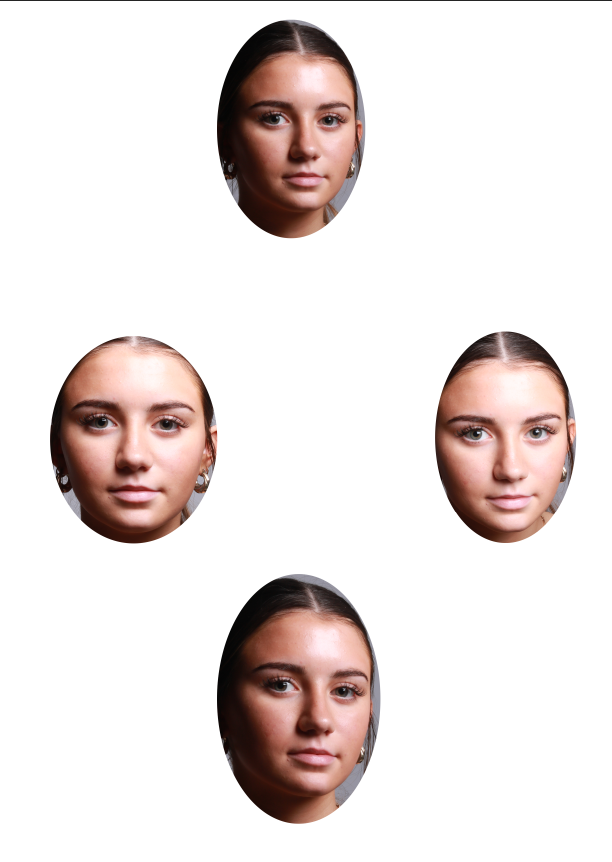
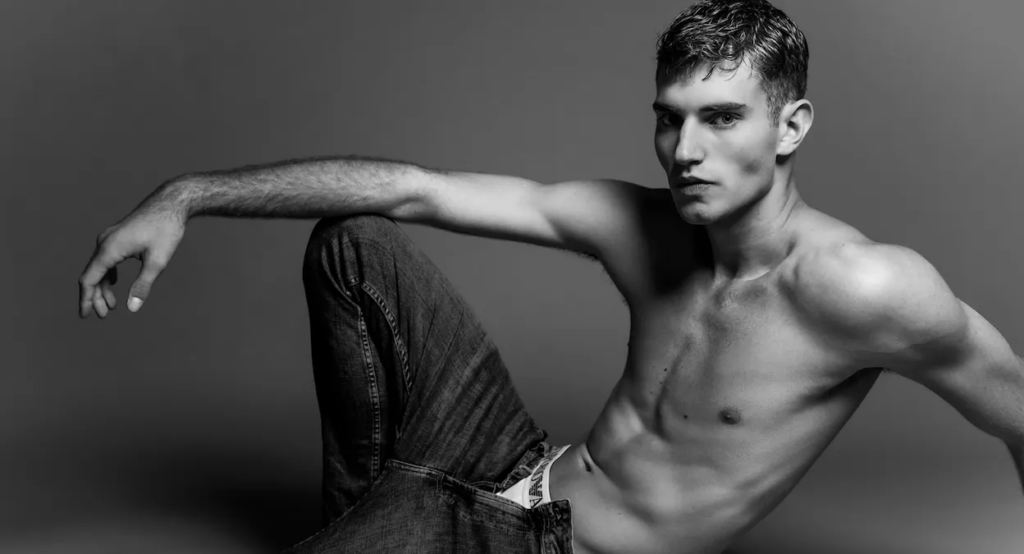
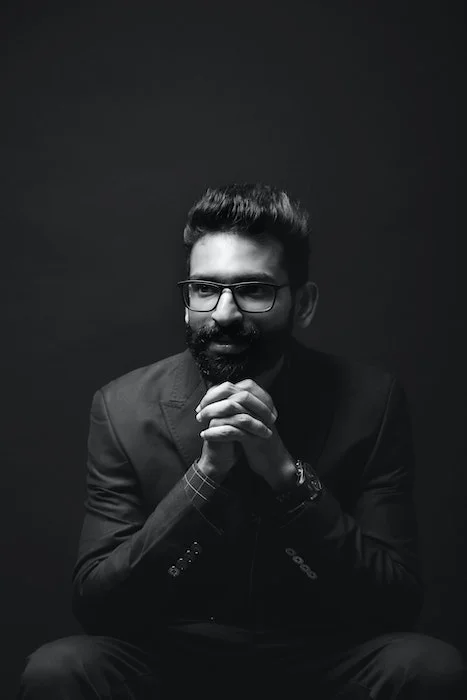
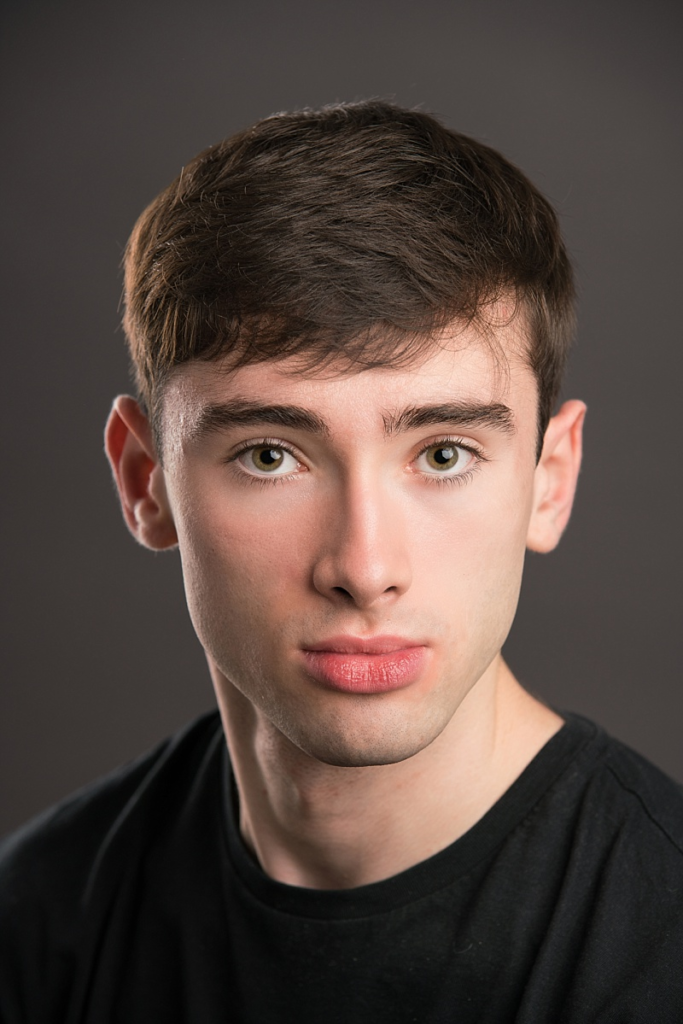
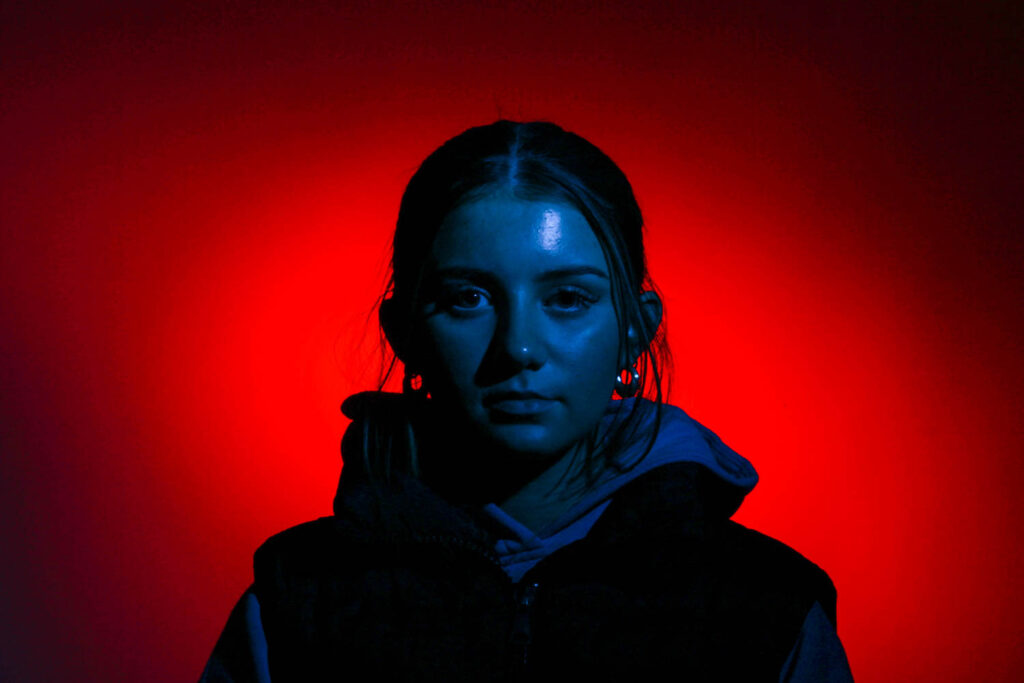
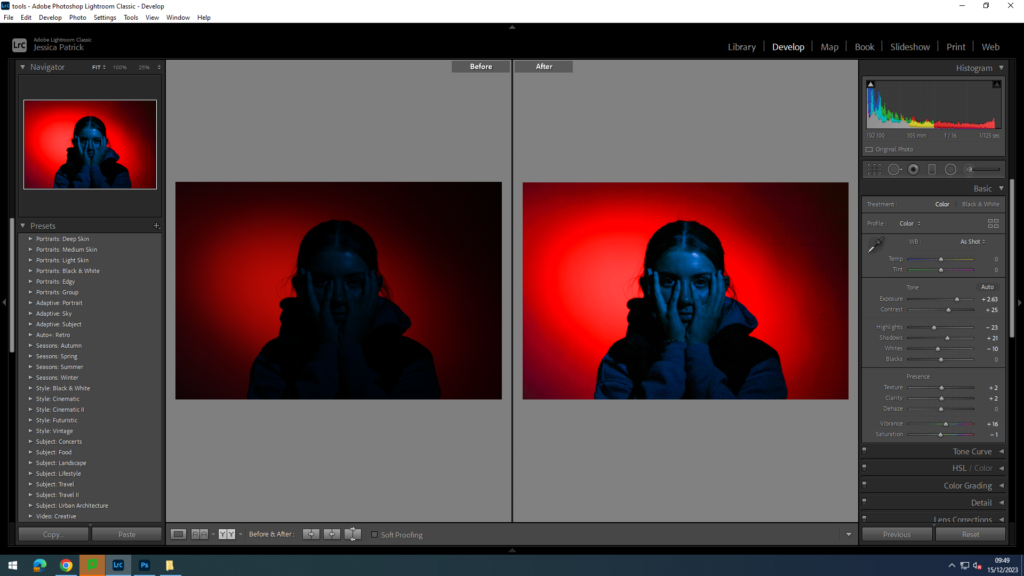
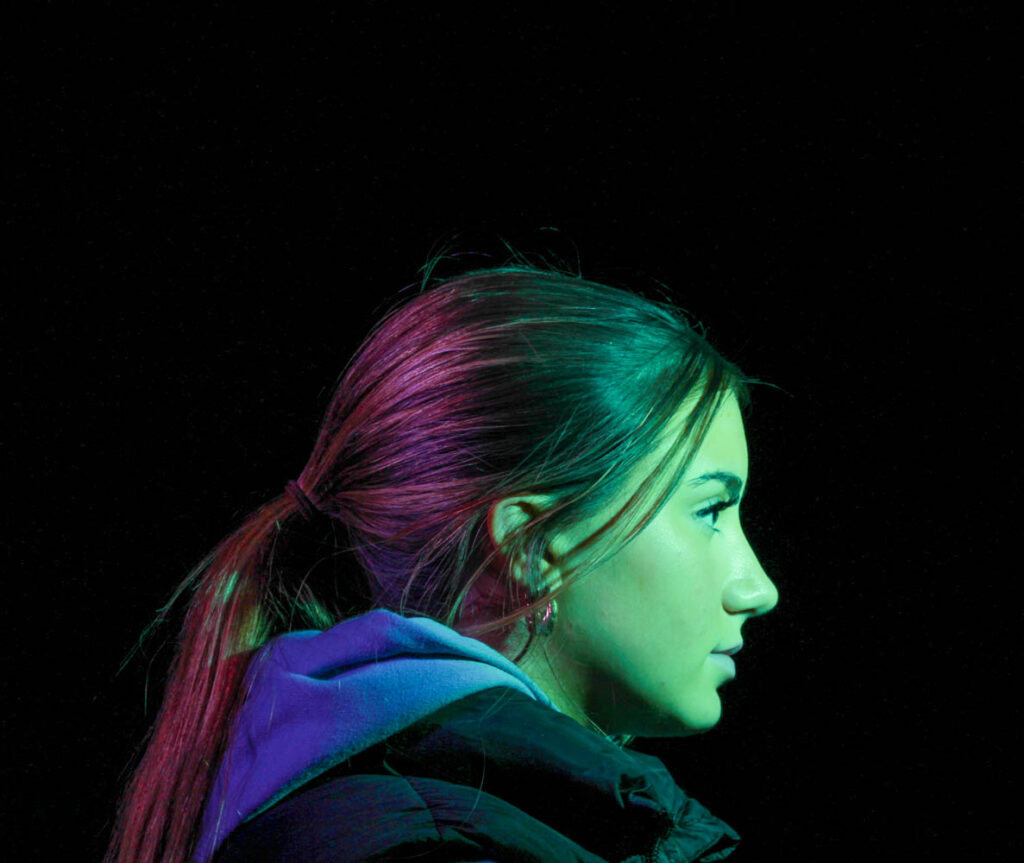
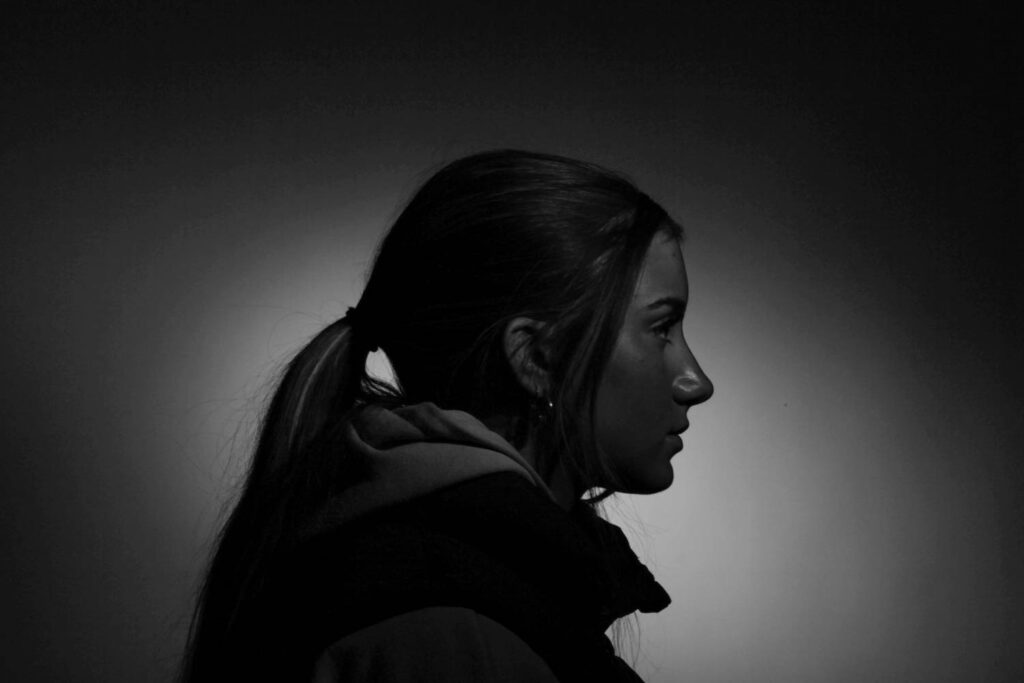
I edited this first photograph to increase the exposure, so the image would be less dark. I did this by increasing the exposure, contrast, highlights, whites, blacks and vibrancy, while decreasing the shadows.

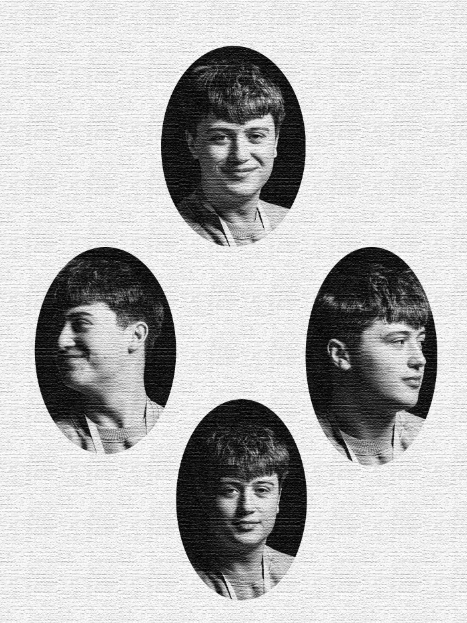
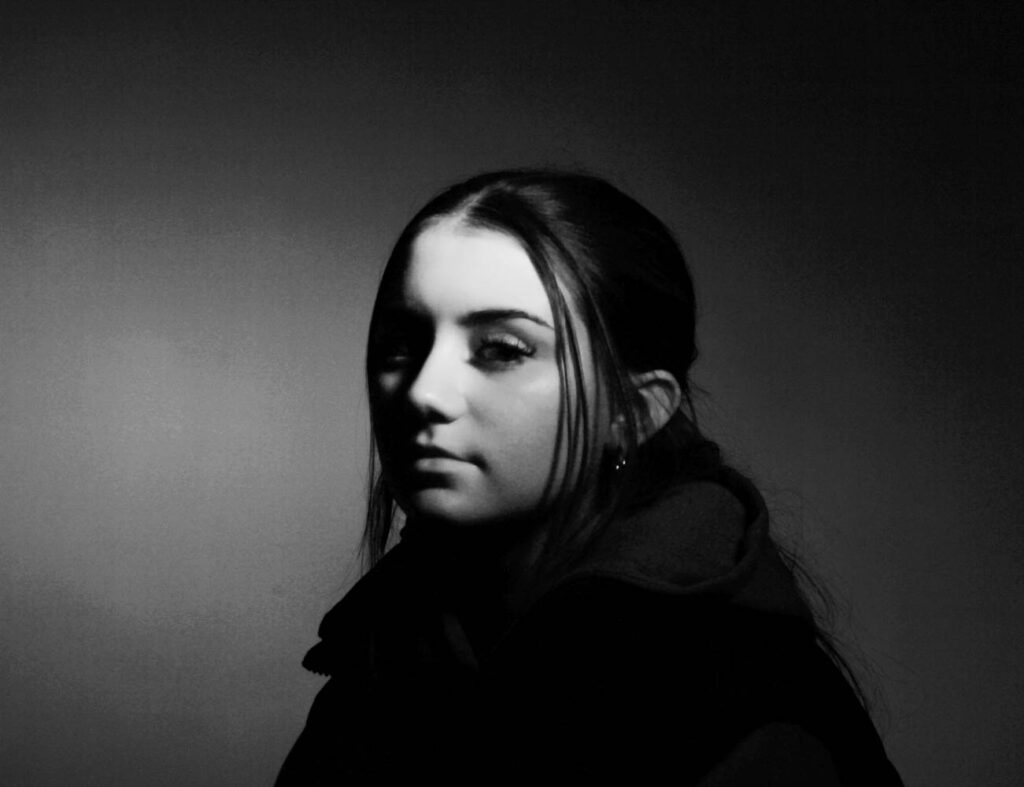
I also created a black and white version of the edited photograph, by creating a virtual copy of the edited photo. I also used a spot removal tool to get rid of any blemishes.

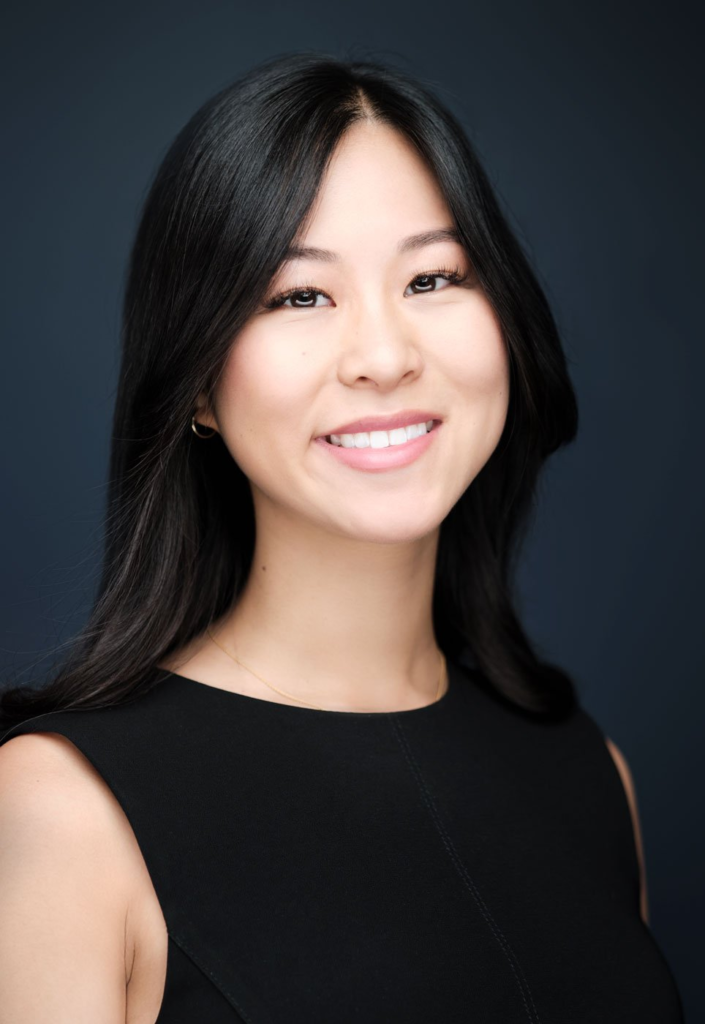
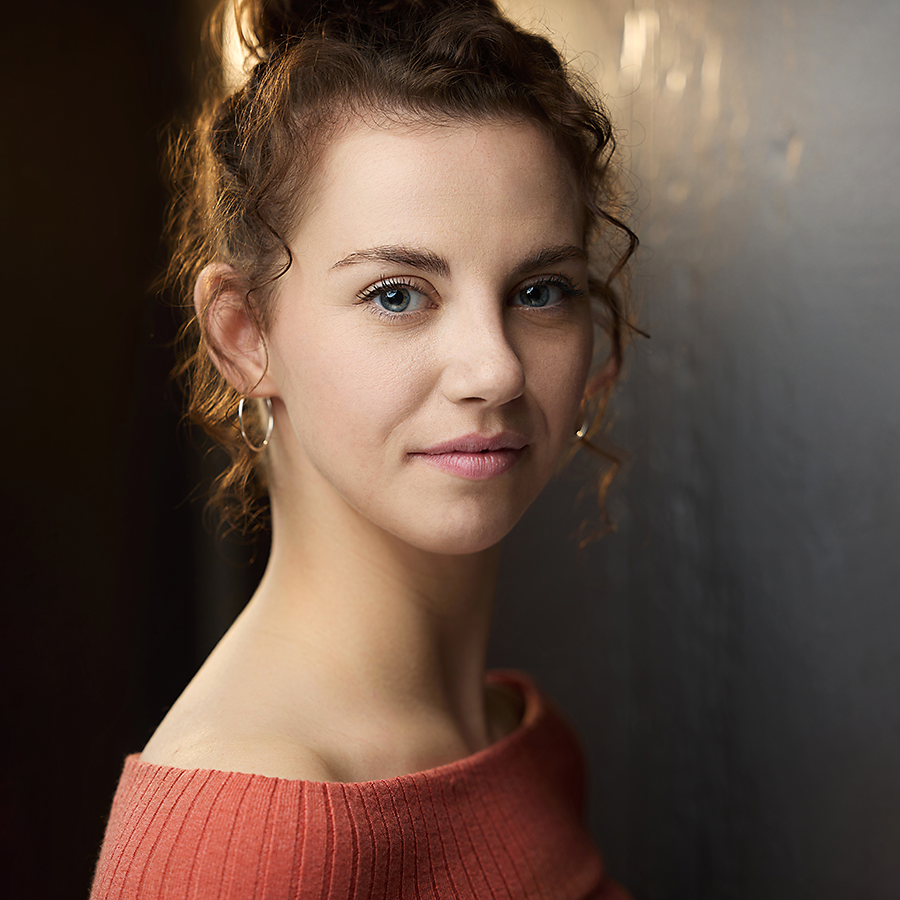
I edited this photo to also increase the exposure, so the image would be lighter. I did this by increasing the exposure, contrast, highlights, shadows, texture, clarity and vibrancy, while decreasing the blacks and whites.

I also made a virtual copy of the edited photograph and made a black and white version.

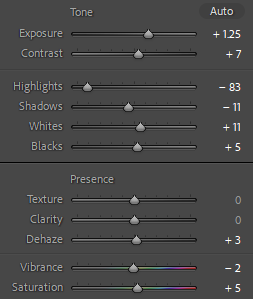
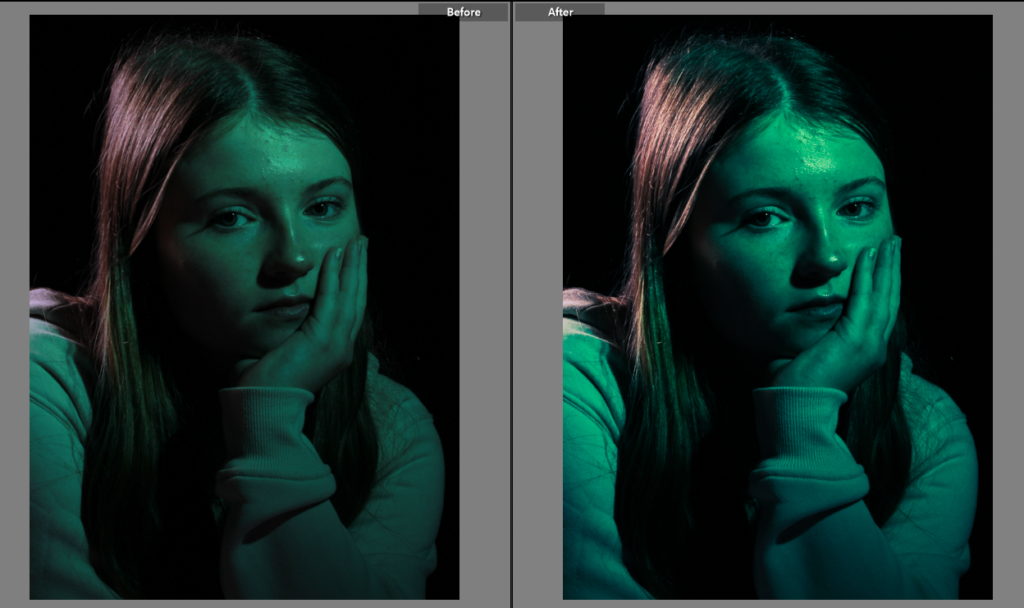
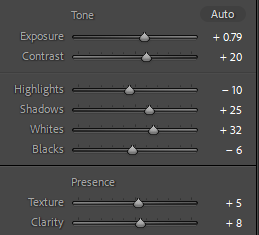
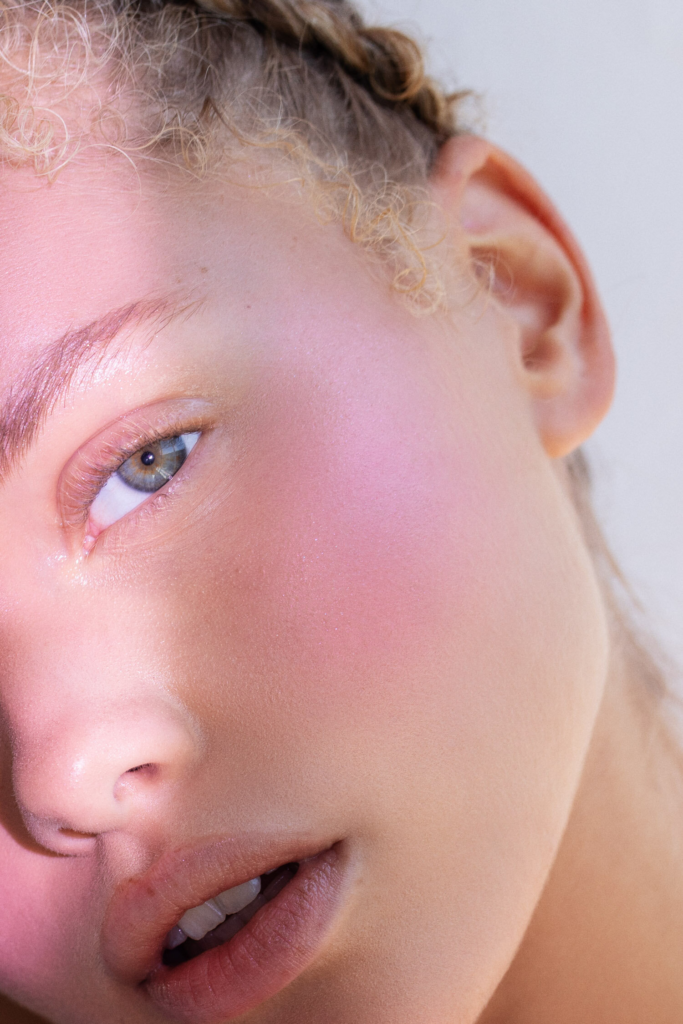
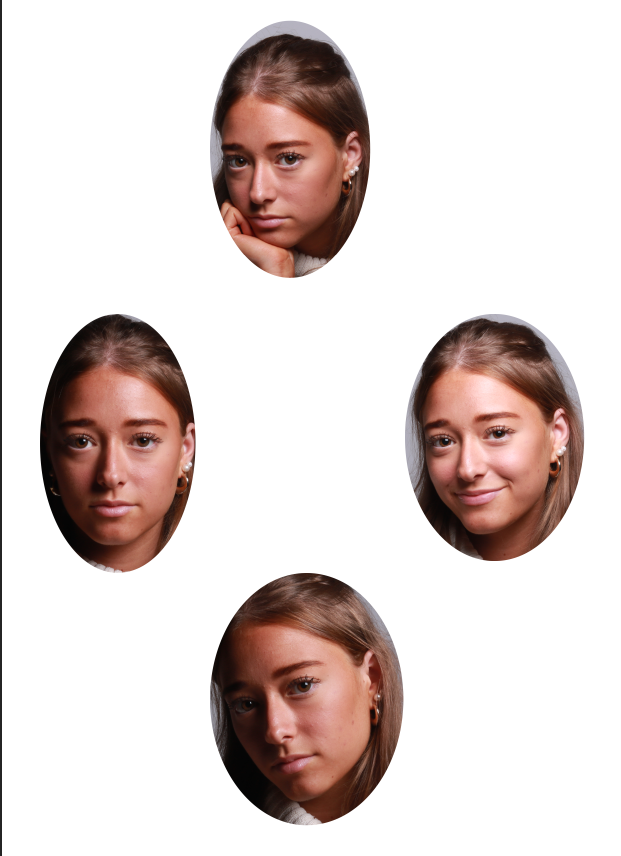
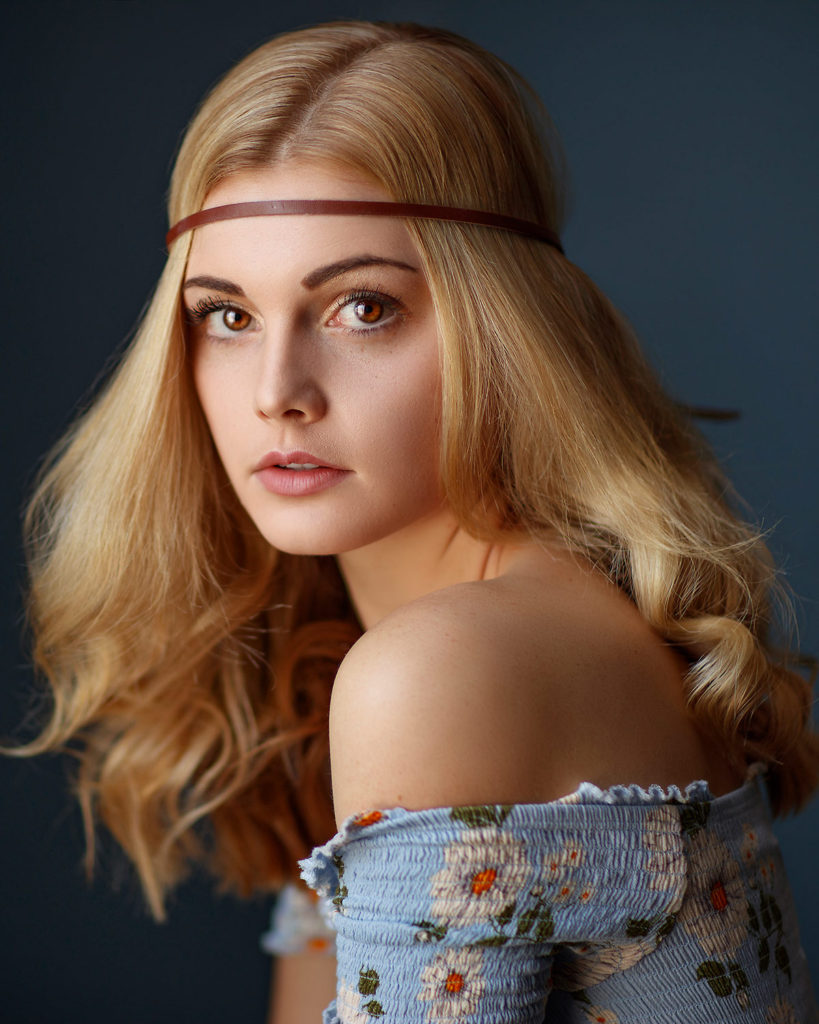
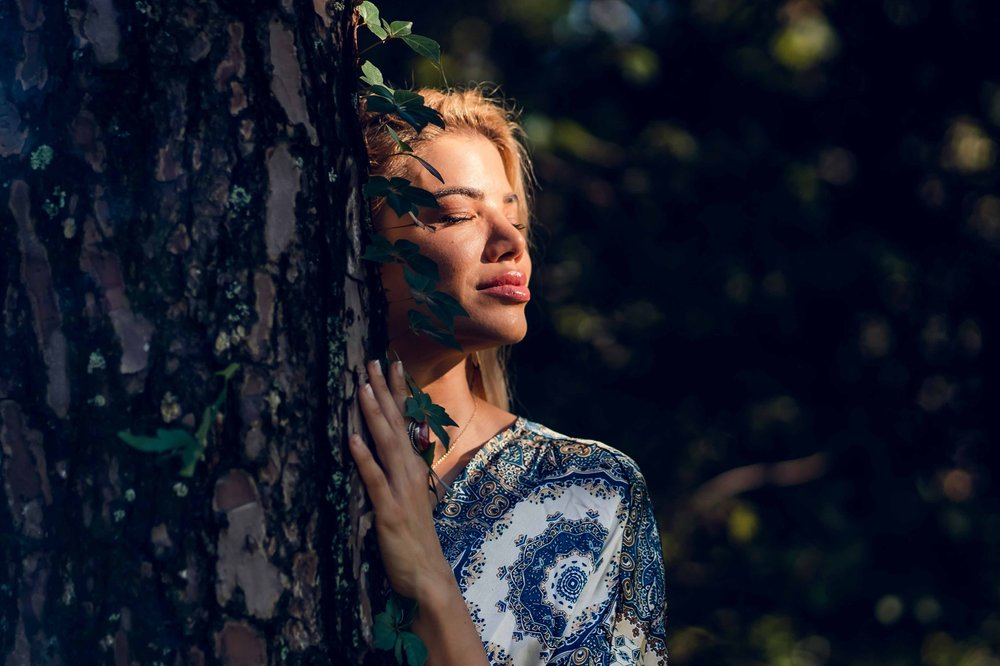
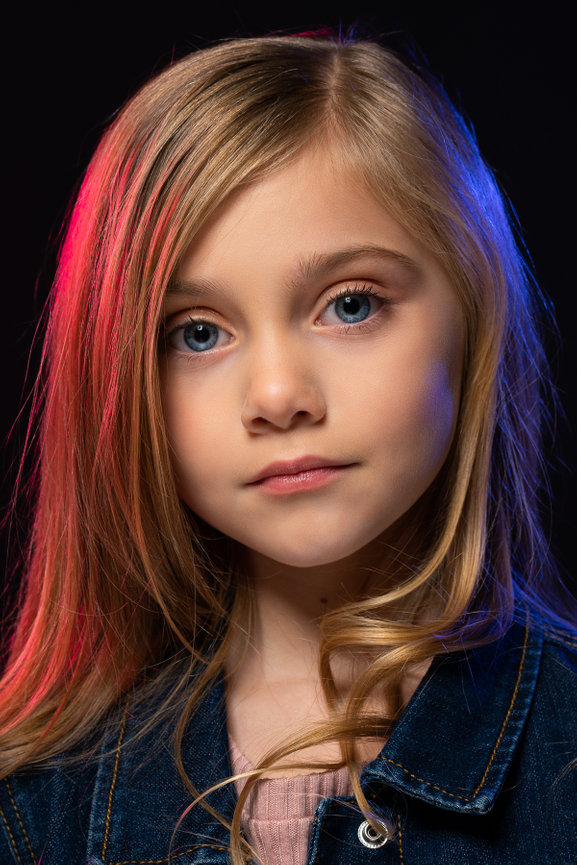
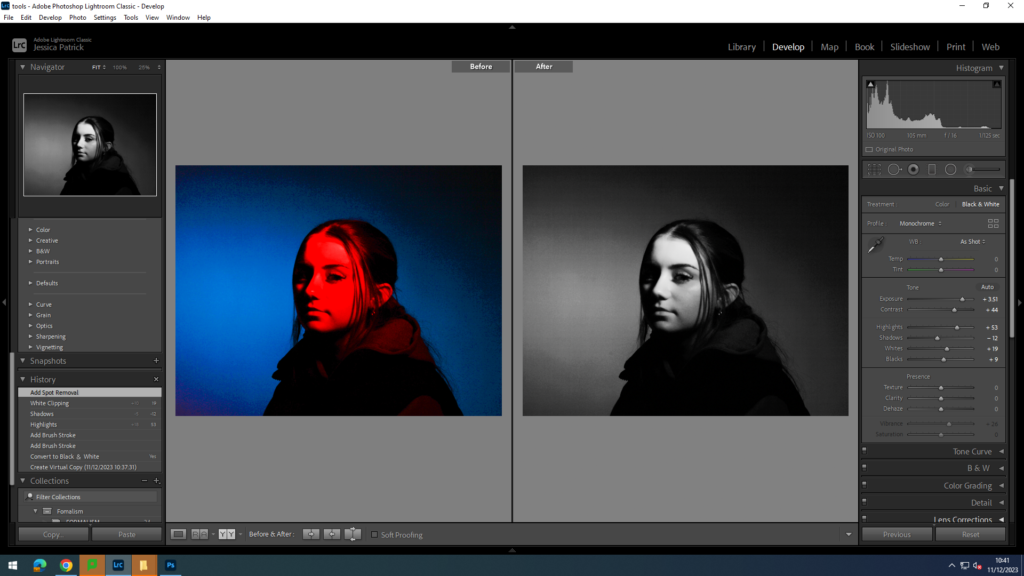
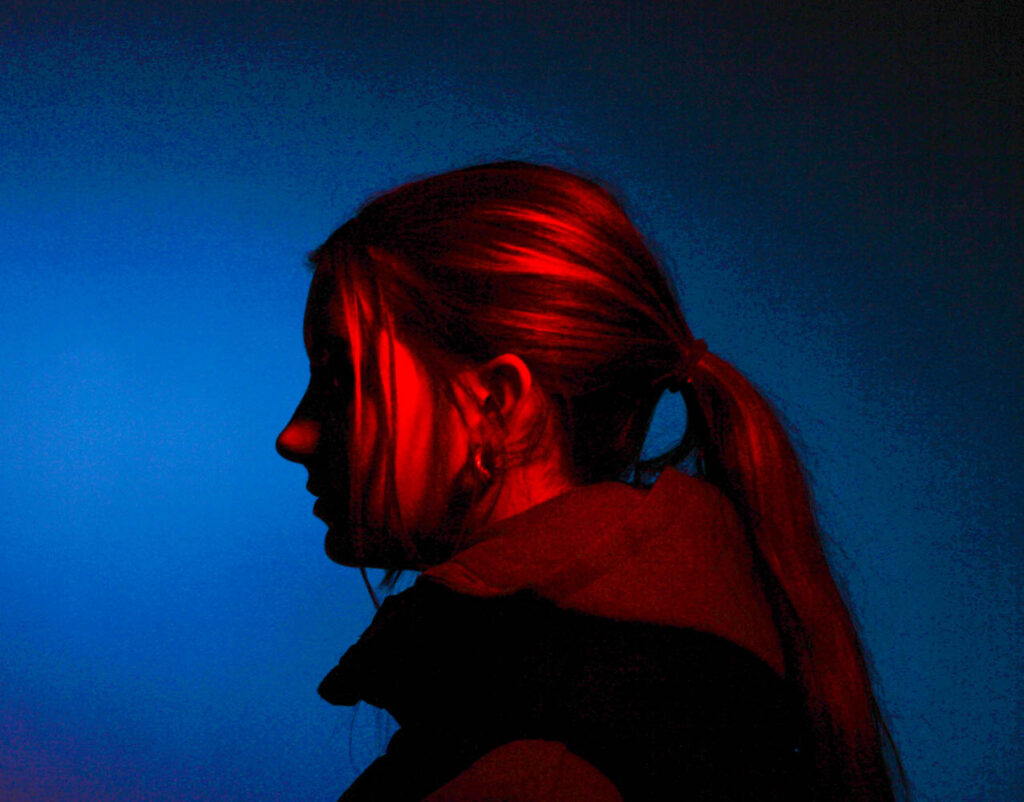
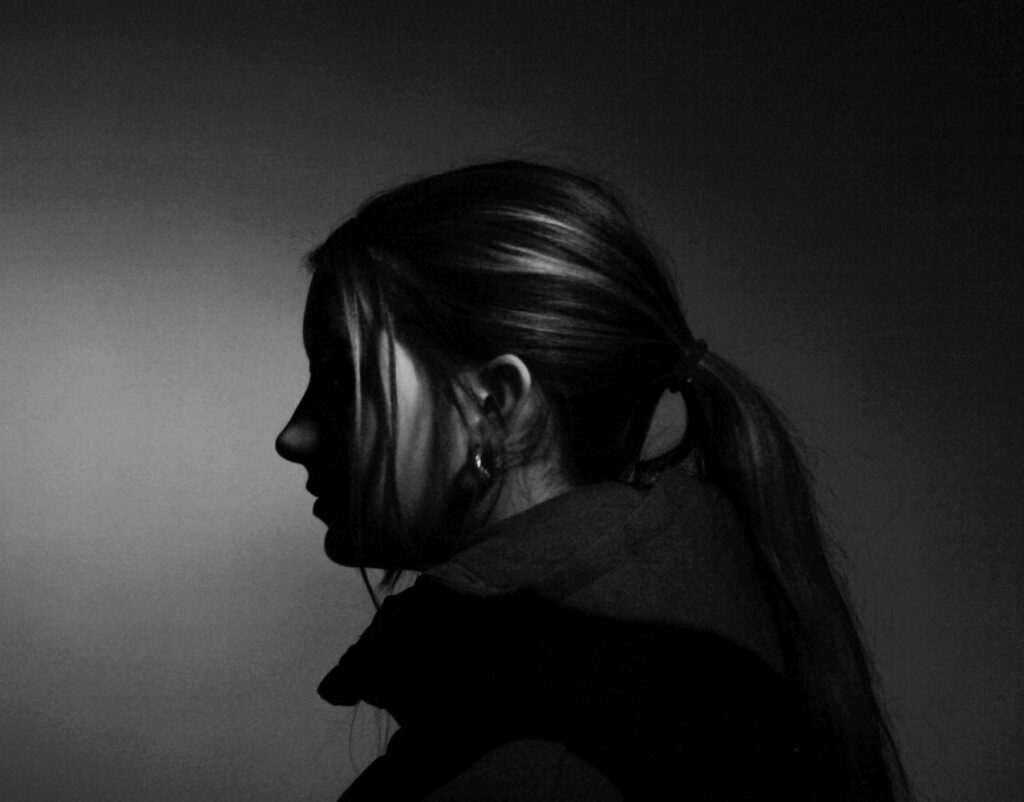
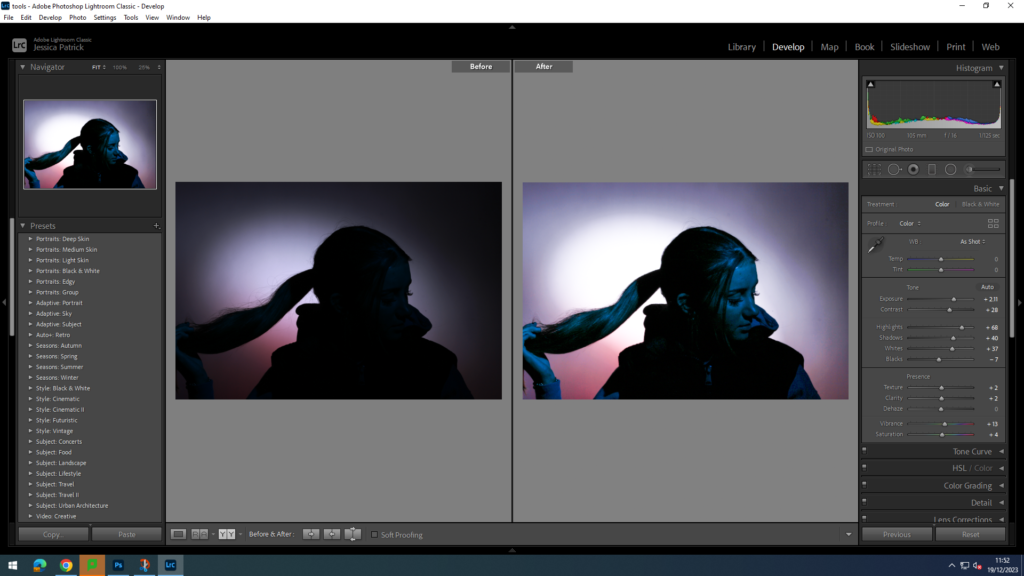
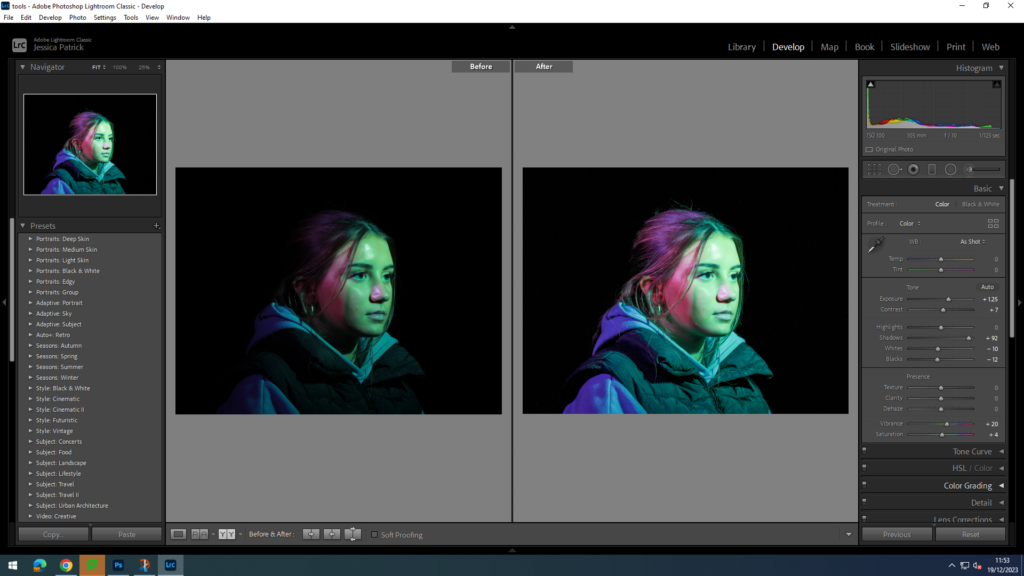
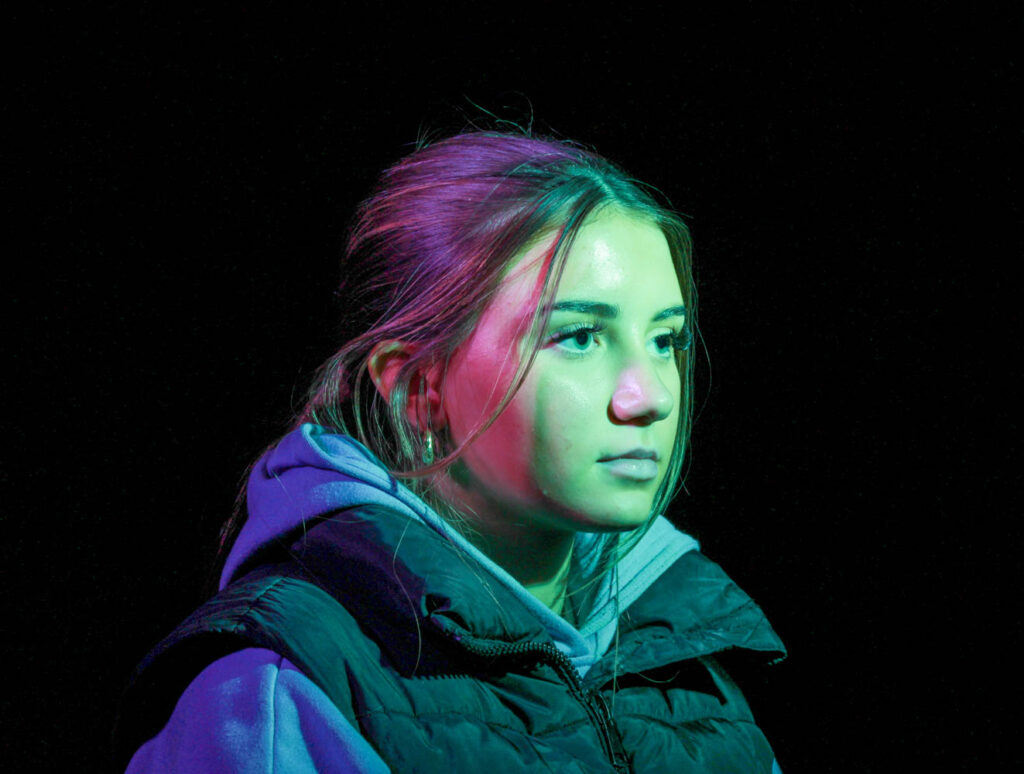
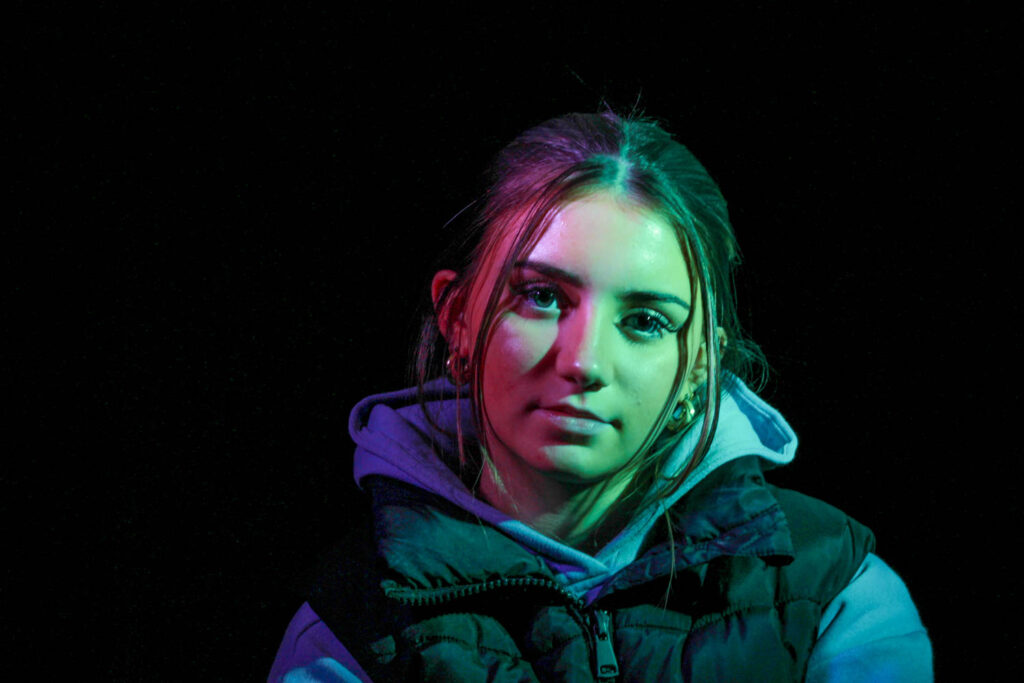
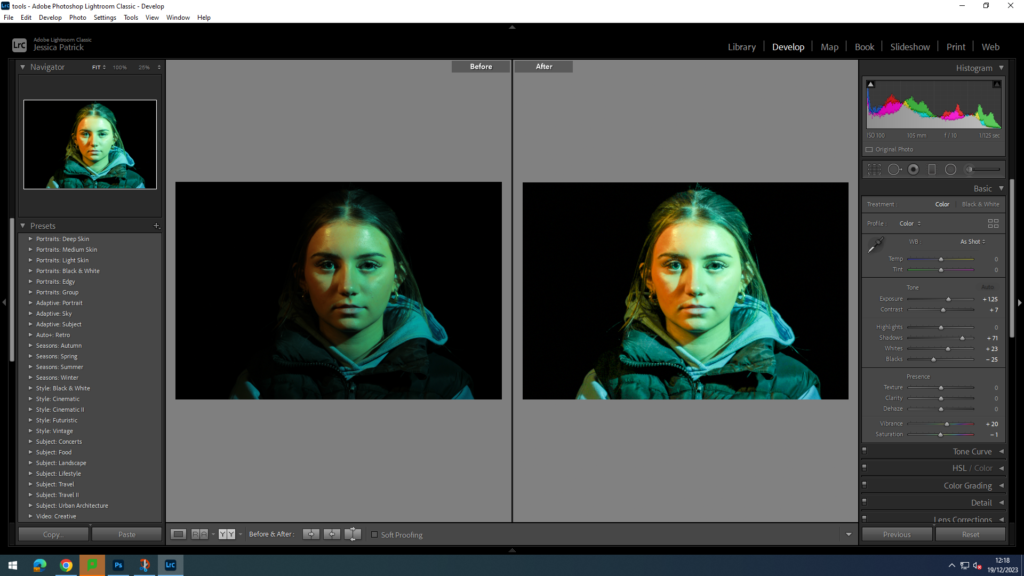
I edited this photo to make it brighter, so the model is more visible. I did this by increasing the exposure, contrast, shadows, vibrancy and saturation, while decreasing the whites and highlights.

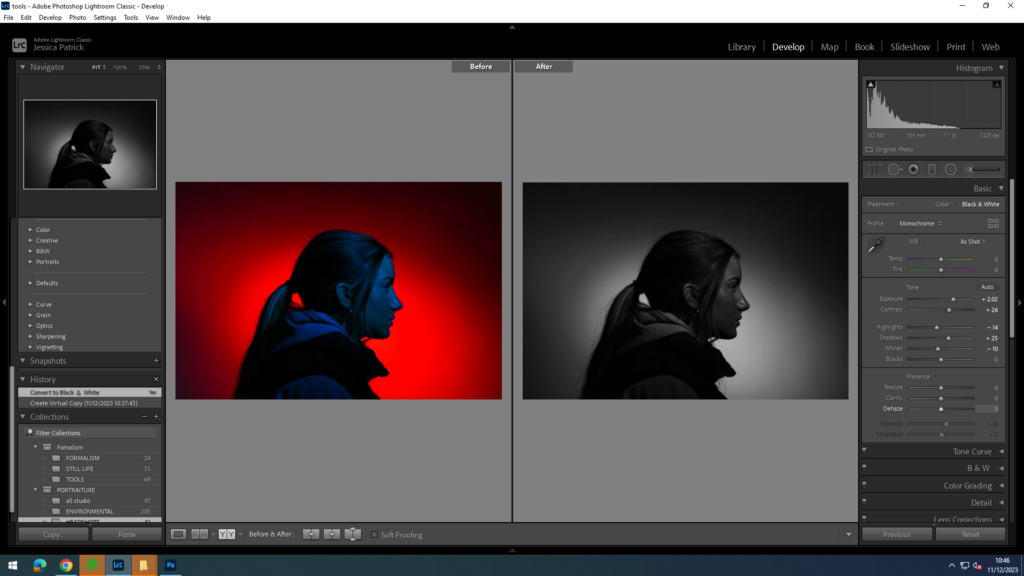
I also made a virtual copy of the edited photograph, so I could create a black and white version.

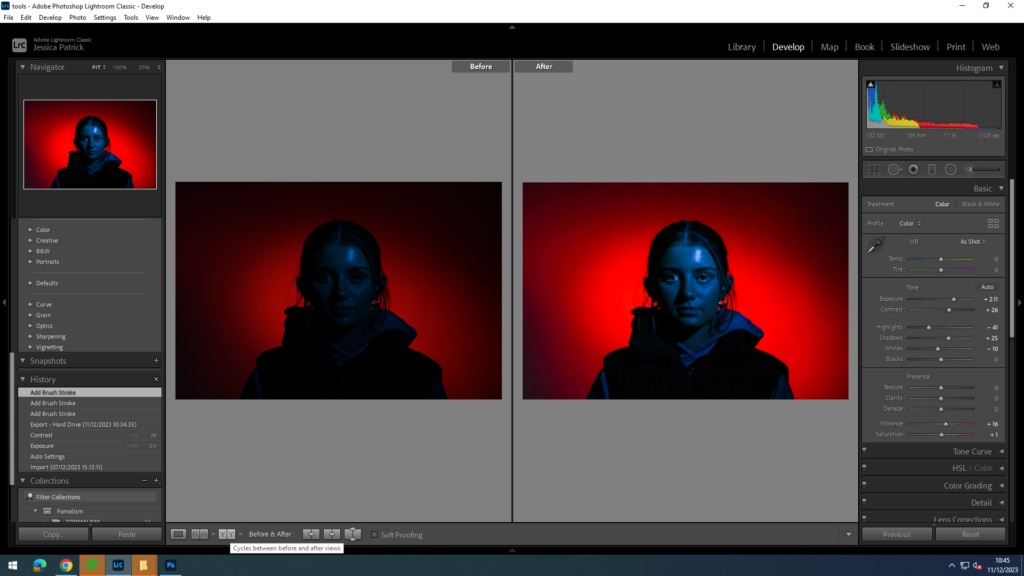
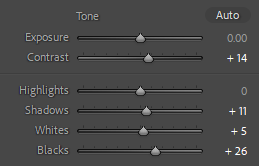
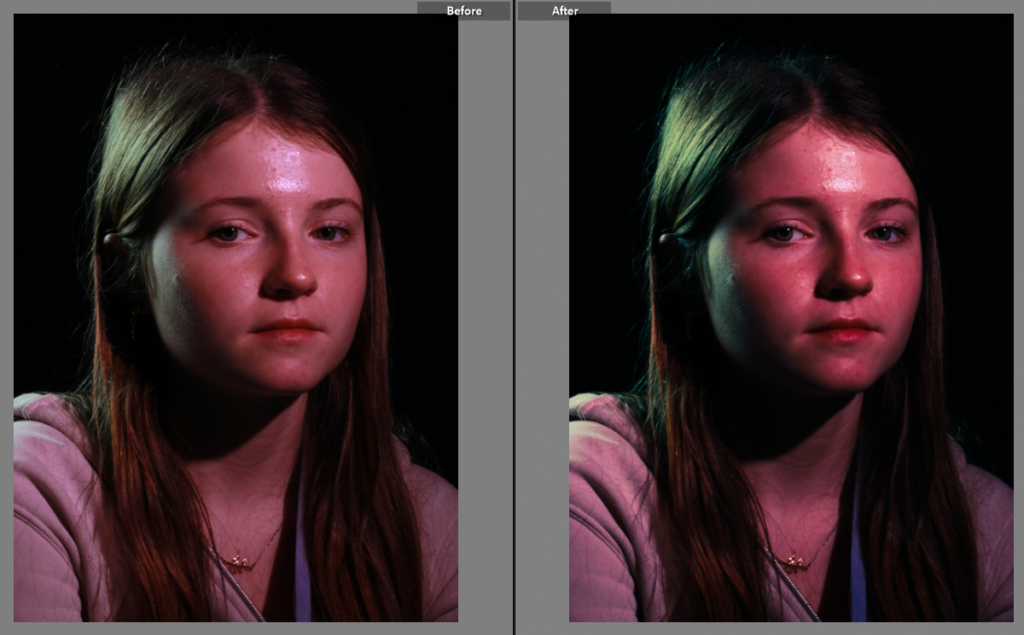
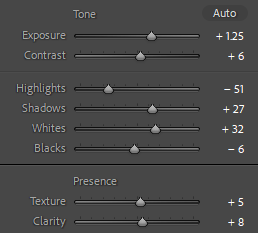
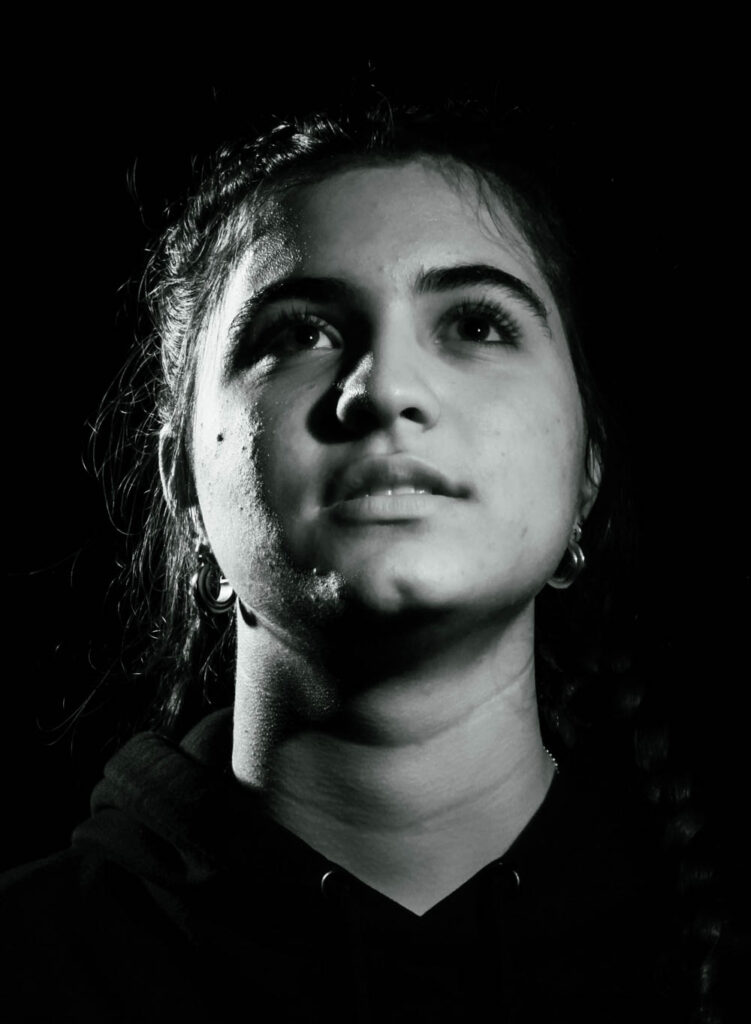
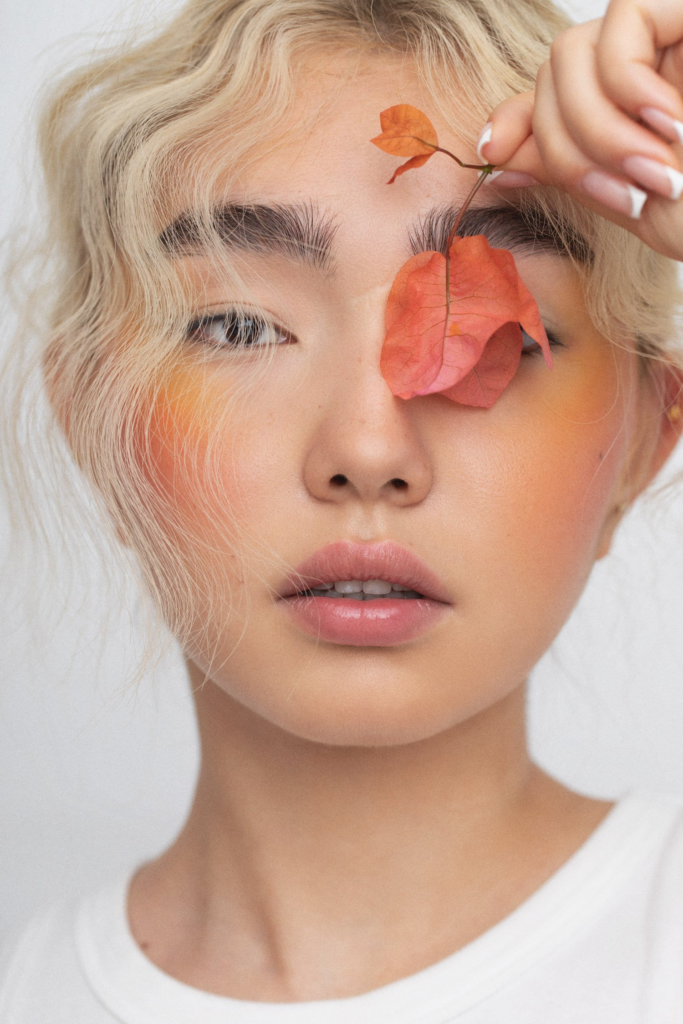
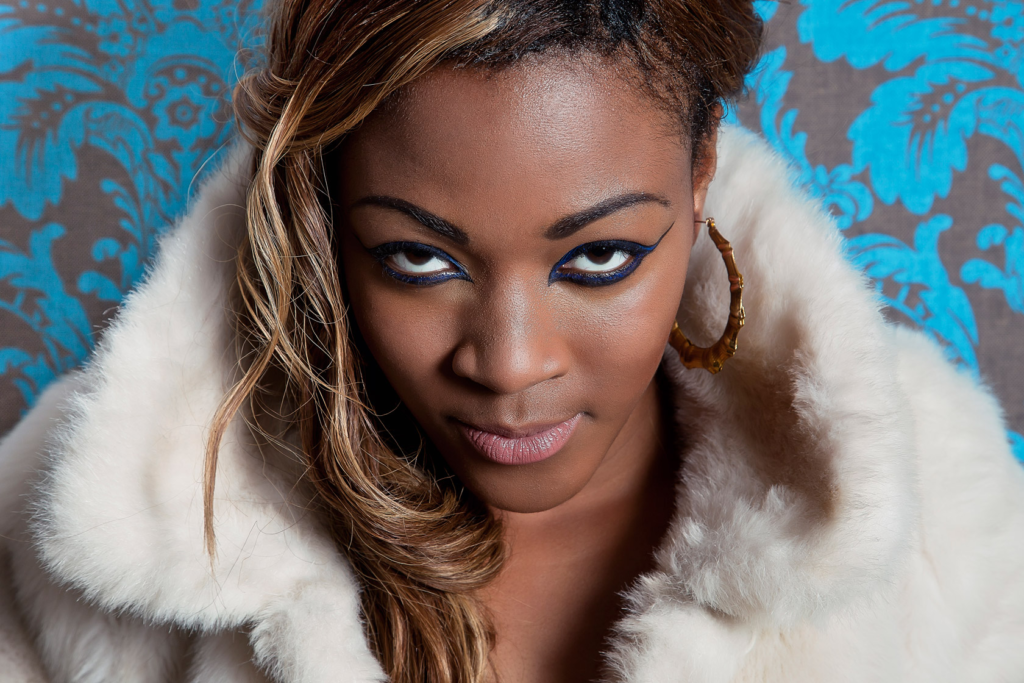
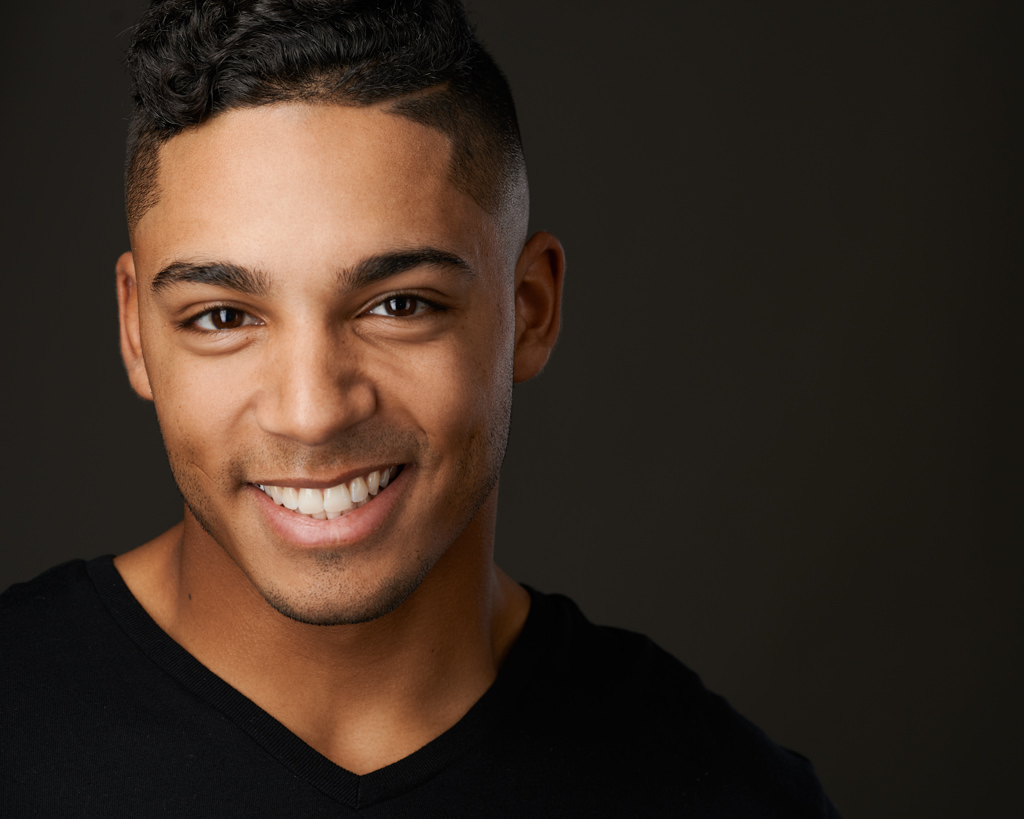
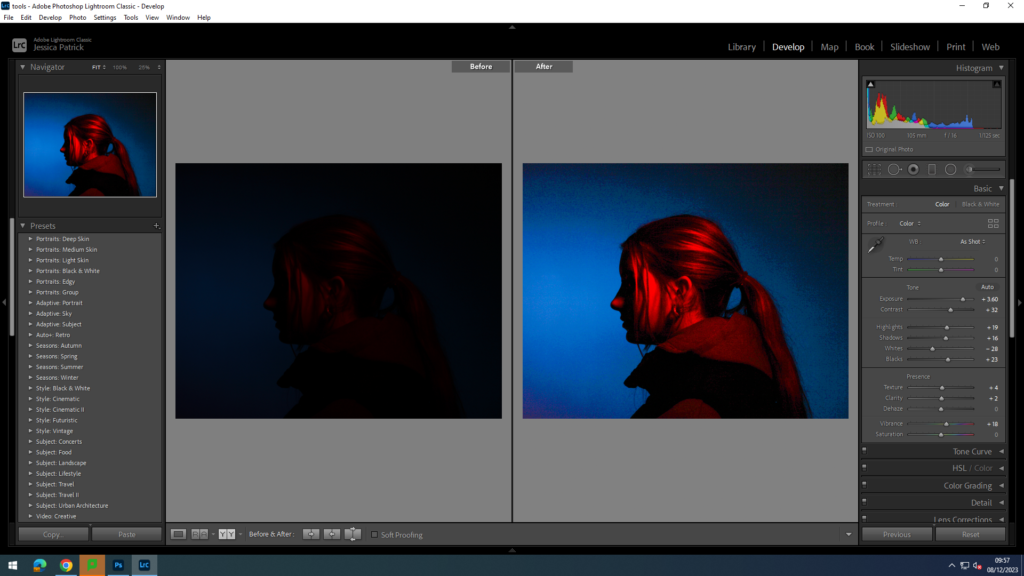
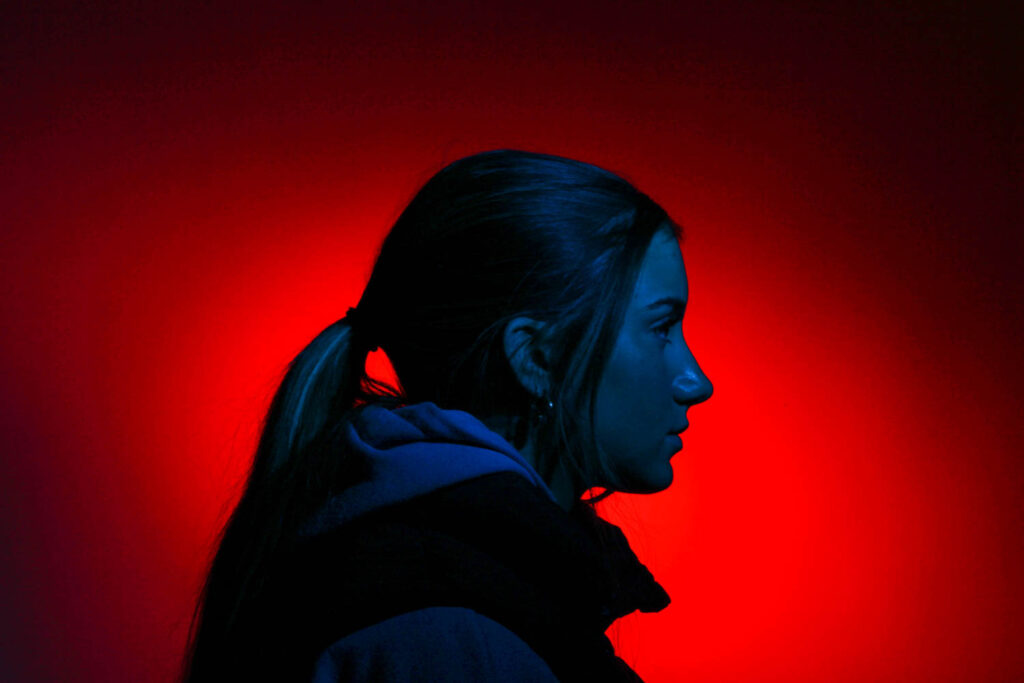
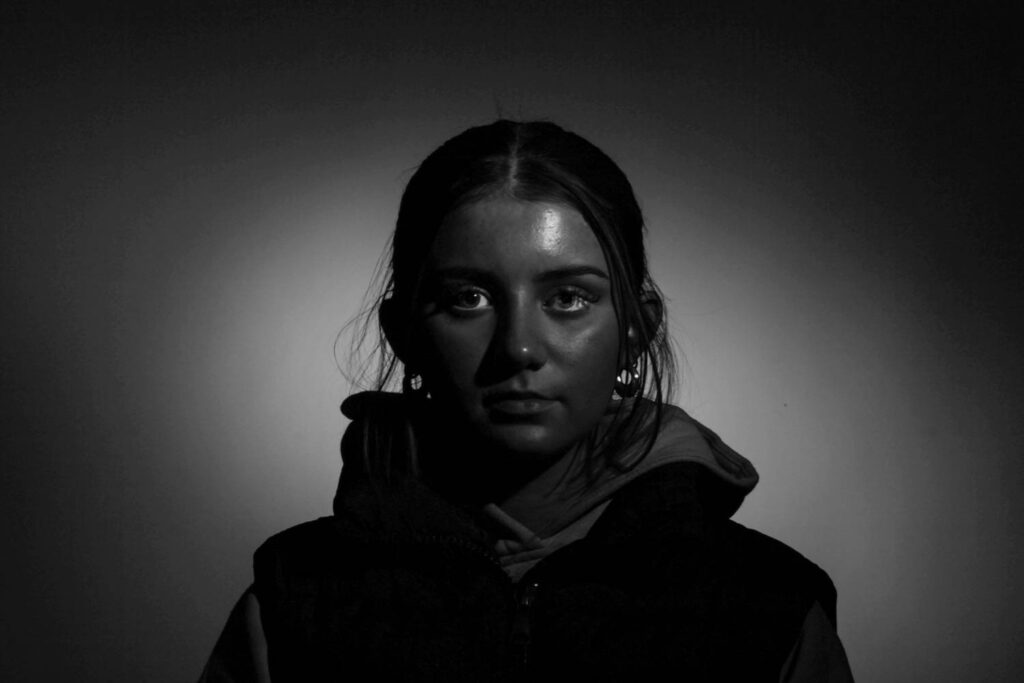
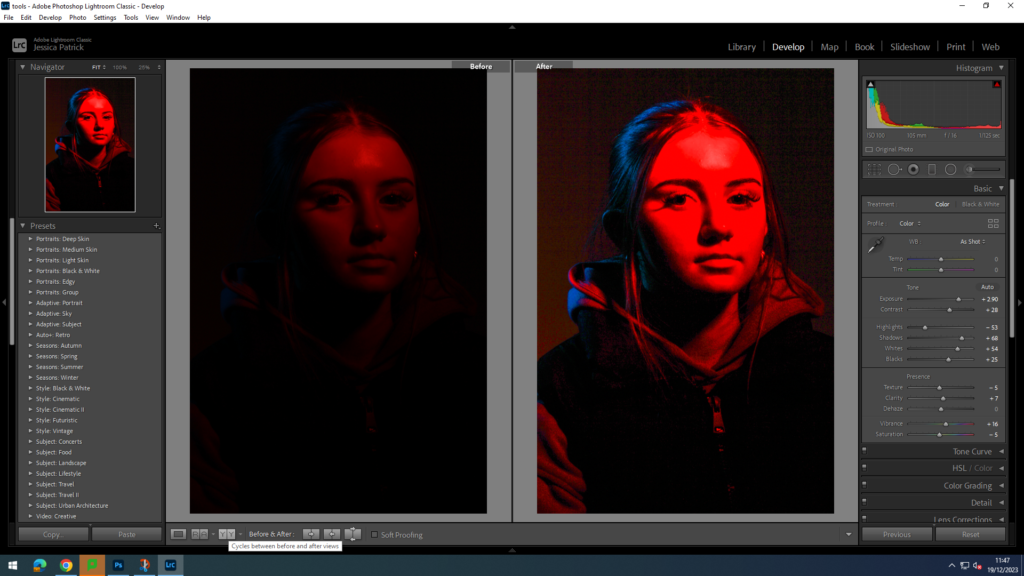
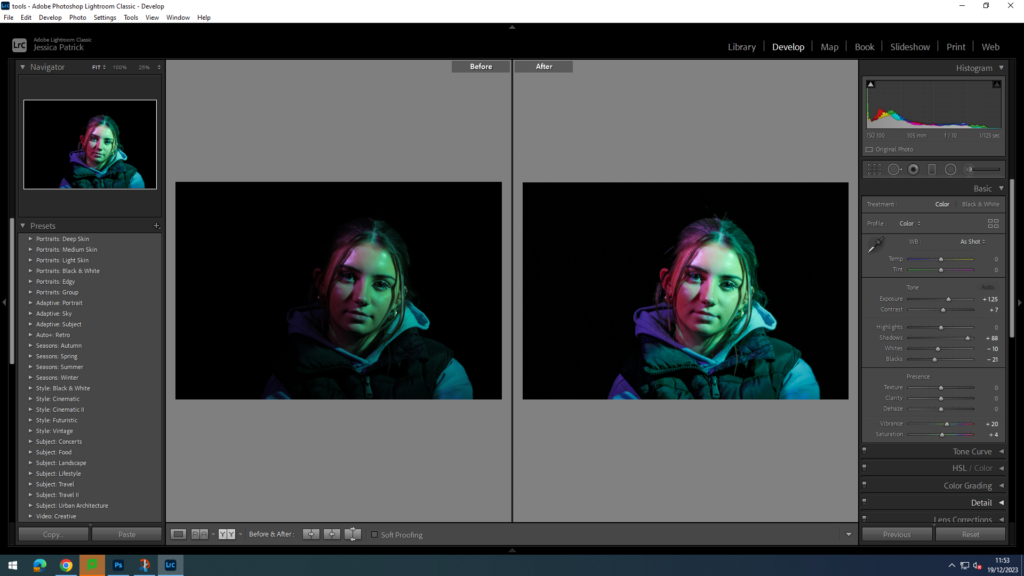
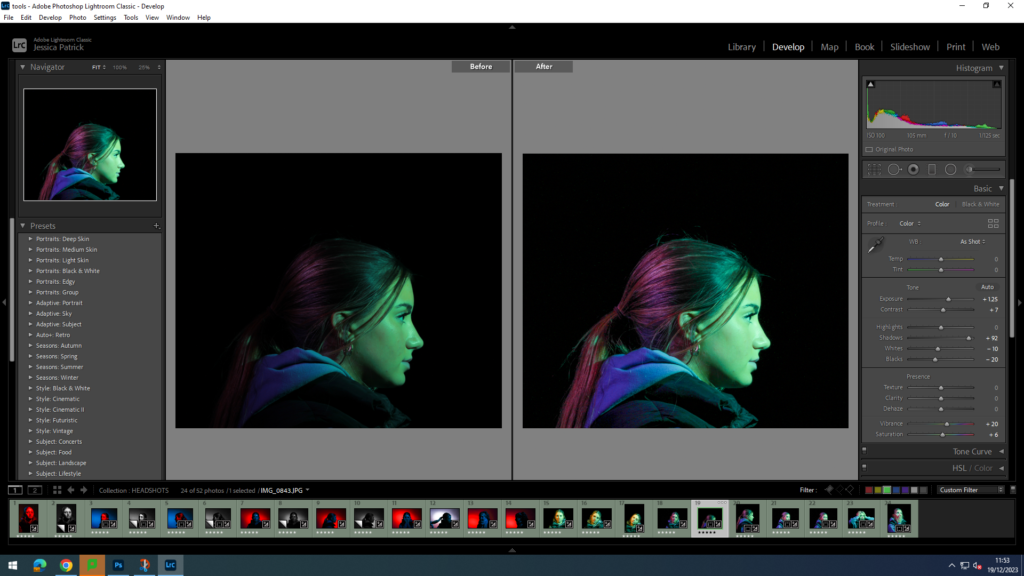
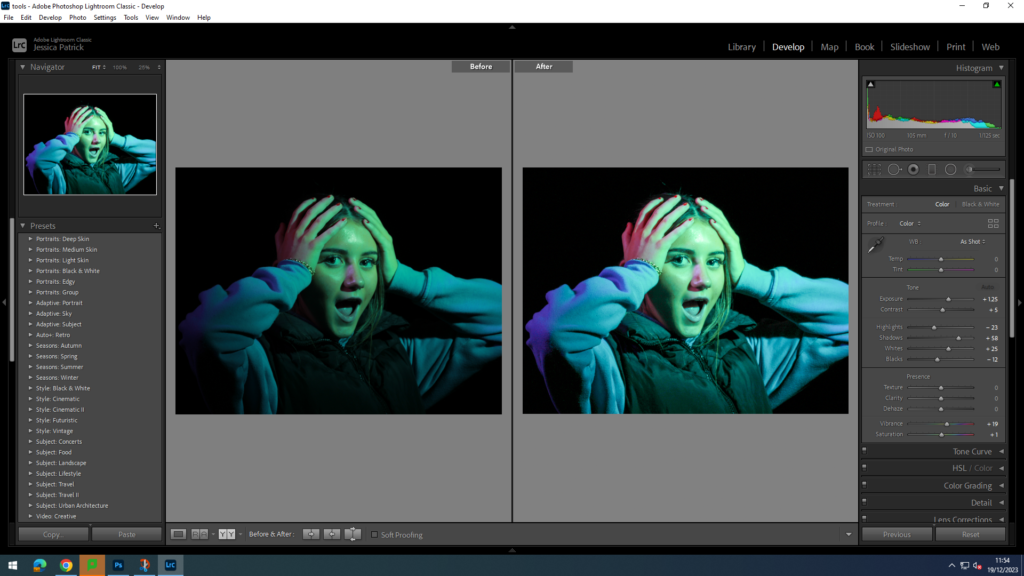
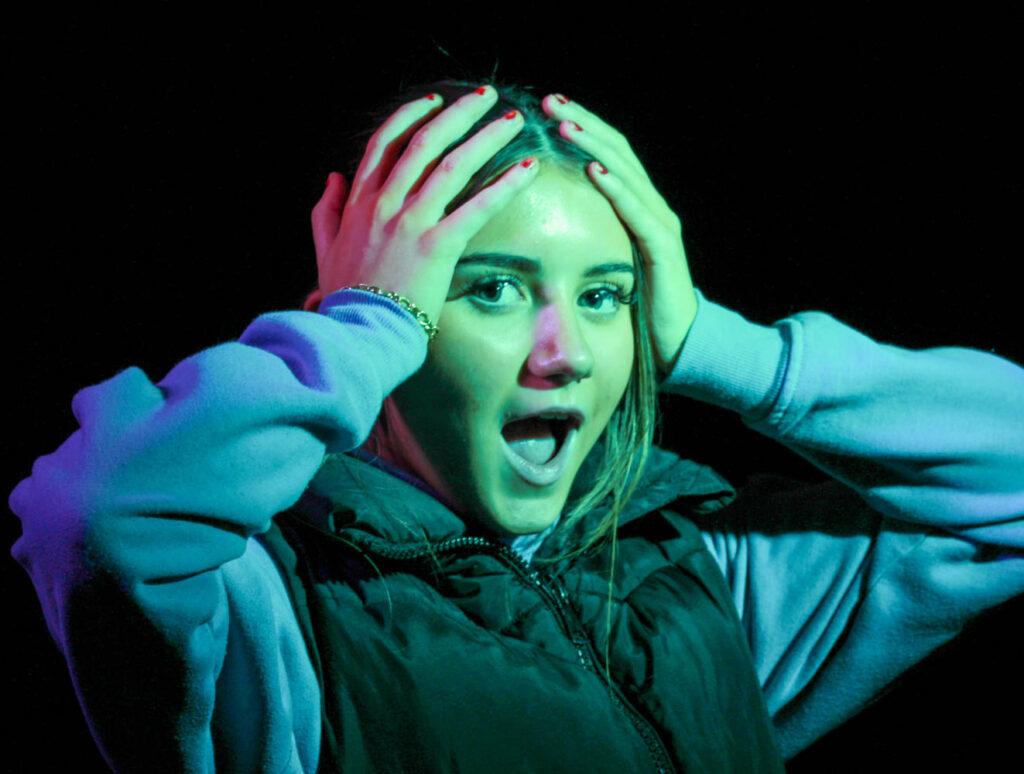
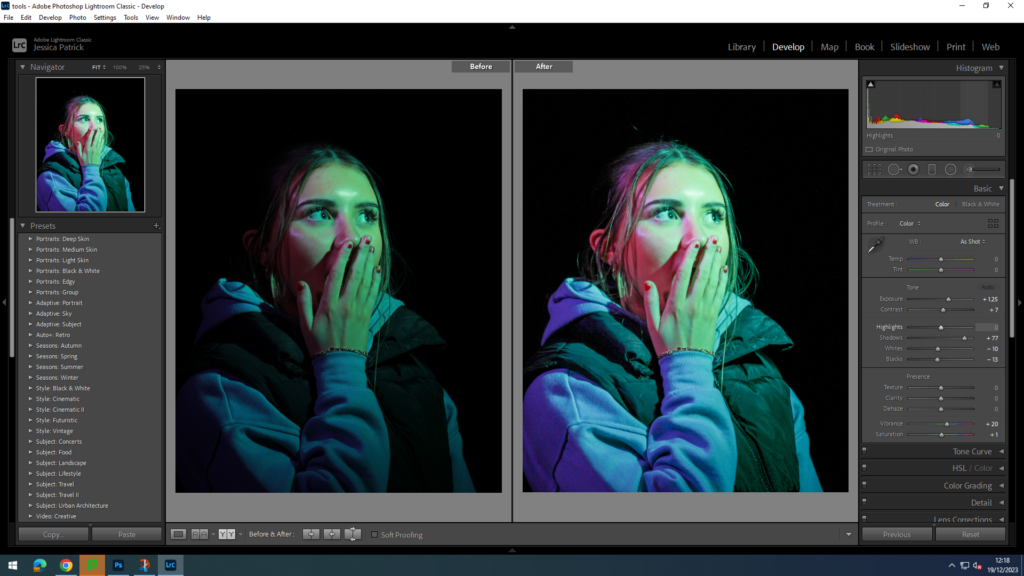
I edited this photo to increase the exposure and to make it brighter. I did this by increasing the exposure, contrast, shadows, vibrancy and saturation, while decreasing the highlights and whites. I also used an eye brightening tool, so the eyes stand out more.

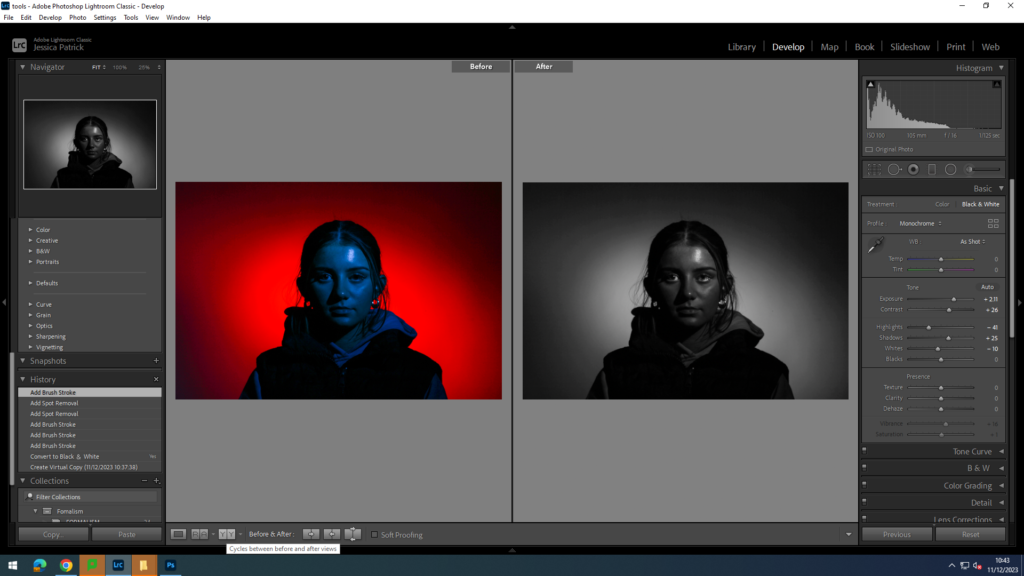
I also made a black and white version of the edited photograph by making a virtual copy. I also used a spot correction tool to get rid of any blemishes.

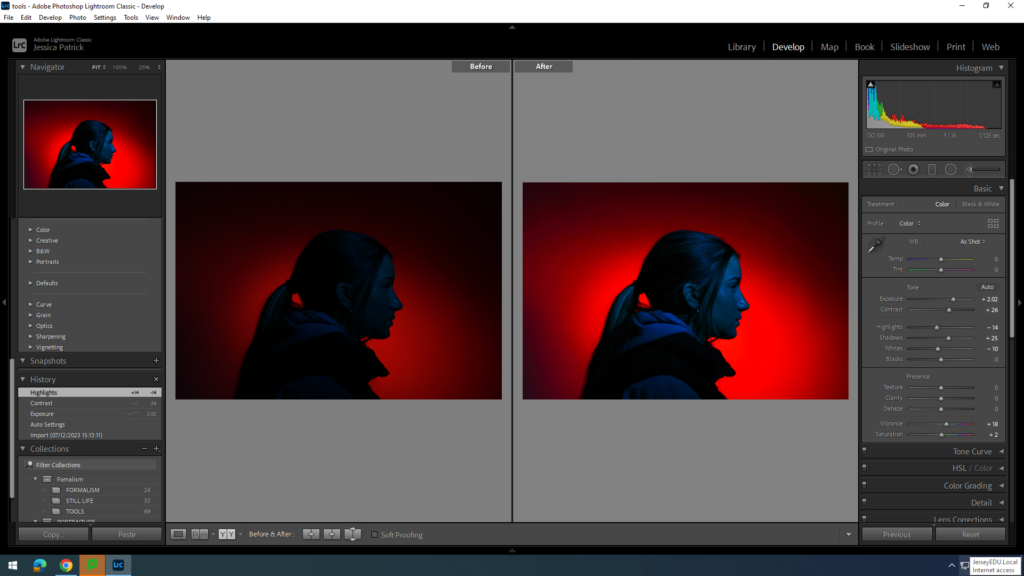
Final 4 Coloured Images for Diamond Cameo

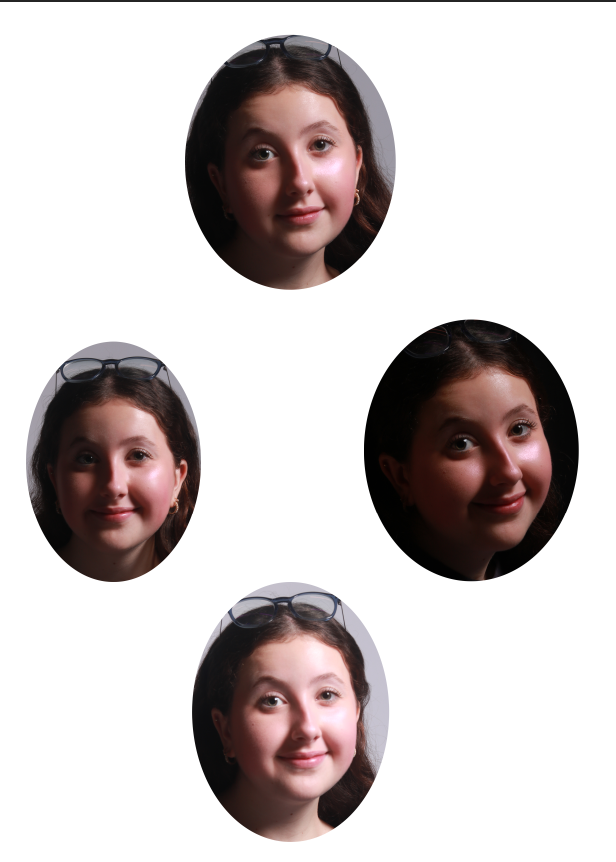
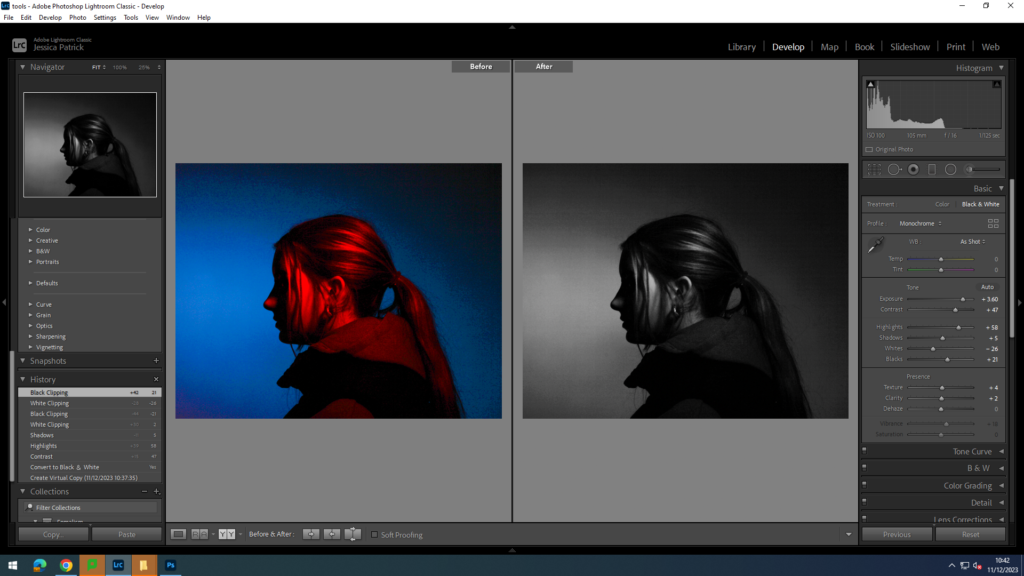
Final 4 B&W Images for Diamond Cameo

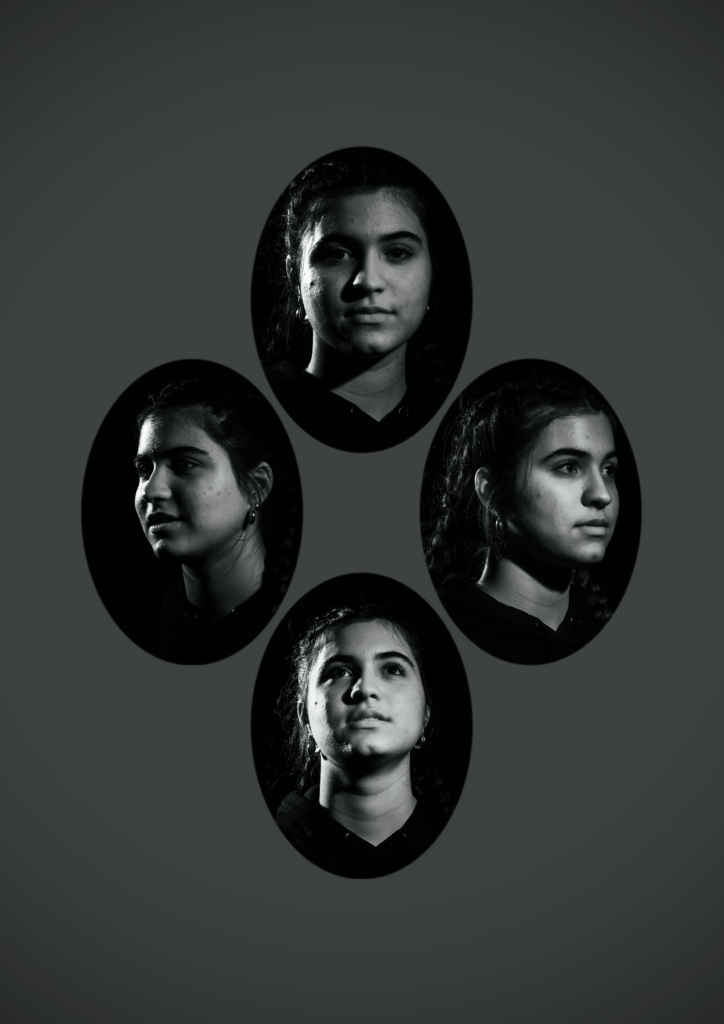
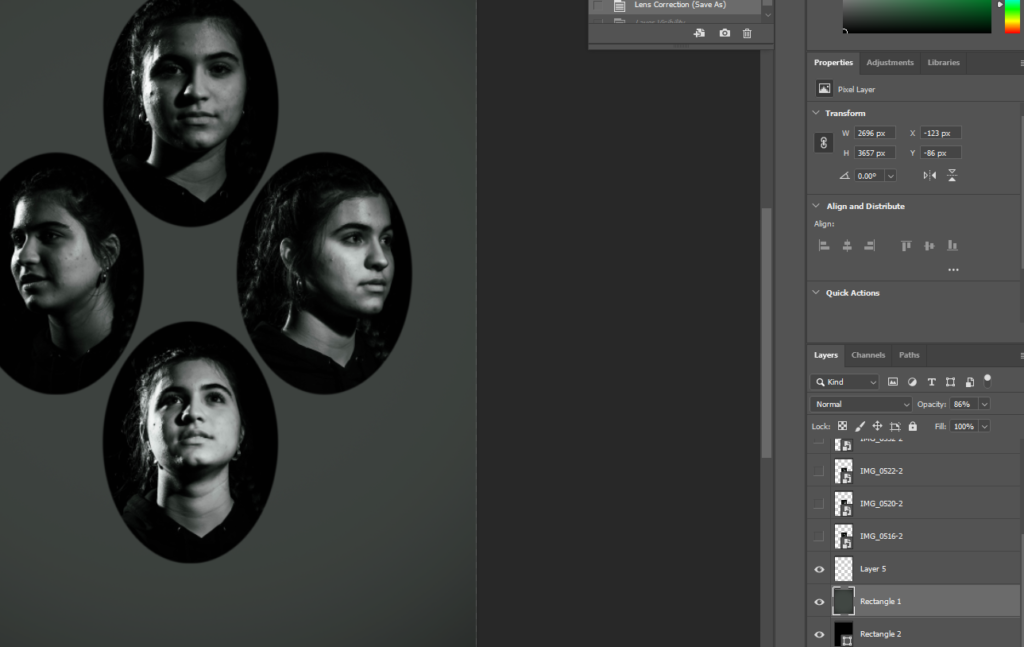
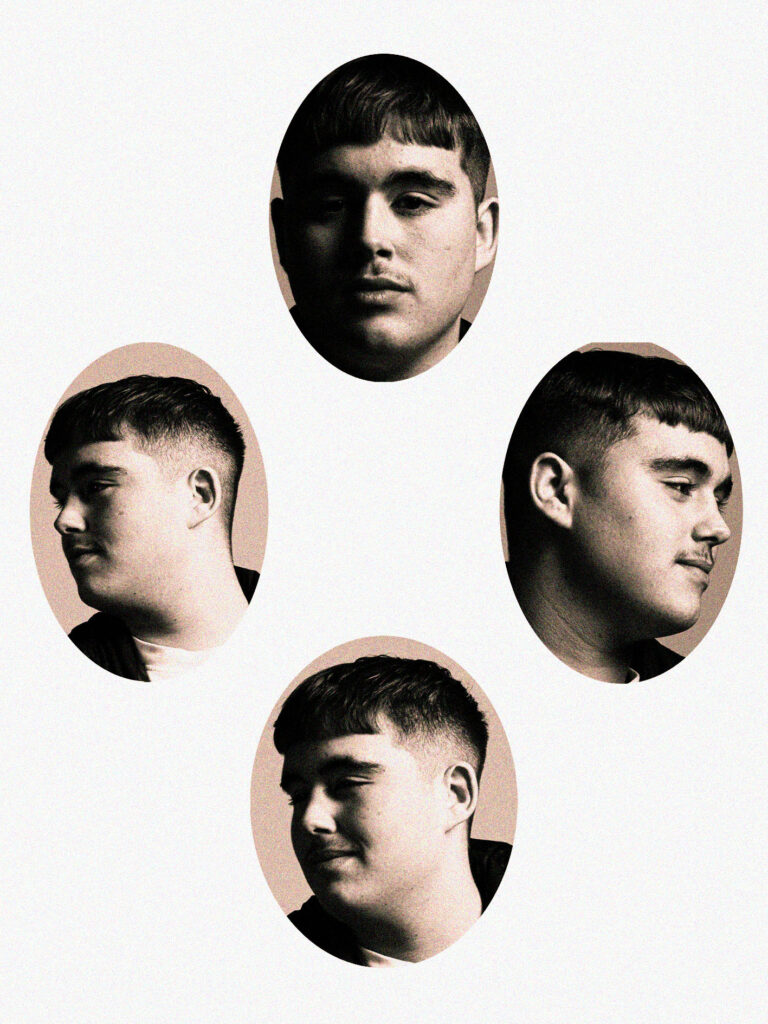
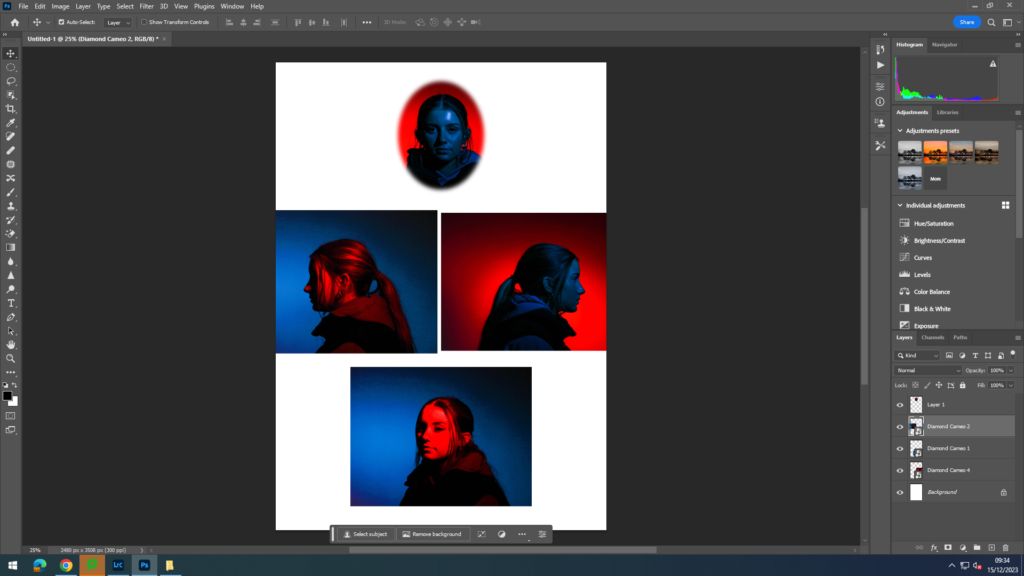
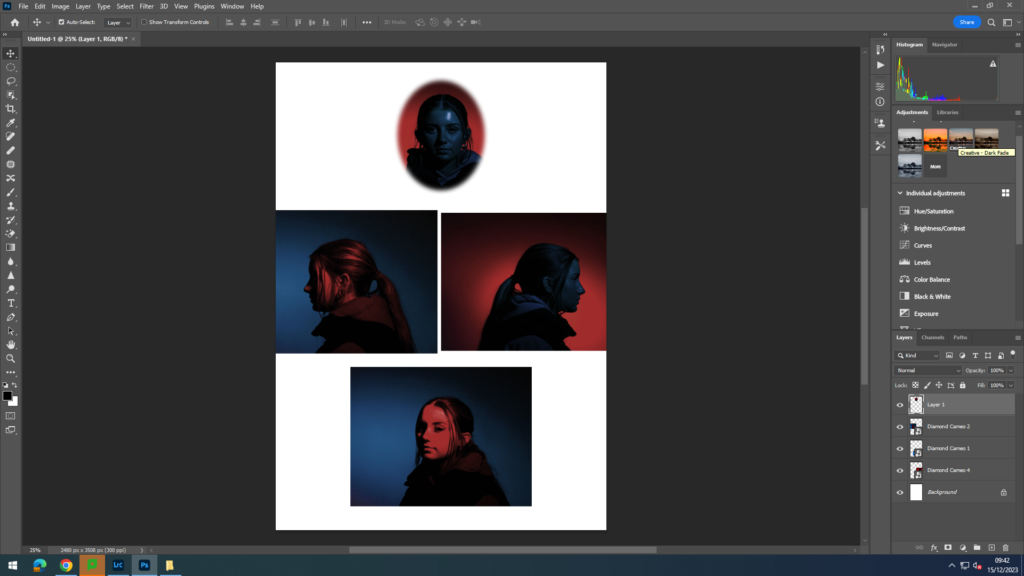
Photoshop- Diamond Cameo

This is my first attempt of creating a diamond cameo on photoshop. Firstly, I imported my four photos which I wanted to use for my diamond cameo onto a background on photoshop. I then selected them all together to resize them to fit the background perfectly. Then, I positioned my four layers where I want them.

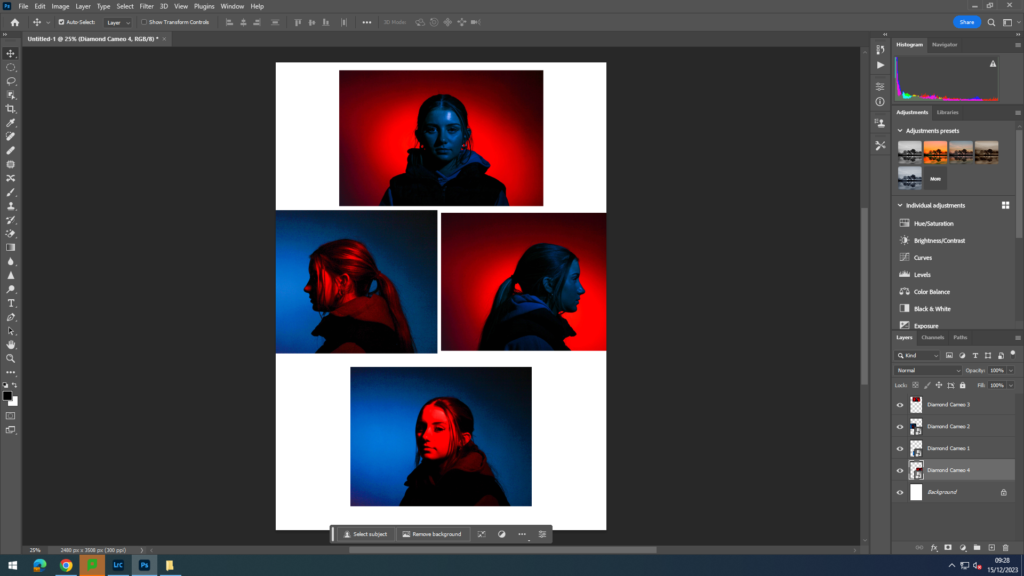
Then I select a layer and select the elliptical marque tool and select the feather at 15, so the edges of my ovals fade in and aren’t sharp ovals. Then, I cut out my desired size and shape oval on the selected layer and right click in the oval click layer via copy to create a copy of the oval cut out.

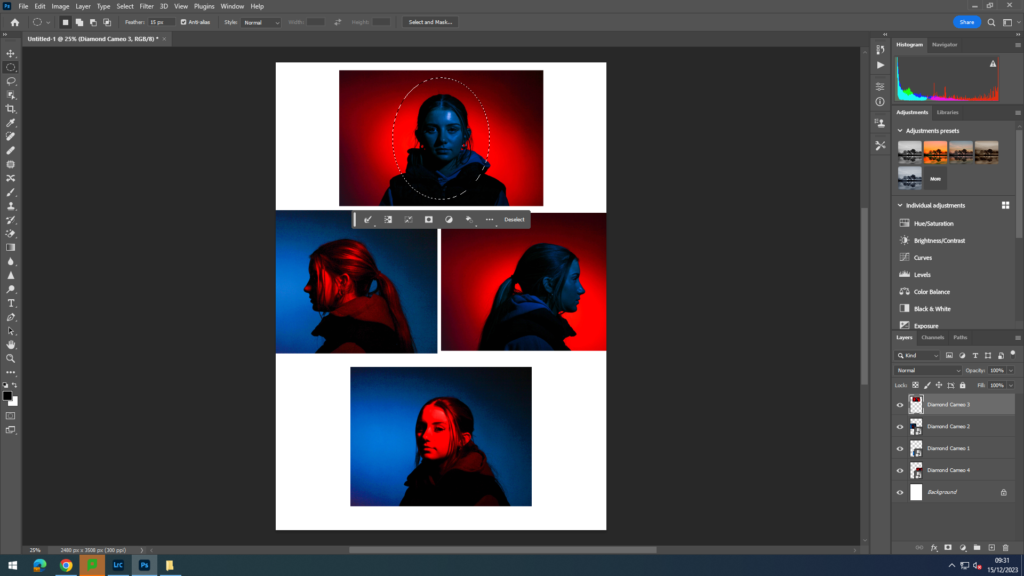
Next, I delete the selected layer without the cut out oval and then repeat this for all the four layers.

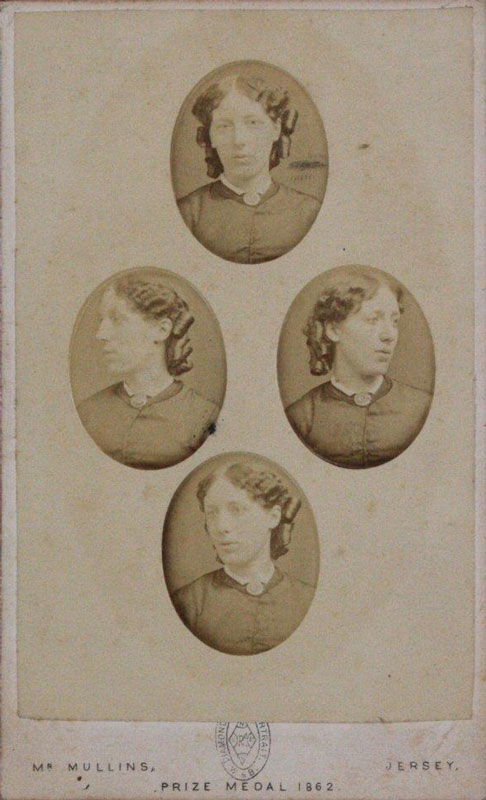
Next, I experimented with my diamond cameo, by changing the background to black by using the gradient tool to fill in the background with black paint. I also experimented with giving my diamond cameo an older look, so I could try and replicate a Henry Mullins diamond cameo.

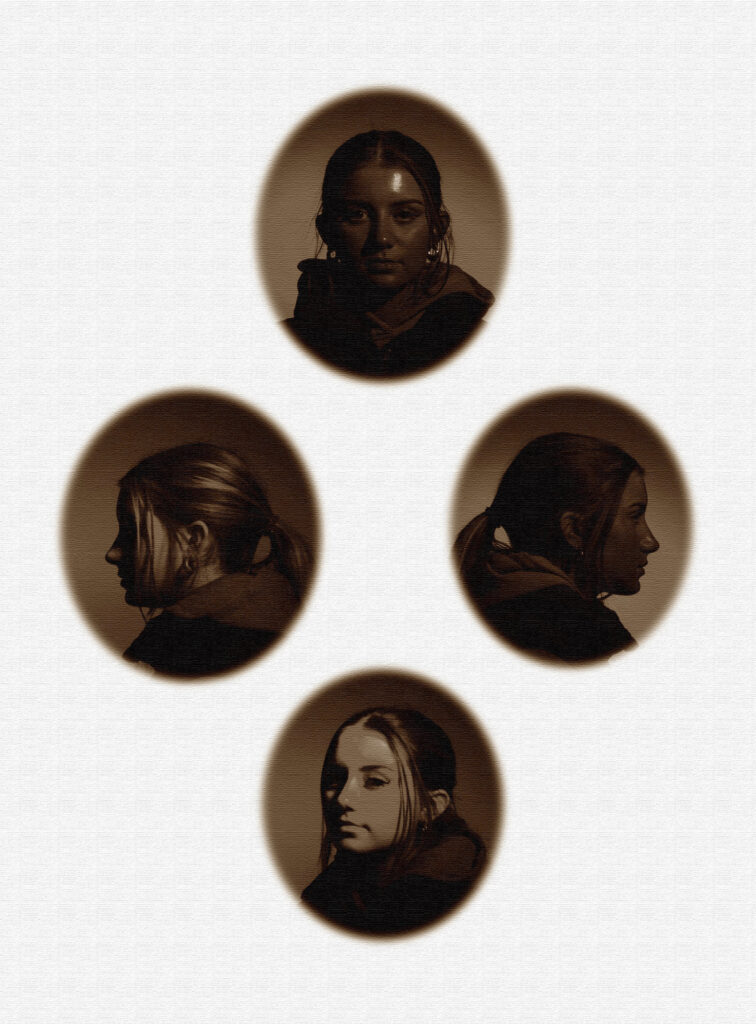
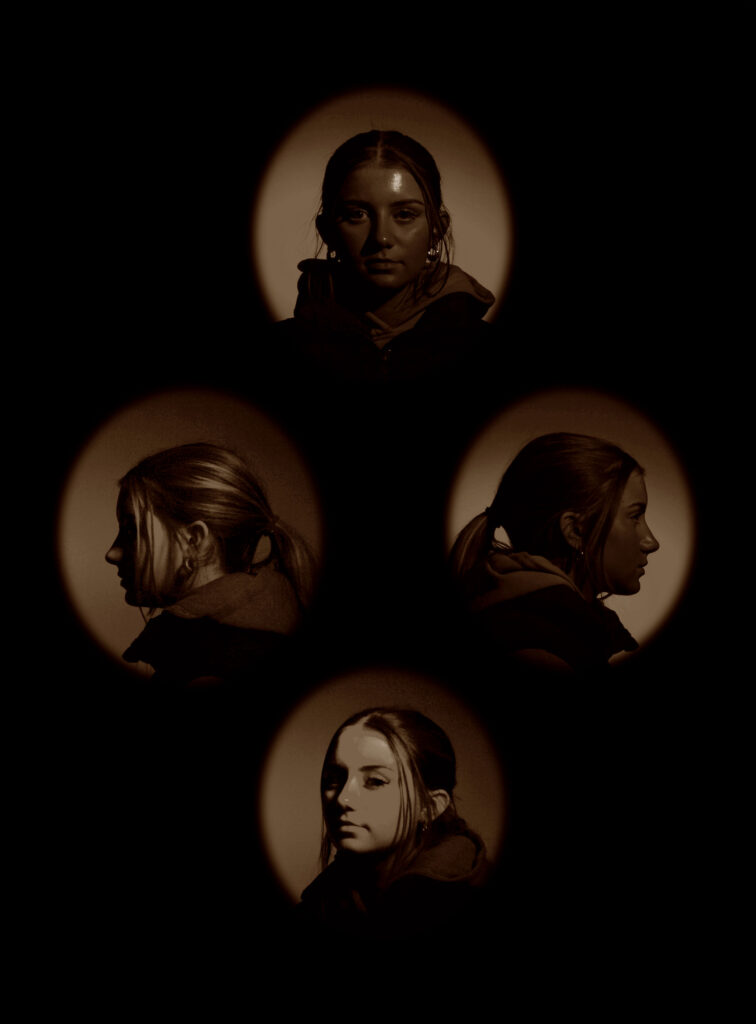
I made an older looking diamond cameo like Henry Mullins by using the filters on the top right of my screen and changing how harsh or light I want them.

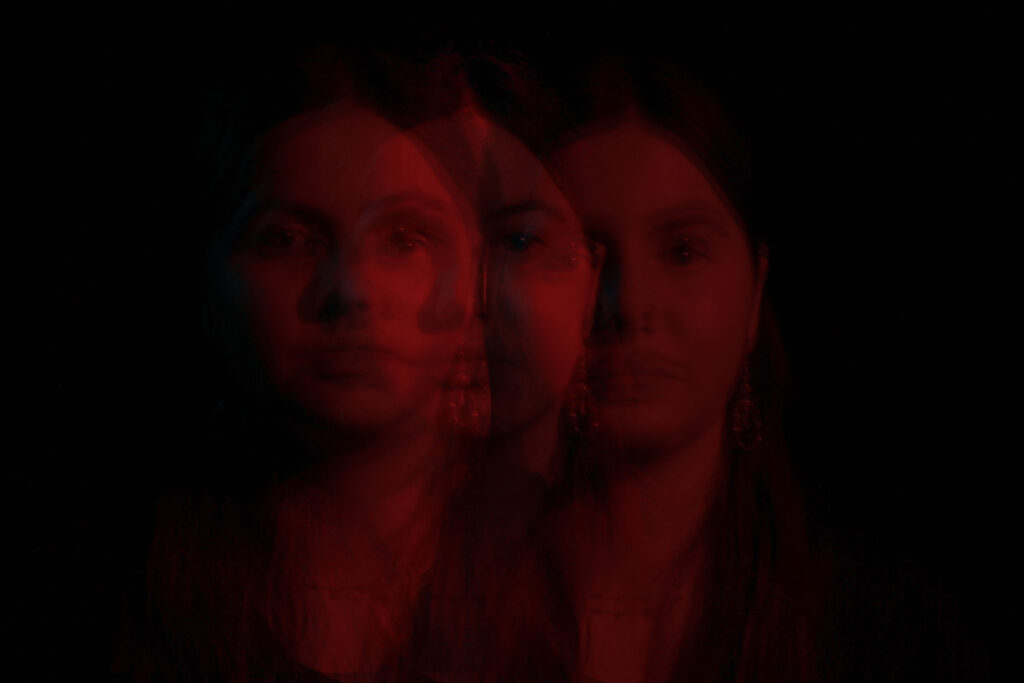
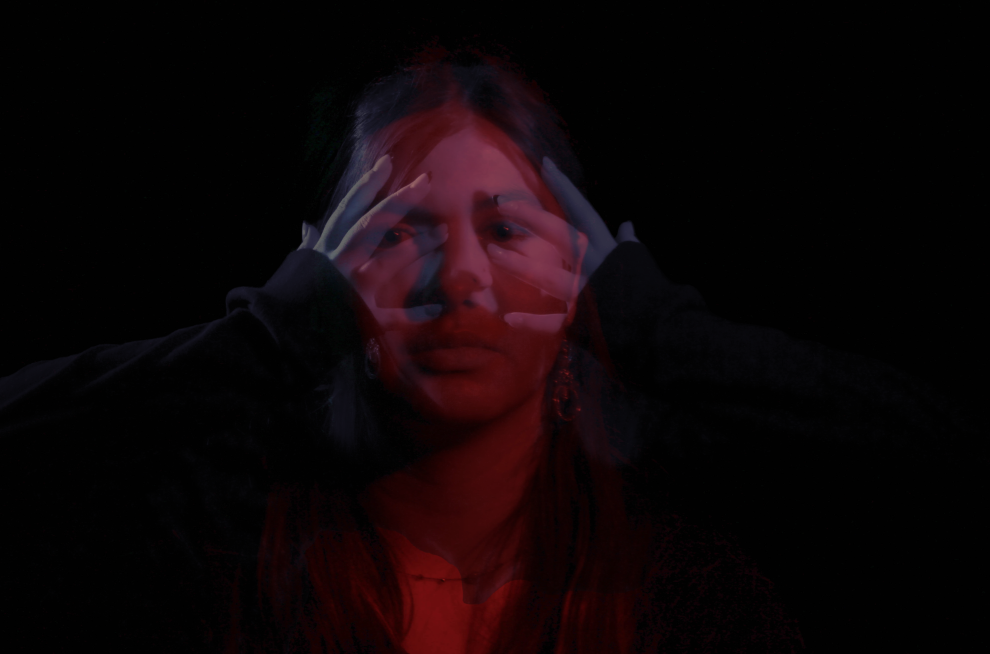
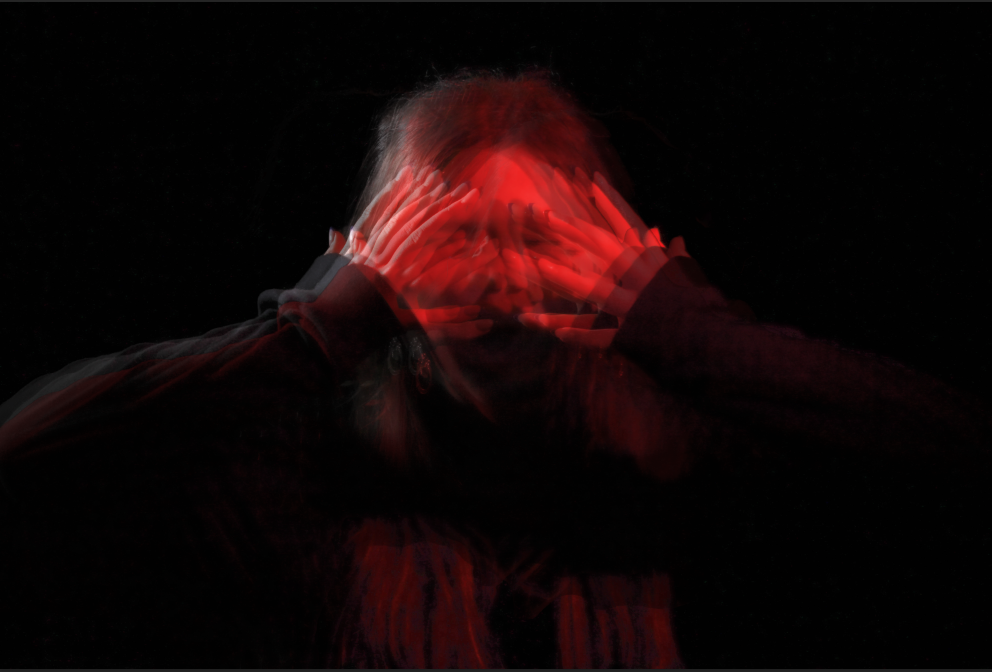
Double Multi-Exposure

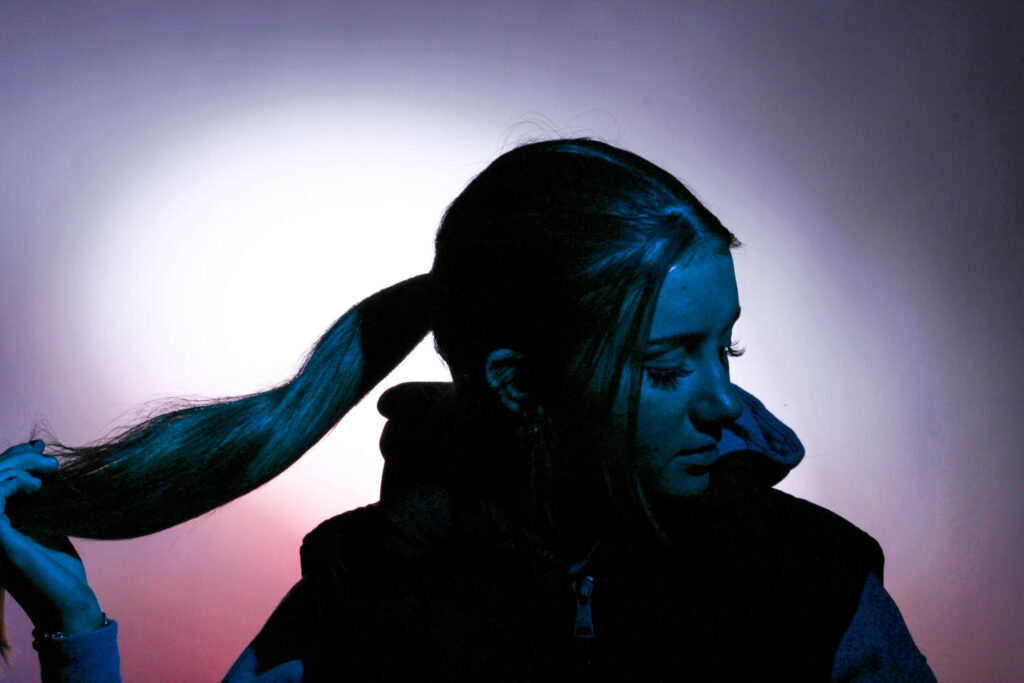
These are the two images I am going to be using for my Multi-exposure photographs, because they are similar, but also have a very obvious difference, which is how the model is using her hands to pose.

I edited this photos to make them brighter and have a greater exposure. I did this by increasing the exposure, contrast, shadows, vibrancy, texture, clarity and saturation, while decreasing the whites and highlights.

This is my first attempt of a double multi- exposure photograph. I created this on photoshop, by firstly layering my two chosen images on a plain background. I select one of my layers then adjust the opacity of the one layer, so it is more transparent. Then I position the more transparent layer on top of my opaque layer where I want it.
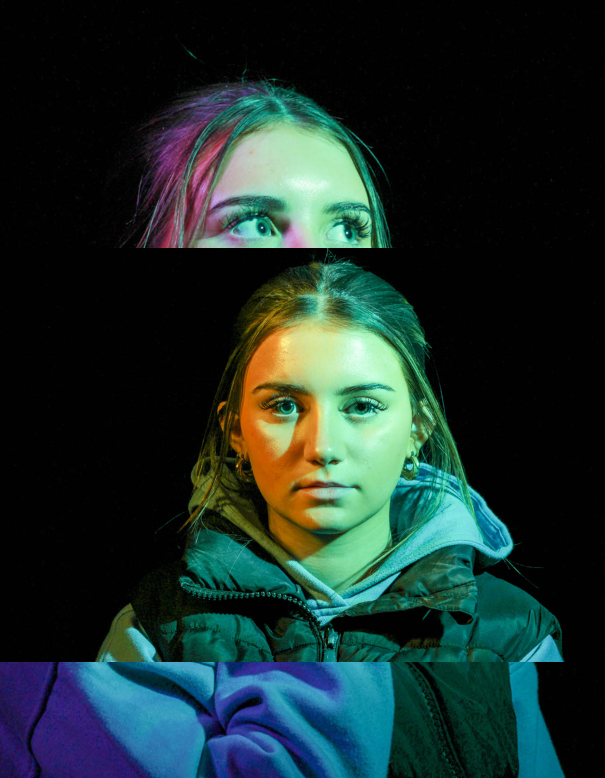
Juxtaposition

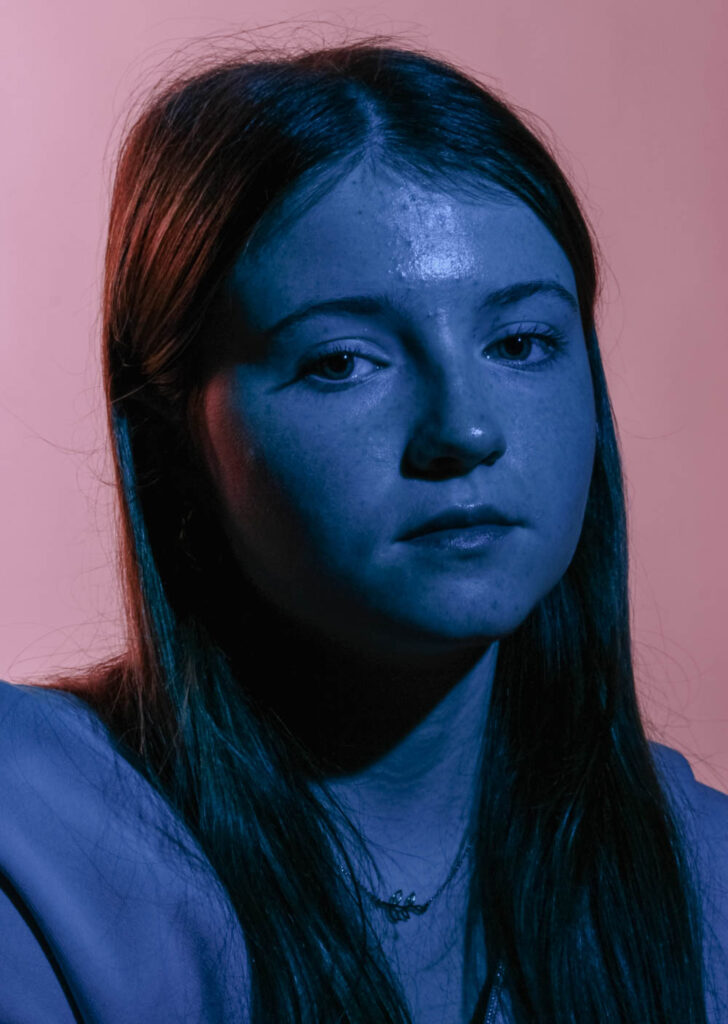
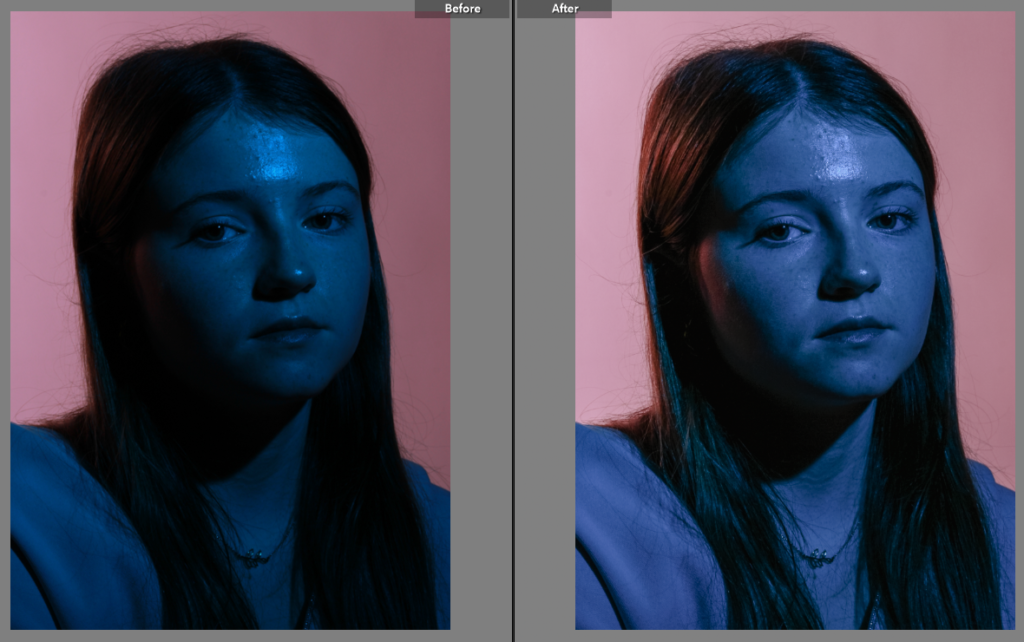
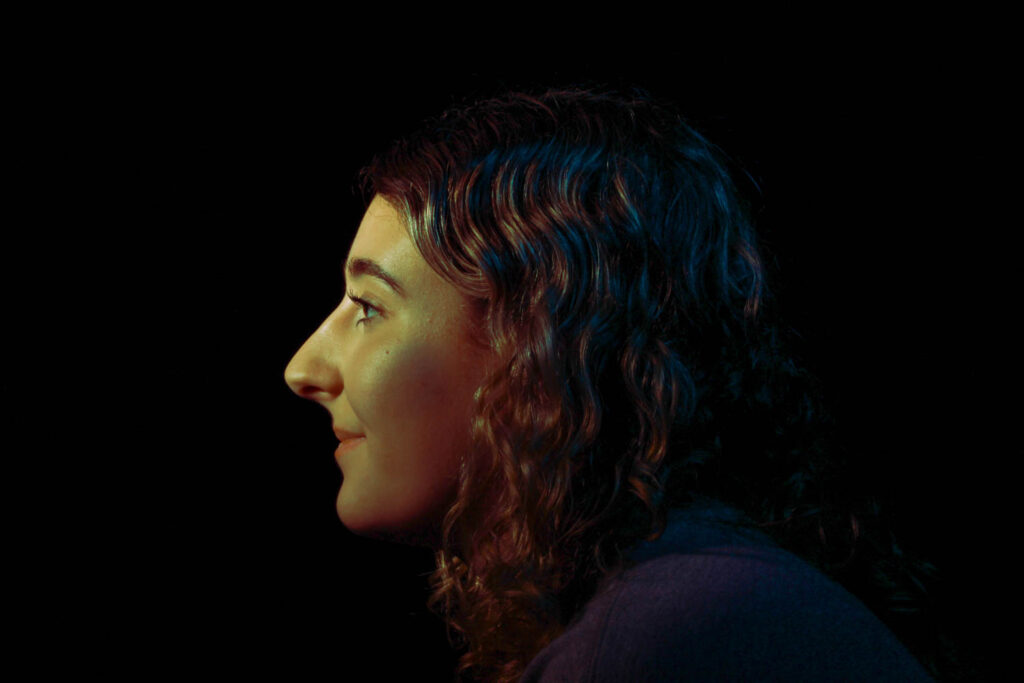
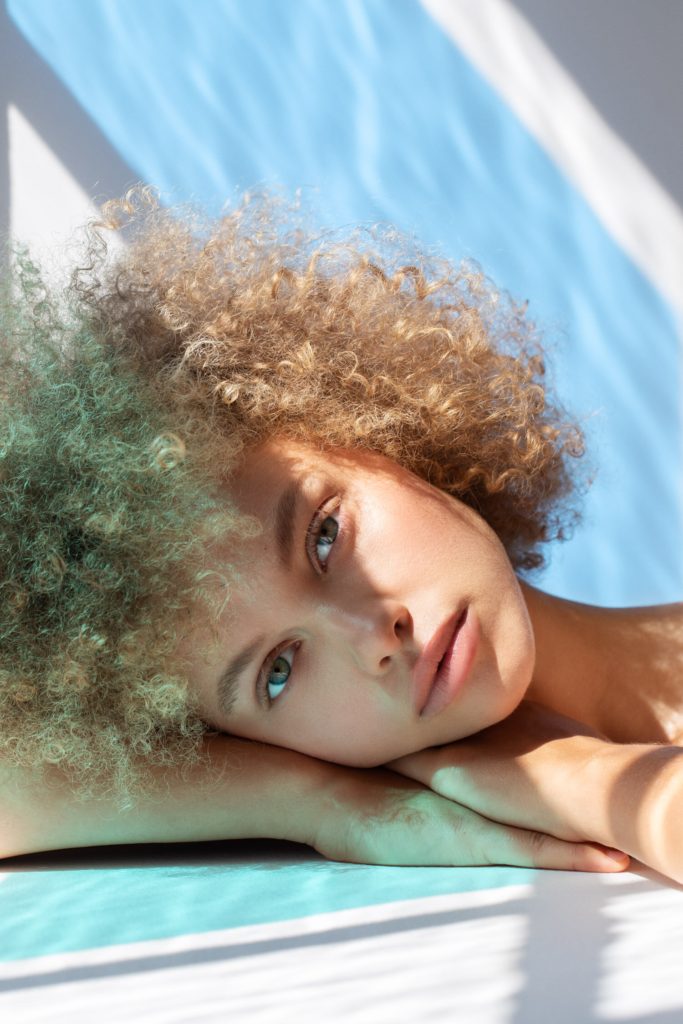
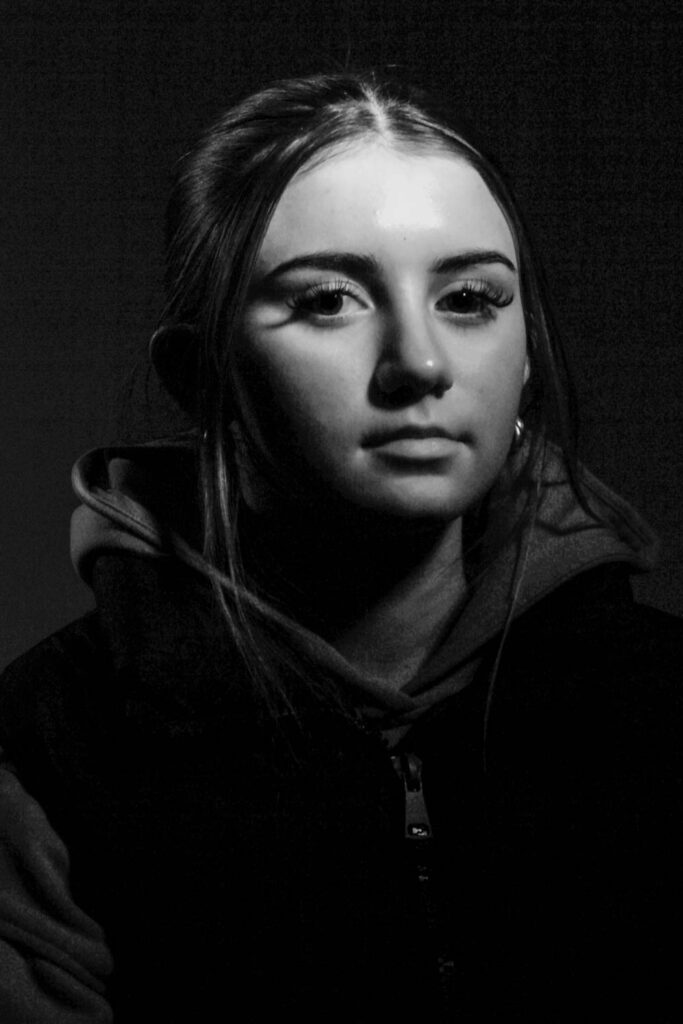
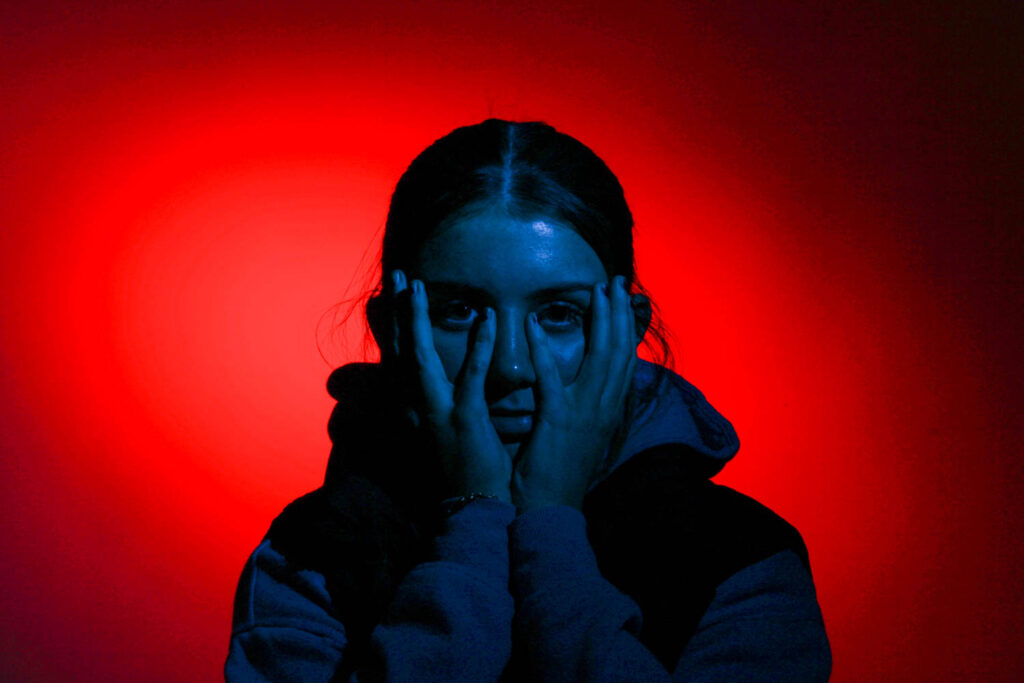
This is the photo I have chosen to edit for my juxtaposition photos, because it has a good composition and is a close up head shot.

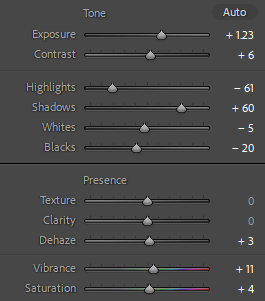
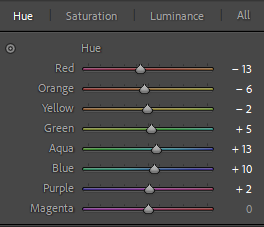
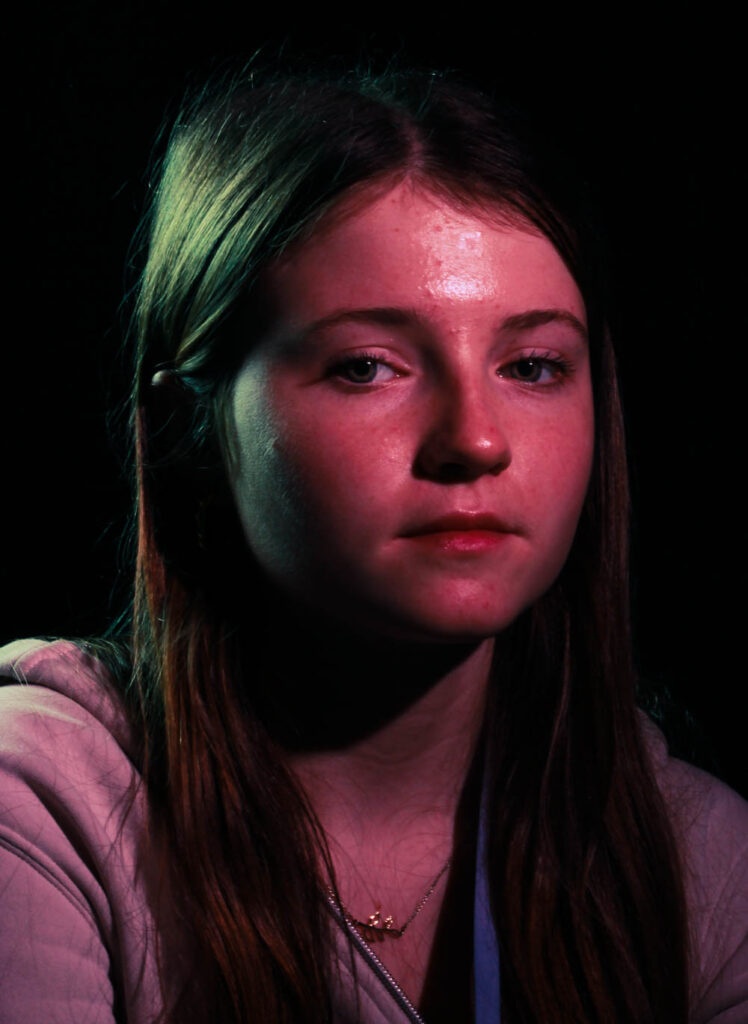
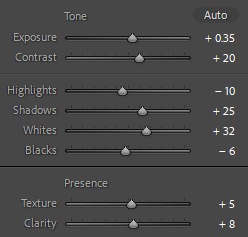
I edited this photo to make it brighter and have a higher exposure, so the model would be more visible and so the image would be less dark. I did this by increasing the exposure, contrast, shadows, whites, blacks, texture, clarity and vibrancy, while decreasing the highlights and saturation.

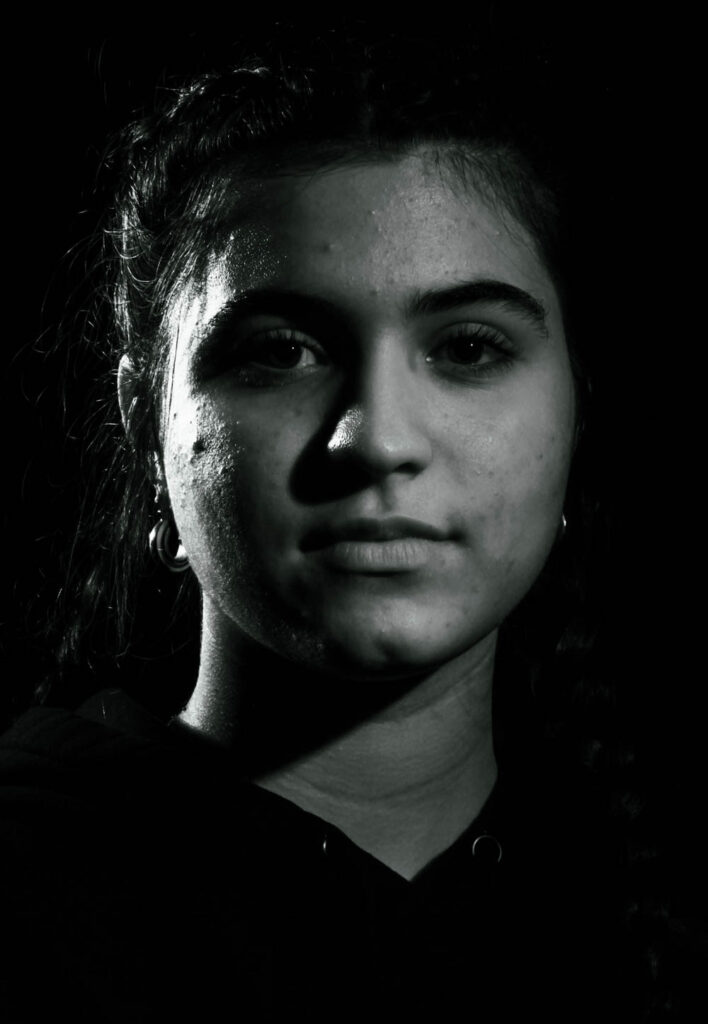
I then made a virtual copy of the edited photograph and created a black and white version for my juxtaposition.
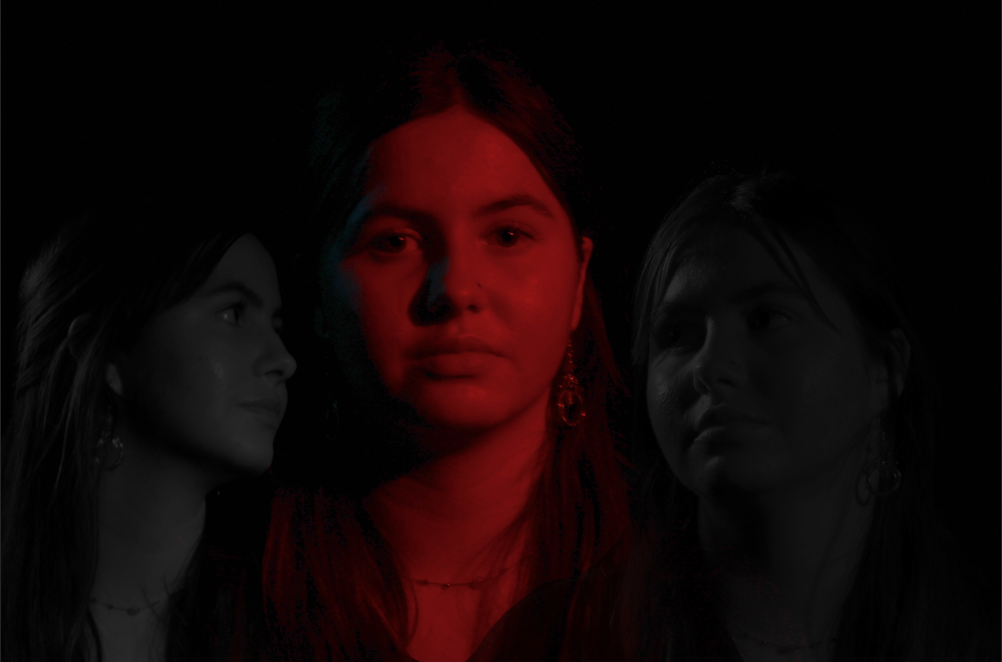
Sequence/ Grid

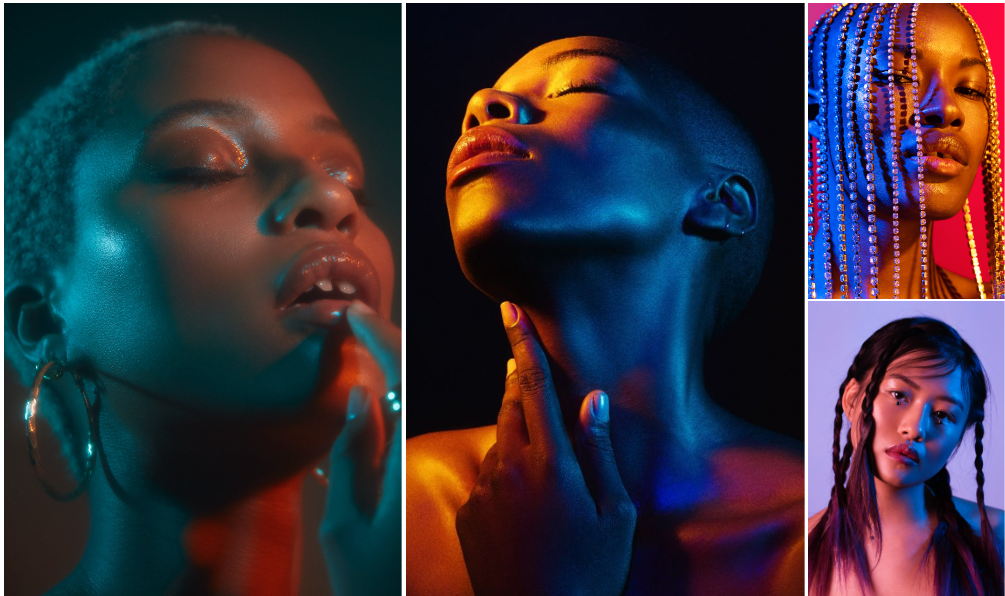
These are the images I have chosen to edit, because they are my top 9 photographs. This is because they have the best compositions, poses, lighting and editing skills.

I edited this image to make the models face brighter and for the image to have more exposure, so the model was more visible. I did this by increasing the exposure, contrast, highlights, shadows, texture, clarity, vibrancy and saturation, while decreasing the blacks.

I edited all these images to make them brighter, so the colours used to photograph with pop more and are more vibrant and colourful. I did this by increasing the exposure, contrast, shadows, whites, vibrancy and saturation on them all, while also decreasing the highlights and blacks. I also used the brightening tool on the models eyes in all of these images, so the eyes would pop and stand out more.

Montage

These are the two images I have chosen to edit and use to create my montage, because they have the best composition, poses and lighting.

I edited these photographs to make them more vibrant, so the colours pop more. I did this by increasing the exposure, contrast, shadows, vibrancy and saturation on both, while decreasing the whites and blacks. I also used the brightening tool to brighten the eyes of the model, so they stand out more.

Headshots photoshoot and My diamond Cameo

I conducted a photoshoot in the studio using a honeycomb head and snout head on the lights, putting coloured gels in front of them to give me a more dynamic lighting style instead of an ordinary white and yellow-toned light. I played around with different colours, placements and angles of my subject whilst also using a white or gold reflector so that the light would bounce into my subjects eyes as they are the most compelling section of a persons face.

My best images:

My favourite image:

This is my absolute favourite image as I have added in a creative aspect to it. I took the circular coloured gels out of the snout light and chose 3 colours that complimented each other well: red, orange and yellow. I placed them into my subjects hand as she rested it on her face as I felt it would look more natural and genuine. I really like the way this turned out as the shapes aren’t entirely opaque so that her features have still been brought through but in a completely different colour. I put a green gel into the snout light and used a very pale yellow on the honeycomb light as if I used a bolder coloured this would’ve ruined the illusion I was aiming to create. I used a black curtain behind my subject as this meant she was the focal point of the image and made it look more dramatic. I didn’t have to edit this image very much as I shot it quite well.

After this, I opened all of these into Photoshop where I created a Diamond Cameo using inspiration from Henry Mullins. Unlike him, I created mine in a more modern way as the colour in my photos would not work aesthetically with an old-fashioned style background.

Diamond Cameo:

I added shadows around the bottom and highlights at the top as this creates an illusion of it being framed which is what a Diamond Cameo looks like. Instead of filling the background with a block colour, I decided to fill it with a gradient from white to black, reversing the style of the ‘frame’ around the images, I really like the contrast in this. I chose the use monotone colours because I didn’t want to wash out the saturation of my images, using these more bland colours means that my images pop out to the viewer and catch attention a lot more because they look entirely different to the background as they have bright and bold colours. As the background of the images are black too, I feel like it gives a mirror effect as the background is dark too, making the image not only more mysterious but it points out the colourful lighting used and my subject a lot more.

Angela Marklew- Headshots

Angela Marklew is a photographer who mainly focuses on portraiture, in particular the headshots area of it. Marklew was born in Canada however she now takes residence in Los Angeles. Marklew takes multiple different types of portraiture photos however the ones which I particularly like are her coloured gels photographs. She also takes photos for beauty as well as advertising.

Analysis:

In this photo there is a woman holding an orange leaf, this implies it has been taken during the autumn time. Along with the orange leaf there is also orange makeup added to the model’s cheeks to enhance the colour and make the face stand out with the leaf. Angela Marklew’s photos often have a soft look to them which is demonstrated in this photo. this is created by using soft pastel colours rather than harsh bright ones which would stand out against each other too much. By removing majority of the background from the photo Marklew is able to make the model the main focus of the photo. This was also done by using a white background and a white shirt as this causes them to blend together rather than standing out and taking any focus away from the models face. There is a warm tone to this photo due to the warm orange and yellow tones in the leaf and the cheeks of the model as well as the hair colour.

Analysis 2:

This image has an empty alt attribute; its file name is image-1333-683x1024.png

This photo is also of a woman however it is not of her full face despite the face being the main focus. Due to half of the face being out of the photo an interesting composition is created. In contrast to the previous photo this one has more of a cooler tone due to the cool tone of pink used on the cheeks and the models blue eyes. This photo also has a soft look to it due to the way that the model blends into the background in the top right section of the photo.

Planning a response

To respond to Angela Marklew’s work I will be using coloured gels to create pictures inspired by her coloured gel photography. I will take these photos in the studio as I will need to use the lighting set up.

Headshots and Diamond Cameo Gallery and Evaluation

My diamond Cameo final presentation and evaluation.

This was my first diamond cameo, I really like the photos and i edited them slightly in Lightroom which added more affect and depth then before, What I don’t like is that its a bit basic and the top and bottom photo are very similar and aren’t different angles its just the facial expression. In some ways I do like that they have different facial expressions as it can tell more of a story of the kind of guy he is, whether he is tough or soft and happy or sad and the viewer has more to interrupt.

For my second diamond cameo I wanted to try something different but used the same photos, this is because in the first photoshoot I take enough different ones and need to take more next time. I edited them in grey and while to give them an old affect that was inspired by henry mullions. I also think it told more of a story, to continue to add this affect I added texture on photoshop to look like the same vibe from old photos once again. I like this but I also think there is too much of the texture and it is hiding the face more.

What I love with these photos is I really started to improve and I did the things that I didn’t like and changed it to make these ones better, I like that all the photos are Edgar going in different directions and it has a yellow tint now to give the coffee spilled affect and oldie look, it also has a slight bit of texture that’s fuzzy but not too much so you can still see the face and the texture given so it can tell its story to the viewer.

What I don’t like is that I should have fixed the contrast ad exposure more as there is a lot of dark shadowing on too much of his face.

This is my final diamond cameo which I loved with the lighting and the different angles but I think it was still boring with no editing and different texture and the oval was cut too tightly around the heads with not much space of the backgrounds.

I liked these photos and mainly wanted to experiment with Photoshop editing to create different affects I had seen. I like this blurry affect on the face and was testing if I wanted it on only the eyes or mouth but then tried it on all the face and like that more. It looks cool but still not my favourite way of editing and I don’t like how it blurred.

This is one of my favourite edits, I figured out how to bring the image over more times and make it transparent in a glitchy, blurred sense , which I actually preferred then using the smudge or blur tool. I really like it but if I was to change it I would make the first image more prominent then the others so it stands out more.

This is some more new editing I was trying that I also really liked and thought looked cool I as trying to add an effect of voices or other people around her to give different meanings to the viewer. I think adding more faces might be cool or having her face in a different facial expression might work better.

I like how this photo turned out but it still wasn’t quite what I was looking for as it is a photo of Ellen with a straight face layered with a more transparent photo of Ellen screaming in a blue colour to give a cool affect that inside she is screaming but shows no emotion, yet it didn’t look quite how I picture but still gives a cool effect and now I think gives more interpretation to viewers.

This is more layering technique which I really liked gave a cool affect.

Research – Henry Mullins

Henry Mullins

Henry Mullins was a photographer who is best known for producing over 9000 portraits of Jersey islanders from 1853 to 1873 at a time when the population was around 55,000. Henry Mullins started working in London in the 1840s and moved to Jersey in July 1848, where he set up a studio and would photograph Jersey political elite, mercantile families, military officers and professional classes. In the record of Mullin’s work, he placed his subjects in a social hierarchy and it is highly politicised.

The portraits taken by Henry Mullins were printed on a carte de visite as a small albumen print, which was a thin paper photograph mounted onto a thicker paper card, and he mounted these prints into an album.

The card photographs became immensely popular because of the small size and affordable reproducibility, and cartes de visite were commonly traded among friends and visitors in the 1860s.

mind map/mood board

masculine photography outlines the way a man is represented in stereotypes such as men being strong, powerful and smart, the photos capture the strength of these men and create the effect to show how strong and powerful a man is in comparison to woman.

femininity in photography outlines the stereotype of women being weaker and the more emotional gender of society while also representing how independent and hard working women can be.

Introduction on Headshots

Headshots are a type of portraiture photography which are usually used for websites, press releases, publications and social media profiles. The term ‘Headshot’ just means that the photo is cropped in order to make a persons face the main focus of the photo rather than the space surrounding them. People use headshots usually to capture peoples individualism and personal brand.

Masculinity vs Femininity – Context

The concept of identity politics and culture wars in photography is an important aspect to look at. This is because it studies your administrative identity combined with your physical characteristics, such as your date and place of birth. A photographic identity allows you to reveal yourself, to stand out among the crowd of photographers, to ensure your individuality and your irreplaceable artistic fingerprint. I believe this is extremely beneficial for modern day photography as it allows each and every person to decide how far they want to take either the masculine or feminine approach in their photographs. Identity politics also aims to eliminate negative misrepresentations (stereotypes) of particular groups that have served to justify their members’ exclusion or assimilation to the point of erasure. A great example of this is identity politics in the United States, which developed in the 1980s and ’90s as a reaction to the perceived failure of liberal civil rights legislation to eliminate identity-based inequities, such as racial and sexual discrimination. In the view of many critics, liberal ideals of equality, such as equal rights were misguided because their transcendent nature made it difficult in practice to justify policies designed to achieve greater social equity exploited groups, particularly African Americans. Indeed, during this period conservative activists and government officials frequently invoked the liberal value of “colour blindness” to resist racial affirmative action programs in education, employment, government contracting, and other areas.

Identity politics

Identity politics is politics based on a particular identity. Some examples of this are

  • Race
  • Nationality
  • Sexual orientation
  • Religion
  • Gender
  • Social background
  • Social class

Culture wars

In political science, a culture war is a type of cultural conflict between different social groups who struggle to politically impose their own ideology (beliefs, virtues, practices) upon their society. An example of a culture war is the gamergate controversy.

Impact on society

These stereotypes and identities had a very large impact on society because over recent years society has adapted to these changes, and they have become known and believed worldwide.

Just another Hautlieu Creative site