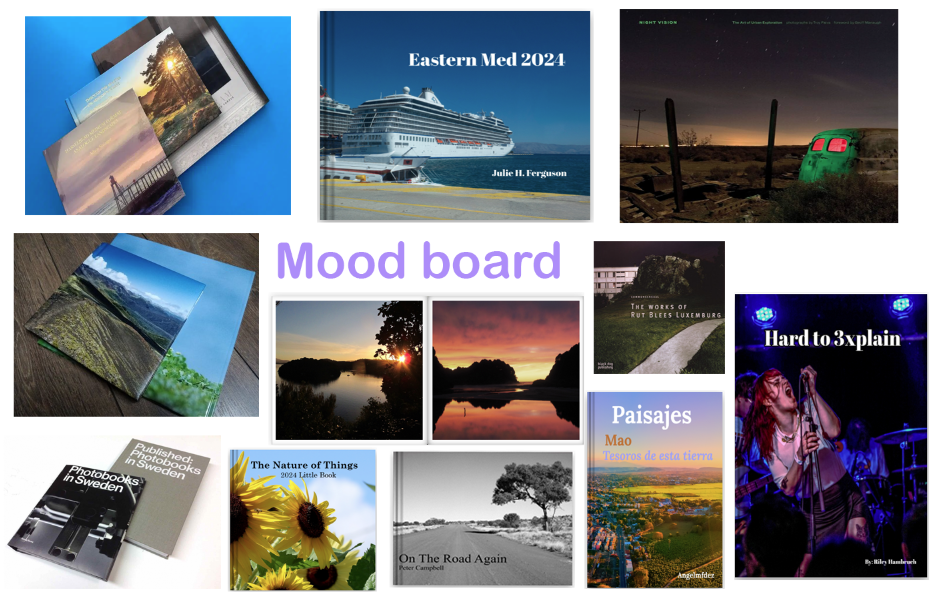
Overall I am really happy and pleased with how my project turned out including the photos/final images/ photography book as I think it all looks really good and it all turned out in the end way better than I expected.
My 5 final/favourite photographs
Final photo Evaluation
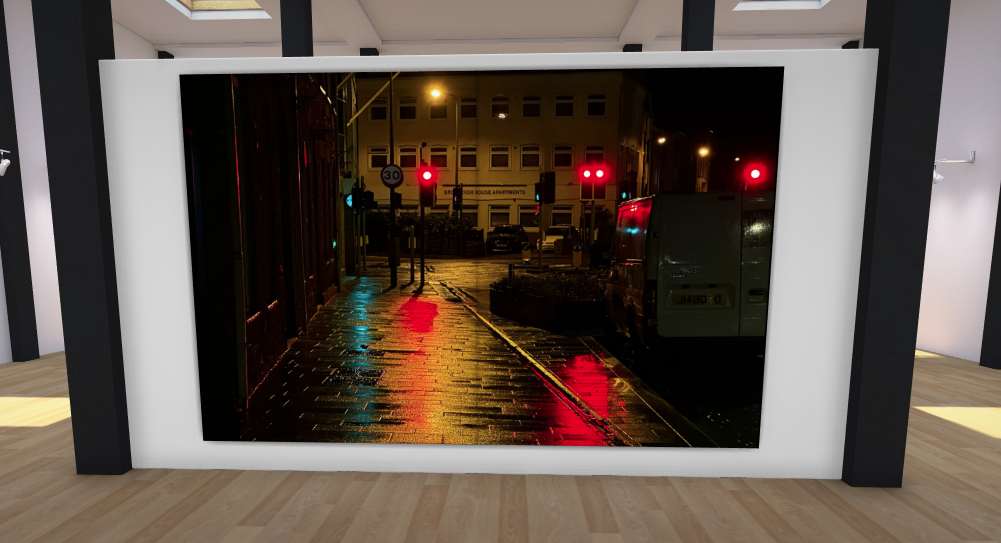
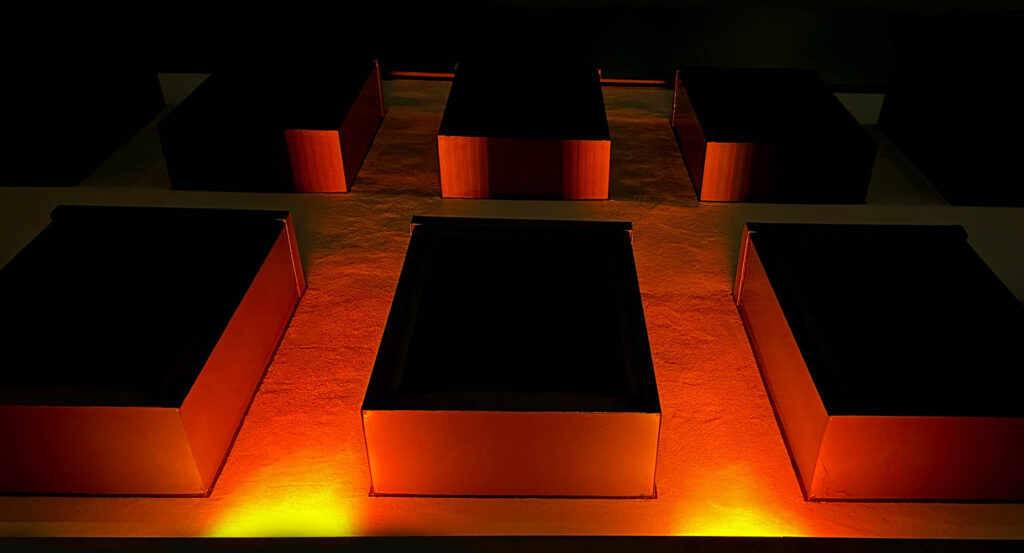
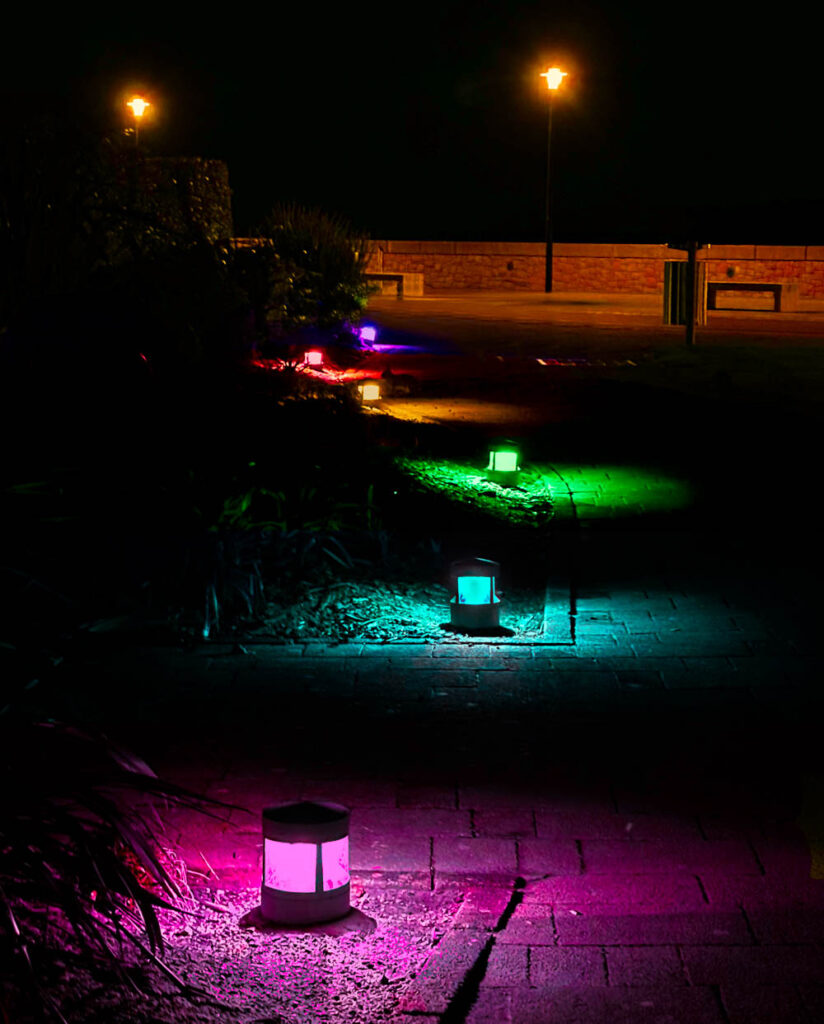
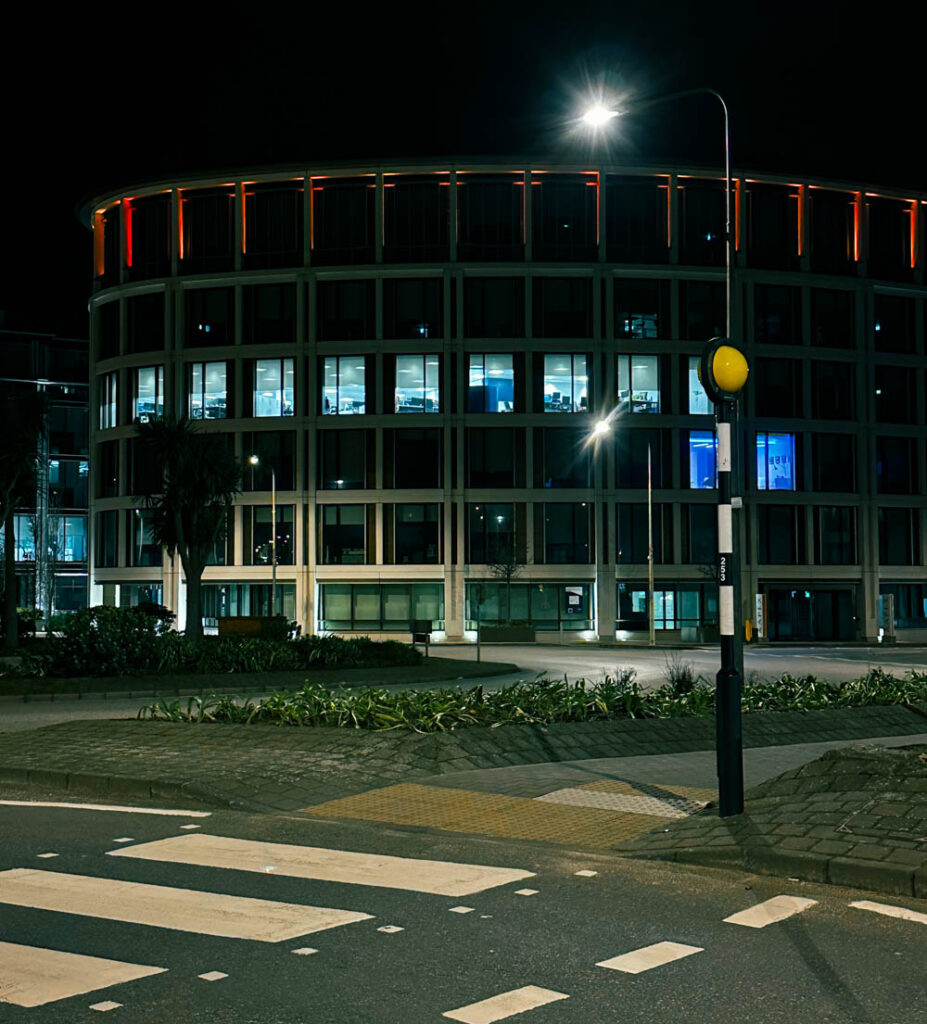
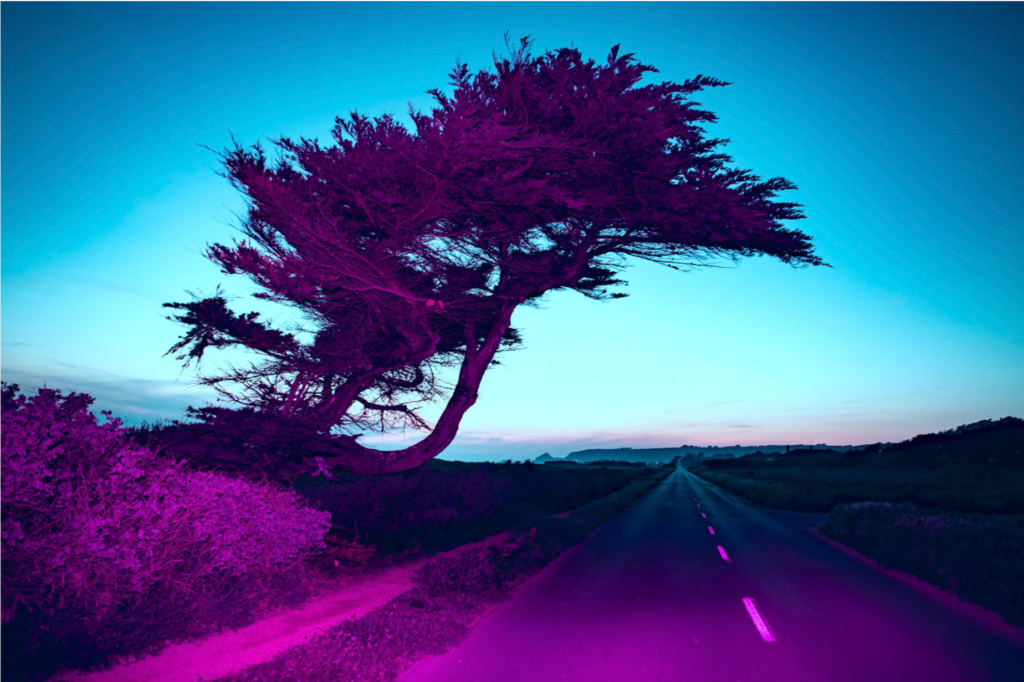
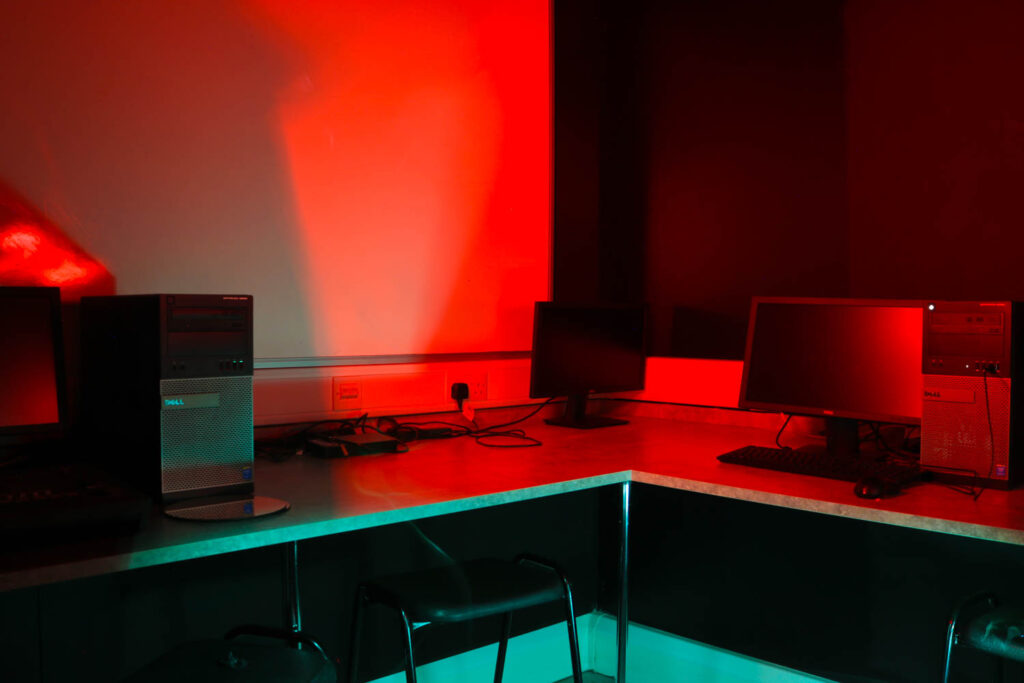
Out of my images I would say this is my final and most successful as the coloured lights make the area more beautiful especially as the lights make the building and floor more colourful. It also has a big impact if they were replaced with cold white lights like the ones along the avenue it would look no ware near as nice and instead be more cold and dull.
It is also like my artist inspirations I chose like in the photo below by Benoit Paillé where he uses colour to illuminate the floor, which makes it look vibrant and beautiful like how the coloured lights in my photo make the floor all colourful and beautiful. As well as Will Lakeman’s photos like in his series ‘lurking in darkness’ which was a great inspiration of mine, such as the photo below where the red light from the sign illuminates a nice red glow on the building and ground which looks beautiful and add colour and vibrancy to the photograph.
Benoit Paillé – ‘Surreal Mexico’Will Lakeman – ‘Lurking in darkness’
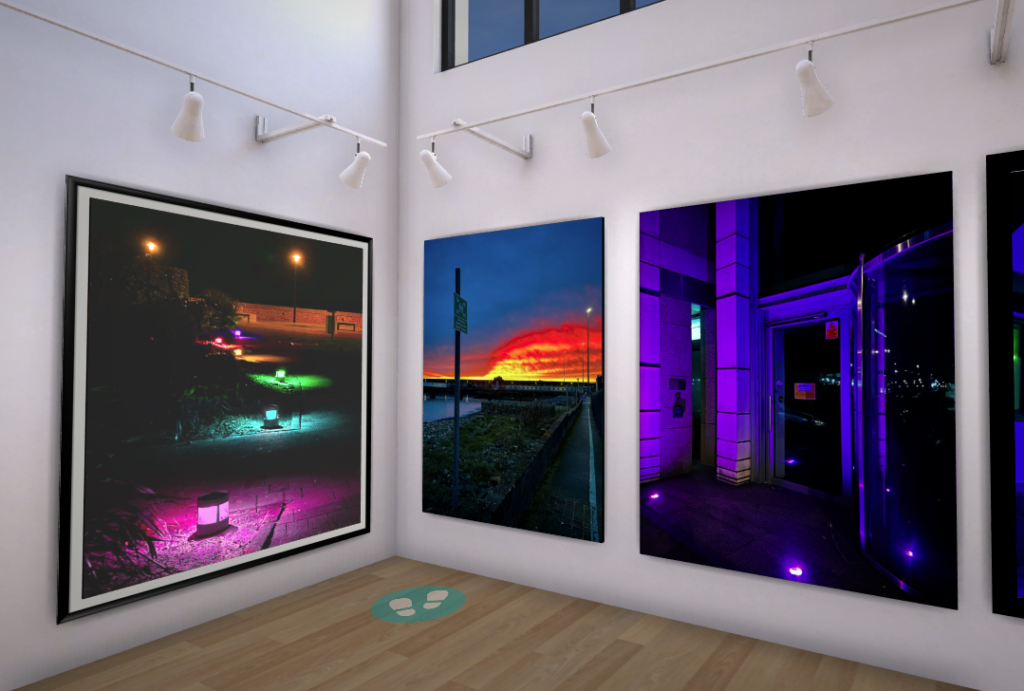
Virtual gallery
Below is my Virtual gallery I created to showcase my final and favourite photos from the project.
I wanted to create a double page spread for this photo because I feel like it deserves a whole page and it wouldn’t have as much emphasis on only one page.
I like the way this portrait image has a whole page to itself as the image feels lonely and isolated so it works well on its own page.
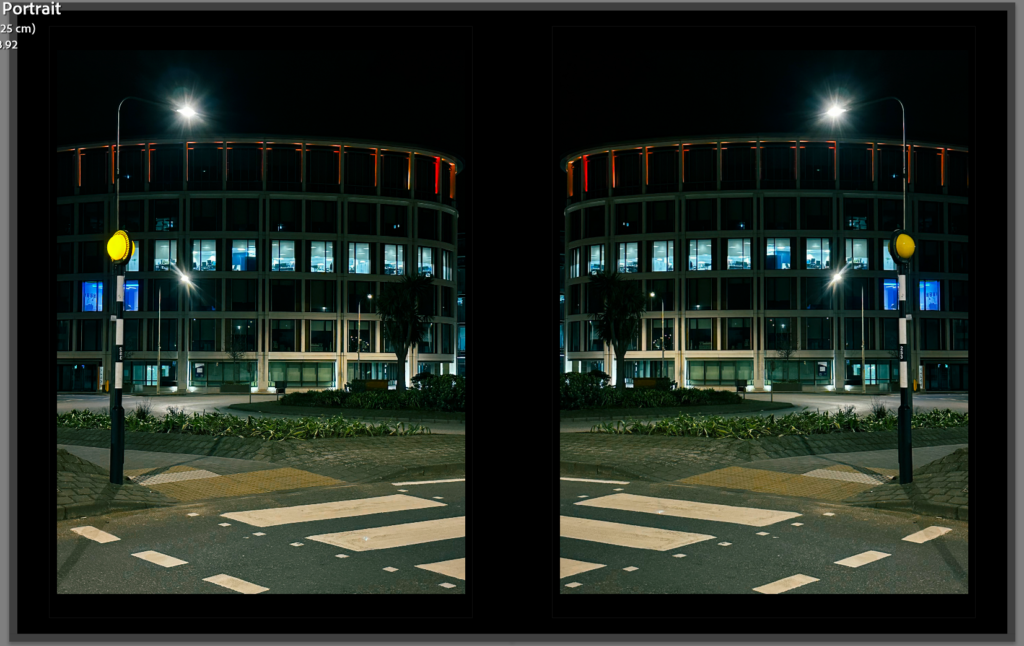
This image here was originally a full page spread, however there was a bit cropped out which affected its composition so I slightly narrowed it so there is a bit of black on the left and the composition isn’t affected now
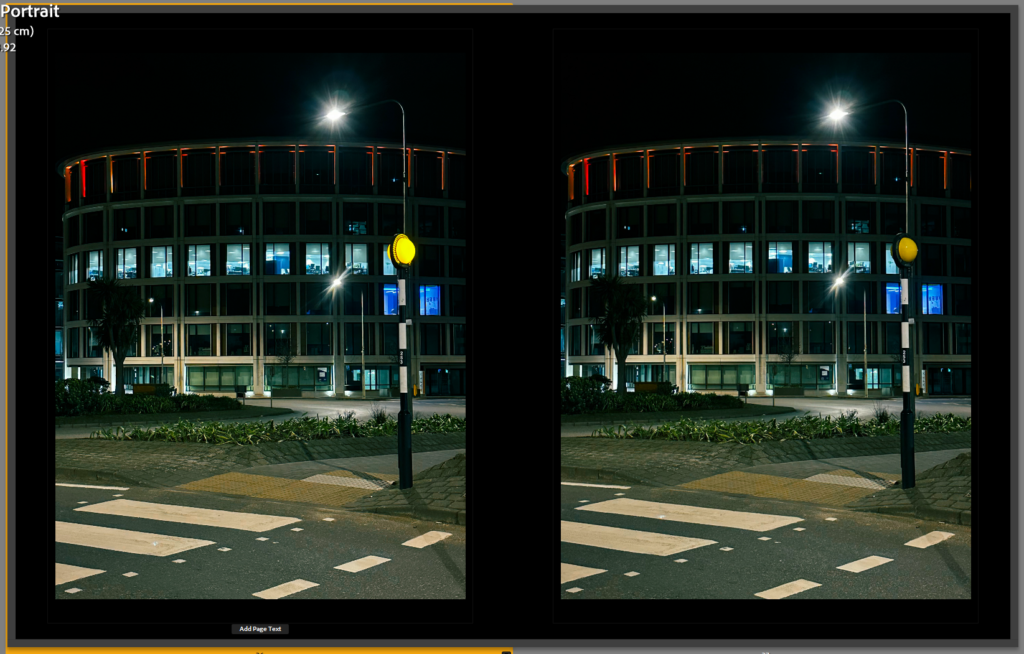
Left photo Flipped
I didn’t know what photo to put on the left but i felt it needed a photo there so I realised I had the same photo of the building but with the beacon light on so I applied the exact same edits I did to the original photo and put it on the left and I think the photos work well together. I tried experimenting by flipping the photo on the left , however I did not like it as much so left it how it was.
Designing the front and back cover
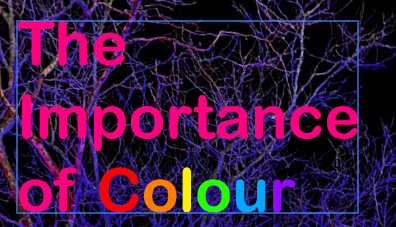
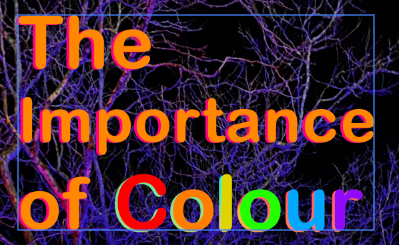
I went into photoshop to design the text for the front cover, I was originally going to make all the text rainbow but I really like this pink and think it contrast well with the blue trees on the front cover and having just the word ‘colour’ in rainbow works so much better and provides meaning/emphasis to the word colour. I chose Arial rounded MT Bold as it is my favourite font and it is really smooth and simple as I don’t feel my photography book needs a really over the top serif font
I tried positioning the text on the right but I wasn’t really a fan of it and think the front cover composition would look way better with the text on the left
I was going to add a glow but whilst I was experimenting with It and the composition I made a copy of the text, then I thought what would the text look like if I made it the colour #F80 (#FF8800)? as I really like using this colour and I use it a lot on my website and other personal projects. It would also contrast really well with the blue on the trees, so I placed it on top of the original pink text and it made this really nice drop shadow effect which I really love. Now I just need to come up with something for the text ‘Colour’ but I have this idea to do the drop shadow effect but with the colours reversed.
After a lot of attempts of adding a drop shadow to the front cover I experimented by adding a gradient one and I eventually settled on a rainbow one (seen below) as the other ones didn’t work as well.
This is the end result of the front cover and I am very pleased with how it turned out.
The essay at the end of the book
I began transferring the essay into the book and I think it looks good with the white text on black paper, I also changed the colour of some words which mention colours as it fits the theme of colour, it also looks good and makes the essay more engaging to read.
A sentence: show how colour makes the world more beautiful
A paragraph: my story is to show how colour is important in a world which is becoming more grey and dull by creating colourful images to show the beauty and highlight the importance of it.
Design:
How you want your book to look and feel: I want my book to look like a real hardback book with smoothness for the cover and also a bit of weight to it as you are holding a real book.
Paper and Ink: I want my book to use Premium Lustre as it is good quality paper and also it is Lustre which mean it is a bit glossy and will give the images a shaper and brighter colours which is perfect for my book especially as it is about colour As my images are taken at night black paper would work well with the photo and overall theme.
Format, size and orientation: For my photo book want it to be Standard A4 as it is the perfect size for my book because I don’t feel like it needs to be an overly big book, and for a small book the images won’t look as good and have the same emphasis if they were tiny. I also decided on portrait for the orientation as it is good for my portrait photos and for my landscape photos can be placed on a double page spread so they fit both pages.
Binding and cover: For the cover I want to have an image wrap which goes across both sides with my name and the book title on the spine so you can tell what the book is if it is on a bookshelf.
Title: I came up with the title ‘The importance of colour’ as I want the reader see how important colour is when they see my book and ‘the importance of colour’ really sums my project up.
Design and layout: for my photos I want them to be laid out as an image per side or to emphasise images have them as either a double page spread or one image per whole page.
Editing and sequencing: For the sequencing there is no specific sequence however I would like to have my images together which I can group such as all the images of the trees with the coloured lights on them together and have all the green and purple images together rather than some being at the start and some at the middle of the book, also images which are taken at the same/similar locations can be together.
Images and text: For the images I want them to be really colourful as my book is about colour For the text I want to include a quote on the first page to give context to the photos. For the essay I want to use white text as it will contrast nicely with the black pages and have some words in colour if I am mentioning colour as my book is about colour and it will look nice make it look more interesting and engaging to the reader.
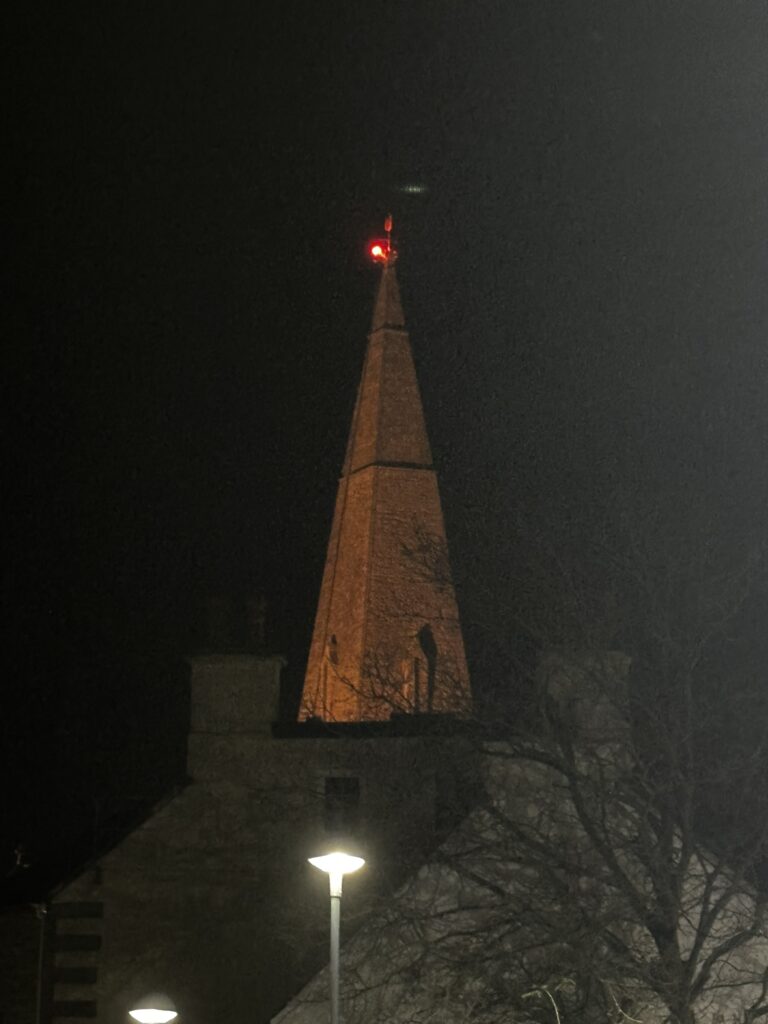
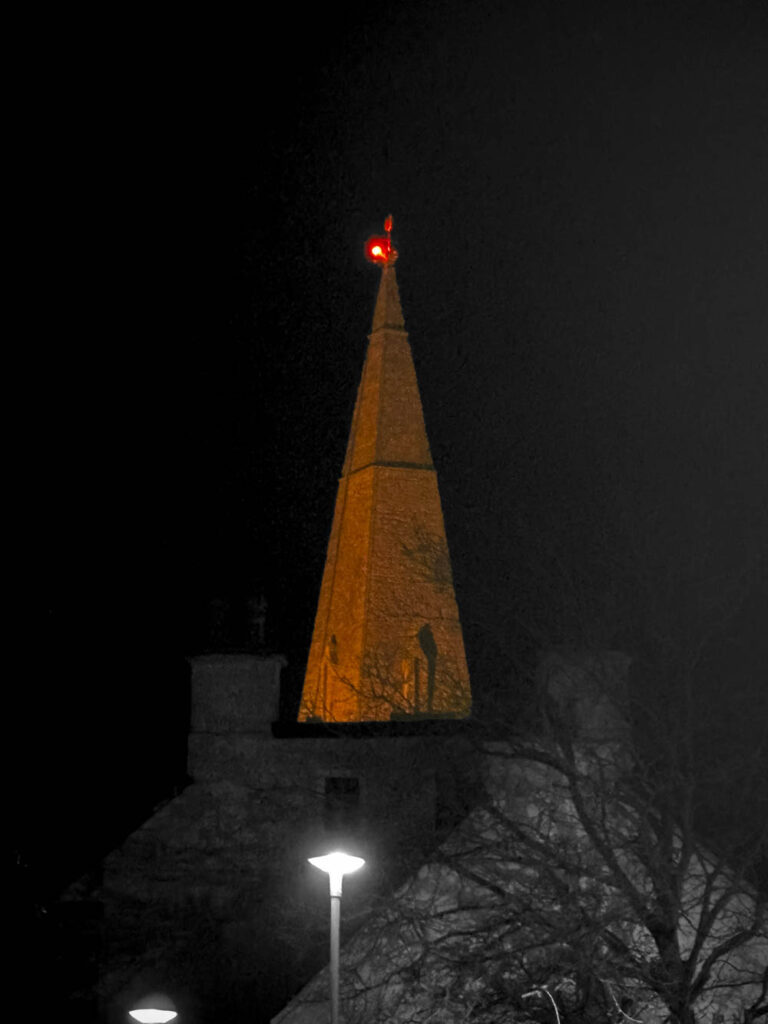
For this image of the church I really wanted to have the orange pop out so I did selective colour to make everything except the church and the red light on the top black and white. I think the image looks alot cleaner like this and it really highlights the orange church better.
To edit this photo I rotated it and cropped it so it was more level and aligned. I also slightly adjusted the colour and the contrast to visually improve the image. I really like this photo as it looks like a strange photo as there is not much context about it I also really like the orange light as it makes the photo look beautiful.
Edit
OriginalEdit
I wasn’t really sure the way I wanted this image to turn out so I decided to experiment by adjusted the contrast, shadows and colour until I turned out with this edit which I think looks so much better than the original photo
OriginalEdit
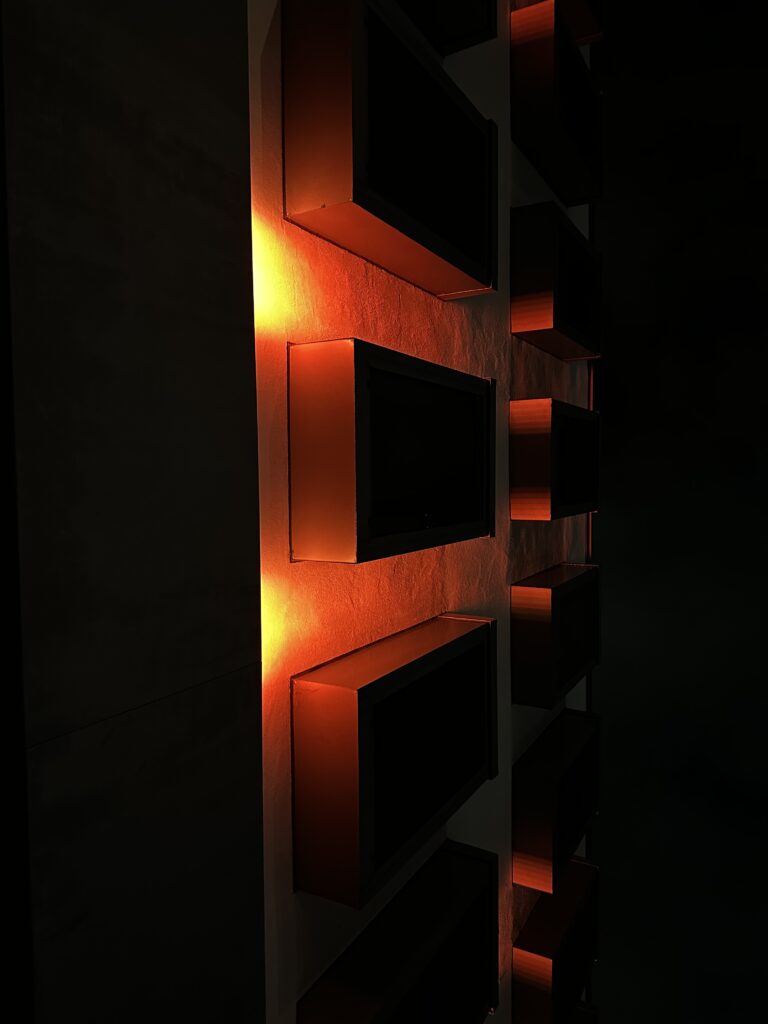
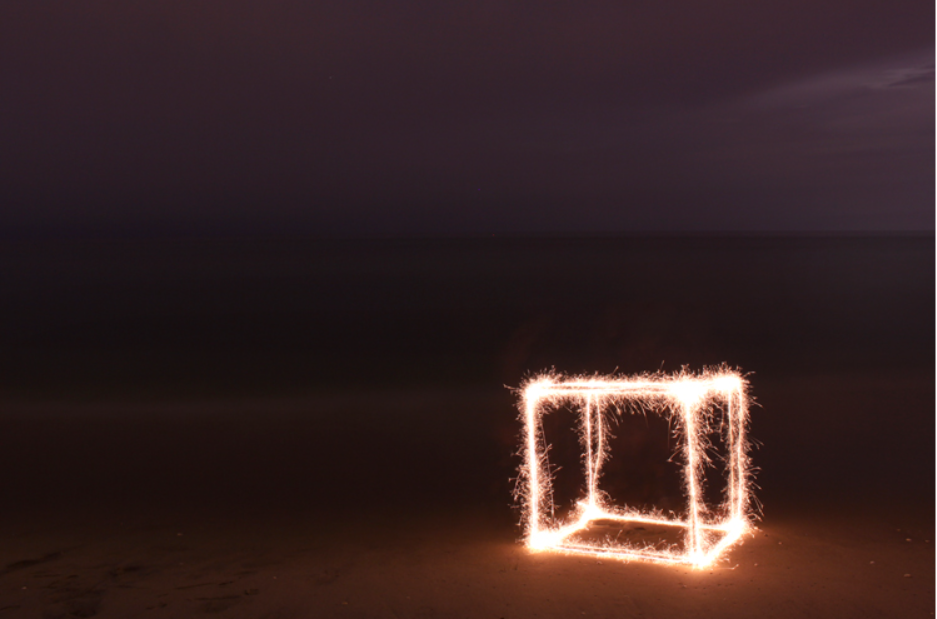
I took this image of some lights by the waterfront and I got this cool idea to make the lights different colours, so I basically divided the image into layers for each light and recoloured them using the camera raw filter which contains a wide range of useful tools. To achieve the different colours for the light I colour graded them and adjusted the hue, saturation and luminance of the specific colours. I also removed the light at the end as it wasn’t needed and was causing problems due to the other lights. I really like how it turned out and how colourful the image now is.
OriginalEdit
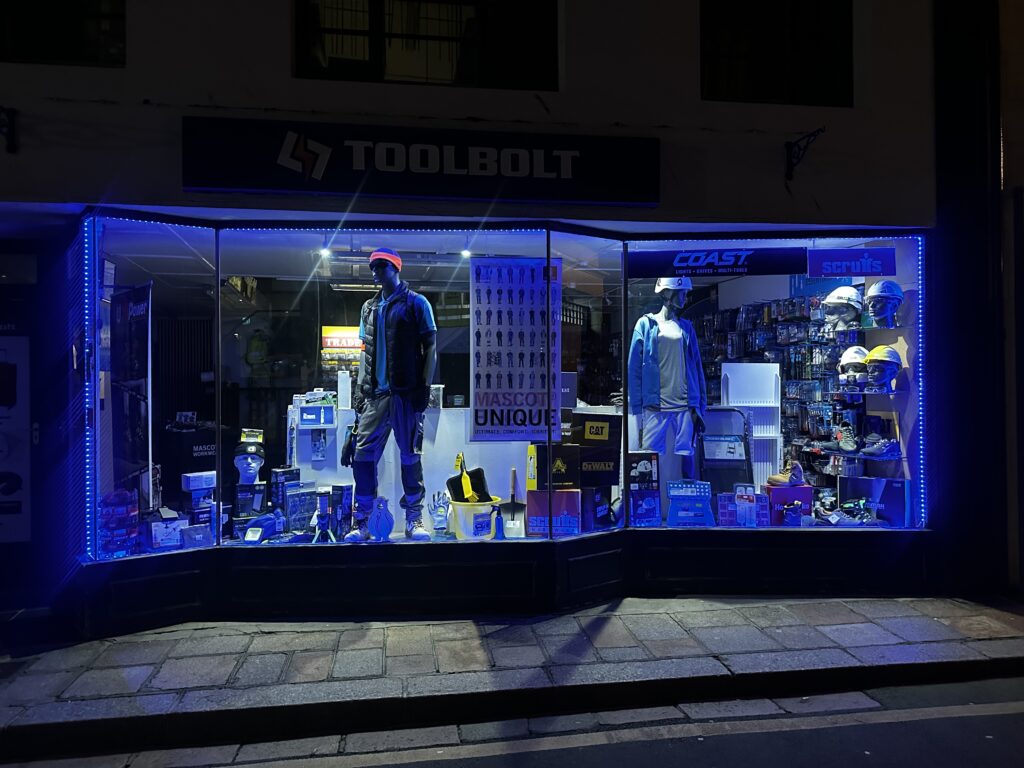
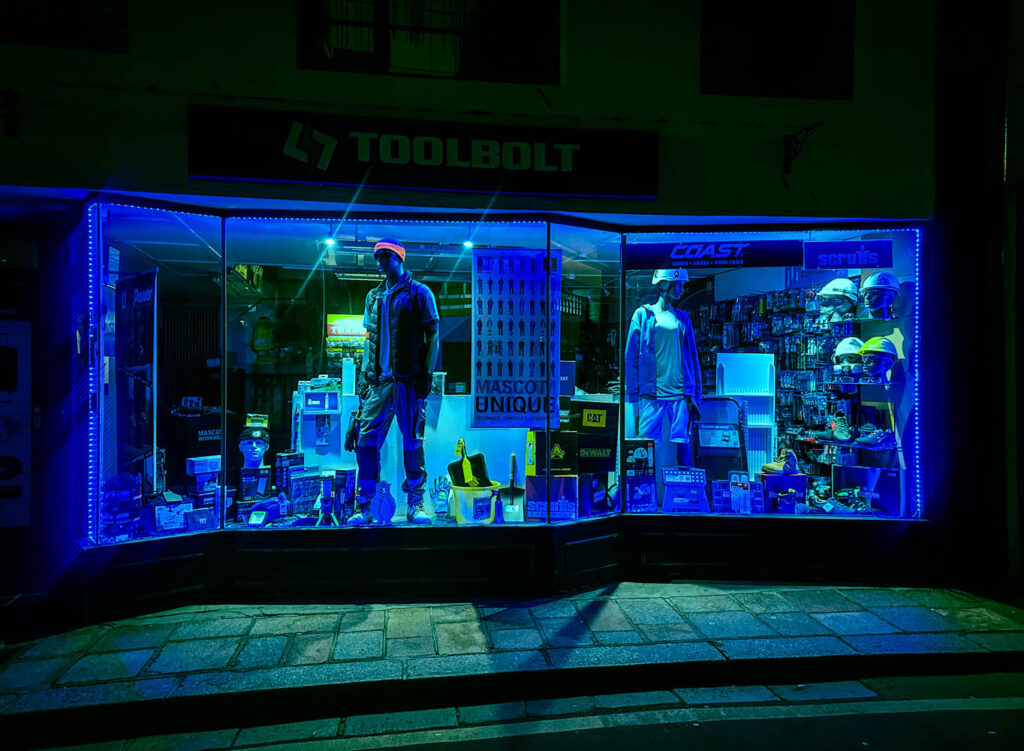
For this image I made slight adjustments to the lighting and enhanced the blue light to make it stand out more. I also added a green colour grade to the shadows and highlights which creates this nice green and blue effect in the reflection of the shop window which I think works well and looks really good.
OriginalEdit
In this photo I slightly cropped it so the building is more centred and inview, I also slightly enhanced the orange/red on the building as I am trying to show colour and its importance so I need it to stand out. I also added this greenish colour filter which give the image a cool/coldish feel and looks quite good.
OriginalEdit
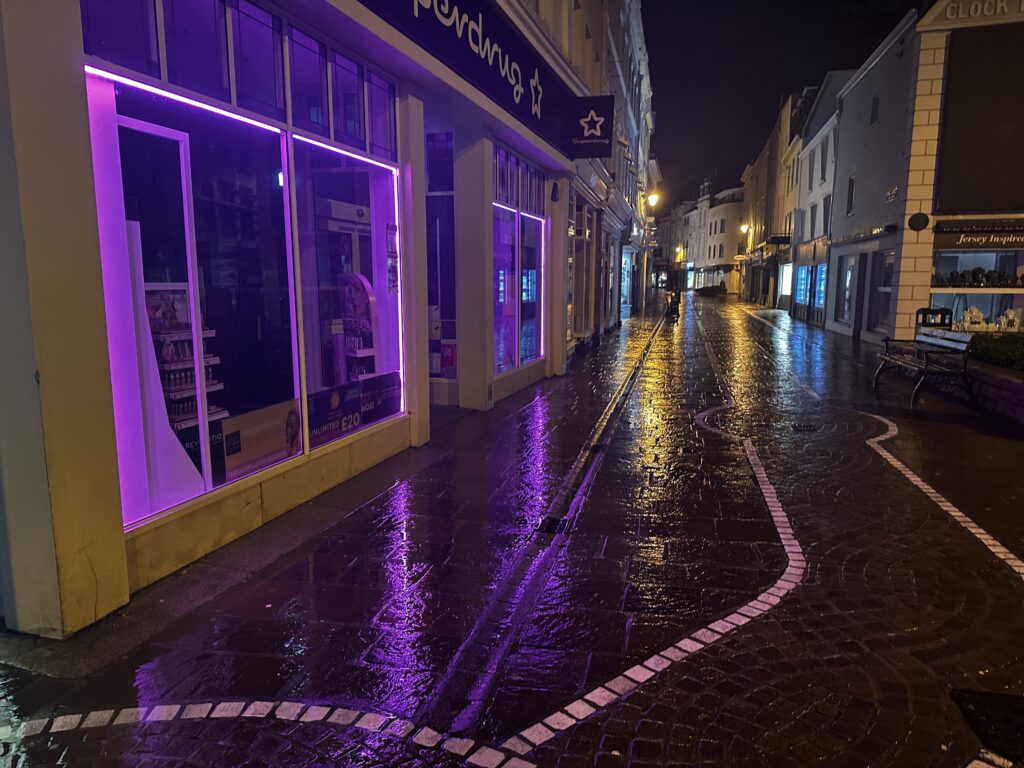
In this photo I increased the Vibrance and Saturation to really make the colours pop and look even more beautiful. I also slightly adjusted the lighting to make the blacks and shadows more stronger. Overall I really like this photo because the reflections on the wet pavement are really nice and the photo really shows why colour is important in our lives as colour helps to create a vibrant and less dull world.
OriginalEdit
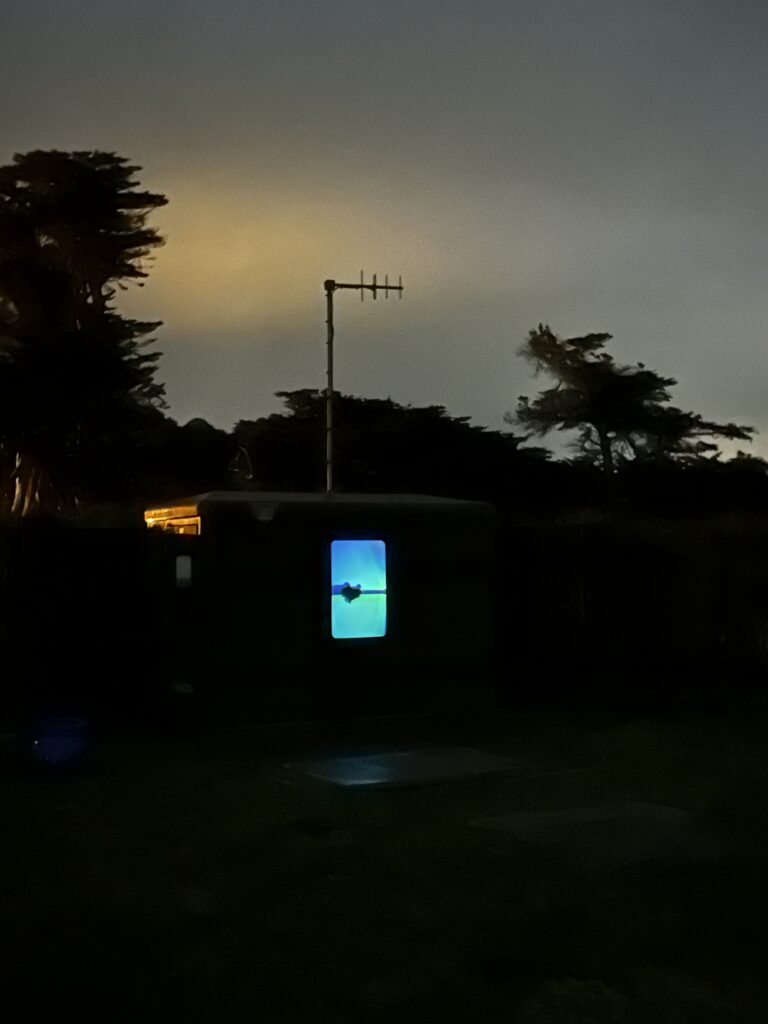
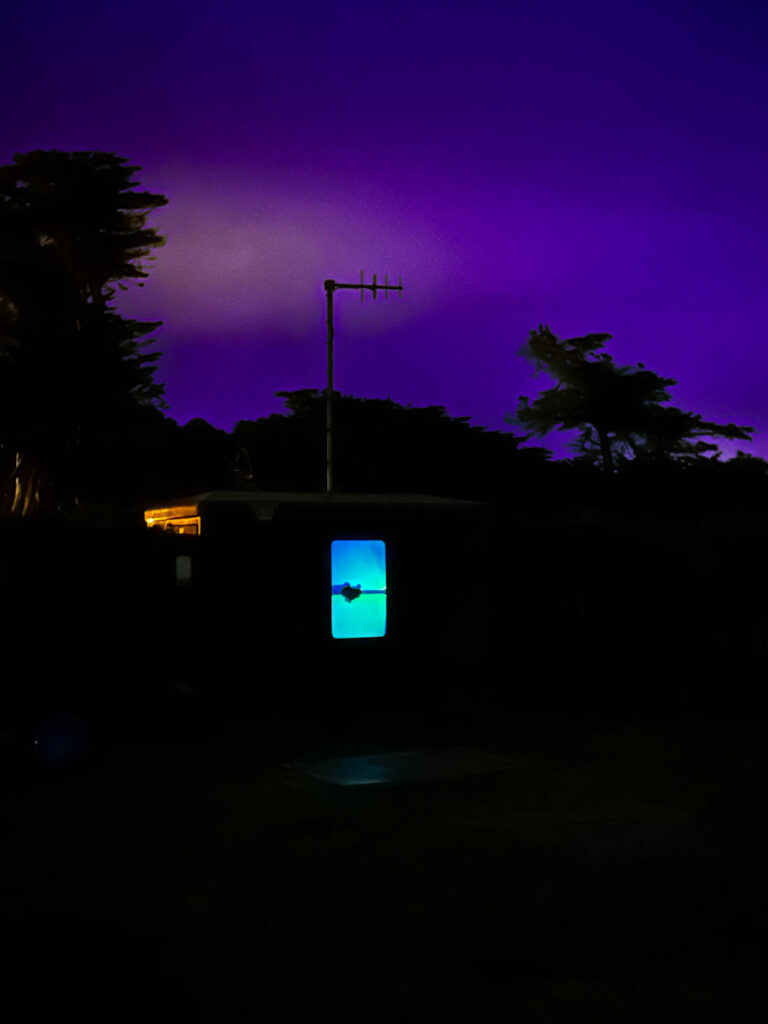
I really like this image I took as it looks mysterious and like a photograph Will Lakeman would take, however the sky could be a lot nicer, so I selected the sky with the masking tool and adjusted the Temperature, Tint and Hue shift to give it this deep purple color which makes the image look more beautiful and goes well with the light in the window.
In what way has Benoit Paillé and Will Lakeman explored colour in their work?
Introduction Colour photography is an area I have always wanted to explore, the use of colour (or the lack of it) can really define an image and be a great tool in creating beautiful, eye catching and exciting photographs. I feel like the world is becoming less colourful and more dull with most modern buildings being painted with colours such as dark greys and whites. Nowadays, cars too, are either coloured in white, back, grey and silver also logos are losing their colour and signage is becoming more dull while street lights are losing their warm orange glow. It does not help that the sky is usually overcast and grey which can lower your mood. I am not the only one who notices this with a study finding that 3 out of 4 manufactured cars are painted in monochrome and the most popular carpet colour is grey. Researchers from the science museum group also analysed thousands of photographs and found that in the 1800s monochrome colours only represented around 15% of all the items in the photographs, but nowadays that number has increased to around 60% of items being either black, white or grey. (Pękala 2024) To combat this, I want to show the importance of colour by creating colourful and vibrant photographs. A fun area of this is painting with light as it has the potential to be creative and illustrative. The artists I want to analyse, both use light painting in their work as well as other photographic techniques such as long exposure and bracketing. Will Lakeman and Benoit Paillé, both create interesting and beautiful images through the use of colour photography and light painting. I want to respond to their style of by capturing and trying to recreate the dream like effect their images have as well as the way they use colour to help compliment their work.
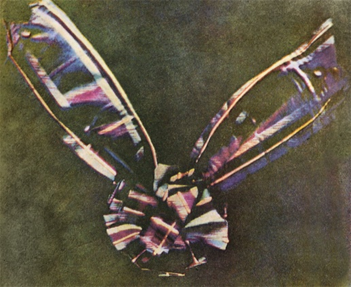
J. Clerk Maxwell, T.Sutton (1861)
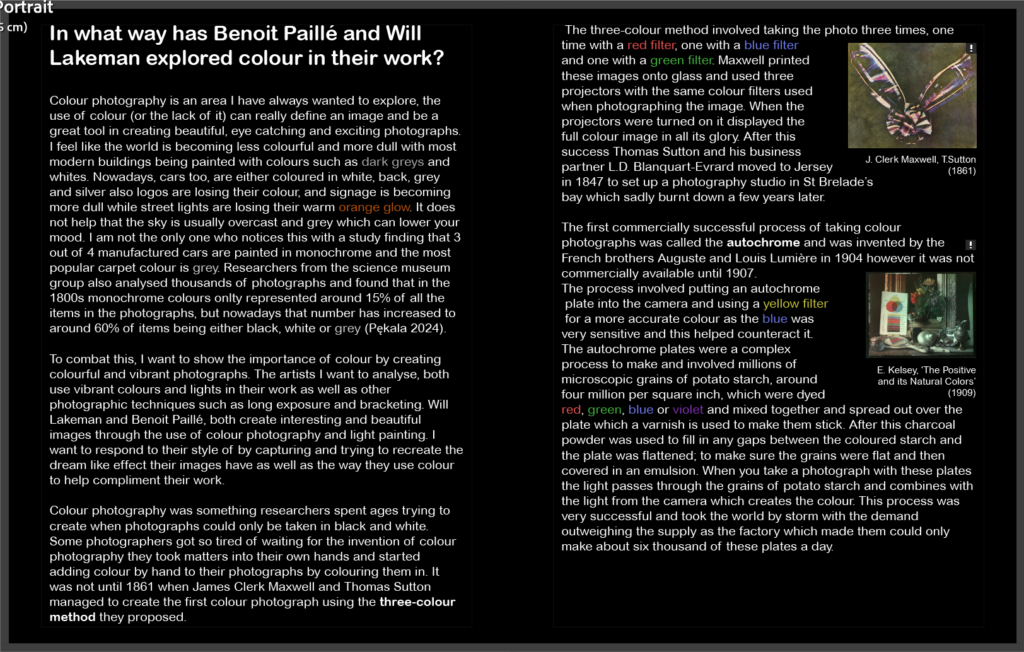
Early colour photography Colour photography was something researchers spent ages trying to create when photographs could only be taken in black and white. Some photographers got so tired of waiting for the invention of colour photography they took matters into their own hands and started adding colour by hand to their photographs by colouring them in. It was not until 1861 when James Clerk Maxwell and Thomas Sutton managed to create the first colour photograph using the three-colour method he proposed. The three-colour method involved taking the photo three times, one time with a red filter, one with a blue filter and one with a green filter. Maxwell printed these images onto glass and used three projectors with the same colour filters used when photographing the image. When the projectors were turned on it displayed the full colour image in all its glory. After this success Thomas Sutton and his business partner L.D. Blanquart-Evrard moved to Jersey in 1847 to set up a photography studio in St Brelade’s bay which sadly burnt down a few years later.
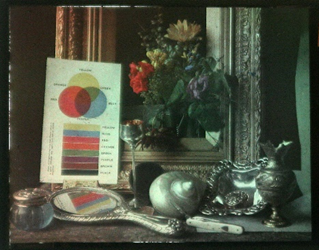
E. Kelsey, ‘The Positive and its Natural Colors‘ (1909)
The first commercially successful process of taking colour photographs was called the autochrome and was invented by the French brothers Auguste and Louis Lumière in 1904 however it was not commercially available until 1907. The process involved putting an autochrome plate into the camera and using a yellow filter for a more accurate colour as the blue was very sensitive and this helped counteract it. The autochrome plates were a complex process to make and involved millions of microscopic grains of potato starch, around four million per square inch, which were dyed red, green, blue or violet and mixed together and spread out over the plate which a varnish is used to make them stick. After this charcoal powder was used to fill in any gaps between the coloured starch and the plate was flattened; to make sure the grains were flat and then covered in an emulsion. When you take a photograph with these plates the light passes through the grains of potato starch and combines with the light from the camera which creates the colour. This process was very successful and took the world by storm with the demand outweighing the supply as the factory which made them could only make about six thousand of these plates a day.
Will Lakeman Will Lakeman is a local Jersey artist. In 2023 he did an exhibition at Art house Jersey’s Capital house gallery, where over two thousand people attended. The exhibition was based on the former leisure centre and swimming pool at Fort Regent. Lakeman states about his work that, ‘through my work I try and communicate something of the weird, vivid sensations of my dreams and nightmares.’ (Lakeman) This can explain why a lot of his photographs have a dream like and in some cases liminal aesthetic to them, especially in his series ‘Lurking in darkness’ which uses coloured gels and is shot at night. As well as Will Lakeman’s work being shown at Arthouse Jersey, he has also had his work shown at the Private & Public gallery and the CCA galleries. In 2021 he was awarded the Summer Prize from the CCA Galleries International Summer Exhibition, and this shows just how creative and talented his photographs are, which I personally find that they are all interesting to look at especially as most the images are taken locally.
W. Lakeman, ‘Lurking in darkness‘ (2020)
This photograph was taken by Will Lakeman in 2020 as part of his series of images called ‘Lurking in darkness’ with Will describing the series as ‘I love to explore the world at night. I aim for these images not to represent reality, but to explore my dreams and fantasies.’ (Lakeman) which can be seen in this image, which has a dreamlike and even liminal aesthetic to it due to multiple factors.
The first factor is due to the sense of unknown. We know nothing about the person looking in the window or even the location, as the background is completely black and there is little to nothing in the image that provides context. The second factor is the strangeness of the photograph. In the photograph, we see a woman looking through a window, which is in the centre of the image and is the main subject of the image. On the other side of the window, there are lots of potted plants. This sense of strangeness reflects his dreams and fantasies, as dreams can be strange and random and contain elements of the unknown, providing mystery and making people want to seek answers.
The lighting is also quite interesting in the image, all the lighting is artificial, and the white light looks incredibly bright especially as it contrasts with the darkness of the rest of the image, there is also a really nice purple shadow coming from the window, made from coloured gels, which provides light to the foreground of the image. The lighting also helps contribute to the dream like feel of the photograph. The cool white and purple from the lighting gives the image a cold feel to it and may imply that the dream is not inviting or positive and may reference that the photographer’s dreams are not enjoyable or wholesome ones.
Benoit Paillé Benoit Paillé is an unconventional artist who abandoned his daily life in 2013 to live in his truck and drive around the world taking beautiful photographs in places such as China, Guatemala, India and Mexico. Benoit describes his photographs as, ‘my pictures document an altered state of mind.’ (Paillé) He originally undertook a biomedical career but ended up becoming a self-taught photographer instead.
B. Paillé, ‘Magical realism nihilism POLE‘ (2019)
This Image is taken by Benoit Paillé is part of a series called ‘Magical realism nihilism POLE’ and in this collection of images Benoit took of poles, a mundane everyday object which people don’t pay much attention to and photographs it in an interesting and glamourous way. Benoit describes it as deconstructing, ‘the aesthetic hierarchy between what is deemed worthy of interest and what is not.’ (Paillé) It is incredibly interesting seeing how he captures these objects which people don’t see worthy of being a photographed and makes them into aesthetically pleasing photographs.
In the photograph, the pole is centred right in the middle of the image which leads the viewer to look and acknowledge it, something they may not notice or pay any attention to if they were walking past it. There is also a contrast as the geometric vertical line of the pole contrasts with the horizontal lines of the wires attached to the pole. The snow in the foreground of the images creates a soft texture which pairs well with the hard wooden pole. The lighting in the photo is also incredibly beautiful with an artificial red light, not seen in the image, creating a lovely glow in the image and making the pole look red, this helps Benoit achieve his goal in making the pole look visually pleasing.
The pole being in the snow which has no footprints and the trees in the background which could be of a forest gives the image a sense of isolation which is further added by the cold feel the photograph has due to the white balance and the blue darkness of the sky. The cold snow may also resemble the isolation of the pole as it just sits there getting no appreciation or thought even though it serves a purpose and may be used as a telegraph pole or to hold up the wires which provide power to a home. The red glow in the image creates a conflict to this as red is seen to be a warm colour and may highlight the photographer’s intentions of shedding light it and breaking the boundaries of what is seen as worthy to be photographed.
Conclusion In conclusion Will Lakeman and Benoit Paillé both explore colour in similar and different ways with will Lakeman using it to create a dream-like feel to his photographs and Benoit Paillé using colour to compliment his work and add to the overall aesthetic. Both photographers use colour to create beautiful and vibrant photographs, and it really highlights the importance of colour in a world where dull colours are becoming a lot more common. I really want to show the importance of colour in my images by using vibrant colours like they do and taking my photographs at night like they do with their photographs that inspire me.
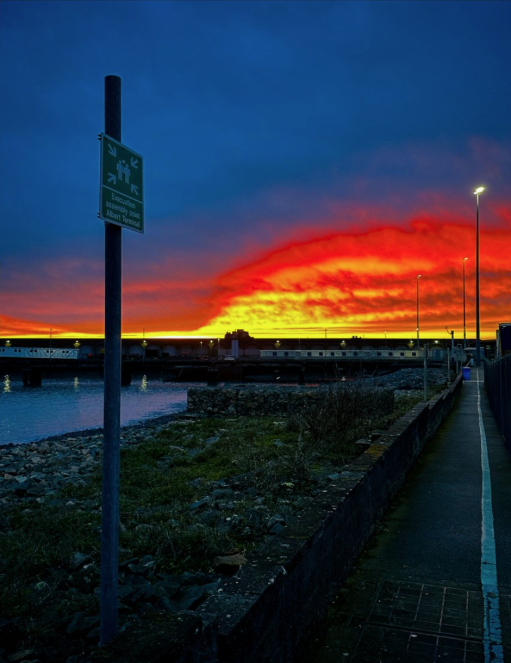
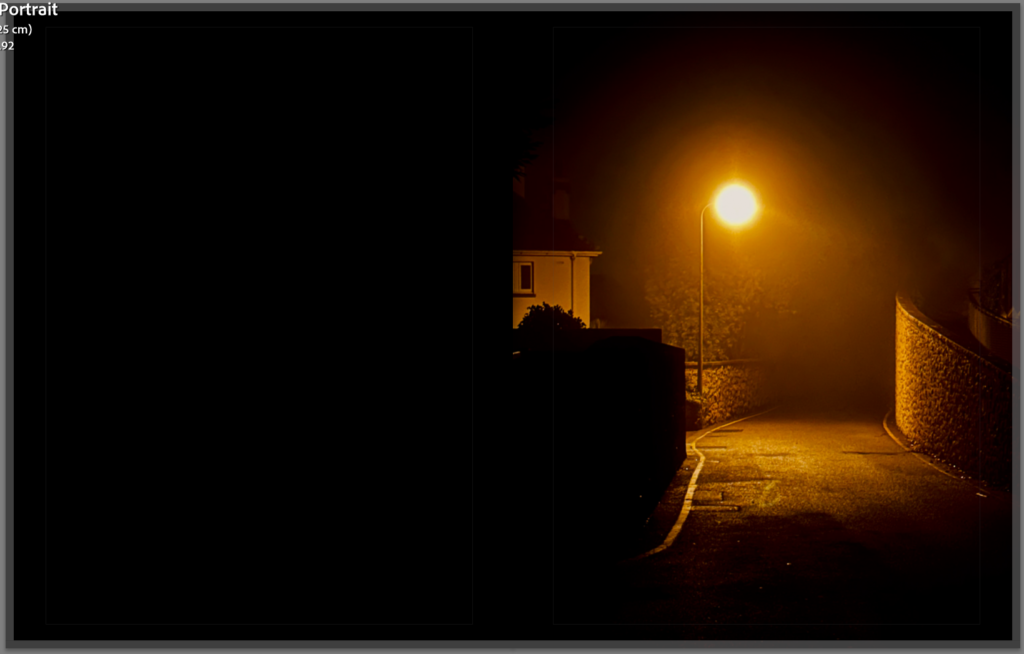
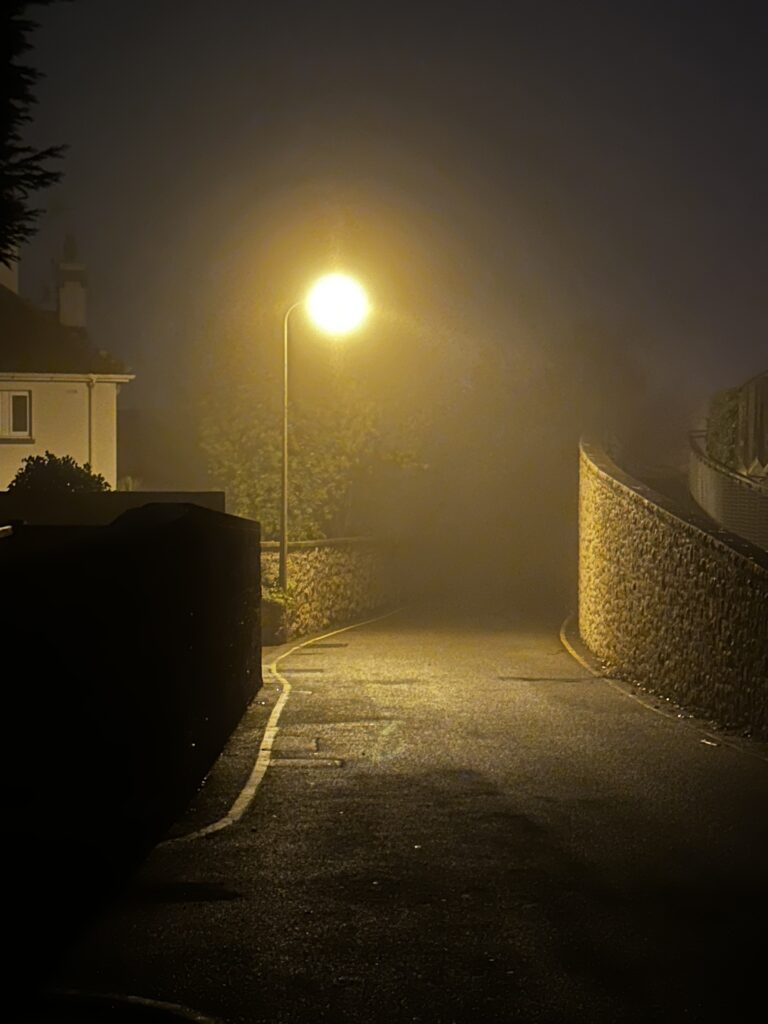
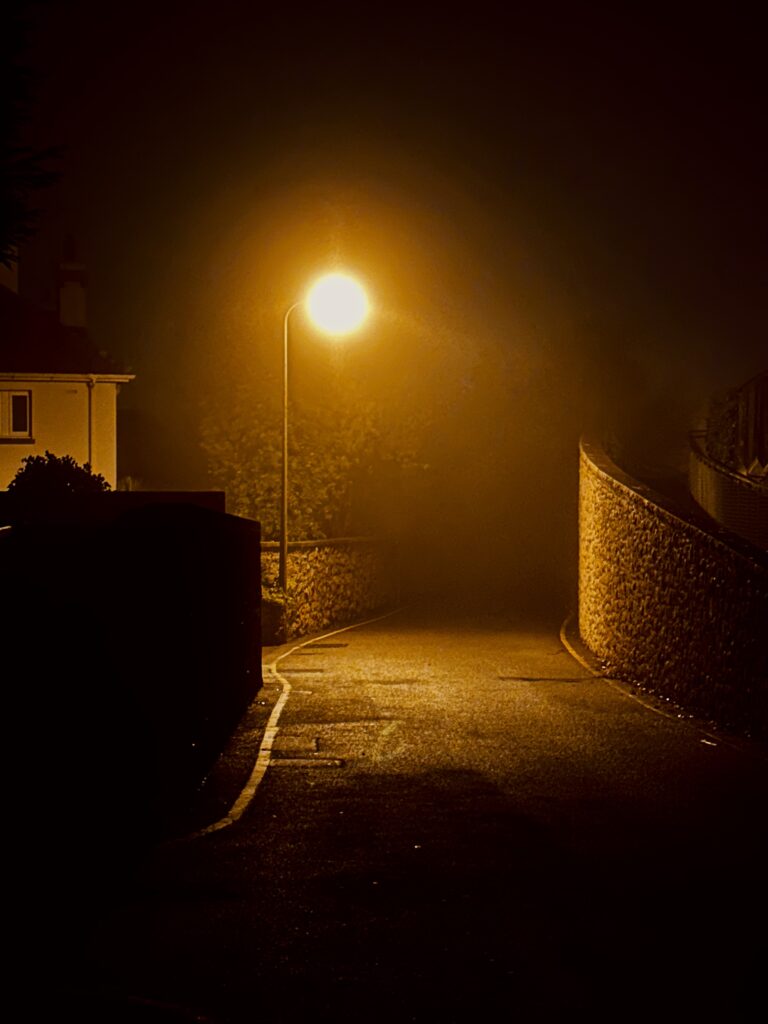
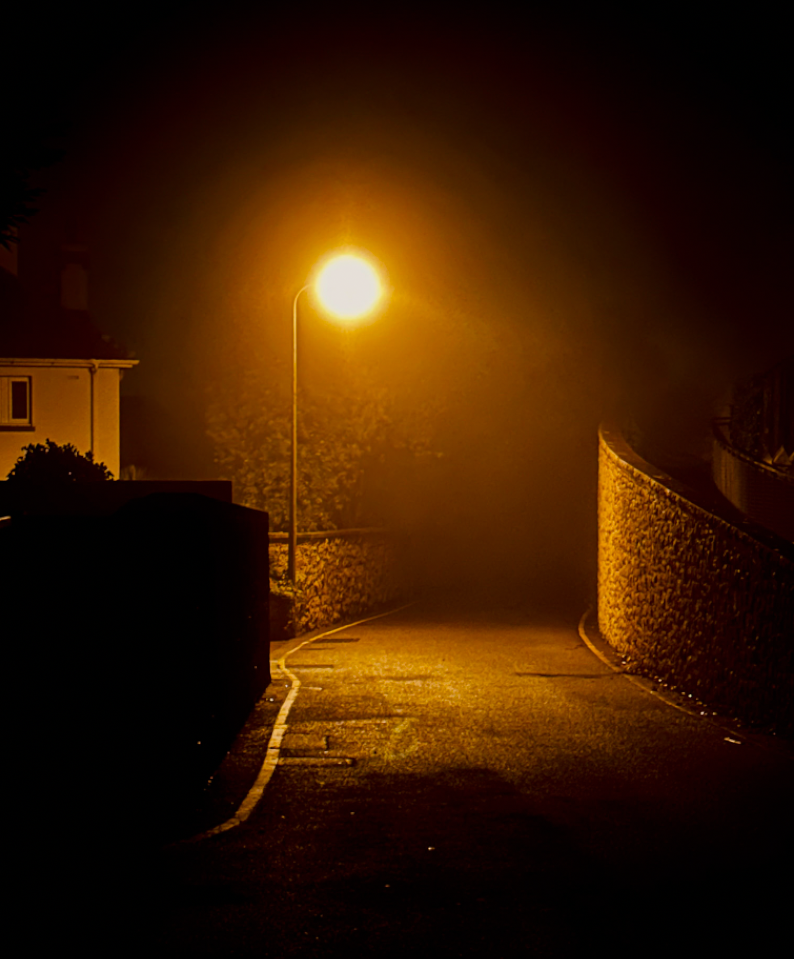
This photo I took was taken at night when there was a bit of fog/mist. As a result, it diffuses the light around the streetlight, giving it this warm orange glow. The ground is also a bit wet, which makes the light on the ground more shiny and reflective. This all contrasts well with the shadows and darkness at the top and bottom of the image, giving a nice balance of light and darkness. The photo also has no one in it and not much context as you can’t see the rest of the road due to the mist and darkness. This gives the photo a mysterious dream-like effect which is something Will Lakeman explores in his series ‘Lurking in darkness’ and gives off the same energy as the photo Will Lakeman took in that series of a road and the entrance to the petrol station in the fog with the vibrant orange glow of the streetlights. The photo also uses techniques from Benoit Paillé as I enhanced the orange in the image to really capture the colour and add to the overall aesthetic of the photograph. This also helps highlight the importance of colour as the warm orange glow would not be possible if the road used dull LED streetlights.
Colour photography is an area I have always wanted to explore, the use of colour (or the lack of it) can really define an image and be a great tool in creating beautiful, eye catching and exciting photographs. I feel like the world is becoming less colourful and more dull with most modern buildings being painted with colours such as dark greys and whites. Nowadays, cars too, are either coloured in white, back, grey and silver also logos are losing their colour and signage is becoming more dull. It does not help that the sky is usually overcast and grey which can dampen your mood.
I am not the only one who notices this with a study finding that three out of four manufactured cars are painted in monochrome and the most popular carpet colour is grey. Researchers from the science museum group also analysed thousands of photographs and found that in the 1800s monochrome colours only represented around 15% of all the items in the photographs, but nowadays that number has increased to around 60% of items being either black, white or grey (Aleksandra Pękala, April 2024).
To combat this, I want to show the importance of colour by creating colourful and vibrant photographs. A fun and effective area of this is painting with light because it has the potential to be creative and illustrative. The artists I want to analyse, both use light painting in their work as well as other photographic techniques such as long exposure and bracketing. Will Lakeman and Benoit Paillé, both create interesting and beautiful images with a dream like aesthetic through the use of colour photography, night photography and light painting. I want to respond to their style of work by capturing and trying to recreate the dream like effect their images have as well as the way they use colour to help compliment their work.
Essay Plan
Essay question
Opening Quote
Introduction: Once you have read some of key texts/ sources below reflect on them and incorporate quotes from text. Add to your introduction above that you will be studying examples of early color photography and developments, as well as Troy Pavia/ contemporary photographers using ‘painting with light’ techniques.
Pg 1: Historical/ theoretical: See book in class room History of Colour Photography Johannes Ittens and colour theory
Roberts, P. (2007). ‘What Came Before’ in The Genius of Colour Photography; From the Autochrome to the Digital Age. London: Goodman Carlton Publishing Group.
For my project I would like to explore nighttime and colour photography . As the world feels less colourful as most buildings and cars and logos use blacks, whites and greys and I really want to create colourful photos as not only does it make photos look more vibrant and visually appealing but also can highlight and define an image. These themes focus on the observe and seek in observe, seek and challenge. I want to help illustrate it by using light painting and colour photography as I feel like it could help illustrate my photos and create a dream like effect as it can be used to help visualise a colourful world. Another part of the project I want to do is the nighttime aspect of it as it is a part I want to focus on as it can help contribute to the dream like feel i want to incorporate and show the use and beauty of colour photography at night.
A great inspiration for my photos is the Jersey photographer Will lakeman as his photos have a dream-Like feel to them. He also uses light painting in his photos as well as nighttime photography which are all similar techniques which I want to use in my photos. Benoit Paillé is another great photographer who has produced some stunning light painting photos which would be great to use as a reference.
Will Lakeman, Lurking in darkness, 2020Benoit Paillé, Surreal Mexico, 2016
To make my photos I would like to include a mix of indoor but mainly outdoor photos as most my photos will be of places, but I do want some photos of objects such as ones from my childhood which I can do with still life photography at home or in the lighting studio. My photos will be a mix of documentary and tableaux as I want to document and show objects for how they are but also show them with some difference such as with the coloured gels or other methods to help make the photos match my themes.
I would like to present my work as a book as it feels important to me to have a physical copy of my work, plus a book feels like the best way to document and show my work as my project is almost like a story. I would present my photos on a page with some brief text probably the title of the photo to help the viewer understand my photos. I would also like to try emphasising some of my images by displaying them on a double page spread or by making some photos appear bigger than others on pages.
For my photoshoots I want them to be at places I spent time at during my life such as the park, the beach and the sand dunes I also want to have a photoshoot in the parish Grouville as I used to live in that parish during my early years and went to the school there, areas I could focus on is the bus shelter, the golf course and the beach (with the castle in the background) as I used to go on walks around there with my mum when I was only a few years old.
Last week I went to the studio to experiment with light painting and using a bulb shutter as some of it is quite new to me and it was good to get used to light painting. Lots of my photos didn’t turn out too well but I started getting the hang of it the more photos I took.
My best four photos from the shoot and their edits
OriginalEdit
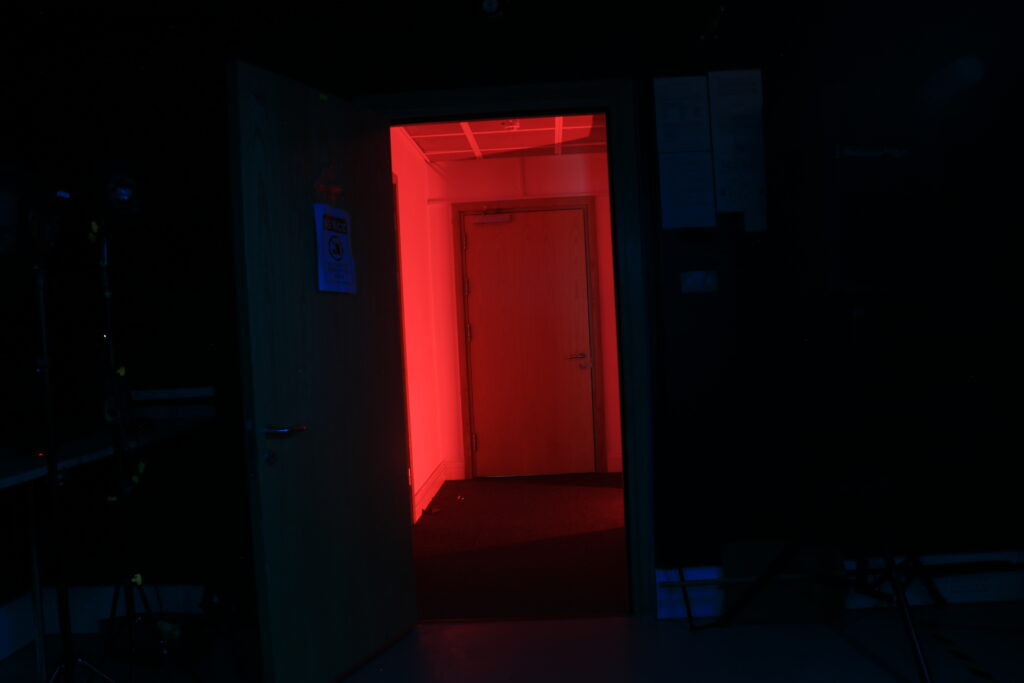
For this photo I liked the idea of having the room one colour and the corridor another colour. First I had to level the photo as it looks bad if it is not level, than I cloned the layer and removed the door so, I was only editing the first room, and increased the contrast, brightness and saturation because the blue was too dark. Now it looks better than it did but I feel like there is still room for improvements.
OriginalEdit
I really loved the colours and the lighting in the photo above, however there were marks caused the by the light, and the camera was not level, because it can be hard to tell in the dark, I managed to fix this in photoshop by rotating the photo and using the Clone stamp tool and the spot healing brush tool to get rid of the marks. Now the photo looks so much better.
OriginalEdit
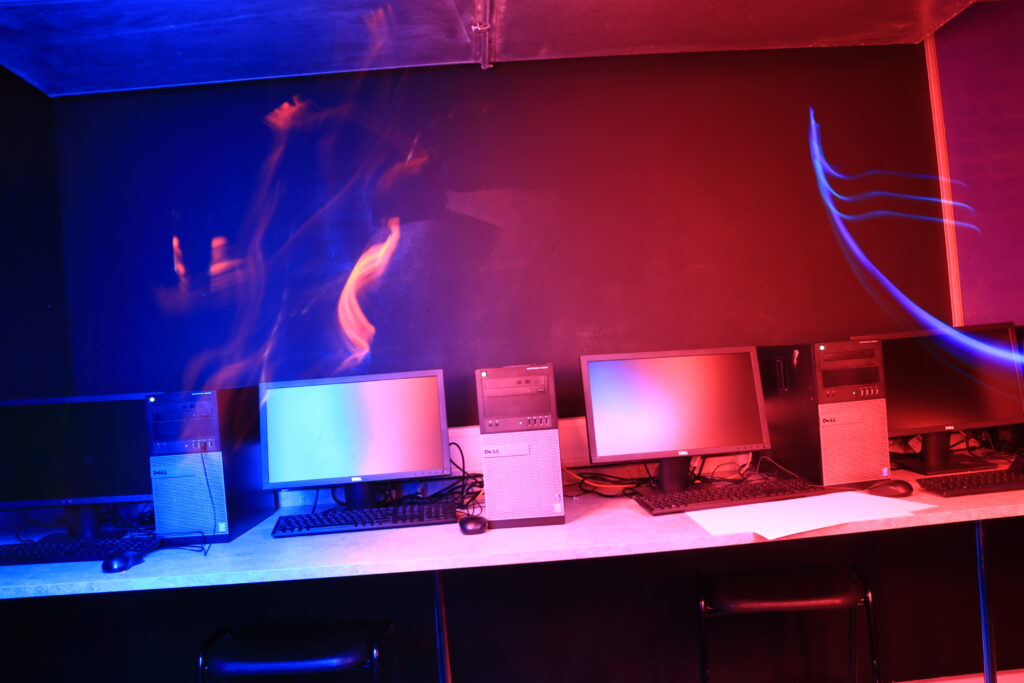
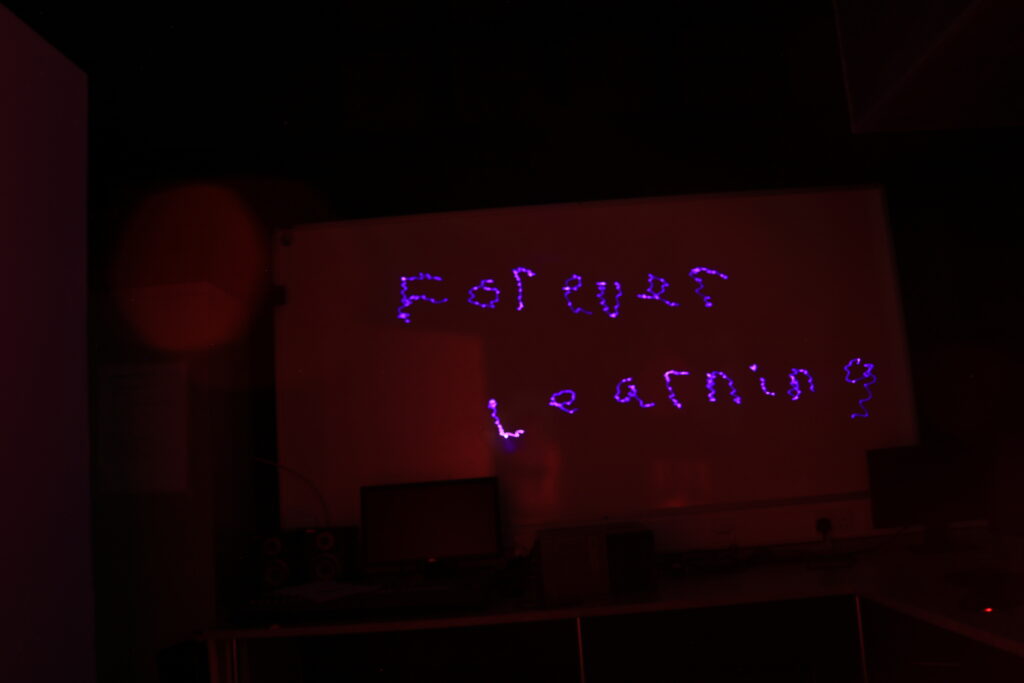
For this photo I wanted to experimenting with writing with light, I did this using a violet laser pointer as it creates a cool light effect and goes well with the red. I wanted to write ‘forever learning’ because its on a whiteboard which teachers teach on and it goes well with the themes I want to explore in the personal study. I started editing the photo by making it brighter and more colourful by editing the: brightness, contrast, exposure and blacks/shadows as well as increasing the Vibrancy of the colours to make them stronger. I also moved some of the letters closer together with the selection tool and the move tool
OriginalEdit
I really like the way the light painting turned out in this photo and I felt it didn’t need too much editing done to it, so I mainly just increased the vibrancy to make the colours look stronger.
Overview
Overall I felt like going to the lighting studio to experiment with light painting was successful and I feel like I greatly improved by being in the studio for a few hours as before I knew how to light paint words but not colours and now I am more confident in both. I also felt like it was a safe space to practice and learn compared to being at a location and trying to figure it out.
Will Lakeman is a local Jersey artist/photographer. Last year he did an exhibition at Art house Jersey’s Capital house gallery, where over two thousand people attended. The exhibition was based on the former leisure centre and swimming pool at fort regent. In the exhibition Will Lakeman includes the use of AI generated images of the the former site which look surreal and are interesting as you see the AI’s interpretation of the old fort regent. However there is a lot of controversy online with AI art as it undermines and negatively impacts real artists who make a living and spend hours creating art and commissions, some people don’t even consider AI art as actual art.
Playtime exhibition, 2023
Lakeman states about his work that “Through my work I try and communicate something of the weird, vivid sensations of my dreams and nightmares.” This can explain why a lot of his photos have a dream like and in some cases liminal aesthetic to them, especially in his series ‘Lurking in darkness‘ which uses coloured gels, as well as being shot at night.
As well as Will Lakeman’s work being shown at Arthouse jersey, he has also had his work shown at the Private & Public gallery and the CCA galleries. In 2021 he was awarded the Summer Prize from the CCA Galleries International Summer Exhibition, this shows just how creative and good his photos are, which I personally find that they are all interesting to look at especially as most the photos are taken locally.
some photos of his work
Lurking in darkness, 2020Lurking in darkness, 2020Lurking in darkness, 2020Playtime exhibition, 2023
Image analysis
This photo was taken by Will Lakeman in 2020 as part of his series of photos called ‘Lurking in darkness’ with Will describing the series as “I love to explore the world at night. I aim for these images not to represent reality, but to explore my dreams and fantasies.” which can be seen in this photo, which has a dreamlike and even liminal aesthetic to it due to multiple factors.
The first factor is due to the sense of unknown. We know nothing about the person looking in the window or even the location, as the background is completely black and there is little to nothing in the photo that provides context. The second factor is the strangeness of the photo. In the photo, we see a woman looking through a window, which is in the centre of the image and is the main subject of the image. On the other side of the window, there are lots of potted plants. This sense of strangeness reflects dreams, as dreams can be strange and random and contain elements of the unknown, providing mystery and making people want to seek answers.
The lighting is also quite interesting in the photo, all the lighting is artificial and the white light looks really bright especially as it contrasts with the darkness of the rest of the image, there is also a really nice purple shadow coming from the window, made from coloured gels, which provides light to the foreground of the photo. The lighting also helps contribute to the dream like feel of the photo. The cool white and purple from the lighting gives the photo a cold feel to it and may imply that the dream is not inviting or positive and may reference that the photographer’s dreams are not enjoyable or wholesome ones.
Jason D. Page is a photographer regarded as a leader of the light painting movement. He has had a passion in light painting photography since 2004 and has even created a website aimed at inspiring people to take up this style of photography. The website contains other light painting artists, a wide range of tutorials on light painting and the history of light painting.
Jason was born in Newport, Virginia, and moved to Florida when he was three, his farther was a Coast Guard machinery technician and an avid photographer, however after they moved he ended up divorcing Jason’s mother which had an impact on Jason. After graduating collage in 2004 Jason focused on cinematography and produced 4 award winning films about surfing.
Jason describes finding his passion as “I have had images in my brain that I wanted to create and could never figure out how to do it. That was up until a winter night in 2004 when I bumped my camera while taking a long exposure of the ocean. When I checked the exposure I saw the moon had made a streak across the sky, in that moment it all clicked for me.”
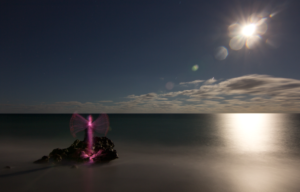
Photos by Jason D. Page
Messages, Jason D. PageLight trails, Jason D. PageMessages, Jason D. PageJason D. Page, Light Sculptures
Image analysis
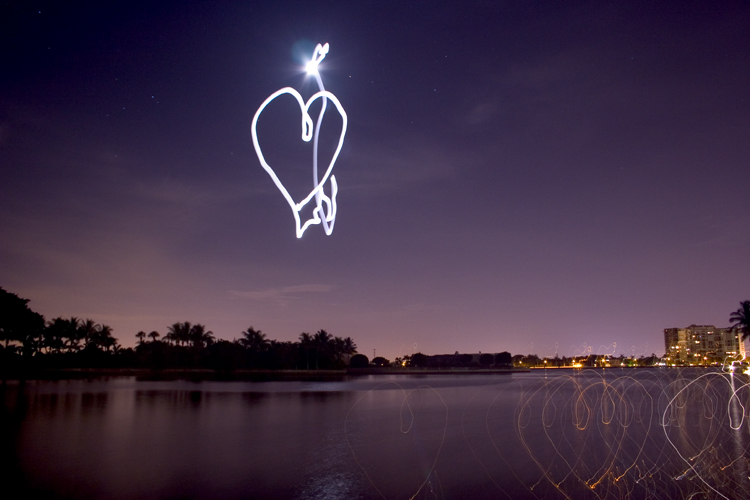
The image above is called Moonlight Drawing #1 and was created by Jason D. Page in 2010. It is the first of three images he created in the series Moonlight Drawings.
The main subject in the photo is the glowing heart, which was made with a slow shutter and by moving the camera so that the light from the moon creates a heart shaped trail. The heart shape could be a personal reference to the photographer’s love and passion for light painting. This reference originated when he was taking a long exposure photo of the moon in 2004 and accidentally knocked the camera, which created a light trail, this led to Jason’s discovery of light painting- and is similar to how this image was produced.
The photo uses a combination of natural light, from the moon and low light from the dusk/dawn in the horizon, as well as some artificial light in the background on the right from the buildings. This helps dimly illuminate the photo so you can see the lake and the silhouettes of the trees which gives the photo a sense of natural beauty and almost a sublime like feel to it due to the smoothness and deepness of the water which can make people wonder what is under the surface.
The water also creates the texture in the image as the bulb shutter makes the gentle ripples in the water look soft and smooth and the reflectiveness of the light gives it dark ranges of purple and black complimented by the orangish colour from the light.