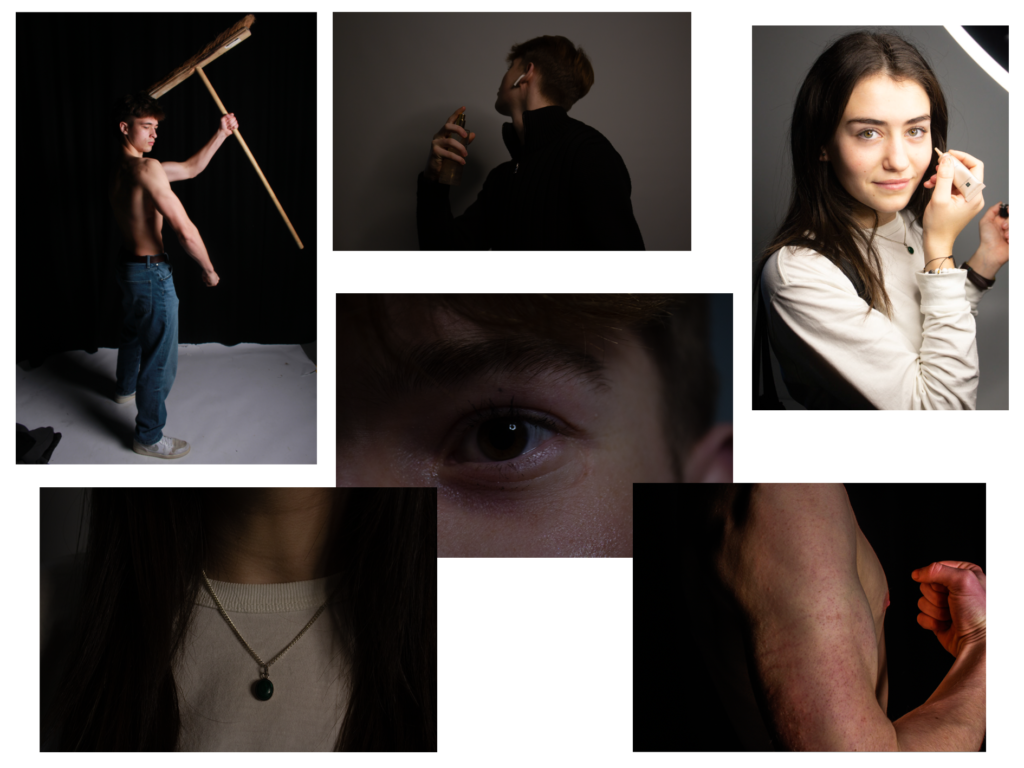
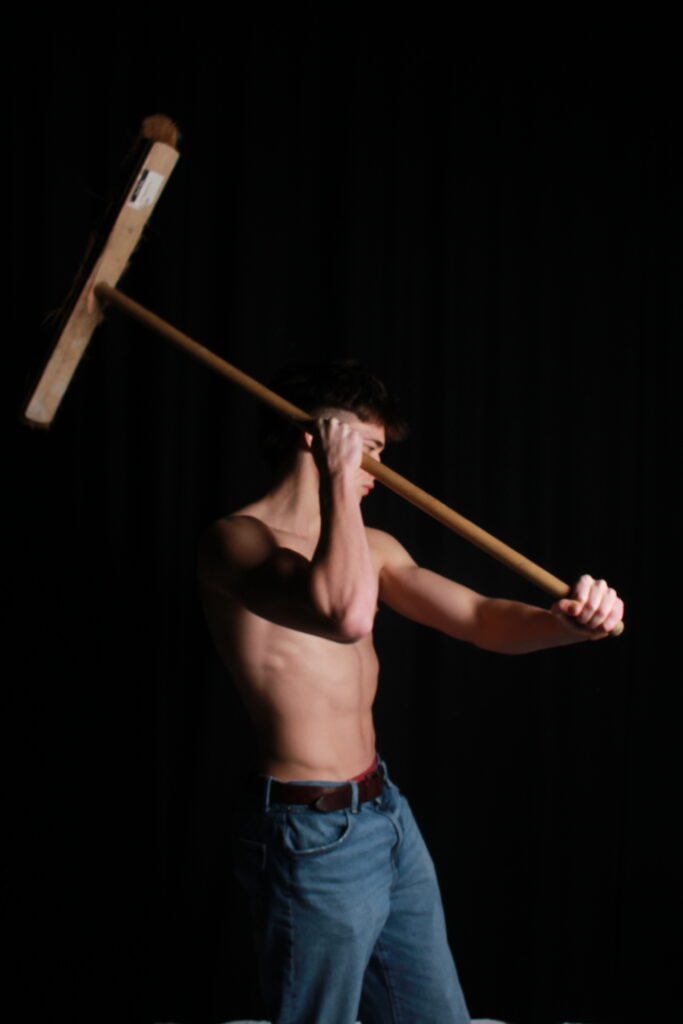
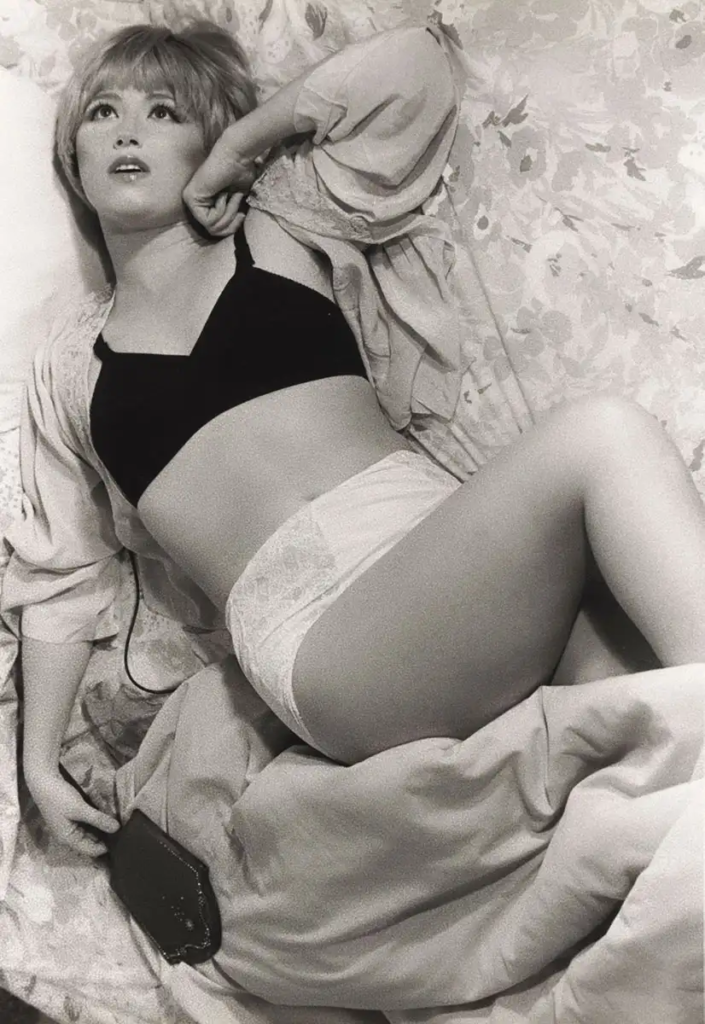
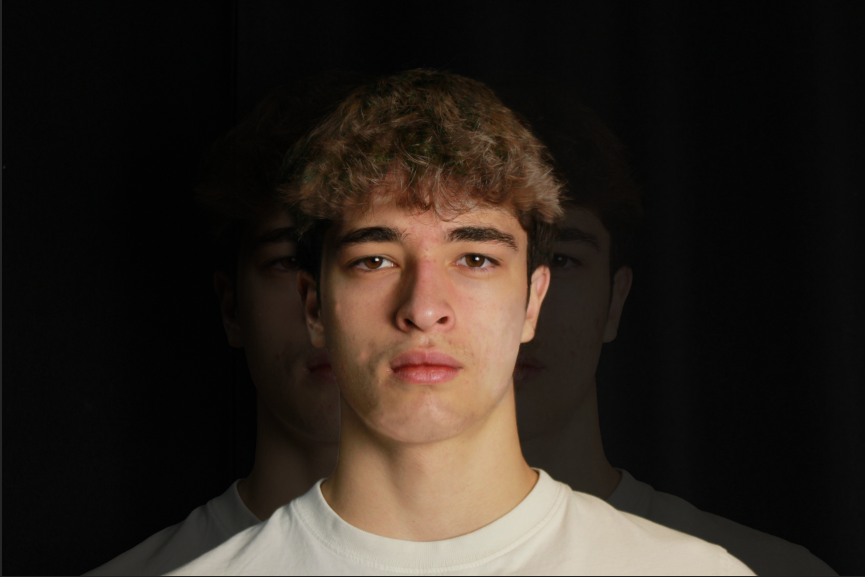
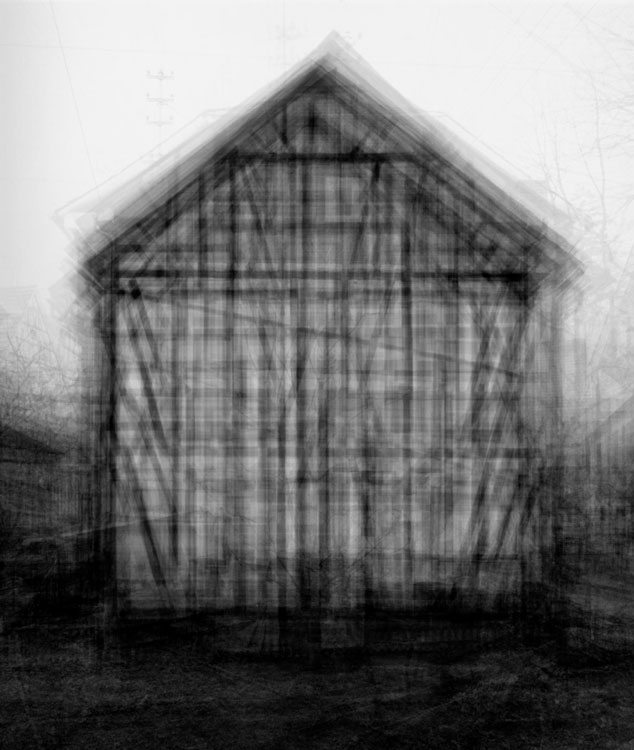
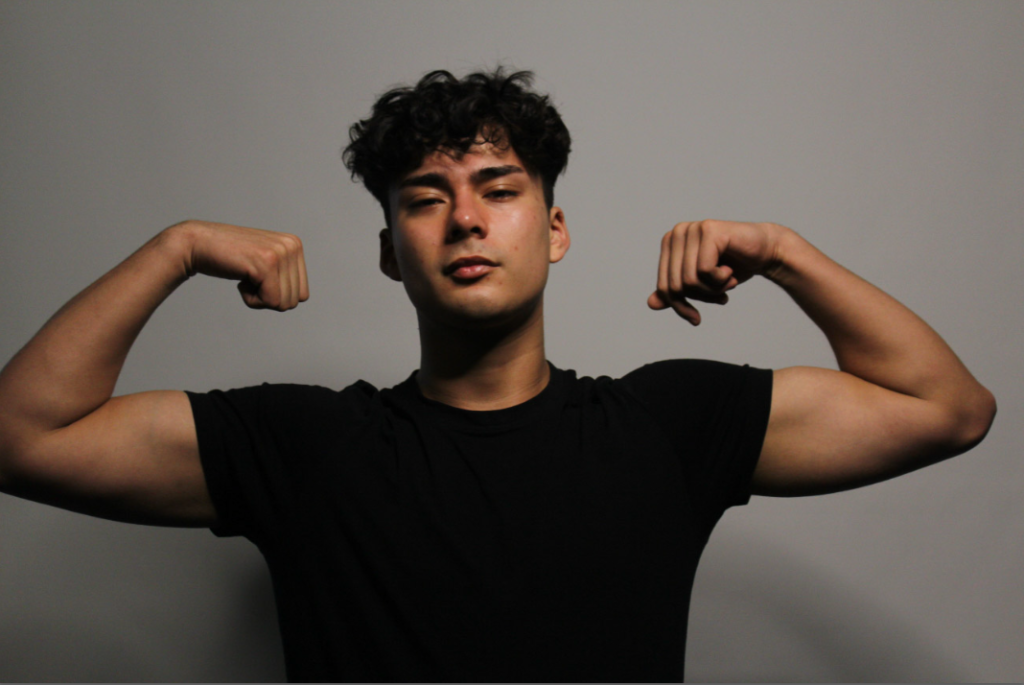
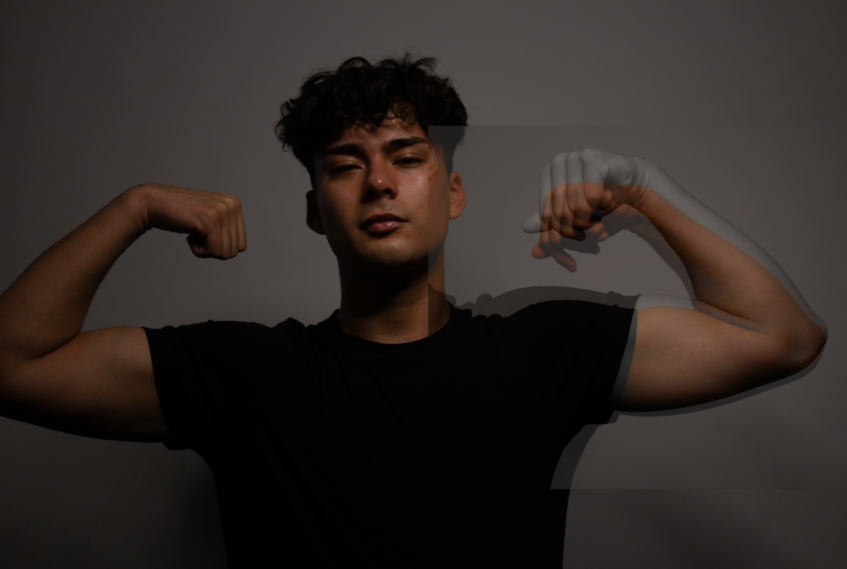
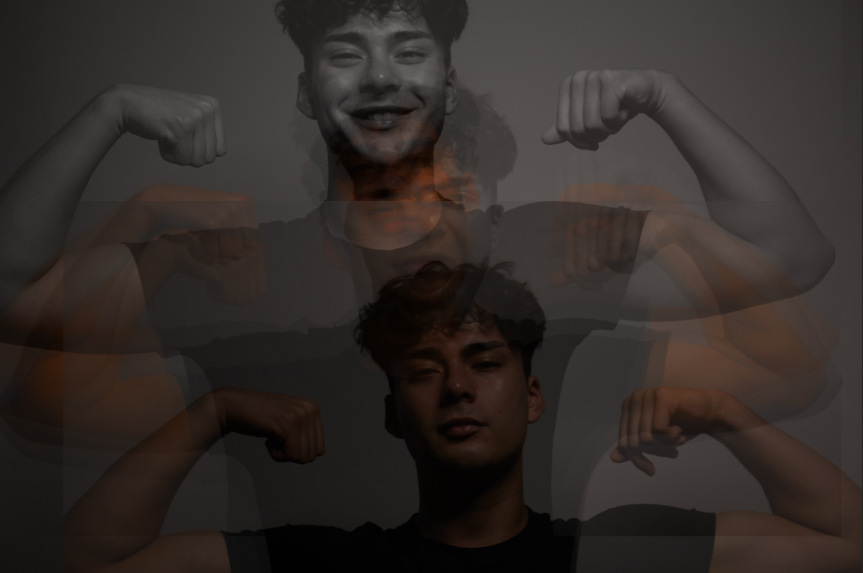
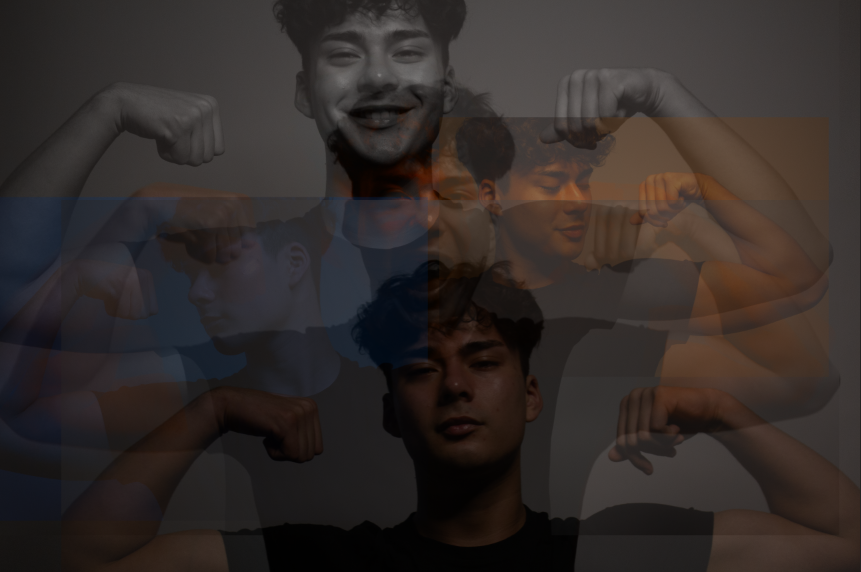
All posts by Thomas Little

Filters

Author:
Category:

Editing Process and Final Photos

Photo #1

This idea came from the artist Lewis Bush and Idris Khan. Two artists that have very similar work which involves multiple exposures overlapping one another to create and end result photo.

This photo from Lewis Bush involves two different models, as you think, but in reality he used tens maybe hundreds of different males and females and overlapped them to create the ‘average female’ and ‘average male’.
This photo is from Idris Khan and he made this by taking pictures of very similar houses and doing the same thing by overlapping them one on top of another to create this overall photo which looks almost alien-like but also abandoned and scary, and even though so much stuff is happening in each photo with the backgrounds, sky and views, I love how you can clearly see the end result and that it is a house.

I started by importing one photo of my model into photoshop.

For this photo, I used artificial lighting by using a black background with no studio lights above, but I used a flash light with box filter over it. Positioned model in the centre, flash light directly on the right side of model, with my model slanted at the light at about a 75 degree angle.
F-stop = f/11
Exposure time = 1/160 seconds.
ISO speed = ISO-100
Focal length = 22mm

Then I added all of the other photos I wanted to use which was 11 photos in total. Put them on top of each other, all in the centre of the grid. Changed of all of them apart from the base picture to 50% opacity, and made sure that even though they were mostly all 50% opacity, I wanted to make sure you can still see a clear image of my model.

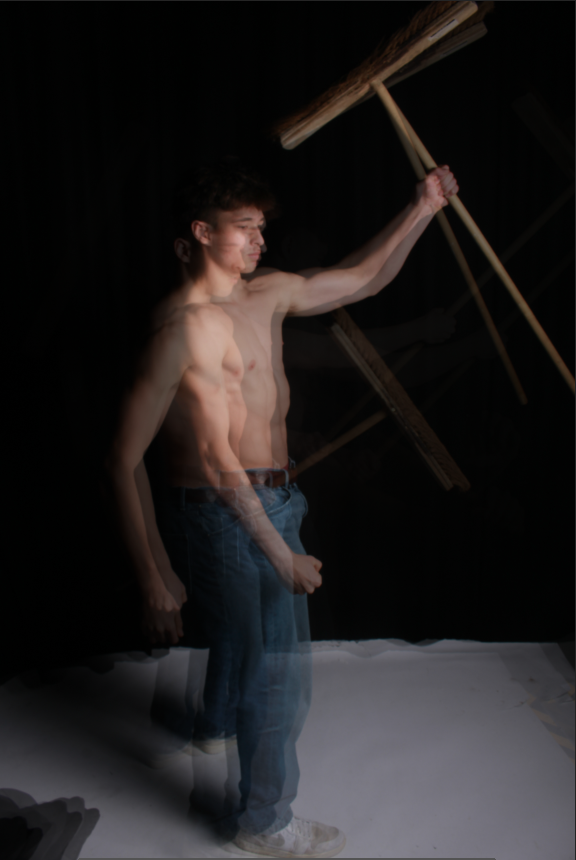
This is my editing process of adding a few in, then some more, and then some more and below.

Which then created this final photo of all of those masculine pictures overlapping each other, which is called Multiple Exposure.
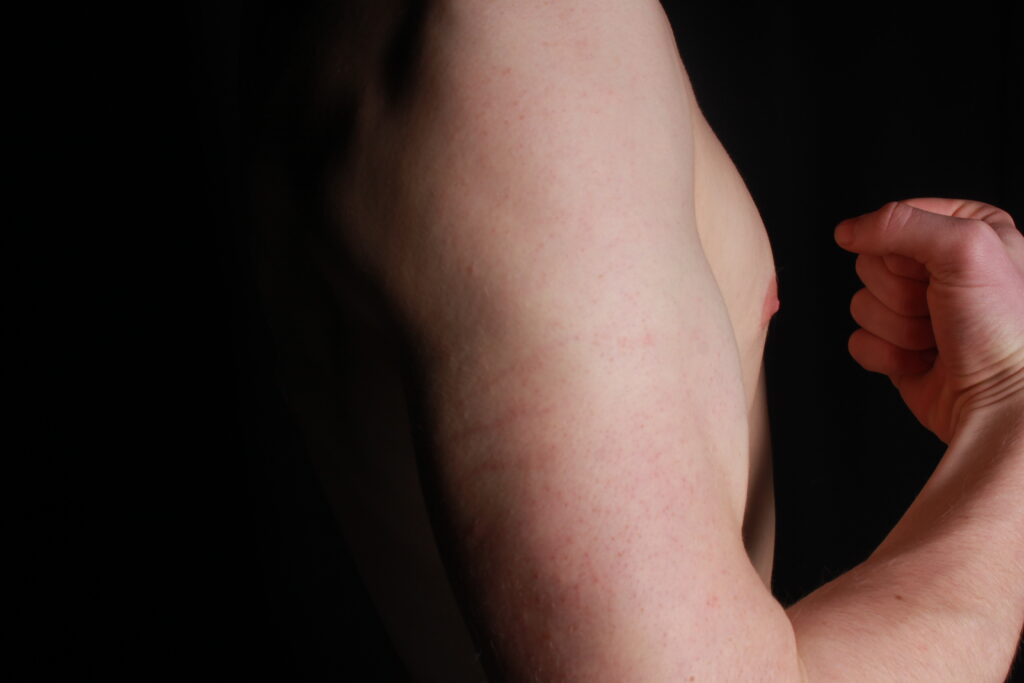
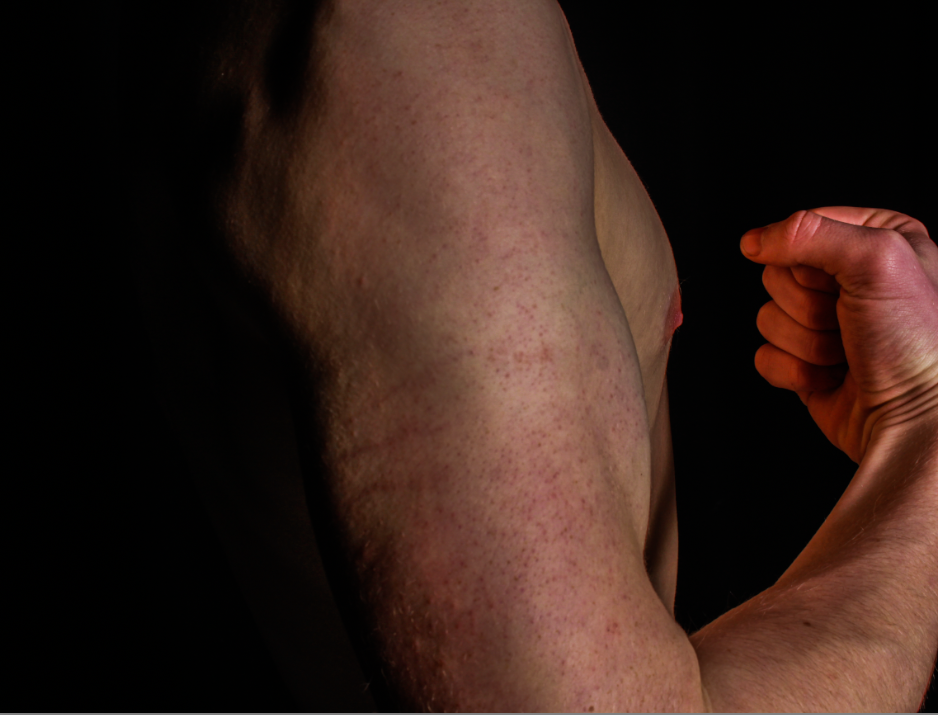
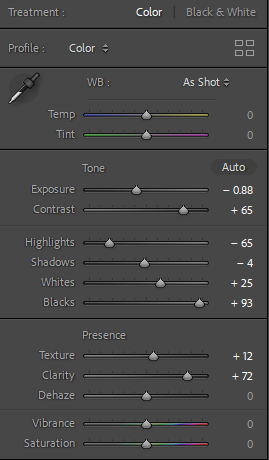
Photo #2

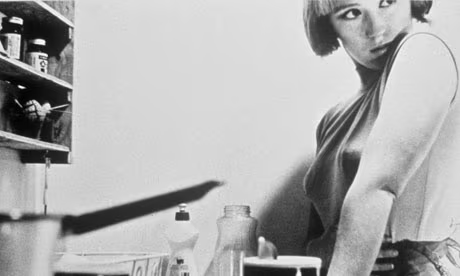
For this photo, I used the artist reference, Cindy Sherman. Sherman uses this way of editing to deceive the audience into thinking that her style is ‘immature, young, funny maybe even considered ugly’. But I used this way of editing on my photo because I like how different body sections are bright and coloured, and the rest is black and white.

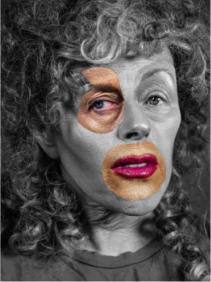
But for my photo, I wanted to use it on a body part instead of the models face as Cindy Sherman did. So, I started by using this photo of my models arm that involved his bicep, tricep, shoulder, forearm and upper back.

I then edited it to look more masculine, increasing the contrast, lowering the exposure, lowering highlights and shadows and increasing the whites and blacks. Then, increased the texture and clarity to show more detail and definition.

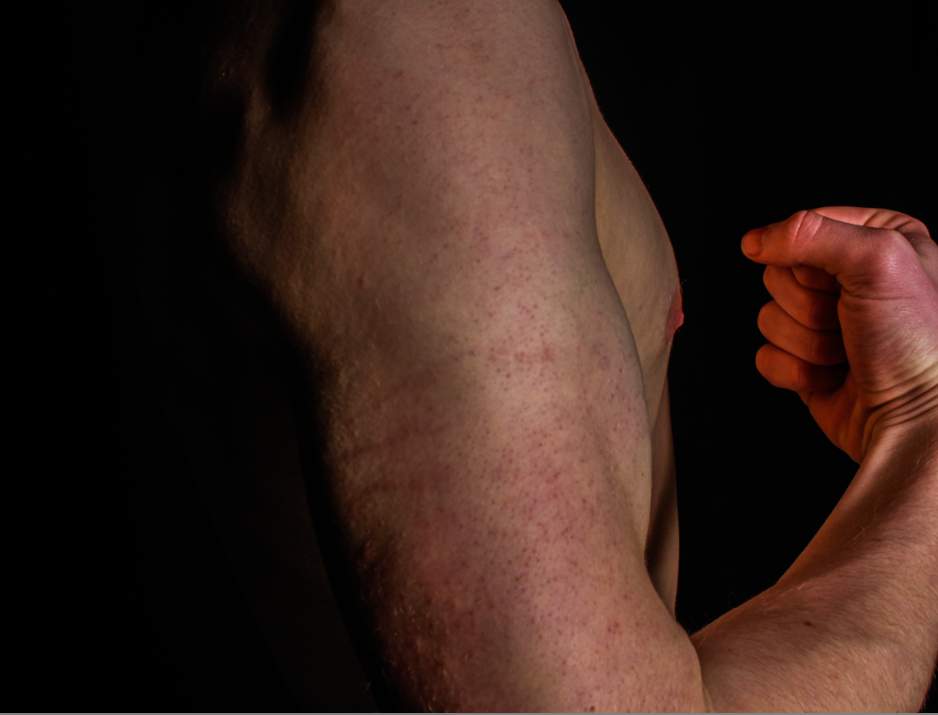
Then for the final photo, I wanted to put the same picture but in black and white over the top of that photo with cut out parts in it to reveal the coloured masculine photo underneath.

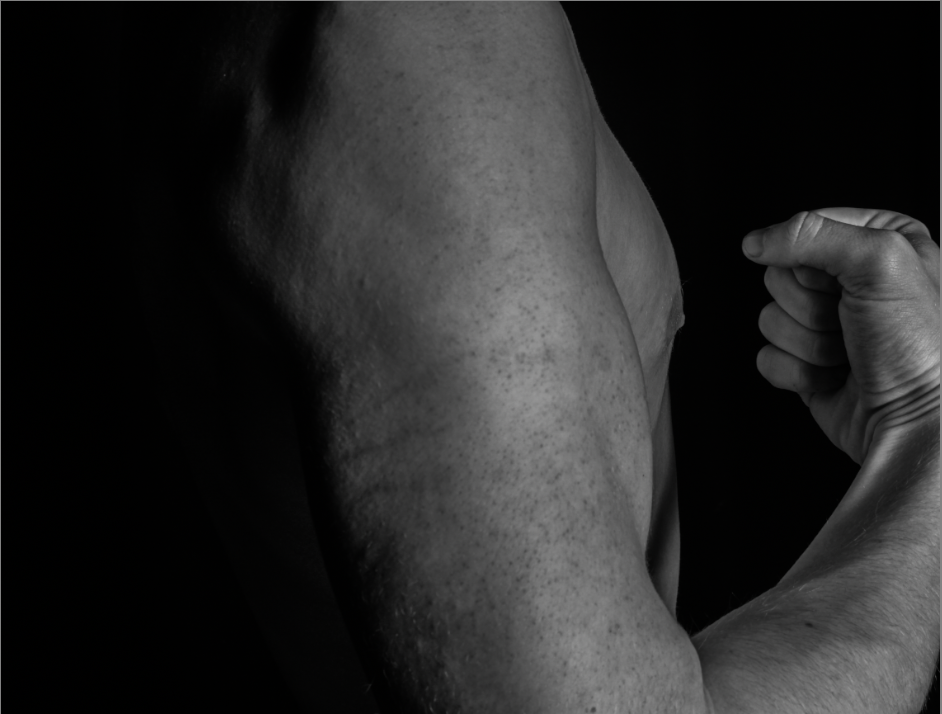
Which then lead to the final result to be a combination of the two with the black and white photo on the top covering most of it, but shapes cut out in it revealing the coloured photo underneath.
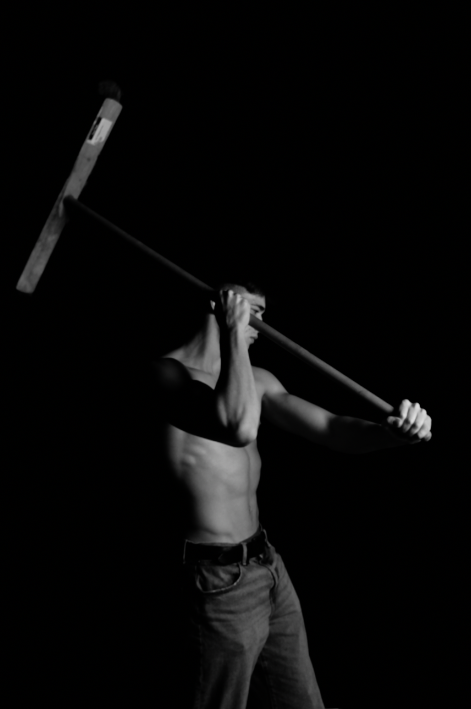
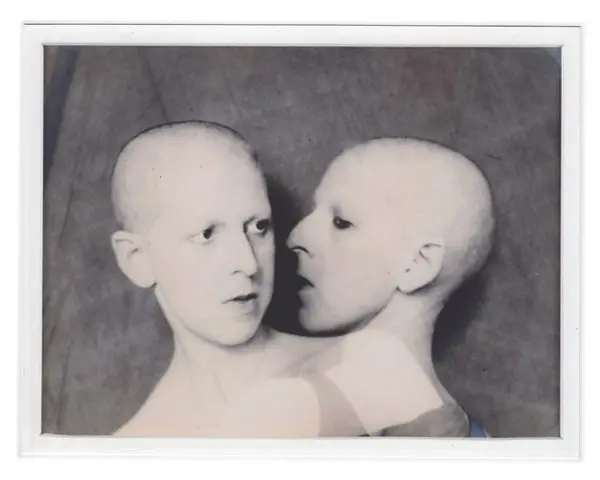
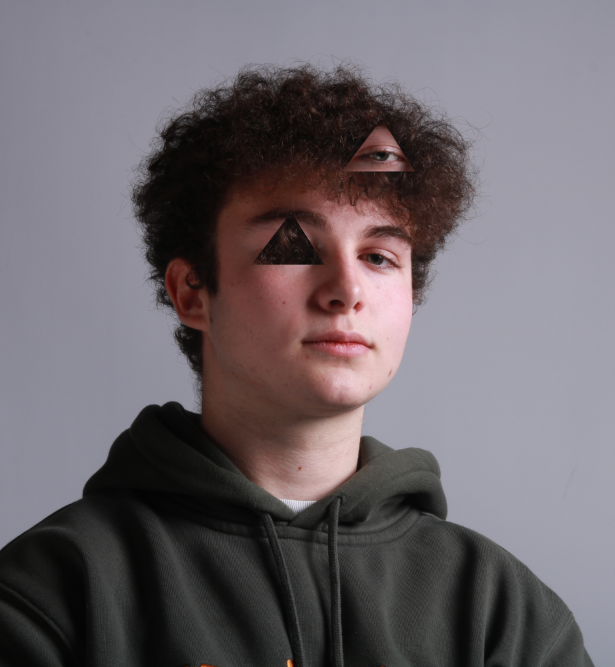
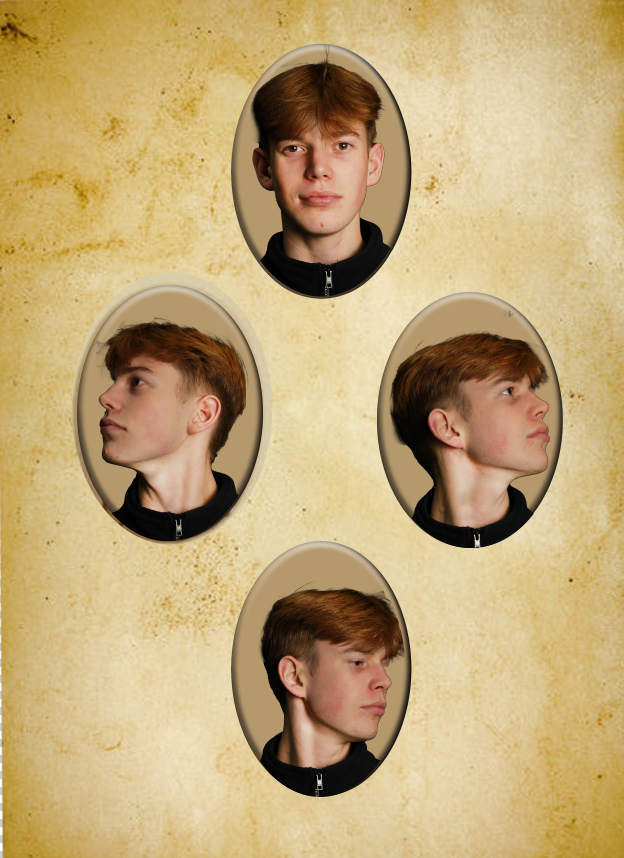
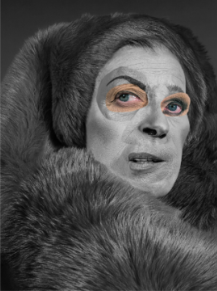
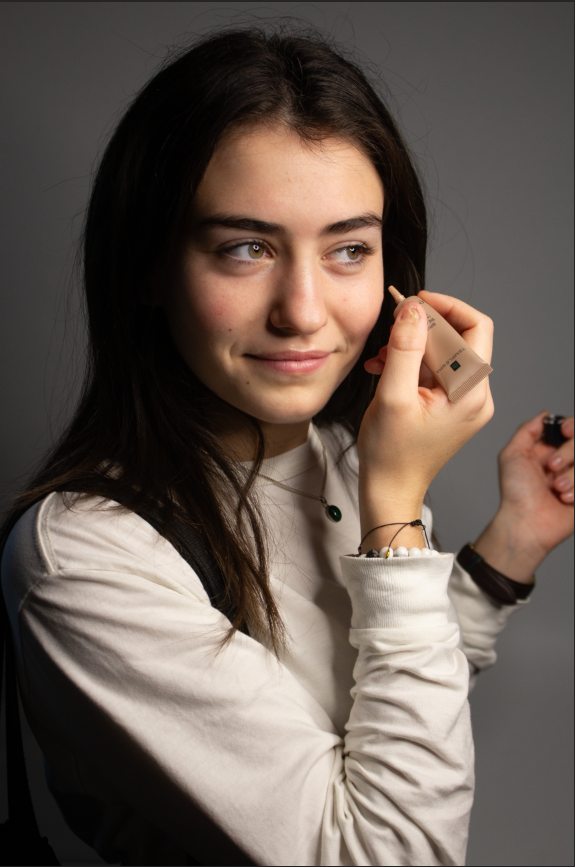
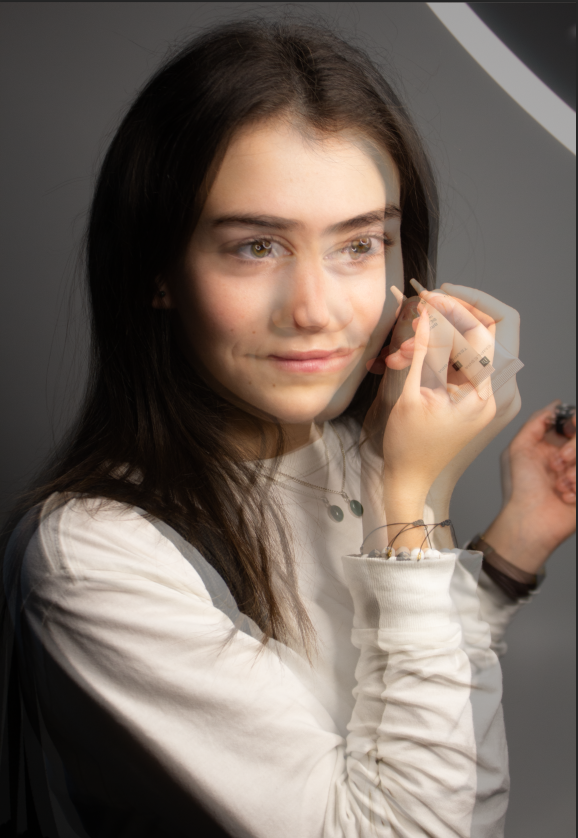
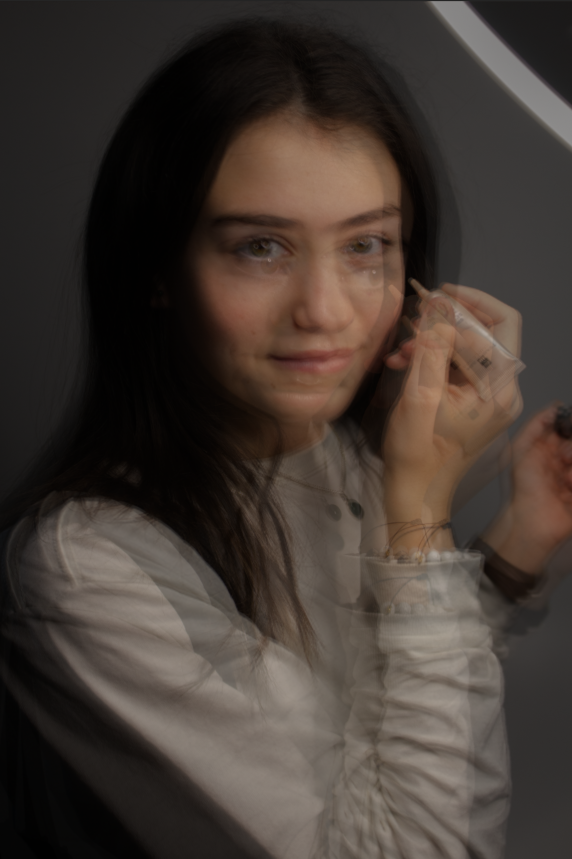
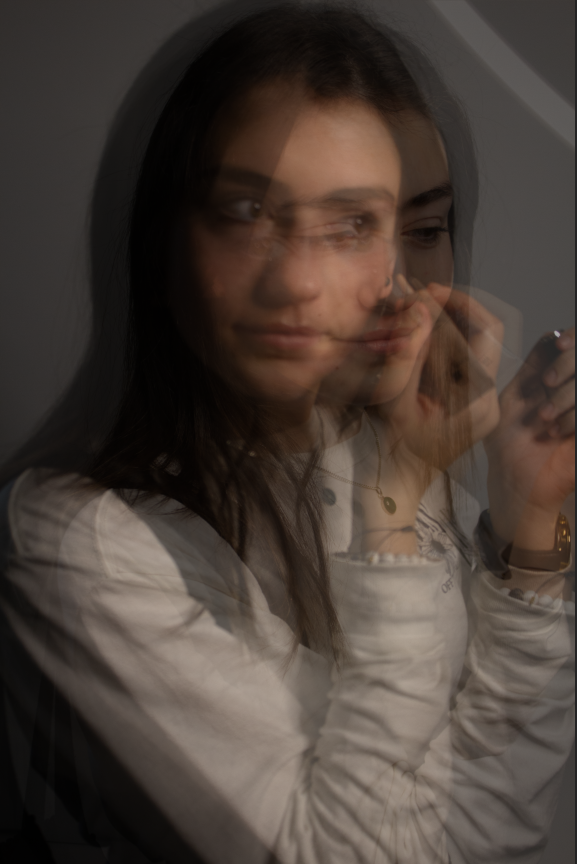
Photo #3

My third photo idea came from the artist, Kensuke Koike and this is because I love how he uses 1 picture to create such a bigger photo by either swapping parts of the face around with other parts. Or, having 3 of the same photo, one lighter, one normal, and one darker all in the same position, and then cutting out parts to reveal lighter parts and darker parts too.

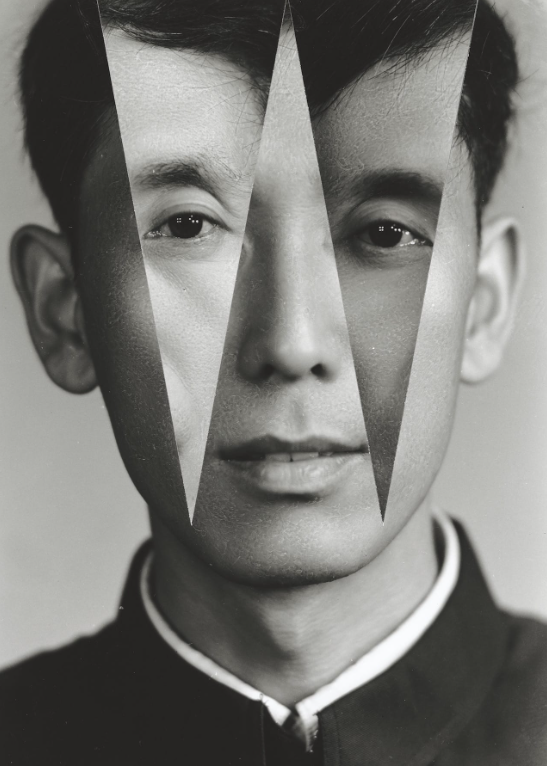
So just before I did this style and reference, I thought why not have two layers a blurred one and a clear one as-well, so I used his editing style but made the main photo blurred, and in the cut-out parts, where it reveals the non-blurred lighter photo underneath, another lighter blurred boarder round the cut-out.

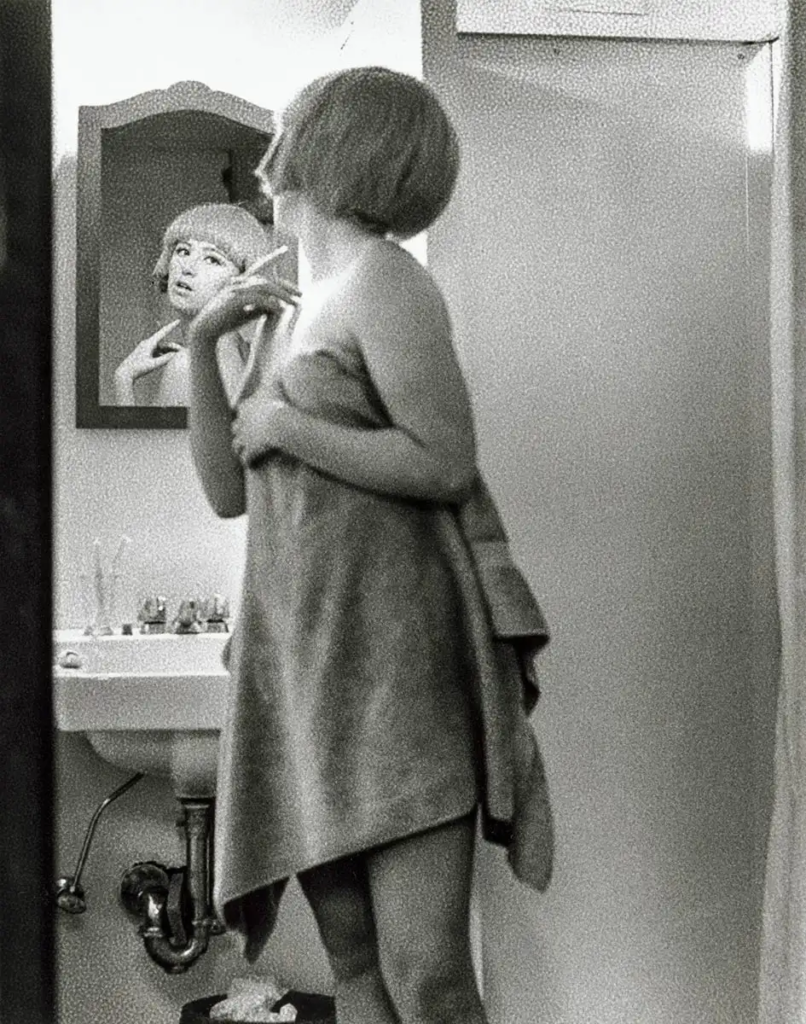
I have chosen to use this photo because it resembles femininity a lot with the use of makeup, a female stereotype and involves a necklace and bracelet which are considered feminine. Also, her green with a ring of hazel round the middle eyes, being the main focus of this photo really brings in the audience and could also be considered a feminine idea.

I started on Adobe Lightroom lowering the exposure and contrast and the other lighting tools like shadow, highlights, whites and blacks to create this darker more focused photo.

Then went into photoshop and had the idea of having a blurred photo of my model and then a brighter photo underneath with cut outs revealing parts of the photo. But I blurred both of the photos, the darker and the lighter one, and then cut out parts so that there was lighter revealed parts, still blurred though. So, after I did that I wanted something else to add to it, so I also, cut out the same shapes in a smaller form of the lighter blurred photo to reveal no blur and just the brighter photo, creating my final photo.
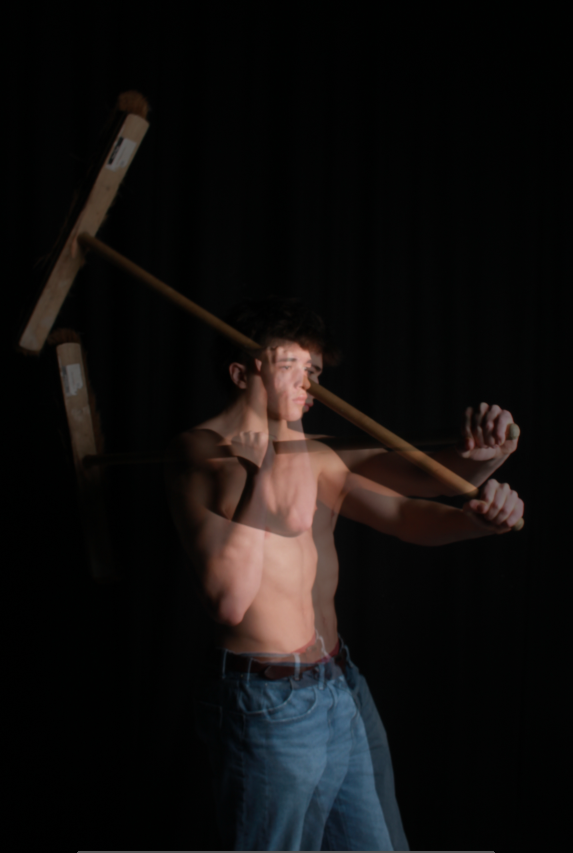
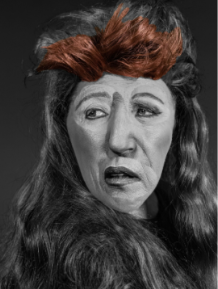
Photo #4

I have stuck with the same editing style for this photo which I really like from Lewis Bush and Idris Khan which involves multiple exposures overlapping one another to create end result photo.

I started by using this photo I took, similar to photo #3 but different style.

I didn’t edit this specific photo because you won’t see it properly anyways as the other photos overlapping it will cover it but not fully.

I then started importing other similar photos on top of each other in the same position to create a mixed, ‘confused’ photo.

This is my editing process of importing each picture in slowly with 50% opacity overlapping each other, which eventually created this full final picture.

I am really glad with how this photo ended up being with all the different multiple exposures on top of each other and how each photo is different but you can still clearly see what’s happening and the full photo.
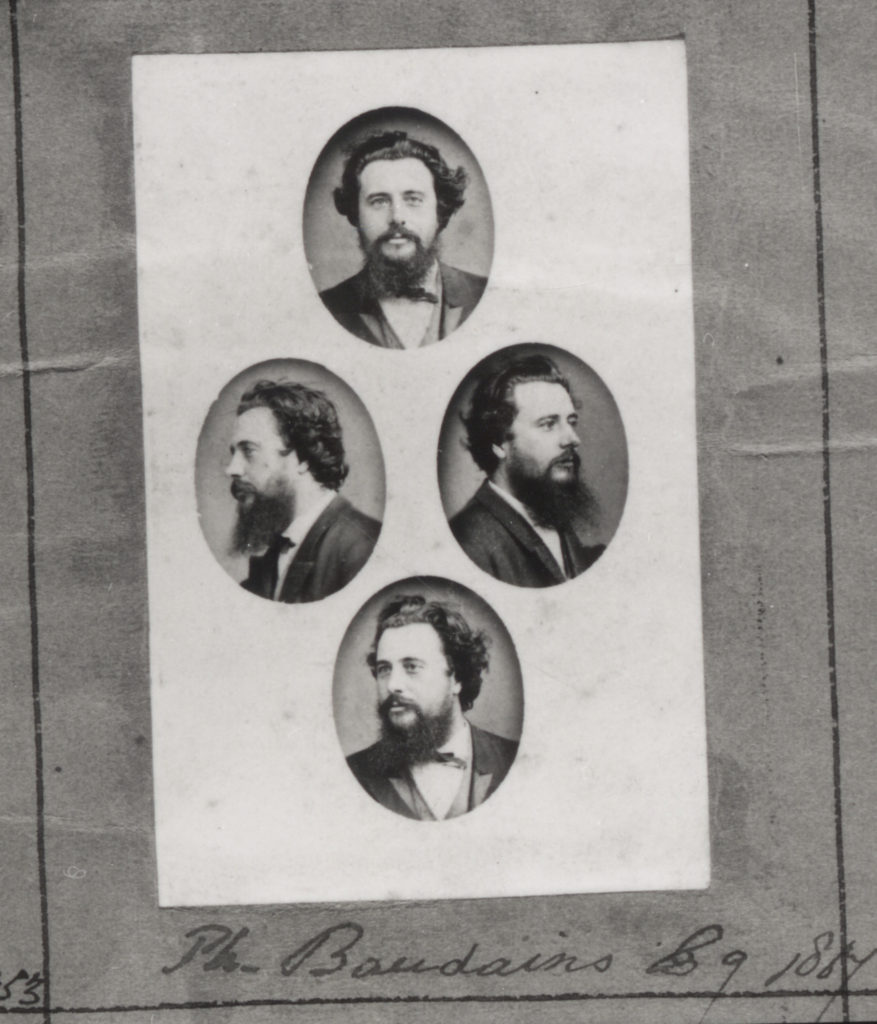
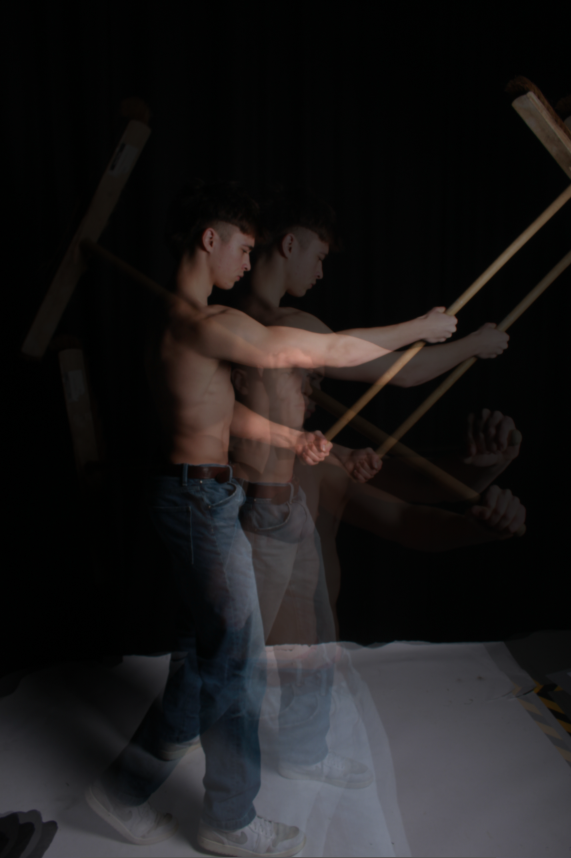
Photo #5

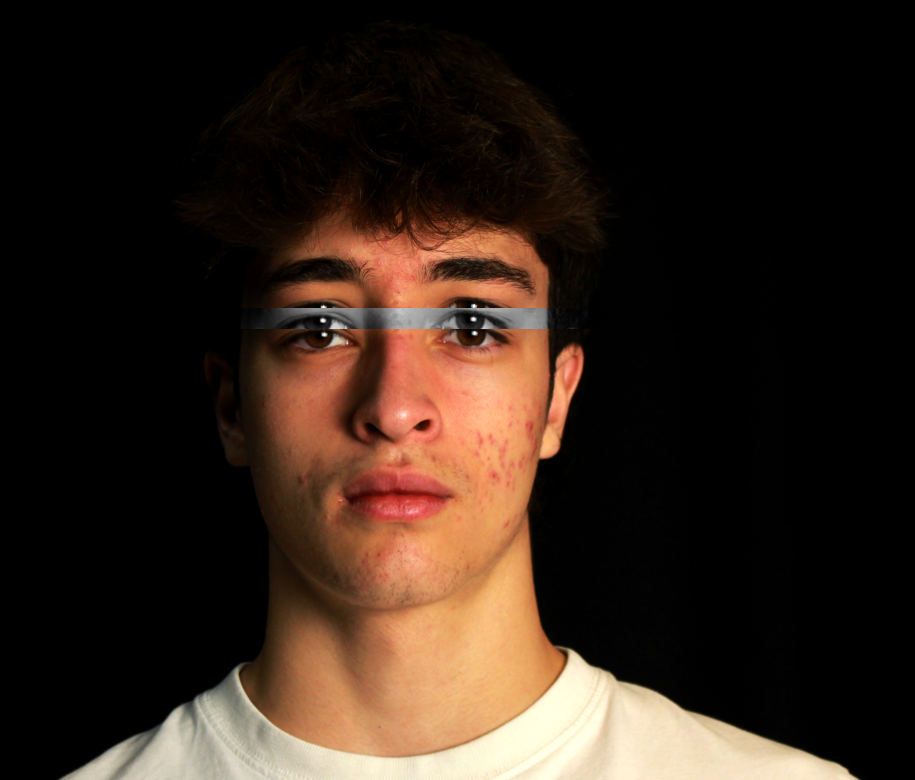
Very similar to photo #1 and #4, I am really glad with my multiple exposures that I have done and so in this one I tried a different idea.

I started with this photo of my Model and was thinking of adding the different angles and positions he was in on top of it.

Again, editing, didn’t need to edit it at all because more different photos are going over it so you won’t see this photo as much.

Started to add the different poses and angles of him over this photo.

But when I started adding each different picture, I thought why not make them alternate.
Between black and white, and coloured, to give it the same style look, but my own touch on it.

After doing that for a few of the photos it came out to looking like this, but I thought why not add some colour in some of them as-well so I added one blue one on the left, and one yellow one on the right, but off-centred to add to the confusion and exposure look.

Having the exposures at different heights and sizes really creates depth for the photo because they are each individual separate photos all showcasing different things, but all also relate to the same thing.
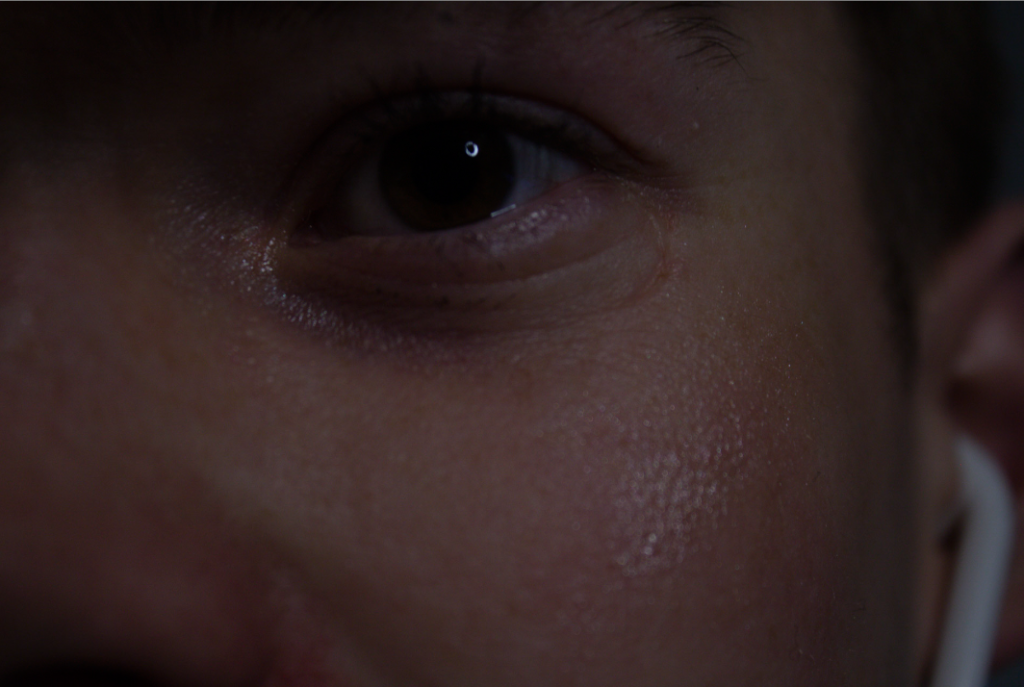
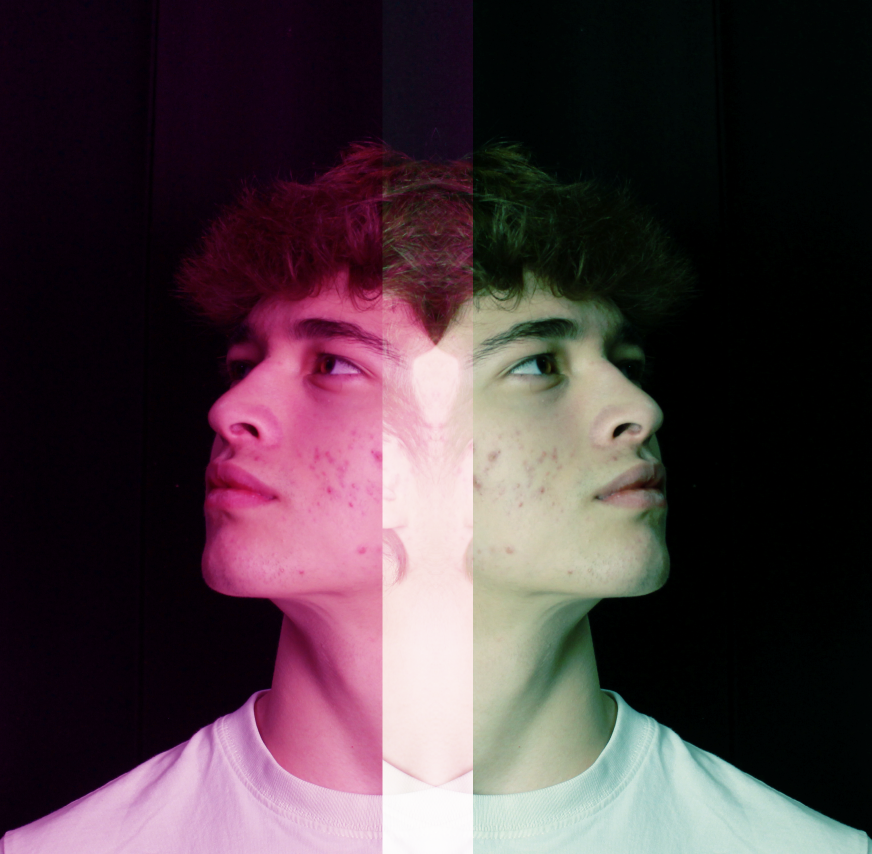
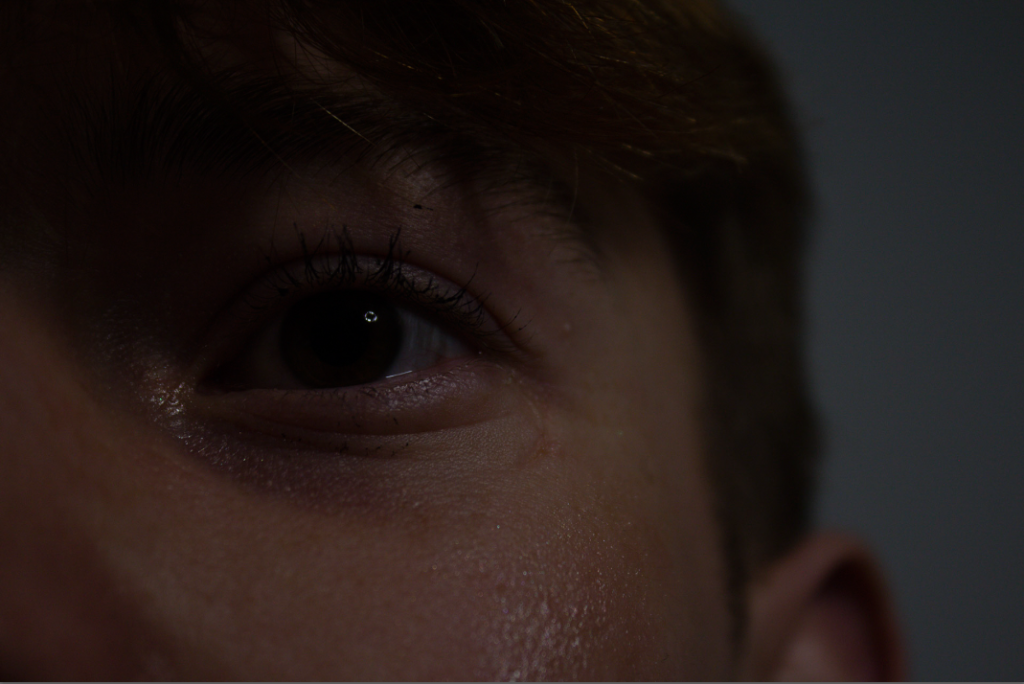
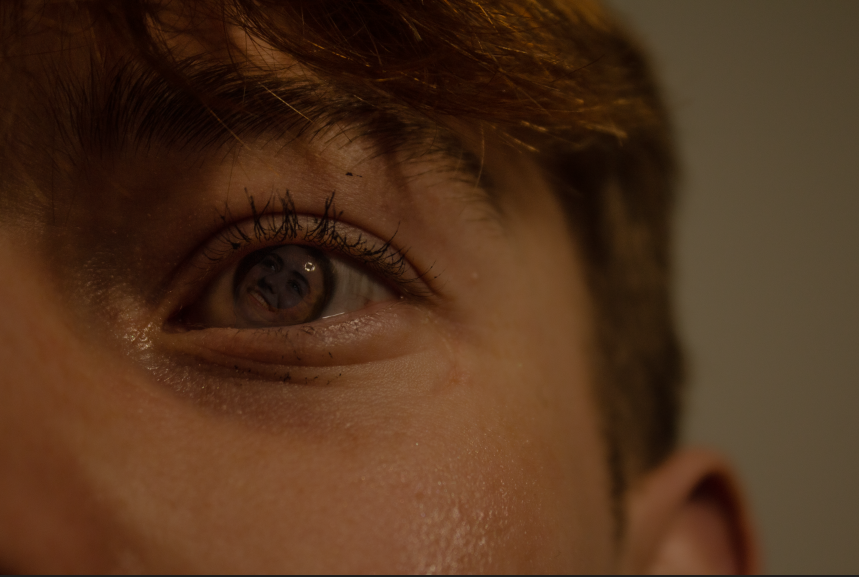
Photo #6

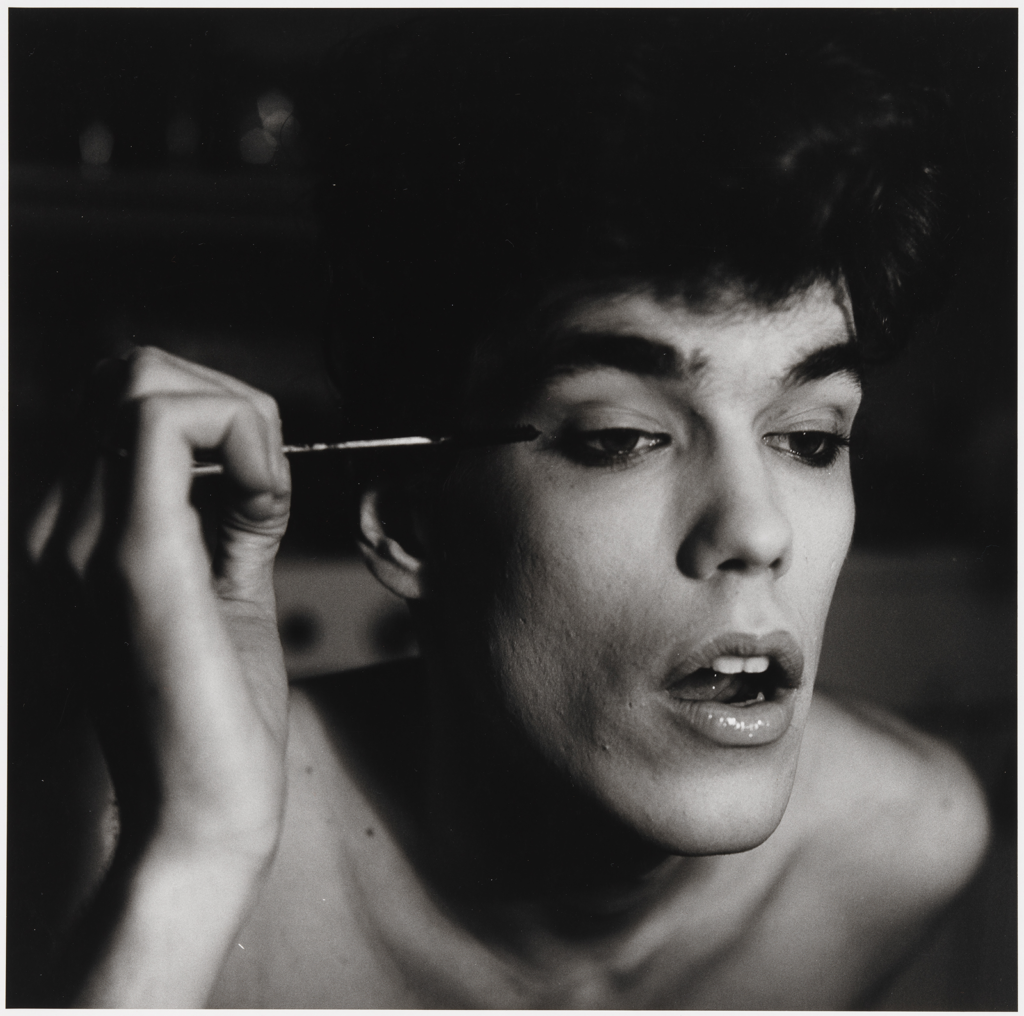
This photo inspiration came from Cindy Sherman again where she uses the different eyes over different faces, but I didn’t want to do that exact idea so I freestyled and came up with the idea of a male model with makeup on, eye shadow on the inner of the eye, glitter on the upper cheek bone, and mascara on the eye lashes. But in the reflection of the pupil/iris was a female who ‘typically’ would be wearing this sort of makeup.

Started by using this photo.

Thought it was a bit dark and so I increased the brightness, increased the exposure, decreased the contrast, increased highlights ever so slightly, decreased the shadows and so it made this photo.

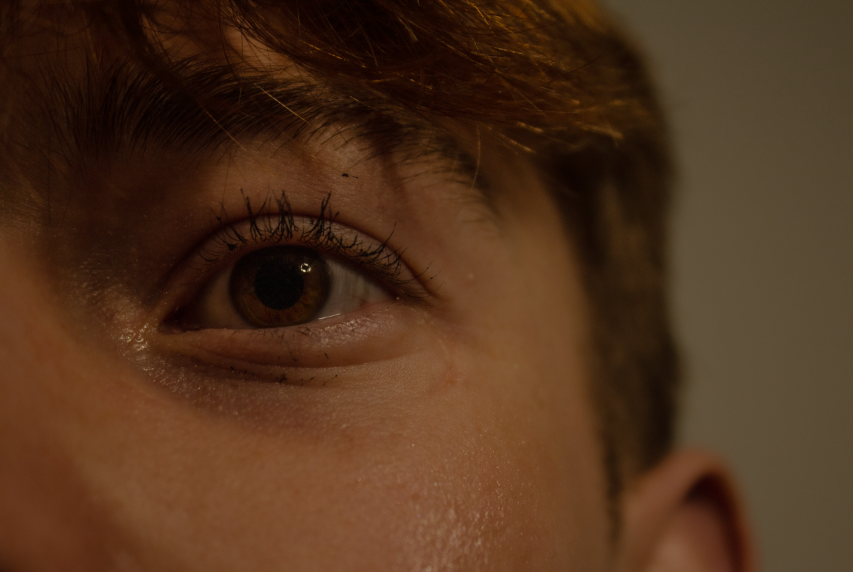
Which I much prefer as it is brighter, warmer, more friendly and helps the ‘feminine’ aesthetic look. But I wanted to use Cindy Sherman’s style by using someone else’s eye over mine, but I thought why don’t I put it in the reflection of the eye, so I got this photo of another Model.

I didn’t need the whole body so I just cut her out so just her head was showing.
As this would be inside of the pupil and iris.

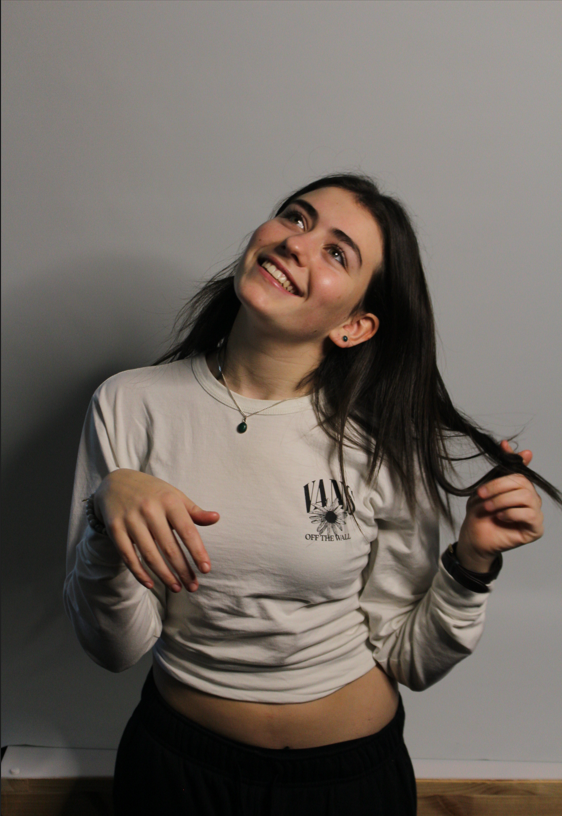
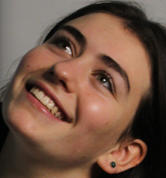
So, after I cut her head out and put it on top of the pupil/iris, I lowered the opacity to 25% and cut around the outside of the face so it fitted the eye, and so you can still see the eye ball behind it ever so slightly and her face doesn’t stand out too much.

This was the final result of the female face in the males eye reflection whilst the male has on all of the ‘feminine’ products such as makeup, (eye shadow, mascara, glitter).

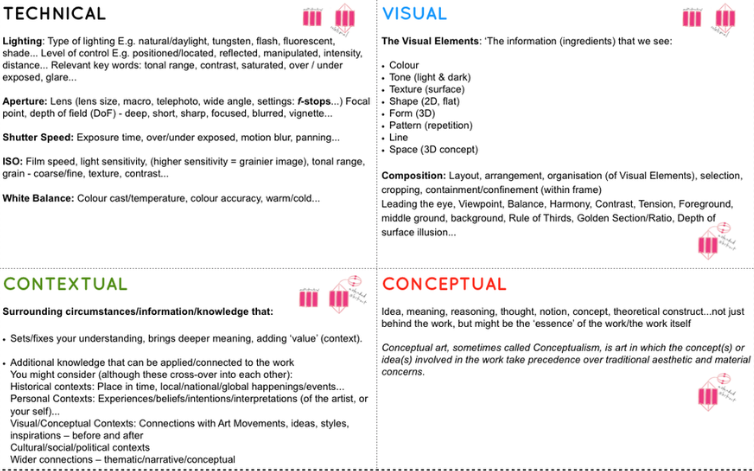
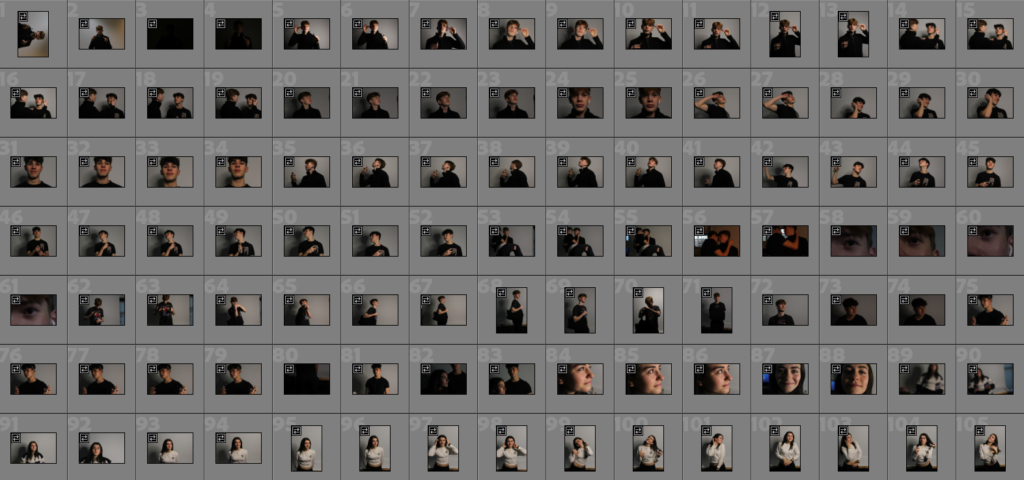
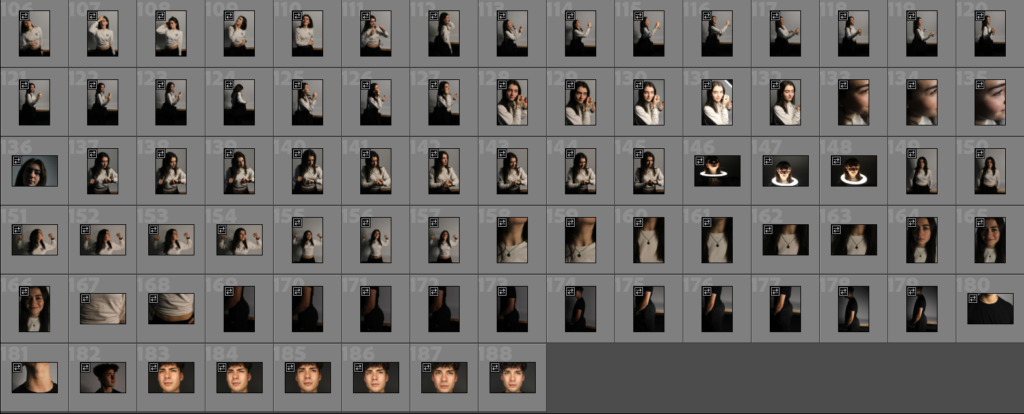
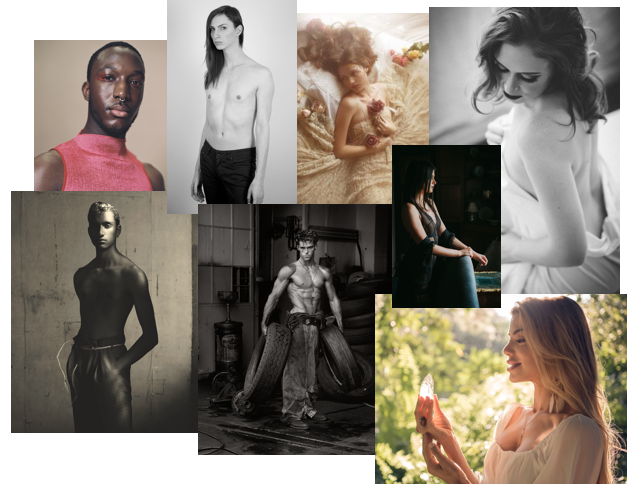
This is my photo gallery of all of my photos being showcased in!

Plan for Final Photo Editing

My plan for the final photos I will edit will consist of:

1: One idea I had was that I will cover the photo in dark, and then select different parts and shapes on the photo to show the underneath photo.

2: I will have a photo fully blurred but at the main focal point it will be unblurred.

3: Another idea is that I will combine some of the photos with shapes/masculinity/femininity ideas to create a stronger photo.

4: A collage of photos of Joey, my Model, with different exposures all low opacity overlapping each other.

5: A combination of multiple exposures of different models doing different poses and positions to create an overall clear photo.

Follow and critique my own photos using this Image Analysis Matrix.

Final Photoshoots

Here is my Top 3 best photos that resemble Masculinity

These photos resemble masculinity because they are mainly photos of muscles and a very traditional ‘masculine’ man, holding ‘masculine’ objects or poses.

These are my final photos after I have edited them.

For this photo, I used black and white because I personally think the b/w affect adds a very ‘masculine’ almost ‘strong’ image to the photo.
For this photo I made my model more tanned, increased the texture to show more detail and definition in the muscles and physique.
Finally, for this photo I increased the texture so my skin was more defined and you could see the stretch marks and skin texture and all of the muscles and veins in the arm, shoulder and forearm to show masculinity.

Here are my Top 3 photos that resemble femininity.

The first photo resembles femininity because it is of a male with makeup on around their eye which shows femininity even though it is a male. The second photo shows a necklace which is particularly a feminine object which a lot of women wear, also the long hair each side helps the audience tell it is a female, but could also be a male with long hair. Finally, the last picture shows my model using makeup (concealer) on her face with a tote bag around her arm which is all feminine things.

The Photoshoot Plan

My photoshoot plan I’m going to use for masculinity vs femininity.

Final Photoshoots:

A woman with ‘feminine’ products and objects, (makeup).

Take a photo of a man holding masculine items with no shirt, (briefcase, aftershave).

Go into a ‘feminine looking’ room (pink walls), (ballet pictures), with a masculine guy on the bed in front of the camera.

Photo Contact Sheet:
Femininity:

For the feminine photoshoot, I did myself and other males wearing makeup, holding stereotypical female objects like perfume, body spray, makeup and has curves too. Also, a female model wearing a crop top which is considered feminine, necklace, and herself holding makeup and using it.

Masculinity:

For the masculine photoshoot, I took photos of myself and some more models showing off ‘masculine muscles’, holding objects that are either heavy or show off ‘masculine’ vibes. Also, jaw lines and males Adams apple.

Cindy Sherman

Cindy Sherman works with female stereotypes and invents personas and tableaus that identify the nature of females. She does this by creating images that assumes gender roles like a photographer, model, makeup artist, hairdresser and stylist. Whilst also portraying a career girl, a blond bombshell, a fashion victim, a clown, or a society lady of a certain age. For over 35 years she created eloquent and provocative body of work for our visual culture.

Sherman’s photography is a depiction of the different ways culture defines “woman.” Her art plays on the feminist idea that gender arises exclusively within culture and deconstructs dominant gender ideologies, representing the underside of popular culture’s definition of “woman.”

She rose to fame in the international art world with her series of black-and-white photographs, “Untitled Film Stills” (1977–80), which advanced the concept of narrative photography. 

Renowned for her depictions of female stereotypes, Sherman has played with masculinity and gender expression before. In a series referred to as “Doctor and Nurse,” Sherman became both a male and female character, embodying stereotypical mid-century professional archetypes.

Femininity vs Masculinity – Claude Cahun: Freedom Fighter

Claude Cahun was a spirit of rebellion and defiance. She was a defying conventional ideals of beauty and femininity with a shaven head and male attire, to her direct resistance of German occupying forces.

Claude Cahun was a Surrealist photographer whose work explored gender identity and the subconscious mind. The artist’s self-portrait from 1928 epitomizes her attitude and style, as she stares defiantly at the camera in an outfit that looks neither conventionally masculine nor feminine.

In this photo, Cahun deceives the audience because they dress up to look like a masculine man with a heavy weight in their hand, short hair, and male clothes like shorts with shirt. But in reality, the weight is fake, the hair is tied up behind so you can’t see it, so the overall photo deceives us, the audience.

Identity, Masculinity & Femininity

Identity
A photograph resembles the likeness of what appeared before the lens. Which means

Identity Politics

Identity politics, as a mode of categorizing, are closely connected to the ascription that some social groups are oppressed (such as women, ethnic minorities, and sexual minorities); that is, the idea that individuals belonging to those groups are, by virtue of their identity, more vulnerable to forms of oppression.

Identity Politics in Jersey

Jersey didn’t want to move away from English and convert to Jerriais because they saw Jerriais as a ‘farm’ language and saw English as more of an international language.

Masculinity is seen to be the trait which emphasizes ambition, acquisition of wealth, and differentiated gender roles. Masculinity involves displaying attitudes and behaviours that signify and validate maleness, and involves being recognised in particular ways by other men and women. Traits traditionally viewed as masculine in Western society include strength, courage, independence, leadership, and assertiveness.

Femininity is a quality of acting in a typically womanly, girlish, or feminine way. Different cultures have different ideas of what femininity looks like. If you’re a gentle, sweet-natured person, your grandmother may praise your femininity. Traits such as nurturance, sensitivity, sweetness, supportiveness, gentleness, warmth, passivity, cooperativeness, expressiveness, modesty, humility, empathy, affection, tenderness, and being emotional, kind, helpful, devoted, and understanding have been cited as stereotypically feminine.

Masculinity Vs Femininity is that in a masculine culture, men are expected to be assertive, competitive, and focused on material success. Women are expected to be nurturing and focused on people and quality of life. In contrast, Hofstede says a feminine culture or feminine society is one where gender roles are more fluid.

This photo contradicts the masculinity vs femininity because it is a man with no shirt which is masculine, but then it shows him using makeup which is feminine, so it’s actually both in one photo.

Mood Board:

Headshots – Double/Multi-Exposures

The plan:

  • Subject looks off into distance or directly at the camera.
  • Multiple exposures behind/to the side or infront.
  • Centre of the frame.
  • Need to line up eyes if they are both pictures are same angle.
  • Main photo no expression, layered photo shows facial expression.
  • Dark background, layered photos less or more transparency.

For this multi-exposure montage picture I imported my model into photoshop, duplicated it two more times and dragged the two copied pictures behind the main photo and selected both of them to have 50% opacity with no background and put them equal on each side.

For this photo I imported the same picture twice with both overlapping each other with the multiply effect on both. Then created a box on the left with the left photo, made it pink, flipped the other same photo to the other side but made it green, but left a thick white bar in the middle to show the split.

Headshots – Photo Montage

The Plan:

  • I will take photos of my subjects facing towards the camera either straight or slightly tilted, and then go into photoshop and use the select tool to select either a triangle shape or square shape on the subjects face and move it to another part of their face like their hair or forehead and the two shapes should swap. For example, if I moved a part of the cheek to the hair then that part of hair would be where the cheek is.

For this photo I used, soft lighting with the body tilted slightly off centre frame, but his head facing directly towards the camera with eyes focus into the lens with only a subtle smile but no other emotions and no other gestures.

For this photo I used a model but I pasted the same picture 3 times and with the middle photo, I made it black and white and just cropped it to the eyes then copped the final photo just from the eyes and below to create this photo montage triple eye image.

Headshots – Diamond Cameo

Diamond Cameo
Diamond Cameo is when four small oval portraits were placed in background in the shape of a diamond with each portrait being of the same person photographed in a different position.

Henry Mullins moved to Jersey in July 1848, setting up a studio known as the Royal Saloon, at 7 Royal Square. Here he would photograph Jersey political elite (The Bailiff, Lt Governor, Jurats, Deputies etc), mercantile families (Robin, Janvrin, Hemery, Nicolle ect.) military officers and professional classes (advocates, bankers, clergy, doctors etc).

My take on Diamond Cameo:

Started by taking a few photos of each other with different face angles to recreate the diamond cameo look.

I really liked these 4 pictures of myself looking in different directions, so I used them in photoshop by copy and pasting them in, moving each photo to the correct position, creating oval shapes to go behind the photos with bevels and shadows on. Old, tea-stained paper for the overall background to give it an old look and then with the dodge tool, I lightened up parts on my neck/face.