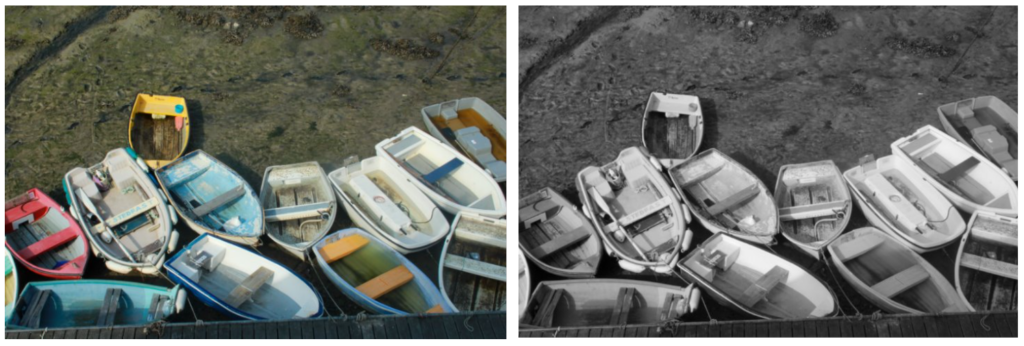
The photoshoot of the harbour included many different areas which meant I was able to get a large range of images. This included the new harbour and the old harbour. personally I prefer the old harbour photos and I also put some of them in black and white to match the more older theme to the photo.
I merged all photoshoots into one as some of these were taken over 3 different times.
I think to improve this shoot I should go down on a different day when the weather is brighter as a large number of the photos have cloudy skies which make them much darker. However, this also worked well with some photos as the black and white effect matches well with darker/ cloudy skies.
Black & White Images
For this photoshoot we went to Jersey’s Maritime museum where we listened to a talk about the history and then had our own time to look around and gather photographs of the museum. There were may different parts to the museum such as the occupation section which focussed on the world war.
I liked this photoshoot however I don’t think I will use it in my final zine as i would struggle to find many things that linked together. The images that are larger above were my favourite images from the photoshoot
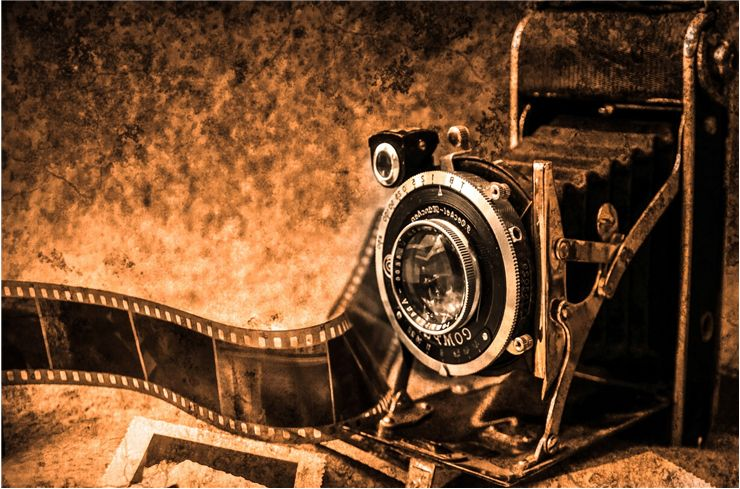
Photography is very good at turning the ordinary into the extraordinary. A usual everyday occurrence could be captured in a photograph and be completely transformed. Something such as as clouds in the sky, which is a usual thing for people to see in their everyday lives, could be captured in a photo to make it more dramatic and unique.
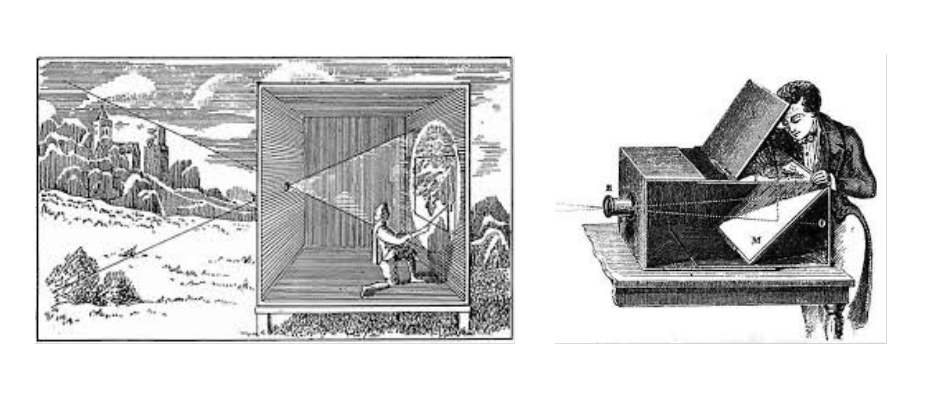
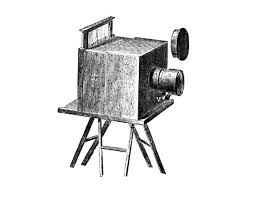
Camera Obscura
The camera obscura (dark chamber), is a device that has been very important in the history of photography. Its function involves light passing through a small aperture into a darkened room or box which would then project an inverted image of the outside scene onto a plain surface inside. During the Renaissance, artists and scientists began to utilize the camera obscura as a tool for drawing and understanding perspective.
Describe how an image is produced using a camera obscura – making the room pitch black and making sure there is no light coming through anywhere. create a hole somewhere where the light will be able to pass through. This process of waiting for the light to show could take up to an hour or two until the cut out shape is able to be shown on the other side of the room
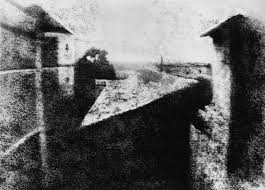
Nicephore Niepce
Nicephore Niepce is known for creating one of the earliest permanent photographs. He was born in 1765 in Chalon-sur-Saône, France. In 1826 or 1827, his first successful photograph was titled “View from the Window at Le Gras.” The exposure time for his image was around eight hours which ended up producing a blurred image however it was recognisable. He studied law at the University of Dijon but developed a keen interest in science and mechanics. Niépce came from a well-off family and was the son of a wealthy merchant. He later inherited his father’s estate. In 1829, Niépce partnered with Louis Daguerre, who was a theatrical designer and inventor. Although their collaboration was cut short by Niépce’s death, it set the stage for significant advancements in photography.
Heliograph- To make the heliograph, Niépce dissolved light-sensitive bitumen in oil of lavender and applied a thin coating over a polished pewter plate. He inserted the plate into camera obscura and positioned it near a window in his second-story workroom. After several days of exposure to sunlight, the plate yielded an impression of the courtyard, outbuildings, and trees outside.
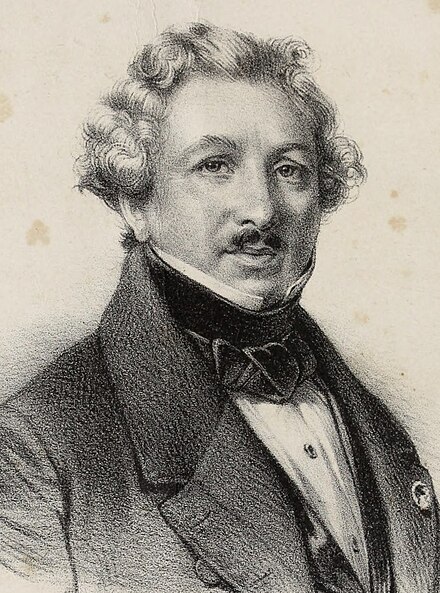
Louis Daguerre
Louis Daguerre 18 November 1787 – 10 July 1851) was a French artist and photographer, recognized for his invention of the eponymous daguerreotype process of photography. In 1829, Daguerre partnered with Nicéphore Niépce, an inventor who had produced the world’s first heliograph in 1822 and the oldest surviving camera photograph in 1826 or 1827.
After Niépce’s sudden death, Daguerre continued experimenting, and evolved the process which would subsequently be known as the daguerreotype. To create this, he exposed a thin silver-plated copper sheet to the vapour given off by iodine crystals, producing a coating of light-sensitive silver iodide on the surface. The plate was then exposed in the camera.
Henry Fox Talbot
William Henry Fox, 11 February 1800 – 17 September 1877, was an English scientist, inventor, and photography pioneer who invented the salted paper and calotype processes. Shortly after.LouisDaguerre’s invention of the daguerreotype was announced in early January 1839, Talbot asserted priority of invention based on experiments he had begun in early 1834.
Differences
Henry Fox Talbot experimented using paper and shoe boxes which he called “mousetraps” to create his image where as Louis Daguerre used a mirrored metal plate instead of paper. Talbot was not an experienced artist as it was known that he couldn’t draw very well whereas Daguerre was an academically trained painter who sold his own work. Daguerre’s invention of the Daguerreotype eventually became less successful and Talbot’s Calotype became more popular.
similarities
Both processes are long and tedious. Both invented in 1839 which meant there would be a competition between the two as they were invented in the same year. both processes fix an image.
He took unremarked photos of Murdock Ans turned ordinary into extraordinary. Andre. Control that transformation- art of photography. “how can something that reveals so much keep so much to itself”. shows the secret strangeness. instantaneous. secrets behind the world
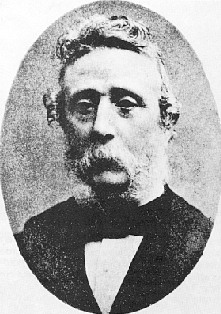
Richard Maddox
Richard Leach Maddox was born at Bath, England, on 4 August 1816. Maddox was prominent in what was called photomicrography, which was photographing minute organisms under the microscope.
In photography, the Collodionprocess was invented in 1851 by Frederick Scott Archer. This invention required only two to three seconds of light exposure to produce an image. When he noticed that his health was being affected by the ‘wet’ collodion’s ethervapor, Maddox began looking for a substitute
George Eastman
George Eastman(July 12, 1854 – March 14, 1932) was an American entrepreneur who founded the Eastman Kodak Company. This was an American public company that produces various products related to its historic basis in film photography. Working as the treasurer and later president of Kodak, he oversaw the expansion of the company and the film industry.
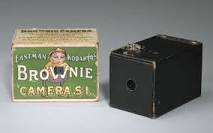
Kodak (Brownie)
The Brownie was a series of camera models made by Eastman Kodak and first released in 1900. This was a basic cardboard box camera which was initially aimed at children. An improved model, called No. 2 Brownie, came in 1901, which produced larger 3.25-by-2.25-inch photos, cost $2, and was also a huge success. Many iconic shots were taken on brownies such as images produced from the Titanic disaster or even taken to war by soldiers. The cameras continued to be popular, and spawned many varieties such as Boy Scout edition in the 1930s. Six-20 Flash Brownie in 1940, Kodak’s first internally synchronized flash camera, using General Electric bulbs. In 1957, Kodak produced the Brownie Star flash, Kodak’s first camera with a built-in flash.
Film/Print Photography
The first film that was in a roll and flexible was made by George Eastman in 1885, but it wasn’t synthetic but on paper. “Safety film” was introduced by Kodak in 1908, made of cellulose acetate and was invented as a replacement for dangerous nitrate film. in 1855, The first Photographic plates that could produce images in colour appeared however this included long exposure time which was very unpractical. Colour film was used for home movies and photographic cameras but was still too dark and much more expensive than black and white. It took 40 years for colour film to become standard and for black and white to be used for low-light and art photography.
Digital Photography
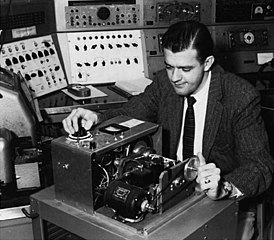
The history of digital photography began in the 1950s. in 1957, American computer engineer Russell Kirsch developed the first rotating drum scanner and software that could digitally record images. Digital photography is a complex technological process that utilizes optical physics, materials engineering, and data science to transform light into electrical signals that are converted into photo elements that comprise a digital image.
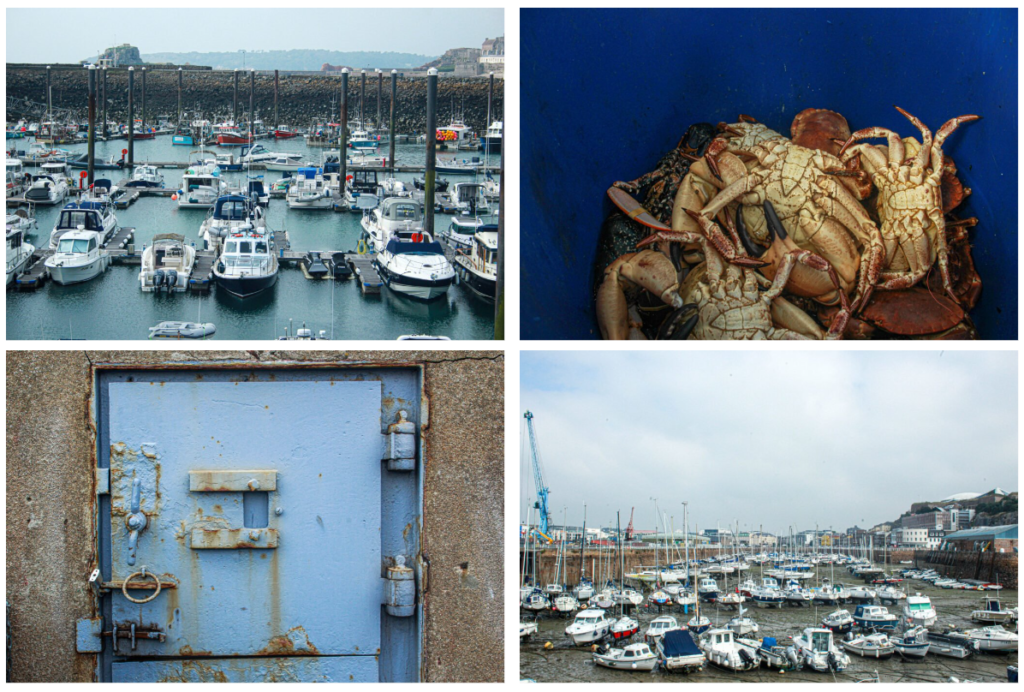
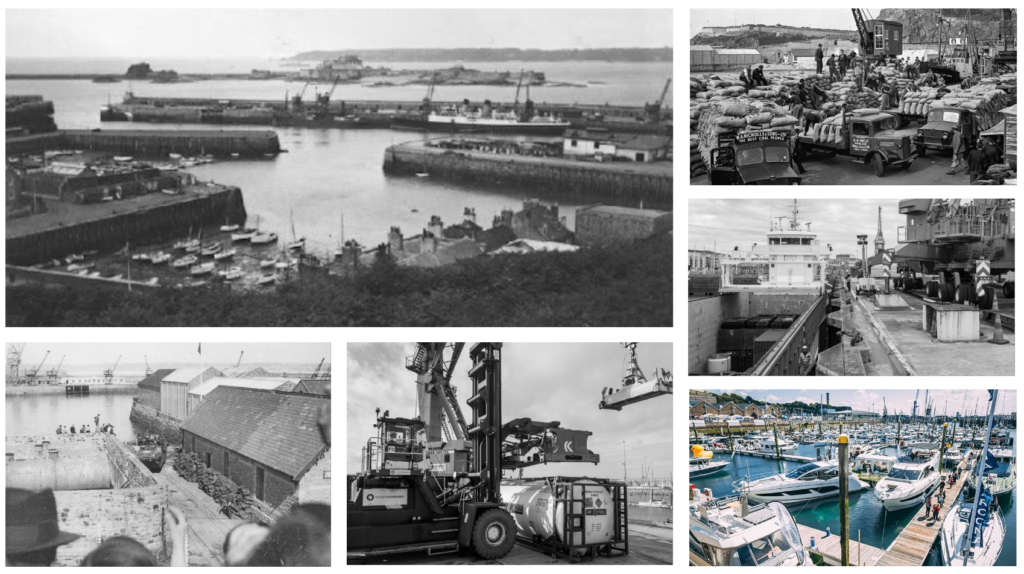
St Helier harbour is the main harbour in Jersey, its located on the south coast of the island and occupies a large amount of the coast in St Helier. It was constructed in the early 19th century. The harbour is split into different parts given the names of Old Harbour, Elizabeth Harbour and The Main Harbour.
origins of St. Helier Harbour can be traced back to the 16th century. With St. Helier being on the south-eastern coast of jersey, it gave it protection from storms meaning it was an ideal site for fishermen. St. Helier became increasingly important as a centre for trade and fishing.
The harbour facilitated the exchange of goods with France and England, and local fishermen relied on it for their catch. In the 18th century the harbour having improvements such as expanding it to fit larger vessels to aid with the trade and fishing. The Albert pier was established in 1853 and it became an essential addition to the harbour. It allowed larger vehicles to dock directly in St Helier harbour. This improved the functionality of the harbour and increased the capacity. The harbour played a critical role in troop and supply movements during both World Wars, particularly during the German occupation in WWII. The islands were occupied by the Germans during the Second World War, and most island-based ships went to England in June 1940. Initially a number of fishing and private boats, then later smaller craft, made the perilous journey with over 200 escaping islanders.
In the late 20th and early 21st centuries, the harbor underwent significant upgrades to accommodate modern shipping needs, enhance security, and improve facilities for passengers and cargo. Different parts of the harbour are places for personal boats and that has to dock creating excellent views of the many different boats and
The harbour increases jersey tourist numbers with its ferry services that travel to the other Channel Islands and the mainland. Many events can be held at the harbour including the boat show which is a popular attraction on the island
What was the involvement of Jersey mariners in the Canadian cod-fisheries and the Transatlantic carrying trade?
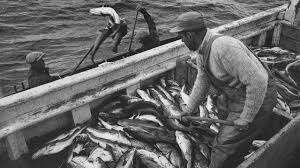
A few hundred years ago, the first islanders went to plunder the cod-rich seas of the American and Canadian coast. Fisherman travelled to these parts and, by 1580, around 10,000 European fishermen were making the transatlantic voyage to the area each year to fish for cod. between 60 and 70 Jersey vessels, manned by up to 2,000 Jersey men and boys (10% of the entire population), were involved in the trade. By 1763, Jersey was shipping more Newfoundland cod than any other British port.
Fishing out in sea was usually pretty easy to catch the Cod however, getting closer to shore was far more difficult. Though it was a challenge, this was commonly where they would be fishing since here was where the Channel Island fishermen got their biggest catches. Some men were employed to catch the cod, others carried fish to the processing site, where others cut off the heads.
The cod trade significantly impacted the economy of Jersey, opening up jobs and providing income for many islanders. The trade routes established during this period laid the groundwork for future maritime commerce.
By the late 19th and early 20th centuries, the cod trade began to decline due to overfishing,
Jersey went through a financial crisis and the Jersey Banking Company collapsed as a result of fraud and embezzlement. head offices relocated to Canada where assets were beyond the reach of Jersey creditors, and as the cod industry went into decline.
Which ports did Jersey ships sail to and trade with?
Fisherman originally belonging to the channel islands were amongst these people and by the 1750s Jersey fishermen participated in this lucrative trade, catching cod and exporting it to Europe, particularly to countries like Portugal and Spain. they had set up trade routes between Canada, Europe and America. Cod was traded in Europe, South America, North America, in the Mediterranean, and Africa.
What type of goods did Jersey merchants exchange for cod-fish?
Jersey traded the cod for things such as rum, molasses, coffee, brazil and mahogany. Fortunes made through the North Atlantic cod trade were most probably the wealth for the construction of some 18th and 19th century houses in Jersey’s town and countryside.
Jersey cod-merchants also exported cod-fish to British colonies in the West Indies and later Brazil too in exchange for plantation goods, such as sugar, molasses, rum, cotton, coffee and tobacco which it brought to markets in America, Europe and the UK (inc. Jersey).
This type of photography technique is used to tell a story within a range of photos printed on one page. These photos tend to link together displaying an overall meaning/story but each image also may be unique in its own way and tell a portion of the story of its own.
It’s important to carefully choose photos that make sense within the story you are telling, if you remove a photo and it no longer makes sense then it tells you that photo was an important aspect whereas if you remove one and it makes more sense that photo would be unneeded.
Establishing shot:- This is a shot that is usually a wide shot of buildings or landscapes which could include important landmarks. The photo would generally give the audience context and an understanding of where the shoot is based or a sum up of what the piece is about
Person at work:- This is a shot that captures an image of a person who is in their work environment. It would usually involve them participating in an activity that relates to their job while the image is being taken. The background of these images are important os that the viewer gets the best understanding of what job they do (for example rails of clothing behind them and a till would explain they work in a clothing shop) as well as this, props can also help (such as a name tag with the shops name on it or a uniform)
relationship shot:- this is a shot which shows a connection between people in the image. This could be relationships such as partners, family members, or friends.
detail shot:- This is usually a shot which would focus on one aspect of an image. Usually this small factor is able to tell the story of the image by itself. The background surrounding the main aspect would be usually blurred to make sure that the main focus remains the main focus and stays high-quality.
environmental portrait:- This is a shot where the person is in their natural environment such as their home or even their place of work. It usually shows key parts of that persons life and what they do
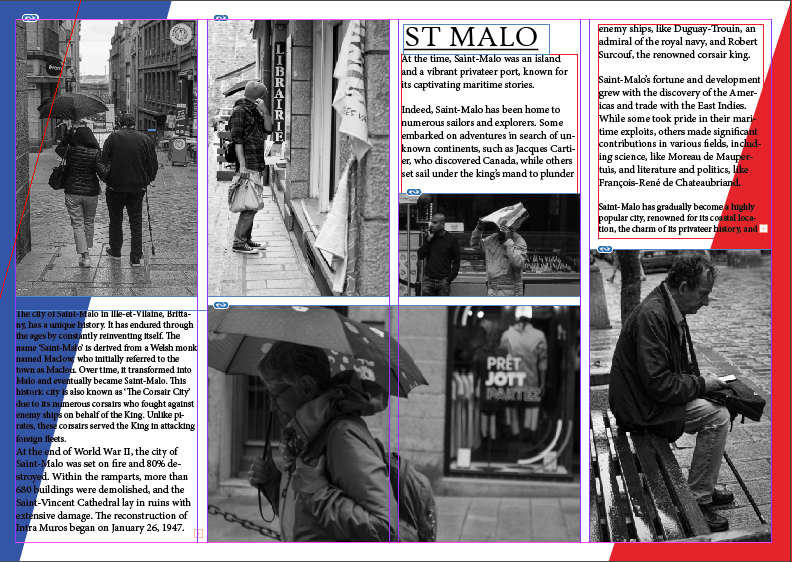
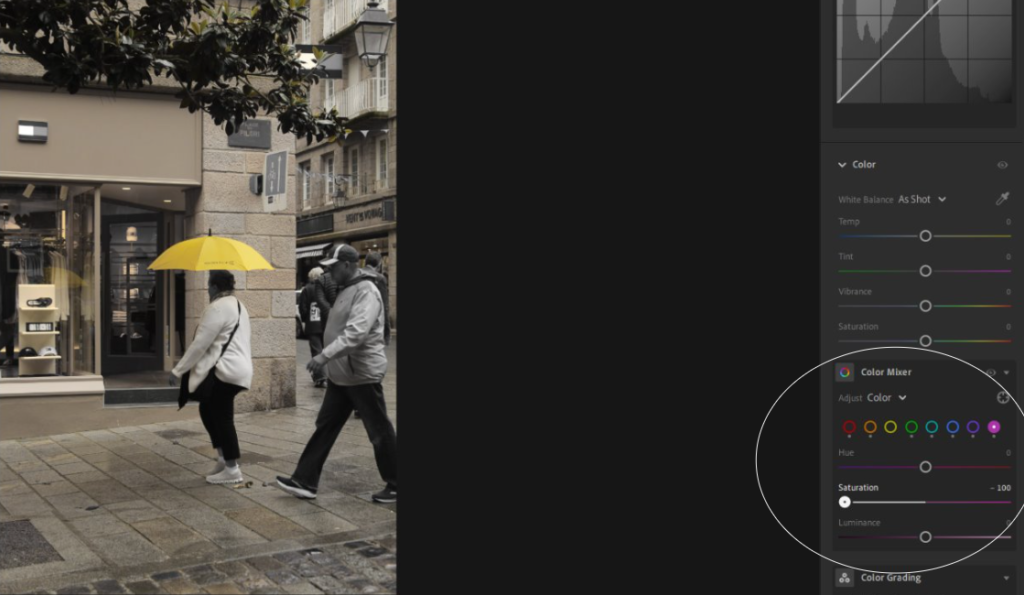
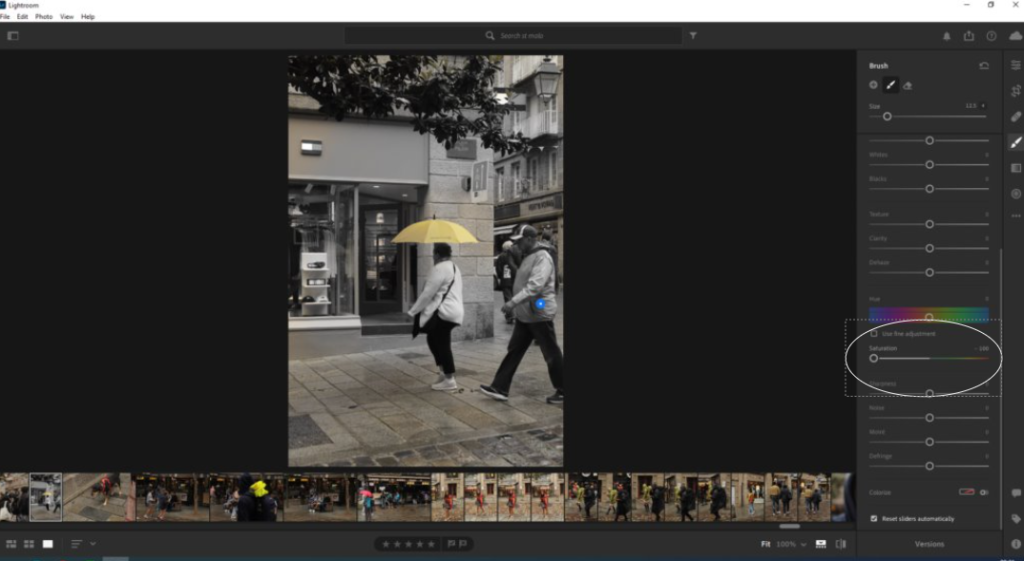
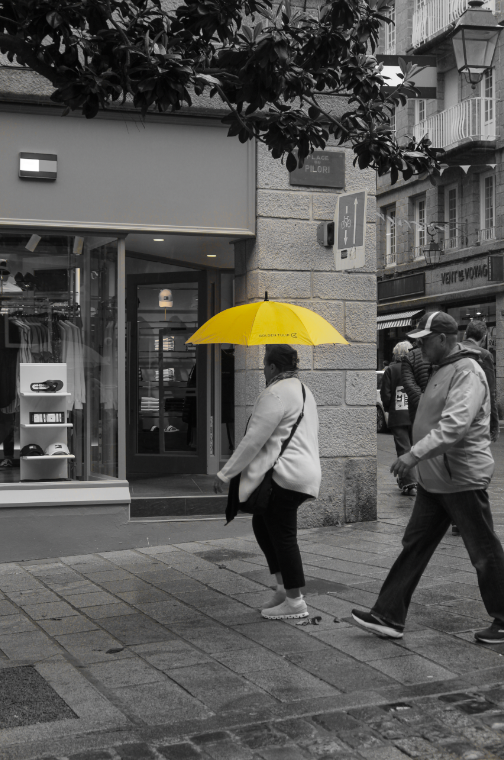
For this edit, I first had to start by picking an image that had an obvious colour in it so that I could make it stand out with the black and white. I chose this photo as yellow is a bright colour and would pop out well.
I got the photo up on Lightroom and then turned all the saturations to -100 on every colour but yellow as that was the colour of the umbrella. this washed out the colour elsewhere in the photo, however, it wasn’t completely black and white. using the brush tool I needed to scroll down and select saturation and turn it down to -100 as I did before with the individual colours. Then I could adjust the size of the brush and drag it over my image around the umbrella. The last step I did was going back to the first step to the saturation of the colours and select yellow and increase it so that the yellow became more vibrant amongst the black and white.
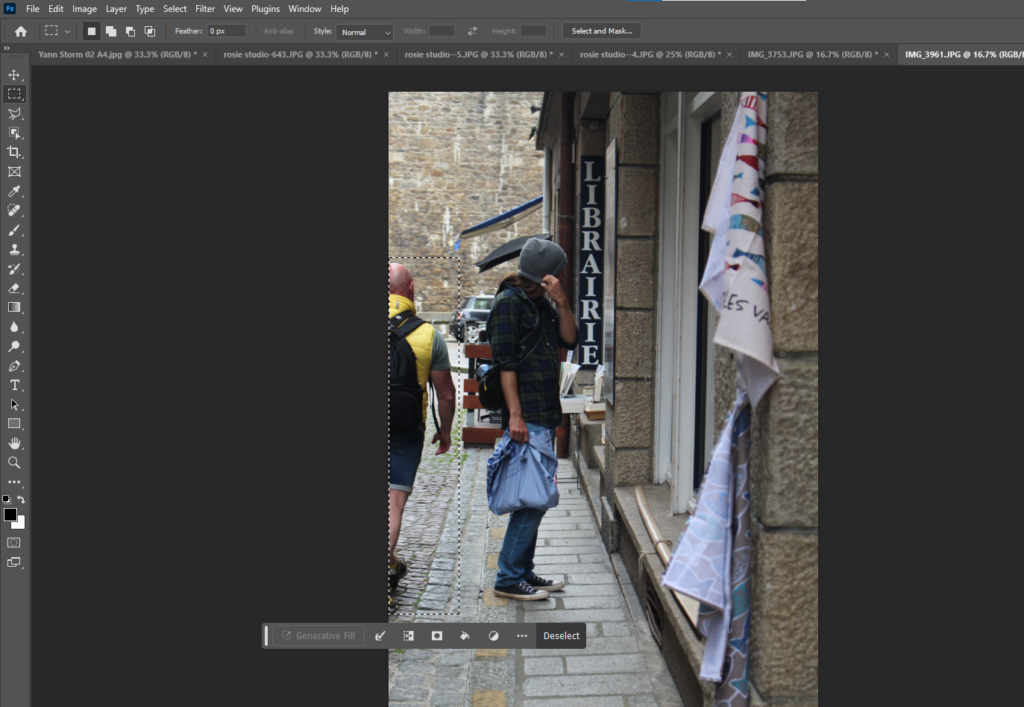
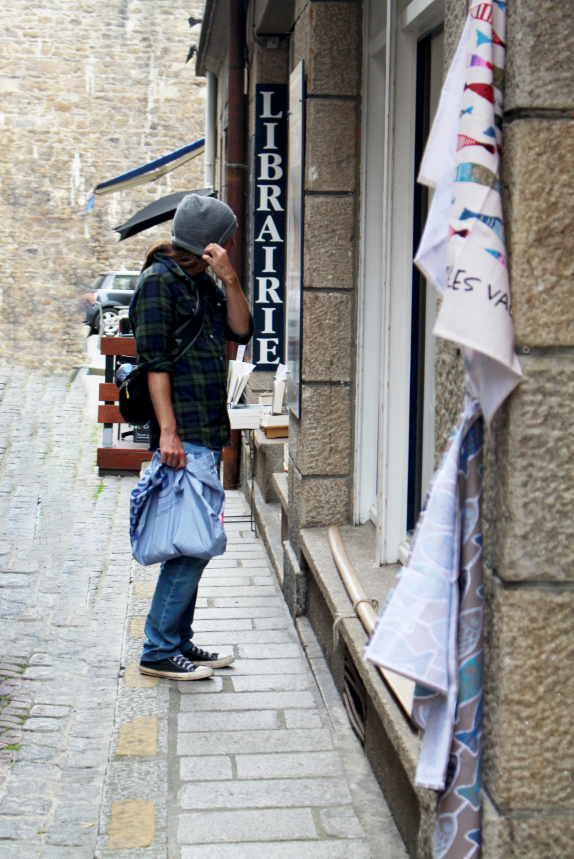
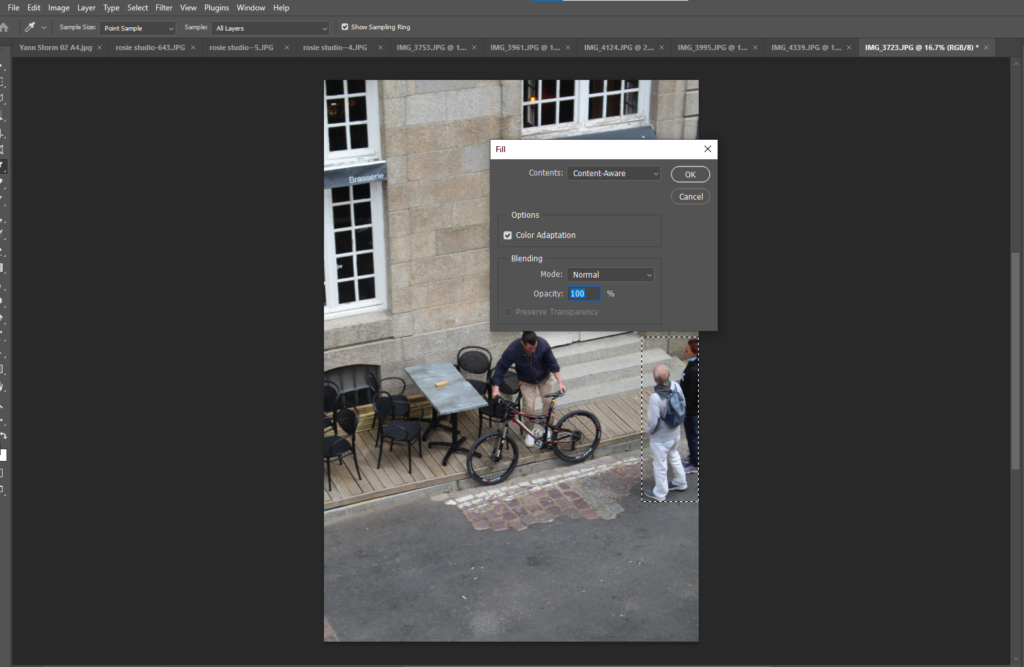
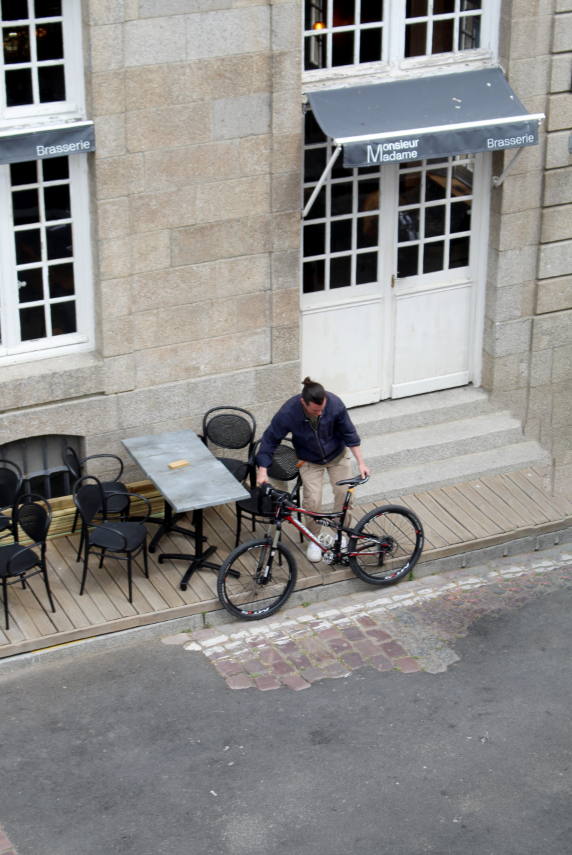
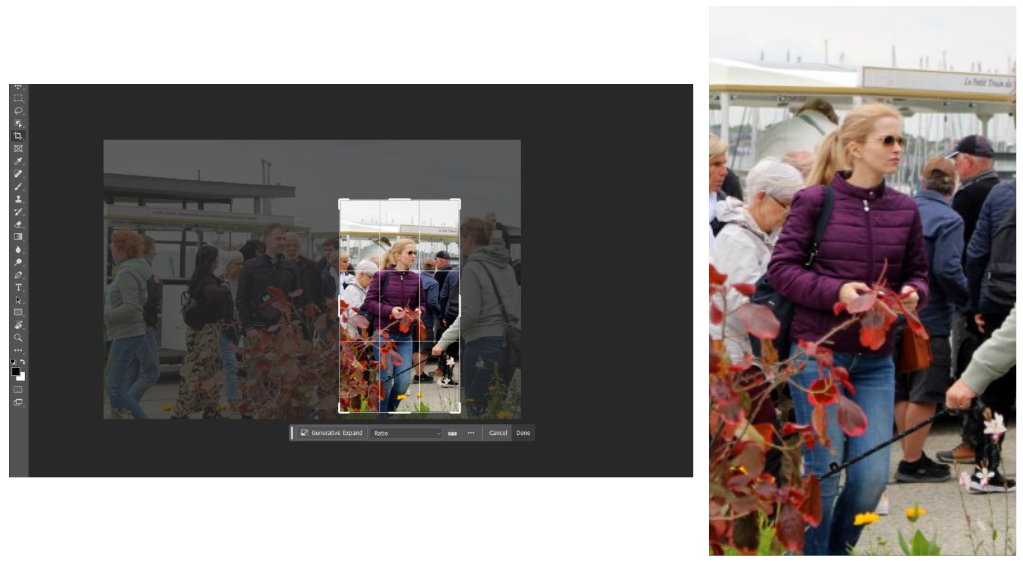
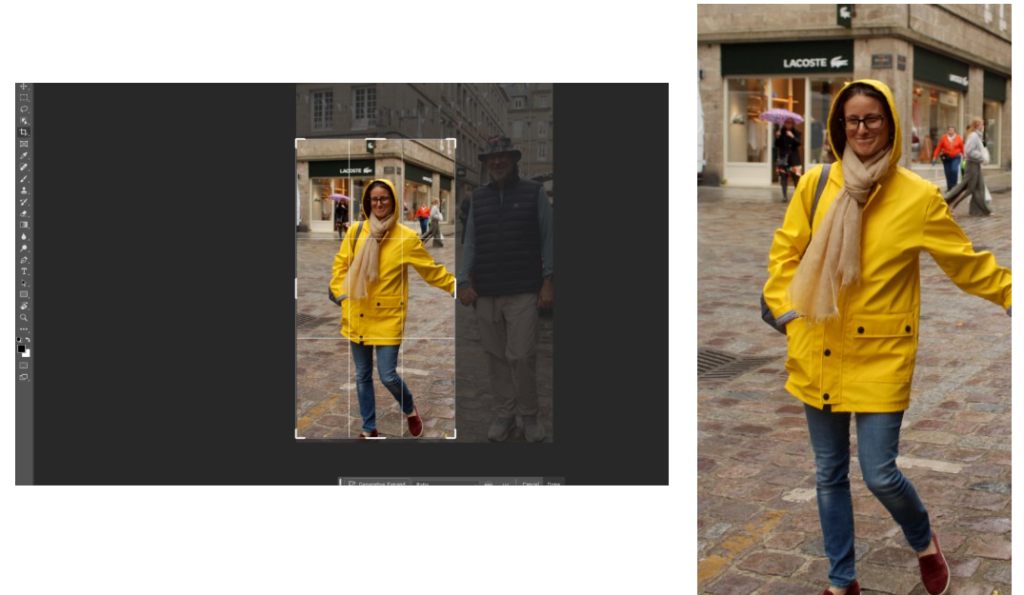
For this edit, I used the AI experimentation work to get id of certain aspects of my image. As you can see in the screenshot photos, I dragged the rectangular marquee tool over the things or people I didn’t want in my image and then simply pressed the backspace on my keyboard and then ‘ok’. after a little bit of loading it then got rid of what I wanted. in some trials, the AI would distort the image which I didn’t like so I had to retry many times or just decide not to use the image.
This photoshoot was taken in St Malo where we were able to go off in groups and take photos of the various things we see. the main focus was people and making sure this didn’t involve any posing as we needed the photos to be natural and unexpected like Henri Cartier-Bresson’s photos. I decided on editing many of my photos into black and white however kept some in their original form as I didn’t want to do everything in black and white. My photos include both camera photos and also photos taken on my phone.
When taking photos on my phone, I put it into portrait mode so that after the photoshoot was over I was able to go through the photos I liked and select the main aspect of the photo so that the camera would refocus on that and add a slight blur into the background. I liked how these type of photos turned out.
When going through my photos, I decided to group them into mini photoshoots when I noticed a few similarities in some images. I really like how some of the photos turned out in the rain so decided to pick out my favourites and present them together.
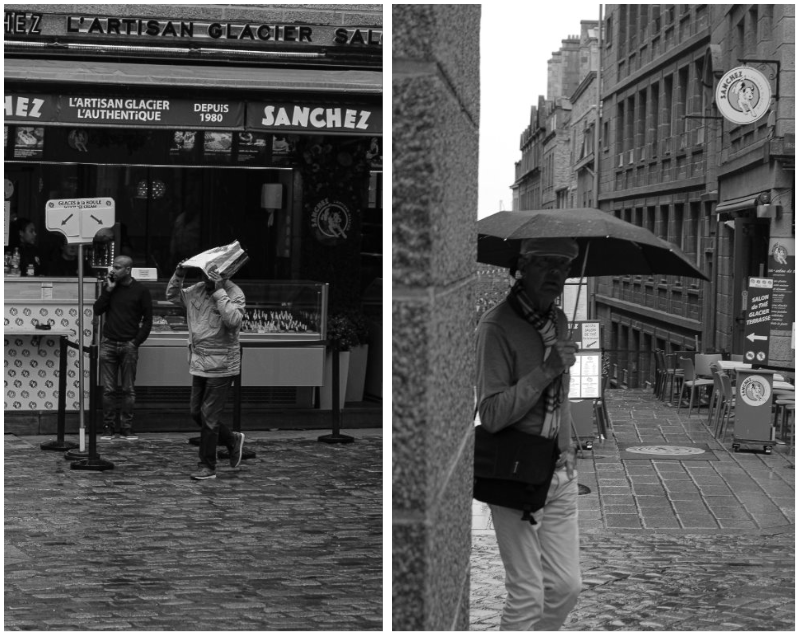
Favourite photos in the rain:
I quite liked how the photos turned out in the rain and I also think putting them images in black and white was a good idea as the use of dark shades adds to the weather which is dark and miserable. I took 3 of these photos in the same place by looking around and waiting for a moment to turn up. On the bottom right image, I kept my camera positioned in the same place as many people were turning the corner at different moments and wouldn’t be expecting to pose for an image. My favourite image from this selection is the top left image.
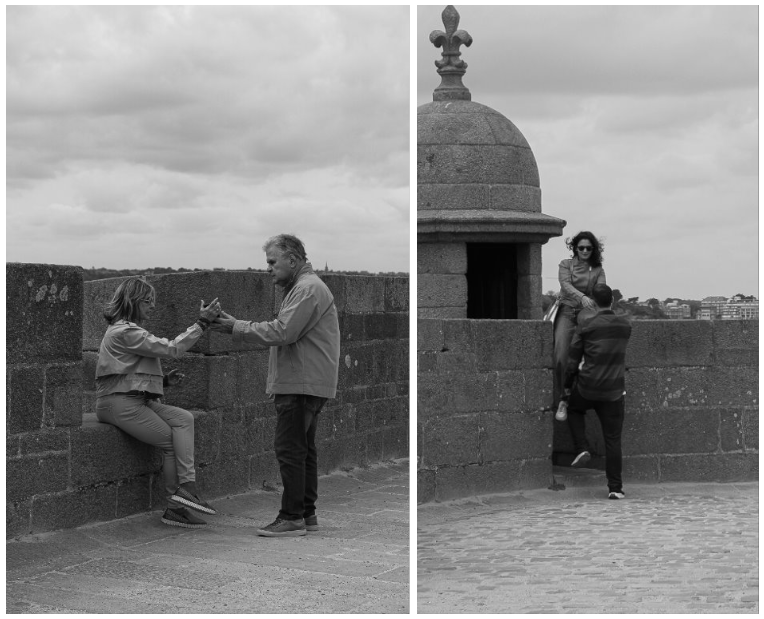
Favourite Photos of Couples:
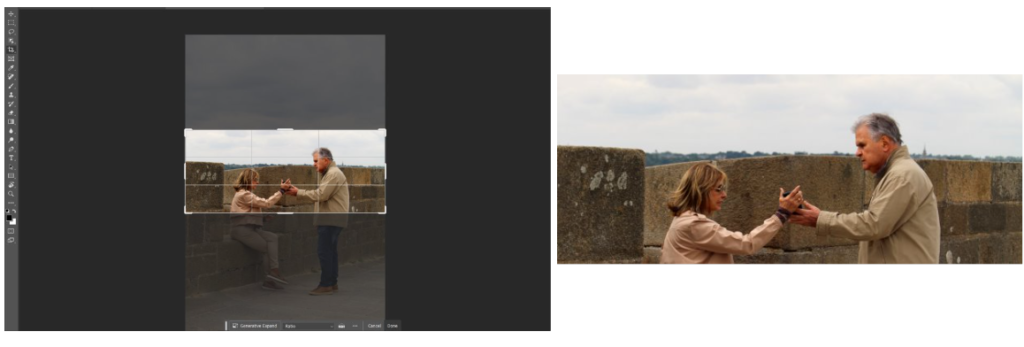
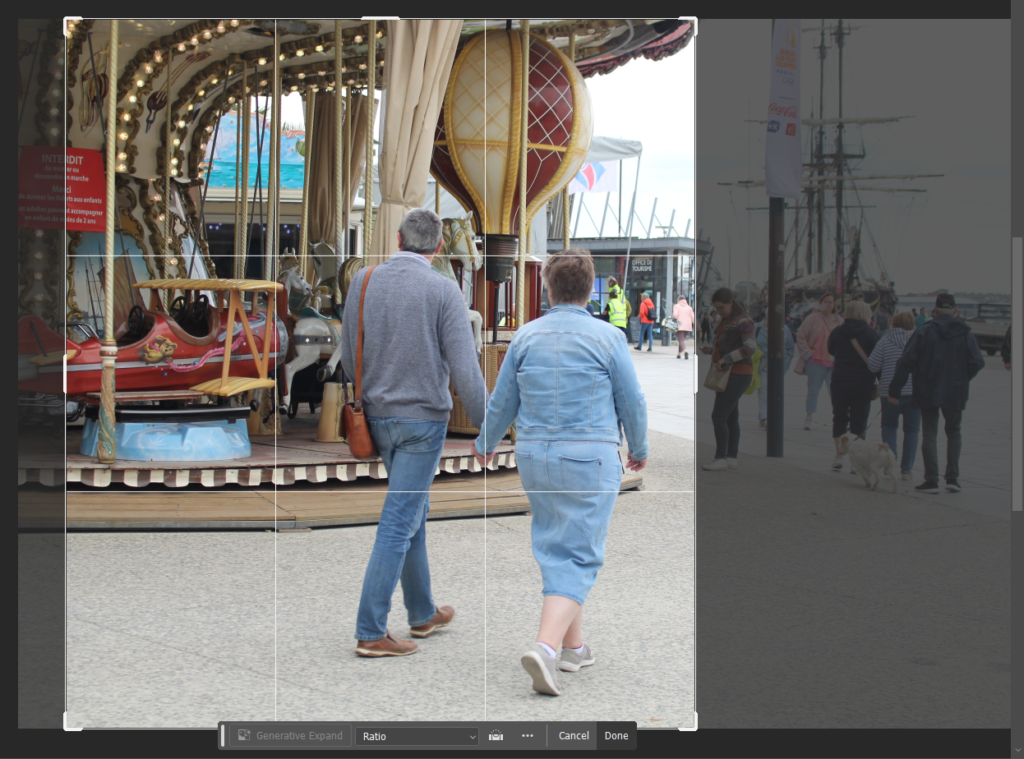
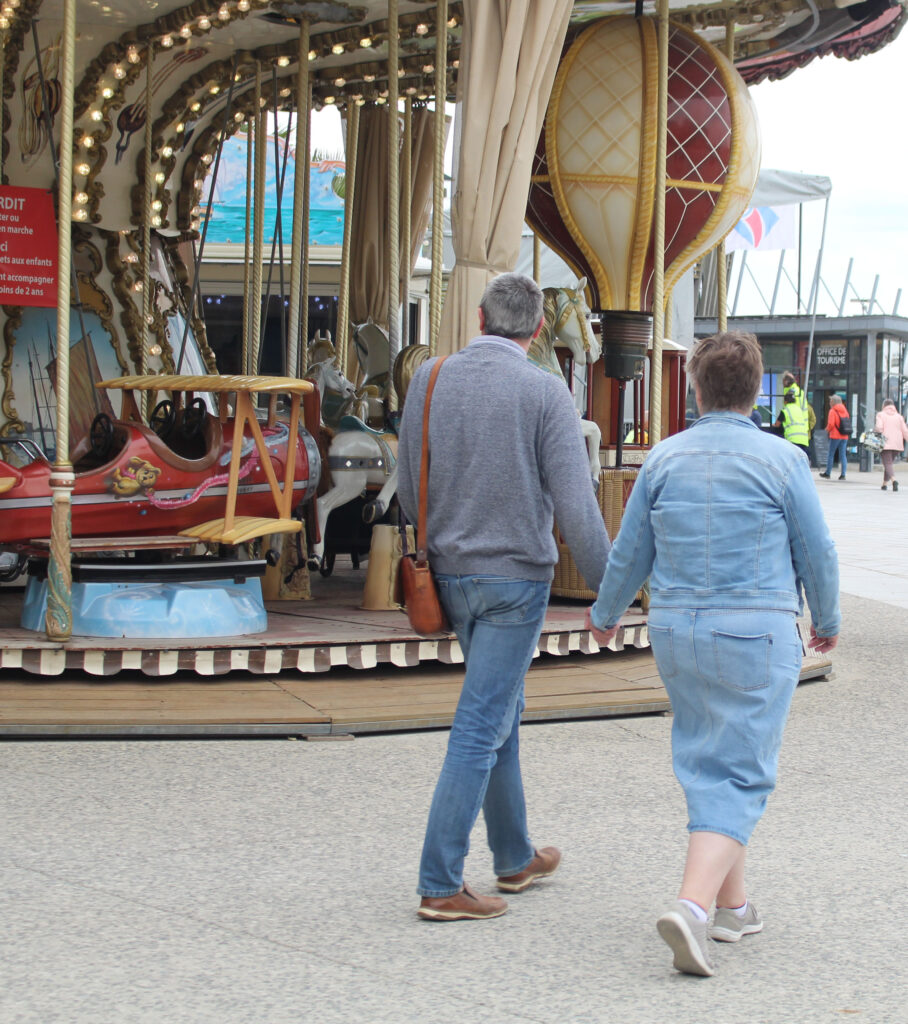
I really liked these images because I think it can bring across a happy feeling to the viewer by seeing two people together captured in a photo. For the top two photos I also used the skill of cropping to make them the centre of the image, the top right photo was originally more zoomed out where the couple in the back weren’t instantly the main focus so i think the way i cropped worked well as they are directly centred and very obviously the main focus.
My favourite photos in colour:
Favourite photo
This image really stood out to me and I decided to choose it as my main image. The lighting in the image is only from natural lighting but as the weather was raining at the time, the lighting is limited as there was barely any sun. The light reflection non the bench further shows the viewer that the weather is wet and rainy as it may not be clear to them instantly. The angle I used was directly next to him but not as close as I didn’t want to be noticed and have him look at the camera. So I simply zoomed up on him from a small distance away. This phot was taken on the camera but I also partially edited it on my phone by using the portrait mode to but the man in focus and blur the background.
I decided to make this image black and white to match the overall feel of the image. The dark tone, rain and emotion shows how black and white would work better than keeping the image in colour.
I think this image would make the viewer feel quite sorry for the man because with the involvement of the weather, darkness and his expression it gives the image a bit of a sad feel to it. The man in the image is sat alone on a bench in the rain with his head slightly tilted down but his eyes are looking off into the distance. I like this because it gives the viewer a chance to imagine what he’s seeing or what he’s feeling and wonder what his story is.
Henri was born on August 22, 1908 in Chanteloup, France. He grew up in a wealthy family in France. It was in his early life that he was introduced to the arts. Cartier-Bresson developed an early love for literature and the arts since creativity was certainly a part of his DNA as his grandfather, uncle and father had been involved in some shape or form. Starting with painting and being drawn to it the most, Bresson soon discovered photography which he described as an extension of drawing and an extension of his eye. He used photography as his way of interacting with the world, he travelled extensively from Europe to Africa and explored many different cultures within his photography work. “I adore shooting photographs,” he’d later note. “It’s like being a hunter. But some hunters are vegetarians—which is my relationship to photography.” His effort and work with photography shaped his outlook on life and he believed that photography isn’t just about images, its about capturing the essence of existence. This is what became his founding of ‘The Decisive moment’
‘The Decisive Moment’ became an unintentional motto which later defined Cartier-Bresson’s work.
Henri Cartier Bresson was known for using a Leica rangefinder with a 50mm lens. this is because in his time, they were a revolutionary piece of equipment. they were compact, reliable and consisted of a discreet design instead of being large and noticeable like an ordinary camera in that time. This meant he was able to capture photos unnoticeably and be hidden while he took the photos which is essential for street photography.
What is the Decisive moment?
Cartier-Bresson presented this idea in his own book which became widely considered to be one of the most important photobooks of the twentieth century. Often described as ‘A bible for photographers’. The book was quite literally about taking pictures in a dynamic and moving world. It was the moment “when the visual and emotional elements of reality captured in the photograph align in perfect synchrony.” It’s the split second when the story, composition, and emotion culminate into a singular, powerful image.
This one particular photo taken by Cartier-Bresson is the perfect image to demonstrate the decisive moment. Bresson took this image while he was passing a contruction site and took the image by simply holding the camera meaning he had not set up any tools in order to capture this, it was simply just an in the moment image. Further evidence of this was that bresson had cropped this photo as he had taken it in between a fence which was visible on the original image. The lighting in this image is natural lighting as the use of shadows and reflections tell us the sky is what is creating the brightness in the image. The reflections further show the decisive moment as you can see how close the persons heel is to the ground and how the shot was captured just before it came into contact with the water.
The cropping edits were quite simple and easy to create as you just needed to select the crop tool and then drag the sides to where you want your image to be cropped to. Cropping is usually used to cancel out other things in the image that don’t need to be there or to create a main focus on something by cropping them into the centre of the image to make them more in focus and so that they stand out.
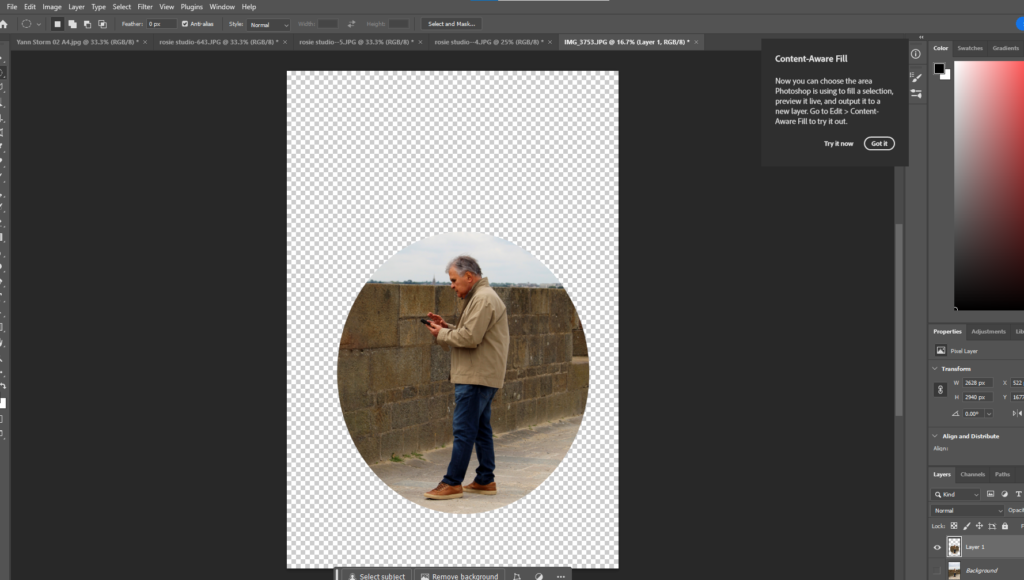
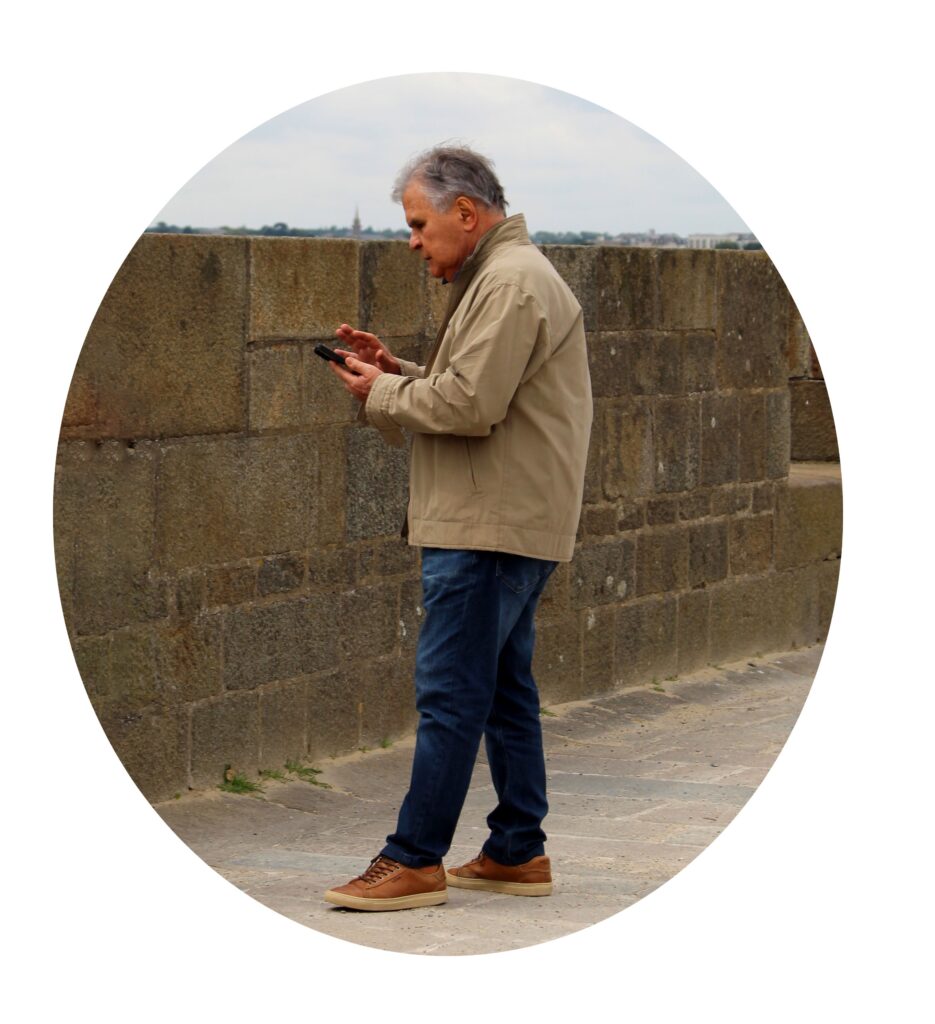
On the the last edit, I decided to use the elliptical marquee tool to create a circle around the main in the image. I dragged it over him, right clicked, selected layer via copy and then got rid of the background layer. I decided to do this so that I had at least one crop edit different from the others.