
Natural vs Artificial lighting:
In photography we can make use of two main types of lighting; Natural lighting, and Artificial lighting.
When using different kinds of natural lighting we must consider the following factors in order to take an effective photograph:
- intensity of the light
- direction of the light
- temperature of the light (and white balance on the camera)
- making use of “the golden hour”
- using reflectors (silver / gold) to really make use of the available light
Artificial lighting is what we can use when taking photographs in a studio. There are two main categories of studio lighting; continuous and flash.
Using artificial lighting can offer many creative possibilities and we should consider the following:
- the size and shape of light
- distance from subject to create hard / soft light (see below for more detail)
- angles and direction…high, low, side lighting
- filtered light
- camera settings : WB / ISO / shutter speed etc
- reflectors
- using diffusers (tissue paper, coloured gels, tracing paper, gauze etc) to soften the light
- key lighting, fill lighting, back lighting, 1,2+3 point lighting
- soft-boxes, flash lighting, spot lights and floodlights
- Rembrandt lighting, butterfly lighting, chiarascuro
- high key and low key lighting techniques (see below for more detail)
- backdrops and infinity curves
- long exposures and slow shutter speeds
Studio lighting:


We can use these in different ways to achieve the following types of lighting:
- rembrandt
- butterfly
- chiaroscuro
I will be looking at these 3 types of lighting in more detail in other blog posts.
The best camera settings to use with studio lighting depend on whether you’re using flash or continuous lighting:
Camera settings (flash lighting)
Tripod: optional
Use transmitter on hotshoe for the flash
White balance: daylight (5000K)
ISO: 100
Exposure: Manual 1/125 shutter-speed > f/16 aperture
Focal length: 105mm portrait lens
Camera settings (continuous lighting)
Tripod: recommended to avoid camera shake
Manual exposure mode
White balance: tungsten light (3200K)
ISO: 400-1600 – depending on how many light sources
Exposure: Manual 1/60-1/125 shutter-speed > f/4-f/8 aperture
Focal length: 50mm portrait lens
Hard vs Soft light:
In photography we can create hard and soft lighting. Hard light tends to be very focused and produces harsher shadows whereas soft light tend to ‘wrap’ around objects, projecting diffused shadows with soft edges. Hard light has more contrast and is usually brighter than soft light, which is usually more even.

Hard light is created by setting up a single point of light that casts very sharp gradations between light and shadow. A camera flash is an example of a light that creates hard light.
Soft lighting can be achieved by using a larger light source or by using multiple points of light. The size of the light relative to the subject is very important for soft lighting.
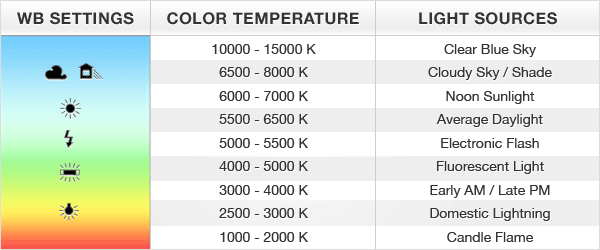
White Balance:
Another thing to do with lighting is white balance and this directly affects colour temperature. different white balance settings should be used in different lighting scenarios.

High-key and Low-key lighting:
High-key and Low-key techniques can be achieved in the following ways:

