Final Deadline for improving Coursework: MON 06 MARCH – Whole School!
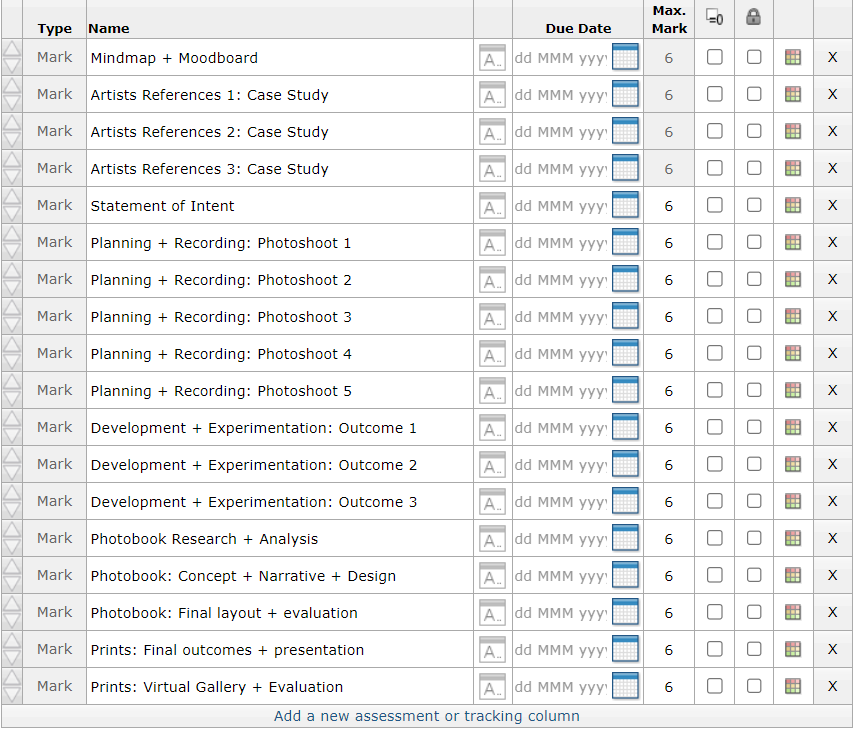
Use this simplified list to check that you are on task. Every item on the list represents one piece of work = one blog post. It is your responsibility as an A-level student to make sure that you complete and publish appropriate blog posts each week.
Examination dates: 15 hrs controlled test over 3 days
Groups 13C & 13D 24, 27, 28 April.
The Theme: ‘SIMPLE or COMPLEX’
Each week you are required to make a photographic response (still-images and/or moving image) that relates to the research and work that you explored in that week. Sustained investigations means taking a lot of time and effort to produce the best you can possibly do – reviewing, modifying and refining your idea and taking more pictures to build up a strong body of work with a clear sense of purpose and direction
SPRING TERM
WEEK 1: 20-26 Feb
1. RESEARCH 1: Mind-map and mood-board
WEEK 2: 27 Feb-5 March
1. RESEARCH 2: Case studies > Artists References (at least two) < overview > context > analysis > meaning
WEEK 3: 6-12 March
1. Statement of Intent
2. PLANNING: 3 photo-shoots > ideas > intentions > response to artists studies
3. HOMEWORK: RECORDING > Photo-shoot 1 > explore ideas > camera handling > composition > lighting
Deadline: Wed 15 March
Week 4: 13-19 March
1. EDITING: Photoshoot 1
2. EXPERIMENTING: Develop images in postproduction using creative processes > techniques > manipulation relevant to your intention
3. EVALUATING: Photoshoot 1 and experimentation > reflect > review responses > compare with artists references
4. HOMEWORK: RECORDING > Photo-shoot 2 > refine > modify > improve > re-visit shoot 1
Deadline: Wed 22 March
Week 5: 20-26 March
1. EDITING: Photoshoot 2
2. EXPERIMENTING: Develop images in postproduction using creative processes > techniques > manipulation relevant to your intention
3. EVALUATING: Photoshoot 2 and experimentation < reflect > review responses > compare with artists references
4. HOMEWORK: RECORDING > Photo-shoot 3 < refine > modify > improve > re-visit shoot 2
Deadline: Wed 29 March
Week 6: 27-31 March
1. EDITING: Photoshoot 3
2. EXPERIMENTING: Develop images in postproduction using creative processes > techniques > manipulation relevant to your intention
3. EVALUATING: Photoshoot 3 and experimentation < reflect > review responses > compare with artists references
4. PLANNING: 2 photo-shoots > ideas > intentions > response to artists studies
HOMEWORK (Easter): RECORDING > final 2 Photo-shoot
< refine > modify > improve > re-visit previous shoots
Deadline: Mon 17 April
Week 7: 17-23 April
1. EDITING: Photoshoots from Easter
2. EXPERIMENTING: Develop images in postproduction using creative processes > techniques > manipulation relevant to your intention
3. EVALUATING: Photoshoots and experimentation < reflect > review responses > compare with artists references
4. PHOTOBOOK: Begin design and layout of photobook in LR
5. PRINTS: Select images and save in print folder here (ready for Day 1: 24 April of the exam)
M:\Radio\Departments\Photography\Students\Image Transfer\YR13 Exam
Week 8: 24-28 April – EXAM
1. PRINTS: Final selection of images in print folder above (ready Day 2: 27 April of the Exam)
2. PRESENTATION: Complete mounting all final prints
3. PHOTOBOOK: Complete design and evaluate
4. BLOG: Review and complete all supporting blogposts
5. FOLDER: Label all final outcomes and put in Exam folder
6. SIGN: Student authentication form
Follow the 10 Step Process and create multiple blog posts for each unit to ensure you tackle all Assessment Objectives thoroughly :
- Mood-board, definition and introduction (AO1)
- Mind-map of ideas (AO1)
- Artist References / Case Studies (must include image analysis) (AO1)
- Photo-shoot Action Plan (AO3)
- Multiple Photoshoots + contact sheets (AO3)
- Image Selection, sub selection, review and refine ideas (AO2)
- Image Editing/ manipulation / experimentation (AO2)
- Presentation of final outcomes (AO4)
- Compare and contrast your work to your artist reference(AO1)
- Evaluation and Critique (AO1+AO4)
PREPARE AND SAVE IMAGES FOR PRINTING:
- Add your images to the print folder here…
File Handling and printing...
- Remember when EXPORTING from Lightroom you must adjust the file size to 1000 pixels on the Short edge for “blog-friendly” images (JPEGS)
- BUT…for editing and printing when EXPORTING from Lightroom you must adjust the file size to Short edge for “high resolution” images (JPEGS) like this…

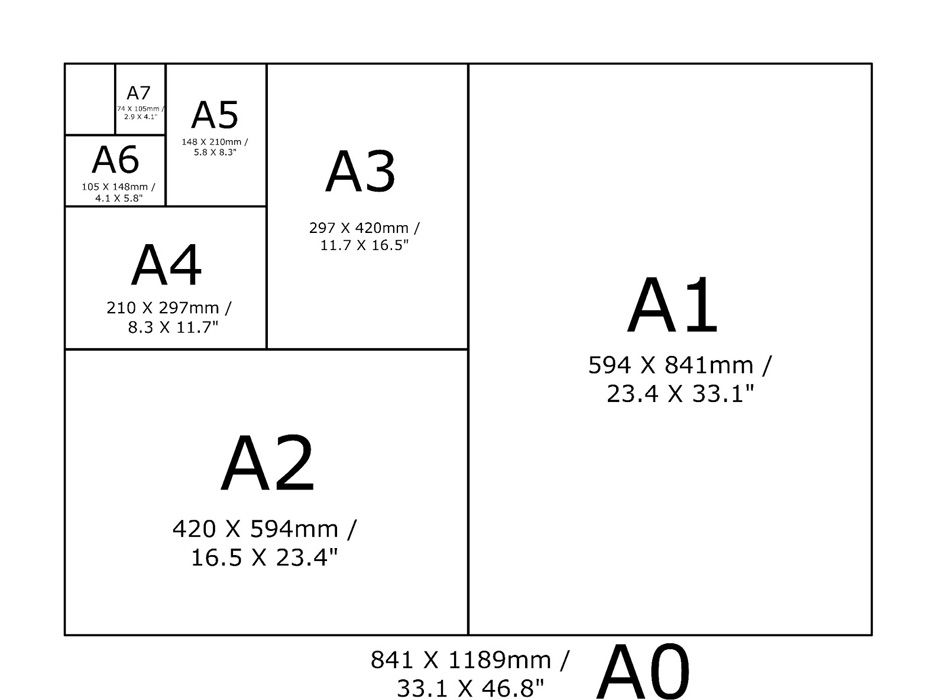
- A5 Short Edge = 14.8 cm
- A4 Short Edge = 21.0 cm
- A3 Short Edge =29.7 cm
This will ensure you have the correct ASPECT RATIO
Ensure you label and save your file in you M :Drive and then copy across to the PRINT FOLDER / IMAGE TRANSFER
For a combination of images, or square format images you use the ADOBE PHOTOSHOP > NEW DOCUMENT + PRINT PRESETS on to help arrange images on the correct size page (A3, A4, A5)
You can do this using Photoshop, Set up the page sizes as templates and import images into each template, then you can see for themselves how well they fit… but remember to add an extra 6mm for bleed (3mm on each side of the page) to the original templates. i.e. A4 = 297mm x 210 but the template size for this would be 303mm x 216mm.