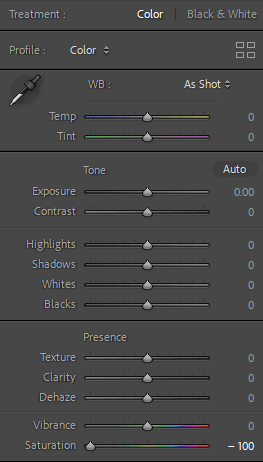
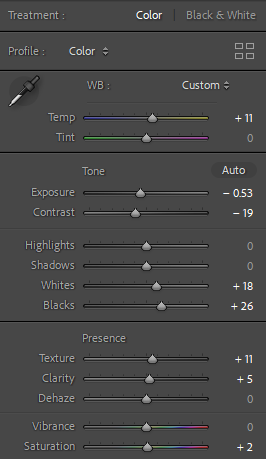
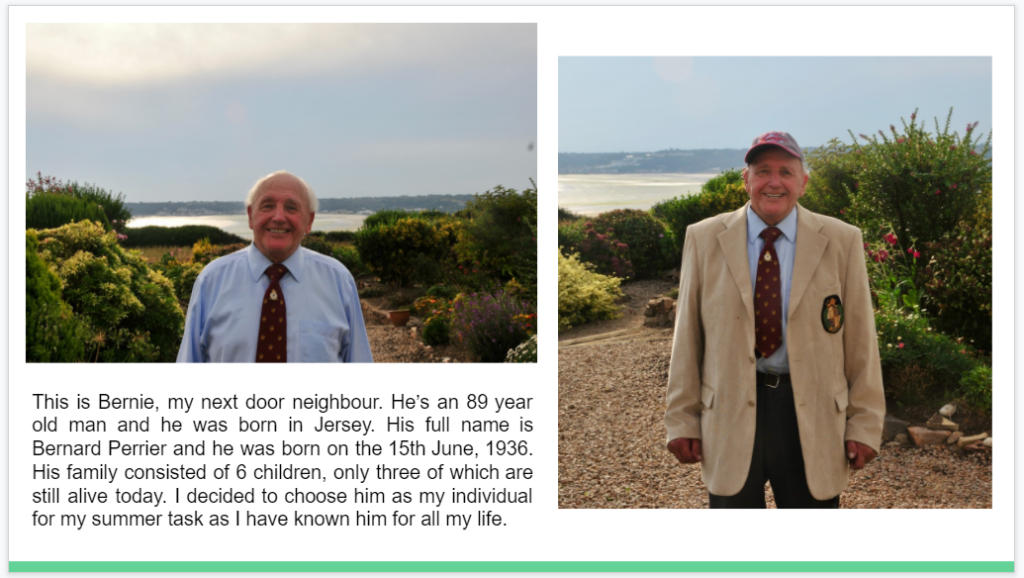
First I went through all my Hamptonne images and organised them in terms of portraits; interiors; exteriors; animals and objects. Then I created a longlist of images that I liked, then I made my final decisions and created a shortlist- beginning to edit images I liked.
Below are the fully edited photos and how I edited them
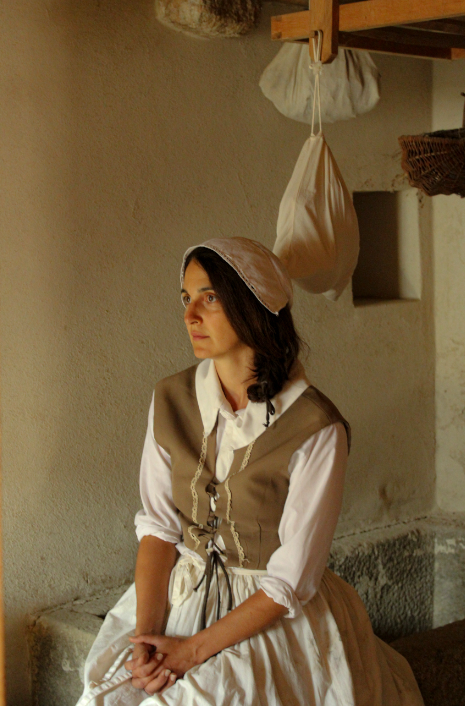
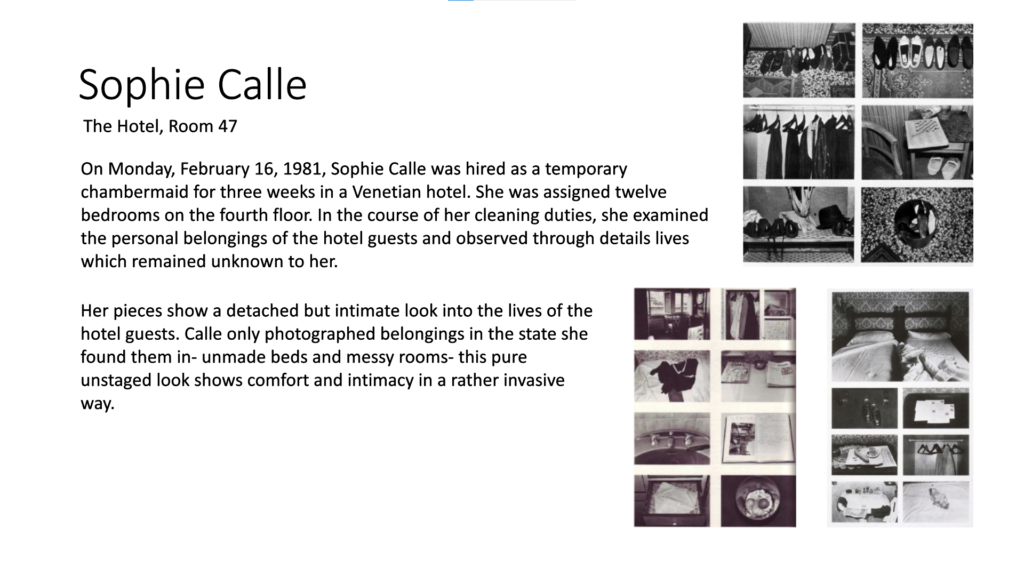
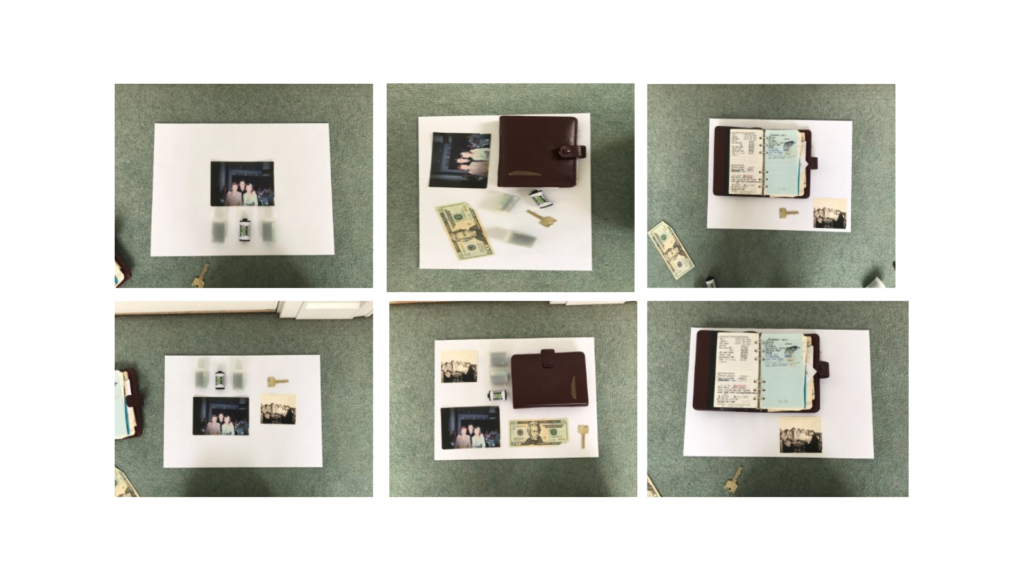
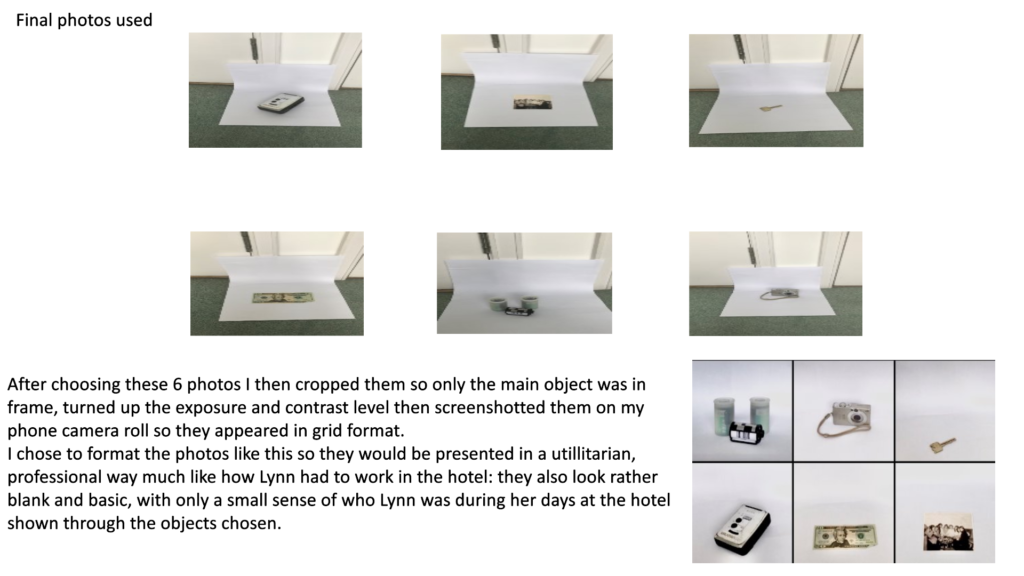
Lynn was at a party in Glasgow when a friend in Jersey who was visiting offered her steady work in the hotel industry, Glasgow had no work at the time and Jersey was a promising destination for workers, Lynn came to Jersey to live in 1986 and settled down starting work as a chambermaid in The Royal Oak Hotel.
Robert Frank Trolley, New Orleans, 1955, from The Americans
Robert Frank Trolley, New Orleans, 1955, from The Americans What Frank saw on his travels was a country enjoying post-war prosperity but deeply riven by racial and class divisions. Nowhere in Frank’s work are these divisions more apparent than in Trolley—New Orleans. Frank’s pictures capture a shadowy postwar society at odds with itself, filled with images of the American population but still very much divided by segregation and politics
CONTEXTUAL
1955 was post-war America, an economic boom advanced across the country, yet racial and class divisions were never more prominent. Frank was taking photos for his photographic book “The Americans,” the photographs were notable for their distanced view of both high and low strata of American society in 1955.
VISUAL
The light and dark tones, created by the natural light, create massive contrast against each other. The bars in between each person shows how it looks like they are separated and sectioned off- showing a literal and figurative sense of the racial tensions in America.
TECHNICAL ELEMENTS
The lighting in this picture is natural, there is also a lot of contrast which creates quite a cold, detached atmosphere. The photo was taken with a wide lens but is very focused on the subjects within it, so that it catches attention well therefore showing Frank’s iconic photography style.
Two point lighting is the most versatile lighting design for shooting fashion or beauty on the street. Having a back light elevates the pictures to a more polished state. Take a look at any CSI tv show or 24 etc and freeze frame as you go. You will see two point lighting on just about every scene if not every shot.
During your first lessons you will be expected to submit and display your summer task and informally present it to your group. As a group we will discuss the merits and limitations of your work and it will be assessed soon and you will receive feedback too.
(If you have not completed a Summer Task as a new recruit…then you have until Monday 13th September to complete the task appropriately.)
We will also discuss your thoughts and feelings / knowledge and understanding of…
Photography’s function(s)
Photography as an art-form
Photography as a science
The difference between the study of photography and the practice of photography
Henri Cartier-Bresson once said…”Your first 10,000 photographs are your worst”
What do you think Cartier-Bresson meant by this…? Discuss
Demonstrating a critical and contextual understanding of photography can be tricky, especially if the subject is relatively new to you in Year 12. The following activities have been designed to encourage you to reflect on what you know already about photography. Hopefully, some of the prompts will encourage you to further develop your understanding of photography through additional pondering and research.
In small groups, discuss the following questions. One person in the group should be responsible for making notes capturing the main ideas of the discussion:
Why do people take/make photographs?
Why is photography important?
What skills do you need to be a good photographer?
How many different kinds of photography can you think of?
How does photography help us see the world?
Can photographic images be trusted?
What are the similarities and differences between photography and other types of visual art?
When would it not be OK to take a photograph?
How do you know when you’ve made a good photograph?
Are photographers also artists?
Where is the best place to see photographs?
What kind of photography interests you most?
What confuses or frustrates you about photography?
Watch this short film in which the photographer Henry Wessel discusses his practice. Make some brief notes. What does he help us to understand about photography?
The roots of photography extend back further than you might assume. In the 4th Century BC, Aristotle made use of the principles of the camera obscura, in which an image is projected through a small hole. Through a camera obscura’s pinhole, the image of the world is often reversed or upside-down. While our notion of a camera has evolved dramatically, the “camera obscura” is considered the ancient building block upon which further revolutionary developments and inventions in the field of photography were built.
WHO INVENTED PHOTOGRAPHY?
Joseph Nicéphore Niépce and Louis Daguerre are often considered the inventors of photography with cameras as we now know it. The former started out experimenting with silver chloride and silver halide photography, but couldn’t figure out how to prevent them from darkening with exposure to light.
In 1826, Niépce succeeded in taking the first camera photograph. He used a sheet of pewter coated with bitumen, which required an exposure time of at least 8 hours! The subject of this photograph hit close to home for Niépce; it is the view from his workroom in Saint-Loup-de-Varennes, France. Painter Louis Jacques Mandé Daguerre was so excited by this achievement, he partnered with Niépce. Daguerre continued to develop, refine, and tinker with the process using silver-plated sheets of copper and fuming them with mercury vapor. As he continued to develop this process, Daguerre was able to vastly reduce to the exposure time.
After their invention, it took a long time for photographs and cameras to develop into what we have come to know today. This required more revolutionary ideas and exciting reinventions, which we can now look back on as milestones in the history of photography.
The film roll: In 1889, George Eastman created the roll of film, which made it possible to shoot multiple pictures one after the other. He released it through his company Kodak, and it was a breakthrough in the practical application of photography. It made snapshots possible, and no longer did the images need to be immediately and individually processed. In the same year, Thomas Edison cut it down the middle and added perforated edges, establishing the 35mm format that became so prevalent later. The 35mm camera: The first Leica camera was developed by Oskar Barnack. Introduced in 1925, the Leica prototype used a small-format, 35mm film. In comparison to the bulky box cameras previously in use, the compact Leica camera was a highly modern improvement. Color photos: In 1936, photographic technology took an exciting step forward with advances in color film. Kodak released Kodachrome, a film with multiple layers for developing in color. Polaroid Pictures: Around that time, the first instant camera was also invented. The aesthetic is as popular as ever, enthusiastically coopted by photo services such as Instagram. The Polaroid camera introduced by Edwin H. Land in 1848 was capable of producing a fully developed photo shortly after taking it. The Digital Camera: While the concept of digital cameras has existed since the 1960s, the camera Steven Sasson of Eastman Kodak built in 1975 is generally considered the first self-contained digital camera. Much like photography with film, advances in the technology have led to explosive growth in the medium’s popularity.
Be aware of some of the methods employed by critics and historians within the history of art and photography.
Demonstrate a sound understanding of your chosen area of study with appropriate use of critical vocabulary. – use for image analysis
Investigate a wide range of work and sources
Develop a personal and critical inquiry.
Academic Sources:
Research and identify 3-5 literary sources from a variety of media such as books, journal/magazines, internet, Youtube/video .
Begin to read essay, texts and interviews with your chosen artists as well as commentary from critics, historians and others.
It’s important that you show evidence of reading and draw upon different pints of view – not only your own.
Take notes when you’re reading…key words, concepts, passages
Write down page number, author, year, title, publisher, place of publication so you can list source in a bibliography
Quotation and Referencing:
Why should you reference?
To add academic support for your work
To support or disprove your argument
To show evidence of reading
To help readers locate your sources
To show respect for other people’s work
To avoid plagiarism
To achieve higher marks
What should you reference?
Anything that is based on a piece of information or idea that is not entirely your own.
That includes, direct quotes, paraphrasing or summarising of an idea, theory or concept, definitions, images, tables, graphs, maps or anything else obtained from a source
How should you reference?
Use Harvard System of Referencing…see Powerpoint: harvard system of referencing for further details on how to use it.https://player.vimeo.com/video/223710862?dnt=1&app_id=122963
Here is an full guide on how to use Harvard System of Referencing including online sources, such as websites etc.
TUE: Essay Question
Think of a hypothesis and list possible essay questions
Below is a list of possible essay questions that may help you to formulate your own.
Make a plan that lists what you are going to write about in each paragraph – essay structure.
Essay question:
Opening quote
Introduction (250-500 words): What is your area study? Which artists will you be analysing and why? How will you be responding to their work and essay question?
Pg 1 (500 words): Historical/ theoretical context within art, photography, visual and popular culture relevant to your area of study. Make links to art movements/ isms and some of the methods employed by critics and historian.
Pg 2 (500 words): Analyse first artist/photographer in relation to your essay question. Present and evaluate your own images and responses.
Pg 3 (500 words): Analyse second artist/photographer in relation to your essay question. Present and evaluate your own images and responses.
Conclusion (250-500 words): Draw parallels, explore differences/ similarities between artists/photographers and that of your own work that you have produced
Bibliography: List all relevant sources used
Essay question: Hypothesis
Think of a hypothesis and list possible essay questions
Introduction (250-500 words). Think about an opening that will draw your reader in e.g. you can use an opening quote that sets the scene. You should include in your introduction an outline of your intention of your study e.g. what and who are you going to investigate. How does this area/ work interest you? What are you trying to prove/challenge, argument/ counter-argument? What historical or theoretical context is the work situated within. Include 1 or 2 quotes for or against. What links are there with your previous studies? What have you explored so far in your Coursework or what are you going to photograph? How did or will your work develop. What camera skills, techniques or digital processes in Photoshop have or are you going to experiment with?
Paragraph 1 Structure (500 words): Use subheading. This paragraph covers the first thing you said in your introduction that you would address.The first sentence introduces the main idea of the paragraph. Other sentences develop the subject of the paragraph.
Content: you could look at the following…exemplify your hypothesis within a historical and theoretical context. Write about how your area of study and own work is linked to a specific art movement/ ism. Research and read key text and articles from critics, historians and artists associated with the movement/ism. Use quotes from sources to make a point, back it up with evidence or an example (a photograph), explain how the image supports the point made or how your interpretation of the work may disapprove. How does the photograph compare or contrast with others made by the same photographer, or to other images made in the same period or of the same genre by other artists. How does the photograph relate to visual representation in general, and in particularly to the history and theory of photography, arts and culture.
Include relevant examples, illustrations, details, quotations, and references showing evidence of reading, knowledge and understanding of history, theory and context!
Paragraph 2 Structure (500 words): Use subheading. In the first sentence or opening sentences, link the paragraph to the previous paragraph, then introduce the main idea of the new paragraph. Other sentences develop the paragraphs subject (use relevant examples, quotations, visuals to illustrate your analysis, thoughts etc)
Content: you could look at the following...Introduce your first photographer. Select key images, ideas or concepts and analyse in-depth using specific model of analysis (describe, interpret and evaluate) – refer to your hypothesis. Contextualise…what was going on in the world at the time; artistically, politically, socially, culturally. Other influences…artists, teachers, mentors etc. Personal situations or circumstances…describe key events in the artist’s life that may have influenced the work. Include examples of your own photographs, experiments or early responses and analyse, relate and link to the above. Set the scene for next paragraph.
Include relevant examples, illustrations, details, quotations, and references showing evidence of reading, knowledge and understanding of history, theory and context!
Paragraph 3 Structure (500 words): Use subheading. In the first sentence or opening sentences, link the paragraph to the previous paragraph, then introduce the main idea of the new paragraph. Other sentences develop the paragraphs subject (use relevant examples, quotations, visuals to illustrate your analysis, thoughts etc)
Content: you could look at the following…Introduce key works, ideas or concepts from your second photographer and analyse in-depth – refer to your hypothesis…Use questions in Pg 2 or add…What information has been selected by the photographer and what do you find interesting in the photograph? What do we know about the photograph’s subject? Does the photograph have an emotional or physical impact? What did the photographer intend? How has the image been used? What are the links or connections to the other photographer in Pg 2? Include examples of your own photographs and experiments as your work develop in response to the above and analyse, compare, contrast etc. Set the scene for next paragraph.
Include relevant examples, illustrations, details, quotations, and references showing evidence of reading, knowledge and understanding of history, theory and context!
Conclusion (500 words): Write a conclusion of your essay that also includes an evaluation of your final photographic responses and experiments.
List the key points from your investigation and analysis of the photographer(s) work – refer to your hypothesis. Can you prove or Disprove your theory – include final quote(s). Has anything been left unanswered? Do not make it a tribute! Do not introduce new material! Summarise what you have learned. How have you been influenced? Show how you have selected your final outcomes including an evaluation and how your work changed and developed alongside your investigation.
Bibliography: List all the sources that you used and only those that you have cited in your text. Where there are two or more works by one author in the same year distinguish them as 1988a, 1988b etc. Arrange literature in alphabetical order by author, or where no author is named, by the name of the museum or other organisation which produced the text. Apart from listing literature you must also list all other sources in alphabetical order e.g. websites, exhibitions, Youtube/TV/ Videos / DVD/ Music etc.
Photographs consist of formal and visual elements and have their own ‘grammar’. These formal and visual elements (such as line, shape, repetition, rhythm, balance etc.) are shared with other works of art. But photographs also have a specific grammar – flatness, frame, time, focus etc. ‘Mistakes’ in photography are often associated with (breaking) the ‘rules’ and expectations of this grammar e.g. out of focus, subject cropped, blur etc. Some photographers enjoy making beautiful images but others are more critical of what beauty means in today’s world.Photographers have to impose order, bring structure to what they photograph. It is inevitable. A photograph without structure is like a sentence without grammar—it is incomprehensible, even inconceivable. — Stephen Shore
This way of thinking about photographs has come to seem a bit old fashioned due to competing theories of photographic meaning, Postmodernism and digital culture. It is certainly true that formalist readings of photographs alone can never do full justice to the complex webs of meaning generated by photographic images. Photographs aren’t neutral. They don’t show us things as they are, although they’re pretty good at pretending they do. Photographs are ideological constructs, a fancy way of saying that they don’t simply show us what is ‘true’ or ‘real’.
However, one might argue that photo literacy in part depends on an understanding of the formal or visual elements, some of which are borrowed from the visual arts, with others appearing to be specific to photography. As in any language, ‘grammar’ gets you so far, helps you appreciate the structure and ‘rules’ governing particular modes of expression. A knowledge of the ‘grammar’ of photography is therefore part of the analytical and creative toolkit of any photography student.
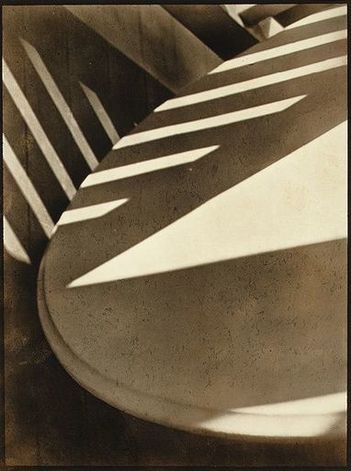
The photograph below is by Paul Strand. It is entitled ‘Abstraction, Twin Lakes, Connecticut’ and was made in 1916. You can read more about the image here. The photographer created a picture that draws attention to the Formal Elements. Spending some time really exploring photographs in terms of the formal elements is an important process in the development of visual literacy.
Light: A triangular slash of bright sunlight appears in the middle of the image. This is accompanied by bands of light running diagonally across the upper portion of the image. These appear to be gaps in another object out of shot, a fence perhaps. Line & Shape: There are number of strong lines, mostly straight, although these are complemented by the sweeping curve of the main object which runs from the top right of the image to the bottom right. All of the lines have the geometric quality of man made objects. Repetition: The shafts of sunlight running across two surfaces create a dramatic rhythm. A number of straight parallel lines punctuate the composition, like repeated notes or beats in a piece of music. Space: The space in the image appears quite shallow, tightly constrained by the framing. We don’t see the whole of any of the objects and the photographer appears to have been quite close to the subject. Texture: All of the objects in the image appear smooth. The drama comes from the jagged bursts of light across their surfaces. Value/Tone: The image contains a range of tones from very dark to very light. There are deep shadows but also mid tones. The photograph is monochrome but has a brownish tint, perhaps caused by the paper the artist has used. Composition: A sense of drama is created by the diagonal lines and the objects seeming to tilt towards the bottom left of the picture.
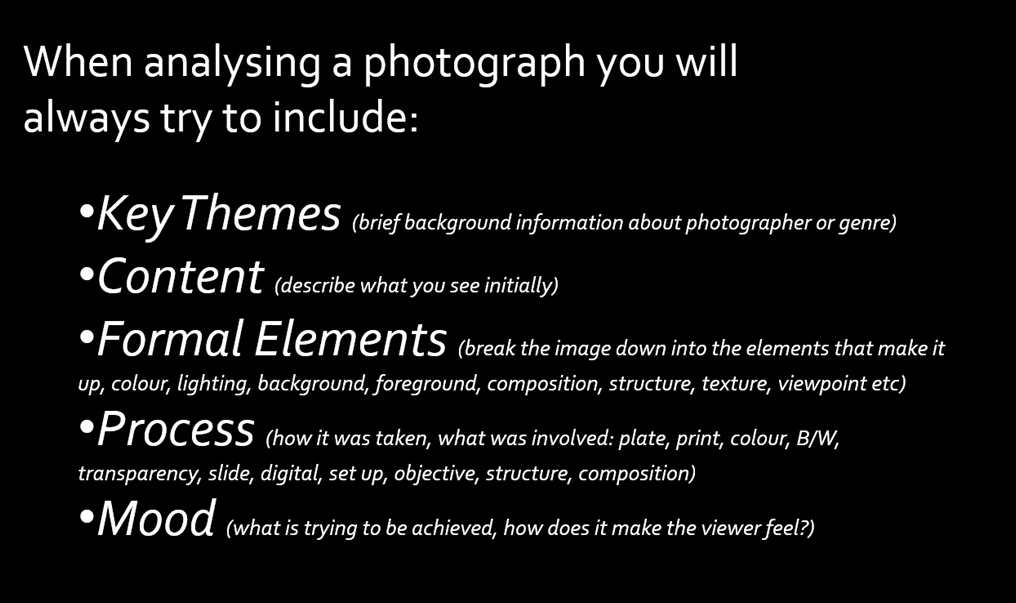
A guide to evaluating a Photograph: Key Themes, Content, Formal Elements, Process & Mood.
Key Themes – brief background information about the photographer or genre Gain insight from title of image, date of image etc. Background research etc.
Content – Describe what you see! Look at the subject of the photograph.
What is it? What is it about? What is happening? What is in the foreground, midground, background? Where and when was it taken? What do you think the relationship is between the photographer and the subject/s is? What has the photographer titled the image and why? Does the title change the way we see the image? Is it staged? Is it real?
Is it a realistic depiction? Has it been manipulated in anyway? If so, where and why? What is the theme of the photograph? What message does the photograph communicate?
Formal Elements – break the image down into the elements that make it up.
Colour, lighting, composition, structure, mood etc.
Colour – Is the photograph colour or black and white? Is there a reason for this? How does this affect the mood? What colours are depicted?
Lighting – is it photographed in a studio? Is it using studio lighting? Natural lighting? Has the photographer waited for the right natural light? Has the photographer positioned themselves? Vantage point. Is the lighting subtle? Is it strong? If so why and who has the lighting been used? Effectively or not? Does the lighting help the image? Why? Create mood/atmosphere? Dark, light? Tone – Is the photograph high or low contrast? How and why? What tonal values. Line/Composition – What sort of lines are there in the image? Leading lines? How have they been positioned in relation to the rest of the image? Is this on purpose? (the viewfinder or cropped afterwards?) What effect does this have?
Shape/Composition – What sort of shapes are there in the image? Do they remind you of anything? Do you think the photographer meant this? Is there symmetry? Is it structured in anyway? Rule of thirds? ‘S’ shape? ‘J’ shape. Golden Spiral, Golden Ratio, Fibonacci? Is it minimal? Simple? Complex? Confused?
Process – how the photograph has been taken, developed, manipulated and printed
Was the image taken inside or out? What time of day? Light sources? Evidence. Materials or tools used (props, objects, studio etc) Has the image been manipulation post production? How and why? B&W or colour? Plate, C print, large format, medium format, pin hole, slide, digital print, projection etc. Date may help.
Mood – look at the mood and feeling of the image
Is the photographer attempting to capture a moment/atmosphere/emotion? Explain why you think this. Is there a narrative/story? How does the image make you feel? Why do you feel like this? How and why?
USEFUL VOCABULARY
Colour
Intense Saturated Bright Luminous Secondary Clash Mixed Soft Cold Opaque Tint Deep Pale Translucent Dull Pastel Transparent Glowing Primary Vibrant