ESSAY WRITING

Objective: Criteria from the Syllabus

  • Be aware of some of the methods employed by critics and historians within the history of art and photography.
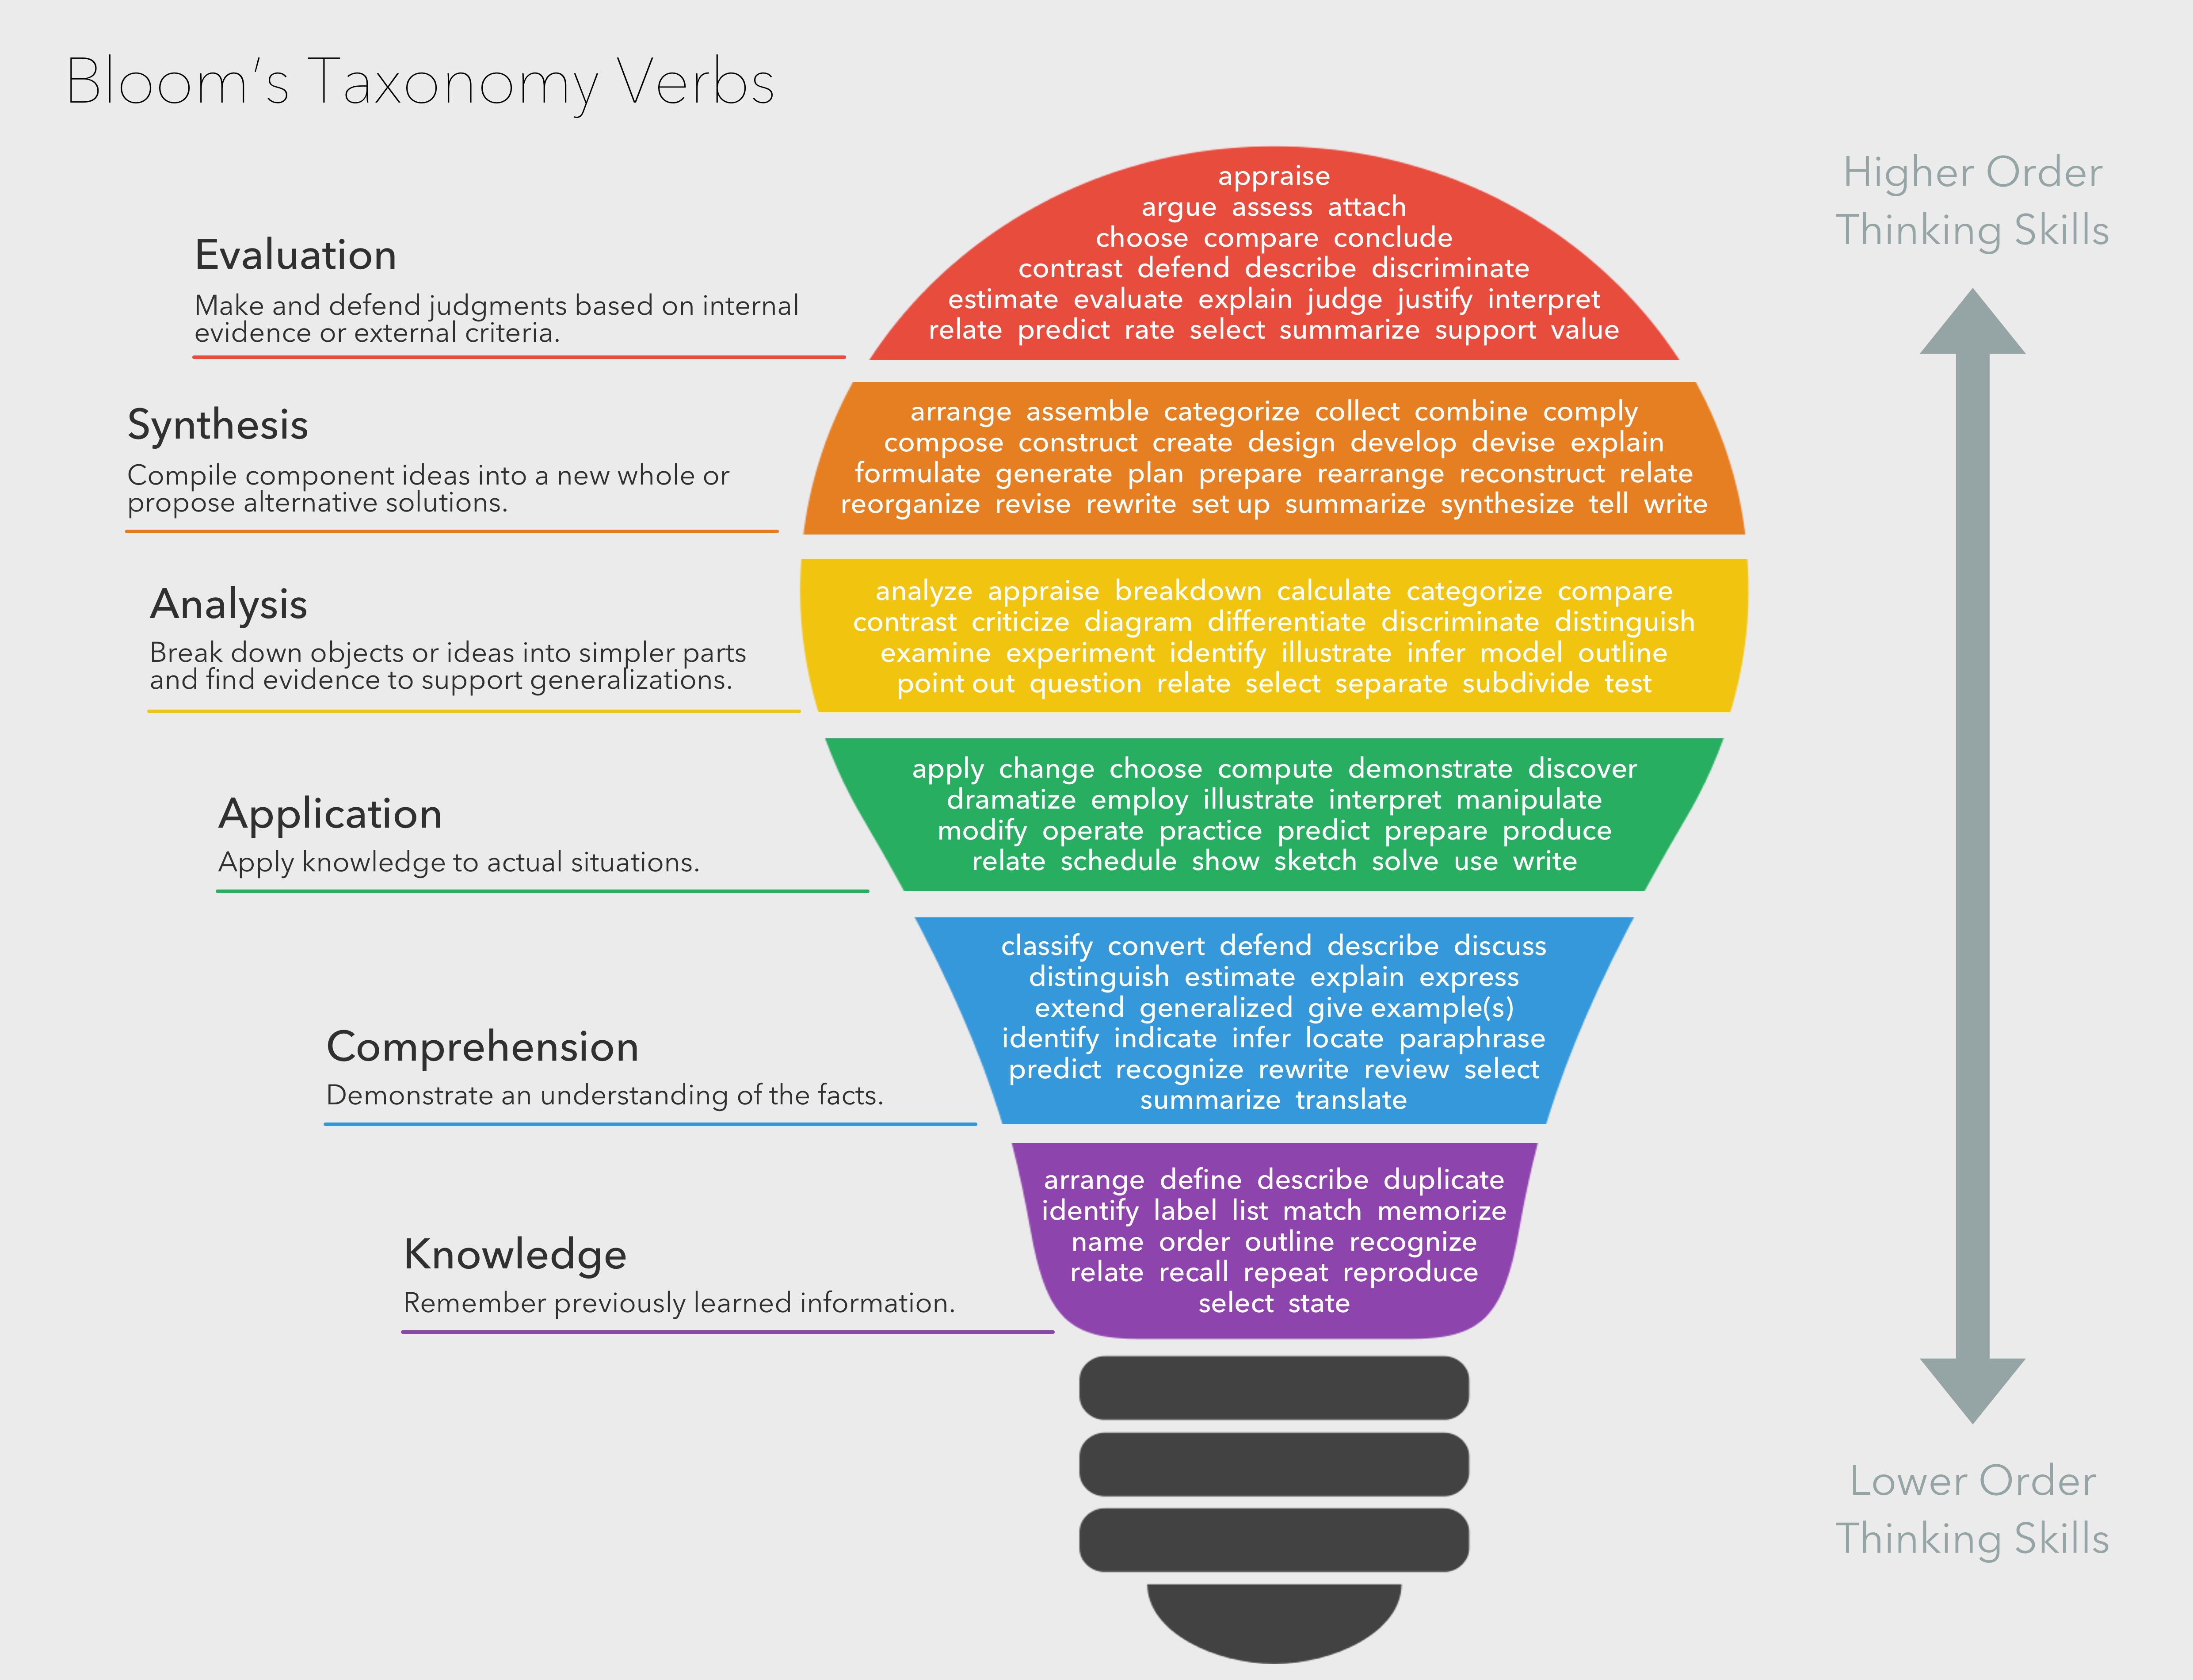
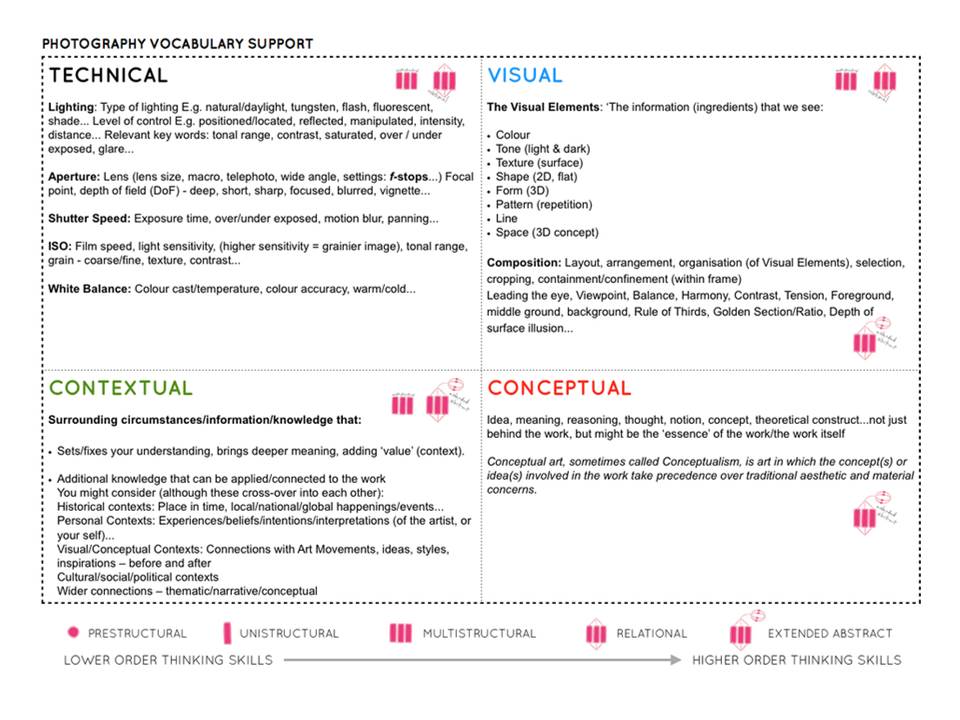
  • Demonstrate a sound understanding of your chosen area of study with appropriate use of critical vocabulary. – use for image analysis
  • Investigate a wide range of work and sources
  • Develop a personal and critical inquiry.

Academic Sources:

  • Research and identify 3-5 literary sources from a variety of media such as books, journal/magazines, internet, Youtube/video .
  • Begin to read essay, texts and interviews with your chosen artists as well as commentary from critics, historians and others.
  • It’s important that you show evidence of reading and draw upon different pints of view – not only your own.
  • Take notes when you’re reading…key words, concepts, passages
  • Write down page number, author, year, title, publisher, place of publication so you can list source in a bibliography

Quotation and Referencing:

Why should you reference?

  • To add academic support for your work
  • To support or disprove your argument
  • To show evidence of reading
  • To help readers locate your sources
  • To show respect for other people’s work
  • To avoid plagiarism
  • To achieve higher marks

What should you reference?

  • Anything that is based on a piece of information or idea that is not entirely your own.
  • That includes, direct quotes, paraphrasing or summarising of an idea, theory or concept, definitions, images, tables, graphs, maps or anything else obtained from a source

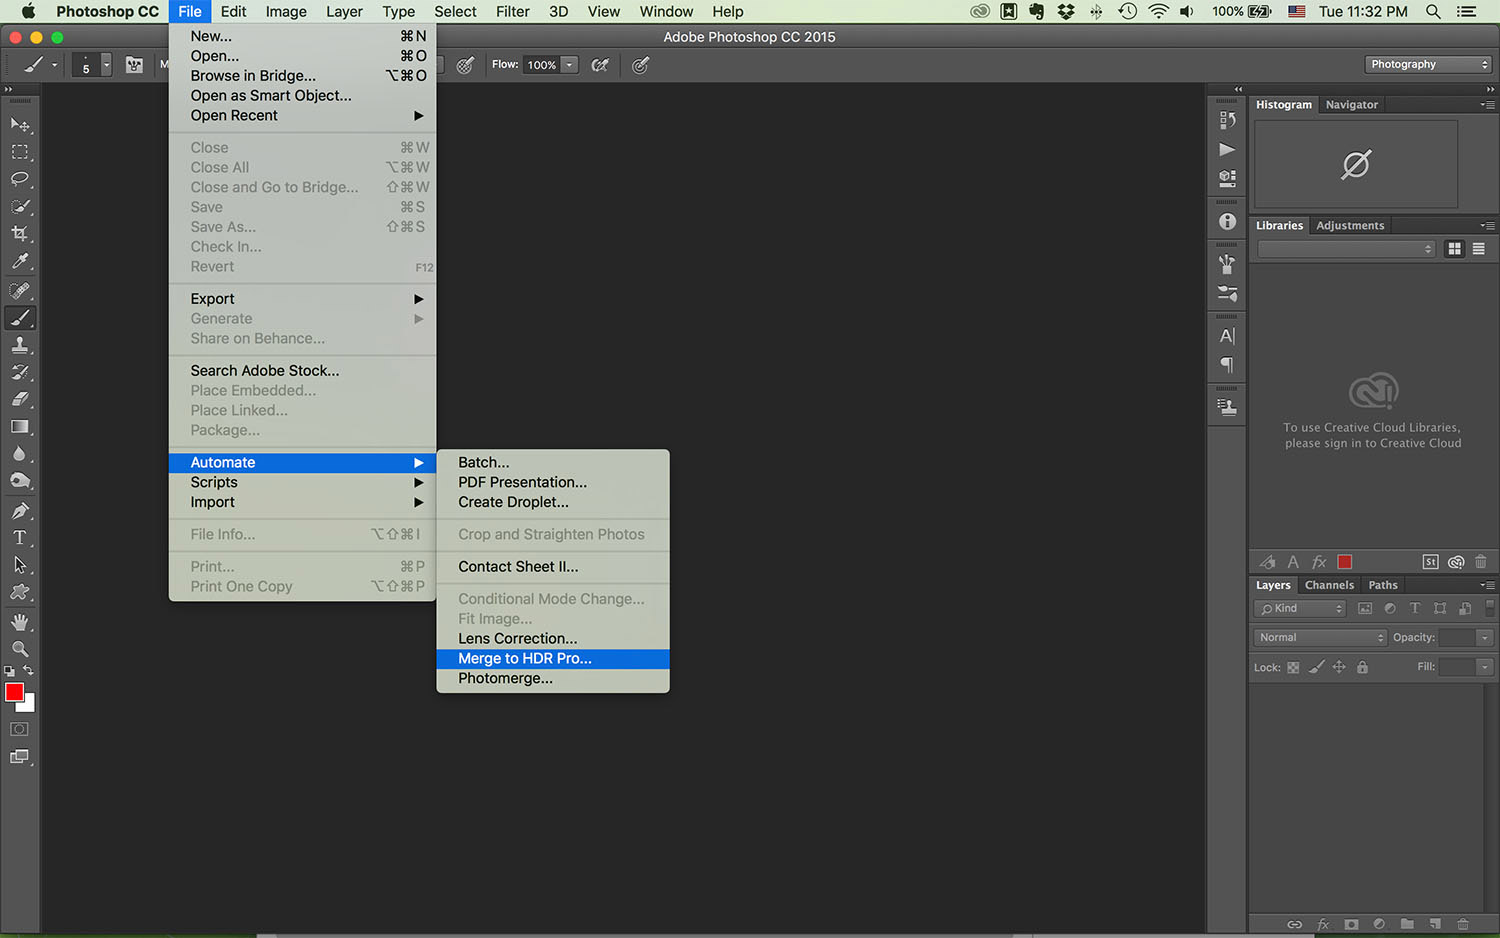
How should you reference?

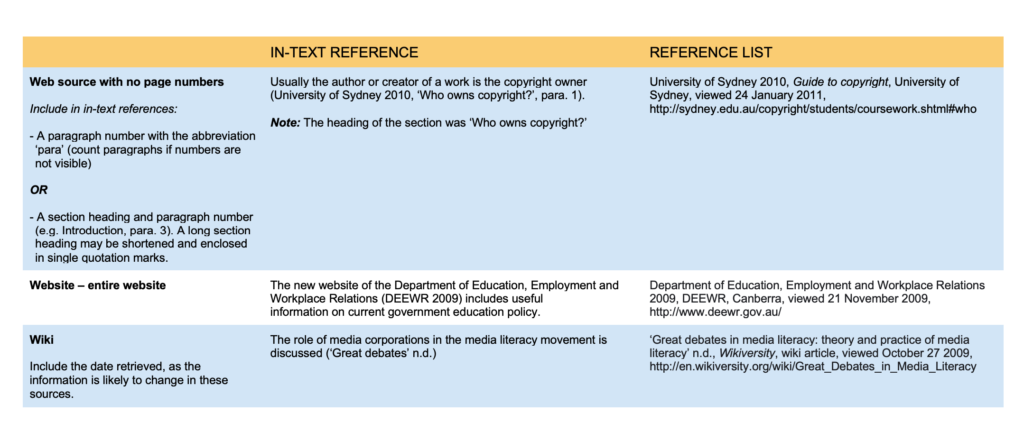
Use Harvard System of Referencing…see Powerpoint: harvard system of referencing for further details on how to use it.https://player.vimeo.com/video/223710862?dnt=1&app_id=122963

Here is an full guide on how to use Harvard System of Referencing including online sources, such as websites etc.

TUE: Essay Question

  • Think of a hypothesis and list possible essay questions
  • Below is a list of possible essay questions that may help you to formulate your own.

possible-questions-to-investigate-1DOWNLOAD

Some examples of Personal Study essays from previous students

In what way does Nick Hedges portray a sense of state discrimination and hopelessness through his monochromatic imagery?

To what extent can we trust documentary photography to tell the truth about reality?

How does Jeff Wal’s Tableaux approach depict a seemingly photojournalistic approach?

Compare how Cindy Sherman and Phoebe Jane Barrett challenge gender stereotypes.

How can something that doesn’t physically exist be represented through photography?

To what extent does Surrealism create an unconscious representation of one’s inner conflicts of identity and belonging? 

How does Carolle Benitah and Claudia Ruiz Gustafson explore their past as a method of understanding identity?

How has children’s stories and literature influenced the work of Anna Gaskell and Julia Margaret Cameron?

How do Diana Markosian and Rita Puig-Serra Costa express the notion of family history and relationships in their work?

How does the work of Darren Harvey-Regan explore abstraction as an intention and process?

Essay Plan:

Make a plan that lists what you are going to write about in each paragraph – essay structure.

  • Essay question:
  • Opening quote
  • Introduction (250-500 words): What is your area study? Which artists will you be analysing and why? How will you be responding to their work and essay question?
  • Pg 1 (500 words): Historical/ theoretical context within art, photography, visual and popular culture relevant to your area of study. Make links to art movements/ isms and some of the methods employed by critics and historian. 
  • Pg 2 (500 words): Analyse first artist/photographer in relation to your essay question. Present and evaluate your own images and responses.
  • Pg 3 (500 words): Analyse second artist/photographer in relation to your essay question. Present and evaluate your own images and responses.
  • Conclusion (250-500 words): Draw parallels, explore differences/ similarities between artists/photographers and that of your own work that you have produced
  • Bibliography: List all relevant sources used

Essay questionHypothesis

Think of a hypothesis and list possible essay questions

Here is a list of  possible questions to investigate that may help you.

Opening quote: Choose a quote from either one of your photographers or critics. It has to be something that relates to your investigation

ESSAY STRUCTURE

See below for a possible essay structure. Further help can be found here essay structure or see link here The Royal Literay Fund

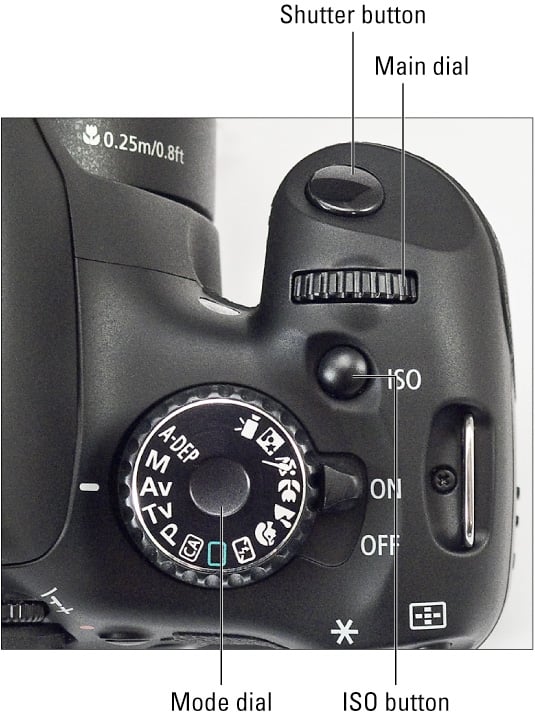
Introduction (250-500 words). Think about an opening that will draw your reader in e.g. you can use an opening quote that sets the scene. You should include in your introduction an outline of your intention of your study e.g. what and who are you going to investigate. How does this area/ work interest you? What are you trying to prove/challenge, argument/ counter-argument? What historical or theoretical context is the work situated within. Include 1 or 2 quotes for or against. What links are there with your previous studies? What have you explored so far in your Coursework or what are you going to photograph? How did or will your work develop. What camera skills, techniques or digital processes in Photoshop have or are you going to experiment with?

Paragraph 1 Structure (500 words) Use subheadingThis paragraph covers the first thing you said in your introduction that you would address. The first sentence introduces the main idea of the paragraphOther sentences develop the subject of the paragraph.

Content: you could look at the followingexemplify your hypothesis within a historical and theoretical context.  Write about how your area of study and own work is linked to a specific art movement/ ism. Research and read key text and articles from critics, historians and artists associated with the movement/ism. Use quotes from sources to make a point, back it up with evidence or an example (a photograph), explain how the image supports the point made or how your interpretation of the work may disapprove. How does the photograph compare or contrast with others made by the same photographer, or to other images made in the same period or of the same genre by other artists. How does the photograph relate to visual representation in general, and in particularly to the history and theory of photography, arts and culture.

Include relevant examples, illustrations, details, quotations, and references showing evidence of reading, knowledge and understanding of history, theory and context!

See link to powerpoints: Pictorialism vs Realism and Modernism vs Postmodernism herepictorialism-vs-realism-2DOWNLOADmodernism-vs-postmodernism_v2-2DOWNLOAD

Paragraph 2 Structure (500 words) Use subheading. In the first sentence or opening sentences, link the paragraph to the previous paragraph, then introduce the main idea of the new paragraph. Other sentences develop the paragraphs subject (use relevant examples, quotations, visuals to illustrate your analysis, thoughts etc)

Content: you could look at the following...Introduce your first photographer. Select key images, ideas or concepts and analyse in-depth using specific model of analysis (describe, interpret and evaluate) – refer to your hypothesis. Contextualise…what was going on in the world at the time; artistically, politically, socially, culturally. Other influences…artists, teachers, mentors etc. Personal situations or circumstances…describe key events in the artist’s life that may have influenced the work. Include examples of your own photographs, experiments or early responses and analyse, relate and link to the above. Set the scene for next paragraph.

Include relevant examples, illustrations, details, quotations, and references showing evidence of reading, knowledge and understanding of history, theory and context!

Paragraph 3 Structure (500 words) Use subheading. In the first sentence or opening sentences, link the paragraph to the previous paragraph, then introduce the main idea of the new paragraph. Other sentences develop the paragraphs subject (use relevant examples, quotations, visuals to illustrate your analysis, thoughts etc)

Content: you could look at the following…Introduce key works, ideas or concepts from your second photographer and analyse in-depth – refer to your hypothesis…Use questions in Pg 2 or add…What information has been selected by the photographer and what do you find interesting in the photograph? What do we know about the photograph’s subject? Does the photograph have an emotional or physical impact? What did the photographer intend? How has the image been used? What are the links or connections to the other photographer in Pg 2? Include examples of your own photographs and experiments as your work develop in response to the above and analyse, compare, contrast etc. Set the scene for next paragraph.

Include relevant examples, illustrations, details, quotations, and references showing evidence of reading, knowledge and understanding of history, theory and context!

Conclusion (500 words) : Write a conclusion of your essay that also includes an evaluation of your final photographic responses and experiments.

List the key points from your investigation and analysis of the photographer(s) work – refer to your hypothesis. Can you prove or Disprove your theory – include final quote(s). Has anything been left unanswered?  Do not make it a tribute! Do not introduce new material! Summarise what you have learned. How have you been influenced? Show how you have selected your final outcomes including an evaluation and how your work changed and developed alongside your investigation.

Bibliography: List all the sources that you used and only those that you have cited in your text. Where there are two or more works by one author in the same year distinguish them as 1988a, 1988b etc. Arrange literature in alphabetical order by author, or where no author is named, by the name of the museum or other organisation which produced the text. Apart from listing literature you must also list all other sources in alphabetical order e.g. websites, exhibitions, Youtube/TV/ Videos / DVD/ Music etc.

FORMAL ELEMENTS

Photographs consist of formal and visual elements and have their own ‘grammar’. These formal and visual elements (such as line, shape, repetition, rhythm, balance etc.) are shared with other works of art. But photographs also have a specific grammar – flatness, frame, time, focus etc. ‘Mistakes’ in photography are often associated with (breaking) the ‘rules’ and expectations of this grammar e.g. out of focus, subject cropped, blur etc. Some photographers enjoy making beautiful images but others are more critical of what beauty means in today’s world.Photographers have to impose order, bring structure to what they photograph. It is inevitable. A photograph without structure is like a sentence without grammar—it is incomprehensible, even inconceivable.
— Stephen Shore

 Modernism or Formalism.

This way of thinking about photographs has come to seem a bit old fashioned due to competing theories of photographic meaning, Postmodernism and digital culture. It is certainly true that formalist readings of photographs alone can never do full justice to the complex webs of meaning generated by photographic images. Photographs aren’t neutral. They don’t show us things as they are, although they’re pretty good at pretending they do. Photographs are ideological constructs, a fancy way of saying that they don’t simply show us what is ‘true’ or ‘real’.

However, one might argue that photo literacy in part depends on an understanding of the formal or visual elements, some of which are borrowed from the visual arts, with others appearing to be specific to photography. As in any language,  ‘grammar’ gets you so far, helps you appreciate the structure and ‘rules’ governing particular modes of expression. A knowledge of the ‘grammar’ of photography is therefore part of the analytical and creative toolkit of any photography student.


The photograph below is by Paul Strand. It is entitled ‘Abstraction, Twin Lakes, Connecticut’ and was made in 1916. You can read more about the image here. The photographer created a picture that draws attention to the Formal Elements. Spending some time really exploring photographs in terms of the formal elements is an important process in the development of visual literacy.

Picture


​Light: A triangular slash of bright sunlight appears in the middle of the image. This is accompanied by bands of light running diagonally across the upper portion of the image. These appear to be gaps in another object out of shot,  a fence perhaps.
Line & Shape: There are number of strong lines, mostly straight, although these are complemented by the sweeping curve of the main object which runs from the top right of the image to the bottom right. All of the lines have the geometric quality of man made objects.
Repetition: The shafts of sunlight running across two surfaces create a dramatic rhythm. A number of straight parallel lines punctuate the composition, like repeated notes or beats in a piece of music.
Space: The space in the image appears quite shallow, tightly constrained by the framing. We don’t see the whole of any of the objects and the photographer appears to have been quite close to the subject.
Texture: All of the objects in the image appear smooth. The drama comes from the jagged bursts of light across their surfaces.
Value/Tone: The image contains a range of tones from very dark to very light. There are deep shadows but also mid tones. The photograph is monochrome but has a brownish tint, perhaps caused by the paper the artist has used.
Composition: A sense of drama is created by the diagonal lines and the objects seeming to tilt towards the bottom left of the picture.

Link to excellent BBC Resource / formal elements and more…

Analysing and Interpreting Robert Frank – Trolley, New Orleans

A guide to evaluating a Photograph: Key Themes, Content, Formal Elements, Process & Mood.

Key Themes – brief background information about the photographer or genre
Gain insight from title of image, date of image etc. Background research etc.

Content – Describe what you see! Look at the subject of the photograph.

What is it? What is it about? What is happening? What is in the foreground, midground, background? Where and when was it taken?
What do you think the relationship is between the photographer and the subject/s is? What has the photographer titled the image and why? Does the title change the way we see the image? Is it staged? Is it real?

Is it a realistic depiction? Has it been manipulated in anyway? If so, where and why? What is the theme of the photograph? What message does the photograph communicate?

Formal Elements – break the image down into the elements that make it up.

Colour, lighting, composition, structure, mood etc.

Colour – Is the photograph colour or black and white? Is there a reason for this? How does this affect the mood? What colours are depicted?

Lighting – is it photographed in a studio? Is it using studio lighting? Natural lighting? Has the photographer waited for the right natural light? Has the photographer positioned themselves? Vantage point. Is the lighting subtle? Is it strong? If so why and who has the lighting been used? Effectively or not? Does the lighting help the image? Why? Create mood/atmosphere? Dark, light?
Tone – Is the photograph high or low contrast? How and why? What tonal values.
Line/Composition – What sort of lines are there in the image? Leading lines? How have they been positioned in relation to the rest of the image? Is this on purpose? (the viewfinder or cropped afterwards?) What effect does this have?

Shape/Composition – What sort of shapes are there in the image? Do they remind you of anything? Do you think the photographer meant this? Is there symmetry? Is it structured in anyway? Rule of thirds? ‘S’ shape? ‘J’ shape. Golden Spiral, Golden Ratio, Fibonacci? Is it minimal? Simple? Complex? Confused?

Process – how the photograph has been taken, developed, manipulated and printed

Was the image taken inside or out? What time of day? Light sources? Evidence. Materials or tools used (props, objects, studio etc) Has the image been manipulation post production? How and why? B&W or colour? Plate, C print, large format, medium format, pin hole, slide, digital print, projection etc. Date may help.

Mood – look at the mood and feeling of the image

Is the photographer attempting to capture a moment/atmosphere/emotion? Explain why you think this. Is there a narrative/story? How does the image make you feel? Why do you feel like this? How and why?

USEFUL VOCABULARY

Colour

Intense         Saturated       Bright      Luminous         Secondary
Clash            Mixed            Soft       Cold             Opaque
Tint             Deep             Pale       Translucent     Dull
Pastel          Transparent     Glowing    Primary            Vibrant

Harmonious      Pure             Warm       Dark

Tone

Dark             Harsh            Bright     Fade       Intense
Contrast        Fair             Smooth     Crisp       Gradation
Sombre

Composition

Background      Distant         Middle Ground         Blurred

Shape            Scale            Perspective           Confused

Foreground      Space            Form                   Proportion      

Symmetry         Structured

Light

Artificial      Gentle          Natural    Dapple           Harsh
Night            Dark             Haze       Shading            Highlight
Shadow          Evening         Intense    Soft             Light
Source          Midday          Tone       Directional     Bright

Focussed

Mood/Feeling

Alive            Disturbing      Sad              Atmospheric     Exciting
Humorous        Delicate        Expressive       Depressing       Happy

Energised       Shocking        Questioning      Thought provoking

Powerful

ASSESSMENT CRITERIA

Personal Study Mark Scheme
Grade Boundaries

Follow the 10 Step Process and create multiple blog posts for each unit to ensure you tackle all Assessment Objectives thoroughly :

  1. Mood-board, definition and introduction (AO1)
  2. Mind-map of ideas (AO1)
  3. Artist References / Case Studies (must include image analysis) (AO1)
  4. Photo-shoot Action Plan (AO3)
  5. Multiple Photoshoots + contact sheets (AO3)
  6. Image Selection, sub selection, review and refine ideas (AO2)
  7. Image Editing/ manipulation / experimentation (AO2)
  8. Presentation of final outcomes (AO4)
  9. Compare and contrast your work to your artist reference(AO1)
  10. Evaluation and Critique (AO1+AO4)

CAMERA HANDLING SKILLS

Luis Tato (@luistatophoto) | Twitter

Please refer to this resource to help you navigate your camera’s function and settings. You will learn how to apply these skills learning to various photo-shoots over the next few months…and you should aim to provide evidence of these skills throughout your coursework.

Remember to practice and experiment. Use your eyes and look. The more you look, the more you will see. How you see the world will determine what kind of photographer you will become.

A camera is only a tool, and it is down to you to get the best out of your equipment by becoming confident and comfortable

Camera Skills

You must experiment with each of these skill areas as we move through our sequence of photo-shoots. Remember to include / produce a blog post on each that includes evidence of your experiments and successes…

Remember to use What / How / Why / When when describing and explaining what you are experiencing and achieving with each of these…

  1. Using Auto-Focus
  2. Using Manual Focus
  3. White Balance
  4. ISO
  5. Aperture
  6. Focal Length : wide, standard and telephoto lenses
  7. Depth of Field
  8. Show / fast Shutter Speed
  9. Exposure and exposure compensation
  10. Exposure bracketing

Ansel Adams and the visualisation of an image

Exposure Triangle : ISO – Shutter Speed- Aperture

The Exposure Triangle – Action Camera Blog

Depth of Field

Image result for canon camera control dial
Camera function layout
canon
Camera function layout
Ensure you are using technical vocab too…use the helpsheet to guide your literacy

Exposure Bracketing

Many digital cameras include an Auto Exposure Bracketing (AEB) option. When AEB is selected, the camera automatically takes three or more shots, each at a different exposure. Auto Exposure Bracketing is very useful for capturing high contrast scenes for HDR like this…

…by taking the same photograph with a range of different exposure settings

bracketed-exposures

You can use Exposure Compensation to quickly adjust how light or how dark your exposure will be using these controls…

canon

Or set the amount of “bracketing” like this…

g0101331

Then you can create your High Dynamic Range images by using this process in Adobe Photoshop…

photoshop_1

Understanding Composition

  1. The Rule of Thirds
  2. One of the fundamentals of painting and photography, the Rule of Thirds is a technique designed to help artists and photographers build drama and interest in a piece. The rule states that a piece should be divided into nine squares of equal size, with two horizontal lines intersecting two vertical lines.
Image result for rule of thirds photography

2. Fibonacci Curve

Image result for fibonacci spiral photography

3. Triangles / angles / Golden Section

Image result for triangles and angles in photography

Cropping / framing

Image result for cropping photography
Create drama / impact with cropping

20 Composition Techniques That Will Improve Your Photos

Understanding Lenses and Focal Length

Camera lenses & focal length. What are the numbers on a lens?

Perspective and Depth

Image result for linear perspective in photography
Linear Perspective (some examples may include a vanishing point)
Image result for atmospheric perspective in photography
Atmospheric Perspective

Photo Shoot Plan

CAMERA SKILLS

FORMAL ELEMENTS

Using the lighting studio

Once you have been instructed on how to use the lighting studio safely and respectfully, you will be able to use the studio during lesson times or in study periods. You must book the facility in advance via one of your teachers JAC / MM / MVT / CMK

You must always leave the studio in a clean and tidy, safe manner. All equipment must be switched off and packed away. Any damage must be reported and logged.

Studio lighting setup - Arch Viz Camp
Typical studio set up with infinity screen back-drop

Types of lighting available

  • Continous lighting (spot / flood)
  • Flash head
  • Soft box
  • Reflectors and coloured gels
Image result for single point lighting portrait effects
Chiarascuro effects and single point lighting
Image result for 2 point lighting studio diagram

Still Life Photography and using the product table / copy stand

Image result for manfrotto product table photography
Product table set-up, with back light and infinity screen

Still-life Studio Shoot:

You can choose to photograph each object individually or group together several objects for a more complex still life arrangements.

Technical stuff

Continuous Lights – photograph objects three dimensionally

Camera setting: Manual Mode
ISO: 100
White Balance: Daylight
Aperture: F/16
Shutter: 0.5 sec to 0.8 sec (depending on reflection of each object)
Lights in room must be switched off to avoid reflections

Continuous Lights – portrait

Camera setting: Manual Mode
ISO: 100
White Balance: Daylight Shutter Speed 1/125 sec Aperture f/16

Flash Lights – photograph images, documents, books, newspapers, etc or portraits

Camera setting: Manual Mode
ISO: 100
White Balance: Daylight
Aperture: F/16
Shutter: 1/125-1/200 (depending on reflection of each object)
Flash heads set to power output: 2.0
Use pilot light for focusing

PORTRAITS

Camera settings (flash lighting)
Tripod: optional
Use transmitter on hotshoe
White balance: daylight (5000K)
ISO: 100
Exposure: Manual 1/125 shutter-speed > f/16 aperture
– check settings before shooting
Focal lenght: 105mm portrait lens

Camera settings (continuous lighting)
Tripod: recommended to avoid camera shake
Manual exposure mode
White balance: tungsten light (3200K)
ISO: 400-1600 – depending on how many light sources
Exposure: Manual 1/60-1/125 shutter-speed > f/4-f/8 aperture
– check settings before shooting
Focal length: 50mm portrait lens

RESOURCE LINK HERE