All posts by Oliver Shiplee

Filters

Author:
Category:

Decdonstructing Photobook

Out of the Blue by Virginie Rebetez — Tipi Photo Bookshop

Book in hand: how does it feel? Smell, sniff the paper. It is a hardback book. It smells like a book

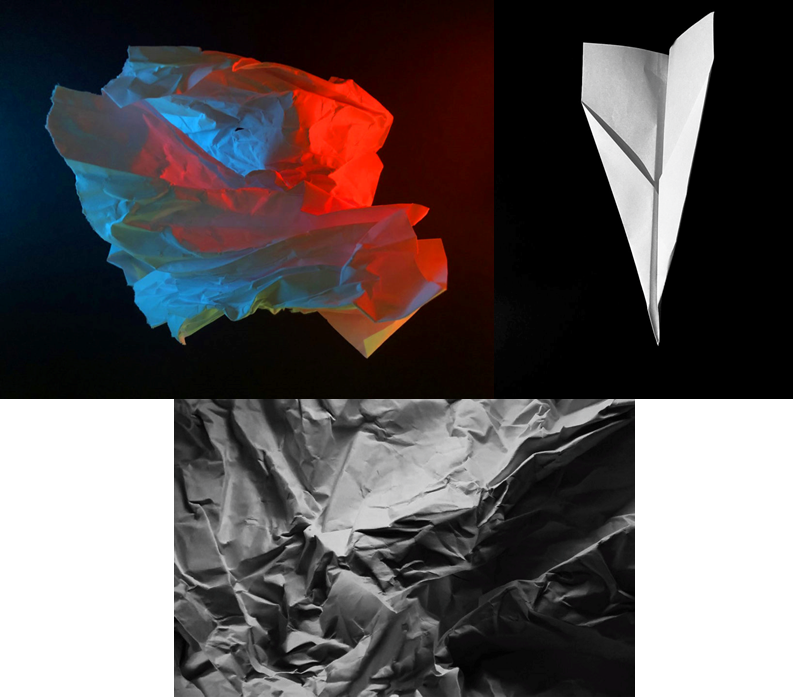
Paper and ink: use of different paper/ textures/ colour or B&W or both. There is a slip of loose paper with an image on it. The front is textured and feels like a linen cover

Format, size and orientation: portraiture/ landscape/ square/ A5, A4, A3 / number of pages. Portrait orientation a4 paper. 144 pages with 57 colour photographs

Binding, soft/hard cover. image wrap/dust jacket. perfect binding/saddle stitch/swiss binding/ Japanese stab-binding/ leperello Hard cover with a perfect binding

Cover: linen/ card. graphic/ printed image. embossed/ debossed. letterpress/ silkscreen/hot-stamping. Linen cover with a printed graphic of stitches/ barbed wire and an image of hair and an ear with an earing on the other side

Title: literal or poetic / relevant or intriguing. The title “out of the blue” may reference the idea of something unexpected happening, causing an imbalance to the normality of daily life.

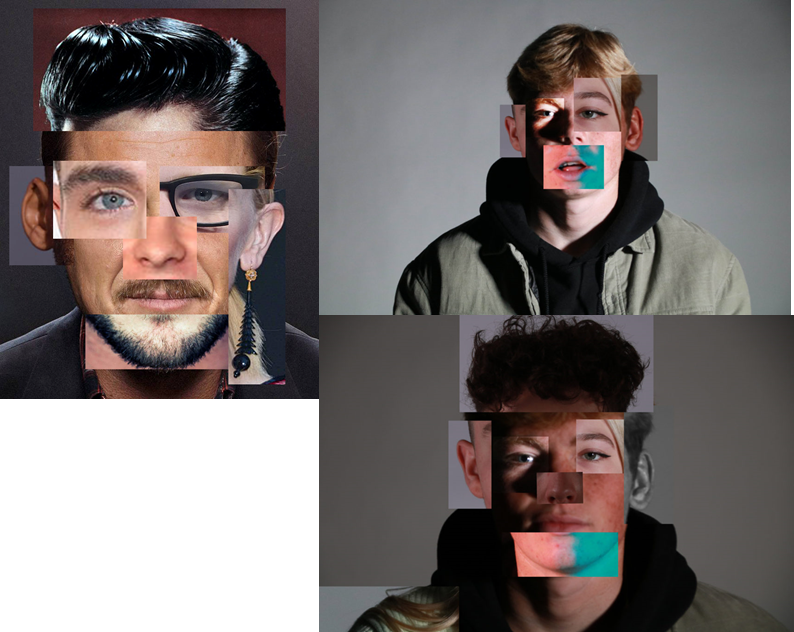
Narrative: what is the story/ subject-matter. How is it told? When looking at the essay in the photo book it is told that it is about a missing person called Suzanne. The story is told by old fashioned photos, images of paper with writing on it, images of old fashioned photos of both her and her parents, images of family items and images of images cut out or covered up referencing that she is not here anymore.

Structure and architecture: how design/ repeating motifs/ or specific features develops a concept or construct a narrative. There is a repeating form of collages of photos partially or completely covered up to reference the disappearance.

Design and layout: image size on pages/ single page, double-spread/ images/ grid, fold- outs/ inserts. The size of images different from page to page as some take up the whole page, half he page or the whole page except a thin white border

Editing and sequencing: selection of images/ juxtaposition of photographs/ editing process. The images all have a retro look to them and the images are chosen to portray a certain message. They start off with an image of a note from the missing person

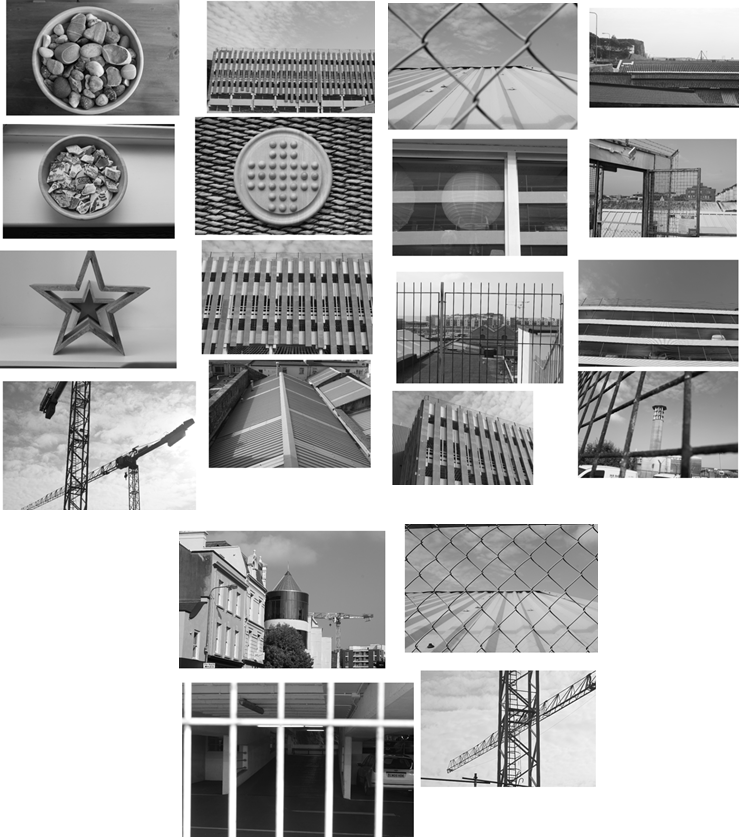
Images and text: are they linked? Introduction/ essay/ statement by artists or others.  Use of captions (if any.) At first you don’t know what is going on and see images of aerial views of a motorway and an image of a note the contents of which I have written below. Then, images of what appears to be a child’s bedroom and images that have the person cut out of. After reading a slip of paper with the essay on you realise it is about a missing girl. There are also a range of family photos of her covered up by other things to represent her disappearance.

Suzzanne Gloria Lyall

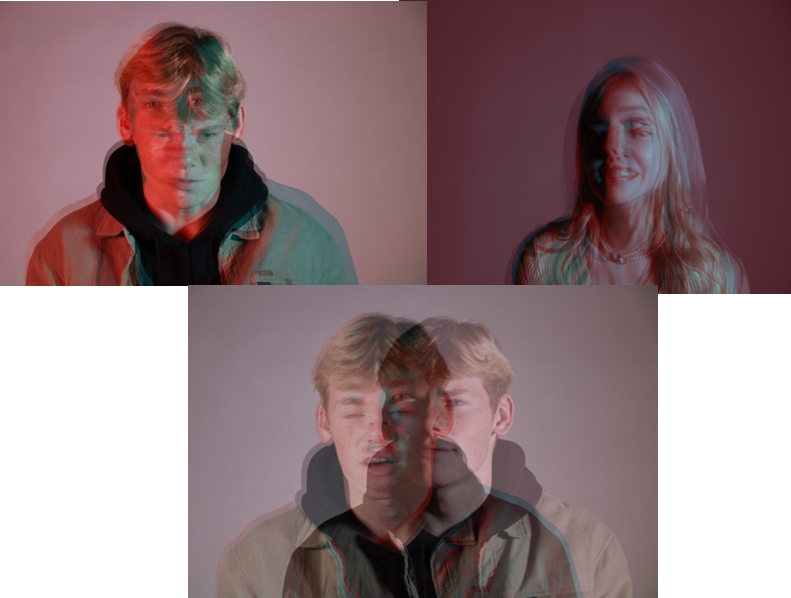
The photobook is about the disappearance of a 20 year old women and how the disappearance has effected the family. The photographer has taken images in different ways which are important in conveying messages. She cuts the missing girl out of old family photos and shows the parents of the girl unsure what they should do without her. The photographer has taken loads of old family photos of her and cut her out or covered her up, and placed all of the images on a big wall with strings attached like a detective case. She then photographed the board bit by bit telling the story of her disappearance.

Review and Reflect

Formalism (Paper Project) – The first project we started was based on formalism. We scrunched up a piece of paper and took photos experimenting with colour, shadows and perspective. I learnt how you can’t just take a few images and them all be good, but you have to take hundreds in different lighting, shapes, angles and colours which in the end gives you a handful of good images.

Expressionism (The World is Beautiful) – The next project we did was about Albert Renger-Patzsch and the World Is Beautiful. For this I went out and took photos around town in black and white. I learnt how black and white creates drama and how different tones can be used to make an image exciting. This project really inspired me and interested me to use black and white in further projects.

Photomontage – Another project I enjoyed doing was the photomontage project. I enjoyed it because it increased my understanding and ability in photoshop. I took many photos of my friend in different lightings and cut out the facial features from myself and my friends. I then put them on top of a background image of a face which then altered the appearance of the original image. I first made one out of celebrities but then out of my friends.

Multi-Exposure – I also enjoyed the multi-exposure project for the same reason as photomontage. I used photoshop to get a few images of the same person in different lighting, position or facial expression and put them on top of each other. I changed the colour of two of the images so they represented old 3d glasses with one side blue and the other side red.

Landscape (Rural and Romanticism) – I enjoyed the landscape project because it introduced me to a different way of taking photos. I went out to take photos to beauport bay with my friend Matthew Brown. We took photos of the waves, the cliffs and the view of St Brelades bay. I took inspiration from Ansel Adams and took my images in colour but made them black and white. I believe black and white is a better medium for photos as it simplifies the image but makes it more exciting with tones.

New Topographic – The new topographic project was my favourite project I completed during my time studying photography. The project allowed me to combine my favourite parts of photography including, landscape in an urban environment, as well as black and white photography and using photoshop to edit my images. I studied a photographer called Lewis Baltz who used lines and high contrasts in tonal values. My outcome from the project was one of the best outcomes I have had from a project.

Anthropocene – The Anthropocene project also helped me with developing my photography skills. I studied two photographers one called Gerry Johansson who focused on photography including high contrast in tonal ranges. The other photographer is called Andy Hughes who focused on photographing plastic waste in relation to pollution. I got to take black and white photos with a good contrast in tones and colourful images with high contrast of plastic waste on beaches.

Best Photoshop Edits


NFT – Final video

https://web.microsoftstream.com/video/7f2e5973-fc97-435e-8d97-632fd5209787

If we had the chance to do this NFT project again, I think we would have done a few things differently. Firstly, I think we should have done some of the drone shots again so that in the video the shot isn’t as shaky. Secondly, I believe we should have got actual vr glasses instead of a printout. Finally, I believe the animated character should have had some similarity to Michael. However, it proves the point of the 2 live as it shows that he is detached from his other version of himself.

NFT – Summary and Statement

Summary

Overall, the completed work by our group turned out to be a success. The filming was good especially the drone shots done by Matthew however some of the walking shots were slightly shaky making it difficult for Michael and Reuben to edit together with the animation shots. Matthew mainly focused on animating the sections that were animated. He did this on blender and was successful in creating different settings for the character to walk through. I mainly focused on making a final poster and finding sound effects that were used in the video. Overall, I believe we succeeded in completing what we set out to complete. I would rate it 8/10 for success only because some of the shots are slightly shaky and the video is quite short.

Statement

Title: Online / Offline
The concept behind our NFT video is that two friends each have two separate lives; one offline and online. Our video shows how anything can happen on an online medium but real connection and friendship occurs in real life. As technology develops relationships of all kinds are growing apart. An example of this occurred in the height of the Covid-19 pandemic lockdown. People only experienced contact with family members in the same household and the only way to speak to people outside was via an online medium. This effected the mental health of everyone and looking back on the first lockdown we can see how much we relied on technology to keep connected with family and friends.

Creators: Oliver Shiplee, Matthew Brown, Michael Kenealy and Reuben Jeanne

Recording and editing

We used our storyboard to decide what we were shooting. Michael was out first model who was mainly going to be at the start of the video. Then we decided that Reuben was going to be the second model and be in the mid-final section of the video. We printed off a picture of vr goggles and taped it onto some sunglasses.

Shooting

We shot the video in an open green area and used Matthews drone to get some of the shots. We got a headshot video of Michael walking using the drone. After these shots we gathered some panning shots and some shots following him. Then we recorded Rueben and Michael meeting in real life.

Editing

Michael and Reuben also edited the video on Adobe Premier Pro. They added effects such as the loading screen, static sound effect and visual and mapped the video to the beat of the music.

The image above shows the video mapped out on Premier Pro. You can see in the bottom left, the different clips, sound effects and visual effects put together to make the video. Next to the clips is the layout which shows the time at which things change. You can see the sound track beneath the video track and where the video clip changes.

Final Image and Evaluation

Matthew made the digital image and took a screen grab of one of the drone shots of Michael and took a section of the the video in which Matthew animated a character in different environments. He then mixed the two and made some cool text that give the feeling of old 3d glasses.

He also added a red and blue outline on the left and bottom of the left hand side of the image. He finally embossed and made the text 3d.

The image represents the idea of two lives but further links to the idea of endless amounts of lives that can be achieved on an online platform. It shows what can happen on the meta verse.

Evaluation

Overall, I believe that the digital image is very successful in telling the story of how the meta verse links to real life. It also references the idea of escapism and how people try and escape from real life in many different ways from film, tv, video games and many more.

NFT Sound effects

In my group, it was decided that I was going to find the sound effects for the video. This included finding sound effects that contained sounds of animals on a farm, natural ambience, a sci-fi whoosh effect, keyboard typing noises, retro video game sounds and more.

For these I researched different websites for free, copyright free, downloadable sound effects. For these I got them from a few different places.

Mixkit

My personal favourite site was called mixkit and had a wide variety of sound effects that you could download for free. Mixkit has sound effects for different headings such as transitions, nature, technology, animals and games. Below are examples of how many sound effects Mixkit has to download.

I mainly used the game section of sound effects as my group needed retro sounding opening sound effects for the video. I also found some transition swoosh sound effects, keyboard typing sound effects and animal noises.

NFT and digital art Research

What is a NFT?

A NFT also known as a non-fungible token is a unit of data stored on a blockchain which is a unique certificate of ownership of one specific piece of data. NFT’s can be used to represent items such as photos, videos, audio and other types of file.

NFT Mania: innovation frontier
Beeple, EVERYDAYS: THE FIRST 5000 DAYS

History of NFTS

The idea of an NFT was first thought up in 2012-13 and started as a coloured coin issued on the same blockchain as Bitcoin. Coloured coins represent real life assets and can prove ownership of something.

The first NFT was created by a man called Kevin McCoy on the 3rd of May 2014 and called it “Quantum”. Quantum is a octagonal shape filled with moving circles creating pulsating and hypnotic hues. It is still a one of a kind art piece and is worth roughly 7 million dollars.

Quantum (Kevin McCoy)

What is Digital Art?

Digital art is an artistic work that uses digital technology as part of the creative presentation process. It is also called multimedia art and links to the larger label of media art. Digital art is a very good example of how modern art can be represented. It is a very powerful form of art and utilises modern techniques.

Febin Raj Archives | Creative Gaga
Febin Raj

History of Digital Art

The first use of “Digital Art” was used in the early 1980’s after computer engineers developed a paint program which was used by the pioneering digital artist Harold Cohen. This program was known as AARON.

Digital art can be computer generated, drawn and scanned or made with a computer. In the 1990’s video had the ability to now be downloaded onto a computer allowing artists to manipulate video and still images. They could now cut and paste creating collages and mash ups of images.

Harold Cohen, ‘Untitled Computer Drawing’ 1982
Untitled Computer Drawing 1982 (Harold Cohen) 

NFT Story Board

A storyboard is a collection of images that tell a story and how the shots telling the story will look. Our storyboard is below and we printed an empty storyboard in which we drew a small image and wrote a small sentence describing what is happening. The storyboard follows a sequence of events that begin with the main subject putting on a VR headset outside when he is transported into a VR world.

Animation Workshop

We completed an animation workshop with and artist and professional animator called Liam Nunn. He gave us a crash course on digital animation in Adobe After Affects. He created what he calls a “Rig” of the face and shoulders of a lady that we could easily animate. It allowed us to animate her facial movement, eyes closing and opening, mouth opening and closing, eye and eyebrow positions, nose movement etc.

Above is an example of what we started off with and the dots on the lines beneath the lady show when movement is happening corresponding with the number of seconds above the dots. Also what line the dots are on shows what movement is occurring. Animating the image is quite easy as after making one or two movements that you like, you can copy and paste again and again to repeat the movements.

Above is an example of the different movements possible and how they work. To make something move you press the little diamond button to the left of the image that is highlighted blue where you want it to happen on the timeline. When entering a keyframe you can change how much movement is occurring and when it is occurring.

Above is my final animated video. I have made her move and changed her hair colour, clothes colour and face colour. It lasts for 15 second because I have looped it. I have had to compress it into a slightly lower quality to get it onto the blog.