Final Deadline for improving Coursework:
MON 22 MARCH – Whole School!
Examination dates: 15 hrs controlled test over 3 days
Groups 13A and Group 13B: 4, 6 and 12 May
Group 13C: 5, 13 and 14 May
The Themes:
‘TRANSITION’ and/or ‘FREEDOMS and/or LIMITATIONS’
PLANNER
ASSESSMENT OBJECTIVES
AO1 Develop ideas through sustained and focused investigations informed by contextual and other sources, demonstrating analytical and critical understanding
AO2 Explore and select appropriate resources, media, materials, techniques and processes, reviewing and refining ideas as work develops
AO3 Record ideas, observations and insights relevant to intentions, reflecting critically on work and progress
AO4 Present a personal and meaningful response that realises intentions and, where appropriate, makes connections between visual and other elements.
Definition in dictionary:
TRANSITION
noun
1. the process or a period of changing from one state or condition to another.”students in transition from one programme to another”
verb
2. undergo or cause to undergo a process or period of transition.”he transitioned into filmmaking easily”
FREEDOMS
noun
1. the power or right to act, speak, or think as one wants.”we do have some freedom of choice”
2. the state of not being imprisoned or enslaved.”the shark thrashed its way to freedom”
LIMITATIONS
1. a limiting rule or circumstance; a restriction.”severe limitations on water use”
2. (LAW) a legally specified period beyond which an action may be defeated or a property right does not continue.

How to start – TASKS FOR H-TERM
- Read both the Exam Papers and Exam Planner thoroughly, especially pages pages 3-5 and page 24-27 which details specific starting points and approaches to the exam theme – make notes! Look up the word in the dictionary, synonyms and etymology (the study of the origin of words and the way in which their meanings have changed throughout history.)
- Brainstorm your idea and research artists listed – look also at starting points in other disciplines e.g. Fine Art and Graphic Communication etc.
- Begin to gather information, collect images, make a mood-board and mind-map,
- Make plans for photoshoots and write a specification.
- Produce at least ONE PHOTO-SHOOT over H-Term as a response to tasks listed below and initial research and ideas.
- You must show evidence of the above on your blog– complete at least 4-5 blog posts.
2018 presentation with examples of Artists References from page 5 of exam booklet – showing evolution of artistic freedom
Each week you are required to make a photographic response (still-images and/or moving image) that relates to the research and work that you explored in that week. Sustained investigations means taking a lot of time and effort to produce the best you can possibly do – reviewing, modifying and refining your idea and taking more pictures to build up a strong body of work with a clear sense of purpose and direction
Preparatory Supporting Studies (Blog posts)
6 weeks of lessons + 2 weeks Easter Break:
Prior to the timed examination you must produce and submit preparatory supporting studies which show why and how the supervised and timed work takes the form it does. You must produce a number of blog posts 25-40 that charts the development of your final piece from conception to completion and must show evidence of:
- Research and exploration of your ideas
- Recorded your experiences and observations
- Analysis and interpretation of things seen, imagined or remembered
- Experimentation with materials, processes and techniques
- Select, evaluate and develop ideas further through sustained investigation
- Show connections between your work and that of other artists/ photographers
Controlled Exam 15 hrs over three days: (Final Outcome)
This time is for you to fine tune and adjust your final images for print using creative tools in Lightroom/Photoshop and/or complete a final edit of your photobook, film or video in Premiere. Your final outcome(s) must be presented in a thoughtful, careful and professional manner demonstrating skills in presenting work in either window mounts, picture frames, foam-board, and/ or submit pdf of photobook, or embed (from Youtube upload) moving image and video based production to the blog.
Week 24: 8 – 14 March:
EXPLORE THEMES > RESEARCH > ANALYSE > PLAN > RECORD > EXPERIMENT > PRESENT
Lesson 1 (Mon): Seminar
Read both exam papers and discuss in class.
Homework: Photo-game 1
What to Photograph?
Deadline: One week > 15 March
Produce blog post with a selection of edited images and an evaluation
Each student think of an instruction, an object, place, or scenario to be photographed. All the instructions will be collated and given to all students in the class. Every student have to make one image of each instruction. As an example, here is a list of instructions (don’t copy!)
A red ball
A tree and a dog
An ugly photograph
A political argument
A kiss
A shallow focus image of a bar of soap
a random photograph
An unambiguous photograph
Grass and concrete
An old-fashioned photograph
A futuristic photograph
a blue car and a white car
Nigeria
Timeless beauty
Flowing water
Lesson 2 (Tue): Group work
Research 1: Analyse and interpret chosen theme(s) and produce mindmap & moodboard.
Publish on blog.
Lesson 3: (Wed): Group work
Present your research and interpretation of exam theme(s).
3 mins.
Lesson 4: (Thurs) Individual work
Statement of Intent: Based on you mindmap and moodboard begin to formulate a specification with details of 2-3 ideas that you wish to explore: How, who, when, where and why? Plan a photo shoot and/or photographic response to one of your initial ideas.
Lesson 5: (Fri) Individual work
Research 2: Begin to support your initial ideas by looking at the work of others and find inspiration from photographers listed on pages 24-27 in the Exam papers. Look also for specific starting points in other disciplines, such as Fine Art, Graphic Communication and Textile Design.
Analyse the work of at least two or more photographers/ artists with references to texts/ sources/ quotes and explain why you have chosen them and how it relates to your idea and the exam theme.
Produce quality blog posts for each artist reference that illustrate your thinking and understanding using pictures and annotation.
Plan a photo shoot and/or photographic response.
Deadline: One week > Fri 19 March
Produce blog post with a selection of edited images and an evaluation.
See blog post: DEVELOPING YOUR IDEAS: ARTISTS REFERENCES for more inspirations and guidelines on how to research and analyse the work of others.
Photogame 1: What to Photograph?
Class 13A
- Waves
- Nature
- Bonfire
- Roadsign
- Flowers
- Fashion
- Sky
- Wind
- Postman
- Something Black and White
- Growth
- A Cow
- A Car
- Old Person
- Light
Class 13B
- Water
- Shoe
- Sea
- Mirror
- Tree
- Person
- Circle
- Cliff
- Nature
- Sun
Class 13C:
- Beach
- Trees
- Sea
- Sand
- Pollution
- Swimming
- Derelict building
- Production
- Mirror
- Mortality
- Transition from caterpillar to butterfly
- Thunderstorm
- Sky
- Fish market
- Reflection
- Balloons
Week 25: 15– 22 March:
EXPLORE THEMES > RESEARCH > ANALYSE > PLAN > RECORD > EXPERIMENT > PRESENT
Lesson 1: (Mon 15 March)
Photogame 1: What to Photograph?
Upload all images in a folder and print a set of small prints (9x13cm = 4 per A4 sheet). Lay all images in a huge grid on the tables so that vertically you can see every students response to the same instruction, while horizontally you will be able to discern each student’s approach or style.
Lesson 3 (Wed 15 March)
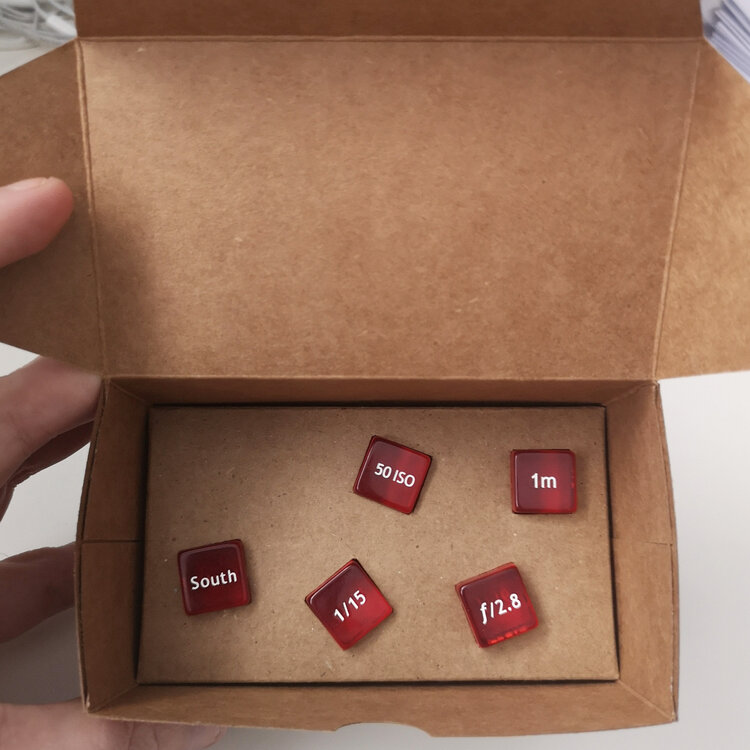
PHOTO-GAME 2: Photo-dice (Zen for Photography)
An artwork which consists of 5 dice, each describing a decision leading to a photograph.
Participants: Whole class, each student roll the dice once.
Aim: Roll the five dices and write down instructions
Method: Produce a set of 10 images using the instructions
Location: Outside/ Inside
Evidence: Produce blog post with a selection of edited images and an evaluation
Deadline: One week > 22 March
Here is a link to a new blog post with more Photogames – use it as an inspiration for generating ideas and make images. It has instructions about how to develop your own Photogame.
Produce blog post from the above photogame with a selection of images, experimentation and analysis. Make contextual links with John Baldessari work where appropriate.
Week 26-27: 22 March – 1 April + EASTER:
EXPLORE THEMES > RESEARCH > ANALYSE > PLAN > RECORD > EXPERIMENT > PRESENT
Statement of Intent
Based on you mindmap and moodboard begin to formulate a specification with details of 2-3 ideas that you wish to explore: How, who, when, where and why? Plan a photo shoot and/or photographic response to one of your initial ideas.
Research 2: ARTISTS REFERENCES
Begin to support your initial ideas by looking at the work of others and find inspiration from photographers listed on pages 24-27 in the Exam papers. Look also for specific starting points in other disciplines, such as Fine Art, Graphic Communication and Textile Design.
See more artists references and guidance here
Planning: PHOTOSHOOT
Plan at least 4-5 photoshoot you can complete by the time you return from Easter. They need to have a sense of purpose and include what, where, when, who and explain how they explore the theme. Make sure you produce at least one shoot before Easter to test out ideas and discuss with your teacher.
EASTER > Recording: PHOTOSHOOOTS
Make sure you complete most of your planned shoots over Easter break. From each shoot select 8-12 images for further experimentation. Produce quality blog posts from each shoot and analyse and evaluate your photos through annotation showing understanding of visual language using specialist terminology. Follow process below of three EEEs.
Before you break off for Easter to must have completed all the above with relevant blog posts charting your thinking and creative progress. Make sure you produce quality blog posts that illustrate your thinking and understanding using pictures and annotation.
Week 28-29: 19 – 30 April:
EXPLORE THEMES > EDIT > EXPERIMENT > EVALUATE
EXAM BEGINS TUE 4 MAY (AFTER BANK HOLIDAY)
BLOG
You are expected to show evidence of the following three EEEs on the blog.
EDITING: For each shoot you have made select and adjust your best set of images using either Lightroom / Photoshop using basic tools such as cropping, exposure, contrast, tonality, colour balance, monochrome etc.
EXPERIMENTING: Make sure you demonstrate creativity and produce at least 3 different variations of the same image, eg. colour/ monochrome, montage/ grid, juxtaposition/ sequence etc.
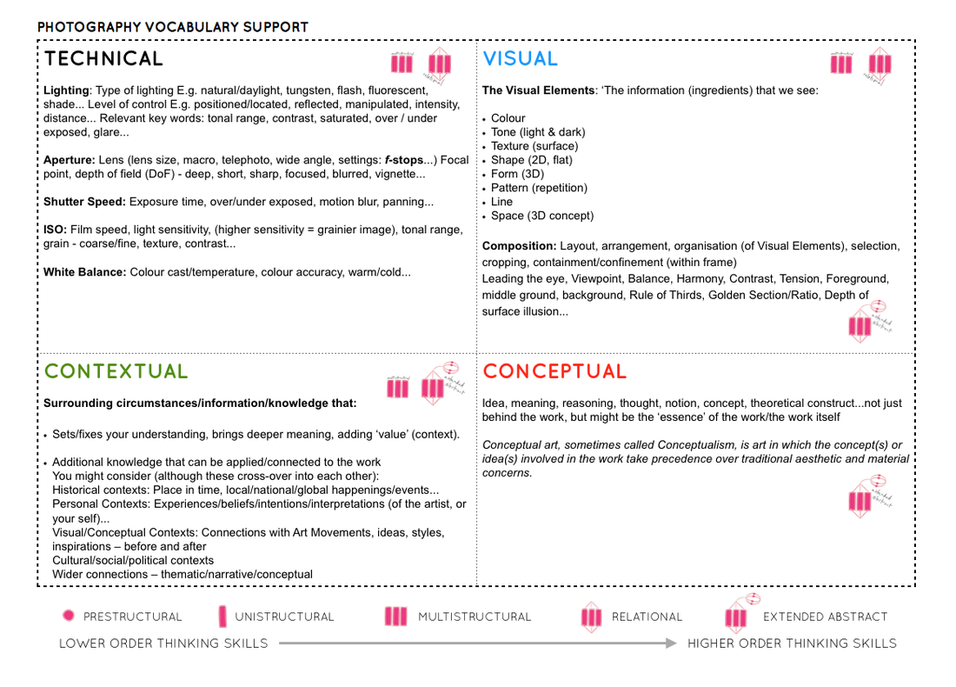
EVALUATING: Compare your images and photographic experiments and provide some analysis of artists references that has inspired your ideas and shoots. Use the Photo-Literacy matrix below. Consider what you need to do next to develop your project? What’s your next step!
REVIEW > REFLECT > REFINE
- Produce another shoot
- Revisit idea/ concept
- Refine experimentation

FINAL OUTCOME
Begin to consider how you wish to present your work:
A set of final prints – single, diptych, triptych, multiple images mounted on foamboard, mountboard
A photobook – design in Lightroom using Blurb
A film – editing in Premiere


