Tableaux – Editing photos

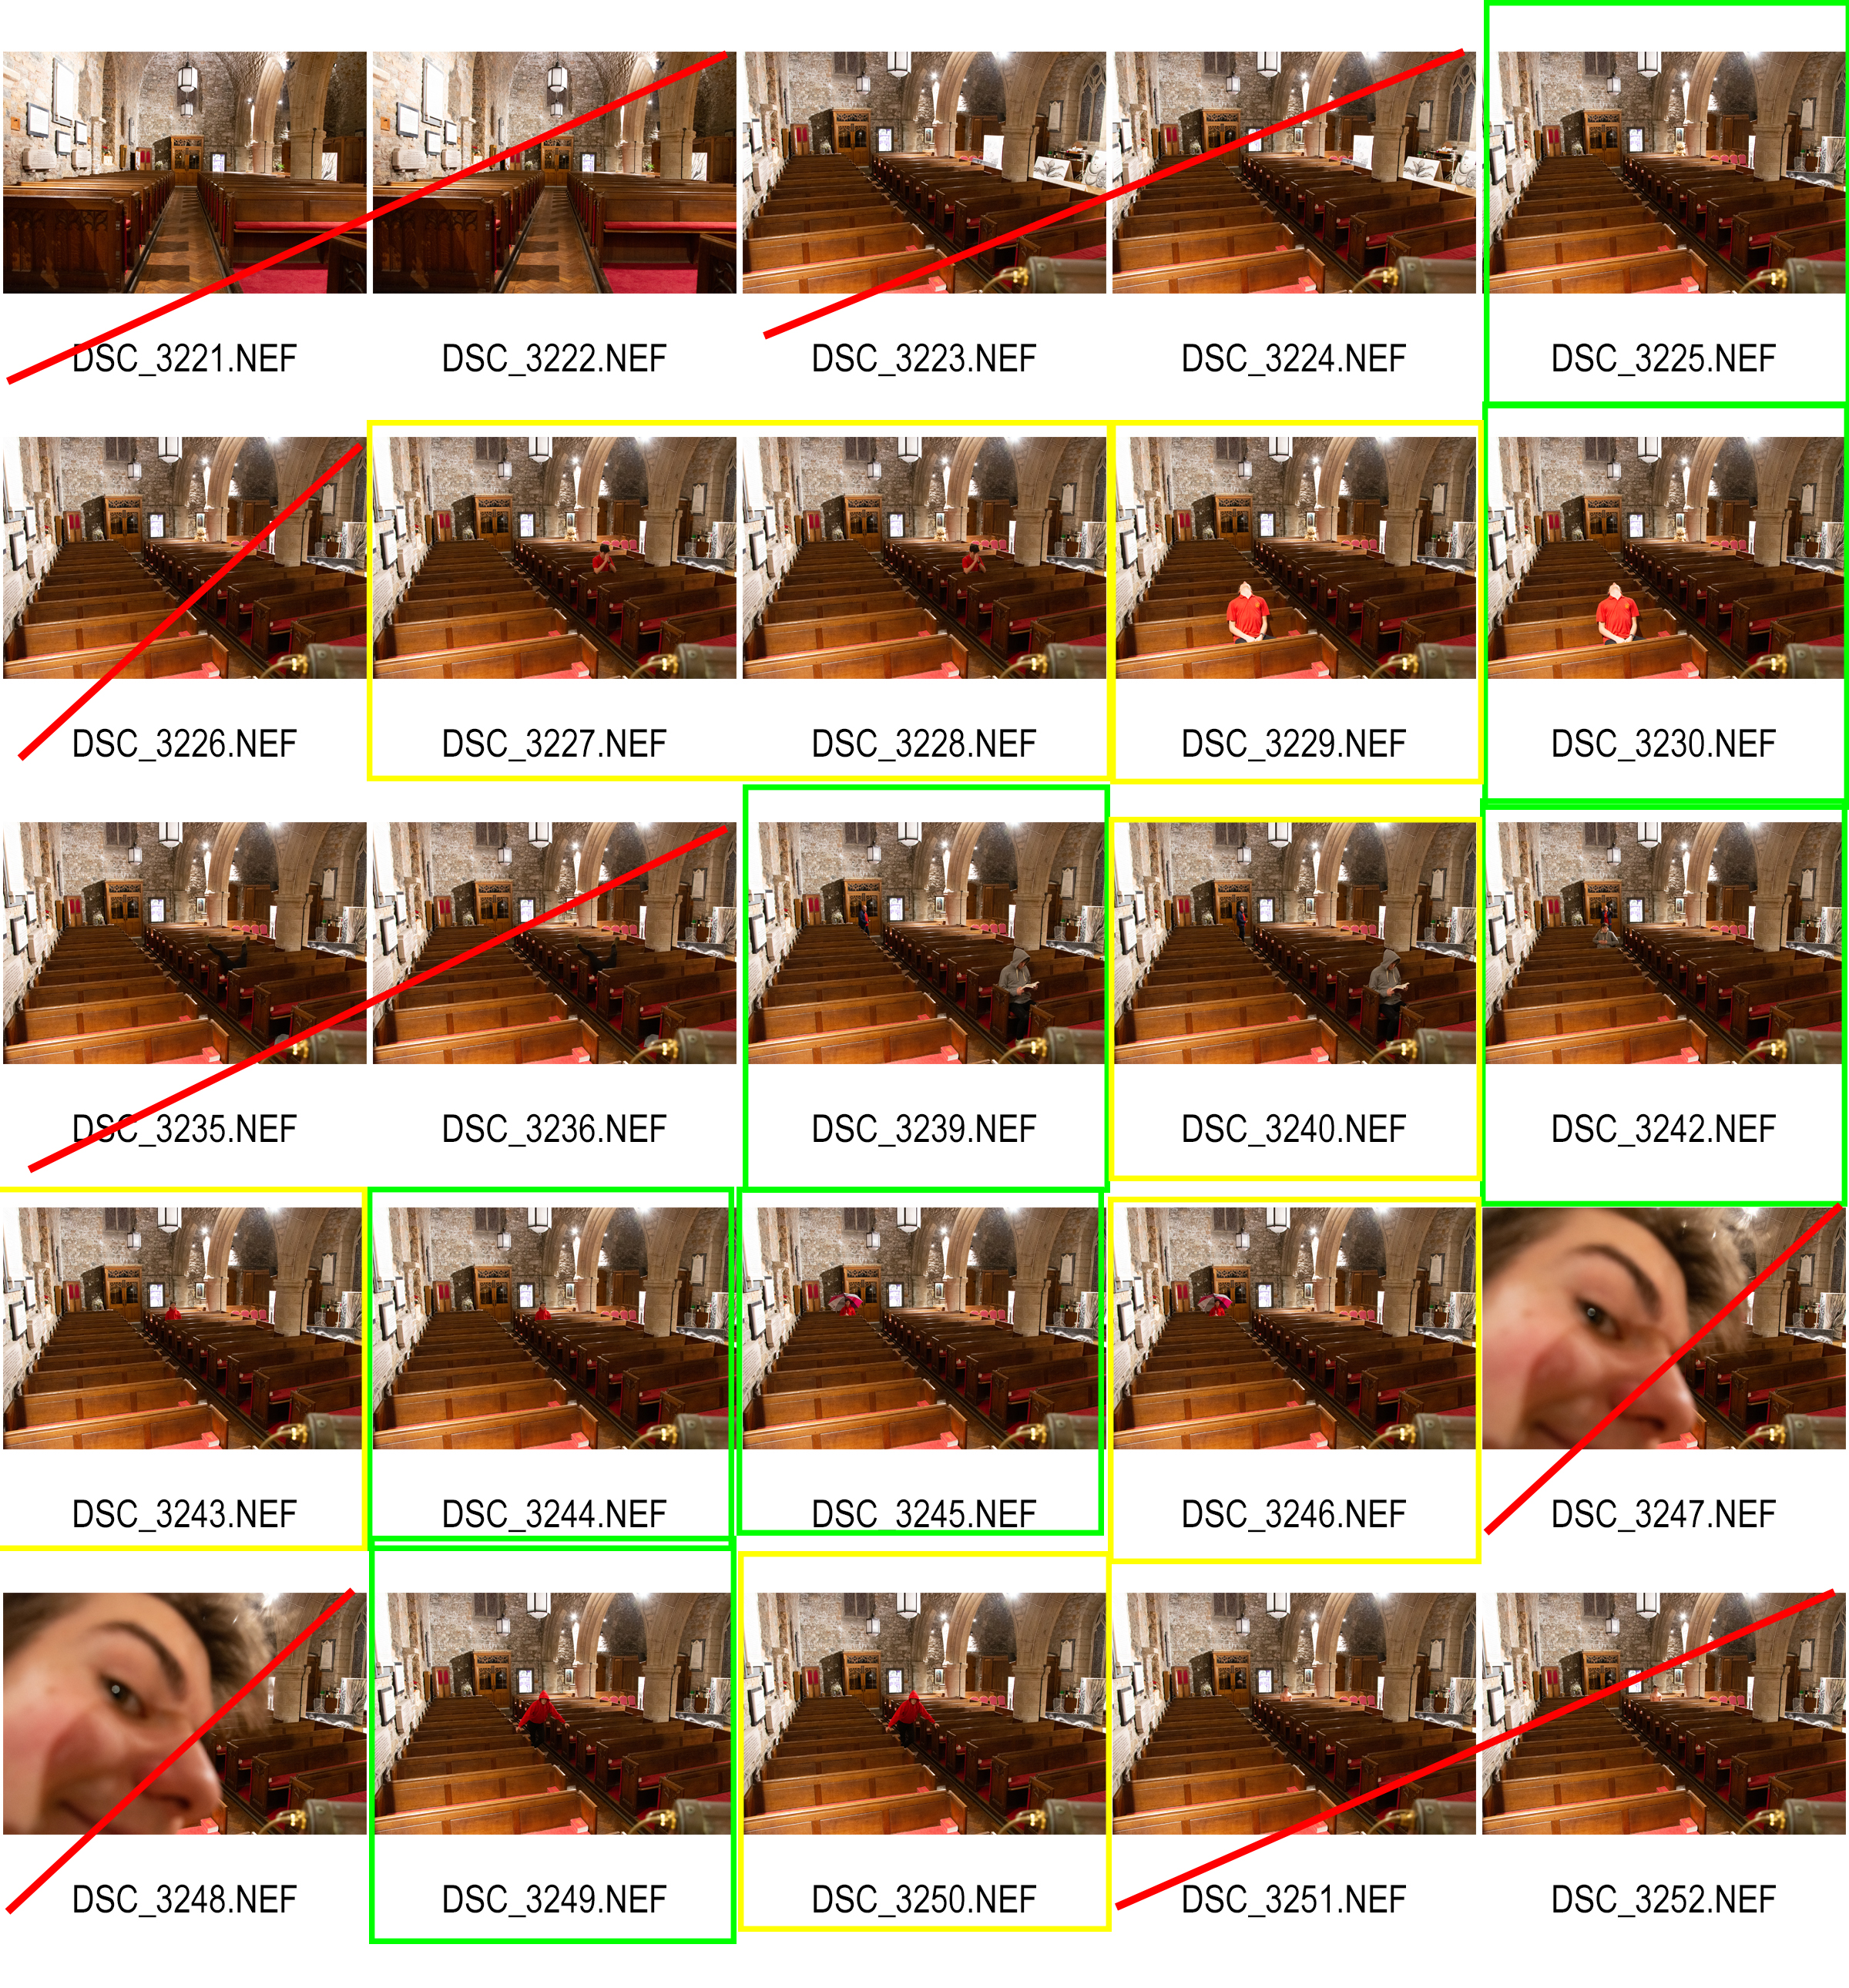
When editing the photos I encountered a problem that I  have mentioned in an earlier post and that is that because I had no trigger and a tripod not suited to my camera, I had some minor problems with camera shake and movement, I did partly fix it by having the camera on a timer but there was some slight miss-alignment in the editing but I did manage to find a way around it, and still produce the image that I wanted. 

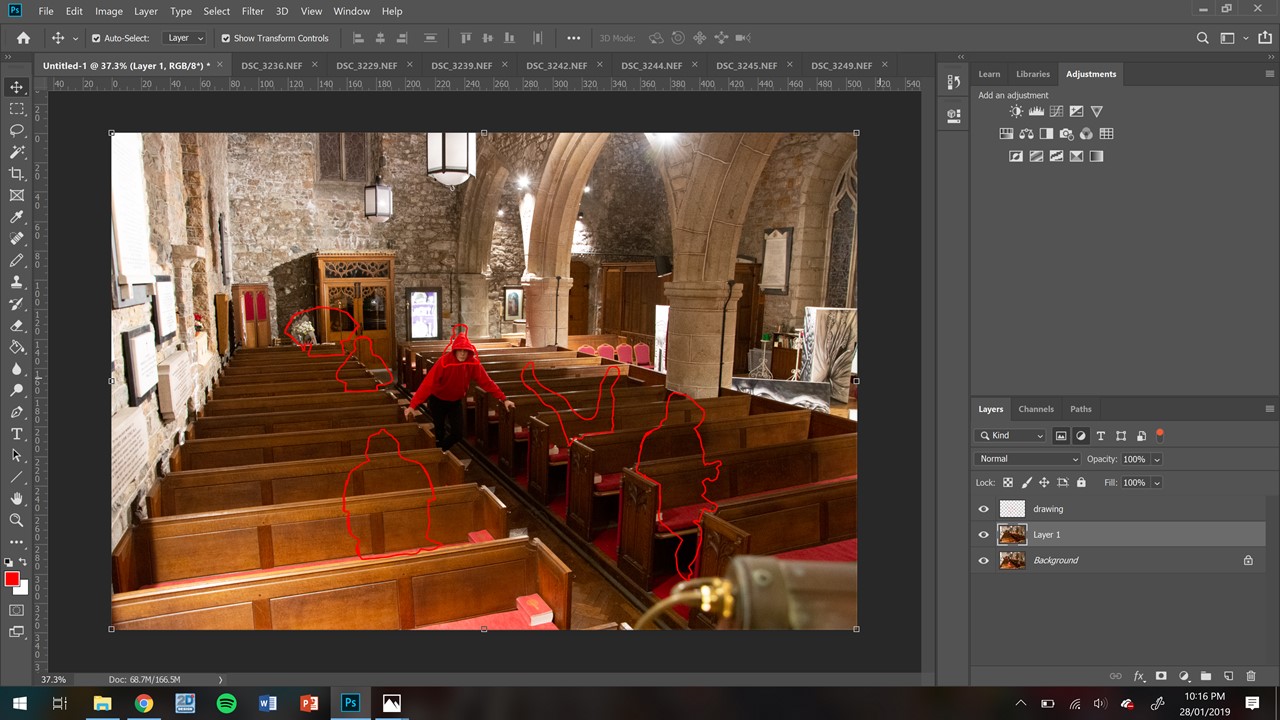
What I tried to do was just to layer each photo on-top of one another and simply rub out the areas where I was in the photo, however, because of the straight lines of the pews and the shake of the camera, that didn’t work, so I decided to add each photo one at a time on top of each other and before I put the next layer on I had a bank layer called “drawing” (seen as the top of the three layers above) and I carefully drew round each of the “me’s” and then rubbed out the filling from the red box each time, and after I did this on a layer I made the drawing layer invisible, by clicking the small eye next to it, and then merged the visible layers and built it up until i had the complete image.

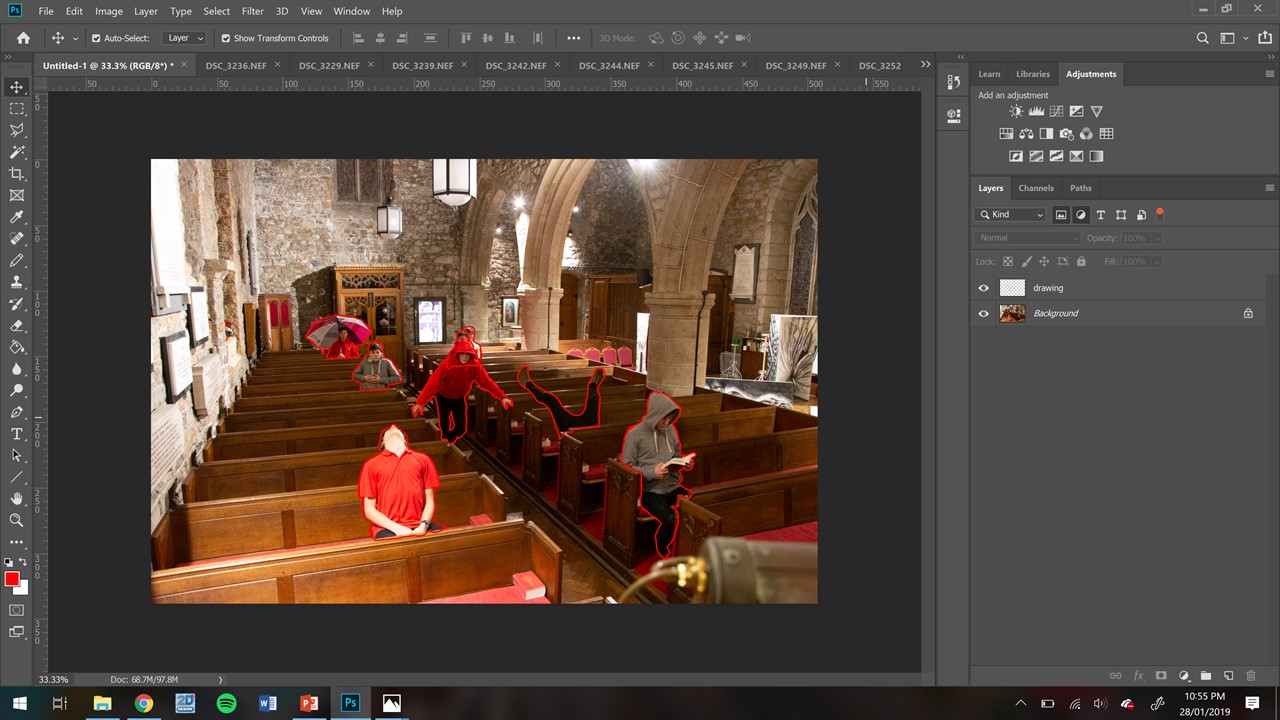
Seen above is the completed image with all outlines. 

Tableaux — Photo-shoot / Image Selection

When I went to take the photos there was a slight problem that the area wasn’t lit as well as I had hoped because the shoot took place in the evening an it was dark, to combat this I boosted the iso on my camera slightly higher than I would have liked but not so much that the grain was immediately evident. Then as I didn’t have a trigger and the tripod I was using is not very strong and I have a large camera my friend who was operating had problems keeping the camera still, the way that I combated this is I set the camera to have a 5 second timer and to take a two shot burst at the end of the timer. This eliminated most of the shake but there was still some.

SOME PHOTOS MISSING


The problem that I had is that image 3227-8 I sat in a bad place and didn’t realise until I reviewed them the next day. The problem was that because in that pose i was leaning onto the back of the pew in-front was being obstructed by a more important image that I later took that was more important to the shoot and would stand out more. So I had to leave images 3227-8 out of the final edit. And all of the images in the green boxes made it into the edit and some that wouldn’t appear on the contact sheet.

Tableaux — shoot plan

The plan that I have is that I will go to a local church and then I will set my camera up on a high tripod overlooking the pews in the pulpit. Then I will have multiple different poses that I will take in the pews and then I will have a friend take a photo using a remote trigger so that the camera doesn’t shake and the photoshop will be easier later. I will set the aperture to be about f/5 so that I will be able to have the same focus point for all the photos and I will still be in focus regardless of where I sit in the pews. I will also manually set the exposure so that there was no difference in colour. I also took multiple different outfits so that it would not look like I am just sitting in different places.

Street Photography – Action Plan

Who: I will be photographing any interesting townspeople of Jersey.

What: I will be taking candid photos of people throughout town as well as trying to capture the idea of movement and excitement in the town. I will likely stage a few photographs for more aesthetically pleasing shots in areas however the majority of the photos will be candid.

Where: I will be taking photos along king street as well as some of some of the outskirts of the town for some slightly grittier images.

Why: I believe that the best street photography are candid images since they effectively capture the subjects personality and mannerisms.

Street Photography – Introduction

Street Photography is a form of photography that involves,  as the name suggests, photographing interesting scenes in the streets. Photographers such as Bruce Gilden heavily explored street photography with Bruce in particular becoming a very prominent figure in photography due to his work with him becoming a member of an elite group of photographers known as Magnum Photographers. They often employed a more objective approach to their work while still taking artistic liberties. When successfully executed these photos can very effectively portray socio-economic status and can really say a lot about someone as they often capture a candid moment which can show the facade that people will apply when in public in order to not expose any insecurities or appear vulnerable.

Image result for bruce gilden street photographyImage result for bruce gilden street photographyImage result for street photographyImage result for street photography

While street photography is often considered a form of portrait, not all portraiture necessarily needs to feature a human subject in the frame and there are various examples of creative examples of portraiture of still life subjects with either no human presence or minimal presence in order to push a particular message.

Image result for street photographyImage result for street photographyImage result for street photography


Paul M Smith artist study – Tableaux

Image result for paul m smith photography

Smith originally studied Fine Art, between 1991 and 1995 at Coventry University and as part of his course he undertook a research project into contemporary art which included living on an Aboriginal reserve for four months. After completing his degree at Coventry he completed a master’s degree in Photography at the Royal College of Art. During this time he examined the meaning and construction of masculinity, concentrating on the cultural and visual creation of various alpha male identities. He has subjected various forms of heroic behaviour to incredible scrutiny. Smith has travelled from ‘Soldier’ via ‘Action Hero’ to arrive in his current body of work, the forensic vision of death presented as a new series called ‘Impact’.      -Wikipedia

Final Photography: Studio Portraiture

As the final 3 choices for my studio portraiture experimentation, I have decided on the following 3 images:

For the above image, I experimented more with contrasting color and camera angles. I feel like the contrast between the bold blue of the flower and the bold red of the subjects clothing helps to draw more attention to the image, and allows for the viewer to have their eye drawn around the image, rather than focusing on just one section. The contrast between the bold colors of the subject and the background also helps to separate the background and the subject in the foreground, which in turn adds more depth to the image. In addition to the colors, I feel that this image makes use of the contrast between the shaded and light areas of the subjects face, which mimics the chiaroscuro effect often found in grey-scale photographs. I feel that this contrast also adds depth to the image, and allows the viewer to see the image as more 3D rather than 2D.

The above image makes use of more abstract shadows, created by holding torn paper in front of the key light in the studio. I feel like the effect that this caused created an interesting pattern of shadows, which in turn will draw the attention of the viewer. With this image, I attempted to experiment more with shadows, and so i neglected to use the filler light to soften the shadows, which allowed for the shadows of the subjects to remain prominent in the image. I feel like this adds to the contrasting tones and colors within the image, and overall I feel like it draws the attention of the viewer to the different contrasting areas of the image.

I feel like the above image is the best example I produced of creating a chiaroscuro effect using lighting and camera angles. A key light was used on one side of the subjects face to create this effect, and I feel like the contrast in tones between the left and right side of the face helps to show more depth in the subject. I feel that this image is the best example of me attempting to create a contrast between the light and dark portion of a subjects face. In addition, I feel like the positioning of the camera in this particular image, allows for the viewer eyes to be led directly to the face of the subject, as it is positioned straight ahead of them. I feel that this allows for the viewer to feel more personally involved with the image, and allows them to relate more to the subject and in turn, the photograph itself.

Portraiture: Natural Lighting

Natural lighting is often used in photography, as it often gives the environment and the subject a more natural look, and can be much more cost effective than using artificial lighting, as this requires specialist lights. Natural lighting can provide light to places where light would naturally occur anyway, and the same with shade, and so by using natural lighting, a photographer does not have to manipulate artificial lights to make the lighting match the effect they are attempting to show.

The products of my experience with using natural lighting with head shots (close ups). The lighting used in my experimentation came through a glass door, which the subject was positioned next to:

A negative of using natural lighting is that it can not be manipulated by the photographer to produce the best outcome. This means that when natural lighting is not available (it is overcast or there are no windows) the photograph will not have the right lighting.

The above 2 images are examples of what happens to the lighting when the sun is obstructed from coming straight through the window. These images appear more flat, and are too dark to allow the viewer to make out certain details. This damages the overall eye-catching effect of the images, and is something that cant be controlled when dealing wit natural lighting.

Natural lighting, in some cases, allowed for the subjects face to appear brighter and softer, which is an effect that may have been missed if harsher studio lights had been used. Using natural lighting with close-ups of subjects can, however, mean that some of the detail within the facial features of the subject is lost, and the positioning of the lighting and its intensity cannot be manipulated.

Chiarascuro Techniques

Definition of Chiaroscuro:

The treatment of light and shade in drawing and painting.  is the use of strong contrasts between light and dark, usually bold contrasts affecting a whole composition. It is also a technical term used by artists and art historians for the use of contrasts of light to achieve a sense of volume in modelling three-dimensional objects and figures.

My Examples of this Technique: