Category Archives: A2 Personal Investigation

Filters

Author:
Category:

Analysing Photographs – Bruce Davidson

Image result for bruce davidson

Bruce Davidson is best known for his subway photographs, his images are of everyday subjects within a very popular form of transport in New York. His images have distinct viewpoints focusing on different people using the underground which makes each image so different whilst still being in the same location. This urban, portrait image in particular is of a family on a dull graffitied tube in New York. The dull, man made lighting within this photograph creates a somewhat eerie atmosphere on the tube as the dull lights on the tube create a green tint to the image. The two adults fit into the rule of thirds making them the main view point off the image creating more of story to the characters themselves. This image is underexposed due to the image being very dark which links to the point about the dull lighting as this effect creates an eerie mood to the image.The colours within the image contrasted with the dim lighting allows for the subjects to stand out from the dull, graffitied background. This image looks to be quite grainy suggesting that it could be taken on a film camera rather than a digital camera, as this picture was taken in the 1980s it is more evident that this image could  be taken on film. The fact that the subjects within this image are evenly spaced out with the child in the middle allows for three different viewing points when looking at this image. However, the photograph is not even and consist of a slight slant within the image. I feel this doesn’t work so well as when looking closer into the image everything in the picture from the signs in the background to the seat they are sitting on becomes uneasy on the eye as the image is not symmetrical. This photograph has a mysterious feel to it due the normal looking family on the misleading looking tube as this family look like tourists who could be on a tube in the wrong area.


ANALYSING PHOTOGRAPHS – ALEX WEBB

Image result for ALEX WEBB HAITI

Alex Webb’s work consists highly of coloured documentary photography in foreign countries such a Haiti in particular. Each image from his shoot consist of vibrant bright colours with numerus viewpoints throughout. The sharp natural lighting within the image enhances the bright colours on the wall allowing for the wall to stand out and create a strong viewpoint to focus on. The viewer is automatically directed towards the wall due to the bold colours. However, when looking at it closer, the image opens up and directs you to a mixture of personalities from the suspicious man on the left to the smiling girl running out the frame. These different personalities create a strong contrast towards each other as well as creating more of a story behind the image. The broken wall symbolizes freedom as they are able to pass through without being stopped by the wall. This naturalistic photograph clearly represents these people’s everyday lives just from capturing where they live in this rundown looking town. Formal elements play a large part in the image due to the repetition of colours and shapes that are seen throughout. This picture is different from real life because not everyone lives like this and the way Alex Webb has captured this image allows us to have more of an insight into the way these people live. Webb has done this to show the viewer what is actually happening and how it can be compared to our lives in such a dramatic way.

Photo book research – Mark power ‘Die Mauer ist Weg!’

Mark power ‘Die Mauer ist Weg!’

      Die mauer ist weg - The wall is gone

Image result for mark power Die Mauer ist Weg!


Die Mauer ist Weg! by Mark Power has a distinctive documentary approach as the images used are focused around the happening involving the taking down of the Berlin wall.  The books title has strong connotations focusing on the fact that they have regained there free dome due to the fact the wall is gone.  While the early pages read as news-based photojournalism from the anticipating news and the celebrations. However, as the book unfolds Power retreats away from the epicenter of the event to re-camp over the border in an almost desolate East Berlin. From there he views the story from another perspective, before embarking on a  search for Bertolt Brecht’s grave.

The book is both a record of a major 20th century news event and also a piece to project the lessons learnt from the experience as, in the accompanying essay, Power recounts his fascinating tale of chance and choice.

Image result for Die Mauer ist Weg! mark powerDie mauer is weg mark power

The silkscreen front and back cover is the newspaper from that specific event. The silkscreen print on the front allows for the newspaper to stand out on the cardboard shell of the book. Furthermore, this also creates an interactive aspect to the book as news papers don’t usually have that. The end pages are also from the newspaper however they have been printed normally onto the white card. This occurs at the front and the back of the book. The images have been printed onto matt, thick photography paper. This allows for that old fashion feeling which is consistent through out the book. The images are all double page spreads, this allows for the images to  stand out more and personally I think they are more aesthetically pleasing when they have been printed larger. The book is a large portrait which means its signifciatnly larger than a standard portrait photo book. The book is also quite heavy due to the size of the book. The title is very literal and is straight to the point (once translated)  of this specific theme of the book and is clearly seen throughout the whole book. I think the way Mark has placed some of the images in the book he is trying to create juxtaposition between two subjects. For example; between the police and normal people. The police are trying to control them and do their job whereas, the people are celebrating due to the fact that wall has been taken down.

Photobook Design Specification

Narrative: What is your story?
Describe in:

  • 3 words

Surveillance, Watched, Paranoia

  • A sentence

The developments of surveillance are slowly causing a common paranoia amongst those within society.

  • A paragraphs

For this ‘political landscape’ project I am focusing on the theme of surveillance, and how surveillance actually effects the general public, in both positive or negative ways. Particularly how mass surveillance and the ‘big brother theory’ causes a common paranoia and feeling of insecurity within the general public, and how the awareness of this can cause an impact on the public’s trust of authority. The rapid developments in surveillance is also something which is evidently adding to this and will also therefore be explored in my work.

Design: Consider the following

  • How you want your book to look and feel

I would like my book to look and feel of a high and lasting quality, using a hardback cover and premium matte photo paper inside.

  • Paper and ink

I would like matte white paper as I believe that when looking at a range of other photo books this kind of paper has a high quality feel and look. Also this kind of paper works with a range of different images (colour and black & white) and as i intend to use a range of photos with very different aesthetic qualities, I believe that this will work best.

  • Format, size and orientation.

7×7 inch Square

  • Binding and cover

I would like my book to have a standard case binding, and I would like it to have a hardback cover.

  • Title 

”Watch Out”

  • Design and layout

Some images will be best as full page spreads (single or double), some images will look best with boarders and some will look best grouped together, and therefore I am not going to limit myself by completely sticking to one uniformed layout and will instead lay out my photographs in the way which I believe individually best suits them.

  • Editing and sequencing

The sequencing of images in the book I intend to follow a narrative of how surveillance is evolving/developing. So as the book continues the images represent closer and more personal forms of  surveillance, such as surveillance through our own devices. Whereas in the beginning it will look at visual forms of surveillance (birds) and then early forms of technological surveillance (CCTV etc.)

Image Analysis – Essay Writing

Paragraph 2 Structure (500 words) Use subheading. In the first sentence or opening sentences, link the paragraph to the previous paragraph, then introduce the main idea of the new paragraph. Other sentences develop the paragraphs subject (use relevant examples, quotations, visuals to illustrate your analysis, thoughts etc)

Content: you could look at the following...Introduce your first photographer. Select key images, ideas or concepts and analyse in-depth using specific model of analysis (describe, interpret and evaluate) – refer to your hypothesis. Contextualise…what was going on in the world at the time; artistically, politically, socially, culturally. Other influences…artists, teachers, mentors etc. Personal situations or circumstances…describe key events in the artist’s life that may have influenced the work. Include examples of your own photographs, experiments or early responses and analyse, relate and link to the above. Set the scene for next paragraph.

Include relevant examples, illustrations, details, quotations, and references showing evidence of reading, knowledge and understanding of history, theory and context!

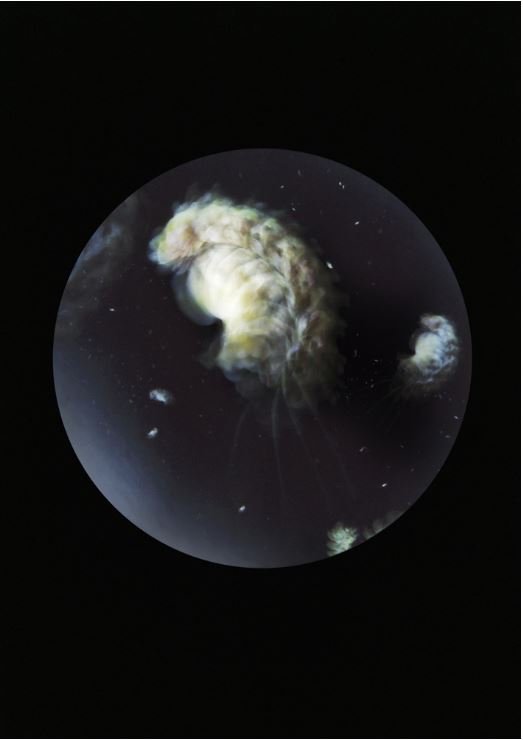
This image depicts the remnants of a partially burnt plastic flower, collected from Carrigaloe estuary, Cove of Cork, Ireland.

  • The item is captured using a slow shutter speed representing the movement of individual plankton in a water column, which also parallels with the planets that have an apparent motion of their own.
  • Captured in a circle on a black background, a re-occuring theme amongst the series, it resembles a planet like

The “plankton” specimens in this work are beautifully photographed objects of marine plastic debris, recovered from the same location as naturalist John Vaughan Thompson’s plankton samples from 200 years ago.

Photobook Design Experimentation

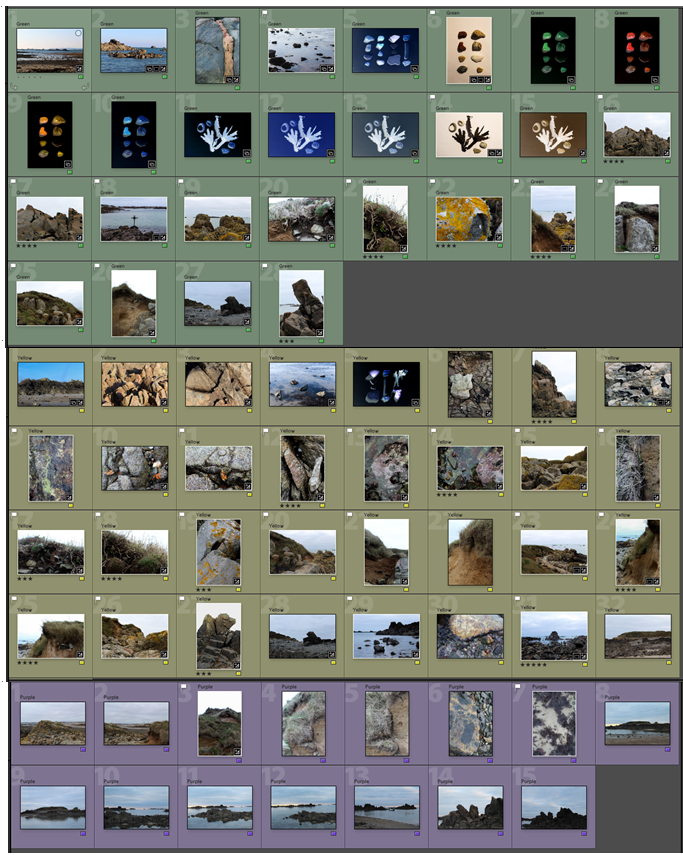
I first started selecting the images I wanted in my photo book by in lightroom by colour rating them into different colours if i wanted to use them. I had an idea of the images I definitely wanted to use in my photobook so rated them green. I then selected other images which I liked and rated them yellow and purple so I could experiment when designing my photobook in lightroom to see which made the best sequence and portrayed a message. This means that I won’t use all the images I’ve rated, but just the ones that combine to make the best photo series.

I then put all the images into a book format and started rearranging them from there instead of before making the book, so I could visually see what the image look like displayed together and which one complement each other. I want the sequence of my book to nt be too overwhelming because within the landscape images there is a lot of detail. To try and stop this i plan to  add in double page spreads of single images between more detailed pages to create a break for the reader. This will also make the double paged images stand out more so I will chose images that I want to be emphasised.

I started my photo book layout by arranging my photos of objects i found on the beach that i formally photographed. I started with theses I knew definitely that i wanted to include these image in my photobook so didn’t have to make decisions about which ones to keep. I decided i wanted a similar layout to Chrystel Lebas in er ‘Field Studies’ book so displayed the original images on the left of the double page spread, with the four edited versions on the right page. I think this layout is effective as it shows the contrast between the originals and the edited versions. One aspect i could improve with these double page spreads are the original images as i don’t like how their is a noticeable border around there the colour of the paper contrasts with the white of the photo book paper. To fix this I made the images full page so that there wasn’t noticeable white borders around the edges.
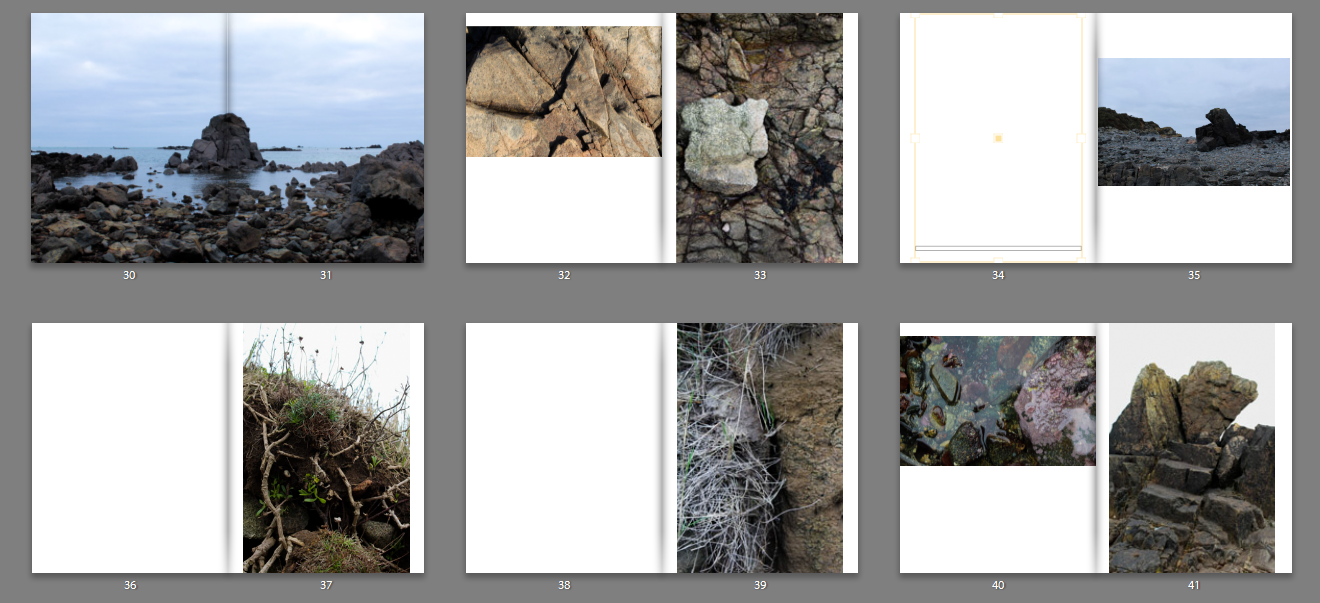
I also started arranging my landscape photography, starting off by trying to find good combinations of images to go on double page spreads. I decided that i would chose a number of set templates for my photobook so it doesn’t look too unordered so it creates an order that’s easy to look through that has a continuous theme. I decided which images looked good as a double page spread and which looked better as single images. For example, the image taken in my ‘Landscapes at dusk’ shoot looks best as a double page because of its composition as well as the cool tones, the double page adding to the vastness.

Also, because i found myself taking images where the main subject  is centered , I couldn’t include these as double page spreads as in my book some of the image in the middle will be cut because of how the book was made, unless the subject was big enough to not get cut off like in the image above. So for these image i had to find combinations with other portrait images to stick to the templates in chose to use which was one landscape and one portrait image on a double page.
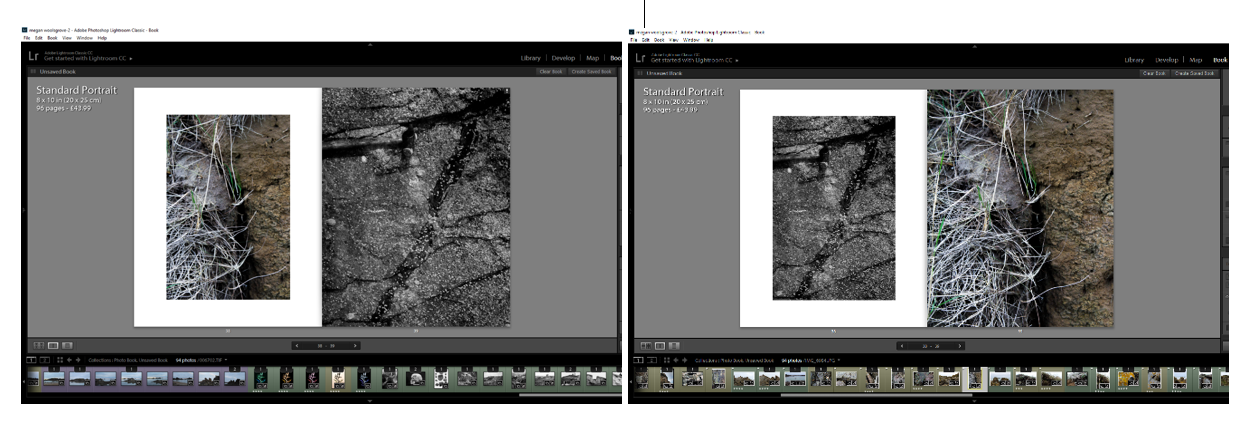
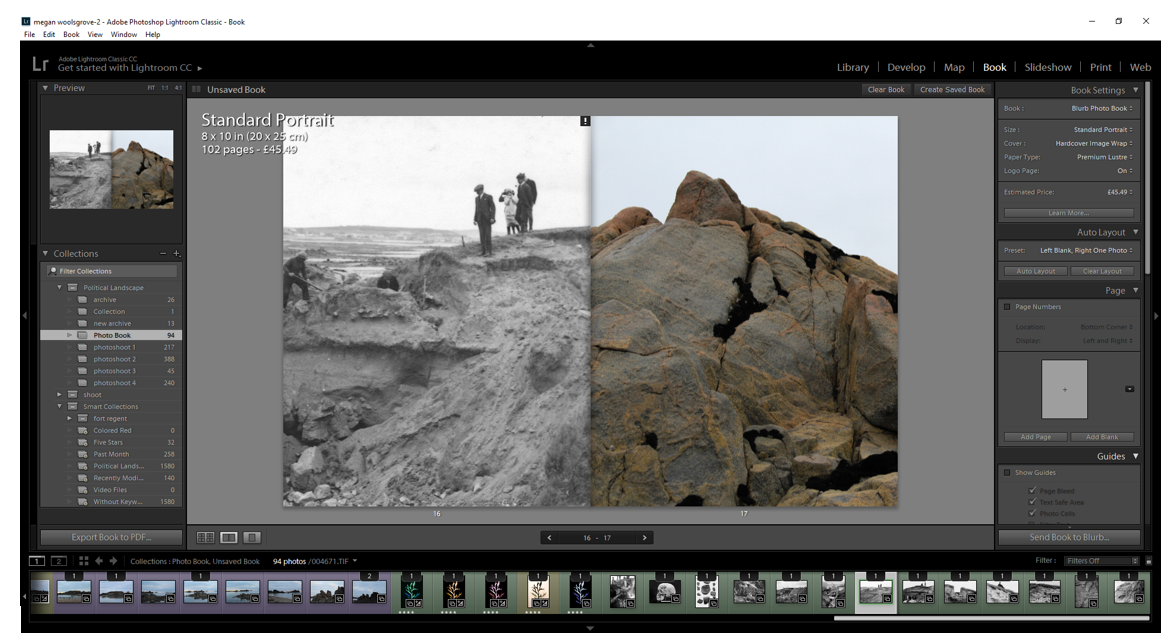
When experimenting with layouts i found i like this combination of the archival image and my modern image as together they connect at the same points, creating the appearance of one image across the double page spread. I think that the contrast between the rounded shape of the image in the right in comparison the the image on the left where theres more detailed in the earth creates an interesting image. Although the image were not taken at the same location at La  Motte (the archival image is of the island whereas mine is a close up of the rock nearby), I think that it creates a juxtaposition of different textures, the archival image is where the earth has fallen apart from the excavation which juxtaposes with the more smooth texture of the rock with the seaweed attached.

I also like how the difference between the archival and modern is emphases by the archival being in black and white compared to the coloured modern one. This makes the brown tones and the pale blue sky in the modern image stand out more. Although, i decided that i didn’t want to use the layout of these tow images together in my photobook as the layout in my book has a full page  image together with another image with a white border, which this layout doesn’t follow so may look out of place. To fix this i could create more double pages like this, but i don’y have enough archival images that connect at the same points to my modern images to make enough page. I will use these images in my photobook, but separately with with different images complementing them.

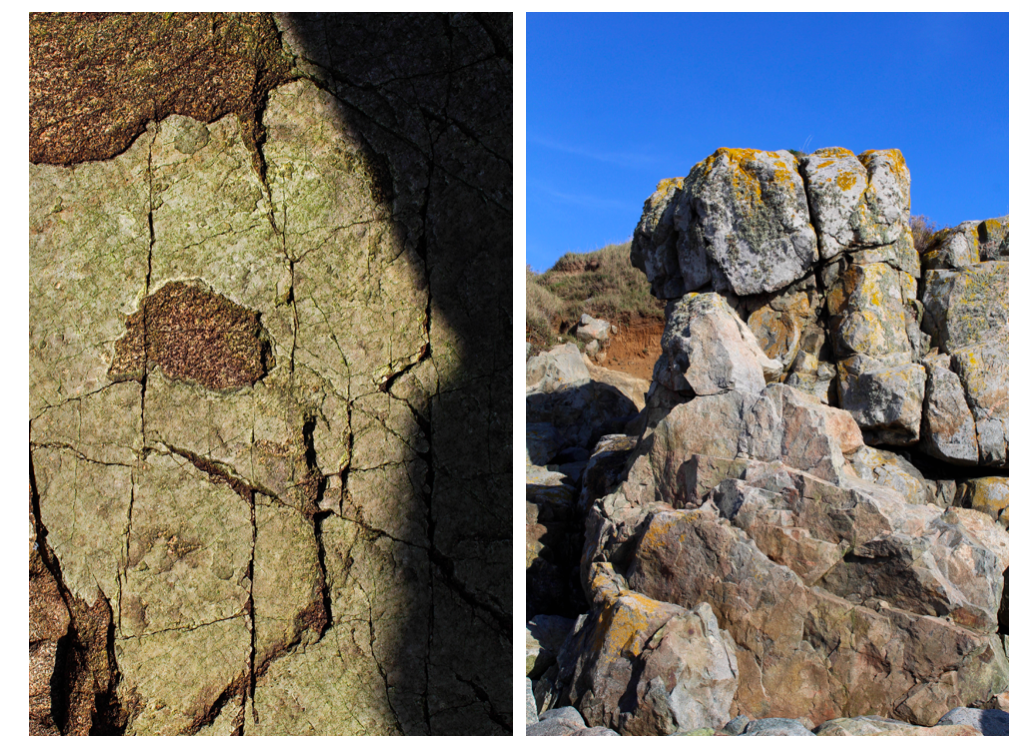
For this layout, I narrowed the images down to two layouts  that worked best with my image on the right side. The layout on the left has my image displayed full page, with an archival image of a skull on the left page. I think this this combination of images works well as the shape of the bright rock in my image resembles the shape of a skull and is a similar colour. This creates a link between the two image which I think makes a good layout, linking the past to the present. When editing I brightened the rock so it was more noticeable, which i think also makes the link more noticeable. I also like the contrast in the background of the two images. The archival image has a lack background as it’s a formally taken photo, this then contrast to the background of my image which is brown rocks, adding more detail to the image. The dark parts and shadows in my image link to the black background of the archival one, which i think makes them complement each other. There is also a mystery surrounding the archival image about who’s skull is displayed in the image as the skull belonged to somebody over 90 years ago, the rock also belonged to the land along time ago.

The second layout is another landscape image i took from a different shoot. In this shoot the lighting was different so the appearance of this rock different as it has warmer tones where the brown is emphasised with more yellow tones. This contrasts worth the image on the right where the warm tones are less noticeable, the town more darker. Another reason i think these images complement each other is they both have noticeable dark lines highlighting the shape and texture of the rock, linking them. The lines in each image are detailed, but have similar shapes to each other and the combination the two makes the layout seem more modern through he warm colours and the shapes resembling that of abstract, especially in the left image where i took a close up angle. Using this image also emphasises the highlights in the right image as it’s brighter.

Comparing the two layouts I decided that I will chose the layout comparing the skull to my image as i think it represent the concept of my project more. he archival image contrasting to the modern image addresses how the natural landscape changes an evolves over time.

Text in Book

La Motte is a tidal island, and listed archaeological site, also known as Green Island, located in the Vingtaine de Samarès in the parish of St Clement on the south-east coast of Jersey, Channel Islands.

Archaeological excavations carried out between 1911 and 1914 showed that the islet had been occupied over a long period of time. Despite being quite small the site is unusual because it had several both ritual and domestic elements, as well as providing important environmental evidence relating to changes in sea level. The remains of a series of prehistoric rubbish heaps, dating between 1,500-300 BC, containing fragments of pottery, animal bones, stone tools and shells were found.

Some archaeological evidence has been found here. Remains of a cemetery on La Motte are believed to be from later settlers. There are Neolithic elements including a cairn and a number of middens, dating from 1500 BC to 300 BC, on La Motte.

I think including text about La Motte gives the reader insight into the images their looking at as they might not know where ‘La Motte’ is as it’s more commonly known as Green Island. I also think that it reflect the work of Chrystel Lebas in her photobook ‘Field Studies’ as she also includes text about the places she visits. In her book she also includes 3 essays from others about the environment to back up her images. I decided not to include long passages in my photobook I didn’t want to take the attention of the readers away from the images, so included a few short passages to help inform them about the project, but not completely distract them away from the main concept.

Photoshoot 6- Landscapes

For this photo shoot i went back to La Motte to gather more objects that I thought represented what was there now to compare with archival images. I narrowed these images down and displayed them in a contact sheet above.  Whilst i was there I also took additional landscape photos as the weather was different to what my other landscape images had been take in. From the photos I took, I displayed the final landscape images and studio images separately in two parts below.

Part 1- Landscapes

I particularly like these two images from this shoot as they have a different atmosphere to the other images in my project. The bright blue sky that’s behind the rocks and horizon, contrasts with the tones in the foreground in both images. When editing these images I will emphasise the contrast between the two colours. In the first image I was drawn to the  unusual shape that the rock made along the top and the detailed sharp edges within it. I wanted to emphases the chaotic nature of the pattern, so contrasted it with the plain blue sky on the top half of the image, splitting the image in two. In the second image I wanted to emphases the developments that have been built along the horizon to contrast with the archival images from over 90 years ago when they were there. This is why I centered the image so that the incinerator was were the eyes are drawn to. I found I also created the same composition in this image as the first image, where the patterned bottom half of the image is contrasted to the blue sky.

I found that when I am taking photos I takes ones where the main subject is in the center of the image, creating a symmetrical composition.  In my photo book I plan to space out the images where I centered an aspect of the photo, so that they create more impact by themselves.

Other images from the shoot:

In these portrait images I tried to emphasise the shadows the that were made by the rocks. I particularly like the third image where i take a close up image of the pattern on a rock, highlighting the light and dark. I think that this image contrasts well with the other landscape images as it shows a close up angles contrasts with a wide one. In all the images, I wanted to focus on one section or a rock or the earth and emphasise it, which is why the objects all continue out of the sides of the photos.

Editing:

When editing these landscape images in photoshop I found that they were most effective when they were black and white. I experimented by editing a couple of them this way and compared them to the originals.

As well as turning the images black and white, I also adjusted the contrast and the white and black to find what made the image look the most aesthetically pleasing.

I think these two images in particular are the most effective in black and white as the detailed patterns that were originally there stand out even more. The different tones in the sky are more noticeable and are emphasised by the contrast to the rocks. Whilst editing I also used the grauduated filter to make the sky have more of a range of tones so that the final image was more vast and dramatic.

Although I like my black and white edits where I’ve emphasised the light and dark, I think that my final images for this project should be in colour as the archival images I have chosen to include in my photo book are in black and white. If my images were also in black and white the reader might get confused as to which ones are the modern ones that I took.

Part 2- Objects Experimentation

For the images photographed in a studio I edited them on photoshop. I first inverted the image to create the appearance of a photogram, simialr to Chrystel Lebas and Edward James Salisbury. I like this editing style as in my previous experiments from different shoots I found that the final images reflect the work of the early botanists where they used light sensitive paper which gives my images a scientific appearance. Instead of using natural objects i.e plants and seaweed, in this shoot I photographed  man made objects to represent the changed environment in my work. Comparing these photos to that of early botanists show how what is found has changed over the period of 100 years and reflects the ideas of anthropocene. Secondly, I adjusted the levcels in my image so that the background was darker to contrast against the objects. I then adjusted the hue of the images so that that I could create different variations of the same image to see which one was the most effective. I displayed these variations below in a grid format. I also adjusted the levels in each image to brighten the obejcts and make the background darker.

From these variations of the same images, I think that the most effective image edited in the bottom row as I like the use of negative space within the circle shape the rope is making. I also like how the background in these images is completely black, taking the attention and focusing on the objects. The other edited images do this but have grey tones within this so distract the audience form the main subjects. Although I do like how the top rown images have a different appearance to the other. The bottom row shows exactly whats the object is, the appearance being more scientific, whereas in the top row it is harder to distinguish what the object is, perhaps making the overall image more interesting. This is through the lighter shapes surrounding the rope, which is the shadows inverted that were created when I photographed the images. I created shadows purposefully when photographing these objects as I wanted to see the effect it created when I inverted the images. Compared to the bottom row images, I think that they have a more delicate appearance as the shapes created are more rounded and go in multiple directions.  In conclusion, I think that all the images are effective as they show different aspects of the same objects at different sections of it. In my photo book I will include a few variations of these images to interpret the work of Chrystel Lebas in her photo book ‘Field Studies’ where she include photograms.

For another object experimentation I decided to use all of the objects I had collected over the shoots I have previously done ans combine them with the objects I found in this shoot. I think that this is a good way of showing the changed environment and I thought that it could be a good image to end my photo book with.  When arranging the objects, I first put the rope in a circle shape as this is the biggest object and the one that stands out the most. I then started placing the other objects around the shape of the rope, going in the same directions. I think that the combination of the natural obejcts e.g rocks, plants, flowers, seaweed in comparison to the main subjects the rope, creates an interesting image as it separates them as there is a divide in the center of the image, created by the rope.

I then went on to experiment with this image by editing the colour and tones within it. I tried to use warm and cold colours to see which was the most effective. Out of these edits I think that the black and white image is the most effective. This is because the shapes and shadows are emphasised as well as the negative space. Although in this image it is harder to see what objects are being photographed as they are all arranged so close together. In the orange/yellow toned image it is easier to tell what the objects are as the edit brightens the objects and the colours within them. In conclusion, I’ve decided that I won’t use this image in my photo book as I think it is too different from my other formally taken images and won’t create an easy sequence to look at. Also I like how in my other images I have displayed the objects by themselves to create a scientific appearance, like what botanists do when they are analysising species. In this image you cannot tell what each o f the objects are clearly and doesn’t follow the scientific approach I have been following throughout my project.

Analysing a Sophie Calle Photograph (Essay work)

Sophie Calle – Suite Vénitienne 

Technical:

The lighting used for this photograph is natural daylight as the photo does not seem to be staged despite the unusual occurrences within the image. The image was most likely taken in the aside of it being midday as the light is not overpowering, and the exposure used for the image seems to be fairly balanced as the lighter tones such as the edges of the steps are balanced and contrast with the darker tones in the image such as the door and the coated man by the camera.

Visual:

The photograph has various visual aspects starting with the composition; the viewer is immediately drawn to the dark figure in the forefront of the frame as the figure takes up a considerable bit of space and catches your eye straight away. The eye of the viewer is likely to go from their backwards through the image passing from the stairs to the two other people, to the door and then to the background of the image where the buildings overlook the Venice canals.  As you can see the image is in black and white, most likely due to the date of the project despite colour photography being around at the time. However this may have been done as a means of creating a mysterious or eerie feel to the photographs as the idea of following a stranger around reflects this.

Contextual:

This image was part of a book by Calle called Suite Vénitienne, in which she met a man, at a party who said he was moving to Venice, so she moved to Venice and there, she began to follow him. Calle documented her attempts at following the man. She phoned hundreds of hotels, even visited the police station, to find out where it was that he was staying, and persuaded a woman who lived opposite to let her photograph him from her window. The photographs which she took for this project show the back of a coated man as he walks around Venice, the city making for a beautiful aesthetic backdrop to her internalized mission.

Conceptual:

The concept behind this photograph, as a part of project consisting of similar images, is that it is documenting the process of Calle stalking the man (subject) around Venice. This photograph however focuses on multiple human subjects despite the main body of the project consisting of the man in question being the main subject within the images.