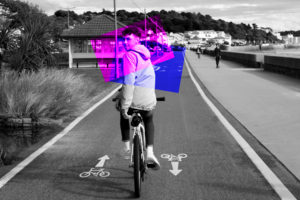
What is an Overlay?
In photography terms, an overlay is simply another layer added to your photograph in an editing program like Photoshop. They can be photographed, scanned or even made in a program. Overlays are used for many different reasons, there is no right or wrong way to use an overlay. For example an overlay can be used when creating double exposure shots and they help to create some abstract and surrealistic images.
How to create an overlay?
There are many different ways to create overlays and many different types which could be used. The most basic way, I think, is to insert a shape of some sort and make it any colour of your choice. Place the shape at any part of your picture and adjust the size to fit appropriately, then right click on the shape layer and go to blending options. Then go to blend mode and select the ‘overlay’ mode.